tint和backgroundTint
tint 和 backgroundTint
什么是 Tint
自 API21(Android L) 开始,Android SDK 引入 tint 着色器,可以随意改变安卓项目中图标或者 View 背景的颜色。
优点
- 一定程度上可以减少同一个样式不同颜色图标的数量,从而起到 Apk 瘦身的作用
- tint 属性还可以用在 selector 中,达到选择器的效果;注意: 在使用 tint 实现选择器的时候,需要在 src 中设置相应的 selector(虽然实现的 drawable 是一样的,但是还是需要都写),还要在 tint 中使用 selector 才可达到相应的效果。
不足
- 使用 tint 存在一定的兼容性问题。tint 属性在 Android5.x 以上的版本才可以直接使用,那么在低与 5.x 版本可以在相关向下兼容的代码中实现。
相关属性
tint 和 tintMode (ImageView 的 src)
tint: 作用于 src 属性,给图标着色的属性,值为所要着色的颜色值,没有版本限制;通常用于给透明通道的 png 图标或者点九图着色。 tintMode: 图标着色模式,值为枚举类型,共有 六种可选值(add、multiply、screen、src_over、src_in、src_atop),仅可用于 API 21 及更高版本。
- android:tint 效果是叠加,而不是直接覆盖。使用 tint 可以保留原来的阴影波纹等效果
- android:tint 默认
SRC_ATOP - 只能用 color,不能用 drawable
1
<attr name="tint" format="color" />
在 Android 中,tint 属性(无论是 android:tint 还是 app:tint)默认只作用于 ImageView 的 src(内容图片),而不会作用于 background(背景图)。这是由 Android 的视图渲染机制决定的。
为什么 tint 只对 src 生效?
- 设计逻辑分离
src:通常用于显示图标、图片等内容,需要动态着色(如根据主题切换颜色)。background:通常用于设置背景(如形状、颜色块),不预期频繁改变颜色。- 系统默认将
tint绑定到src,保持逻辑职责清晰。
- 性能优化
background可能包含复杂图形(如渐变、形状),直接着色可能导致性能损耗,而src通常更简单(如图标),适合快速着色。
backgroundTint 和 backgroundTintMode (所有控件)
backgroundTint: 作用于 background 属性
那么 android:background 和 android:backgroundTint 有什么区别呢?
- 如果设置了 android:background,那么控件的背景颜色就会直接修改。
- 如果设置了 android:backgroundTint,那么就会将设置的颜色和原来的背景进行一个叠加的过程,至于如何叠加,就是 mode。
- 如果控件没有背景,设置 backgroundTint 无效
backgroundTint 使用
1、使用 backgroundTint 属性
- API 21+
1
2
3
4
5
<ImageView
    android:layout_width="wrap_content"
    android:layout_height="wrap_content"
    android:background="@drawable/your_background"
    android:backgroundTint="#FF0000" />
- 低版本:低版本需使用
app:backgroundTint并依赖 AppCompat 库:
1
2
3
<androidx.appcompat.widget.AppCompatImageView
    …
    app:backgroundTint="#FF0000" />
2、代码动态着色 通过 DrawableCompat 对 background 的 Drawable 着色:
1
2
3
4
val imageView: ImageView = findViewById(R.id.image_view)
val backgroundDrawable = imageView.background.mutate() // 避免共享状态
DrawableCompat.setTint(backgroundDrawable, Color.RED)
imageView.background = backgroundDrawable
tint 和 backgroundTint 总结
| 属性 | 作用对象 | 适用场景 | 兼容性 |
|---|---|---|---|
android:tint | src | 图标、矢量图着色 | API 21+ |
app:tint | src | 兼容旧版本的图标着色 | 全版本(需 AppCompat) |
android:backgroundTint | background | 背景着色 | API 21+ |
app:backgroundTint | background | 兼容旧版本的背景着色 | 全版本(需 AppCompat) |
常见问题?
为什么 backgroundTint 不生效?
- 未使用 AppCompat 组件:在低版本中需使用
AppCompatImageView或AppCompatButton。 - 背景非透明:若
background是纯色不透明图片,着色可能不可见。
如何同时着色 src 和 background?
- 对
src使用app:tint,对background使用app:backgroundTint
1
2
3
4
5
6
7
<androidx.appcompat.widget.AppCompatImageView
    android:layout_width="48dp"
    android:layout_height="48dp"
    android:src="@drawable/ic_icon"
    android:background="@drawable/bg_shape"
    app:tint="#FF0000"             <!-- 着色 src -->
    app:backgroundTint="#00FF00" /> <!-- 着色 background -->
- 或通过代码分别设置:
1
2
3
4
5
6
// 着色 src
imageView.setColorFilter(Color.RED)

// 着色 background
val background = imageView.background.mutate()
DrawableCompat.setTint(background, Color.RED)
简单使用
图标着色
backgroundTint: 作用于 background 属性
图标着色:使用 android:tint 属性对 src 属性指向的图标着色处理;背景着色:使用 backgroundTint 属性对 background 属性赋予的背景色着色处理
1
2
3
4
5
6
7
8
9
10
11
12
13
14
15
16
17
18
19
20
21
22
23
24
25
26
27
28
29
30
31
32
<TextView
    style="@style/LabelText"
    android:padding="10dp"
    android:text="普通无着色、着红色、着绿色背景橘黄色" />

<LinearLayout
    android:layout_width="match_parent"
    android:layout_height="wrap_content"
    android:orientation="horizontal"
    android:padding="20dp">

    <ImageView
        android:layout_width="wrap_content"
        android:layout_height="wrap_content"
        android:src="@drawable/chatting_voice_btn_icon" />

    <ImageView
        android:layout_width="wrap_content"
        android:layout_height="wrap_content"
        android:layout_marginStart="10dp"
        android:src="@drawable/chatting_voice_btn_icon"
        android:tint="@color/red_A200" />

    <ImageButton
        android:layout_width="wrap_content"
        android:layout_height="wrap_content"
        android:layout_marginStart="10dp"
        android:background="@color/pink_800"
        android:backgroundTint="@color/orange_700"
        android:src="@drawable/chatting_voice_btn_icon"
        android:tint="@color/green_600" />
</LinearLayout>
效果: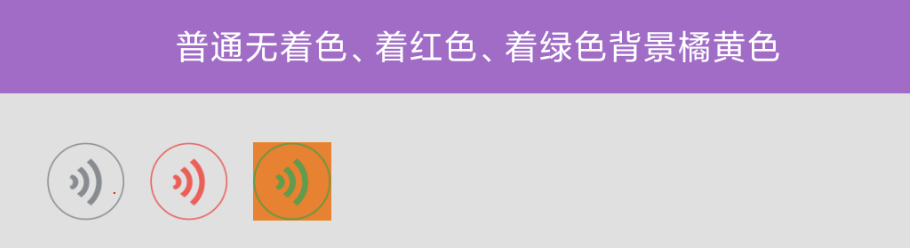
selector
ImageView 的 src 设置 selector tint 使用
1
2
3
4
5
6
7
8
9
10
11
12
13
<?xml version="1.0" encoding="utf-8"?>
<selector xmlns:android="http://schemas.android.com/apk/res/android">
    <item android:state_pressed="true">
        <bitmap android:src="@drawable/ic_success" android:tint="#fac300" android:tintMode="multiply"/>
    </item>
    <item android:drawable="@drawable/ic_success"/>
</selector>
<android.support.v7.widget.AppCompatImageView
        android:id="@+id/iv_tint3"
        android:src="@drawable/selector_tint"
        android:onClick="tintMode3"
        android:layout_width="40dp"
        android:layout_height="40dp"/>
Button 直接设置 background:
1
2
3
4
5
<android.support.v7.widget.AppCompatButton
        android:background="@drawable/selector_tint"
        android:clickable="true"
        android:layout_width="wrap_content"
        android:layout_height="wrap_content"/>
代码设置 tint selector
1
2
3
4
5
6
7
8
9
10
11
12
13
14
15
16
17
18
19
20
21
22
23
24
25
26
27
public void setTintSelector() {
    Drawable drawable = ContextCompat.getDrawable(this, R.mipmap.ic_launcher);
    // 颜色数组
    int colors[] = new int[]{ContextCompat.getColor(this, R.color.colorAccent), ContextCompat.getColor(this, R.color.colorPrimary)};

    // 状态
    int states[][] = new int[2][];

    states[0] = new int[]{android.R.attr.state_pressed};
    states[1] = new int[]{};

    // 颜色状态集
    ColorStateList colorStateList = new ColorStateList(states, colors);

    // 状态选择集
    StateListDrawable stateListDrawable = new StateListDrawable();

    stateListDrawable.addState(states[0], drawable);
    stateListDrawable.addState(states[1], drawable);

    Drawable.ConstantState state = stateListDrawable.getConstantState();
    drawable = DrawableCompat.wrap(state == null ? drawable : state.newDrawable()).mutate();
    DrawableCompat.setTintList(drawable, colorStateList);

    test_iv.setImageDrawable(drawable);
    test_iv.setClickable(true);
}
Java 代码操作
Java 代码实现 tint 变色,2 种方式,api 高于或等于 21 的直接用 setImageTintList 进行着色,api 低的用着色好的 drawable 来加载
- 方式 1
1
2
3
4
5
6
7
8
9
10
11
12
13
14
15
16
17
18
19
20
21
22
23
private void tint_red(){
    //需要api21
    if (Build.VERSION.SDK_INT >= Build.VERSION_CODES.LOLLIPOP) {
        LogUtil.d("setImageTintList red >>> ");
        ibt_1.setImageTintList(ColorStateList.valueOf(getResources().getColor(R.color.red)));
    }
    else{
        LogUtil.d("setImageDrawable red >>> ");
        ibt_1.setImageDrawable(tintDrawable(this, R.mipmap.dev_printer, R.color.red));
    }
}

public static Drawable tintDrawable(Context context, int resIcon, int resColor){
    //利用ContextCompat工具类获取drawable图片资源
    Drawable drawable = ContextCompat.getDrawable(context, resIcon);
    return tintDrawable(drawable, ContextCompat.getColor(context,resColor));
}

public static Drawable tintDrawable(Drawable drawable, int colors) {
    final Drawable wrappedDrawable = DrawableCompat.wrap(drawable).mutate();
    DrawableCompat.setTint(wrappedDrawable, colors);
    return wrappedDrawable;
}
- 方式 2 使用 DrawableCompat.setTint,setTintList,setTintMode
1
2
3
4
Drawable originalDrawable = ContextCompat.getDrawable(this, R.mipmap.ic_launcher);
Drawable tintDrawable = DrawableCompat.wrap(originalDrawable).mutate();
DrawableCompat.setTint(tintDrawable, ContextCompat.getColor(this, R.color.common_status_bg_color));
mIvTint2.setImageDrawable(tintDrawable);
工具类
1
2
3
4
5
6
7
8
9
10
11
12
13
14
15
16
17
18
19
20
21
22
23
24
25
26
27
28
29
30
31
32
33
34
35
36
37
38
39
40
41
42
43
44
45
46
47
48
49
50
51
52
53
54
55
56
57
58
59
60
61
62
63
64
65
66
67
68
69
70
71
72
73
74
75
76
77
78
79
80
81
82
83
public class SelectorUtils {

    public static SelectorUtils instance;

    public static SelectorUtils newInstance() {
        if (instance == null) {
            synchronized (SelectorUtils.class) {
                if (instance == null) {
                    instance = new SelectorUtils();
                }
            }
        }
        return instance;
    }

    /**
     * 主要针对的是ImageView设置图片,
     * 图片资源为一张,通过tint来修改不同状态时显示的不同背景,
     * 以达到节约资源,减少内存的目的
     *
     * @param activity      当前的Activity或者Fragment
     * @param view          需要修改的View,主要只ImageView
     * @param drawableRes   drawable资源id
     * @param normalColor   正常时的颜色
     * @param selectorColor 选中时的颜色
     */
    public void viewSetSelector(Activity activity, View view, int drawableRes, int normalColor, int selectorColor) {
        Drawable drawable = ContextCompat.getDrawable(activity, drawableRes);
        //获得选中颜色和非选中颜色
        int colors[] = new int[]{ContextCompat.getColor(activity, selectorColor),
                ContextCompat.getColor(activity, normalColor)};
        //点击状态数组
        int states[][] = new int[2][];

        //点击状态
        states[0] = new int[]{android.R.attr.state_pressed};
        //非点击状态
        states[1] = new int[]{};
        //存放状态值和颜色
        ColorStateList colorStateList = new ColorStateList(states, colors);

        //存放相应状态和drawable
        StateListDrawable stateListDrawable = new StateListDrawable();
        stateListDrawable.addState(states[0], drawable);
        stateListDrawable.addState(states[1], drawable);

        Drawable.ConstantState state = stateListDrawable.getConstantState();
        drawable = DrawableCompat.wrap(state == null ? drawable : state.newDrawable()).mutate();

        DrawableCompat.setTintList(drawable, colorStateList);
        view.setClickable(true);
        //改变背景Drawable
        view.setBackgroundDrawable(drawable);
        //如果是ImageView,可以设置src相关
        //view.setImageDrawable(drawable);
    }

    /**
     * 改变View的状态的图示,通过Tint减少资源和内存
     *
     * @param activity    当前Activity或者Fragment
     * @param view        当前需要改变的View
     * @param drawableRes 资源id
     * @param colorRes    color资源
     */
    public void changeViewState(Activity activity, View view, int drawableRes, int colorRes) {
        Drawable drawable = ContextCompat.getDrawable(activity, drawableRes);

        int color = ContextCompat.getColor(activity, colorRes);

        Drawable.ConstantState state = drawable.getConstantState();

        drawable = DrawableCompat.wrap(state == null ? drawable : state.newDrawable()).mutate();

        drawable.setBounds(0, 0, drawable.getIntrinsicWidth(), drawable.getIntrinsicHeight());

        DrawableCompat.setTint(drawable, color);

        view.setBackgroundDrawable(drawable);
        //如果是ImageView,可以设置src相关
        //view.setImageDrawable(drawable);
    }
}
Ref
https://blog.csdn.net/huangxiaoguo1/article/details/63282956
https://blog.csdn.net/u012238268/article/details/53380242