Visual Studio Code配置C++环境
VSCode 配置 C++ 环境(Mac)
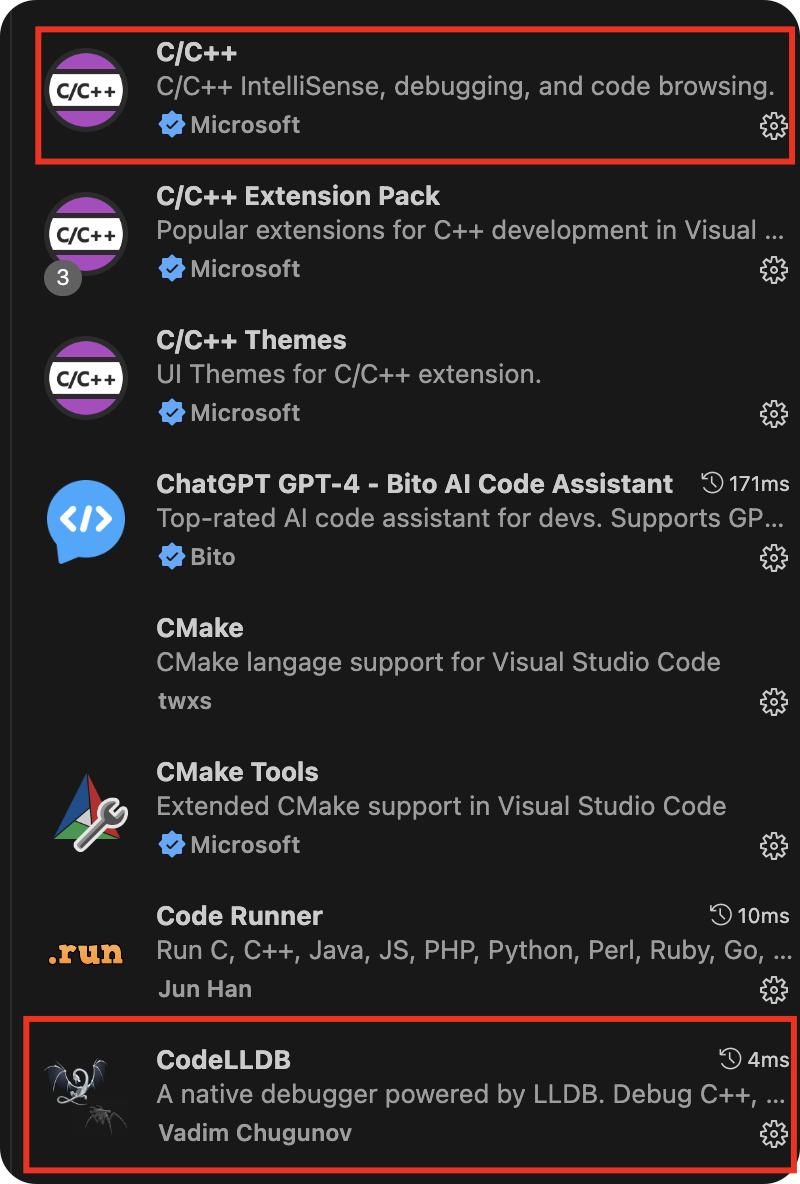
安装插件
- 安装 VS Code
- 安装扩展
C/C++CodeLLDB
|  |
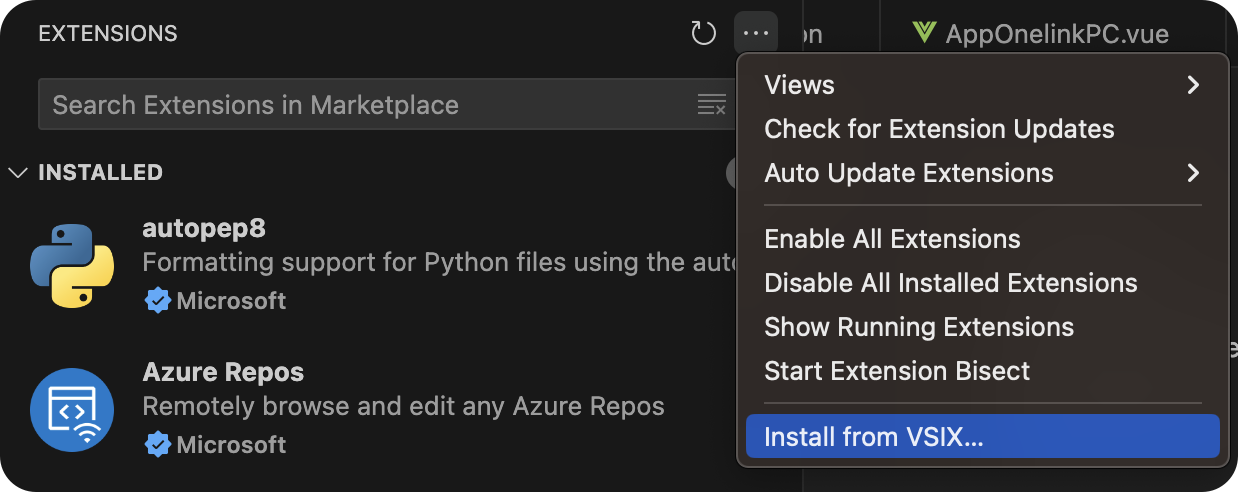
CodeLLDB 可能由于网络问题安装不成功,可手动下载 打开 Github:https://github.com/vadimcn/vscode-lldb/releases,打开之后根据你的电脑芯片下载对应的版本
如果是基于 Intel 的 Mac 选择 codelldb-×86_64-darwin.vsix,
如果是基于 Apple Silicon 的 Mac 选择
codelldb-aarch64-darwin.vsix
下载完成后,在扩展中点击从 vsix 中安装,即可。
|  |
配置编译器和调试环境
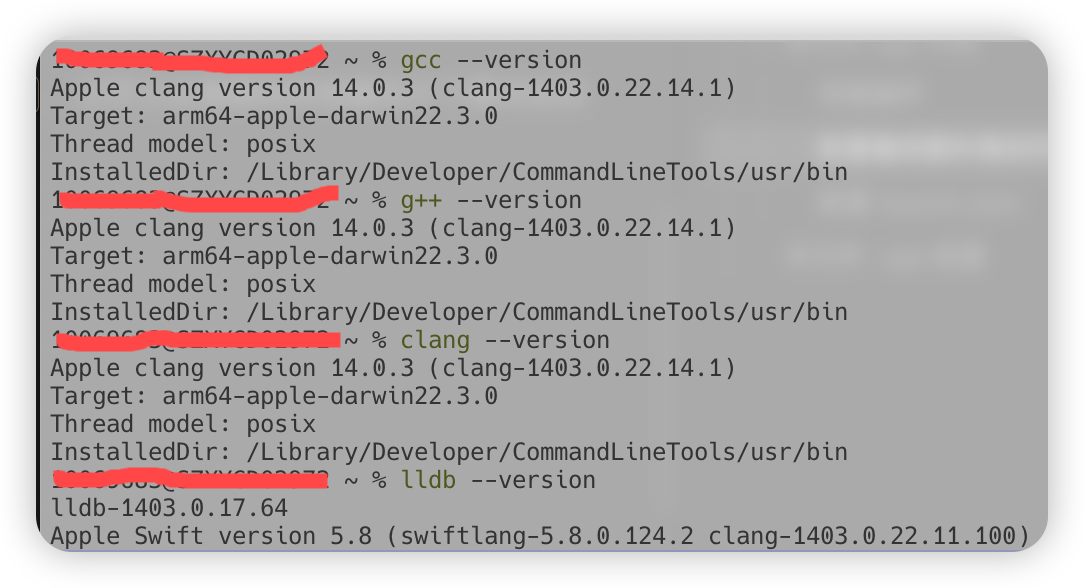
安装 C/C++ 编译器和调试工具:
- 如果您在 Windows 上,可能需要安装 Build Tools for Visual Studio。
- 在 Linux 或 macOS 上,需要安装
GCC或Clang编译器以及GDB或LLDB调试器。
安装后,在终端中运行 gcc --version(或 clang --version)以及 gdb --version(或 lldb --version)以确认安装成功。
|  |
如果 Clang 没有安装:
1
xcode-select --install
配置 VSCode 项目
在 VSCode 中打开您的工作区:
- 对于单文件的 C/C++ 程序,只需创建一个
.cpp文件就可以开始。 - 对于多文件或项目,您应该创建一个包含所有相关源码文件的文件夹作为工作区。
Explore IntelliSense 代码提示
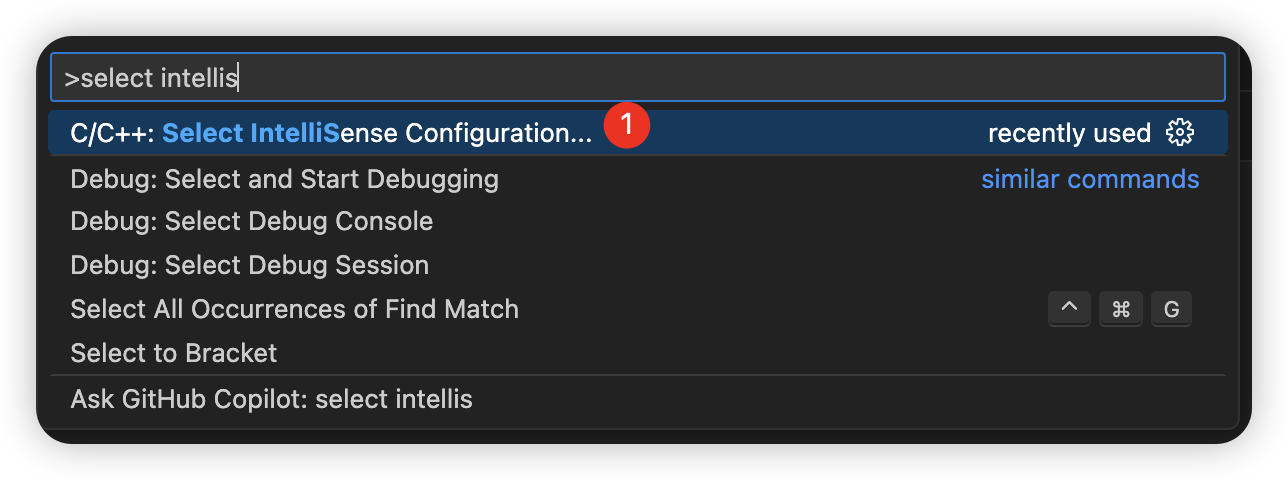
默认就是开启的,按 Tab 补全,如果没有开启,按下面步骤:
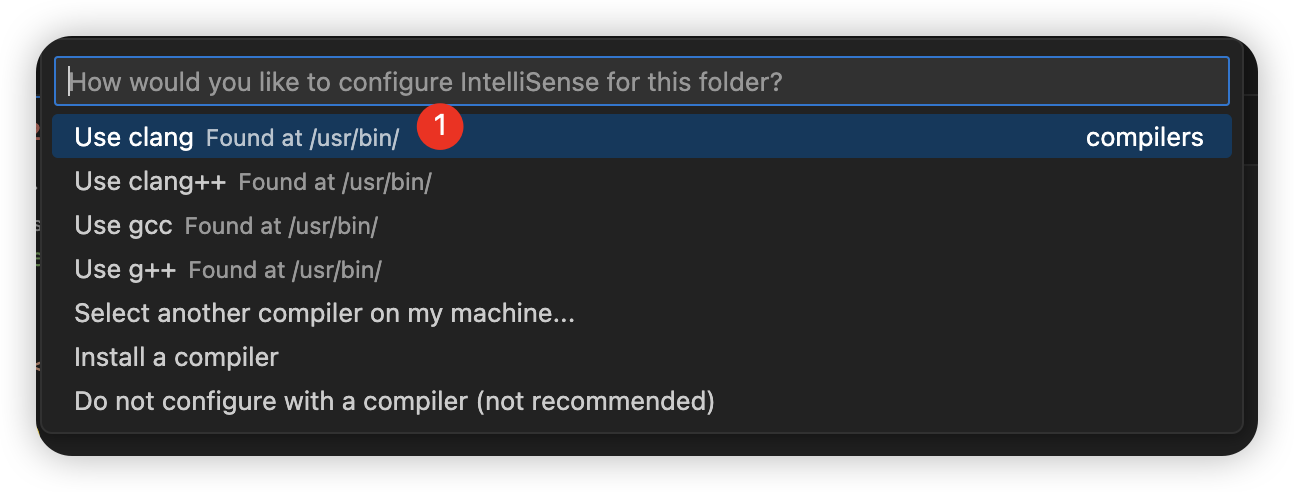
- open the Command Palette (
⇧⌘P) - Select IntelliSense Configuration,select
Use clang++
|  |
|  |
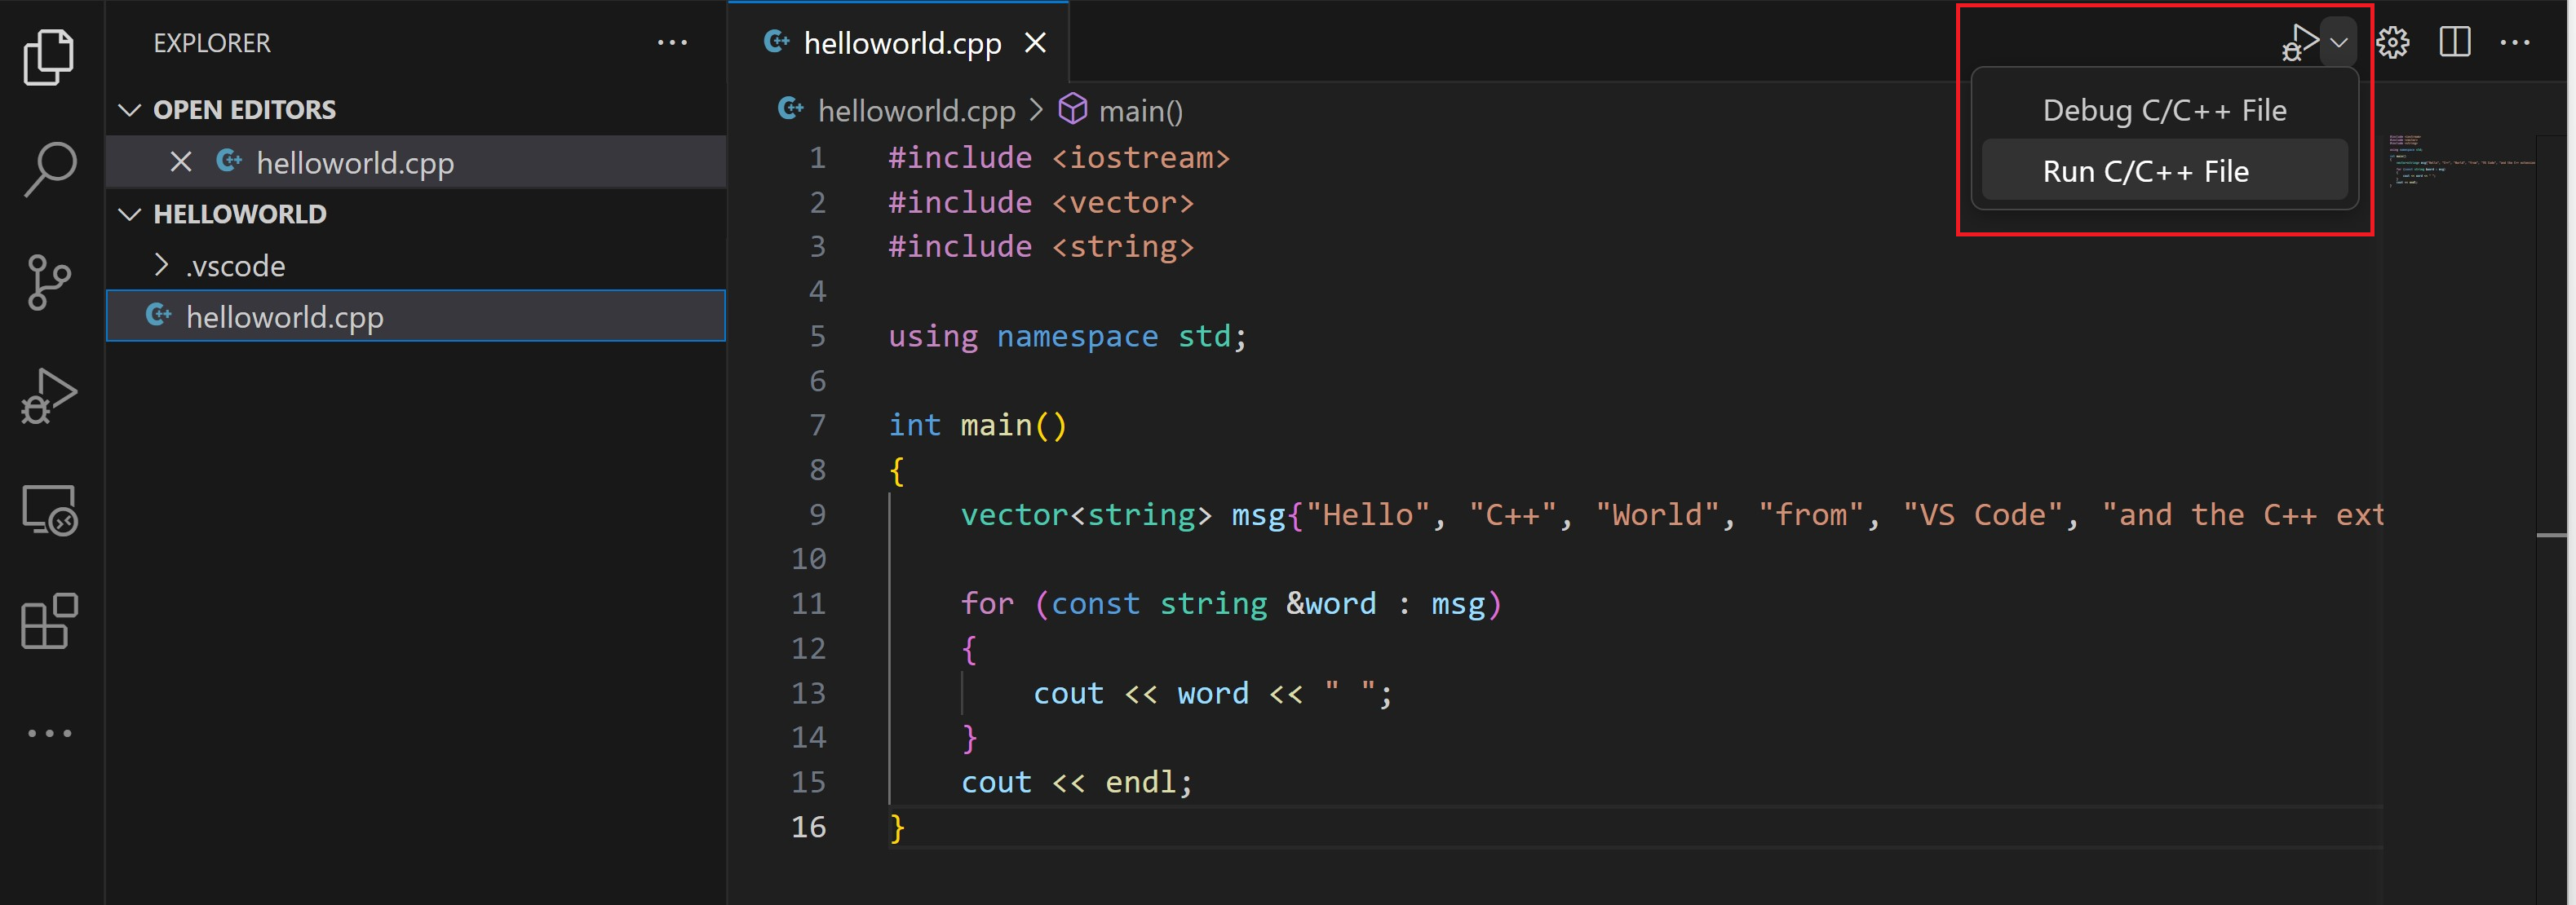
Run Code
Run C/C++ File
|  |
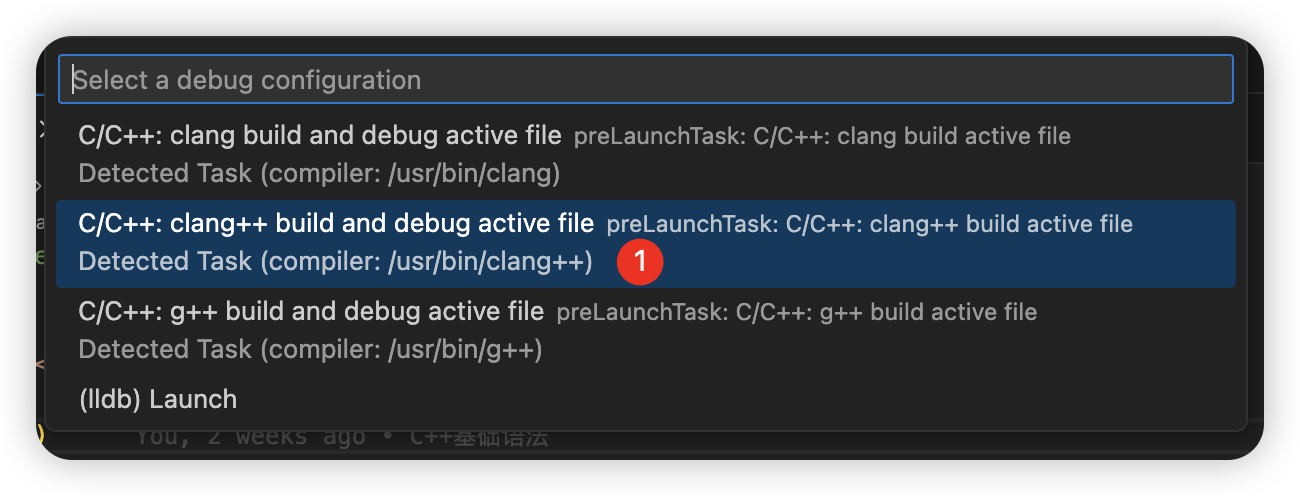
- 选择编译器:C/C++: clang++ build and debug active file
|  |
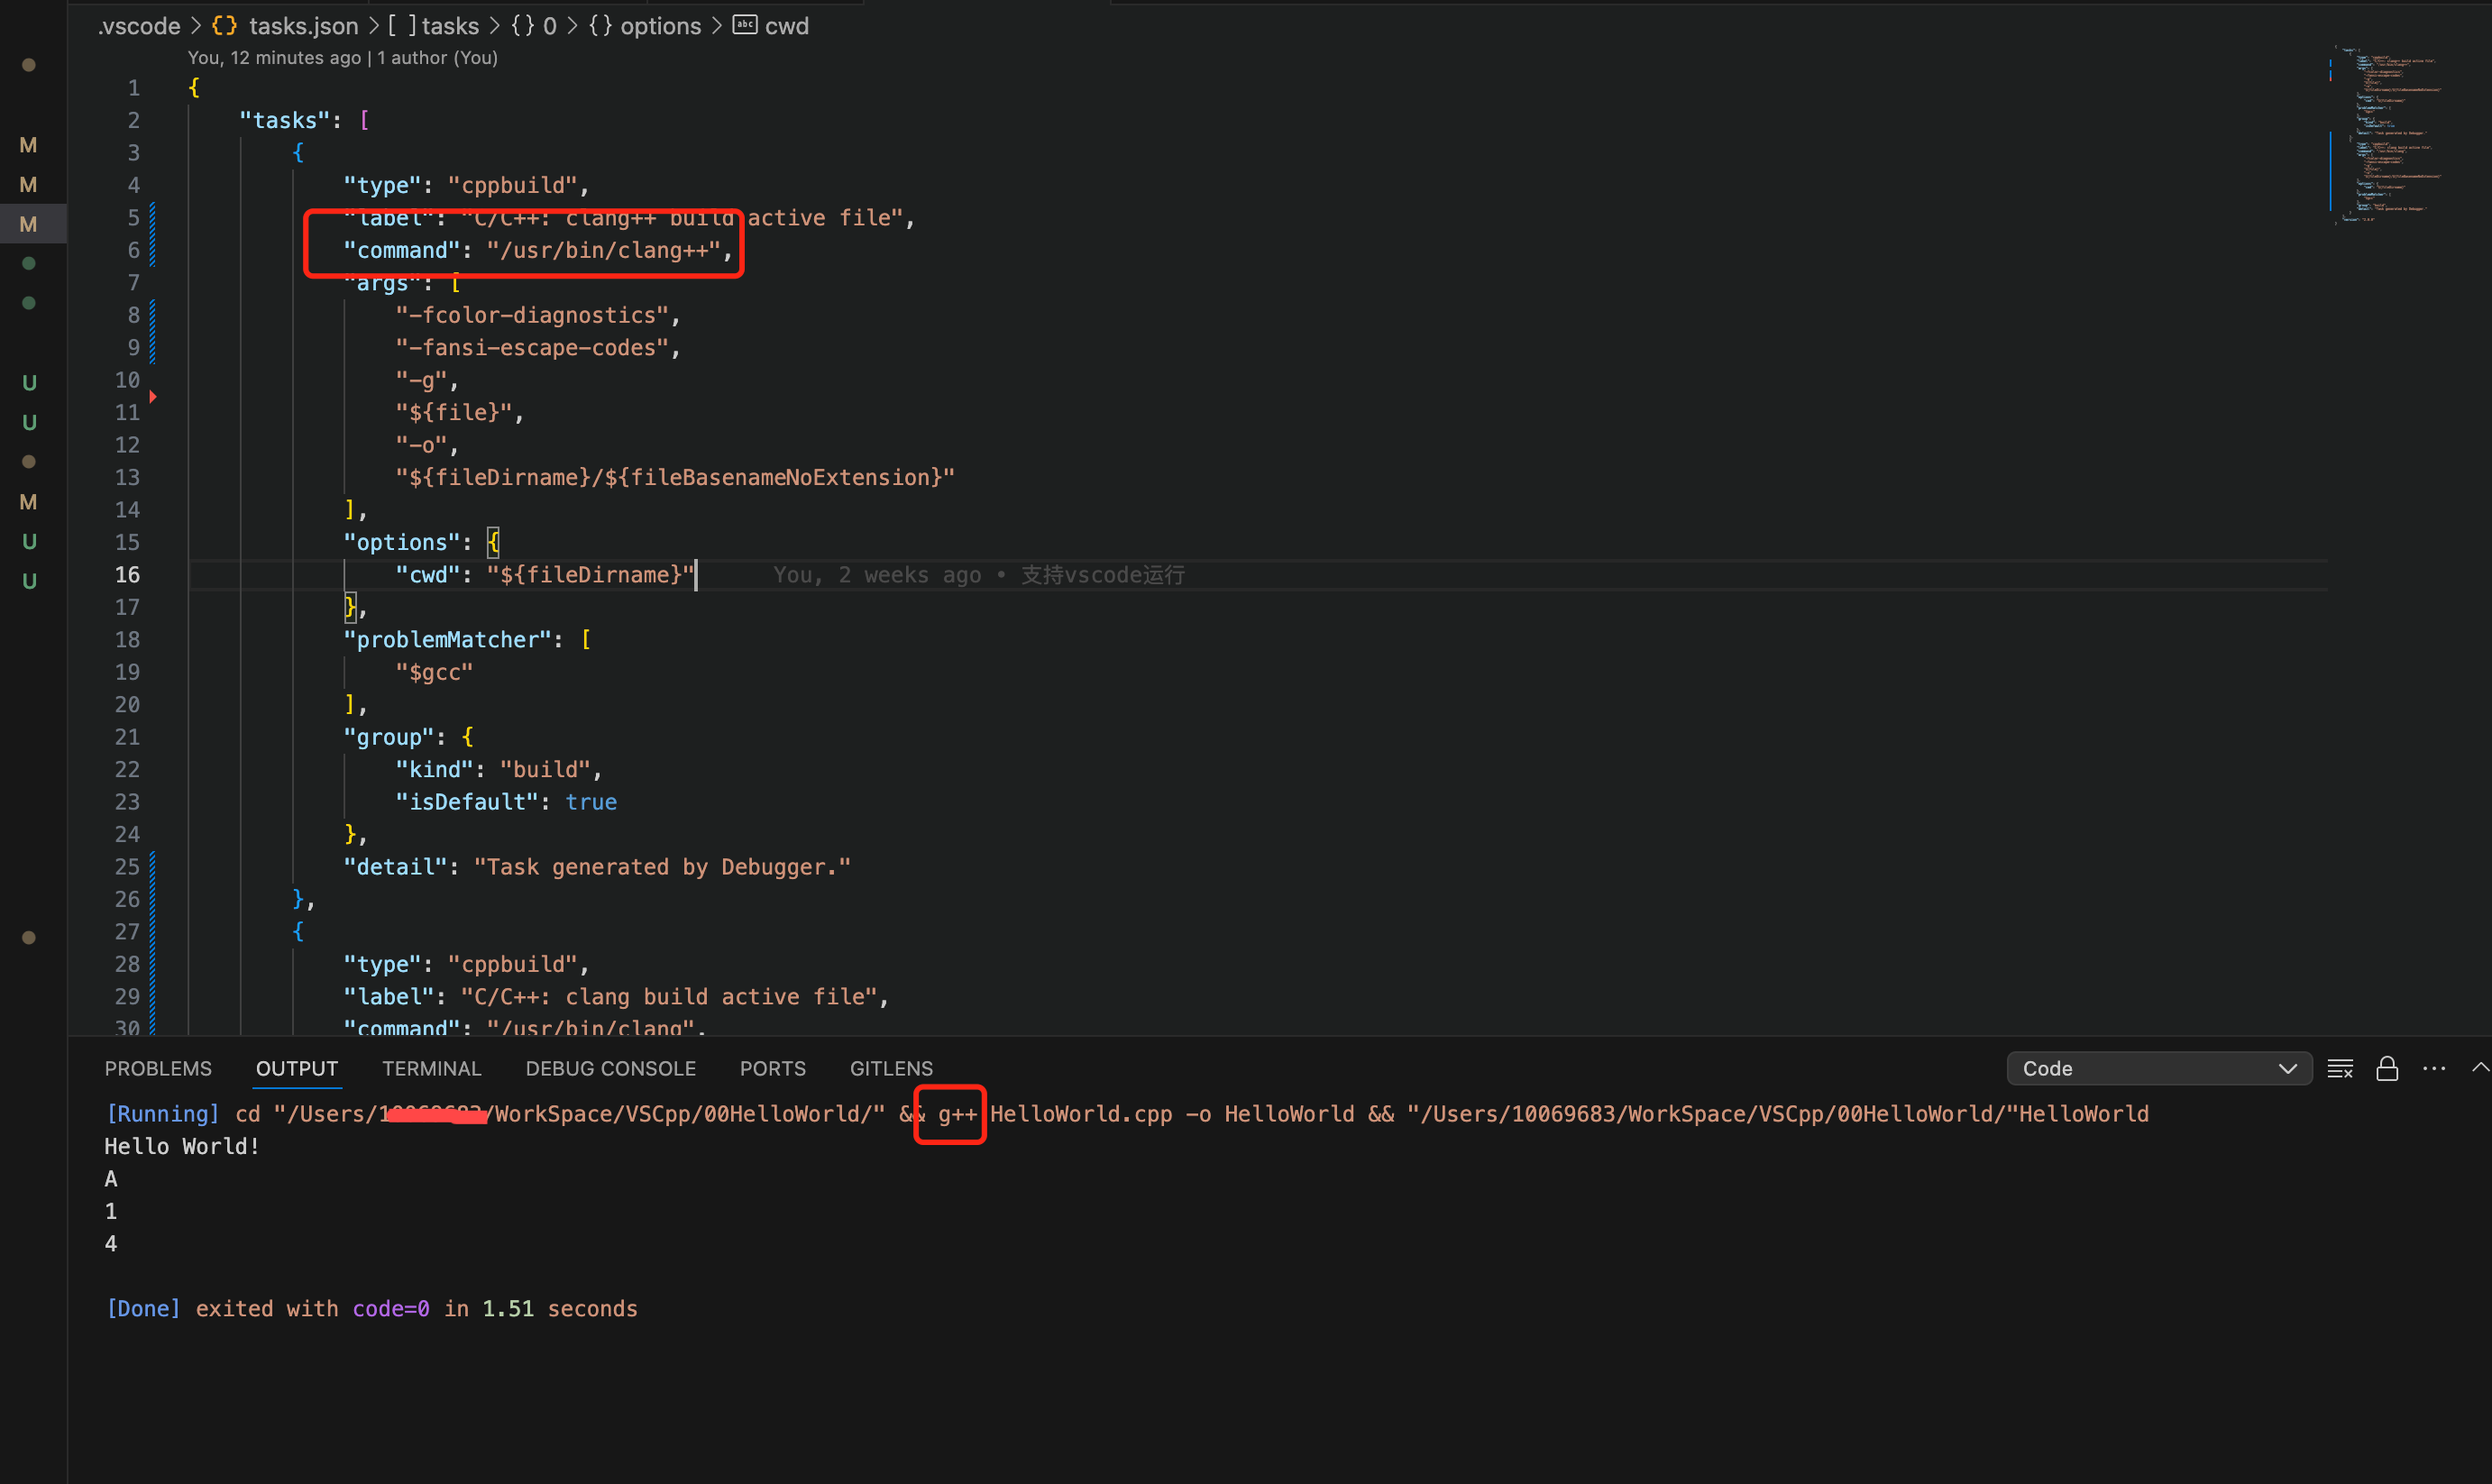
然后在 .vscode 目录生成 task.json 文件:
1
2
3
4
5
6
7
8
9
10
11
12
13
14
15
16
17
18
19
20
21
22
23
24
25
26
27
28
29
{
    "tasks": [
        {
            "type": "cppbuild",
            "label": "C/C++: clang++ build active file",
            "command": "/usr/bin/clang++",
            "args": [
                "-fcolor-diagnostics",
                "-fansi-escape-codes",
                "-g",
                "${file}",
                "-o",
                "${fileDirname}/${fileBasenameNoExtension}"
            ],
            "options": {
                "cwd": "${fileDirname}"
            },
            "problemMatcher": [
                "$gcc"
            ],
            "group": {
                "kind": "build",
                "isDefault": true
            },
            "detail": "Task generated by Debugger."
        }
    ],
    "version": "2.0.0"
}
- 编译成功后,Console 输出产物
|  |
task.json 配置
第一次运行程序时,C++ 扩展会创建 tasks.json ,位于项目的 .vscode 文件夹中。 tasks.json 存储构建配置。以下是 macOS 上 tasks.json 文件的示例:
task.json 文件用于配置任务,它定义了执行特定操作的任务,并提供了相应的命令和参数。
1
2
3
4
5
6
7
8
9
10
11
12
13
14
15
16
17
18
19
20
21
22
23
24
25
26
27
28
29
{
    "tasks": [
        {
            "type": "cppbuild",
            "label": "C/C++: clang++ build active file",
            "command": "/usr/bin/clang++",
            "args": [
                "-fcolor-diagnostics",
                "-fansi-escape-codes",
                "-g",
                "${file}",
                "-o",
                "${fileDirname}/${fileBasenameNoExtension}"
            ],
            "options": {
                "cwd": "${fileDirname}"
            },
            "problemMatcher": [
                "$gcc"
            ],
            "group": {
                "kind": "build",
                "isDefault": true
            },
            "detail": "Task generated by Debugger."
        }
    ],
    "version": "2.0.0"
}
注意,
task.json中可能用到的变量:variables reference.
- command
command设置指定要运行的程序。在本例中,即clang++。 - args
args数组指定传递给clang++的命令行参数。这些参数必须按照编译器期望的顺序指定。
此任务告诉 C++ 编译器获取活动文件 (${file}),对其进行编译,并在当前目录 ( ${fileDirname} )。此过程创建 helloworld 。
- label
label值是您在任务列表中看到的值,这取决于您的个人偏好。 - detail
detail值是任务列表中任务的描述。更新此字符串以将其与类似任务区分开。 - problemMatcher
problemMatcher值选择用于查找编译器输出中的错误和警告的输出解析器。对于clang++,$gcc问题匹配器会创建最佳结果。 - group
从现在开始,播放按钮始终从 tasks.json 读取,以确定如何构建和运行程序。您可以在 tasks.json 中定义多个构建任务,并且标记为默认的任务就是播放按钮使用的任务。如果您需要更改默认编译器,可以运行 “ 任务:命令面板中的配置默认构建任务 “。或者,您可以修改 tasks.json 文件并通过替换此段来删除默认值:
1
2
3
4
"group": {
	"kind": "build",
	"isDefault": true
},
设置编译不支持 C++11 及以后的标准,配置 task.json
1
2
3
4
5
6
7
8
9
10
11
12
13
14
15
16
17
18
19
20
21
22
23
24
25
26
27
28
29
30
31
{
    "tasks": [
        {
            "type": "cppbuild",
            "label": "C/C++: g++ 生成活动文件",
            "command": "/usr/bin/g++",
            "args": [
                "-std=c++17",
                "-stdlib=libc++",
                "-fdiagnostics-color=always",
                "-g",
                "-Wall",
                "${file}",
                "-o",
                "${fileDirname}/${fileBasenameNoExtension}"
            ],
            "options": {
                "cwd": "${fileDirname}"
            },
            "problemMatcher": [
                "$gcc"
            ],
            "group": {
                "kind": "build",
                "isDefault": true
            },
            "detail": "调试器生成的任务。"
        }
    ],
    "version": "2.0.0"
}
示例:
1
2
3
4
5
6
7
8
9
10
11
12
13
14
15
16
17
18
19
20
21
#include <iostream>
#include <string>
#include <vector>
using namespace std;

int main()
{
    int b = 1;
    auto a = b;
    cout << a << endl;
    vector<string> msg{"Hello", "C++", "World", "from", "VS Code", "and the C++ extension!"};
    int len = msg.size();
    cout << "长度" << len << endl;
    for (int i = 0; i < 5; i++)
    {
        // ms.push_back("a");
        cout << i << endl;
    }

    return 0;
}
修改 task.json 以支持多个 .cpp
- 您可以使用
"${workspaceFolder}/*.cpp"等参数而不是"${file}"来修改tasks.json以构建多个 C++ 文件。这将构建当前文件夹中的所有.cpp文件。 - 您还可以通过将
"${fileDirname}/${fileBasenameNoExtension}"替换为硬编码文件名(例如"${workspaceFolder}/myProgram.out")来修改输出文件名。
1
2
3
4
5
6
7
8
9
10
11
12
13
14
15
16
17
18
19
20
21
22
23
24
25
26
27
28
29
30
31
// 支持多个cpp文件
{
    "tasks": [
        {
            "type": "cppbuild",
            "label": "C/C++: clang++ build active file",
            "command": "/usr/bin/clang++",
            "args": [
                "-fcolor-diagnostics",
                "-fansi-escape-codes",
                "-g",
                // "${workspaceFolder}/*.cpp",
                "${fileDirname}/*.cpp",
                "-o",
                "${fileDirname}/bin/${fileBasenameNoExtension}"
            ],
            "options": {
                "cwd": "${fileDirname}"
            },
            "problemMatcher": [
                "$gcc"
            ],
            "group": {
                "kind": "build",
                "isDefault": true
            },
            "detail": "Task generated by Debugger."
        }
    ],
    "version": "2.0.0"
}
Debug 代码
- 返回到
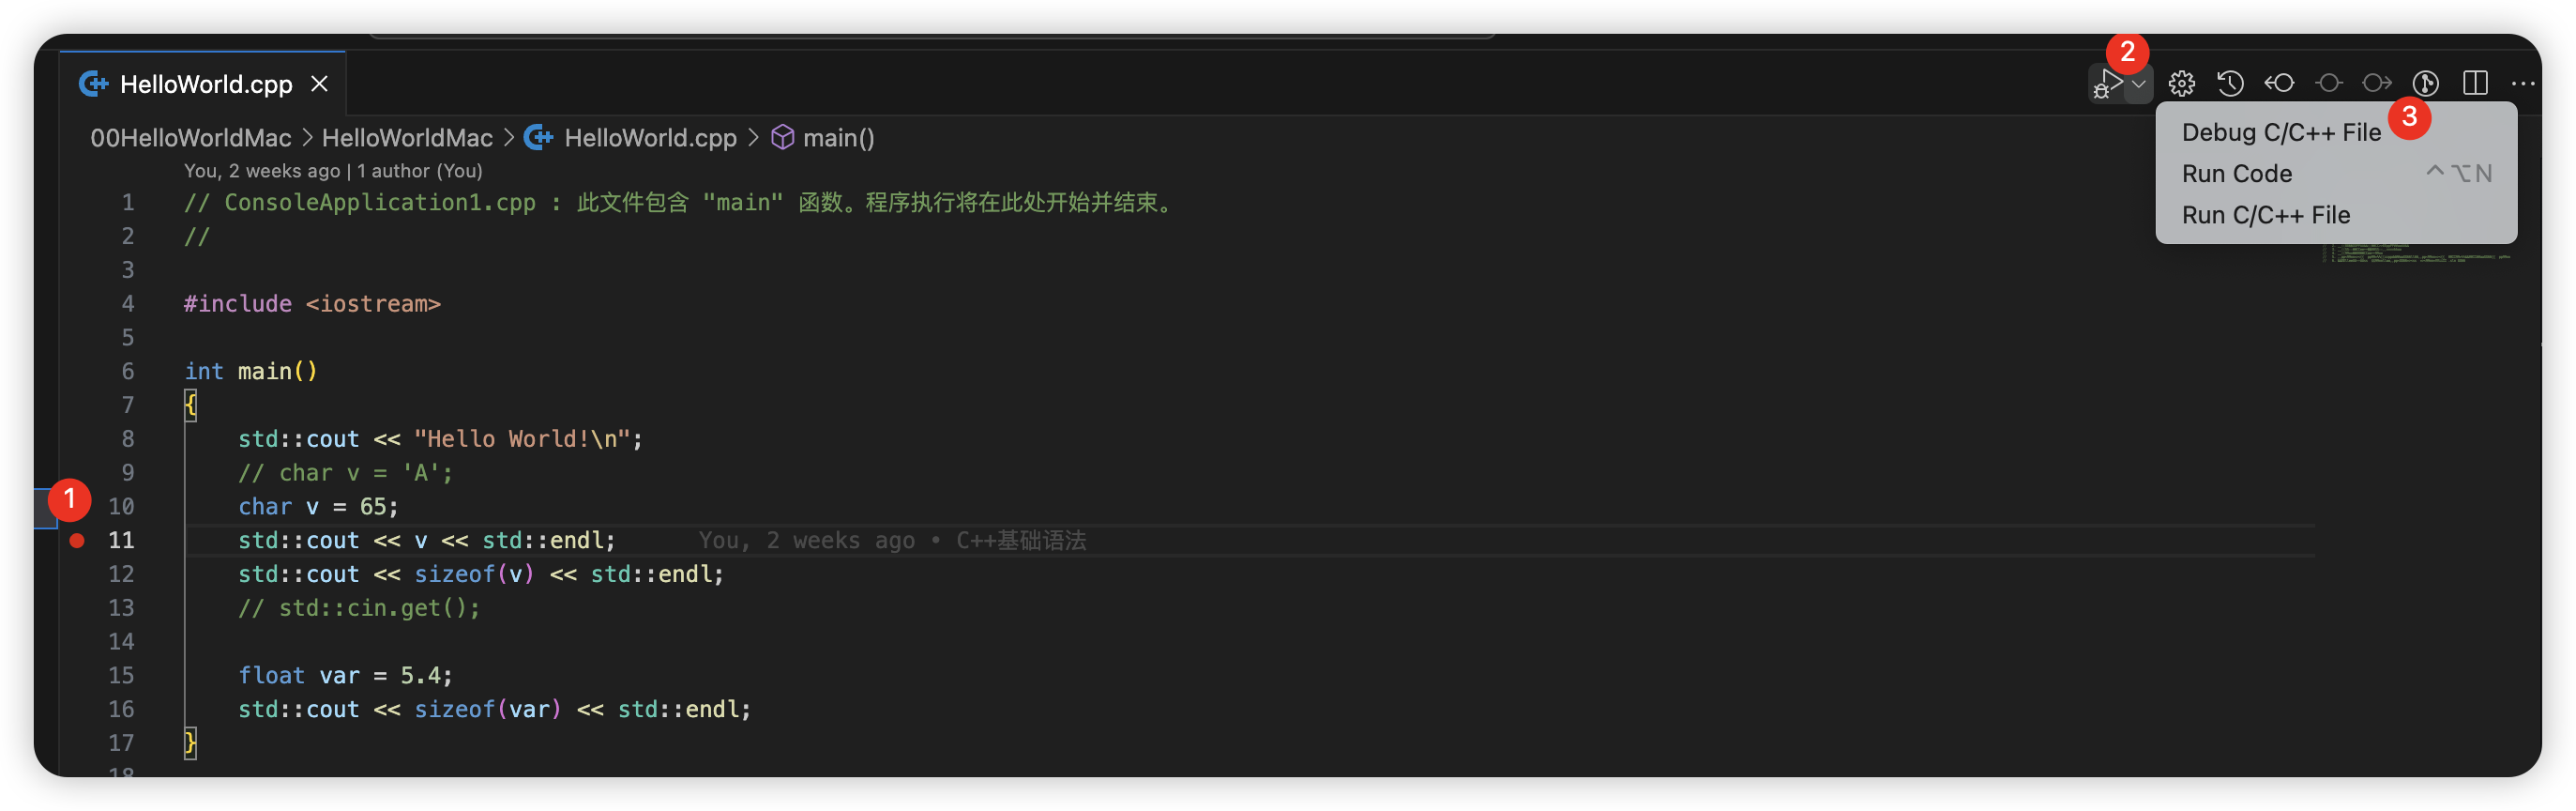
helloworld.cpp,使其成为活动文件。 - 通过单击编辑器边距或在当前行上使用
F9设置断点,从播放按钮旁边的下拉列表中,选择 “Debug C/C++ File“。。
|  |
- 从系统上检测到的编译器列表中选择 C/C++: clang++ 构建和调试活动文件(只有在第一次运行或调试
helloworld.cpp时才会要求您选择编译器)。
|  |
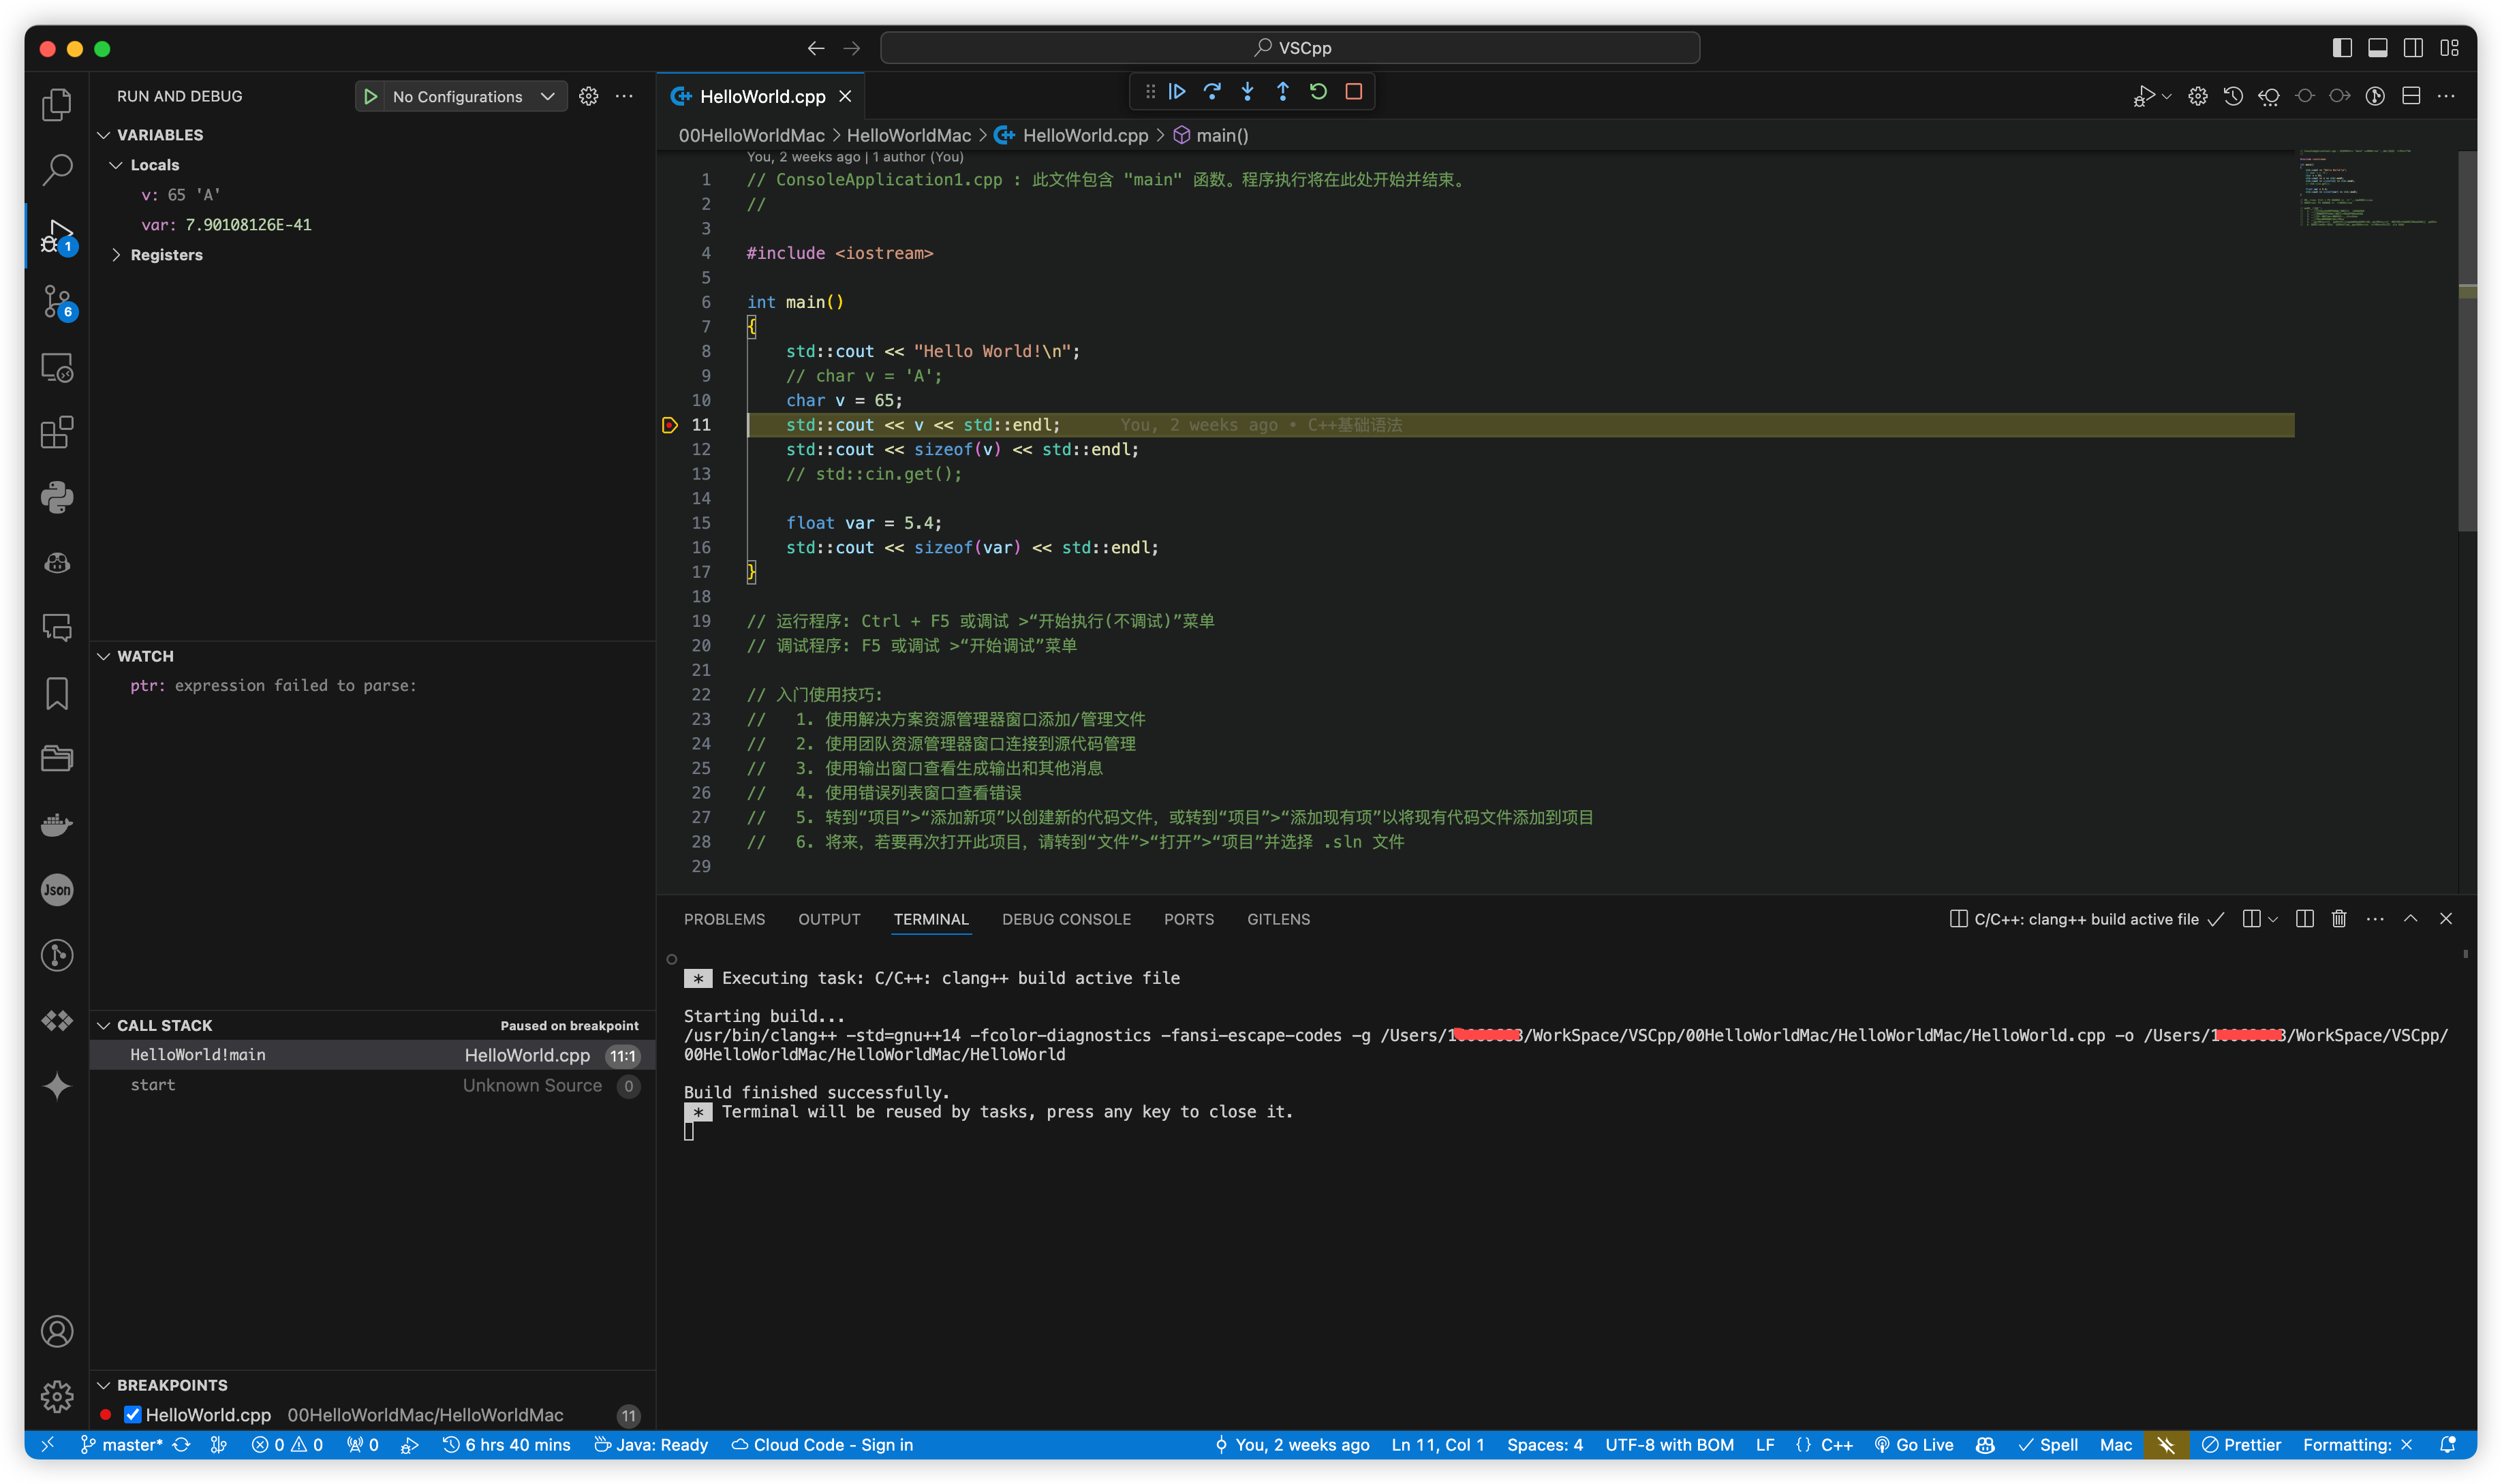
- 进入到了调试界面
|  |
如何 Debug
Debug 界面
|  |
- 编辑器会突出显示您在启动调试器之前设置断点的行
- 活动栏中的 “ 运行和调试 “ 视图显示调试信息。
在代码编辑器的顶部,会出现一个调试控制面板。您可以通过抓住左侧的点在屏幕上移动它。

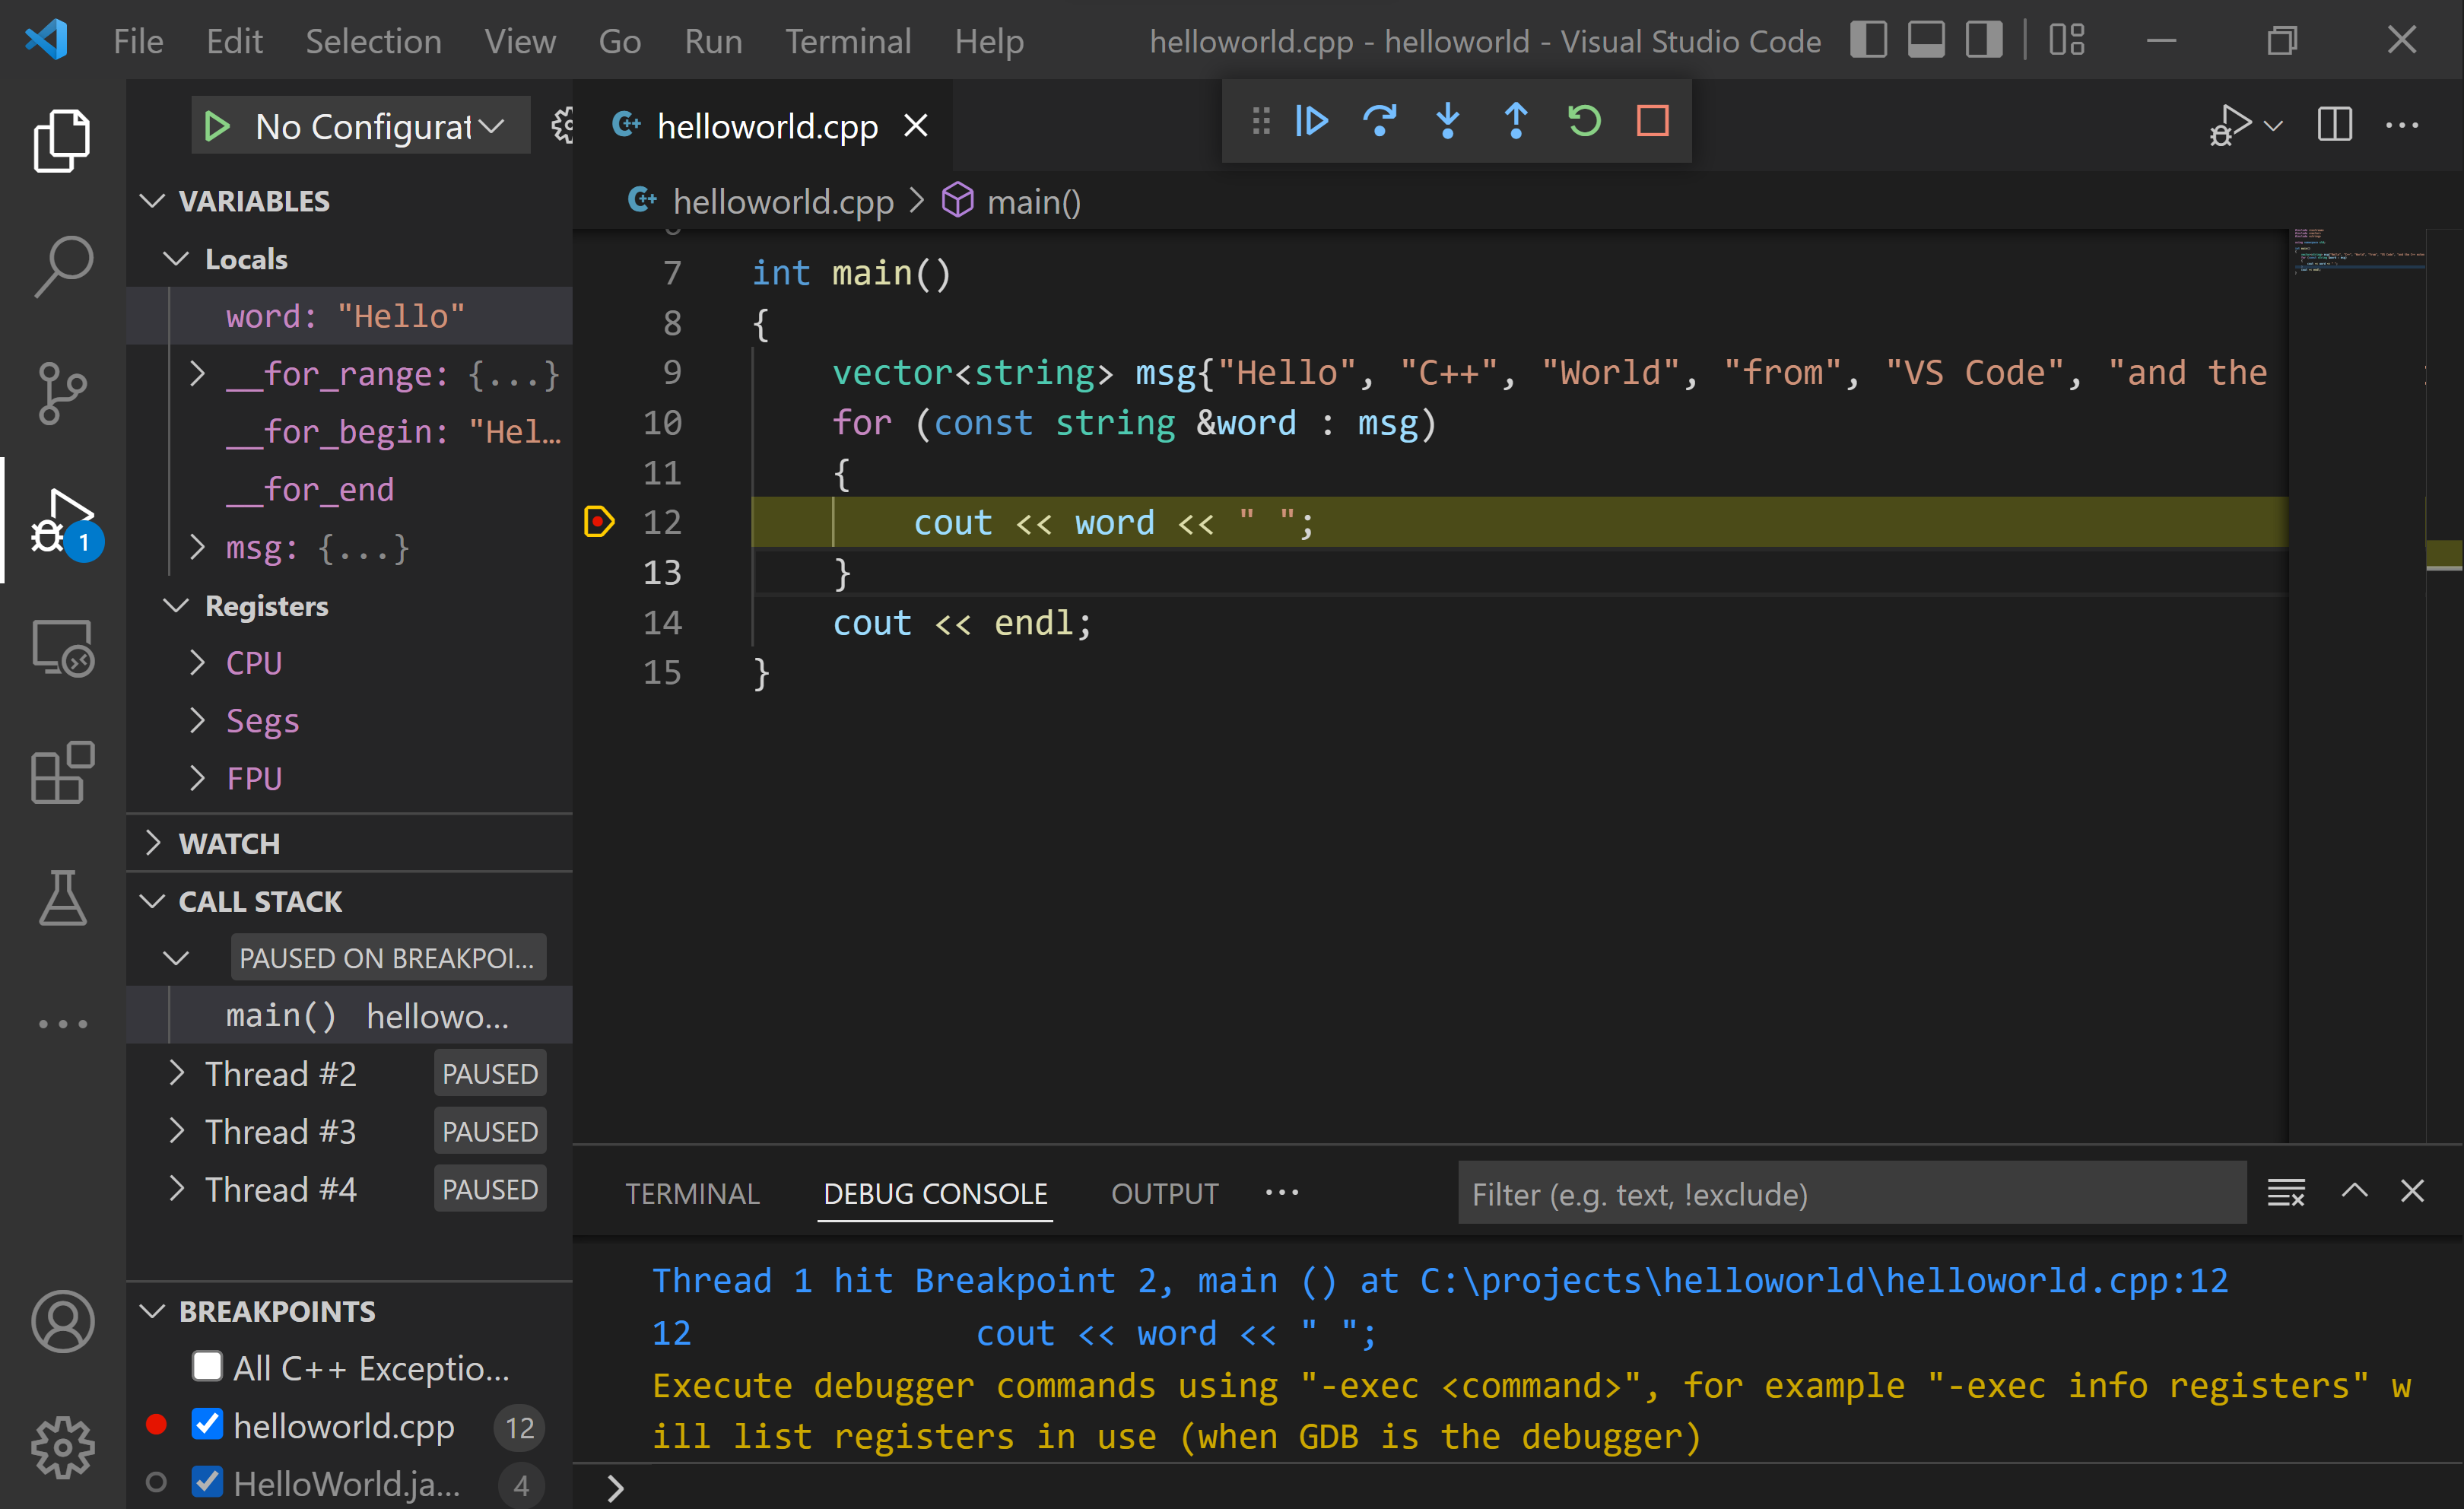
单步执行代码
- 在调试控制面板中选择 “ 单步执行 “ 图标,以便突出显示
for (const string& word : msg)语句
|  |
设置 watch
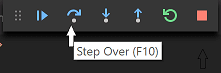
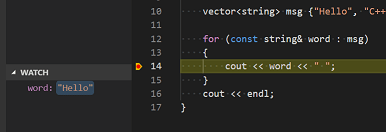
您可能希望在程序执行时跟踪变量的值。您可以通过对变量设置监视来做到这一点。
- 将插入点放置在循环内。在 “ 监视 “ 窗口中,选择加号并在文本框中键入
word。这是循环变量的名称。现在,当您单步执行循环时,请查看 “ 监视 “ 窗口。
|  |
- 通过在循环之前添加以下语句来添加另一个监视:
int i = 0;。然后,在循环内添加以下语句:++i;。现在,像上一步中一样添加i的监视。
|  |
- 要在执行暂停时快速查看任何变量的值,可以将鼠标指针悬停在该变量上。
launch.json 配置
当您使用 Run 按钮或 F5 进行调试时,C++扩展 会动态创建动态调试配置。
在某些情况下,您需要自定义调试配置,例如指定在运行时传递给程序的参数。您可以在 launch.json 文件中定义自定义调试配置。
launch.json 文件用于配置 调试器,它定义了调试会话的启动方式以及各种调试选项。
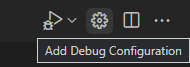
要创建 launch.json ,请从播放按钮下拉菜单中选择 “添加调试配置“,
|  |
或者:
| 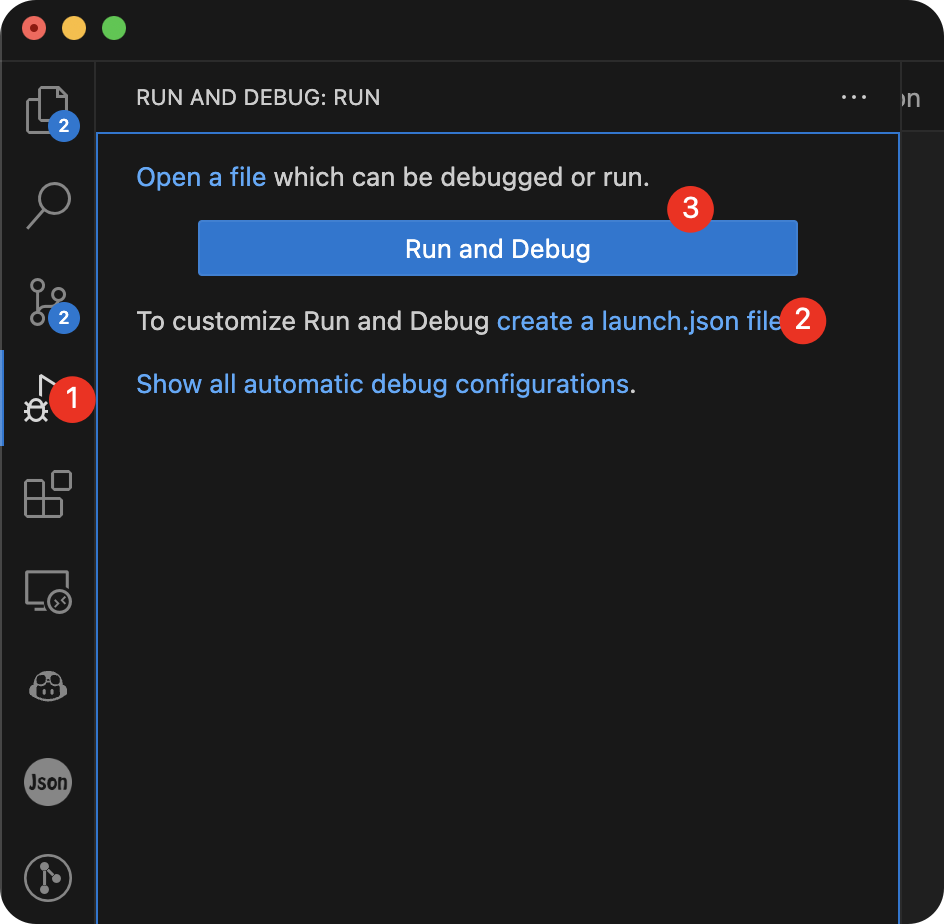 |
然后,您将看到各种预定义调试配置的下拉列表。选择 C/C++:clang++ 构建并调试活动文件。
|  |
VS Code 创建一个 launch.json 文件,如下所示:
1
2
3
4
5
6
7
8
9
10
11
12
13
14
15
16
17
18
{
  "configurations": [
    {
      "name": "C/C++: clang++ build and debug active file",
      "type": "cppdbg",
      "request": "launch",
      "program": "${fileDirname}/bin/${fileBasenameNoExtension}",
      "args": [],
      "stopAtEntry": false,
      "cwd": "${fileDirname}",
      "environment": [],
      "externalConsole": false,
      "MIMode": "lldb",
      "preLaunchTask": "C/C++: clang++ build active file"
    }
  ],
  "version": "2.0.0"
}
"configurations":包含了一个或多个调试配置,每个配置定义了一个特定的调试方案。"type":指定了要使用的调试器类型,如C++、Python、Node.js等。"request":指定了调试器的请求类型,例如"launch"、"attach"等。"program":指定了要调试的程序的入口点路径。此处设置为活动文件夹${fileDirname}和活动文件名${fileBasenameNoExtension},如果helloworld.cpp是活动文件,则为helloworld。args属性是在运行时传递给程序的参数数组。"args":指定了传递给被调试程序的命令行参数。environment:指定了环境变量,用于设置调试过程中的环境。stopAtEntry:默认情况下,C++ 扩展不会向源代码添加任何断点,并且stopAtEntry值设置为false。将stopAtEntry值更改为true以使调试器在开始调试时停止在main方法上。preLaunchTask:确保preLaunchTask值与tasks.json文件中构建任务的label问题匹配器会创建最佳结果。
从现在开始,在启动程序进行调试时,播放按钮和 F5 将从您的 launch.json 文件中读取。
注意:请确保 launch.json 中 preLaunchTask 的值和 tasks.json 中的 label 保持一致。
c_cpp_properties.json 配置
c_cpp_properties.json 中包含了编译器路径、头文件路径等等的设置信息,这些信息主要用于编辑的代码智能提示 (IntelliSense)。
C++ 的语法提示、代码跳转等功能是 c++ 插件提供的,插件中有一套默认配置,无需用户自行设置。但如果有 diy 需要,就用得到 c_cpp_properties.json 文件了。
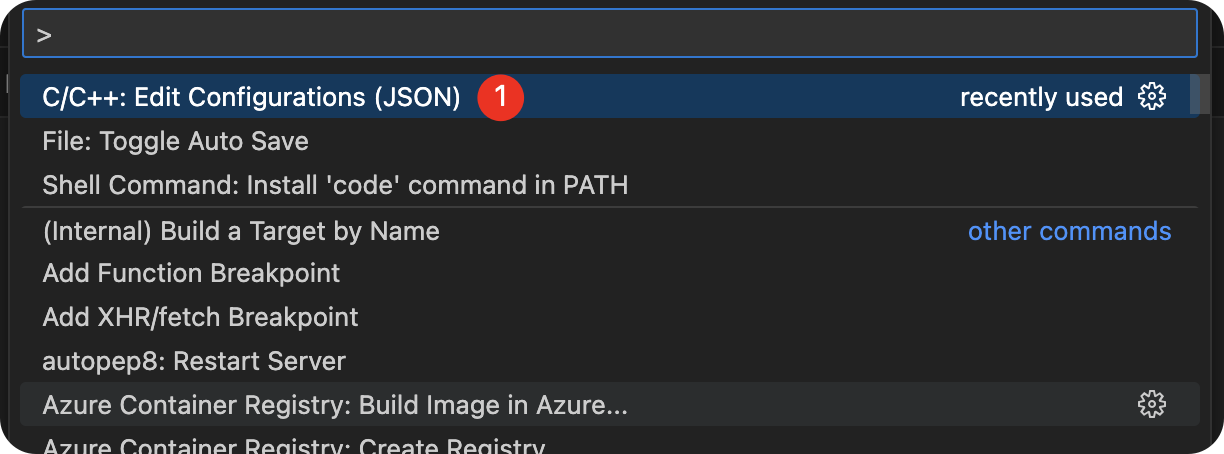
在 VSCode 中按下 ⇧⌘P,输入命令 C/C++: Edit Configurations (UI) 打开 C/C++ 的配置页面。
C/C++ Configuration
这将打开 C/C++ 配置页面。
| 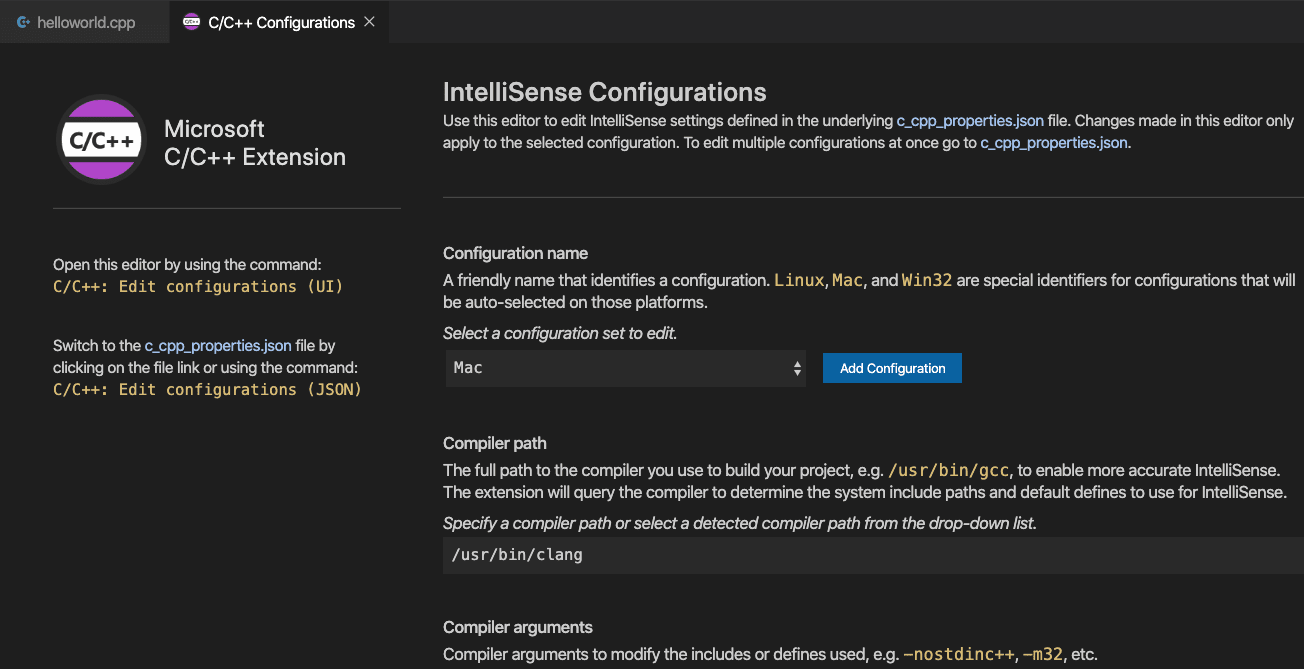 |
根据 CPU 架构 (一般是 Intel 或 Apple Silicon) 和编译器 (Compiler path: Clang 或 GCC) 的不同,我们需要在配置页面中设置 编译器路径 和 IntelliSense 模式 这两个选项。
编译器路径
从下拉框中选择 Clang/GCC 可执行文件对应的路径。
- Clang 的路径示例:
/usr/bin/clang或者/usr/bin/clang++ - GCC 的路径示例:
/opt/homebrew/Cellar/gcc/12.2.0/bin/g++
IntelliSense 模式
| CPU | 编译器 | 选项 |
|---|---|---|
| Intel | Clang | macos-clang-x64 |
| Intel | GCC | macos-gcc-x64 |
| Apple Silicon | Clang | macos-clang-arm64 |
| Apple Silicon | GCC | macos-gcc-arm64 |
launch.json、tasks.json 和 c_cpp_properties.json 小结
tasks.json->gcc;launch.json->gdb- 启动
gdb调试会话之前需要首先执行gcc编译任务。因此,launch.json有一条配置preLaunchTask,指向tasks.json中的编译任务 (label)。其实有些人的配置无法运行的部分原因就是这个不一致。 c_cpp_properties.json这个文件主要是用于 VSCode 语法提示的配置,例如:指定 include 路径,问题匹配类型等。Ctrl+Shift+P打开Command Palette,找到并打开:C/C++:Edit Configurations (UI)。进行一些配置后,.vscode文件夹下会自动生成此文件。这个配置不会影响到 gcc 编译命令,只是让你在编写代码时能有方法、变量等的语法提示。
c_cpp_properties.json
在 C/C++ 的配置页面设置好之后,VSCode 会为我们自动生成 .vscode/c_cpp_properties.json 文件。
1
2
3
4
5
6
7
8
9
10
11
12
13
14
15
16
17
18
19
{
    "configurations": [
        {
            "name": "Mac",
            "includePath": [
                "${workspaceFolder}/**"
            ],
            "defines": [],
            "macFrameworkPath": [
                "/Library/Developer/CommandLineTools/SDKs/MacOSX.sdk/System/Library/Frameworks"
            ],
            "cStandard": "c17",
            "cppStandard": "c++17",
            "intelliSenseMode": "macos-clang-arm64",
            "compilerPath": "/usr/bin/clang++"
        }
    ],
    "version": 4
}
有关 c_cpp_properties.json 的官方说明可以参考:
c_cpp_properties.json reference
问题
配置的 clang 不生效
原因:配置了 Code Runner 插件,用的是 g++
|  |
解决:把 Code Runner 插件 disable;不要用右键 Run Code 的功能
Run C/C++ File 不允许
在 Mac 上,点击 Run 后,这是生成二进制,没有给我们运行二进制,我们可以自定义一个 Task。
在 Visual Studio Code(VS Code)中,没有内置的 “ 编译和运行 “ 按钮用于 C++ 程序。不过,您可以通过配置任务(Tasks)和拓展插件来实现类似的功能。有 2 种方式
VS Code 任务配置编译和运行按钮
- 在
task.json中新增一个 task
1
2
3
4
5
6
7
8
9
10
11
12
{
   "label": "Run Executable",
   "type": "shell",
   "command": "./${fileBasenameNoExtension}", // 注意修改成可运行的二进制的目录
   "group": {
	   "kind": "test",
	   "isDefault": true
   },
   "presentation": {
	   "reveal": "always"
   }
}
- 然后通过
Ctrl+Shift+P,Run task,运行该 Task
使用 Code Runner 拓展插件
- 安装 Code Runner 插件:打开扩展视图(在侧边栏,或者按
Ctrl+Shift+X),搜索 Code Runner 插件并安装它。 - 插件安装完成后,您将在 VS Code 顶部的菜单栏看到一个小三角形运行图标,您可以通过点击它来运行当前代码。
- 如果您希望一键编译并运行 C++ 代码,您可以在
settings.json中为 Code Runner 配置一些自定义的编译指令。例如:
1
2
3
4
5
6
"code-runner.executorMap": {
	// ...
	"c": "cd $dir && gcc $fileName -o bin/$fileNameWithoutExt && bin/$dir$fileNameWithoutExt",
	"cpp": "cd $dir && g++ $fileName -o bin/$fileNameWithoutExt && bin/$dir$fileNameWithoutExt"
	// ...
}
上面我们在生成的二进制和执行的二进制命令前都加了 bin 目录
- 这样配置后,每当您点击 Code Runner 的运行按钮或者使用快捷键
Ctrl+Alt+N时,它将编译当前的 .cpp 文件并立即运行产生的可执行文件。 - 另外,您也可以编辑 VS Code 中的
keybindings.json文件来为编译和运行设置自定义快捷键。
VSCode 配置 C/C++ 环境(Windows)
安装必须
- VSCode
C/C++插件
Installing the MinGW-w64 toolchain
什么是 MinGW?
MinGW (Minimalist GNU for Windows) 是一个为 Windows 平台提供的 GNU 工具链的精简版本。它包括一套开源的编程工具,如 GCC (GNU 编译器集合),它支持多种编程语言,包括 C、C++、Fortran 和其他语言。MinGW x 64 是这个工具链的 64 位版本,它允许开发者在 Windows 上创建原生的 Win 64 应用程序。
MinGW 提供了一个免费且简单的 GNU 工具集合,在不需要重写源代码的情况下支持跨平台的程序开发。它利用 Windows 的本地 Win 32 API,而不是为 POSIX 兼容层提供支持(比如 Cygwin)。因此,使用 MinGW 编译的程序性能往往更高,因为它直接和 Windows 操作系统的底层接口打交道。
简而言之,MinGW x 64 提供的主要功能包括:
gcc: GNU C 和 C++ 编译器。g++: GNU C++ 编译器。gfortran: GNU Fortran 编译器。binutils: 一组二进制工具,包括链接器和资源编译器。MSYS: 一个提供了 bash shell 和 Unix 风格构建工具的命令行环境。mingw-get: 一个类似于 Linux 上的 apt-get 或 yum 的包管理器,用于安装、删除和更新 MinGW 工具和库。
安装 MinGW
- 安装
MSYS2:direct link to the installer - 然后安装
MinGW-64,打开刚刚安装的MSYS2,输入下面命令:
1
pacman -S --needed base-devel mingw-w64-ucrt-x86_64-toolchain
- 默认按确认,中途输入
Y,安装所有
| 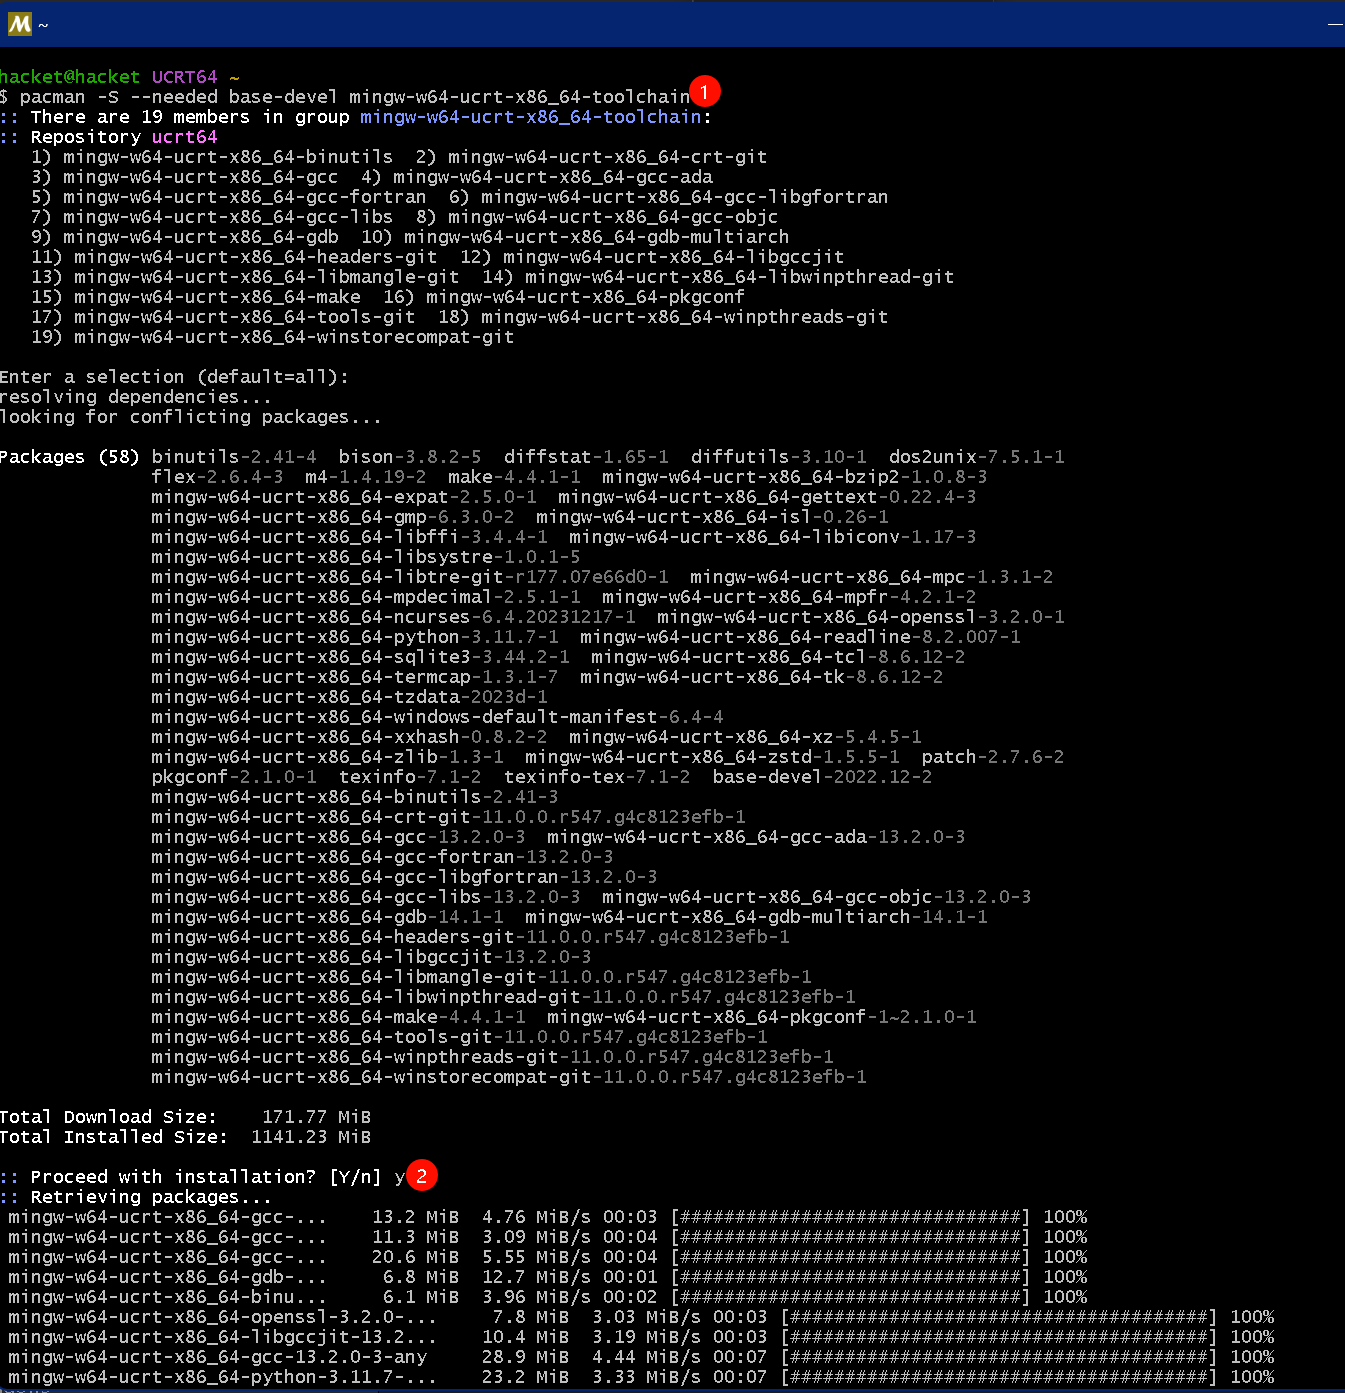 |
- 配置 path:
D:\msys64\ucrt64\bin - 校验
MinGwx64是否安装和配置成功:
1
2
3
gcc --version
g++ --version
gdb --version
配置 IntelliSense
- open the Command Palette (
Ctrl+Shift+P) - 选择:Select IntelliSense Configuration
- Use
gcc.exe
配置 task.json
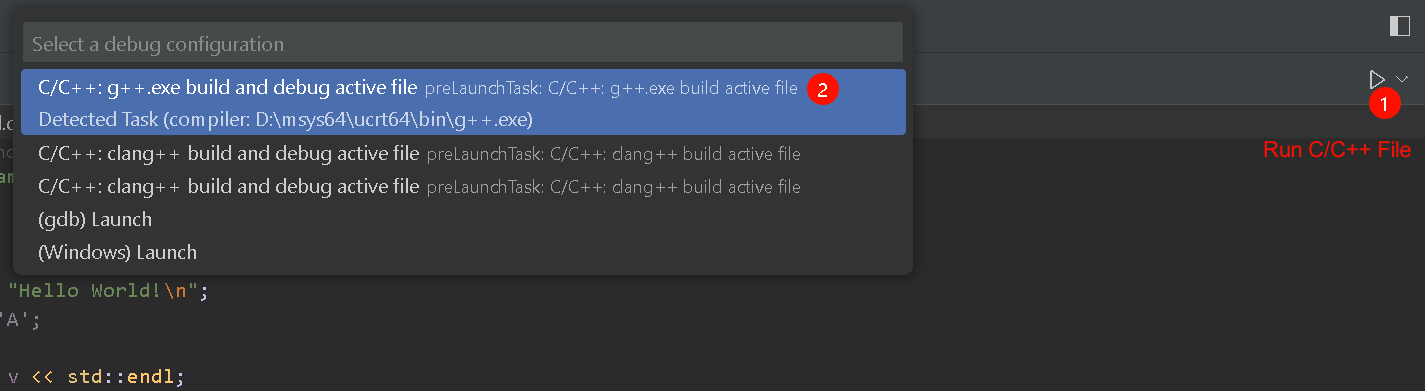
- Run C/C++ File
|  |
- 选择编译器: C/C++: g++.exe build and debug active file
|  |
- 然后在
tasks.json创建一个配置:
1
2
3
4
5
6
7
8
9
10
11
12
13
14
15
16
17
18
19
20
21
22
23
24
25
26
27
28
29
30
31
32
33
34
35
36
37
38
39
40
41
42
43
44
45
46
47
48
49
{
    "tasks": [
        {
            "type": "cppbuild",
            "label": "C/C++: clang++ build active file",
            "command": "/usr/bin/clang++",
            "args": [
                "-fcolor-diagnostics",
                "-fansi-escape-codes",
                "-g",
                "${fileDirname}/*.cpp",
                "-o",
                "${fileDirname}/bin/${fileBasenameNoExtension}"
            ],
            "options": {
                "cwd": "${fileDirname}"
            },
            "problemMatcher": [
                "$gcc"
            ],
            "group": "build",
            "detail": "Task generated by Debugger."
        },
        {
            "type": "cppbuild",
            "label": "C/C++: g++.exe build active file",
            "command": "D:\\msys64\\ucrt64\\bin\\g++.exe",
            "args": [
                "-fdiagnostics-color=always",
                "-g",
                "${file}",
                "-o",
                "${fileDirname}\\bin\\${fileBasenameNoExtension}.exe"
            ],
            "options": {
                "cwd": "${fileDirname}"
            },
            "problemMatcher": [
                "$gcc"
            ],
            "group": {
                "kind": "build",
                "isDefault": true
            },
            "detail": "Task generated by Debugger."
        }
    ],
    "version": "2.0.0"
}
上面有 2 个 task,第 1 个是 Mac 上配置的 Clang++,第 2 个是 Windows 配置的 G++
注意:修改了输出,加了 \\bin 目录,编译的 exe 在 bin 目录下。
配置支持多个 cpp 文件
修改 task.json,将 ${file} 改成 ${fileDirname}/*.cpp
1
2
3
4
5
6
7
8
9
10
11
12
13
14
15
16
17
18
19
20
21
22
23
24
25
26
27
28
{
    "tasks": [
        {
            "type": "cppbuild",
            "label": "C/C++: g++.exe build active file",
            "command": "D:\\msys64\\ucrt64\\bin\\g++.exe",
            "args": [
                "-fdiagnostics-color=always",
                "-g",
                "${fileDirname}/*.cpp",
                "-o",
                "${fileDirname}\\bin\\${fileBasenameNoExtension}.exe"
            ],
            "options": {
                "cwd": "${fileDirname}"
            },
            "problemMatcher": [
                "$gcc"
            ],
            "group": {
                "kind": "build",
                "isDefault": true
            },
            "detail": "Task generated by Debugger."
        }
    ],
    "version": "2.0.0"
}
配置 Debugger:launch.json
- 生成
launc.json
| 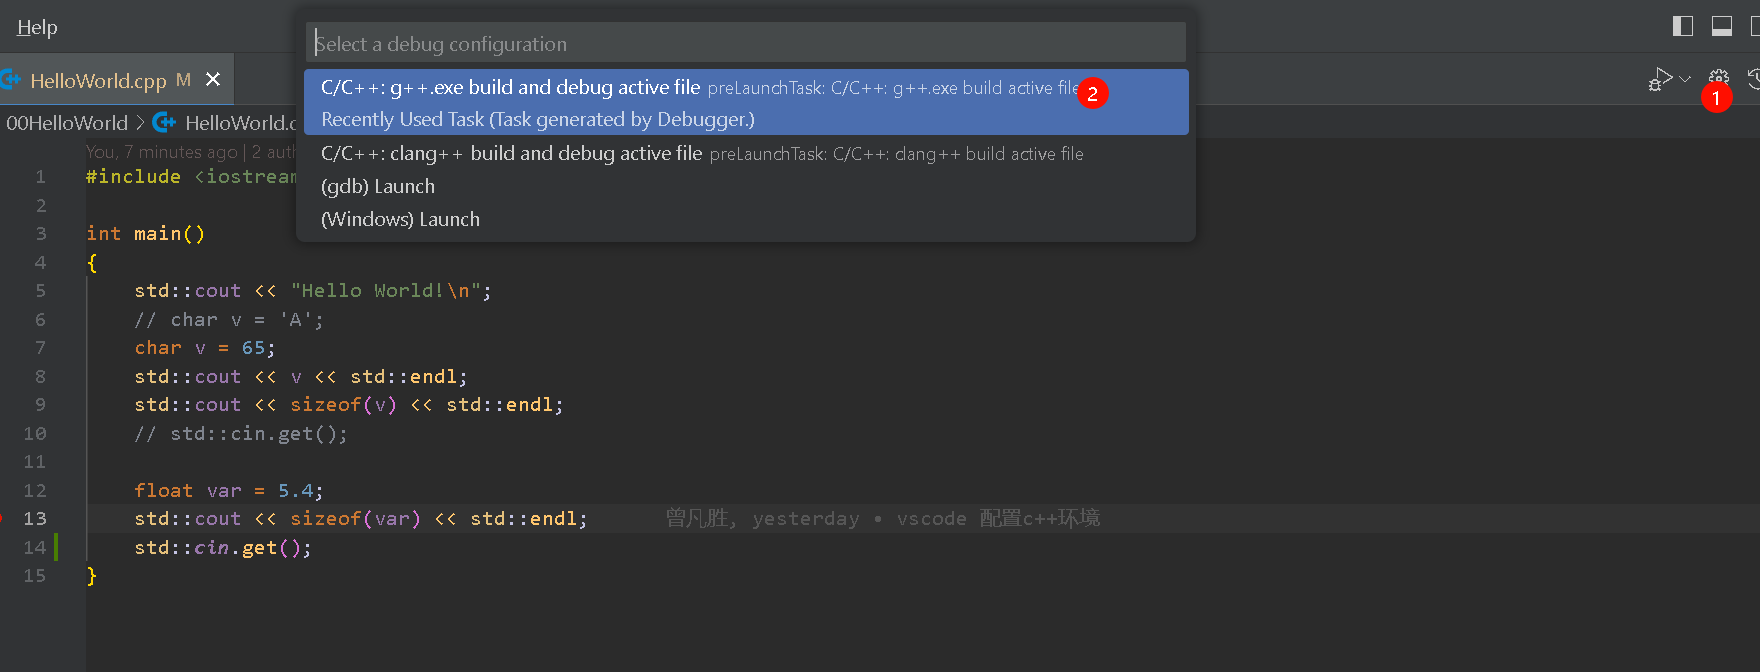 |
launch.json文件
1
2
3
4
5
6
7
8
9
10
11
12
13
14
15
16
17
18
19
20
21
22
23
24
25
26
27
28
29
30
31
32
33
34
35
36
37
38
39
40
41
42
43
44
{
    "configurations": [
        {
            "name": "C/C++: clang++ build and debug active file",
            "type": "cppdbg",
            "request": "launch",
            "program": "${fileDirname}/bin/${fileBasenameNoExtension}",
            "args": [],
            "stopAtEntry": false,
            "cwd": "${fileDirname}",
            "environment": [],
            "externalConsole": false,
            "MIMode": "lldb",
            "preLaunchTask": "C/C++: clang++ build active file"
        },
        {
            "name": "C/C++: g++.exe build and debug active file",
            "type": "cppdbg",
            "request": "launch",
            "program": "${fileDirname}\\bin\\${fileBasenameNoExtension}.exe",
            "args": [],
            "stopAtEntry": false,
            "cwd": "${fileDirname}",
            "environment": [],
            "externalConsole": false,
            "MIMode": "gdb",
            "miDebuggerPath": "D:\\msys64\\ucrt64\\bin\\gdb.exe",
            "setupCommands": [
                {
                    "description": "Enable pretty-printing for gdb",
                    "text": "-enable-pretty-printing",
                    "ignoreFailures": true
                },
                {
                    "description": "Set Disassembly Flavor to Intel",
                    "text": "-gdb-set disassembly-flavor intel",
                    "ignoreFailures": true
                }
            ],
            "preLaunchTask": "C/C++: g++.exe build active file"
        }
    ],
    "version": "2.0.0"
}
VSCode 中配置 CMake
Get started with CMake Tools on Linux
必要工具安装
- 安装 CMake
- VSCode CMake 插件:要功能是 CMake 语法高亮、自动补全
- VSCode CMake Tools 插件:CMake Tools 插件提供了更高级的集成和工具,使得在 VSCode 中配置、构建、测试和调试基于 CMake 的项目变得简单
MINGW(Windows),Mac 上安装Clangmacro-commander: 组合 vscode 命令的插件,可选
检测 CMake 安装是否成功:
1
cmake --version
检查 MINGW/Clang 是否安装成功:
1
gcc -v
CMake hello world
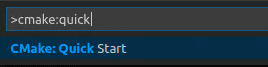
- Open the Command Palette (
Ctrl+Shift+P) and run the CMake: Quick Start command:
|  |
- 选择Executable或者
Library - 创建一个
main.cpp,CMakeLists.txt和build目录
Select a kit
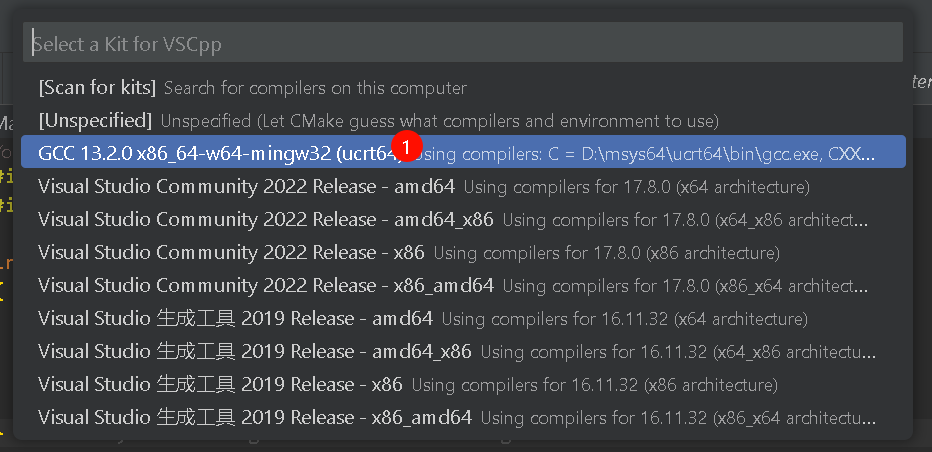
- Open the Command Palette (
Ctrl+Shift+P) and run CMake: Select a Kit - 选择
GCC
|  |
Configure Hello World
配置好后,会生成 main.cpp 和 CMakeLists.txt 2 个文件
切换到 Cmake 视图,可以在这配置 Build/Debug/Launch 等
| 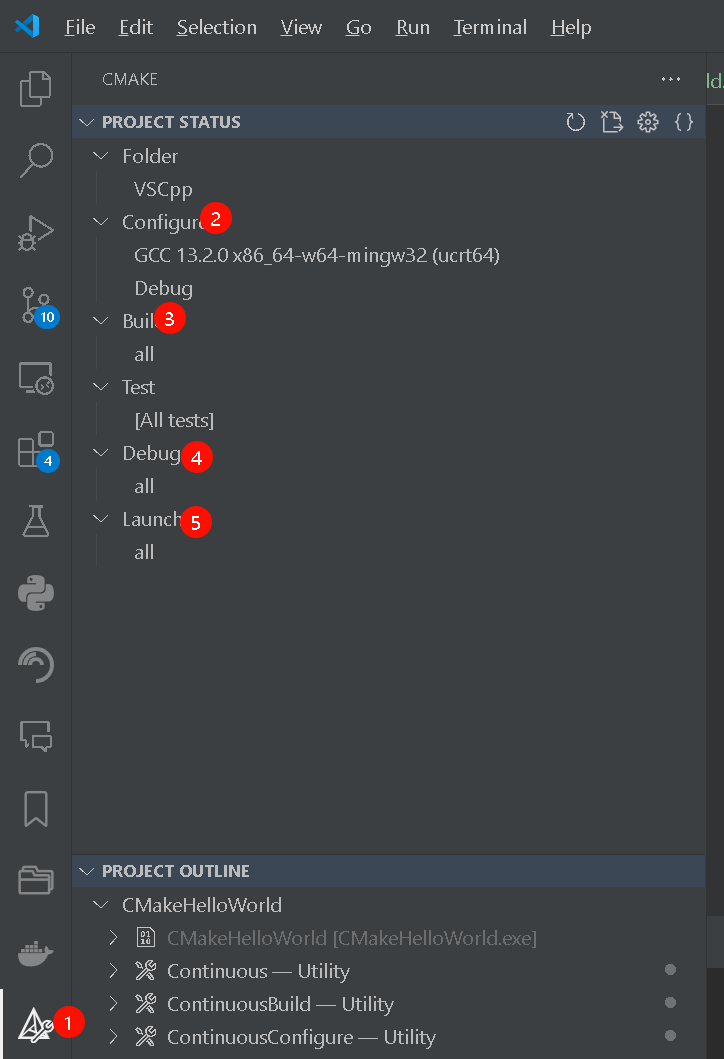 |
也会在 ./vscode/settins.json 目录生成 CMake 相关的配置:
1
2
3
4
{
	"cmake.sourceDirectory": "F:/C++/Workspace/VSCpp/C++/CMake",
	"cmake.cacheInit": null
}
- CMake 的
cmake.sourceDirectory配置变量一般是用于指定单个源代码目录的,也就是包含项目顶层 CMakeLists. Txt 文件的目录。它用于告诉 CMake 从哪个目录开始运行 CMake 脚本。 cmake.sourceDirectory改变后需要删除build/目录重新构建
Build hello world 和 Run
状态栏 build,Debug 和 Run: 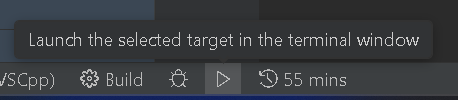
还可以通过 PROJECT OUTLINE:
|  |
配置 CMake 的 gitignore
1
2
3
4
5
6
7
8
9
10
11
12
13
14
15
16
17
18
19
20
21
22
23
24
25
26
27
# Exclude build directory
build/

# Exclude CMake temporary files
CMakeCache.txt
CMakeFiles/
cmake_install.cmake
Makefile
*.make

# Exclude files generated by CTest
CTestTestfile.cmake
Testing/

# Exclude IDE and editor files
.idea/
*.code-workspace
.vscode/
*.sublime-workspace

# Exclude user-specific files
*.user
*.user.*

# Exclude system-specific files
*.suo
*.ncb
Ref
多个源文件配置
VSCode 结合 Cmake 开发编译程序时的步骤:
- 在各个子文件目录下创建
CMakeLists.txt文件 - 首先
Ctrl+Shift+P调出快捷输入窗 - 使用
CMake Config配置后,选择电脑上安装好的编译器进行编译。 - 使用
CMake Build,自动生成外部构建的 build 文件夹。 - 使用
CMake Debug,进行程序代码调试。
目录结构如下: 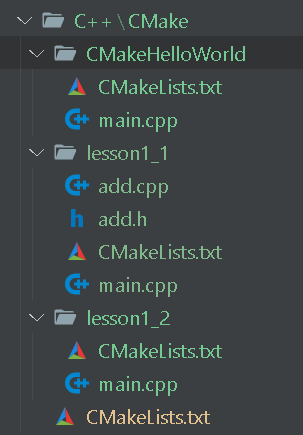
.vscode/settings.json 配置:
1
2
3
4
5
```json
{
	"cmake.sourceDirectory": "F:/C++/Workspace/VSCpp/C++/CMake",
	"cmake.cacheInit": null
}
F:/C++/Workspace/VSCpp/C++/CMake 根目录 CMakeLists.txt 配置:
1
2
3
4
cmake_minimum_required(VERSION 3.5)
add_subdirectory(lesson1_1/)
add_subdirectory(lesson1_2/)
add_subdirectory(CMakeHelloWorld/)
看一个 lesson_1 的配置,其他的都类似:
1
add_executable(lesson1_1_exe "main.cpp" "add.cpp")
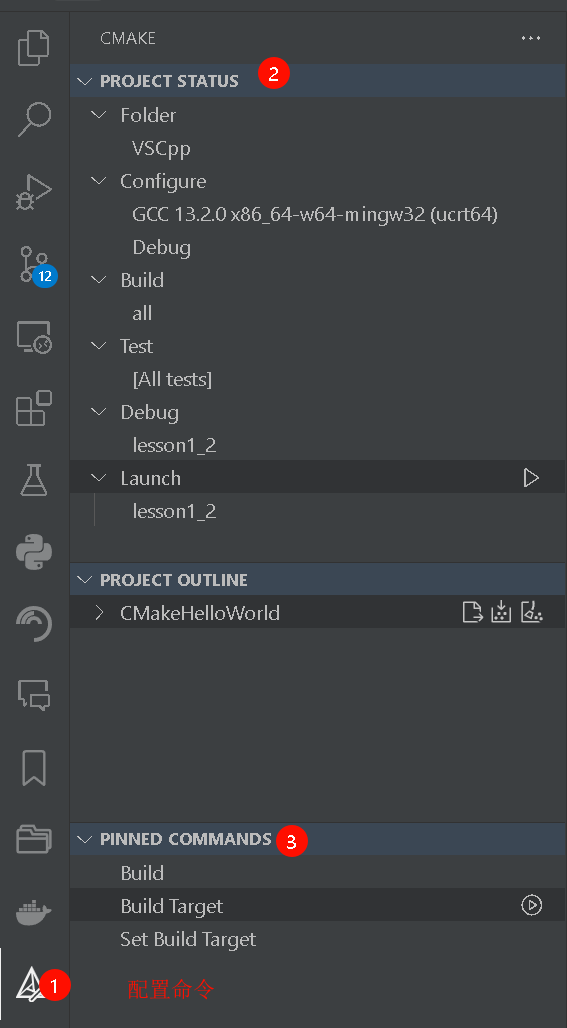
CMake 视图:
|  |
VSCode 底部状态栏快捷的 CMake 命令启动: 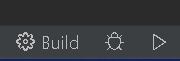
cmake.sourceDirectory 配置支持多平台
在 .vscode/settings.json 中,用 ${workspaceFolder} 就可以配置在各个平台通用了
1
"cmake.sourceDirectory": "${workspaceFolder}/C++/Singleton",