ViewBinding
ViewBinding 入门
集成
视图绑定功能可按模块启用。要在某个模块中启用视图绑定,请将 viewBinding 元素添加到其 build.gradle 文件中,如下例所示:
1
2
3
4
5
6
7
// 需要AGp3.6,否则编译不过
android {
    // ...
    viewBinding {
        enabled = true
    }
}
AGP4.0
1
2
3
4
5
6
7
8
9
10
11
12
13
//    agp4.0及+
android {
    // The default value for each feature is shown below.
    // You can change the value to override the default behavior.
    buildFeatures {
        // Determines whether to support View Binding.
        // Note that the viewBinding.enabled property is now deprecated.
        viewBinding = true
        // Determines whether to support Data Binding.
        // Note that the dataBinding.enabled property is now deprecated.
        dataBinding = true
    }
}
如果您希望在生成绑定类时忽略某个布局文件,请将 tools:viewBindingIgnore="true" 属性添加到相应布局文件的根视图中:
1
2
3
4
5
<LinearLayout
        ...
        tools:viewBindingIgnore="true" >
    ...
</LinearLayout>
视图绑定在 Android Studio 3.6 Canary 11 及更高版本中可用。
使用
基本使用
为某个模块启用视图绑定功能后,系统会为该模块中包含的每个 XML 布局文件各生成一个绑定类。每个绑定类均包含对根视图以及具有 ID 的所有视图的引用。系统会通过以下方式生成绑定类的名称:将 XML 文件的名称转换为驼峰式大小写,并在末尾添加 Binding 一词。
例如,假设某个布局文件名为 result_profile.xml:
1
2
3
4
5
6
<LinearLayout ... >
    <TextView android:id="@+id/name" />
    <ImageView android:cropToPadding="true" />
    <Button android:id="@+id/button"
        android:background="@drawable/rounded_button" />
</LinearLayout>
生成的绑定类将名为 ResultProfileBinding。此类具有两个字段:一个是名为 name 的 TextView,另一个是名为 button 的 Button。该布局中的 ImageView 没有 ID,因此绑定类中不存在对它的引用。
每个绑定类还包含一个 getRoot() 方法,用于为相应布局文件的根视图提供直接引用
1
2
3
4
5
6
7
8
9
10
11
12
13
private lateinit var binding: ResultProfileBinding

    @Override
    fun onCreate(savedInstanceState: Bundle) {
        super.onCreate(savedInstanceState)
        binding = ResultProfileBinding.inflate(layoutInflater)
        setContentView(binding.root)
    }

    // 现在,绑定类的实例可用于引用任何视图:
    binding.name.text = viewModel.name
    binding.button.setOnClickListener { viewModel.userClicked() }
}
布局中直接的控件
在布局中添加一个 id 为 tv_text 的 TextView 后,直接在 Activity 中使用 mBinding.tvText 即可拿到该控件。如下所示,可以看到也是以控件 ID 的驼峰命名法来获取的:
1
mBinding.tvText.setText("是你得不到的ViewBinding");
布局中使用 include
例如我们有个 layout_comment.xml 的布局,布局中有 id 为 tv_include 的 TextView,代码如下:
1
2
3
4
5
6
7
8
9
10
11
12
<?xml version="1.0" encoding="utf-8"?>
<androidx.constraintlayout.widget.ConstraintLayout xmlns:android="http://schemas.android.com/apk/res/android"
    android:layout_width="match_parent"
    android:layout_height="match_parent">

    <TextView
        android:id="@+id/tv_include"
        android:text="这就是测试啊"
        android:layout_width="match_parent"
        android:layout_height="match_parent" />

</androidx.constraintlayout.widget.ConstraintLayout>
然后在 activity_main.xml 文件中 include 该布局:
1
2
3
4
5
6
7
8
9
10
11
12
13
14
15
16
17
18
19
20
21
22
23
<?xml version="1.0" encoding="utf-8"?>
<androidx.constraintlayout.widget.ConstraintLayout xmlns:android="http://schemas.android.com/apk/res/android"
    xmlns:app="http://schemas.android.com/apk/res-auto"
    xmlns:tools="http://schemas.android.com/tools"
    android:layout_width="match_parent"
    android:layout_height="match_parent"
    tools:context=".MainActivity">

    <TextView
        android:id="@+id/tv_text"
        android:layout_width="wrap_content"
        android:layout_height="wrap_content"
        android:text="Hello World!"
        app:layout_constraintBottom_toBottomOf="parent"
        app:layout_constraintLeft_toLeftOf="parent"
        app:layout_constraintRight_toRightOf="parent"
        app:layout_constraintTop_toTopOf="parent" />

    <include
        android:id="@+id/layout_include"
        layout="@layout/layout_comment" />

</androidx.constraintlayout.widget.ConstraintLayout>
那么此时我们如何使用到 layout_comment.xml 布局中的 TextView 控件呢,首先 include 标签需要声明 id,例如 layout_include,然后 Activity 中代码如下:
1
mBinding.layoutInclude.tvInclude.setText("这就是你的不对了");
当你给 layout_comment.xml 的根布局再添加 id(比如添加了 layout_xxx 的 ID)的时候,此时会报错:
java.lang.NullPointerException: Missing required view with ID: layout_xxx
布局中使用 include 和 merge
我们将上文的 layout_comment.xml 稍作修改,根布局使用 merge 标签,其他不做修改:
1
2
3
4
5
6
7
8
9
10
11
12
13
<?xml version="1.0" encoding="utf-8"?>
<merge xmlns:android="http://schemas.android.com/apk/res/android"
    android:layout_width="match_parent"
    android:layout_height="wrap_content">

    <TextView
        android:id="@+id/tv_include"
        android:text="这就是测试啊"
        android:gravity="end"
        android:layout_width="match_parent"
        android:layout_height="match_parent" />

</merge>
引用
1
2
3
4
5
6
7
8
9
10
11
12
13
<?xml version="1.0" encoding="utf-8"?>
<androidx.constraintlayout.widget.ConstraintLayout xmlns:android="http://schemas.android.com/apk/res/android"
    xmlns:app="http://schemas.android.com/apk/res-auto"
    xmlns:tools="http://schemas.android.com/tools"
    android:layout_width="match_parent"
    android:layout_height="match_parent"
    tools:context=".MainActivity">

        <include
            android:id="@+id/layout_include"
            layout="@layout/layout_comment" />

</androidx.constraintlayout.widget.ConstraintLayout>
activity_main.xml 文件中使用 include 添加该布局后,在 java 代码中依旧是可以正常使用以下代码的:
1
mBinding.layoutInclude.tvInclude.setText("会不会出现问题呀");
运行就会报错:
1
java.lang.NullPointerException: Missing required view with ID: layoutInclude
所以对于含有 merge 标签的布局我们可以使用 bind() 方法来绑定到根布局上,在这里,根布局就是 mBinding.getRoot() 了。所以代码如下:
1
2
3
4
5
//这么写不可以
//mBinding.layoutInclude.tvInclude.setText("会不会出现问题呀");

LayoutCommentBinding commentBinding = LayoutCommentBinding.bind(mBinding.getRoot());
commentBinding.tvInclude.setText("这就不会出现问题了吧");
Activity 中使用 ViewBinding
1
2
3
4
5
6
7
8
9
10
11
12
class ViewBindingHelloWorldActivity : AppCompatActivity() {
    lateinit var binding: ActivityViewBindingHelloWorldBinding
    override fun onCreate(savedInstanceState: Bundle?) {
        super.onCreate(savedInstanceState)
        binding = ActivityViewBindingHelloWorldBinding.inflate(layoutInflater)
        setContentView(binding.root)
        binding.name.text = "ViewBinding name"
        binding.button.setOnClickListener {
            toast("ViewBinding button toast")
        }
    }
}
Fragment 中使用 ViewBinding
1
2
3
4
5
6
7
8
9
10
11
12
13
14
15
16
17
18
19
private var _binding: ResultProfileBinding? = null
// This property is only valid between onCreateView and
// onDestroyView.
private val binding get() = _binding!!

override fun onCreateView(
    inflater: LayoutInflater,
    container: ViewGroup?,
    savedInstanceState: Bundle?
): View? {
    _binding = ResultProfileBinding.inflate(inflater, container, false)
    val view = binding.root
    return view
}

override fun onDestroyView() {
    super.onDestroyView()
    _binding = null
}
Note: Fragments outlive their views. Make sure you clean up any references to the binding class instance in the fragment’s onDestroyView() method.
自定义 Dialog 中使用 ViewBinding
dialog 中使用和 Activity 以及 Fragment 一样,直接使用单参数的 inflate() 方法即可
自定义 View 中使用 ViewBinding
使用的布局 xml 文件根标签不为 merge
就是自定义了一个 LinearLayout 然后往其中添加了一个布局,该布局是 view_my_layout.xml 文件,代码如下:
1
2
3
4
5
6
7
8
9
10
11
12
13
<?xml version="1.0" encoding="utf-8"?>
<androidx.constraintlayout.widget.ConstraintLayout xmlns:android="http://schemas.android.com/apk/res/android"
    android:layout_width="match_parent"
    android:layout_height="match_parent">

    <TextView
        android:layout_width="match_parent"
        android:layout_height="match_parent"
        android:gravity="center"
        android:text="这是自定义布局"
        android:textSize="50sp" />

</androidx.constraintlayout.widget.ConstraintLayout>
会生成一个对应的 ViewMyLayoutBinding.java 文件,看下文 MyLinearLayout 代码:
- init1、2、3、4 是使用 inflate 来导入 layout 布局的写法,全部可以正常显示自定义的布局
- init10、11、12 是使用 ViewBinding 的写法,10 无法正常显示视图,11 和 12 是两种不同的写法,道理一样。
1
2
3
4
5
6
7
8
9
10
11
12
13
14
15
16
17
18
19
20
21
22
23
24
25
26
27
28
29
30
31
32
33
34
35
36
37
38
39
40
41
42
43
44
45
46
47
48
49
50
51
public class MyLinearLayout extends LinearLayout {
    public MyLinearLayout(Context context) {
        this(context, null);
    }

    public MyLinearLayout(Context context, @Nullable AttributeSet attrs) {
        this(context, attrs, 0);
    }

    public MyLinearLayout(Context context, @Nullable AttributeSet attrs, int defStyleAttr) {
        super(context, attrs, defStyleAttr);

//        init1();
//        init2();
//        init3();
        init4();
    }

    private void init1() {
        inflate(getContext(), R.layout.view_my_layout, this);
    }

    private void init2() {
        View view = LayoutInflater.from(getContext()).inflate(R.layout.view_my_layout, this);
    }

    //和init2()方法相等
    private void init3() {
        View view = LayoutInflater.from(getContext()).inflate(R.layout.view_my_layout, this, true);
    }

    private void init4() {
        View view = LayoutInflater.from(getContext()).inflate(R.layout.view_my_layout, this, false);
        addView(view);
    }

    //视图异常,布局无法填充满
    private void init10() {
        ViewMyLayoutBinding binding = ViewMyLayoutBinding.inflate(LayoutInflater.from(getContext()));
        addView(binding.getRoot());
    }

    private void init11() {
        ViewMyLayoutBinding binding = ViewMyLayoutBinding.inflate(LayoutInflater.from(getContext()), this, true);
    }

    private void init12() {
        ViewMyLayoutBinding binding = ViewMyLayoutBinding.inflate(LayoutInflater.from(getContext()), this, false);
        addView(binding.getRoot());
    }
}
使用的布局 xml 文件根标签为 merge
我们添加一个 view_my_layout_merge.xml 文件,根标签为 merge:
1
2
3
4
5
6
7
8
9
10
11
<?xml version="1.0" encoding="utf-8"?>
<merge xmlns:android="http://schemas.android.com/apk/res/android"
    android:layout_width="match_parent"
    android:layout_height="match_parent">
    <TextView
        android:layout_width="match_parent"
        android:layout_height="match_parent"
        android:gravity="center"
        android:text="这是自定义merge"
        android:textSize="50sp" />
</merge>
此时在 MyLinearLayout.java 中使用的话,正确写法是 init20() 方法:
1
2
3
4
5
6
7
8
private void init20() {
    ViewMyLayoutMergeBinding binding = ViewMyLayoutMergeBinding.inflate(LayoutInflater.from(getContext()), this);
}

//没有效果,可以理解为还没有rootView
private void init21() {
    ViewMyLayoutMergeBinding binding = ViewMyLayoutMergeBinding.bind(this);
}
我们对比下使用 merge 标签和不使用 merge 标签所对应的 Binding 文件:
- 使用 merge 标签生成的代码大致如下,inflate() 方法最终调用了 bind() 方法:
1
2
3
4
5
6
7
8
9
10
11
12
13
14
15
16
17
@NonNull
public static ViewMyLayoutMergeBinding inflate(@NonNull LayoutInflater inflater,
  @NonNull ViewGroup parent) {
    if (parent == null) {
      throw new NullPointerException("parent");
    }
    inflater.inflate(R.layout.view_my_layout_merge, parent);
    return bind(parent);
}

@NonNull
public static ViewMyLayoutMergeBinding bind(@NonNull View rootView) {
    if (rootView == null) {
      throw new NullPointerException("rootView");
    }
    return new ViewMyLayoutMergeBinding(rootView);
}
- 不使用 merge 标签的 Binding 代码如下,
inflate(LayoutInflater inflater)调用了inflate(LayoutInflater inflater, ViewGroup parent, boolean attachToParent)方法,最终调用了bind(View rootView)方法:
1
2
3
4
5
6
7
8
9
10
11
12
13
14
15
16
17
18
19
20
21
22
  @NonNull
public static ViewMyLayoutBinding inflate(@NonNull LayoutInflater inflater) {
    return inflate(inflater, null, false);
}

@NonNull
public static ViewMyLayoutBinding inflate(@NonNull LayoutInflater inflater,
  @Nullable ViewGroup parent, boolean attachToParent) {
    View root = inflater.inflate(R.layout.view_my_layout, parent, false);
    if (attachToParent) {
      parent.addView(root);
    }
    return bind(root);
}

@NonNull
public static ViewMyLayoutBinding bind(@NonNull View rootView) {
    if (rootView == null) {
      throw new NullPointerException("rootView");
    }
    return new ViewMyLayoutBinding((ConstraintLayout) rootView);
}
ViewStub 和 ViewBinding
见 [[ViewStub#ViewStub 和 ViewBinding]]
- 布局
1
2
3
4
5
6
7
8
9
10
11
12
13
14
15
16
17
18
19
20
<FrameLayout
	android:layout_width="match_parent"
	android:layout_height="match_parent">

	<androidx.recyclerview.widget.RecyclerView
		android:id="@+id/recycler_view"
		android:layout_width="match_parent"
		android:layout_height="match_parent" />

	<ViewStub
		android:id="@+id/cartSurpriseCouponLayoutViewStub"
		android:layout_width="wrap_content"
		android:layout_height="wrap_content"
		android:layout_gravity="bottom|end"
		android:layout_marginBottom="165dp"
		android:inflatedId="@+id/tipMsgLayout"
		android:layout="@layout/shopping_bag_surprise_coupon"
		tools:visibility="visible" />

</FrameLayout>
- 自定义 View
1
2
3
4
5
6
7
class CartSurpriseCouponView @JvmOverloads constructor(
    context: Context, attrs: AttributeSet? = null
) : LinearLayout(context, attrs), View.OnClickListener {

    private val mBinding =
        ShoppingBagSurpriseCouponBinding.inflate(LayoutInflater.from(context), this) // 使用merge,只有2个构造函数
}
- shopping_bag_surprise_coupon.xml
1
2
3
4
5
6
7
8
9
10
<?xml version="1.0" encoding="utf-8"?>
<merge xmlns:android="http://schemas.android.com/apk/res/android"
    xmlns:app="http://schemas.android.com/apk/res-auto"
    xmlns:tools="http://schemas.android.com/tools"
    android:id="@+id/root_surprise_coupon"
    android:layout_width="wrap_content"
    android:layout_height="wrap_content"
    android:orientation="vertical"
    tools:background="@color/yellow_300">
</mrege>
报错
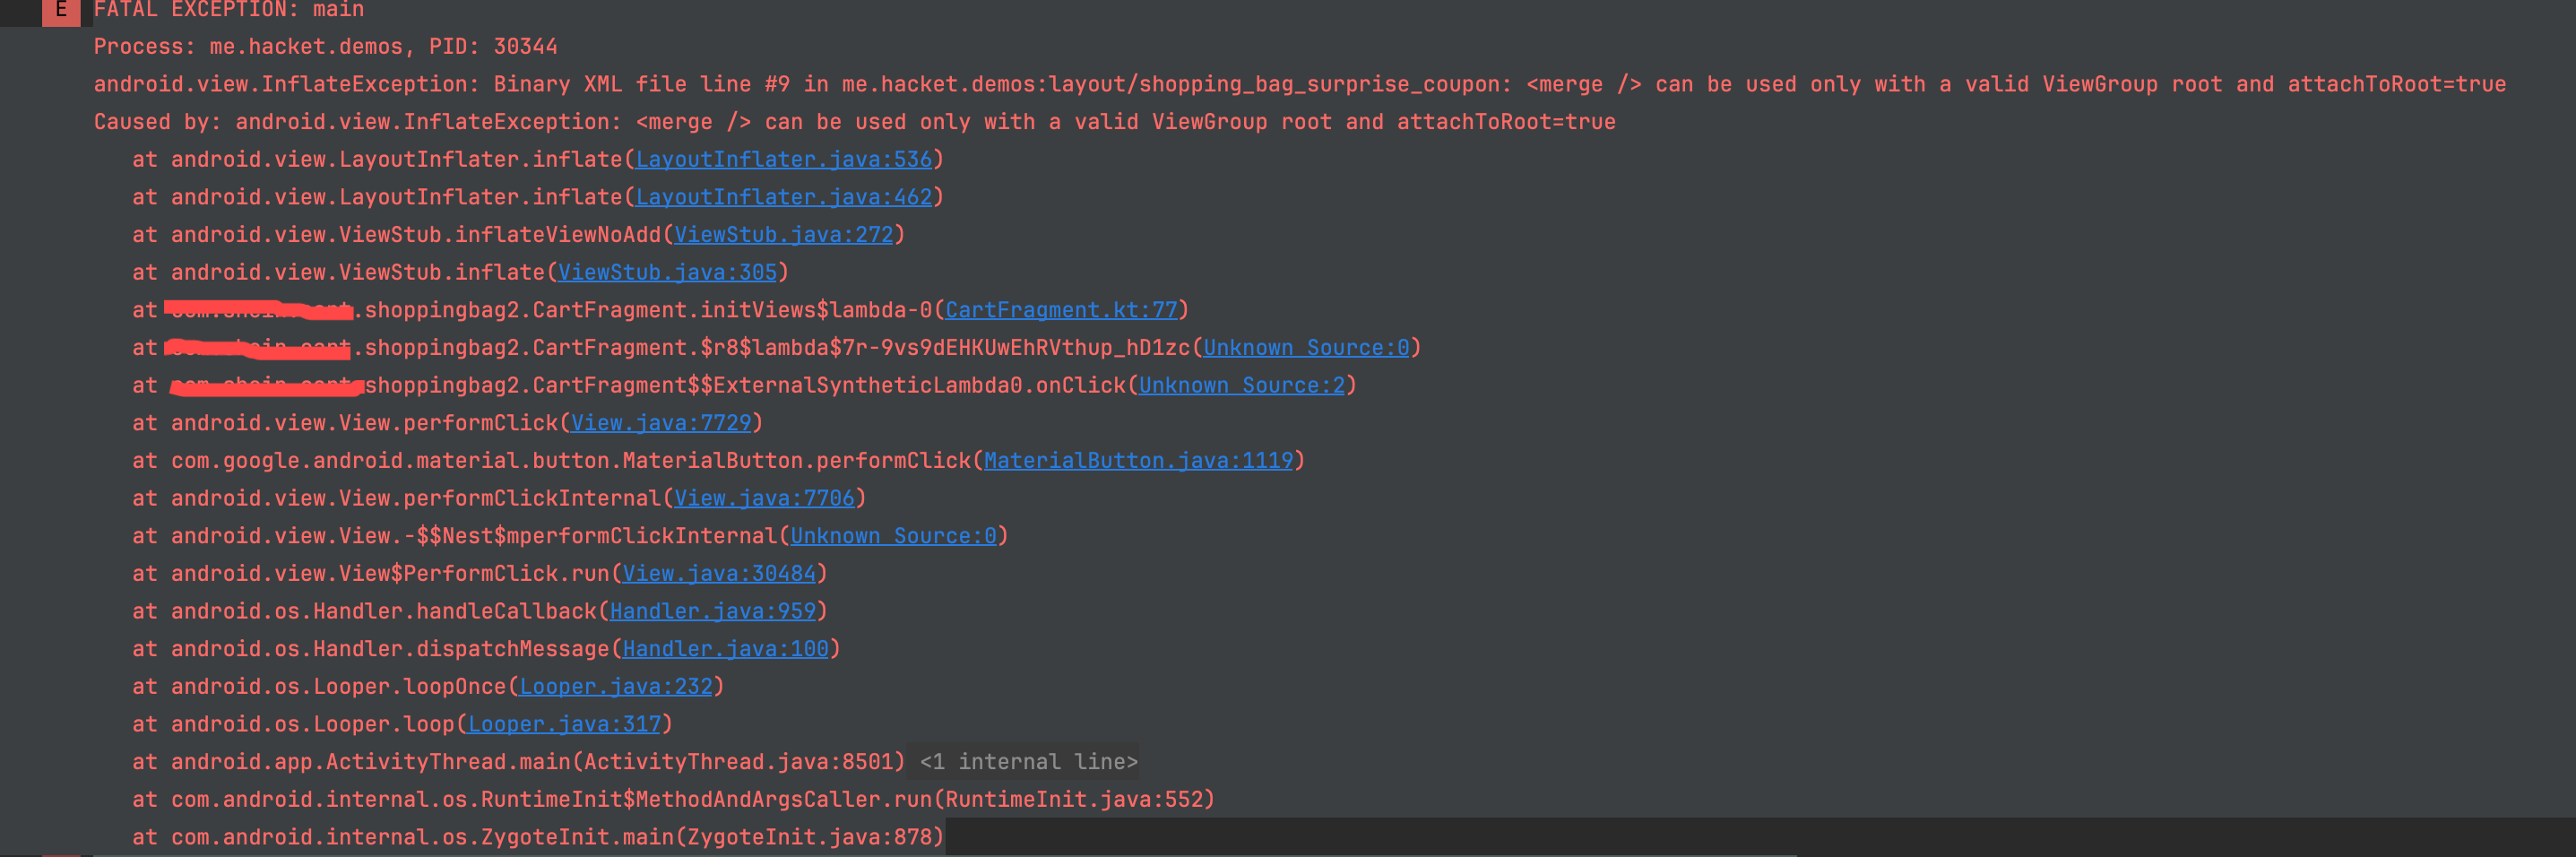
解决,在 ViewStub 中,不使用 merge 标签
进阶使用
lint all layouts are marked as UnusedResources
lint.xml 中配置
1
2
3
4
5
6
<?xml version="1.0" encoding="UTF-8"?>
<lint>
    <issue id="RestrictedApi" severity="error">
        <ignore path="build" />
    </issue>
</lint>
封装 ViewBinding
反射(BaseViewBindingActivity、BaseViewBindingFragment)
封装 BaseActivity(多层继承也支持)
VB 需要防混淆
1
2
3
4
5
6
7
8
9
10
11
12
13
14
15
16
17
18
19
20
21
22
23
24
25
26
27
28
29
30
31
32
33
34
35
abstract class BaseViewBindingActivity<VB : ViewBinding> : AppCompatActivity() {

    private lateinit var binding: VB

    override fun onCreate(savedInstanceState: Bundle?) {
        super.onCreate(savedInstanceState)
        setContentView(initBinding().root)
        init(binding)
    }

    private fun initBinding(): VB {
        // 利用反射,调用指定ViewBinding中的inflate方法填充视图
        var type: Type? = javaClass.genericSuperclass
        while (type != null && type !is ParameterizedType) {
            type = (type as? Class<*>)?.genericSuperclass
        }
        if (type is ParameterizedType) {
            val clazz = type.actualTypeArguments[0] as Class<*>
            val method = clazz.getMethod("inflate", LayoutInflater::class.java)
            @Suppress("UNCHECKED_CAST")
            binding = method.invoke(null, layoutInflater) as VB
            return binding
        }
        throw IllegalAccessException("VB实例化失败,请检查VB参数")
    }

    fun getBinding(): VB {
        if (::binding.isInitialized.not()) {
            binding = initBinding()
        }
        return binding
    }

    abstract fun init(binding: VB)
}
混淆规则:
1
2
3
4
5
6
# 防止反射方法被混淆
-keepclassmembers class * implements androidx.viewbinding.ViewBinding {
  public static * inflate(android.view.LayoutInflater);
  public static * inflate(android.view.LayoutInflater, android.view.ViewGroup, boolean);
  public static * bind(android.view.View);
}
封装 BaseFragment(多层继承也支持)
VB 需要防混淆
1
2
3
4
5
6
7
8
9
10
11
12
13
14
15
16
17
18
19
20
21
22
23
24
25
26
27
abstract class BaseViewBindingFragment<VB : ViewBinding> : Fragment() {
    private var _binding: VB? = null
    override fun onCreateView(inflater: LayoutInflater, container: ViewGroup?, savedInstanceState: Bundle?): View? {
        //利用反射,调用指定ViewBinding中的inflate方法填充视图
        while (type != null && type !is ParameterizedType) {
            type = (type as? Class<*>)?.genericSuperclass
        }
        val clazz = (type as ParameterizedType).actualTypeArguments[0] as Class<*>
        val method = clazz.getMethod("inflate", LayoutInflater::class.java, ViewGroup::class.java, Boolean::class.java)
        @Suppress("UNCHECKED_CAST")
        _binding = method.invoke(null, layoutInflater, container, false) as VB
        return _binding!!.root
    }
    override fun onViewCreated(view: View, savedInstanceState: Bundle?) {
        super.onViewCreated(view, savedInstanceState)
        init(getBinding())
    }
    fun getBinding(): VB {
        if (_binding == null) throw NullPointerException("getBinding() must call between onCreateView and onDestroyView")
        return _binding!!
    }
    override fun onDestroyView() {
        _binding = null
        super.onDestroyView()
    }
    abstract fun init(binding: VB)
}
- 混淆规则:
1
2
3
4
5
6
# 防止反射方法被混淆
-keepclassmembers class * implements androidx.viewbinding.ViewBinding {
  public static * inflate(android.view.LayoutInflater);
  public static * inflate(android.view.LayoutInflater, android.view.ViewGroup, boolean);
  public static * bind(android.view.View);
}
remix 方式 (非反射封装 Activity 和 Fragment)
1
2
3
4
5
6
7
8
9
10
11
12
13
14
15
16
17
18
19
20
21
22
23
24
25
26
27
28
29
30
31
32
33
34
35
36
37
38
39
40
41
42
43
44
45
46
47
48
49
50
51
52
53
54
55
56
57
58
59
60
61
62
63
64
65
66
67
68
69
70
71
72
73
74
75
76
abstract class BaseViewBindingActivityRemix<VB : ViewBinding> : BaseActivity() {

    private var _binding: ViewBinding? = null
    protected val binding: VB
        @Suppress("UNCHECKED_CAST")
        get() = _binding as VB

    abstract val bindingInflater: (LayoutInflater) -> VB

    override fun getLayoutResId(): Int {
        // hook
        _binding = bindingInflater.invoke(layoutInflater)
        setContentView(binding.root)
        return 0
    }

    override fun setContentView(layoutResID: Int) {
        // do nothing
    }

    override fun onCleared() {
        super.onCleared()
        _binding = null
    }
}

abstract class BaseViewBindingFragmentRemix<VB : ViewBinding> : BaseFragment() {

    private var _binding: ViewBinding? = null
    protected val binding: VB
        @Suppress("UNCHECKED_CAST")
        get() = _binding as VB

    abstract val bindingInflater: (LayoutInflater, ViewGroup?, Boolean) -> VB

    override fun onCreateView(
        inflater: LayoutInflater,
        container: ViewGroup?,
        savedInstanceState: Bundle?,
    ): View? {
        _binding = bindingInflater.invoke(inflater, container, false)
        return binding.root
    }

    override fun onDestroyView() {
        super.onDestroyView()
        _binding = null
    }
}

abstract class BaseViewBindingDialogFragment<VB : ViewBinding> : BaseDialogFragment() {

    private var _binding: ViewBinding? = null
    protected val binding: VB
        @Suppress("UNCHECKED_CAST")
        get() = _binding as VB

    abstract val bindingInflater: (LayoutInflater, ViewGroup?, Boolean) -> VB

    override fun onCreateView(
        inflater: LayoutInflater,
        container: ViewGroup?,
        savedInstanceState: Bundle?
    ): View? {
        _binding = bindingInflater.invoke(inflater, container, false)
        mRootView = binding.root
        return mRootView
    }

    final override fun getLayoutId() = 0

    override fun onDestroyView() {
        super.onDestroyView()
        _binding = null
    }
}
使用:
1
2
3
4
5
6
7
8
9
10
class OvoSettingsActivity : BaseViewBindingActivity<ActivityOvoSettingsBinding>() {

    override val bindingInflater: (LayoutInflater) -> ActivityOvoSettingsBinding
        get() = ActivityOvoSettingsBinding::inflate
}

class OvoFragment : BaseViewBindingFragment<FragmentOvoBinding>() {
    override val bindingInflater: (LayoutInflater, ViewGroup?, Boolean) -> FragmentOvoBinding
        get() = FragmentOvoBinding::inflate
}
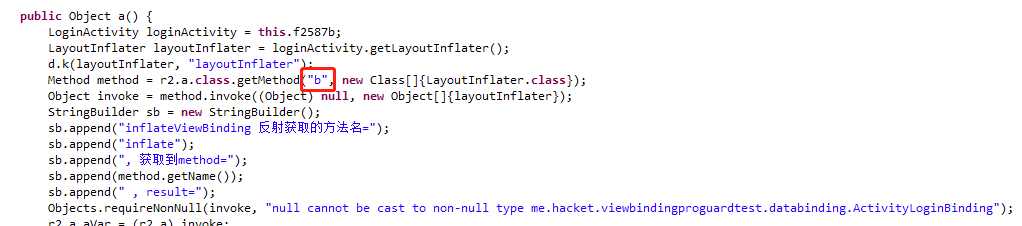
委托属性封装 ViewBinding(反射)
这几种方式,不添加 keep 规则,release 混淆后也可以跑,method 方法名 inflate 直接替换成为混淆后的 b 了
1
2
3
4
5
6
7
8
9
10
11
12
13
14
15
16
17
18
19
20
21
22
23
24
25
26
27
28
29
30
31
32
33
34
35
36
37
38
39
40
41
42
43
44
45
46
47
48
49
50
51
52
53
54
55
56
57
58
59
60
61
62
63
64
65
66
67
68
69
70
71
72
73
74
75
76
/**
 * 获取viewBinding inflate(LayoutInflater)1个参数的方法;未添加keep也可以找到
 */
fun getInflateMethod(viewBindingClass: Class<*>): Method? {
//    避免反射使用导致未keep导致NoSuchMethodError,T::class.java.getMethod("inflate", LayoutInflater::class.java).invoke(null, layoutInflater) as T
    return getInflateMethod(viewBindingClass, 1)
}

/**
 * 获取viewBinding inflate(LayoutInflater,xxx,xxx)方法
 */
fun getInflateMethod(viewBindingClass: Class<*>, parameterSize: Int): Method? {
    val declaredMethods = viewBindingClass.declaredMethods
    declaredMethods.forEach {
        val parameterTypes = it.parameterTypes
        if (parameterTypes.size == parameterSize && parameterTypes[0] == LayoutInflater::class.java) {
            return it
        }
    }
    return null
}
/**
 * 获取viewBinding bind(View)方法
 */
fun getBindMethod(viewBindingClass: Class<*>): Method? {
    val declaredMethods = viewBindingClass.declaredMethods
    declaredMethods.forEach {
        val parameterTypes = it.parameterTypes
        if (parameterTypes.size == 1 && parameterTypes[0] == View::class.java) {
            return it
        }
    }
    return null
}

// region 反射方式
/**
 * 需要keep T的inflate方法
 */
inline fun <reified T : ViewBinding> inflateViewBinding(layoutInflater: LayoutInflater) =
    getInflateMethod(T::class.java)!!.invoke(null, layoutInflater) as T

/**
 * XXXBinding.inflate(LayoutInflater)
 */
inline fun <reified T : ViewBinding> Activity.inflate() = lazy {
    inflateViewBinding<T>(layoutInflater).apply { setContentView(root) }
}

/**
 * XXXBinding.bind(View)方法
 */
inline fun <reified T : ViewBinding> Fragment.inflate() = FragmentViewBindingDelegate(T::class.java)

class FragmentViewBindingDelegate<T : ViewBinding>(private val viewBindingClass: Class<T>) :
    ReadOnlyProperty<Fragment, T> {
    private var binding: T? = null

    @Suppress("UNCHECKED_CAST")
    override fun getValue(thisRef: Fragment, property: KProperty<*>): T {
        if (binding == null) {
            binding = getBindMethod(viewBindingClass)!!.invoke(null, thisRef.requireView()) as T
            thisRef.viewLifecycleOwner.lifecycle.addObserver(object : DefaultLifecycleObserver {
                override fun onDestroy(owner: LifecycleOwner) {
                    binding = null
                }
            })
        }
        return binding!!
    }
}

inline fun <reified T : ViewBinding> Dialog.inflate() = lazy {
    inflateViewBinding<T>(layoutInflater).apply { setContentView(root) }
}
// endregion
委托属性封装 ViewBinding(非反射)
1
2
3
4
5
6
7
8
9
10
11
12
13
14
15
16
17
18
19
20
21
22
23
24
25
26
27
28
29
30
31
32
33
34
35
36
37
38
39
40
/** Activity binding delegate, may be used since onCreate up to onDestroy (inclusive) */
inline fun <T : ViewBinding> AppCompatActivity.viewBinding(
    crossinline factory: (LayoutInflater) -> T
) =
    lazy(LazyThreadSafetyMode.NONE) {
        factory(layoutInflater)
    }

/** Fragment binding delegate, may be used since onViewCreated up to onDestroyView (inclusive) */
fun <T : ViewBinding> Fragment.viewBinding(factory: (View) -> T): ReadOnlyProperty<Fragment, T> =
    object : ReadOnlyProperty<Fragment, T>, DefaultLifecycleObserver {
        private var binding: T? = null

        override fun getValue(thisRef: Fragment, property: KProperty<*>): T =
            binding ?: factory(requireView()).also {
                // if binding is accessed after Lifecycle is DESTROYED, create new instance, but don't cache it
                if (viewLifecycleOwner.lifecycle.currentState.isAtLeast(Lifecycle.State.INITIALIZED)) {
                    viewLifecycleOwner.lifecycle.addObserver(this)
                    binding = it
                }
            }

        override fun onDestroy(owner: LifecycleOwner) {
            binding = null
        }
    }

/** Binding delegate for DialogFragments implementing onCreateDialog (like Activities, they don't
 *  have a separate view lifecycle), may be used since onCreateDialog up to onDestroy (inclusive) */
inline fun <T : ViewBinding> DialogFragment.viewBinding(crossinline factory: (LayoutInflater) -> T) =
    lazy(LazyThreadSafetyMode.NONE) {
        factory(layoutInflater)
    }

/** Not really a delegate, just a small helper for RecyclerView.ViewHolders */
inline fun <T : ViewBinding> ViewGroup.viewBinding(
    factory: (LayoutInflater, ViewGroup, Boolean) -> T
) =
    factory(LayoutInflater.from(context), this, false)
// endregion
- 委托属性封装 ViewBinding
https://github.com/kirich1409/ViewBindingPropertyDelegate
https://github.com/DylanCaiCoding/ViewBindingKTX
关闭 ViewBinding
- 单个布局文件
tools:viewBindingIgnore="true" - 按需开启 ViewBinding 而不是 ignore 单个文件
在 buildSrc 覆盖 AGP 的默认处理
Android 如何按需开启 ViewBinding而不是ignore单个文件?
区别
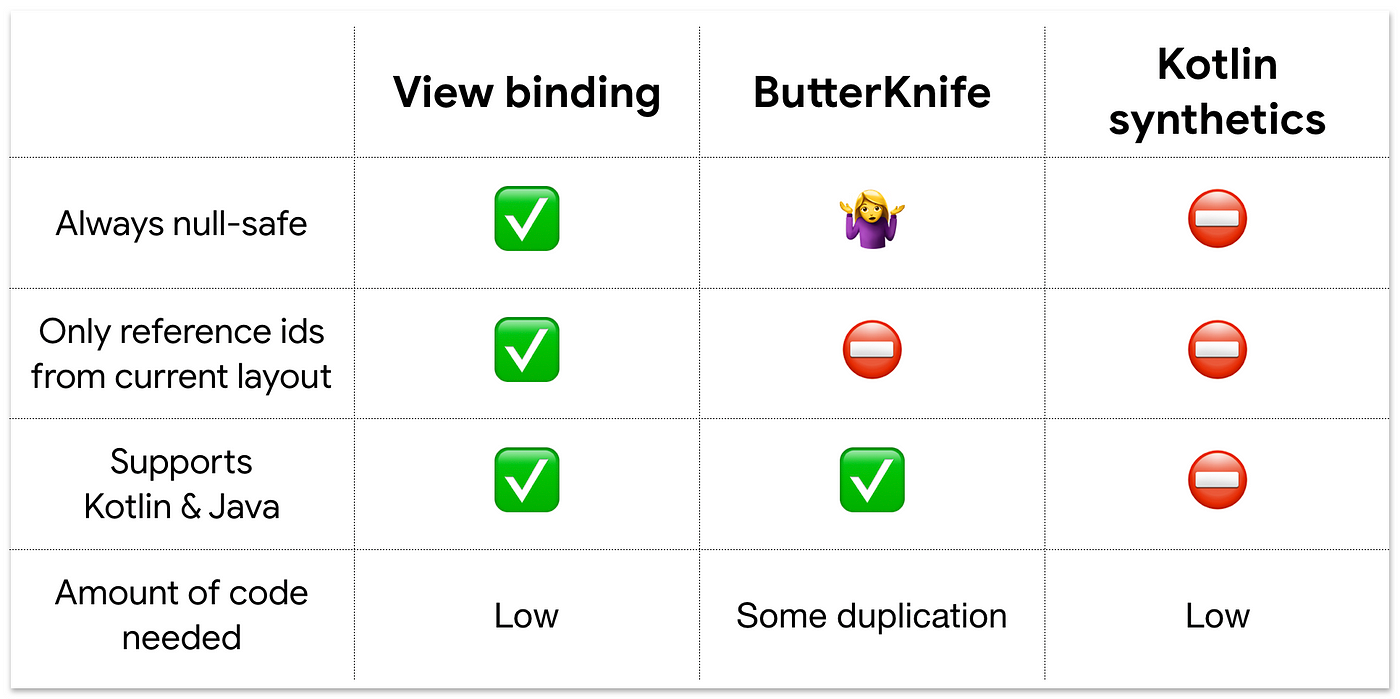
ViewBinding 相较 ButterKnife、Kotlin Android Extensions 的几点优势
Null safety
findViewById, ButterKnife 与 Kotlin Android Extensions 均存在 Null 不安全问题。这个什么意思呢?就是在我们访问那个 View 的时候它不存在。为什么会出现这种情况呢?例如不小心使用了错误的 Id,或者访问的时候那个 view 还不存在。
使用了错误 Id 这个估计大家都有此类经历,但是访问时候那个 view 不存在怎么理解呢?例如我们在手机横屏和竖屏的时候分别使用一套 XML layout 文件,假设横屏中包含了一个竖屏中没有的 view,那么在屏幕从横屏旋转到竖屏的时候,NullPointer 问题就出现了。
而 ViewBinding 中, 产生的 binding 类中的属性是依据 XML layout 文件生成的,所以 Id 不会错。而且其将仅存在某一个配置下的 layout 文件的那些 view 对应的字段标记为@Nullable,而且,生成类中还会很贴心的给你加上详细的注释。这一切都是为了提醒程序员,注意对这个 view 特别处理,它在某些情况下为 Null。
Type safety
findViewById, ButterKnife 均存在类型转换问题,例如不小心将一个 TextView 错误的赋值给一个 Button 变量,都会报错,这一错误很容易出现,关键在错误还出现在运行时,而不是编译时!
而 ViewBinding 中,产生的 binding 类中的属性是依据 XML layout 文件生成的,所以类型不会错,生成的时候已经处理好了。
简洁优雅
将绑定 view 的模板代码自动生成到了其他类中,使 controlor 类(Activity,Fragment)更加清晰了。
与 DataBinding 数据绑定库的区别
视图绑定和数据绑定库均会生成可用于直接引用视图的绑定类。不过,这两者之间存在明显差异:
- 数据绑定库仅处理使用
<layout>代码创建的数据绑定布局。 - 视图绑定不支持布局变量或布局表达式,因此它不能用于在 XML 中将布局与数据绑定。
Ref
- Use view binding to replace findViewById https://medium.com/androiddevelopers/use-view-binding-to-replace-findviewbyid-c83942471fc
- Android View Binding https://androidadepth.blogspot.com/2020/03/android-view-binding.html
ViewBinding 原理
ViewBinding 生成规则
在布局文件后加 Binding,如 activity_view_binding_hello_world.xml,生成的类为 ActivityViewBindingHelloWorldBinding
1
2
3
4
5
6
7
8
9
10
11
12
13
14
15
16
17
18
19
20
<?xml version="1.0" encoding="utf-8"?>
<LinearLayout xmlns:android="http://schemas.android.com/apk/res/android"
    xmlns:tools="http://schemas.android.com/tools"
    android:layout_width="match_parent"
    android:layout_height="match_parent"
    android:orientation="vertical"
    tools:viewBindingIgnore="false"
    tools:context=".samples.google.architecture.viewbinding.helloworld.ViewBindingHelloWorldActivity">
    <TextView
        android:id="@+id/name"
        android:layout_width="match_parent"
        android:layout_height="wrap_content"
        android:text="ViewBinding TextView" />
    <Button
        android:id="@+id/button"
        android:layout_width="match_parent"
        android:layout_height="wrap_content"
        android:background="@drawable/selector_btn_bg"
        android:text="ViewBinding Button" />
</LinearLayout>
ViewBinding 生成路径
生成的路径 /build/generated/data_binding_base_class_source_out/ActivityViewBindingHelloWorldBinding.java:
1
2
3
4
5
6
7
8
9
10
11
12
13
14
15
16
17
18
19
20
21
22
23
24
25
26
27
28
29
30
31
32
33
34
35
36
37
38
39
40
41
42
43
44
45
46
47
48
49
50
51
52
53
54
55
56
57
58
59
60
61
62
public final class ActivityViewBindingHelloWorldBinding implements ViewBinding {
  @NonNull
  private final LinearLayout rootView;

  @NonNull
  public final Button button;

  @NonNull
  public final TextView name;

  private ActivityViewBindingHelloWorldBinding(@NonNull LinearLayout rootView,
      @NonNull Button button, @NonNull TextView name) {
    this.rootView = rootView;
    this.button = button;
    this.name = name;
  }

  @Override
  @NonNull
  public LinearLayout getRoot() {
    return rootView;
  }

  @NonNull
  public static ActivityViewBindingHelloWorldBinding inflate(@NonNull LayoutInflater inflater) {
    return inflate(inflater, null, false);
  }

  @NonNull
  public static ActivityViewBindingHelloWorldBinding inflate(@NonNull LayoutInflater inflater,
      @Nullable ViewGroup parent, boolean attachToParent) {
    View root = inflater.inflate(R.layout.activity_view_binding_hello_world, parent, false);
    if (attachToParent) {
      parent.addView(root);
    }
    return bind(root);
  }

  @NonNull
  public static ActivityViewBindingHelloWorldBinding bind(@NonNull View rootView) {
    // The body of this method is generated in a way you would not otherwise write.
    // This is done to optimize the compiled bytecode for size and performance.
    int id;
    missingId: {
      id = R.id.button;
      Button button = rootView.findViewById(id);
      if (button == null) {
        break missingId;
      }

      id = R.id.name;
      TextView name = rootView.findViewById(id);
      if (name == null) {
        break missingId;
      }

      return new ActivityViewBindingHelloWorldBinding((LinearLayout) rootView, button, name);
    }
    String missingId = rootView.getResources().getResourceName(id);
    throw new NullPointerException("Missing required view with ID: ".concat(missingId));
  }
}