View杂项
AttachInfo
AttachInfo 是什么?
当 View attach 到 window 时,给 view 的一些信息,都封装在 AttachInfo;这个信息是用来在窗口处理中用的,Android 的窗口系统就是用过 AttachInfo 来判断 View 的所属窗口的
View.AttachInfo 里面的信息,就是 View 和 Window 之间的信息。每一个被添加到窗口上的 View 我们都会看到有一个 AttachInfo;同一个 ViewRootImpl 下的 View 的 AttachInfo 都是同一个实例,在 ViewRootImpl 会进行分发,在 measure/layout 前
AttachInfo 源码
1
2
3
4
5
6
7
8
9
10
11
12
13
14
15
16
17
18
19
20
21
22
23
24
25
26
27
28
29
30
31
32
33
34
35
36
37
38
39
40
41
42
43
44
45
46
47
48
49
50
51
52
53
54
55
56
// View.AttachInfo Android29
/**
 * A set of information given to a view when it is attached to its parent
 * window.
 */
final static class AttachInfo {
    interface Callbacks {
        void playSoundEffect(int effectId);
        boolean performHapticFeedback(int effectId, boolean always);
    }
    final IWindowSession mSession;

    final IWindow mWindow;

    final IBinder mWindowToken;

    Display mDisplay;

    final Callbacks mRootCallbacks;

    /**
     * The top view of the hierarchy.
     */
    View mRootView;

    boolean mHardwareAccelerated;
    boolean mHardwareAccelerationRequested;
    ThreadedRenderer mThreadedRenderer;
    List<RenderNode> mPendingAnimatingRenderNodes;

    final ViewTreeObserver mTreeObserver;

    Canvas mCanvas;

    /**
     * The view root impl.
     */
    final ViewRootImpl mViewRootImpl;

    final Handler mHandler;

    final Matrix mTmpMatrix = new Matrix();
    // ...
    AttachInfo(IWindowSession session, IWindow window, Display display,
            ViewRootImpl viewRootImpl, Handler handler, Callbacks effectPlayer,
            Context context) {
        mSession = session;
        mWindow = window;
        mWindowToken = window.asBinder();
        mDisplay = display;
        mViewRootImpl = viewRootImpl;
        mHandler = handler;
        mRootCallbacks = effectPlayer;
        mTreeObserver = new ViewTreeObserver(context);
    }
}
AttachInfo 成员变量
- mRootCallbacks AttachInfo.Callback
- mRootView View 树最顶层的 View,一般是 DecorView
- mHardwareAccelerated 是否开启硬件加速
- mHandler ViewRootHandler
- mViewRootImpl ViewRootImpl
- ThreadedRenderer mThreadedRenderer;
ThreadedRenderer mThreadedRenderer
硬件加速的 render thread,在 ViewRootImpl#enableHardwareAcceleration 创建
1
2
3
4
5
6
7
private void enableHardwareAcceleration(WindowManager.LayoutParams attrs) {
    if (hardwareAccelerated) {
        mAttachInfo.mThreadedRenderer = ThreadedRenderer.create(mContext, translucent, attrs.getTitle().toString());
        // ...
    }
    // ...
}
CallBack
- void playSoundEffect(int effectId) 这个用于播放按键声音,参数是这个点击事件的类型;如果想改成不同的声音,在自定义的 View 上,重写 View#playSoundEffect 方法
- boolean performHapticFeedback(int effectId, boolean always) 触感反馈,需要用户在系统打开触感反馈选项,参数可以看 HapticFeedbackConstants 这个类
把参数
HapticFeedbackConstants.FLAG_IGNORE_GLOBAL_SETTING就可以忽略全局设置;参数HapticFeedbackConstants.FLAG_IGNORE_VIEW_SETTING就可以忽略我们在 View 里面设置的android:hapticFeedbackEnabled
InvalidateInfo
InvalidateInfo 用于刷新 UI,当我们刷新 UI 的时候,会生成一个新的 InvalidateInfo 对象,然后根据这个来刷新 UI
AttachInfo 何时创建?
在 ViewRootImpl 创建时,就创建了
1
2
3
4
5
6
7
8
9
10
11
12
13
14
// ViewRootImpl Android29
public class ViewRootImpl {
    final IWindowSession mWindowSession;
    final W mWindow;
    final ViewRootHandler mHandler = new ViewRootHandler();

    final View.AttachInfo mAttachInfo;
    public ViewRootImpl(Context context, Display display) {
        mWindowSession = WindowManagerGlobal.getWindowSession();
        mWindow = new W(this);
        mAttachInfo = new View.AttachInfo(mWindowSession, mWindow, display, this, mHandler, this,
                    context);
    }
}
何时分发给 view?
在第一次 ViewRootImpl#performTraversals 时,分发给 view
1
2
3
4
5
6
7
8
9
10
11
// ViewRootImpl Android29
public class ViewRootImpl {
    private void performTraversals() {
        final View host = mView;
        if (mFirst) {
            host.dispatchAttachedToWindow(mAttachInfo, 0);
            mAttachInfo.mTreeObserver.dispatchOnWindowAttachedChange(true);
            dispatchApplyInsets(host);
        }
    }
}
这里的 mView 是 DecorView,DecorView 是个 FrameLayout,最终走的是 ViewGroup 的 dispatchAttachedToWindow
1
2
3
4
5
6
7
8
9
10
11
12
13
14
15
16
17
18
19
20
// ViewGroup Android29
void dispatchAttachedToWindow(AttachInfo info, int visibility) {
    mGroupFlags |= FLAG_PREVENT_DISPATCH_ATTACHED_TO_WINDOW;
    super.dispatchAttachedToWindow(info, visibility);
    mGroupFlags &= ~FLAG_PREVENT_DISPATCH_ATTACHED_TO_WINDOW;

    final int count = mChildrenCount;
    final View[] children = mChildren;
    for (int i = 0; i < count; i++) {
        final View child = children[i];
        child.dispatchAttachedToWindow(info,
                combineVisibility(visibility, child.getVisibility()));
    }
    final int transientCount = mTransientIndices == null ? 0 : mTransientIndices.size();
    for (int i = 0; i < transientCount; ++i) {
        View view = mTransientViews.get(i);
        view.dispatchAttachedToWindow(info,
                combineVisibility(visibility, view.getVisibility()));
    }
}
在 ViewGroup#dispatchAttachedToWindow,先调用的 View#dispatchAttachedToWindow,然后遍历所有子 view#dispatchAttachedToWindow,现在我们看看看 View#dispatchAttachedToWindow:
1
2
3
4
5
6
7
8
9
// ViewGroup Android29
void dispatchAttachedToWindow(AttachInfo info, int visibility) {
    mAttachInfo = info; // 保存AttachInfo
    mWindowAttachCount++;
    // ...
    onAttachedToWindow();
    // ...
    onVisibilityChanged(this, visibility);
}
View#dispatchAttachedToWindow,保存 AttachInfo;view 依赖 window 的数量加 1;调用 onAttachedToWindow;调用 onVisibilityChanged
AttachInfo 赋值
- mRootView 赋值,在 ViewRootImpl#setView,实际调用是 WindowManagerGlobal#addView
1
2
3
4
5
6
7
// ViewRootImpl Android29
public void setView(View view, WindowManager.LayoutParams attrs, View panelParentView) {
    if (mView == null) {
       mView = view;
       mAttachInfo.mRootView = view;
    }
}
- 硬件加速
1
2
3
4
5
6
7
8
9
10
11
12
13
14
15
16
17
18
19
20
21
22
23
24
25
26
27
28
29
30
31
32
33
34
35
36
37
38
39
40
41
42
43
// ViewRootImpl Android29
private void enableHardwareAcceleration(WindowManager.LayoutParams attrs) {
    mAttachInfo.mHardwareAccelerated = false;
    mAttachInfo.mHardwareAccelerationRequested = false;
    // Don't enable hardware acceleration when the application is in compatibility mode
    if (mTranslator != null) return;

    final boolean hardwareAccelerated = (attrs.flags & WindowManager.LayoutParams.FLAG_HARDWARE_ACCELERATED) != 0;
    if (hardwareAccelerated) {
        if (!ThreadedRenderer.isAvailable()) {
            return;
        }
        final boolean fakeHwAccelerated = (attrs.privateFlags &
                WindowManager.LayoutParams.PRIVATE_FLAG_FAKE_HARDWARE_ACCELERATED) != 0;
        final boolean forceHwAccelerated = (attrs.privateFlags &
                WindowManager.LayoutParams.PRIVATE_FLAG_FORCE_HARDWARE_ACCELERATED) != 0;
        if (fakeHwAccelerated) {
            mAttachInfo.mHardwareAccelerationRequested = true;
        } else if (!ThreadedRenderer.sRendererDisabled
                || (ThreadedRenderer.sSystemRendererDisabled && forceHwAccelerated)) {
            if (mAttachInfo.mThreadedRenderer != null) {
                mAttachInfo.mThreadedRenderer.destroy();
            }

            final Rect insets = attrs.surfaceInsets;
            final boolean hasSurfaceInsets = insets.left != 0 || insets.right != 0
                    || insets.top != 0 || insets.bottom != 0;
            final boolean translucent = attrs.format != PixelFormat.OPAQUE || hasSurfaceInsets;
            final boolean wideGamut =
                    mContext.getResources().getConfiguration().isScreenWideColorGamut()
                    && attrs.getColorMode() == ActivityInfo.COLOR_MODE_WIDE_COLOR_GAMUT;

            mAttachInfo.mThreadedRenderer = ThreadedRenderer.create(mContext, translucent,
                    attrs.getTitle().toString());
            mAttachInfo.mThreadedRenderer.setWideGamut(wideGamut);
            updateForceDarkMode();
            if (mAttachInfo.mThreadedRenderer != null) {
                mAttachInfo.mHardwareAccelerated =
                        mAttachInfo.mHardwareAccelerationRequested = true;
            }
        }
    }
}
读取 WindowManager.LayoutParams.flags,看是否包含
WindowManager.LayoutParams.FLAG_HARDWARE_ACCELERATED判断是否开启硬件加速;硬件加速的 flags(FLAG_HARDWARE_ACCELERATED)默认根据清单文件的 application 和 activity 节点的 hardwareAccelerated;硬件加速的 flags 也可通过 Window#setFlags 来赋值
- mHandler ViewRootHandler,在 ViewRootImpl 构造方法赋值
- mViewRootImpl ViewRootImpl,在 ViewRootImpl 构造方法赋值
View 中的 AttachInfo
- View 是否 attach 到 Window 了
1
2
3
4
// View Android29
public boolean isAttachedToWindow() {
    return mAttachInfo != null;
}
- 判断是否开启了硬件加速
1
2
3
4
// View Android29
public boolean isHardwareAccelerated() {
    return mAttachInfo != null && mAttachInfo.mHardwareAccelerated;
}
- 获取 Handler, 如果 attach 了 View#post 也是通过该 Handler#post
1
2
3
4
5
6
7
8
// View Android29
public Handler getHandler() {
    final AttachInfo attachInfo = mAttachInfo;
    if (attachInfo != null) {
        return attachInfo.mHandler;
    }
    return null;
}
- 获取 ViewRootImpl
1
2
3
4
5
6
7
// View Android29
public ViewRootImpl getViewRootImpl() {
    if (mAttachInfo != null) {
        return mAttachInfo.mViewRootImpl;
    }
    return null;
}
- 获取 ThreadedRenderer hide
1
2
3
4
5
// View Android29
// @hide
public ThreadedRenderer getThreadedRenderer() {
    return mAttachInfo != null ? mAttachInfo.mThreadedRenderer : null;
}
- 获取 Window
1
2
3
4
// View Android29
protected IWindow getWindow() {
    return mAttachInfo != null ? mAttachInfo.mWindow : null;
}
Matrix
Matrix 是一个矩阵,主要功能是坐标映射,数值转换。
Matrix 基本原理
Matrix 是一个矩阵,最根本的作用就是坐标转换,下面我们就看看几种常见变换的原理:
我们所用到的变换均属于仿射变换,仿射变换是 线性变换 (缩放,旋转,错切) 和 平移变换 (平移) 的复合
基本变换有 4 种: 平移 (translate)、缩放 (scale)、旋转 (rotate) 和错切 (skew)。
四种变换都是由哪些参数控制的。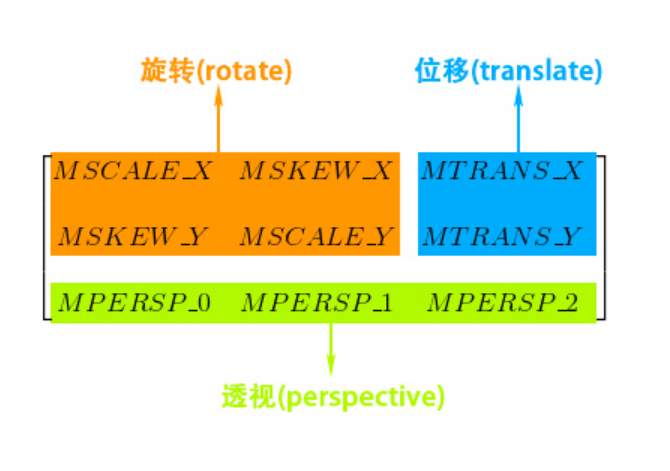
可以看到最后三个参数是控制透视的,这三个参数主要在 3D 效果中运用,通常为 (0, 0, 1)
Matrix 源码定义:
1
2
3
4
5
6
7
8
9
10
11
12
public class Matrix {

    public static final int MSCALE_X = 0;
    public static final int MSKEW_X  = 1;
    public static final int MTRANS_X = 2;
    public static final int MSKEW_Y  = 3;
    public static final int MSCALE_Y = 4;
    public static final int MTRANS_Y = 5;
    public static final int MPERSP_0 = 6;
    public static final int MPERSP_1 = 7;
    public static final int MPERSP_2 = 8;
}
Ref
- 安卓自定义 View 进阶 -Matrix 原理
https://www.gcssloop.com/customview/Matrix_Basic
https://blog.51cto.com/zensheno/513652
自定义 ViewGroup 中 child 绘制顺序
- 重写 isChildrenDrawingOrderEnabled 方法返回 true,表示开启自定义绘制顺序
- .重写 getChildDrawingOrder 方法,根据自己实际需求返回 View 的顺序。由于新添加的 View 先绘制,所以我们需要倒序返回
1
2
3
4
5
6
7
8
9
10
11
12
13
class CustomOrderDrawChildFrameLayout @JvmOverloads constructor(
    context: Context,
    attrs: AttributeSet? = null
) : FrameLayout(context, attrs) {

    override fun isChildrenDrawingOrderEnabled(): Boolean {
        return true
    }

    override fun getChildDrawingOrder(childCount: Int, i: Int): Int {
        return childCount - i - 1 // 倒序
    }
}
Ref
- 自定义 ViewGroup 中 child 绘制顺序
https://blog.csdn.net/ZYJWR/article/details/108164788
getDimension(),getDimensionPixelOffset(),getDimensionPixelSize() 的区别
- float getDimension(int id) – 真实的尺寸
是基于当前 DisplayMetrics 进行转换,获取指定资源 id 对应的尺寸
- int getDimensionPixelOffset(int id) – 取整
与 getDimension() 功能类似,不同的是将结果转换为 int,并且偏移转换是直接截断小数位,即取整(其实就是把 float 强制转化为 int,注意不是四舍五入哦)
- int getDimensionPixelSize(int id) – 四舍五入
与 getDimension() 功能类似,不同的是将结果转换为 int,并且小数部分四舍五入。
简单粗暴的解释就是:
- 这三个函数返回的都是绝对尺寸,而不是相对尺寸(dp\sp 等)。
- 如果 getDimension() 返回结果是 20.5f,
- getDimensionPixelOffset() 返回结果取整就是 20
- getDimensionPixelSize() 返回结果四舍五入就是 21。
View 类的四个构造函数
1
2
3
4
public View(Context context) {}
public View(Context context, AttributeSet attrs) {}
public View(Context context, AttributeSet attrs, int defStyleAttr) {}
public View(Context context, AttributeSet attrs, int defStyleAttr, int defStyleRes) {
4 个构造函数
构造方法 View(Context context) 代码 new 对象
在代码中创建一个 View 的时候使用
构造方法 View(Context context,@Nullable AttributeSet attrs) xml 创建对象
第二个参数 AttributeSet attrs 就代表了在 XML 中为 TextView 声明的属性集,我们可以利用它解析出声明的属性值,例如 android:text 和 android:textSize。
在 xml 中定义了 View 然后在代码中使用这个 View 的时候,这个 View 就是利用这个构造方法生成的。View 的属性值来自 AttributeSet 的值
构造方法 View(Context context,@Nullable AttributeSet attrs,int defStyleAttr) 全局 Theme
这个构造方法就是提供了默认的 defStyleAttr 用于指定基本的属性。也就是允许 View 有自己基础的风格
例如 Button 会默认提供 com.android.internal.R.attr.buttonStyle
1
2
3
public Button(Context context, AttributeSet attrs) {
    this(context, attrs, com.android.internal.R.attr.buttonStyle);
}
可以通过 Theme 全局控制控件的样式,其中的原理就是使用三个参数的构造函数
三个参数构造函数的使用方式有点特别,一般是二个参数的构造函数中传入一个 Theme 中的属性
1
2
3
4
5
6
7
public TextView(Context context, @Nullable AttributeSet attrs) {
    this(context, attrs, com.android.internal.R.attr.textViewStyle);
}

public TextView(Context context, @Nullable AttributeSet attrs, int defStyleAttr) {
    this(context, attrs, defStyleAttr, 0);
}
可以看到,TextView 两个参数的构造函数调用了三个参数的构造函数,而第三个参数使用的值就是 Theme 中的 com.android.internal.R.attr.textViewStyle 属性值。
如果我们想覆盖 Theme 中的 com.android.internal.R.attr.textViewStyle,就需要自定义这个属性的值,代码如下:
1
2
3
4
5
6
7
8
9
10
11
12
<style name="AppTheme" parent="Theme.AppCompat.Light.DarkActionBar">
    <item name="colorPrimary">@color/colorPrimary</item>
    <item name="colorPrimaryDark">@color/colorPrimaryDark</item>
    <item name="colorAccent">@color/colorAccent</item>
    <!--定义TextView使用的属性-->
    <item name="android:textViewStyle">@style/MyTextViewStyle</item>
</style>

<!--自定义TextView的颜色-->
<style name="MyTextViewStyle" parent="Widget.AppCompat.TextView">
    <item name="android:textColor">@color/colorAccent</item>
</style>
构造方法 View(Context context ,@Nullable AttributeSet attrs,int defStyleAttr,int defStyleRes) 自定义 style
Theme 是全局控制样式的,但是时候我们只想为某几个 TextView 单独定义样式,那就得使用四个参数的构造函数。
四个参数构造函数的使用方式,一般是在三个参数的构造函数中调用,并传入自定义 Style。
首先,在 styles.xml 中声明一个 TextView 使用的 Style
1
2
3
<style name="CustomTextViewStyle" parent="Widget.AppCompat.TextView" >
    <item name="android:textColor">@color/colorPrimaryDark</item>
</style>
属性值的覆盖规则
既然有这么多地方能控制属性值,那么就有个有限顺序。其实可以从四个参数的 View#obtainStyledAttributes() 方法中看到这个规则
1
2
3
4
5
第一个参数AttributeSet set指的是XML中声明的属性集。

第三个参数int defStyleAttr指的是Theme中的控制控件的属性。

第四个参数int defStyleRes指的是自定义的Style。
获取的优先规则就是第一个参数,第三个参数,第四个参数。
如果在 XML 给控件使用 style 属性呢?它的优先级是介于第一个参数和第三个参数之间。
1
2
3
4
1. XML中属性
2. XML中style属性
3. Theme中属性
4. 构造函数自定义Style
Android 布局中的 tools 属性
https://developer.android.com/studio/write/tool-attributes
tools 可以覆盖 android 的所有标准属性,将 android: 换成 tools: 即可。
在运行的时候 tools: 本身是被忽略的,不会被带进 apk 中,不用我们手动删除。
tool 属性使用
添加名称空间
1
xmlns:tools="http://schemas.android.com/tools"
常见属性
Error handling attributes
0、tools:parentTag
android studio2.2 新加了这个属性可以指定 <merge> 标签的布局类型,用于预览 merge 的布局,在自定义组合布局中非常实用。
1
2
3
4
5
6
7
8
<?xml version="1.0" encoding="utf-8"?>
<merge
        xmlns:android="http://schemas.android.com/apk/res/android"
        xmlns:tools="http://schemas.android.com/tools"
        tools:parentTag="me.hacket.assistant.samples.ui.声波view.SoundRecordView"
        android:layout_width="match_parent"
        android:layout_height="wrap_content">
</merge>
1、tools:ignore
用于 lint。
压制 lint 警告,通过逗号区分,写 lint id;或者 all 压制所有
1
<string name="show_all_apps" tools:ignore="MissingTranslation">All</string>
2、tools:targetApi
用于 lint。
指定该 View 显示的目标 api,功能同 @TargetApi 注解。
1
2
3
<GridLayout xmlns:android="http://schemas.android.com/apk/res/android"
    xmlns:tools="http://schemas.android.com/tools"
    tools:targetApi="14" >
3、tools:locale
用于 resource。
用于指定 resource 的 locale 语言。
1
2
<resources xmlns:tools="http://schemas.android.com/tools"
    tools:locale="es">
Design-time view attributes
1、tools: instead of android
用于 view 上。
如:tools:text,tools:visibility
2、tools:context
用于布局 root 标签上。
指定该布局所关联的 Activity,通过该属性,可以快速的创建如 onClick 方法对应的 Activity。
3、RecyclerView/ListView 相关
- tools:itemCount 指定 RecyclerView 预览的 item 条目数量
1
2
3
4
5
<android.support.v7.widget.RecyclerView
    android:id="@+id/recyclerView"
    android:layout_width="match_parent"
    android:layout_height="match_parent"
    tools:itemCount="3"/>
tools:listitemitem 布局预览tools:listheaderitem header 预览tools:listfooteritem footer 预览
1
2
3
4
5
6
7
8
9
10
11
12
13
14
15
16

<com.qiushibaike.inews.widget.RecyclerListView

        android:layout_width="match_parent"

        android:layout_height="match_parent"

        tools:listheader="@layout/item_footer"

        tools:listfooter="@layout/item_footer"

        tools:listitem="@layout/item_article_one_image"

        tools:itemCount="2"

        android:id="@+id/rv_recyclerView_category_list"/>
4、tools:layout
作用于 <fragment> 标签,预览 fragment 布局
1
2
3
4

<fragment android:name="com.example.master.ItemListFragment"

    tools:layout="@layout/list_content" />
5、tools:showIn
作用于布局 root 标签,添加父布局预览。用于将该布局作为 <include> 时,在父布局的预览
1
2
3
4
5
6
7
8
9
10
11
12

<TextView xmlns:android="http://schemas.android.com/apk/res/android"

    xmlns:tools="http://schemas.android.com/tools"

    android:text="@string/hello_world"

    android:layout_width="wrap_content"

    android:layout_height="wrap_content"

    tools:showIn="@layout/activity_main" />
6、tools:openDrawer
作用于 DrawerLayout,让 DrawerLayout 打开一个方向。
可以传递 start,end,left,right
7、”@tools:sample/*” 资源
具体参考:https://developer.android.com/studio/write/tool-attributes#toolssample_resources
Attribute value Description of placeholder data
@tools:sample/full_names Full names that are randomly generated from the combination of@tools:sample/first_names and @tools:sample/last_names.
@tools:sample/first_names Common first names.
@tools:sample/last_names Common last names.
@tools:sample/cities Names of cities from across the world.
@tools:sample/us_zipcodes Randomly generated US zipcodes.
@tools:sample/us_phones Randomly generated phone numbers with the following format: (800) 555-xxxx.
@tools:sample/lorem Placeholder text that is derived from Latin.
@tools:sample/date/day_of_week Randomized dates and times for the specified format.
@tools:sample/date/ddmmyy
@tools:sample/date/mmddyy
@tools:sample/date/hhmm
@tools:sample/date/hhmmss
@tools:sample/avatars Vector drawables that you can use as profile avatars.
@tools:sample/backgrounds/scenic Images that you can use as backgrounds.
Resource shrinking attributes
1、tools:shrinkMode
适用对象:。
指定构建的时候是使用 safe mode 还是 strict mode。safe mode 保留所有直接引用的资源和可能动态使用的资源,比如 Resources.getIdentifier() 方式调用的资源。strict mode 只保留直接引用的资源。默认的安全模式是 shrinkMode=”safe”。
建立一个 res/raw/keep.xml 文件,在 tools:keep 属性中指定每个要保留的资源,在 tools:discard 属性中指定每个要舍弃的资源。这两个属性都接受逗号分隔的资源名称列表。您可以使用星号字符作为通配符
1
2
3
4
5
6

<?xml version="1.0" encoding="utf-8"?>

<resources xmlns:tools="http://schemas.android.com/tools"

    tools:keep="@layout/used_1,@layout/used_2,@layout/*_3" />
2、tools:keep
适用对象:标签。这个属性能够保留特定的资源,比如 Resources.getIdentifier()) 动态使用的资源。用法是可以创建 res/raw/keep.xml 文件,内容如下:
1
2
3
4
5
6

<?xml version="1.0" encoding="utf-8"?>

<resources xmlns:tools="http://schemas.android.com/tools"

    tools:keep="@layout/used_1,@layout/used_2,@layout/*_3" />
3、tools:discard
适用对象:标签。有些资源可能被引用但是又对 app 没有影响,不能直接删除这些资源,那么这个属性可以移除这些资源;或者 Gradle 插件错误地推断这些资源是被引用的,那么也可以使用这个属性。用法如下:
1
2
3
4
5
6

<?xml version="1.0" encoding="utf-8"?>

<resources xmlns:tools="http://schemas.android.com/tools"

    tools:discard="@layout/unused_1" />
sample data
需求:不想要在资源目录中加上很多的预览资源, 如图片, 文本等, 他们仅仅在预览的时候有用, 打包时我并不需要将它们也打包进 APK,这时候就要用到 sample data。
从 Android Studio 3.0 开始, 我们就能够使用 Android Studio 提供的预定义数据, 或者自行创建一个 Sample data 的目录, 然后放入一些假的数据以供预览使用.
预定义数据
Android Studio 3.0 开始提供了一系列的预定义数据, 我们可以在 tools:text 属性使用 @tools/data/:
1
tools:text="@tools:sample/last_names"
除了 text 类型的, 预定义数据还包括:
| 属性值 | 占位数据描述 |
|---|---|
@tools:sample/full_names | 随机生成的 @tools:sample/first_namesand @tools:sample/last_names的组合名称 |
@tools:sample/first_names | 常用的名 |
@tools:sample/last_names | 常用的姓 |
@tools:sample/cities | 世界范围内城市的名字 |
@tools:sample/us_zipcodes | 随机生成的🇺🇸邮政编码 |
@tools:sample/us_phones | 随机生成的🇺🇸☎️号码, 符合下面的格式: (800) 555-xxxx |
@tools:sample/lore | 起源于拉丁文的占位文字 |
@tools:sample/date/day_of_week | 随机的特定格式的日期和时间 |
@tools:sample/date/ddmmyy | |
@tools:sample/date/mmddyy | |
@tools:sample/date/hhmm | @tools:sample/date/hhmmss |
@tools:sample/avatars | 可以用于人物头像的 vector drawables |
@tools:sample/backgrounds/scenic | 可以用于背景的图片 |
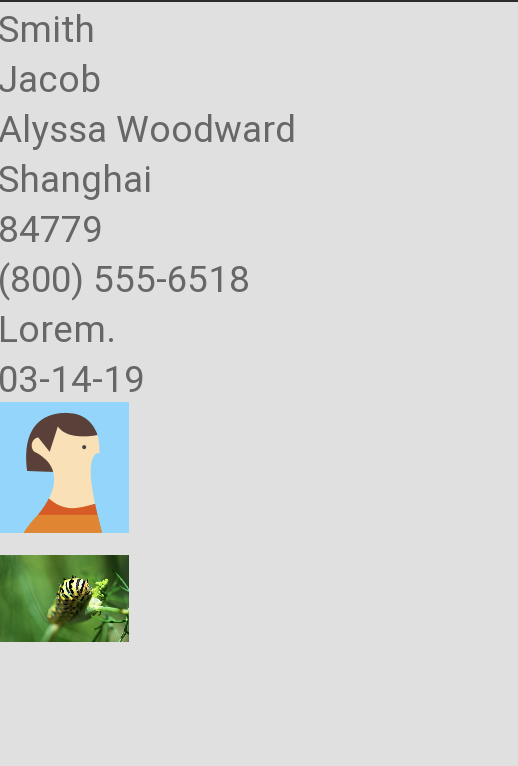
案例:
1
2
3
4
5
6
7
8
9
10
11
12
13
14
15
16
17
18
19
20
21
22
23
24
25
26
27
28
29
30
31
32
33
34
35
36
37
38
39
40
41
42
43
44
45
46
47
48
49
50
51
52
53
54
55
56
57
58
59
60
61
62
63
64
65
66
67
68
69
70
71
<?xml version="1.0" encoding="utf-8"?>
<LinearLayout xmlns:android="http://schemas.android.com/apk/res/android"
    xmlns:tools="http://schemas.android.com/tools"
    android:layout_width="match_parent"
    android:layout_height="match_parent"
    android:orientation="vertical"
    tools:context=".samples.ui.杂项.sampledata.SampleDataDemo">


    <TextView
        android:layout_width="match_parent"
        android:layout_height="wrap_content"
        android:text="TextView"
        tools:text="@tools:sample/last_names" />

    <TextView
        android:layout_width="match_parent"
        android:layout_height="wrap_content"
        android:text="TextView"
        tools:text="@tools:sample/first_names" />


    <TextView
        android:layout_width="match_parent"
        android:layout_height="wrap_content"
        android:text="TextView"
        tools:text="@tools:sample/full_names" />

    <TextView
        android:layout_width="match_parent"
        android:layout_height="wrap_content"
        android:text="TextView"
        tools:text="@tools:sample/cities" />

    <TextView
        android:layout_width="match_parent"
        android:layout_height="wrap_content"
        android:text="TextView"
        tools:text="@tools:sample/us_zipcodes" />

    <TextView
        android:layout_width="match_parent"
        android:layout_height="wrap_content"
        android:text="TextView"
        tools:text="@tools:sample/us_phones" />

    <TextView
        android:layout_width="match_parent"
        android:layout_height="wrap_content"
        android:text="TextView"
        tools:text="@tools:sample/lorem" />

    <TextView
        android:layout_width="match_parent"
        android:layout_height="wrap_content"
        android:text="TextView"
        tools:text="@tools:sample/date/mmddyy" />

    <ImageView
        android:layout_width="50dp"
        android:layout_height="50dp"
        android:text="TextView"
        tools:src="@tools:sample/avatars" />

    <ImageView
        android:layout_width="50dp"
        android:layout_height="50dp"
        android:text="TextView"
        tools:src="@tools:sample/backgrounds/scenic" />

</LinearLayout>
自定义 sample data
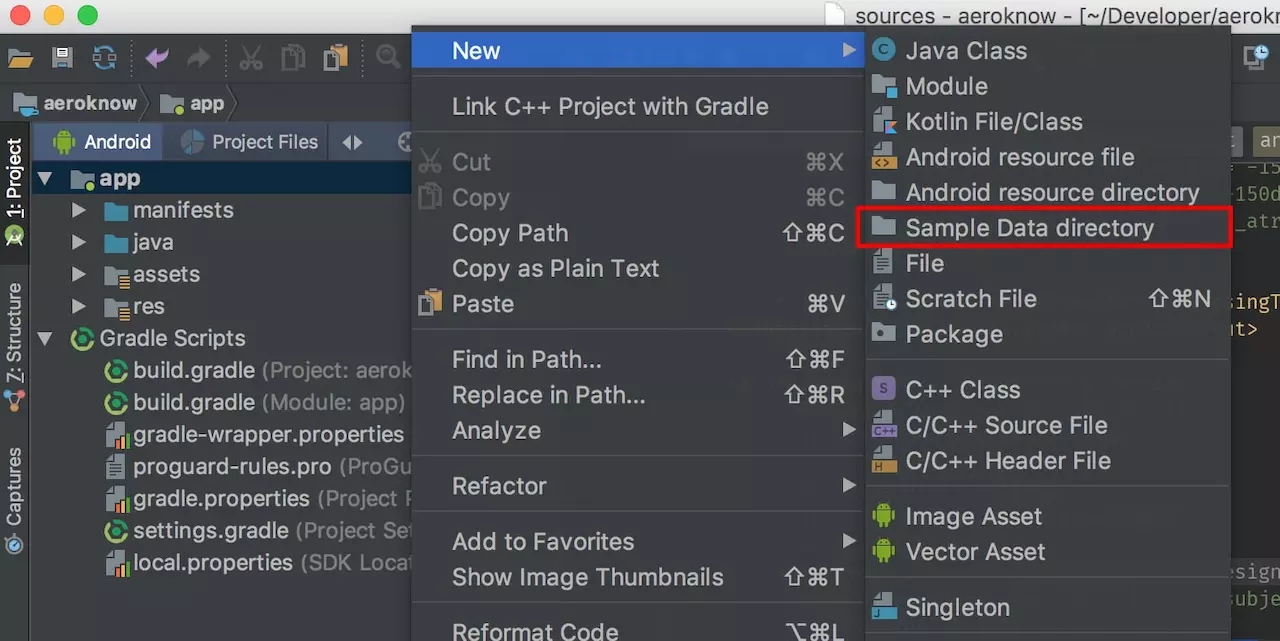
在 app (module) 文件夹右键, 选择 new -> Sample Data directory 创建存放假数据的 sample data 文件夹。在这个文件夹下, 我们创建文本文件如 txt 文件, 添加一些原始数据如
#ff33aa (是的, 可以放置颜色) 或者就是简单的文字, 需要主要每添加一条数据后需要换行, 换言之每行数据占一行. 然后再布局文件中我们就可以通过 tools:text 属性引用 @sample/存放数据的文件的名称 .
1. 普通文本
1
2
3
4
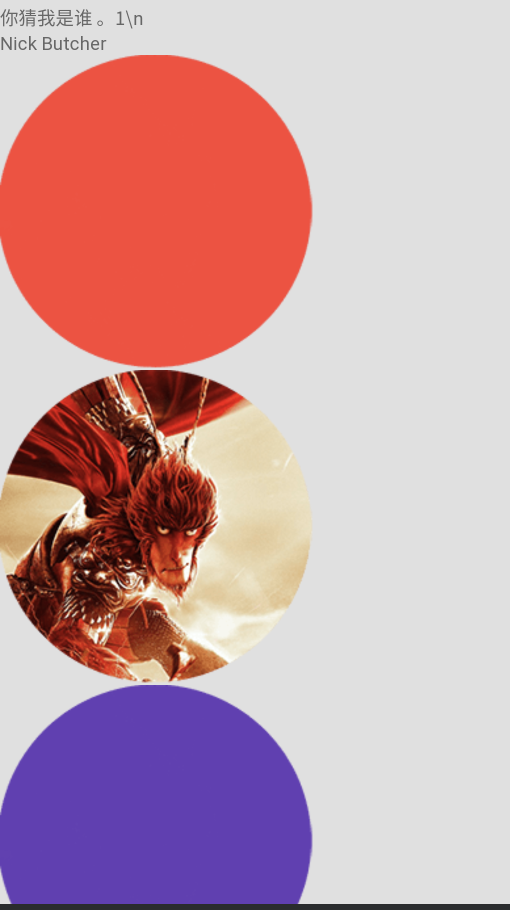
你猜我是谁 。1\n
我管
1
2
2. 可以创建 JSON 文件来展示复杂的数据
1
2
3
4
5
6
7
8
9
10
11
12
13
14
15
16
17
18
19
20
{
  "github_users": [
    {
      "name": "Nick Butcher",
      "github": "https://github.com/nickbutcher"
    },
    {
      "name": "Chris Banes",
      "github": "https://github.com/chrisbanes"
    },
    {
      "name": "Jake Wharton",
      "github": "https://github.com/JakeWharton"
    },
    {
      "name": "Romain Guy",
      "github": "https://github.com/romainguy"
    }
  ]
}
需要注意的是, 这里要求 JSON 文件开头不能是 JsonArray, 只能是 JsonObject. 创建完成后,需要重新编译一下才能引用到最新的数据.
3. 颜色
1
2
3
# FF4336
# 9727BO
# 673AB7
引用:
1
2
3
4
5
6
7
8
9
10
11
12
13
14
15
16
17
18
19
20
21
22
23
24
25
26
27
28
29
30
31
32
<LinearLayout
    android:layout_width="match_parent"
    android:layout_height="match_parent"
    android:orientation="vertical">
    <TextView
        android:layout_width="wrap_content"
        android:layout_height="wrap_content"
        tools:text="@sample/test.txt" />

    <TextView
        android:layout_width="wrap_content"
        android:layout_height="wrap_content"
        tools:text="@sample/github_user.json/github_users/name" />

    <ImageView
        android:layout_width="wrap_content"
        android:layout_height="wrap_content"
        android:src="@drawable/ic_avatar"
        tools:tint="@sample/test_color" />

    <ImageView
        android:layout_width="wrap_content"
        android:layout_height="wrap_content"
        android:src="@drawable/ic_avatar"
        tools:tint="@sample/test_color" />

    <ImageView
        android:layout_width="wrap_content"
        android:layout_height="wrap_content"
        android:src="@drawable/ic_avatar"
        tools:tint="@sample/test_color" />
</LinearLayout>
foreground 应用
foreground 也就是前景色,需要注意,foreground 的支持是在 Android 6.0(也就是 API 23)才加入的;之前其实也有,不过只支持 FrameLayout,而直到 6.0 才把这个支持放进了 View 类里。
Android 在所有布局的基类 View 类中 就定义了 Foreground 这个属性,因为 API 版本没有 23 的话,只有 FrameLayout 布局上设置该属性才会生效。观察 View 的代码发现这样一段。它只针对是 FrameLayout 的实例做获取该 styleable 的操作。
1
2
3
4
5
6
7
8
9
10
case R.styleable.View_foreground:
    if (targetSdkVersion >= VERSION_CODES.M || this instanceof FrameLayout) {
         setForeground(a.getDrawable(attr));
    }
    break;
case R.styleable.View_foregroundGravity:
    if (targetSdkVersion >= VERSION_CODES.M || this instanceof FrameLayout) {
    setForegroundGravity(a.getInt(attr, Gravity.NO_GRAVITY));
    }
    break;
foreground 应用
整个控件容器的遮罩
foreground 是盖在整个控件最上层,可以作为遮罩层
实现一种点击查看的效果
比如那种点击查看谜底的功能就可以简单用这种方法实现
1
2
3
4
5
6
7
8
9
10
11
12
13
14
15
16
17
18
19
20
21
22
23
24
25
26
27
28
29
30
<?xml version="1.0" encoding="utf-8"?>
<LinearLayout xmlns:android="http://schemas.android.com/apk/res/android"
        android:layout_width="match_parent"
        android:layout_height="match_parent"
        android:orientation="vertical">

    <TextView
            android:layout_width="wrap_content"
            android:layout_height="wrap_content"
            android:text="世界上最帅的程序员是谁?点击下方查看谜底答案" />

    <FrameLayout
            android:layout_width="wrap_content"
            android:layout_height="wrap_content"
            android:clickable="true"
            android:foreground="@drawable/forceground_drawable">

        <LinearLayout
                android:layout_width="wrap_content"
                android:layout_height="wrap_content"
                android:orientation="vertical">

            <TextView
                    android:layout_width="wrap_content"
                    android:layout_height="wrap_content"
                    android:text="世界上最帅的程序员是青蛙要fly,世界上最好用的语言是PHP" />

        </LinearLayout>
    </FrameLayout>
</LinearLayout>
selector
1
2
3
4
5
<?xml version="1.0" encoding="utf-8"?>
<selector xmlns:android="http://schemas.android.com/apk/res/android">
    <item android:state_pressed="true" android:drawable="@color/colorAccent1"/>
    <item android:drawable="@color/colorAccent2" />
</selector>
color
1
2
<color name="colorAccent1">#00ffffff</color>
<color name="colorAccent2">#ffc0c0c0</color>
使用一行代码就实现了水波纹效果
1
android:foreground="?selectableItemBackground"
如果无效的话,检查是否 clickable 是否为 true.
- 水波纹改色,这个需要在主题中进行配置 ,配置代码如下
1
<item name="colorControlHighlight">@color/accent_material_light</item>
透明度对应 16 进制值(十六进制)
计算方法
255 * 不透明度 -> 转换成16进制数
1
2
3
4
5
6
7
8
9
//java代码生成的对应表
for (int i = 100; i>=0; i--) {
   double j = (i / 100.0d);
   int alpha = (int) Math.round(255-j * 255);
   String hex = Integer.toHexString(alpha).toUpperCase();
   if (hex.length() == 1) hex = "0" + hex;
   int percent = (int) (j*100);
   System.out.println(String.format("%d%% — %s", percent, hex));
}
不透明度 16 进制值、十六进制颜色
1
2
3
4
5
6
7
8
9
10
11
12
13
14
15
16
17
18
19
20
21
22
23
24
25
26
27
28
29
30
31
32
33
34
35
36
37
38
39
40
41
42
43
44
45
46
47
48
49
50
51
52
53
54
55
56
57
58
59
60
61
62
63
64
65
66
67
68
69
70
71
72
73
74
75
76
77
78
79
80
81
82
83
84
85
86
87
88
89
90
91
92
93
94
95
96
97
98
99
100
101
100% — FF(完全不透明)
99% — FC
98% — FA
97% — F7
96% — F5
95% — F2
94% — F0
93% — ED
92% — EB
91% — E8
90% — E6
89% — E3
88% — E0
87% — DE
86% — DB
85% — D9
84% — D6
83% — D4
82% — D1
81% — CF
80% — CC
79% — C9
78% — C7
77% — C4
76% — C2
75% — BF
74% — BD
73% — BA
72% — B8
71% — B5
70% — B3
69% — B0
68% — AD
67% — AB
66% — A8
65% — A6
64% — A3
63% — A1
62% — 9E
61% — 9C
60% — 99
59% — 96
58% — 94
57% — 91
56% — 8F
55% — 8C
54% — 8A
53% — 87
52% — 85
51% — 82
50% — 80
49% — 7D
48% — 7A
47% — 78
46% — 75
45% — 73
44% — 70
43% — 6E
42% — 6B
41% — 69
40% — 66
39% — 63
38% — 61
37% — 5E
36% — 5C
35% — 59
34% — 57
33% — 54
32% — 52
31% — 4F
30% — 4D
29% — 4A
28% — 47
27% — 45
26% — 42
25% — 40
24% — 3D
23% — 3B
22% — 38
21% — 36
20% — 33
19% — 30
18% — 2E
17% — 2B
16% — 29
15% — 26
14% — 24
13% — 21
12% — 1F
11% — 1C
10% — 1A
9% — 17
8% — 14
7% — 12
6% — 0F
5% — 0D
4% — 0A
3% — 08
2% — 05
1% — 03
0% — 00(全透明)