Spring Boot基础
Spring Boot 入门
SpringBoot 简介
SpringBoot 是由 Pivotal 团队提供的全新框架,其设计目的是用来简化 Spring ` 应用的初始搭建以及开发过程。
使用了 Spring 框架后已经简化了我们的开发。而 SpringBoot 又是对 Spring 开发进行简化的,可想而知 SpringBoot 使用的简单及广泛性。
SpringBoot 快速入门
- Spring Initializr 创建后下载 spring-boot-quickstart.zip
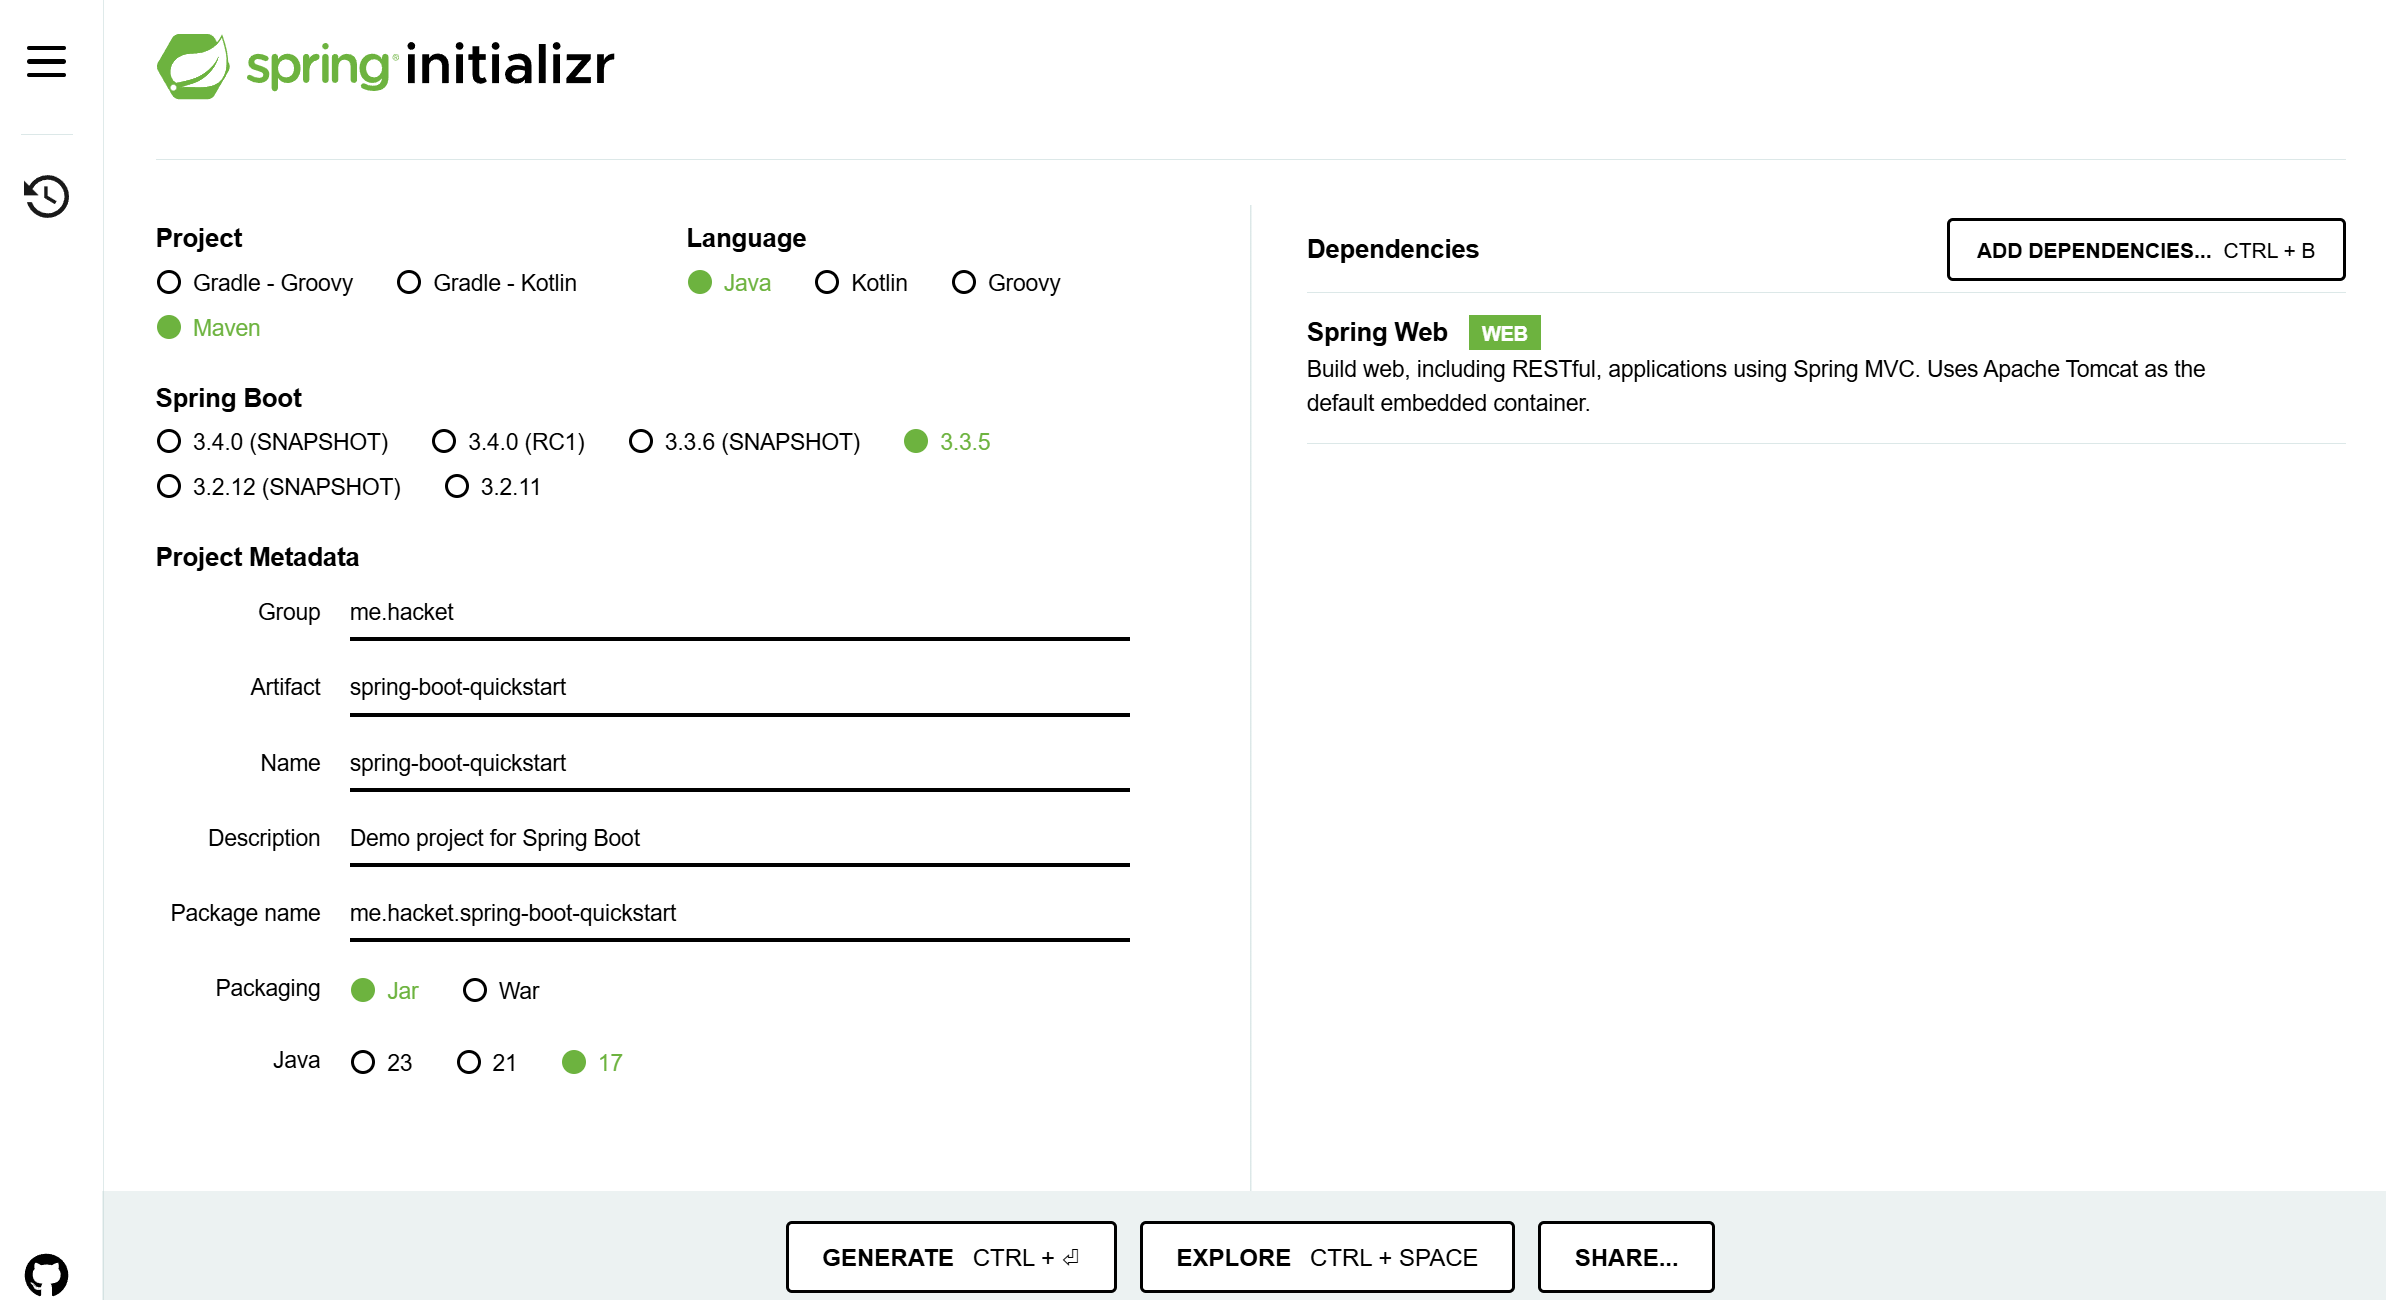
- Spring Initializr 模板:基于 Idea 的
Spring Initializr快速构建SpringBoot工程时需要联网 - 手动创建
手动
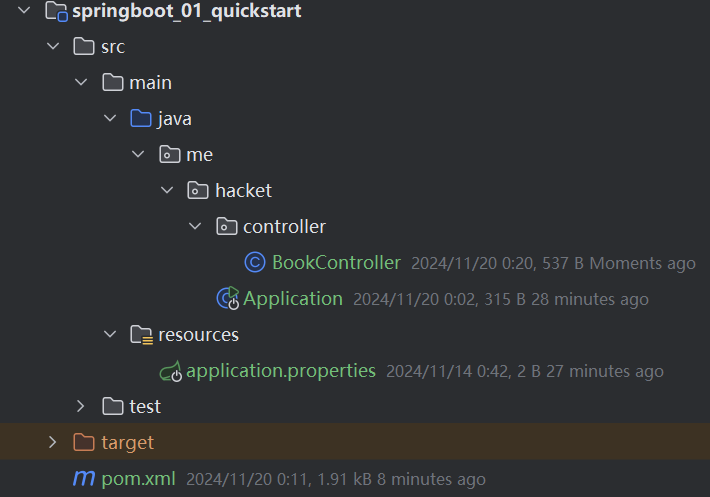
- 目录结构
|  |
- pom.xml
1
2
3
4
5
6
7
8
9
10
11
12
13
14
15
16
17
18
19
20
21
22
23
24
25
26
27
28
29
30
31
32
33
34
35
36
37
38
39
40
41
42
43
44
45
46
47
48
49
50
51
52
53
54
<?xml version="1.0" encoding="UTF-8"?>
<project xmlns="http://maven.apache.org/POM/4.0.0"
         xmlns:xsi="http://www.w3.org/2001/XMLSchema-instance"
         xsi:schemaLocation="http://maven.apache.org/POM/4.0.0 http://maven.apache.org/xsd/maven-4.0.0.xsd">
    <modelVersion>4.0.0</modelVersion>
    <parent>
        <groupId>org.springframework.boot</groupId>
        <artifactId>spring-boot-starter-parent</artifactId>
        <version>3.3.5</version>
        <relativePath/> <!-- lookup parent from repository -->
    </parent>

    <artifactId>springboot_01_quickstart</artifactId>

    <properties>
        <maven.compiler.source>11</maven.compiler.source>
        <maven.compiler.target>11</maven.compiler.target>
        <project.build.sourceEncoding>UTF-8</project.build.sourceEncoding>
    </properties>

    <dependencies>
        <dependency>
            <groupId>org.springframework.boot</groupId>
            <artifactId>spring-boot-starter-web</artifactId>
            <!--            排除依赖-->
            <exclusions>
                <exclusion>
                    <groupId>org.springframework.boot</groupId>
                    <artifactId>spring-boot-starter-tomcat</artifactId>
                </exclusion>
            </exclusions>
        </dependency>

        <dependency>
            <groupId>org.springframework.boot</groupId>
            <artifactId>spring-boot-starter-jetty</artifactId>
        </dependency>

        <dependency>
            <groupId>org.springframework.boot</groupId>
            <artifactId>spring-boot-starter-test</artifactId>
            <scope>test</scope>
        </dependency>
    </dependencies>

    <build>
        <plugins>
            <plugin>
                <groupId>org.springframework.boot</groupId>
                <artifactId>spring-boot-maven-plugin</artifactId>
            </plugin>
        </plugins>
    </build>
</project>
- Application
1
2
3
4
5
6
@SpringBootApplication
public class Application {
    public static void main(String[] args) {
        SpringApplication.run(Application.class, args);
    }
}
- Controller
1
2
3
4
5
6
7
8
9
10
@RestController
@RequestMapping("/books")
public class BookController {

    @GetMapping("/{id}")
    public String getById(@PathVariable Integer id){
        System.out.println("id ==> "+id);
        return "hello , spring boot!";
    }
}
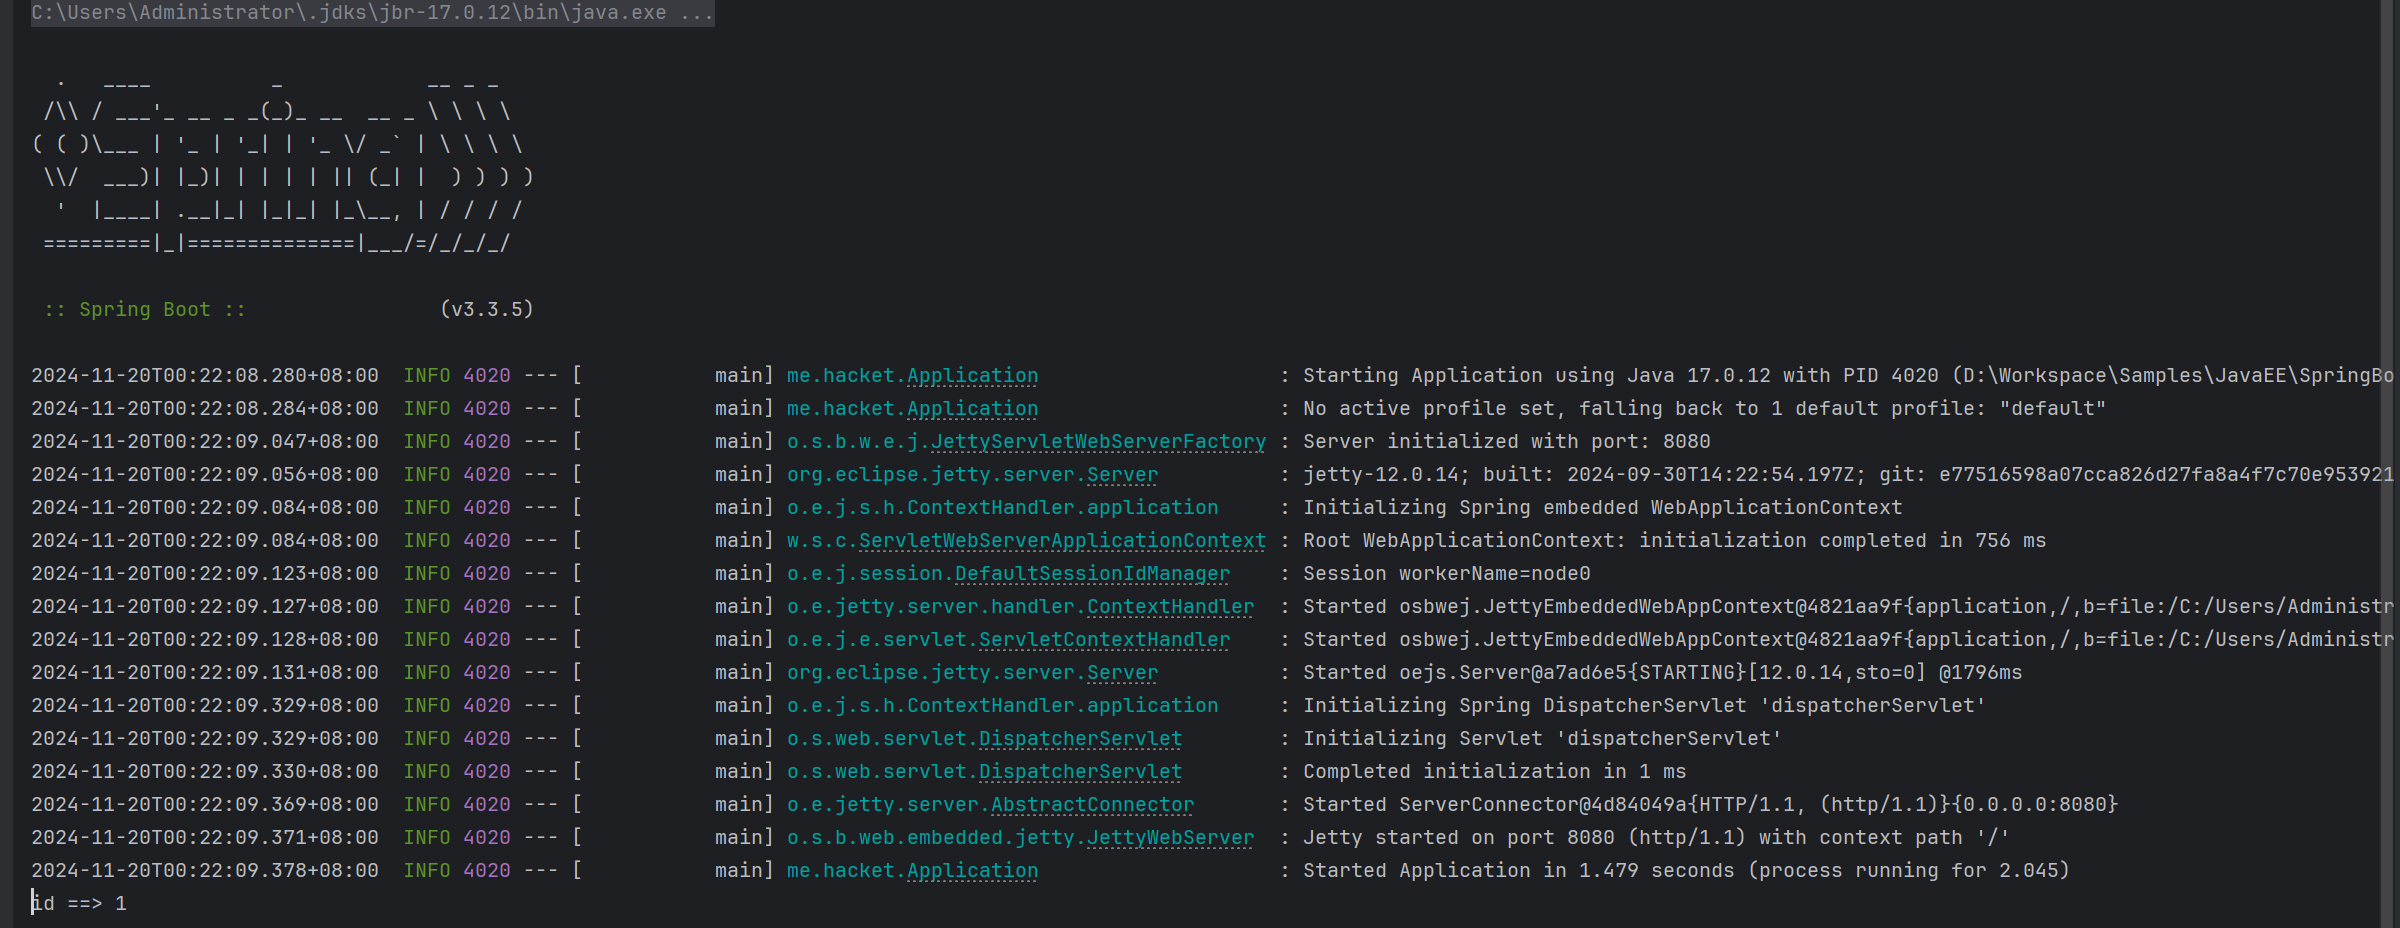
- 运行
SpringBoot工程不需要使用本地的Tomcat和 插件,只运行项目的Application类,我们就可以在控制台看出如下信息
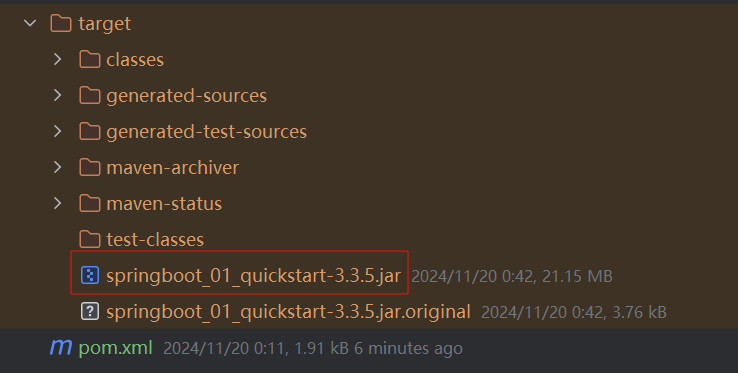
打包
由于我们在构建 SpringBoot 工程时已经在 pom.xml 中配置了如下插件
1
2
3
4
<plugin>
    <groupId>org.springframework.boot</groupId>
    <artifactId>spring-boot-maven-plugin</artifactId>
</plugin>
所以我们只需要使用 Maven 的 package 指令打包就会在 target 目录下生成对应的 Jar 包。
==注意:该插件必须配置,不然打好的
jar包也是有问题的。==
|  |
启动
进入 jar 包所在位置,在 命令提示符 中输入如下命令
1
java -jar springboot_01_quickstart-0.0.1-SNAPSHOT.jar
执行上述命令就可以看到 SpringBoot 运行的日志信息
切换服务器
启动工程使用的是 tomcat 服务器,那能不能不使用 tomcat 而使用 jetty 服务器,jetty 在我们 maven 高级时讲 maven 私服使用的服务器。而要切换 web 服务器就需要将默认的 tomcat 服务器给排除掉,怎么排除呢?使用 exclusion 标签
1
2
3
4
5
6
7
8
9
10
<dependency>
    <groupId>org.springframework.boot</groupId>
    <artifactId>spring-boot-starter-web</artifactId>
    <exclusions>
        <exclusion>
            <artifactId>spring-boot-starter-tomcat</artifactId>
            <groupId>org.springframework.boot</groupId>
        </exclusion>
    </exclusions>
</dependency>
排除 tomcat 服务器,还要引入 jetty 服务器。在 pom.xml 中因为 jetty 的起步依赖
1
2
3
4
<dependency>
    <groupId>org.springframework.boot</groupId>
    <artifactId>spring-boot-starter-jetty</artifactId>
</dependency>
通过切换服务器,我们不难发现在使用 SpringBoot 换技术时只需要导入该技术的起步依赖即可。
Spring Boot 使用
Spring 概述
SpringBoot 是由 Pivotal 团队提供的全新框架,其设计目的是用来==简化==Spring 应用的==初始搭建==以及==开发过程==。
大家已经感受了 SpringBoot 程序,回过头看看 SpringBoot 主要作用是什么,就是简化 Spring 的搭建过程和开发过程。
原始 Spring 环境搭建和开发存在以下问题:
- 配置繁琐
- 依赖设置繁琐
SpringBoot 程序优点恰巧就是针对 Spring 的缺点
- 自动配置。这个是用来解决
Spring程序配置繁琐的问题 - 起步依赖。这个是用来解决
Spring程序依赖设置繁琐的问题 - 辅助功能(内置服务器,…)。我们在启动
SpringBoot程序时既没有使用本地的tomcat也没有使用tomcat插件,而是使用SpringBoot内置的服务器。
SpringBoot 起步依赖
我们使用 Spring Initializr 方式创建的 Maven 工程的的 pom.xml 配置文件中自动生成了很多包含 starter 的依赖:
- spring-boot-starter-parent
- spring-boot-starter-web
这些依赖就是==启动依赖==
SpringBoot 还提供了哪些 starter 模块
Spring Boot 推荐的基础 POM 文件
| 名称 | 说明 |
|---|---|
| spring-boot-starter | 核心 POM,包含自动配置支持、日志库和对 YAML 配置文件的支持。 |
| spring-boot-starter-aop | 包含 spring-aop 和 AspectJ 来支持面向切面编程(AOP)。 |
| spring-boot-starter-web | 支持 Web 应用开发,包含 Tomcat 和 spring-mvc。 |
| spring-boot-starter-tomcat | 使用 Spring Boot 默认的 Tomcat 作为应用服务器。 |
Spring Boot 配置文件
三种配置文件
SpringBoot 提供了多种属性配置方式
application.properties1
server.port=80
application.yml1 2
server: port: 81 ```
application.yaml1 2
server: port: 82 ```
==注意:==
SpringBoot程序的配置文件名必须是application,只是后缀名不同而已。
注意:在配合文件中如果没有提示,可以在 Project Structure 的 Facets 中设置下
三种配合文件的优先级
在三种配合文件中分别配置不同的端口号,启动服务查看绑定的端口号。用这种方式就可以看到哪个配置文件的优先级更高一些
三种配置文件的优先级是:
==application.properties > application.yml > application.yaml==
注意:
SpringBoot核心配置文件名为applicationSpringBoot内置属性过多,且所有属性集中在一起修改,在使用时,通过提示键 + 关键字修改属性
例如要设置日志的级别时,可以在配置文件中书写 logging,就会提示出来。配置内容如下
1
2
3
logging:
level:
root: info
多环境配置
以后在工作中,对于开发环境、测试环境、生产环境的配置肯定都不相同,比如我们开发阶段会在自己的电脑上安装 mysql ,连接自己电脑上的 mysql 即可,但是项目开发完毕后要上线就需要该配置,将环境的配置改为线上环境的。
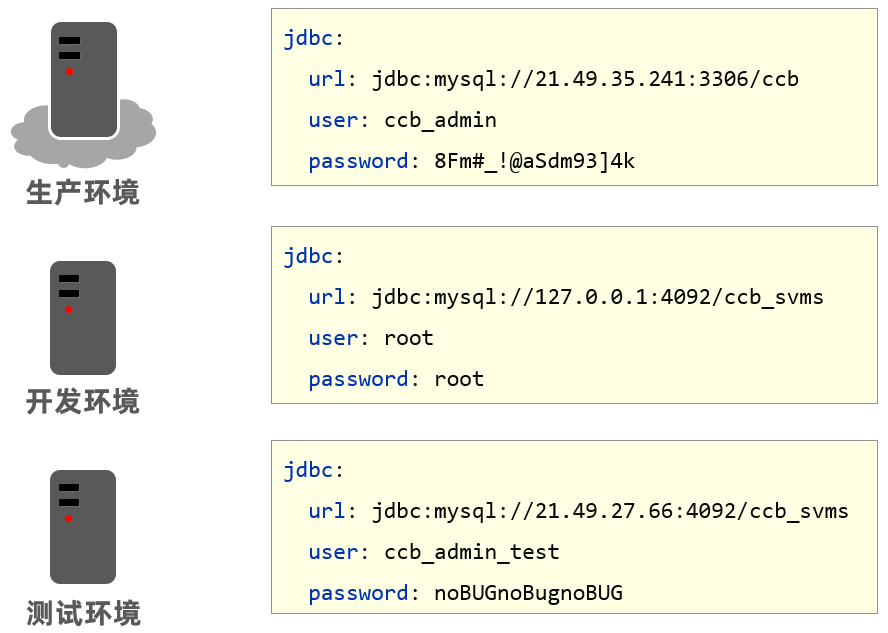
来回的修改配置会很麻烦,而 SpringBoot 给开发者提供了多环境的快捷配置,需要切换环境时只需要改一个配置即可。不同类型的配置文件多环境开发的配置都不相同。
yaml 文件
1
2
3
4
5
6
7
8
9
10
11
12
13
14
15
16
17
18
19
20
21
22
23
24
25
26
27
28
#设置启用的环境
spring:
profiles:
active: pro # 设置启用的环境
---
#开发
spring:
config:
activate:
on-profile: dev #给开发环境起的名字
server:
port: 80
---
#生产
spring:
config:
activate:
on-profile: pro #给生产环境起的名字
server:
port: 81
---
#测试
spring:
profiles: test #给测试环境起的名字;过时写法,不推荐使用,推荐使用spring.config.activate.on-profile
server:
port: 82
---
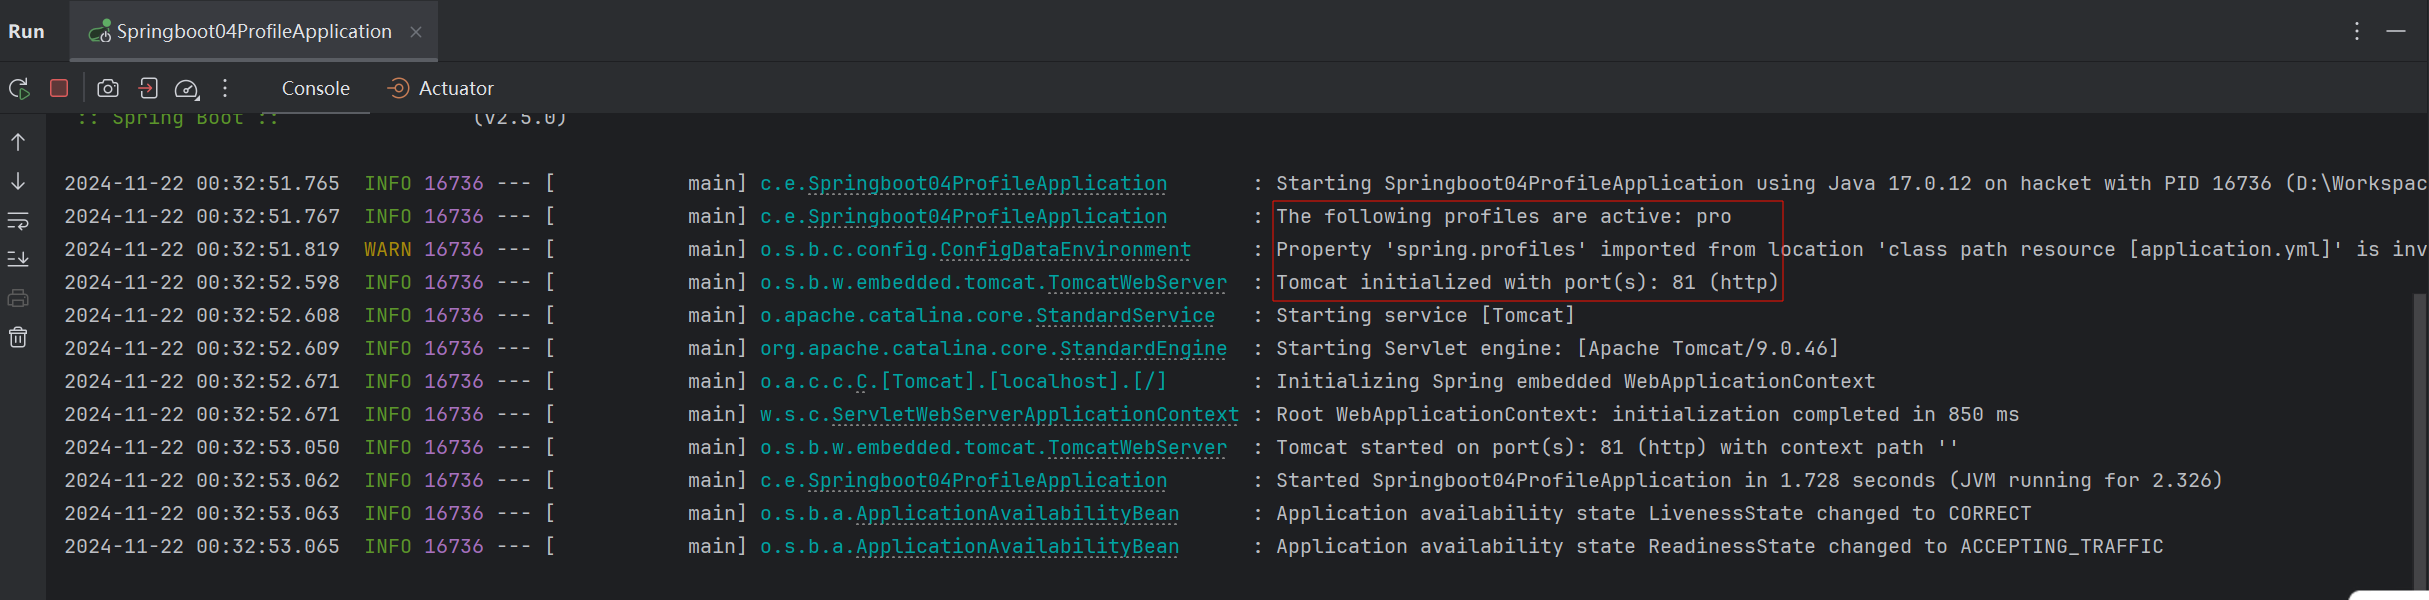
如何查看环境是否切换成功:
在上面配置中给不同配置起名字的 spring.profiles 配置项已经过时。最新用来起名字的配置项是:
1
2
3
4
5
#开发
spring:
config:
activate:
on-profile: dev
properties 文件
properties 类型的配置文件配置多环境需要定义不同的配置文件
| 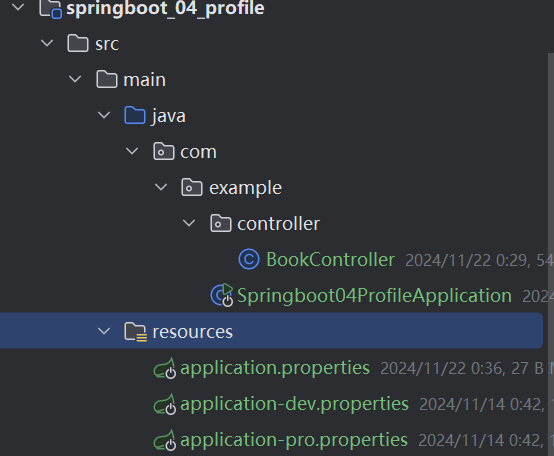 |
application-dev.properties是开发环境的配置文件。我们在该文件中配置端口号为80
1
server.port=80
application-test.properties是测试环境的配置文件。我们在该文件中配置端口号为81
1
server.port=81
application-pro.properties是生产环境的配置文件。我们在该文件中配置端口号为82
1
server.port=82
application.properties
SpringBoot 只会默认加载名为 application.properties 的配置文件,所以需要在 application.properties 配置文件中设置启用哪个配置文件;如果配置的 test 没有,则默认为 8080
1
spring.profiles.active=test
命令行启动参数设置
SpringBoot 提供了在运行 jar 时设置开启指定的环境的方式,如下:
1
java –jar xxx.jar –-spring.profiles.active=test
那么这种方式能不能临时修改端口号呢?也是可以的,可以通过如下方式
1
java –jar xxx.jar –-server.port=88
当然也可以同时设置多个配置,比如即指定启用哪个环境配置,又临时指定端口,如下:
1
java –jar springboot.jar –-server.port=88 –-spring.profiles.active=test
大家进行测试后就会发现命令行设置的端口号优先级高(也就是使用的是命令行设置的端口号),配置的优先级其实 SpringBoot 官网已经进行了说明,参见 : docs.spring.io/spring-boot/redirect.html?page=spring-boot-features#boot-features-external-config
如果使用了多种方式配合同一个配置项,优先级高的生效。
配置文件分类
由于测试环境和开发环境的很多配置都不相同,所以测试人员在运行我们的工程时需要临时修改很多配置,如下
1
java –jar springboot.jar –-spring.profiles.active=test --server.port=85 --server.servlet.context-path=/heima --server.tomcat.connection-timeout=-1 …… …… …… …… ……
针对这种情况,SpringBoot 定义了配置文件不同的放置的位置;而放在不同位置的优先级时不同的。
SpringBoot 中 4 级配置文件放置位置:
- 1 级:classpath:
application.yml - 2 级:classpath:
config/application.yml - 3 级:file :
application.yml - 4 级:file :
config/application.yml
==说明: == 级别越高优先级越高
验证 1 级和 2 级的优先级: 类路径下的 config 下的配置文件优先于类路径下的配置文件
classpath 路径:就是 resources 路径下
| 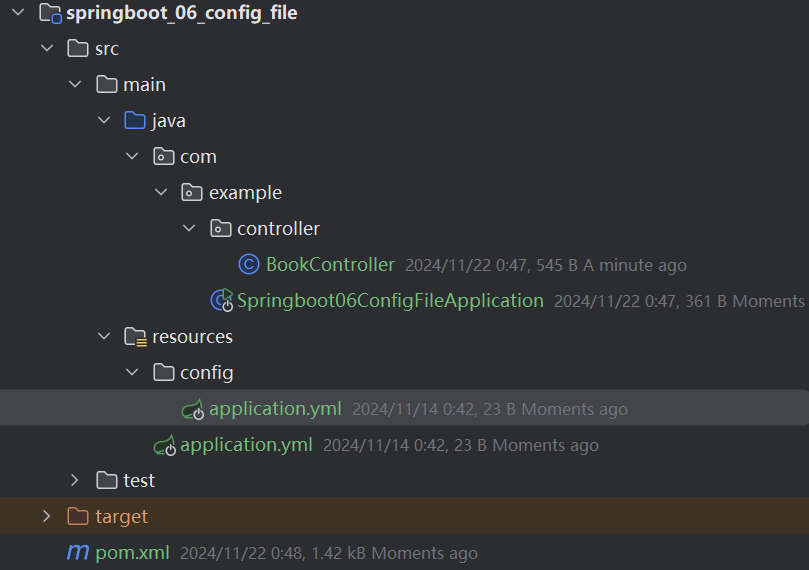 |
验证 2 级和 4 级的优先级: file 路径:
- 点击工程的
package来打jar包 - 在硬盘上找到
jar包所在位置 - 在
jar包所在位置创建config文件夹,在该文件夹下创建application.yml配置文件,而在该配合文件中将端口号设置为82 - 在命令行使用以下命令运行程序:java -jar springboot_06_config_file-0.0.1-SNAPSHOT. Jar
==file: config 下的配置文件优先于类路径下的配置文件。==
疑问
为什么我们添加一个 starter-web 模块便可以了呢?
我们安装 Maven Helper 的插件,用来查看 spring-boot-starter-web 模块的依赖:
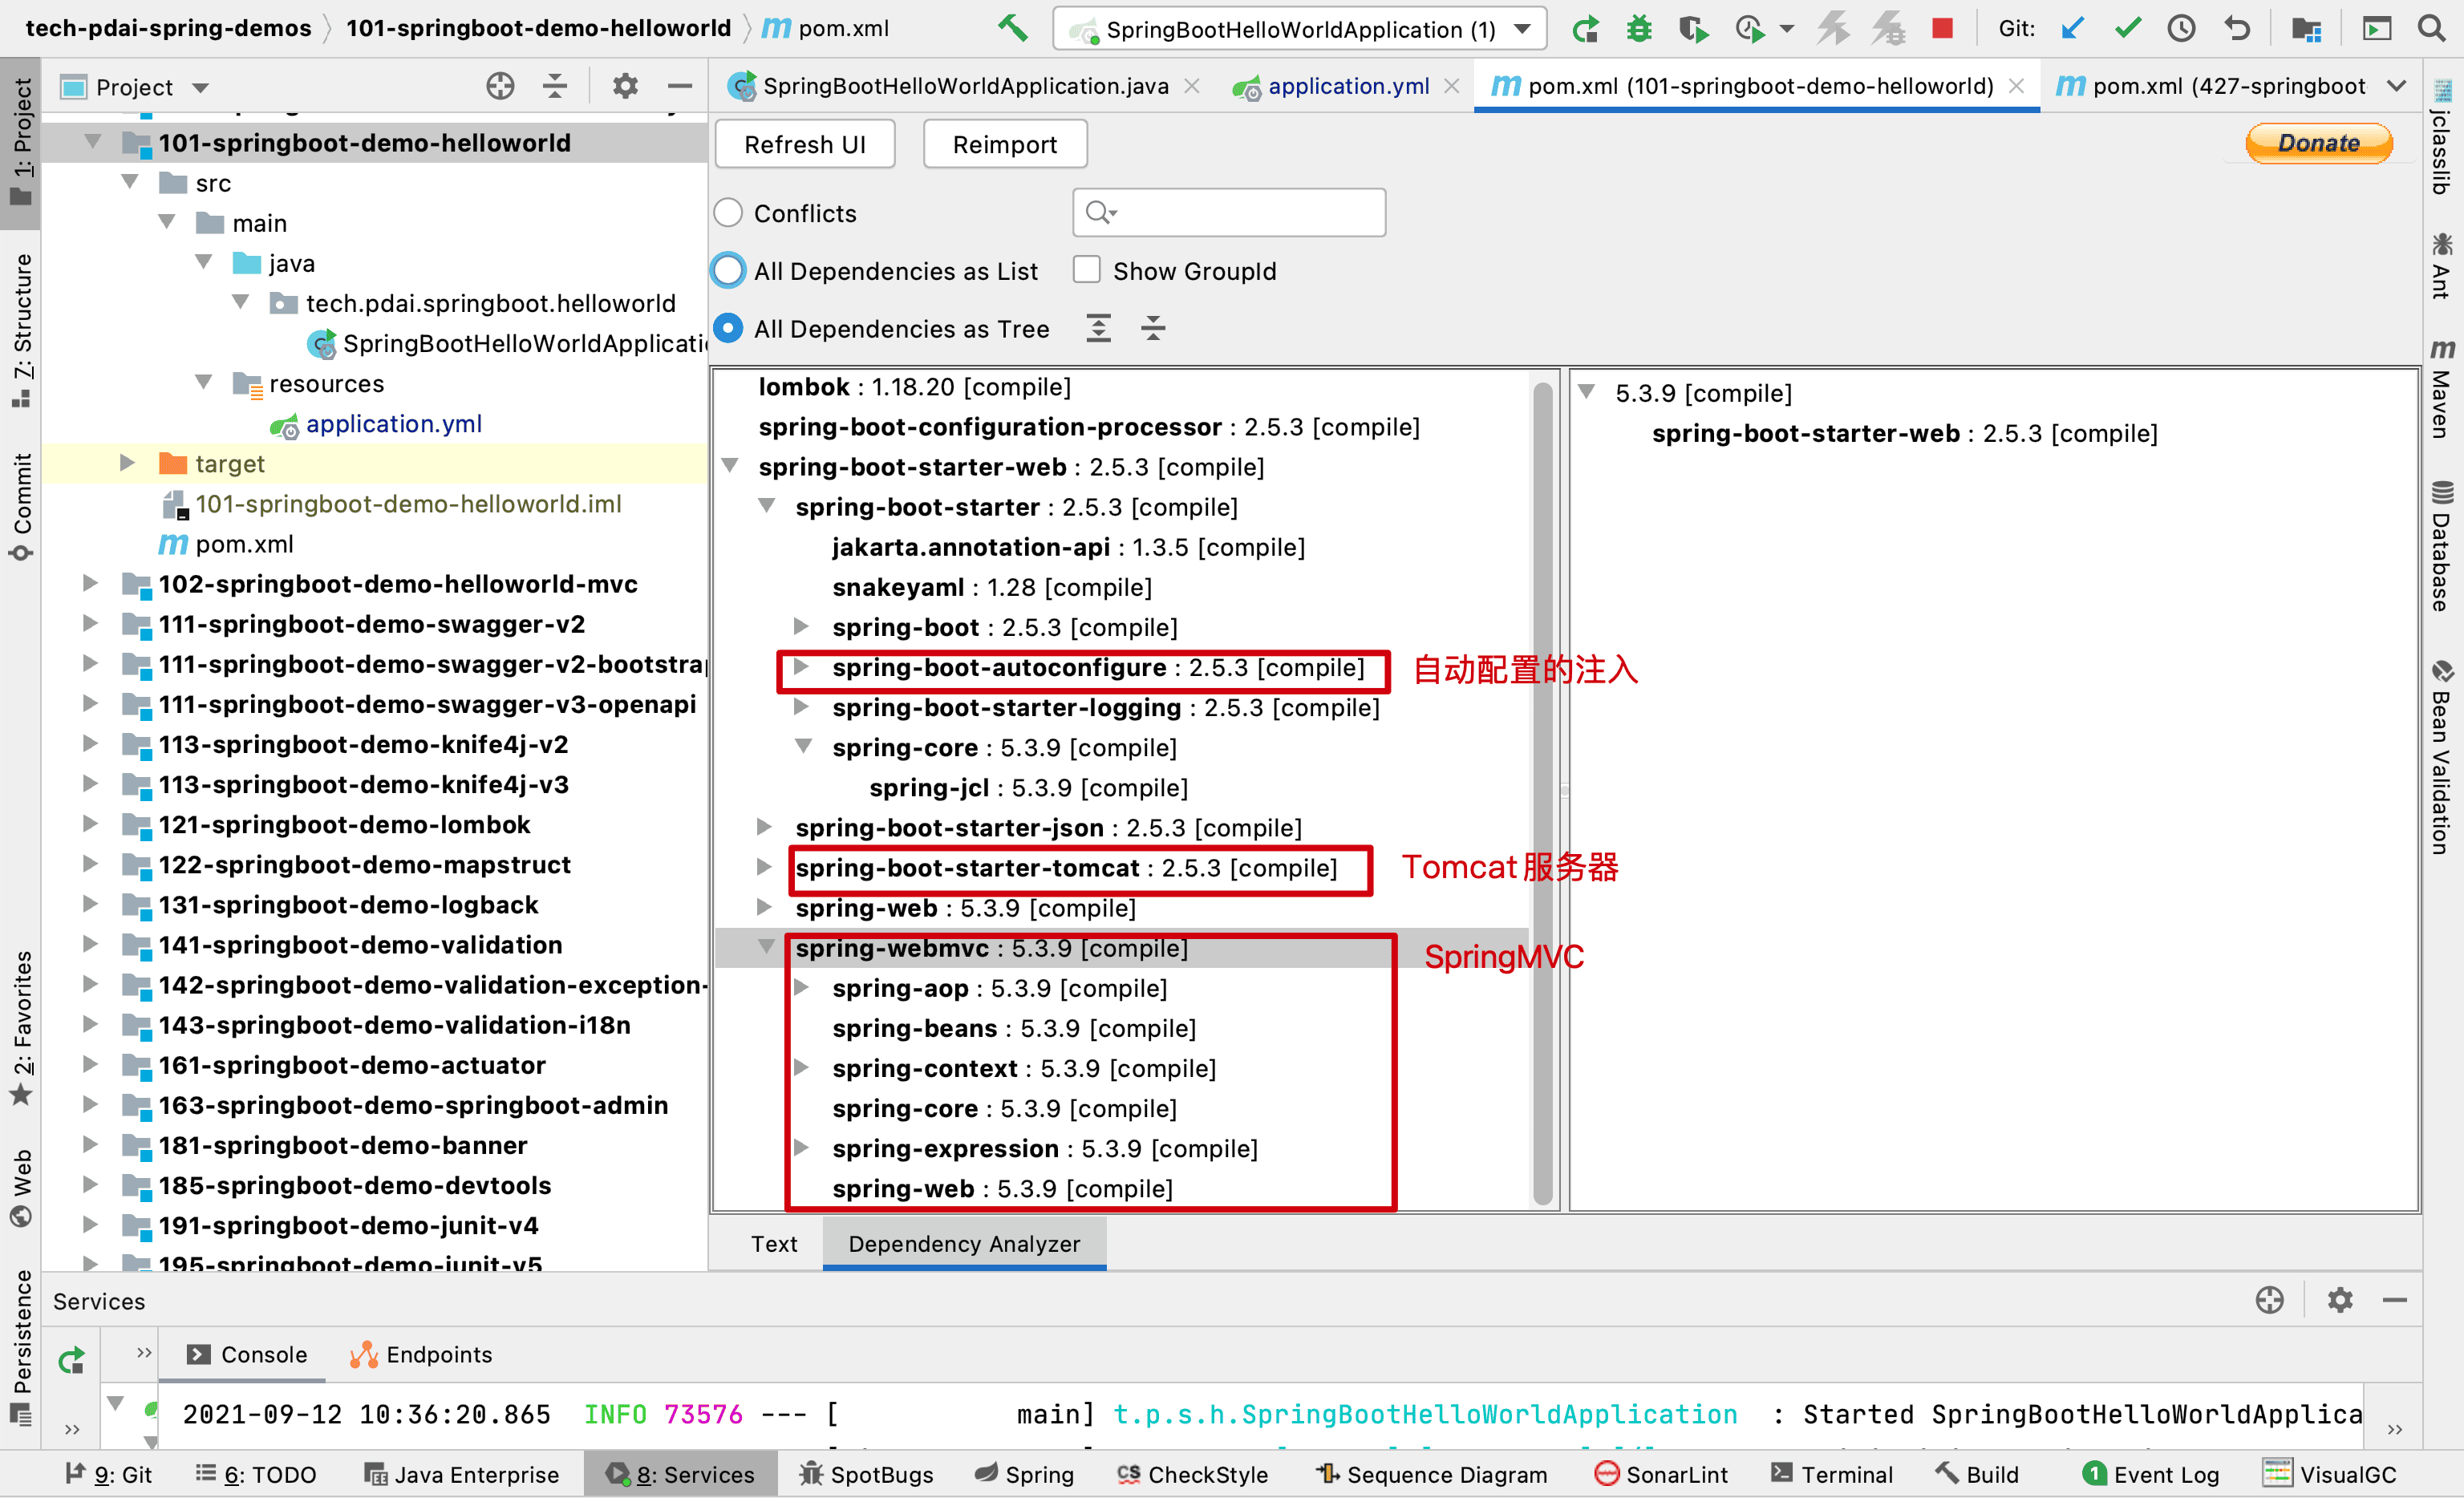
我们如何更改更多 Server 的配置呢?比如 Tomcat Server
为什么 Tomcat 默认端口是 8080? 如前文所述,SpringBoot 最强大的地方在于约定大于配置,只要你引入某个模块的 xx-start 包,它将自动注入配置,提供了这个模块的功能;比如这里我们在 POM 中添加了如下的包
1
2
3
4
<dependency>
    <groupId>org.springframework.boot</groupId>
    <artifactId>spring-boot-starter-web</artifactId>
</dependency>
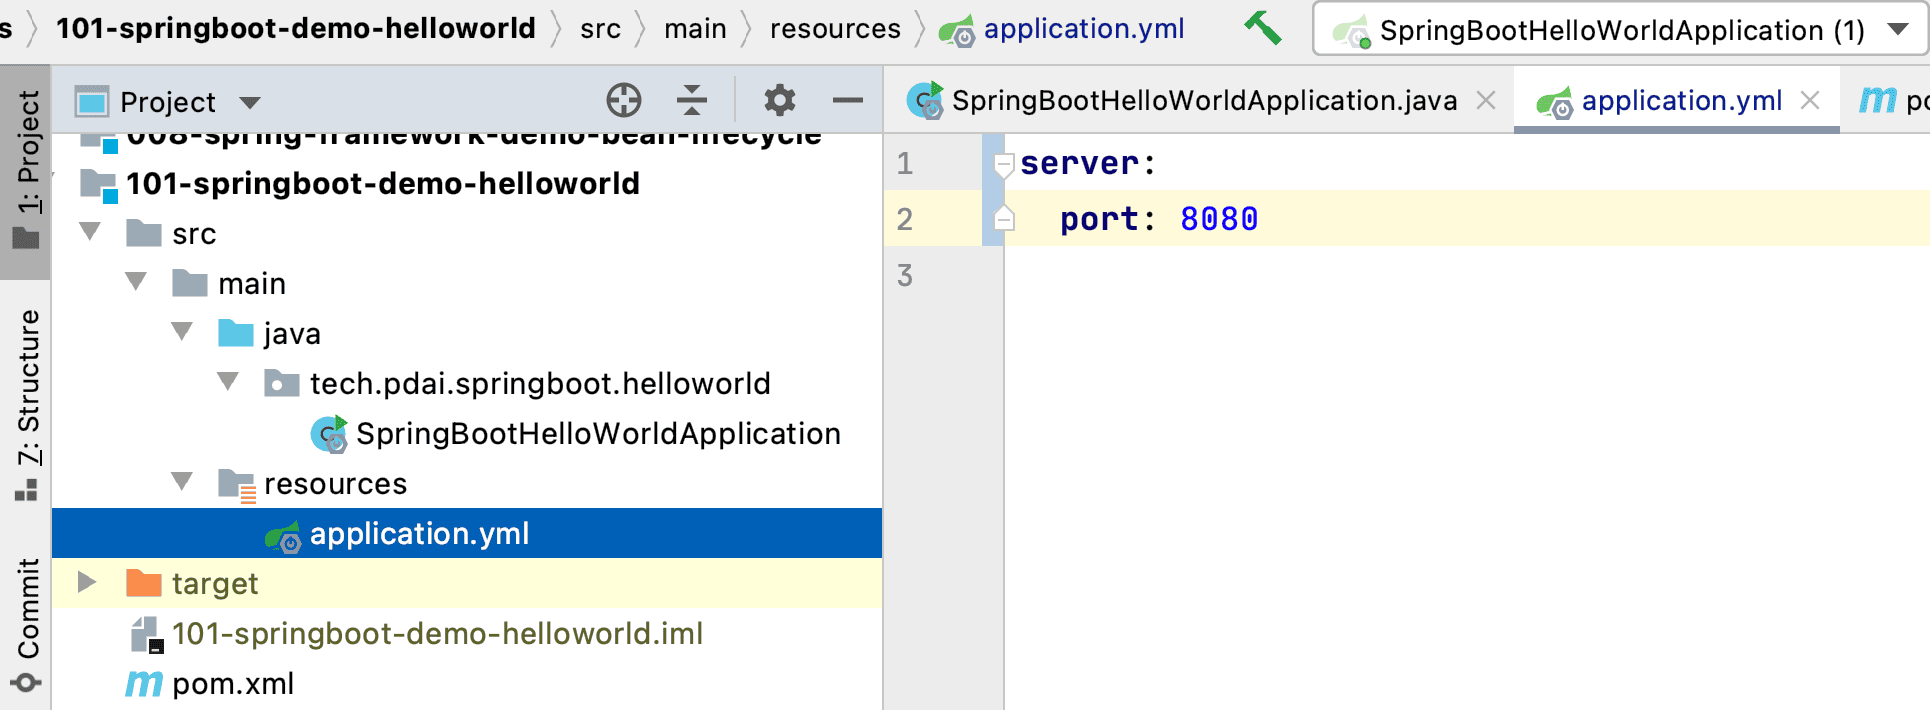
它内嵌了 Tomcat 并且提供了默认的配置,比如默认端口是 8080.
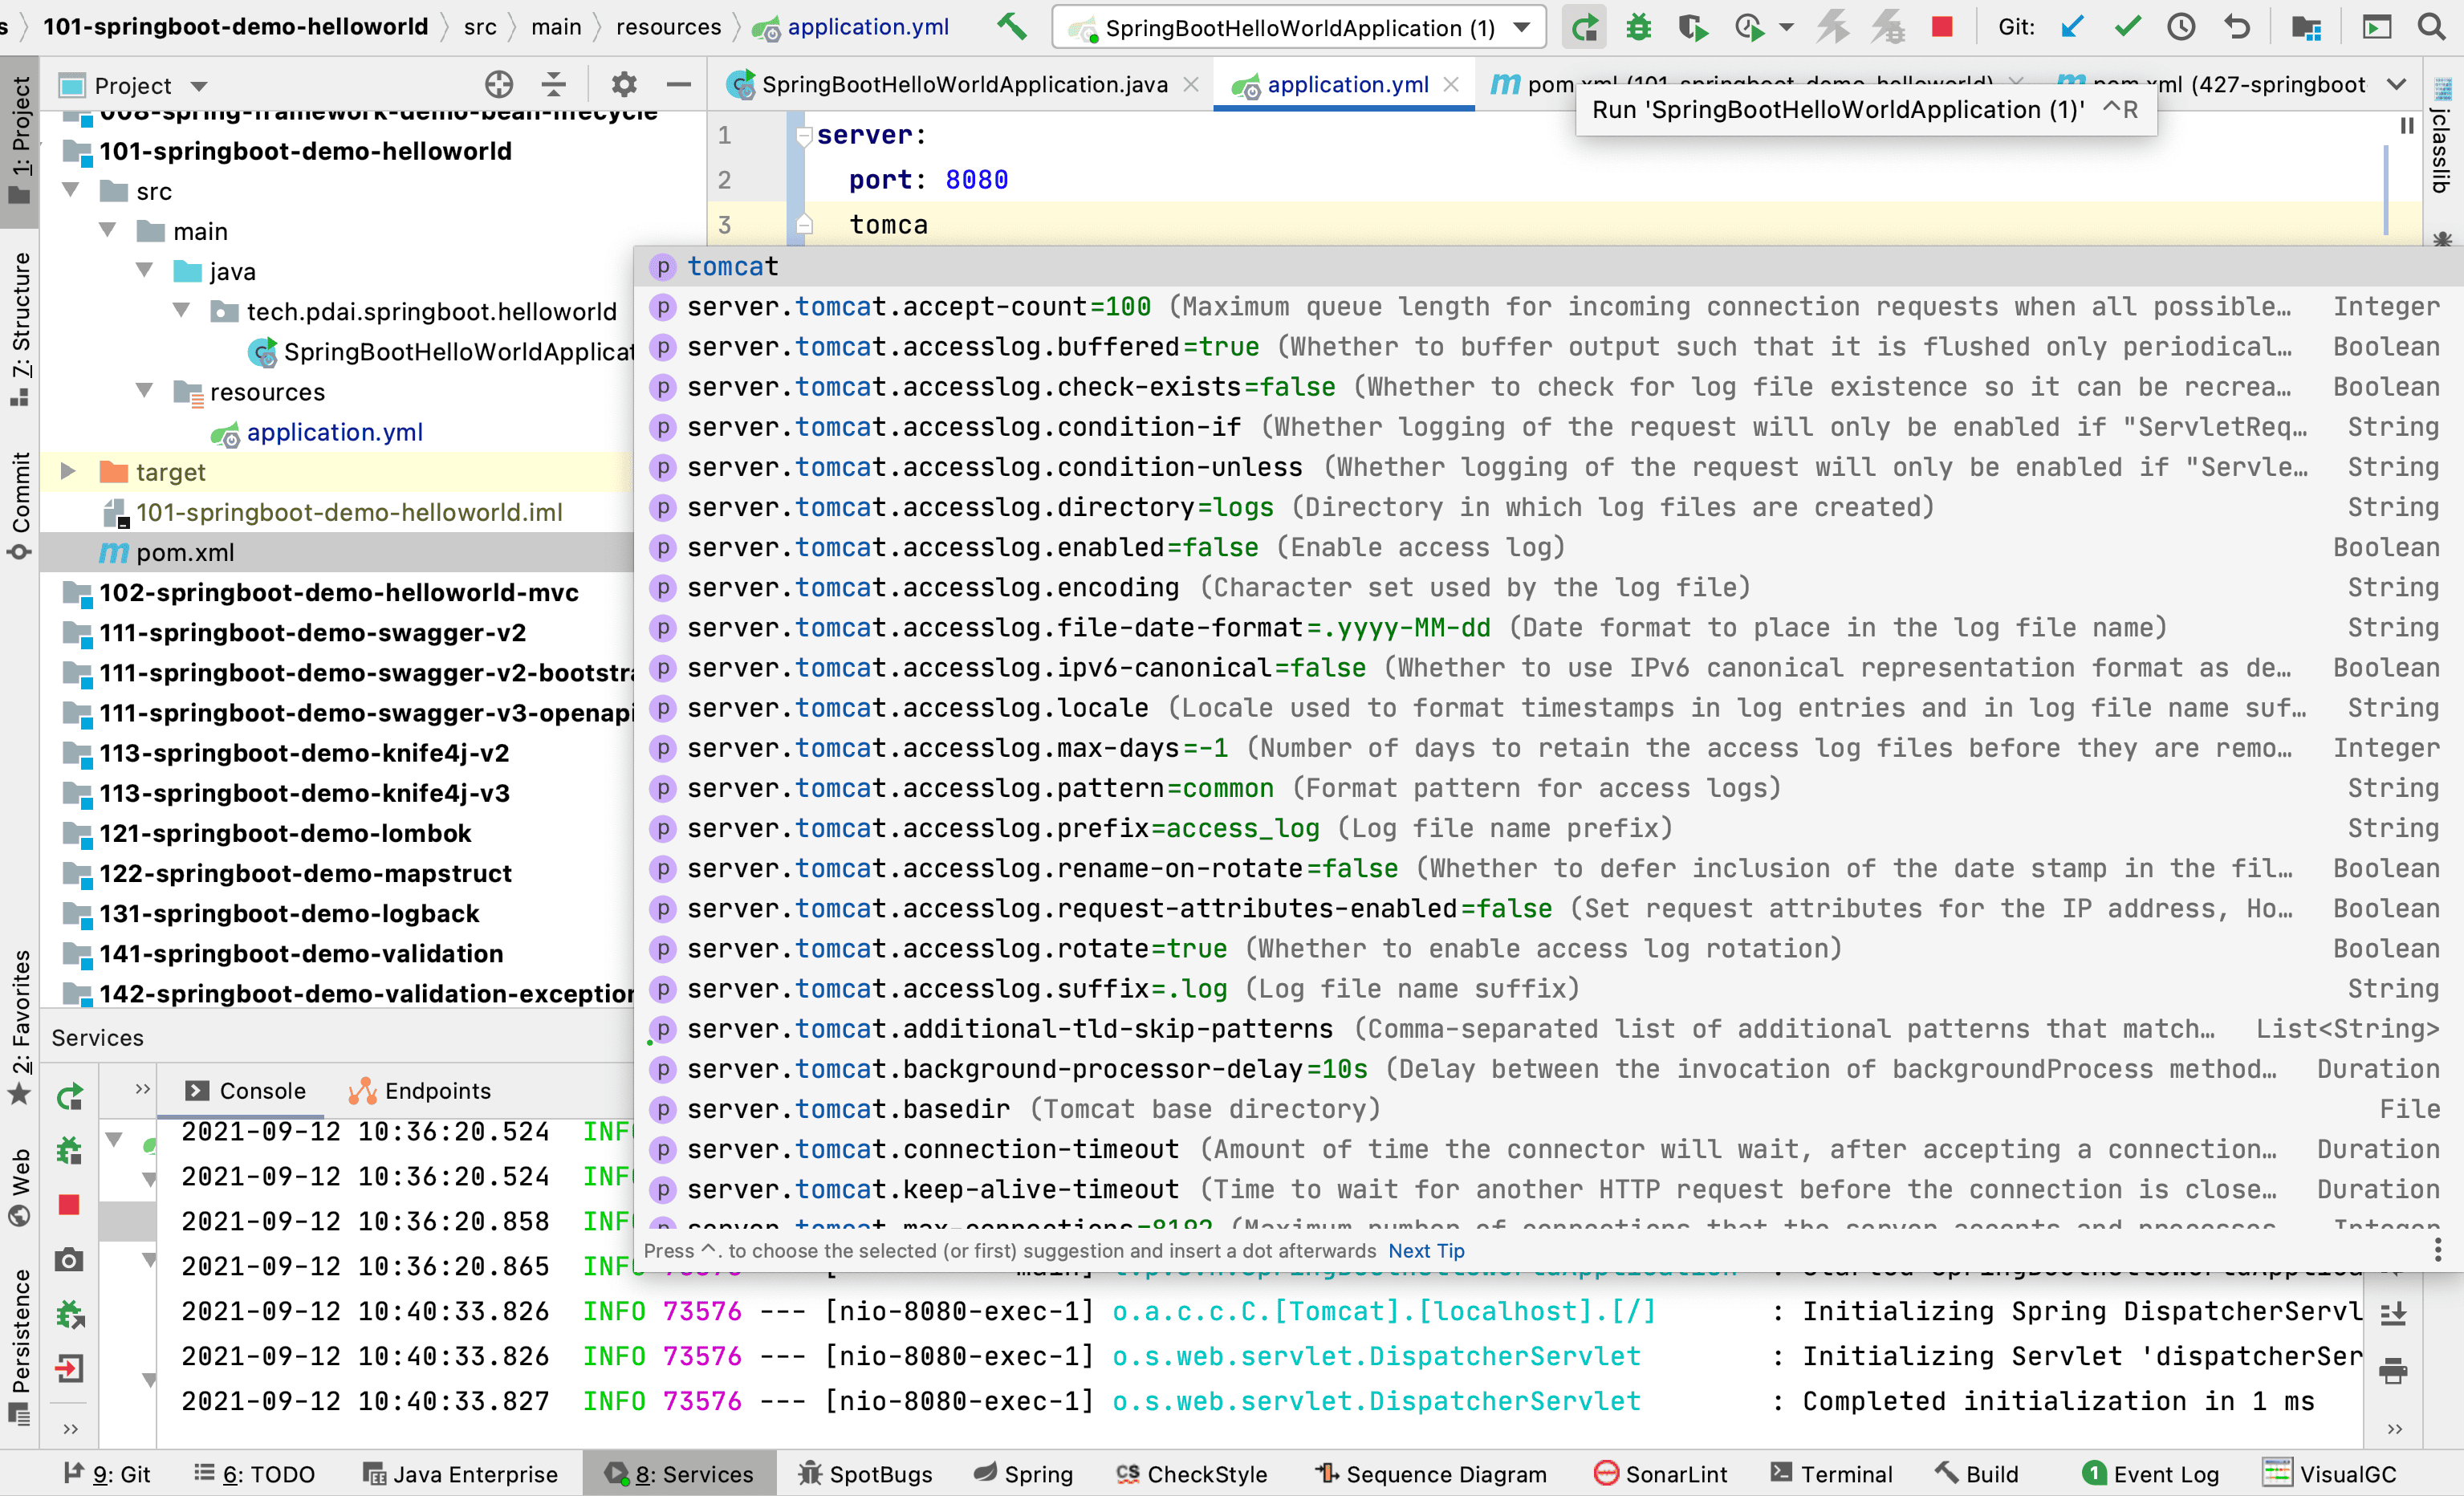
我们可以在 application.properties 或者 application.yml 中配置
如果你添加了如下包:
1
2
3
4
5
<dependency>
    <groupId>org.springframework.boot</groupId>
    <artifactId>spring-boot-configuration-processor</artifactId>
    <optional>true</optional>
</dependency>
并且你的 IDE 支持(比如 IDEA 商业版),可以自动给你配置提示
Spring Boot 教程
| [♥SpringBoot 知识体系详解♥ | Java 全栈知识体系](https://pdai.tech/md/spring/springboot/springboot.html) |