Service基础
Service 基础
什么是 service?
Service 概述
Service(服务) 是一个一种可以在后台执行长时间运行操作而没有用户界面的应用组件。服务可由其他应用组件启动(如 Activity),服务一旦被启动将在后台一直运行,即使启动服务的组件(Activity)已销毁也不受影响。此外,组件可以绑定到服务,以与之进行交互,甚至是执行进程间通信 (IPC)。 例如,服务可以处理网络事务、播放音乐,执行文件 I/O 或与内容提供程序交互,而所有这一切均可在后台进行。
Service 基础
Service 创建及清单配置
- 创建一个类继承自 Service(或它的子类,如 IntentService),重写里面的一些关键的回调方法,如 onStartCommand(),onBind() 等
- 在 Manifests 文件里面为其声明,并根据需要配置一些其他属性;在 Manifests 文件里进行声明的时候,只有
android:name属性是必须要有的。
1
2
3
4
5
6
7
8
9
10
<service
    android:enabled=["true" | "false"]
    android:exported=["true" | "false"]
    android:icon="drawable resource"
    android:isolatedProcess=["true" | "false"]
    android:label="string resource"
    android:name="string"
    android:permission="string"
    android:process="string" >
</service>
- android:enabled : 如果为 true,则这个 service 可以被系统实例化,如果为 false,则不行。默认为 true
- android:exported : 如果为 true,则其他应用的组件也可以调用这个 service 并且可以与它进行互动,如果为 false,则只有与 service 同一个应用或者相同 user ID 的应用可以开启或绑定此 service。它的默认值取决于 service 是否有 intent filters。如果一个 filter 都没有,就意味着只有指定了 service 的准确的类名才能调用,也就是说这个 service 只能应用内部使用——其他的应用不知道它的类名。这种情况下 exported 的默认值就为 false。反之,只要有了一个 filter,就意味着 service 是考虑到外界使用的情况的,这时 exported 的默认值就为 true
- android:icon : 一个象征着这个 service 的 icon
- android:isolatedProcess : 如果设置为 true,这个 service 将运行在一个从系统中其他部分分离出来的特殊进程中,我们只能通过 Service API 来与它进行交流。默认为 false。
- android:label : 显示给用户的这个 service 的名字。如果不设置,将会默认使用
<application>的 label 属性。 - android:name : 这个 service 的路径名,例如
com.lypeer.demo.MyService。这个属性是唯一一个必须填的属性。 - android:permission : 其他组件必须具有所填的权限才能启动这个 service。
- android:process : service 运行的进程的 name。默认启动的 service 是运行在主进程中的。(配置多进程)
创建 Service 实例:
1
2
3
4
5
6
7
8
9
10
11
12
13
14
15
16
17
18
19
20
21
22
23
24
public class ServiceDemo extends Service {
    @Override
    public void onCreate() {
        super.onCreate();
        // 只在service创建的时候调用一次,可以在此进行一些一次性的初始化操作
    }

    @Override
    public int onStartCommand(Intent intent, int flags, int startId) {
        //当其他组件调用startService()方法时,此方法将会被调用,在这里进行这个service主要的操作
        return super.onStartCommand(intent, flags, startId);
    }
    @Nullable
    @Override
    public IBinder onBind(Intent intent) {
        //当其他组件调用bindService()方法时,此方法将会被调用,如果不想让这个service被绑定,在此返回null即可
        return null;
    }
    @Override
    public void onDestroy() {
        // service调用的最后一个方法,在此进行资源的回收
        super.onDestroy();
    }
}
清单文件声明:
1
2
<!--in manifests -->
<service android:name=".ServiceDemo"/>
Service 的启动 startService 和绑定 bindService
见 02Serivce基础之Service生命周期和startService&bindService.md
Service 生命周期
见 02Serivce基础之Service生命周期和startService&bindService.md
前台 Service
前台服务被认为是用户主动意识到的一种服务,因此在内存不足时,系统也不会考虑将其终止。
前台服务必须为状态栏提供通知,除非服务停止或从前台删除,否则不能清除通知。
- startForeground(int id, Notification notification)
把当前服务设置为前台服务,其中 id 参数代表唯一标识通知的整型数,需要注意的是提供给 startForeground() 的整型 ID 不得为 0,而 notification 是一个状态栏的通知。 - stopForeground(boolean removeNotification)
从前台删除服务,此方法传入一个布尔值,指示是否也删除状态栏通知,true 为删除。 注意该方法并不会停止服务。 但是,如果在服务正在前台运行时将其停止,则通知也会被删除。
1
2
3
4
5
6
7
8
9
10
11
12
13
14
15
16
17
18
19
20
21
22
23
24
25
26
27
28
29
30
31
32
33
34
35
36
37
38
39
40
41
42
43
44
45
46
47
48
49
50
51
52
53
54
55
56
57
58
59
60
61
62
63
64
65
66
67
public class ForegroundService extends Service {

    /**
     * id不可设置为0,否则不能设置为前台service
     */
    private static final int NOTIFICATION_DOWNLOAD_PROGRESS_ID = 0x0001;

    private boolean isRemove=false;//是否需要移除

    /**
     * Notification
     */
    public void createNotification(){
        //使用兼容版本
        NotificationCompat.Builder builder=new NotificationCompat.Builder(this);
        //设置状态栏的通知图标
        builder.setSmallIcon(R.mipmap.ic_launcher);
        //设置通知栏横条的图标
        builder.setLargeIcon(BitmapFactory.decodeResource(getResources(),R.drawable.screenflash_logo));
        //禁止用户点击删除按钮删除
        builder.setAutoCancel(false);
        //禁止滑动删除
        builder.setOngoing(true);
        //右上角的时间显示
        builder.setShowWhen(true);
        //设置通知栏的标题内容
        builder.setContentTitle("I am Foreground Service!!!");
        //创建通知
        Notification notification = builder.build();
        //设置为前台服务
        startForeground(NOTIFICATION_DOWNLOAD_PROGRESS_ID,notification);
    }

    @Override
    public int onStartCommand(Intent intent, int flags, int startId) {
        int i=intent.getExtras().getInt("cmd");
        if(i==0){
            if(!isRemove) {
                createNotification();
            }
            isRemove=true;
        }else {
            //移除前台服务
            if (isRemove) {
                stopForeground(true);
            }
            isRemove=false;
        }
        return super.onStartCommand(intent, flags, startId);
    }

    @Override
    public void onDestroy() {
        //移除前台服务
        if (isRemove) {
            stopForeground(true);
        }
        isRemove=false;
        super.onDestroy();
    }

    @Nullable
    @Override
    public IBinder onBind(Intent intent) {
        return null;
    }
}
IBinder 接口
bindService 时,需要实现 onBind 方法,提供一个 IBinder 对象,该接口可以通过三种方法定义接口:
ServiceConnection
代表与服务的连接,它只有两个方法, onServiceConnected 和 onServiceDisconnected
- onServiceConnected(ComponentName name, IBinder service)
系统会调用该方法以传递 Service 的 onBind() 方法返回的 IBinder 对象。其中 service 便是 Service 返回的 IBinder 实现类对象,通过该对象我们便可以调用获取 Service 实例对象,进而调用 Service 的公共方法。而 ComponentName 是一个封装了组件 (Activity, Service, BroadcastReceiver, or ContentProvider) 信息的类,如包名,组件描述等信息,较少使用该参数。 - onServiceDisconnected(ComponentName name)
Android 系统会在与服务的连接意外中断时(例如当服务崩溃或被终止时)调用该方法。注意: 当客户端取消绑定时,系统 “ 绝对不会 “ 调用该方法。
扩展 Binder 类 (App 内部用,不需要跨进程)
如果服务是提供给自有应用专用的,并且 Service(服务端) 与客户端相同的进程中运行(常见情况),则应通过扩展 Binder 类并从 onBind() 返回它的一个实例来创建接口。
客户端收到 Binder 后,可利用它直接访问 Binder 实现中以及 Service 中可用的公共方法。如果我们的服务只是自有应用的后台工作线程,则优先采用这种方法。不采用该方式创建接口的唯一原因是,服务被其他应用或不同的进程调用。步骤:
1
2
3
4
1. 创建BindService服务端,继承自Service并在类中,创建一个实现IBinder 接口的实例对象并提供公共方法给客户端调用
2. 清单文件中声明Service
2. 从 onBind() 回调方法返回此 Binder 实例。
3. 在客户端中,从 onServiceConnected() 回调方法接收 Binder,并使用提供的方法调用绑定服务。
- Service 端的实现 BindService.java
1
2
3
4
5
6
7
8
9
10
11
12
13
14
15
16
17
18
19
20
21
22
23
24
25
26
27
28
29
30
31
32
33
34
35
36
37
38
39
40
41
42
43
44
45
46
47
48
49
50
51
52
53
54
55
56
57
58
59
60
61
62
63
64
65
66
67
68
69
70
71
72
73
74
public class LocalService extends Service {

    private final static String TAG = "hacket";

    private int count;
    private boolean quit;
    private Thread thread;
    private LocalBinder binder = new LocalBinder();

    /**
     * 创建Binder对象,返回给客户端即Activity使用,提供数据交换的接口
     */
    public class LocalBinder extends Binder {
        // 声明一个方法,getService。(提供给客户端调用)
        LocalService getService() {
            // 返回当前对象LocalService,这样我们就可在客户端端调用Service的公共方法了
            return LocalService.this;
        }
    }

    /**
     * 把Binder类返回给客户端
     */
    @Nullable
    @Override
    public IBinder onBind(Intent intent) {
        return binder;
    }


    @Override
    public void onCreate() {
        super.onCreate();
        Log.i(TAG, "Service is invoke Created");
        thread = new Thread(new Runnable() {
            @Override
            public void run() {
                // 每间隔一秒count加1 ,直到quit为true。
                while (!quit) {
                    try {
                        Thread.sleep(1000);
                    } catch (InterruptedException e) {
                        e.printStackTrace();
                    }
                    count++;
                }
            }
        });
        thread.start();
    }

    /**
     * 公共方法
     */
    public int getCount() {
        return count;
    }

    /**
     * 解除绑定时调用
     */
    @Override
    public boolean onUnbind(Intent intent) {
        Log.i(TAG, "Service is invoke onUnbind");
        return super.onUnbind(intent);
    }

    @Override
    public void onDestroy() {
        Log.i(TAG, "Service is invoke Destroyed");
        this.quit = true;
        super.onDestroy();
    }
}
- 客户端 BindActivity 的实现
1
2
3
4
5
6
7
8
9
10
11
12
13
14
15
16
17
18
19
20
21
22
23
24
25
26
27
28
29
30
31
32
33
34
35
36
37
38
39
40
41
42
43
44
45
46
47
48
49
50
51
52
53
54
55
56
57
58
59
60
61
62
63
64
65
66
67
68
69
70
71
72
73
74
75
76
77
78
79
80
81
82
83
84
85
86
87
88
89
public class BindActivity extends AppCompatActivity {

    protected static final String TAG = "hacket";
    Button btnBind;
    Button btnUnBind;
    Button btnGetDatas;
    TextView textView;

    private LocalService mService;
    /**
     * ServiceConnection代表与服务的连接,它只有两个方法, onServiceConnected和onServiceDisconnected,
     * 前者是在操作者在连接一个服务成功时被调用,而后者是在服务崩溃或被杀死导致的连接中断时被调用
     */
    private ServiceConnection conn = new ServiceConnection() {
        /**
         * 与服务器端交互的接口方法 绑定服务的时候被回调,在这个方法获取绑定Service传递过来的IBinder对象,
         * 通过这个IBinder对象,实现宿主和Service的交互。
         */
        @Override
        public void onServiceConnected(ComponentName name, IBinder service) {
            Log.d(TAG, "绑定成功调用:onServiceConnected");
            textView.append("绑定成功调用:onServiceConnected" + "\n");
            // 获取Binder
            LocalService.LocalBinder binder = (LocalService.LocalBinder) service;
            mService = binder.getService();
        }

        /**
         * 当取消绑定的时候被回调。但正常情况下是不被调用的,它的调用时机是当Service服务被意外销毁时,
         * 例如内存的资源不足时这个方法才被自动调用。
         */
        @Override
        public void onServiceDisconnected(ComponentName name) {
            textView.append("onServiceDisconnected" + "\n");
            mService = null;
        }
    };

    @Override
    protected void onCreate(Bundle savedInstanceState) {
        super.onCreate(savedInstanceState);
        setContentView(R.layout.activity_local_binder);
        btnBind = (Button) findViewById(R.id.BindService);
        btnUnBind = (Button) findViewById(R.id.unBindService);
        btnGetDatas = findViewById(R.id.getServiceDatas);
        textView = findViewById(R.id.tv_status);

        // 开启绑定
        btnBind.setOnClickListener(new View.OnClickListener() {
            @Override
            public void onClick(View v) {
                Log.d(TAG, "绑定调用:bindService");
                textView.append("绑定调用:bindService\n");
                Intent intent = new Intent(BindActivity.this, LocalService.class);
                //调用绑定方法
                bindService(intent, conn, Service.BIND_AUTO_CREATE);
            }
        });
        // 解除绑定
        btnUnBind.setOnClickListener(new View.OnClickListener() {
            @Override
            public void onClick(View v) {
                textView.append("解除绑定调用:unbindService\n");
                Log.d(TAG, "解除绑定调用:unbindService");
                // 解除绑定
                if (mService != null) {
                    mService = null;
                    unbindService(conn);
                }
            }
        });

        // 获取数据
        btnGetDatas.setOnClickListener(new View.OnClickListener() {
            @Override
            public void onClick(View v) {
                if (mService != null) {
                    // 通过绑定服务传递的Binder对象,获取Service暴露出来的数据

                    Log.d(TAG, "从服务端获取数据:" + mService.getCount());
                    textView.append("从服务端获取数据:" + mService.getCount() + "\n");
                } else {
                    Log.d(TAG, "还没绑定呢,先绑定,无法从服务端获取数据");
                    textView.append("还没绑定呢,先绑定,无法从服务端获取数据" + "\n");
                }
            }
        });
    }
}
使用 Messenger
Messenger 可以翻译为信使,通过它可以在不同的进程中共传递 Message 对象 (Handler 中的 Messager,因此 Handler 是 Messenger 的基础),在 Message 中可以存放我们需要传递的数据,然后在进程间传递。如果需要让接口跨不同的进程工作,则可使用 Messenger 为服务创建接口,客户端就可利用 Message 对象向服务发送命令。同时客户端也可定义自有 Messenger,以便服务回传消息。这是执行进程间通信 (IPC) 的最简单方法,因为 Messenger 会在单一线程中创建包含所有请求的队列,也就是说 Messenger 是以串行的方式处理客户端发来的消息,这样我们就不必对服务进行线程安全设计了。
使用 Messenger 步骤:
1
2
3
4
5
1. 服务端实现一个Handler,由其接受来自客户端的每个调用的回调
2. 服务端使用实现的Handler创建Messenger对象
3. 服务端通过Messenger得到一个IBinder对象,并将其通过onBind()返回给客户端
4. 客户端使用 IBinder 将 Messenger(引用服务的 Handler)实例化,然后使用后者将 Message 对象发送给服务
5. 服务端在其 Handler 中(具体地讲,是在 handleMessage() 方法中)接收每个 Message
- 服务端 Service
1
2
3
4
5
6
7
8
9
10
11
12
13
14
15
16
17
18
19
20
21
22
23
24
25
26
27
28
29
30
31
32
33
34
35
36
37
38
39
40
41
42
43
44
45
46
public class MessengerService extends Service {

    private static final String TAG = "hacket";

    /**
     * Command to the service to display a message
     */
    static final int MSG_SAY_HELLO = 1;

    /**
     * 用于接收从客户端传递过来的数据
     */
    class IncomingHandler extends Handler {
        @Override
        public void handleMessage(Message msg) {
            switch (msg.what) {
                case MSG_SAY_HELLO:
                    Log.i(TAG, "thanks,Service had receiver message from client!");
                    //回复客户端信息,该对象由客户端传递过来
                    Messenger client = msg.replyTo;
                    //获取回复信息的消息实体
                    Message replyMsg = Message.obtain(null, MessengerService.MSG_SAY_HELLO);
                    Bundle bundle = new Bundle();
                    bundle.putString("reply", "ok~,I had receiver message from you! ");
                    replyMsg.setData(bundle);
                    //向客户端发送消息
                    try {
                        client.send(replyMsg);
                    } catch (RemoteException e) {
                        e.printStackTrace();
                    }

                    break;
                default:
                    super.handleMessage(msg);
            }
        }
    }

    private Messenger messenger = new Messenger(new IncomingHandler());

    @Override
    public IBinder onBind(Intent intent) {
        return messenger.getBinder();
    }
}
- client
1
2
3
4
5
6
7
8
9
10
11
12
13
14
15
16
17
18
19
20
21
22
23
24
25
26
27
28
29
30
31
32
33
34
35
36
37
38
39
40
41
42
43
44
45
46
47
48
49
50
51
52
53
54
55
56
57
58
59
60
61
62
63
64
65
66
67
68
69
70
71
72
73
74
75
76
77
78
79
80
81
82
83
84
85
86
87
88
89
90
91
92
93
94
95
96
97
98
99
100
101
102
103
104
105
106
107
108
public class ActivityMessenger extends AppCompatActivity {
    /**
     * 与服务端交互的Messenger
     */
    Messenger mService = null;

    /**
     * Flag indicating whether we have called bind on the service.
     */
    boolean mBound;

    /**
     * 用于接收服务器返回的信息
     */
    private Messenger mRecevierReplyMsg = new Messenger(new ReceiverReplyMsgHandler());


    private static class ReceiverReplyMsgHandler extends Handler {
        private static final String TAG = "hacket";

        @Override
        public void handleMessage(Message msg) {
            switch (msg.what) {
                //接收服务端回复
                case MessengerService.MSG_SAY_HELLO:
                    Log.i(TAG, "receiver message from service:" + msg.getData().getString("reply"));
                    break;
                default:
                    super.handleMessage(msg);
            }
        }
    }

    /**
     * 实现与服务端链接的对象
     */
    private ServiceConnection mConnection = new ServiceConnection() {
        public void onServiceConnected(ComponentName className, IBinder service) {
            /**
             * 通过服务端传递的IBinder对象,创建相应的Messenger
             * 通过该Messenger对象与服务端进行交互
             */
            mService = new Messenger(service);
            mBound = true;
        }

        public void onServiceDisconnected(ComponentName className) {
            // This is called when the connection with the service has been
            // unexpectedly disconnected -- that is, its process crashed.
            mService = null;
            mBound = false;
        }
    };

    public void sayHello(View v) {
        if (!mBound) return;
        // 创建与服务交互的消息实体Message
        Message msg = Message.obtain(null, MessengerService.MSG_SAY_HELLO, 0, 0);
        //把接收服务器端的回复的Messenger通过Message的replyTo参数传递给服务端
        msg.replyTo = mRecevierReplyMsg;
        try {
            //发送消息
            mService.send(msg);
        } catch (RemoteException e) {
            e.printStackTrace();
        }
    }

    @Override
    protected void onCreate(Bundle savedInstanceState) {
        super.onCreate(savedInstanceState);
        setContentView(R.layout.activity_messenger);
        Button bindService = (Button) findViewById(R.id.bindService);
        Button unbindService = (Button) findViewById(R.id.unbindService);
        Button sendMsg = (Button) findViewById(R.id.sendMsgToService);

        bindService.setOnClickListener(new View.OnClickListener() {
            @Override
            public void onClick(View v) {
                Log.d("hacket", "onClick-->bindService");
                //当前Activity绑定服务端
                bindService(new Intent(ActivityMessenger.this, MessengerService.class), mConnection,
                        Context.BIND_AUTO_CREATE);
            }
        });

        //发送消息给服务端
        sendMsg.setOnClickListener(new View.OnClickListener() {
            @Override
            public void onClick(View v) {
                sayHello(v);
            }
        });


        unbindService.setOnClickListener(new View.OnClickListener() {
            @Override
            public void onClick(View v) {
                // Unbind from the service
                if (mBound) {
                    Log.d("hacket", "onClick-->unbindService");
                    unbindService(mConnection);
                    mBound = false;
                }
            }
        });
    }
}
使用 AIDL
由于 Messenger 是以串行的方式处理客户端发来的消息,如果当前有大量消息同时发送到 Service(服务端),Service 仍然只能一个个处理,这也就是 Messenger 跨进程通信的缺点了,因此如果有大量并发请求,Messenger 就会显得力不从心了,这时 AIDL(Android 接口定义语言)就派上用场了, 但实际上 Messenger 的跨进程方式其底层实现 就是 AIDL,只不过 android 系统帮我们封装成透明的 Messenger 罢了 。因此,如果我们想让服务同时处理多个请求,则应该使用 AIDL。 在此情况下,服务必须具备多线程处理能力,并采用线程安全式设计。使用 AIDL 必须创建一个定义编程接口的 .aidl 文件。Android SDK 工具利用该文件生成一个实现接口并处理 IPC 的抽象类,随后可在服务内对其进行扩展。
见 AIDL.md
注意
Context#startForegroundService() did not then call Service#startForeground()
Fatal Exception: android.app.RemoteServiceException
Context.startForegroundService() did not then call Service.startForeground()
解决:https://github.com/paulpv/ForegroundServiceAPI26
https://issuetracker.google.com/issues/76112072
https://console.firebase.google.com/project/qsbk-voicechat-001/crashlytics/app/android:club.jinmei.mgvoice/issues/a5e0f80f3cbaa98cbf4240a49fd7ae12?time=last-seven-days&sessionId=5EA64BBD030A00012718CF61BD7EED85_DNE_0_v2>
Service 浅杀和深杀
mashi 遇到的问题
在 Redmi Note 8T 上,运行 mashi 开启语音后,压到后台,最近任务列表中划掉卡片时房间声音未停止
原因:在最近任务列表中划掉卡片时,前台服务不会停止;(经过测试,发现只是对于 AOSP/CM/国际上对 Framework 层改动较小的 Android 系统是成立的;EMUI/MIUI 等未加入白名单的情况下,划掉卡片,前台服务也会停止;加入白名单后划掉卡片的行为与国际厂商的系统相似。)
解决:在 onTaskRemoved 方法 stopSelf()
1
2
3
4
override fun onTaskRemoved(rootIntent: Intent?) {
    super.onTaskRemoved(rootIntent)
    stopSelf()
}
- Android 应用被杀后 Notification 不取消问题及应用深杀和浅杀时 Service 生命周期情况
https://www.jianshu.com/p/169bd25ce96e
Oppo 部分手机 ava.lang.SecurityException Unable to start service Intent
异常:
1
2
3
4
java.lang.SecurityException


Unable to start service Intent { cmp=com.qiushibaike.inews/.common.service.NetworkChangedService }: Unable to launch app com.qiushibaike.inews/10206 for service Intent { cmp=com.qiushibaike.inews/.common.service.NetworkChangedService }: user 0 is restricted
解决:
这个问题的原因是 OPPO 手机自动熄屏一段时间后,会启用系统自带的电量优化管理,禁止一切自启动的 APP(用户设置的自启动白名单除外)。所以,类似的崩溃常常集中在用户休息之后的夜里或者凌晨,但是并不影响用户平时的正常使用。至于会出现 user 0 is restricted,我觉得是 coloros 系统电量优化管理做得不好的地方。对 coloros 官方的处理建议:既然禁止自启动,那么干脆直接 force stop 对应的进程,而不是抛出 RuntimeException 来让开发者买单。
https://stackoverflow.com/questions/38764497/security-exception-unable-to-start-service-user-0-is-restricted
http://bbs.coloros.com/thread-174655-3-1.html
Android 5.0 以上的隐式启动问题
- 显示启动
1
2
3
// 显示启动
Intent intent = new Intent(this,ForegroundService.class);
startService(intent);
- 隐式启动
1
2
final Intent serviceIntent=new Intent(); serviceIntent.setAction("com.android.ForegroundService");
startService(serviceIntent);
- Android5.0 以上问题
Android 5.0 之后 google 出于安全的角度禁止了隐式声明 Intent 来启动 Service。如果使用隐式启动 Service,会出没有指明 Intent 的错误 - 解决方式
- 设置 Action 和 packageName
1
2
3
final Intent serviceIntent=new Intent(); serviceIntent.setAction("com.android.ForegroundService");
serviceIntent.setPackage(getPackageName()); // 设置应用的包名
startService(serviceIntent);
- 将隐式启动转换为显示启动
1
2
3
4
5
6
7
8
9
10
11
12
13
14
15
16
17
18
19
20
21
22
23
24
public static Intent getExplicitIntent(Context context, Intent implicitIntent) {
    // Retrieve all services that can match the given intent
     PackageManager pm = context.getPackageManager();
     List<ResolveInfo> resolveInfo = pm.queryIntentServices(implicitIntent, 0);
     // Make sure only one match was found
     if (resolveInfo == null || resolveInfo.size() != 1) {
         return null;
     }
     // Get component info and create ComponentName
     ResolveInfo serviceInfo = resolveInfo.get(0);
     String packageName = serviceInfo.serviceInfo.packageName;
     String className = serviceInfo.serviceInfo.name;
     ComponentName component = new ComponentName(packageName, className);
     // Create a new intent. Use the old one for extras and such reuse
     Intent explicitIntent = new Intent(implicitIntent);
     // Set the component to be explicit
     explicitIntent.setComponent(component);
     return explicitIntent;
}
// 调用
Intent mIntent=new Intent();//辅助Intent
mIntent.setAction("com.android.ForegroundService");
final Intent serviceIntent=new Intent(getExplicitIntent(this,mIntent));
startService(serviceIntent);
Ref
- Android 中的 Service
- Android 中的 Service:默默的奉献者 (1) https://blog.csdn.net/luoyanglizi/article/details/51586437
- Android 中的 Service:Binder,Messenger,AIDL(2) http://blog.csdn.net/luoyanglizi/article/details/51594016
- Android:学习 AIDL,这一篇文章就够了 (上)
https://blog.csdn.net/luoyanglizi/article/details/51980630 - Android:学习 AIDL,这一篇文章就够了 (下)
https://blog.csdn.net/luoyanglizi/article/details/52029091
- 关于 Android Service 真正的完全详解,你需要知道的一切
https://blog.csdn.net/javazejian/article/details/52709857
Service 生命周期和 startService&bindService
Service 生命周期
| 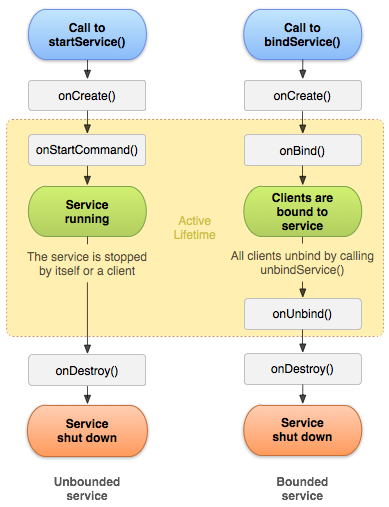 |
其中左图显示了使用 startService() 所创建的服务的生命周期,右图显示了使用 bindService() 所创建的服务的生命周期。
- 服务的整个生命周期从调用 onCreate() 开始起,到 onDestroy() 返回时结束。与 Activity 类似,服务也在 onCreate() 中完成初始设置,并在 onDestroy() 中释放所有剩余资源。例如,音乐播放服务可以在 onCreate() 中创建用于播放音乐的线程,然后在 onDestroy() 中停止该线程。
- 无论服务是通过 startService() 还是 bindService() 创建,都会为所有服务调用 onCreate() 和 onDestroy() 方法。
- 服务的有效生命周期从调用 onStartCommand() 或 onBind() 方法开始。每种方法均有 Intent 对象,该对象分别传递到 startService() 或 bindService()。
- 对于启动服务,有效生命周期与整个生命周期同时结束(即便是在 onStartCommand() 返回之后,服务仍然处于活动状态)。对于绑定服务,有效生命周期在 onUnbind() 返回时结束。
onCreate()
首次创建服务时,系统将调用此方法来执行一次性设置程序(在调用 onStartCommand() 或 onBind() 之前)。如果服务已在运行,则不会调用此方法,该方法只调用一次
onStartCommand(Intent,flags,startId)
当另一个组件(如 Activity)通过调用 startService() 请求启动服务时,系统将调用此方法。一旦执行此方法,服务即会启动并可在后台无限期运行。 如果自己实现此方法,则需要在服务工作完成后,通过调用 stopSelf() 或 stopService() 来停止服务。(在 bindService 状态下,无需实现此方法。)
由于每次启动服务(调用 startService)时,onStartCommand 方法都会被调;bindService 不会调用此方法。
onStartCommand(Intent intent, int flags, int startId)参数解释
- intent : 启动时,启动组件传递过来的 Intent,如 Activity 可利用 Intent 封装所需要的参数并传递给 Service
- flags : 表示启动请求时是否有额外数据,可选值有 0,
START_FLAG_REDELIVERY,START_FLAG_RETRY。它们具体含义如下:- 0 代表没有
- START_FLAG_REDELIVERY 这个值代表了 onStartCommand 方法的返回值为
START_REDELIVER_INTENT,而且在上一次服务被杀死前会去调用 stopSelf 方法停止服务。其中 START_REDELIVER_INTENT 意味着当 Service 因内存不足而被系统 kill 后,则会重建服务,并通过传递给服务的最后一个 Intent 调用 onStartCommand(),此时 Intent 时有值的。 - START_FLAG_RETRY 该 flag 代表当 onStartCommand 调用后一直没有返回值时,会尝试重新去调用 onStartCommand()。
- startId 指明当前服务的唯一 ID,与 stopSelfResult (int startId) 配合使用,stopSelfResult 可以更安全地根据 ID 停止服务。
onStartCommand flags
START_NOT_STICKY
如果系统在 onStartCommand() 返回后终止服务,则除非有挂起 Intent 要传递,否则系统不会重建服务。这是最安全的选项,可以避免在不必要时以及应用能够轻松重启所有未完成的作业时运行服务。
” 非粘性的 “。使用这个返回值时,如果在执行完 onStartCommand 后,服务被异常 kill 掉,系统不会自动重启该服务。
START_STICKY
如果系统在 onStartCommand() 返回后终止服务,则会重建服务并调用 onStartCommand(),但绝对不会重新传递最后一个 Intent。相反,除非有挂起 Intent 要启动服务(在这种情况下,将传递 Intent),否则系统会通过空 Intent 调用 onStartCommand()。这适用于不执行命令、但无限期运行并等待作业的媒体播放器。
如果 service 进程被 kill 掉,保留 service 的状态为开始状态,但不保留递送的 intent 对象。随后系统会尝试重新创建 service,由于服务状态为开始状态,所以创建服务后一定会调用 onStartCommand(Intent,int,int) 方法。如果在此期间没有任何启动命令被传递到 service,那么参数 Intent 将为 null。
START_REDELIVER_INTENT
如果系统在 onStartCommand() 返回后终止服务,则会重建服务,并通过传递给服务的最后一个 Intent 调用 onStartCommand()。任何挂起 Intent 均依次传递。这适用于主动执行应该立即恢复的作业(如下载文件)的服务。
重传 Intent。使用这个返回值时,如果在执行完 onStartCommand 后,服务被异常 kill 掉,系统会自动重启该服务,并将 Intent 的值传入。
START_STICKY_COMPATIBILITY
START_STICKY 的兼容版本,但不保证服务被 kill 后一定能重启。
总结
- 如果希望 Service 一直存活并且保留上次启动它的 intent 的数据,那么 return START_REDELIVER_INTENT;
- 如果只希望 Service 一直存活不需要 intent 中的数据,那么 return START_STICKY;
- 如果希望 Service 执行完指定的任务后销毁,那么 return START_NOT_STICKY;
- 如果没有什么要求那么直接 return super.onStartCommand;
onBind
当另一个组件想通过调用 bindService() 与服务绑定(例如执行 RPC)时,系统将调用此方法。在此方法的实现中,必须返回 一个 IBinder 接口的实现类,供客户端用来与服务进行通信。无论是 startService 还是 bindService,此方法必须重写,但在 startService 的情况下直接返回 null。
onUnbind
调用 unbindService 调用
onDestroy()
当服务不再使用且将被销毁时,系统将调用此方法。服务应该实现此方法来清理所有资源,如线程、注册的侦听器、接收器等,这是服务接收的最后一个调用。
startService 启动服务和 bindService 绑定服务
Service 基本上分为两种形式:
- 启动状态
当应用组件(如 Activity)通过调用 startService() 启动服务时,服务即处于 “ 启动 “ 状态。一旦启动,服务即可在后台无限期运行,即使启动服务的组件已被销毁也不受影响,除非手动调用才能停止服务, 已启动的服务通常是执行单一操作,而且不会将结果返回给调用方。
- 绑定状态
当应用组件通过调用 bindService() 绑定到服务时,服务即处于 “ 绑定 “ 状态。绑定服务提供了一个客户端 - 服务器接口,允许组件与服务进行交互、发送请求、获取结果,甚至是利用进程间通信 (IPC) 跨进程执行这些操作。 仅当与另一个应用组件绑定时,绑定服务才会运行。 多个组件可以同时绑定到该服务,但全部取消绑定后,该服务即会被销毁。
| 启动 service 的方式 | 停止 service 的方式 | service 与启动它的组件之间的通信方式 | service 的生命周期 | |
|---|---|---|---|---|
| startService | 在其他组件中调用 startService()方法后,服务即处于启动状态 | service 中调用 stopSelf()方法,或者其他组件调用 stopService()方法后,service 将停止运行 | 没有提供默认的通信方式,启动 service 后该 service 就处于独立运行状态 | 一旦启动,service 即可在后台无限期运行,即使启动 service 的组件已被销毁也不受其影响,直到其被停止 |
| bindService | 在其他组件中调用 bindService()方法后,服务即处于启动状态 | 所有与 service 绑定的组件都被销毁,或者它们都调用了 unbindService()方法后,service 将停止运行 | 可以通过 ServiceConnection进行通信,组件可以与 service 进行交互、发送请求、获取结果,甚至是利用 IPC 跨进程执行这些操作 | 当所有与其绑定的组件都取消绑定 (可能是组件被销毁也有可能是其调用了 unbindService() 方法) 后,service 将停止 |
其他组件不包括 Broadcast receiver,其无法直接启动或绑定 service;静态注册的 receiver 不能 bindservice,动态注册的则可以 (待验证);broadcastreceiver 不能 bindService,但是可以 startService 的 (待验证)
startService
其他组件通过调用 startService() 方法启动 Service,Service 的 onStartCommand() 方法被调用,其他组件通过 Intent 传递参数给 Service 可以在 onStartCommond 中获取;
当一个 Service 通过 startService 方式启动之后,它的生命周期就已经不受启动它的组件影响了,它可以在后台无限期的运行下去,只要 Service 自身没有调用 stopSelf() 并且其他的组件没有调用针对它的 stopService()。
如果确定了使用这种方式启动 service 并且不希望这个 service 被绑定的话,可以继承 IntentService。因为默认情况下 Service 将工作于应用的主线程,IntentService 工作在子线程 (如果你不要求这个 service 要同时处理多个请求,子线程顺序一个个执行),如果你有让 service 同时处理多个请求的需求,这个时候就只能去继承 Service 了,这个时候就要自己去处理工作线程那些事。
IntentService 已经做了这些事:
1
2
3
4
5
1. 创建默认的工作线程,用于在应用的主线程外执行传递给 onStartCommand() 的所有 Intent
2. 创建工作队列,用于将一个 Intent 逐一传递给 onHandleIntent() 实现,这样的话就永远不必担心多线程问题了
3. 在处理完所有启动请求后停止服务,再也不用担心我忘记调用 stopSelf() 了
4. 提供 onBind() 的默认实现(返回 null)
5. 提供 onStartCommand() 的默认实现,可将 Intent 依次发送到工作队列和 onHandleIntent() 实现
- startService,生命周期走 onCreate,onStartCommand,每调用一次 startService,onStartCommond 回调一次
- stopService 停止服务,走
onDestroy(),如果 bindService 后,调用 stopService,service 不会 onDestroy,需要再调用 unBindServce,然后就会 onUnbind,onDestroy
bindService
绑定服务;必须要重写它的 onBind() 方法。这个方法会返回一个 IBinder 对象,它是客户端用来和服务器进行交互的接口
绑定服务是 Service 的另一种变形,当 Service 处于绑定状态时,其代表着客户端 - 服务器接口中的服务器。当其他组件(如 Activity)绑定到服务时(有时我们可能需要从 Activity 组建中去调用 Service 中的方法,此时 Activity 以绑定的方式挂靠到 Service 后,我们就可以轻松地方法到 Service 中的指定方法),组件(如 Activity)可以向 Service(也就是服务端)发送请求,或者调用 Service(服务端)的方法,此时被绑定的 Service(服务端)会接收信息并响应,甚至可以通过绑定服务进行执行进程间通信 (即 IPC)。与启动服务不同的是绑定服务的生命周期通常只在为其他应用组件 (如 Activity) 服务时处于活动状态,不会无限期在后台运行,也就是说宿主 (如 Activity) 解除绑定后,绑定服务就会被销毁。那么在提供绑定的服务时,该如何实现呢?实际上我们必须提供一个 IBinder 接口的实现类,该类用以提供客户端用来与服务进行交互的编程接口,该接口可以通过三种方法定义接口:
- Binder 类
- Messenger
- AIDL
bindService 注意
- 多个客户端可同时连接到一个服务。不过,只有在第一个客户端绑定时,系统才会调用服务的 onBind() 方法来检索 IBinder。系统随后无需再次调用 onBind(),便可将同一 IBinder 传递至任何其他绑定的客户端。当最后一个客户端取消与服务的绑定时,系统会将服务销毁(除非 startService() 也启动了该服务)
- 通常情况下我们应该在客户端生命周期(如 Activity 的生命周期)的引入 (bring-up) 和退出 (tear-down) 时刻设置绑定和取消绑定操作,以便控制绑定状态下的 Service,一般有以下两种情况:
- 如果只需要在 Activity 可见时与服务交互,则应在 onStart() 期间绑定,在 onStop() 期间取消绑定
- 如果希望 Activity 在后台停止运行状态下仍可接收响应,则可在 onCreate() 期间绑定,在 onDestroy() 期间取消绑定。需要注意的是,这意味着 Activity 在其整个运行过程中(甚至包括后台运行期间)都需要使用服务,因此如果服务位于其他进程内,那么当提高该进程的权重时,系统很可能会终止该进程。
- 通常情况下 (注意),切勿在 Activity 的 onResume() 和 onPause() 期间绑定和取消绑定,因为每一次生命周期转换都会发生这些回调,这样反复绑定与解绑是不合理的。此外,如果应用内的多个 Activity 绑定到同一服务,并且其中两个 Activity 之间发生了转换,则如果当前 Activity 在下一次绑定(恢复期间)之前取消绑定(暂停期间),系统可能会销毁服务并重建服务,因此服务的绑定不应该发生在 Activity 的 onResume() 和 onPause() 中。
- 我们应该始终捕获 DeadObjectException DeadObjectException 异常,该异常是在连接中断时引发的,表示调用的对象已死亡,也就是 Service 对象已销毁,这是远程方法引发的唯一异常,DeadObjectException 继承自 RemoteException,因此我们也可以捕获 RemoteException 异常。
- 应用组件(客户端)可通过调用 bindService() 绑定到服务,Android 系统随后调用服务的 onBind() 方法,该方法返回用于与服务交互的 IBinder,而该绑定是异步执行的。
bindService 情况
- 第一次启动 Service 走
onCreate,如果 Service 已经启动了就不走; - 第一次启动 Service 会走
onBind,onServiceConnected,后面再调用 bindService 的话,不会走 onBind 和 onServiceConnnected - 如果没有 startService,只是 bindService,每次 unBindService 后再次 bindService 的话,会走
onCreate,onBind,onServiceConnected - 已经 startService,bindService 的,unbindService 后,再次 bindService 时,第一次 bindService 会走
onBind,onServiceConnected,后面每次 unbindSerivce/bindService,只会走 onServiceConnected,而不会走 onBind,连续多次 bindService,只会走一次 onServiceConnected
- service 未启动,直接调用 bindService
1
2
3
I: [onCreate] main 2019-09-25 23:59:42
I: [onBind intent=Intent { cmp=me.hacket.assistant/.samples.基础.service.bindservice.TestService }] main 2019-09-25 23:59:42
I: [onServiceConnected service=me.hacket.assistant.samples.基础.service.bindservice.TestService$MyBinder@490f3dc] main 2019-09-25 23:59:42
- startService→bindService→unBindService→bindService
1
2
3
4
5
I: [onCreate] main 2019-09-26 00:14:50
I: [onStartCommand startId=1] main 2019-09-26 00:14:50
I: [onBind intent=Intent { cmp=me.hacket.assistant/.samples.基础.service.bindservice.TestService }] main 2019-09-26 00:15:24
I: [onServiceConnected service=me.hacket.assistant.samples.基础.service.bindservice.TestService$MyBinder@f761442] main 2019-09-26 00:15:24
I: [onServiceConnected service=me.hacket.assistant.samples.基础.service.bindservice.TestService$MyBinder@f761442] main 2019-09-26 00:15:29
同一个 Intent 多次 bindService,只有第一次走 onBind,需要需要每次都走 onBind,那么需要 Intent 都不一样,可以加个时间戳啥的
1
2
3
4
5
6
7
8
9
10
11
12
13
14
15
16
17
18
19
20
21
22
fun start(view: IRoomView, roomId: Long, roomNick: String = "", from: Int): RoomManager {
    try {
        val service = Intent(view.getContext(), RoomService::class.java)
        service.putExtra(RoomService.ROOM_ID, roomId)
        service.putExtra(RoomService.ROOM_FROM, from)
        service.type = roomId.toString() + "-" + System.currentTimeMillis()
        iRoomView = view
        if (isRoomServiceRunning().not()) {
            ContextCompat.startForegroundService(view.getContext(), service)
            view.getContext().bindService(service, conn, Context.BIND_AUTO_CREATE)
            LogUtils.d(TAG, "${anchor("start")}start and bind RoomService," +
                    "roomId=$roomId,from=$from")
        } else {
            LogUtils.w(TAG, "${anchor("start")}RoomService is running,bind RoomService," +
                    "roomId=$roomId,from=$from")
            view.getContext().bindService(service, conn, Context.BIND_AUTO_CREATE)
        }
    } catch (e: Exception) {
        LogUtils.printStackTrace(e)
    }
    return this
}
- unBindService
- 只能 unBind 一次,多次 unBind 出错
1
Service not registered: me.hacket.assistant.samples.基础.service.bindservice.ServiceBindDemo$MyServiceConnection@2811033
linkToDeath
1
2
3
4
5
6
7
8
9
10
11
12
13
14
15
16
17
18
19
20
21
22
23
24
25
26
27
28
29
30
31
32
33
34
private final ServiceConnection conn = new ServiceConnection() {
    @Override
    public void onServiceConnected(ComponentName name, IBinder service) {
        Log.i(TAG, "onServiceConnected name=" + name + " ,service=" + System.identityHashCode(service) + " --" + Thread.currentThread().getName() + ",isBinderAlive=" + service.isBinderAlive());

        boolean binderAlive = service.isBinderAlive();

        mBinder = AIDLPlayService.Stub.asInterface(service);
        try {
            mBinder.asBinder().linkToDeath(mDeathProxy, 0);
        } catch (RemoteException e) {
            e.printStackTrace();
        }
    }

    @Override
    public void onServiceDisconnected(ComponentName name) {
        Log.w(TAG, "onServiceDisconnected name=" + name + " --" + Thread.currentThread().getName());
    }
};

IBinder.DeathRecipient mDeathProxy = new IBinder.DeathRecipient() {
    @Override
    public void binderDied() {
        Log.i(TAG, "【client】binderDied");
        if (mBinder == null) {
            return;
        }
        mBinder.asBinder().unlinkToDeath(this, 0);
        mBinder = null;
        // 重新绑定
        bindService();
    }
};
startService 和 bindService 混合使用
一个服务的状态有启动和绑定两种,也可以同时是这两种状态。也就是说,它既可以是启动服务(以无限期运行),也可以是绑定服务。有点需要注意的是 Android 系统仅会为一个 Service 创建一个实例对象,所以不管是启动服务还是绑定服务,操作的是同一个 Service 实例,而且由于绑定服务或者启动服务执行顺序问题将会出现以下两种情况:
- 先绑定服务后启动服务
如果当前 Service 实例先以绑定状态运行,然后再以启动状态运行,那么绑定服务将会转为启动服务运行,这时如果之前绑定的宿主(Activity)被销毁了,也不会影响服务的运行,服务还是会一直运行下去,指定收到调用停止服务或者内存不足时才会销毁该服务。 - 先启动服务后绑定服务
如果当前 Service 实例先以启动状态运行,然后再以绑定状态运行,当前启动服务并不会转为绑定服务,但是还是会与宿主绑定,只是即使宿主解除绑定后,服务依然按启动服务的生命周期在后台运行,直到有 Context 调用了 stopService() 或是服务本身调用了 stopSelf() 方法抑或内存不足时才会销毁服务。
- 启动服务的优先级确实比绑定服务高一些;
- 可以通过清单文件将服务声明为私有服务,阻止其他应用访问;
- 由于服务在其托管进程的主线程中运行(UI 线程),它既不创建自己的线程,也不在单独的进程中运行(除非另行指定)。这意味着,如果服务将执行任何耗时事件或阻止性操作(例如 MP3 播放或联网)时,则应在服务内创建新线程来完成这项工作,简而言之,耗时操作应该另起线程执行。只有通过使用单独的线程,才可以降低发生 “ 应用无响应 “(ANR) 错误的风险,这样应用的主线程才能专注于用户与 Activity 之间的交互, 以达到更好的用户体验。
startService 和 bindService 测试情况
1、start/stop
先调用 startService,再 stopService
1
2
3
4
2019-11-01 10:44:36.723 I: [onCreate] main 2019-11-01 10:44:36
2019-11-01 10:44:36.729 I: [onStartCommand startId=1] main 2019-11-01 10:44:36

2019-11-01 10:44:39.255 I: [onDestroy ] main 2019-11-01 10:44:39
2、bind/unbind
先调用 bindService,再调用 unBindService
1
2
3
4
5
2019-11-01 10:45:34.873 I: [onCreate] main 2019-11-01 10:45:34
2019-11-01 10:45:34.878 I: [onBind intent=Intent { cmp=me.hacket.assistant/.samples.基础.service.bindservice.TestService }] main 2019-11-01 10:45:34
2019-11-01 10:45:34.886 I: [onServiceConnected service=me.hacket.assistant.samples.基础.service.bindservice.TestService$MyBinder@1da4241] main 2019-11-01 10:45:34
2019-11-01 10:45:37.677 I: [onUnbind intent=Intent { cmp=me.hacket.assistant/.samples.基础.service.bindservice.TestService }] main 2019-11-01 10:45:37
2019-11-01 10:45:37.681 I: [onDestroy ] main 2019-11-01 10:45:37
3、start/bind/unbind/stop
依次调用 start、bind、unbind、stop
1
2
3
4
5
6
7
8
9
2019-11-01 10:46:27.094 I: [onCreate] main 2019-11-01 10:46:27
2019-11-01 10:46:27.099 I: [onStartCommand startId=1] main 2019-11-01 10:46:27

2019-11-01 10:46:33.791 I: [onBind intent=Intent { cmp=me.hacket.assistant/.samples.基础.service.bindservice.TestService }] main 2019-11-01 10:46:33
2019-11-01 10:46:33.802 I: [onServiceConnected service=me.hacket.assistant.samples.基础.service.bindservice.TestService$MyBinder@c84c37a] main 2019-11-01 10:46:33

2019-11-01 10:46:40.192 I: [onUnbind intent=Intent { cmp=me.hacket.assistant/.samples.基础.service.bindservice.TestService }] main 2019-11-01 10:46:40

2019-11-01 10:46:45.816 I: [onDestroy ] main 2019-11-01 10:46:45
4、bind/stop/unbind
先 bind,再 stop,最后 unbind
调用 stop 没有反应的
1
2
3
4
5
6
2019-11-01 10:47:33.457 I: [onCreate] main 2019-11-01 10:47:33
2019-11-01 10:47:33.461 I: [onBind intent=Intent { cmp=me.hacket.assistant/.samples.基础.service.bindservice.TestService }] main 2019-11-01 10:47:33
2019-11-01 10:47:33.471 I: [onServiceConnected service=me.hacket.assistant.samples.基础.service.bindservice.TestService$MyBinder@6277bce] main 2019-11-01 10:47:33

2019-11-01 10:48:04.387 I: [onUnbind intent=Intent { cmp=me.hacket.assistant/.samples.基础.service.bindservice.TestService }] main 2019-11-01 10:48:04
2019-11-01 10:48:04.392 I: [onDestroy ] main 2019-11-01 10:48:04
5、start/bind/stop/unbind
依次调用 start、bind、stop、unbind
stop 调用没有反应,需要调用 unbind 后解绑和 onDestory 依次调用
1
2
3
4
5
6
7
8
2019-11-01 10:48:51.730 I: [onCreate] main 2019-11-01 10:48:51
2019-11-01 10:48:51.735 I: [onStartCommand startId=1] main 2019-11-01 10:48:51

2019-11-01 10:48:52.620 I: [onBind intent=Intent { cmp=me.hacket.assistant/.samples.基础.service.bindservice.TestService }] main 2019-11-01 10:48:52
2019-11-01 10:48:52.631 I: [onServiceConnected service=me.hacket.assistant.samples.基础.service.bindservice.TestService$MyBinder@a1f2778] main 2019-11-01 10:48:52

2019-11-01 10:49:07.158 I: [onUnbind intent=Intent { cmp=me.hacket.assistant/.samples.基础.service.bindservice.TestService }] main 2019-11-01 10:49:07
2019-11-01 10:49:07.162 I: [onDestroy ] main 2019-11-01 10:49:07
Service 杂七杂八
如何保证 Service 不被杀死?
- 提高进程优先级,降低进程被杀死的概率
- 监控手机锁屏解锁事件,在屏幕锁屏时启动 1 个像素的 Activity,在用户解锁时将 Activity 销毁掉
- 启动前台 Service
- 提升 Service 优先级:在 Manifest 文件中对于 intent-filter 可以通过
android:priority=1000这个属性设置最高优先级,1000 是最高值,如果数字越小则优先级越低,同时适用于广播。
- 在进程被杀死后,进行拉活
- 注册高频率广播接收器,唤起进程(如网络变化、解锁屏幕、开机等)
- 双进程互相唤起
- 依靠系统唤起
- 在 onDestroy 方法里重启 Service:Service+BroadCast 方式,就是当 Service 走 onDestroy 的时候,发送一个自定义广播,当收到广播的时候,重新启动 Service
- 依靠第三方
- 根据终端不同,在 MIUI 接入小米推送、华为手机接入华为推送;其他手机可以考虑接入腾讯信鸽或极光推送