Navigation
Navigation 基础
https://developer.android.com/guide/navigation
入门
Navigation 提供功能
- 处理 Fragment 事务
- 默认情况下,正确处理往返操作
- 转场动画
- 实现 deeplink(深层链接)
- 包括导航界面模式(例如抽屉式导航和底部导航),用户只需完成极少的额外工作
- SafeArgs 在目标之间导航和传递数据时提供类型安全的 Gradle 插件
- ViewModel 支持
依赖
1
2
3
4
5
6
7
8
9
10
11
12
13
14
15
16
17
dependencies {
  def nav_version = "2.3.0-alpha01"

  // Java language implementation
  implementation "androidx.navigation:navigation-fragment:$nav_version"
  implementation "androidx.navigation:navigation-ui:$nav_version"

  // Kotlin
  implementation "androidx.navigation:navigation-fragment-ktx:$nav_version"
  implementation "androidx.navigation:navigation-ui-ktx:$nav_version"

  // Dynamic Feature Module Support
  implementation "androidx.navigation:navigation-dynamic-features-fragment:$nav_version"

  // Testing Navigation
  androidTestImplementation "androidx.navigation:navigation-testing:$nav_version"
}
使用入门
向 Activity 添加 NavHost
导航宿主是 Navigation 组件的核心部分之一。导航宿主是一个空容器,用户在您的应用中导航时,目的地会在该容器中交换进出。
导航宿主必须派生于 NavHost。Navigation 组件的默认 NavHost 实现 (NavHostFragment) 负责处理 Fragment 目的地的交换。
注意:Navigation 组件旨在用于具有一个主 Activity 和多个 Fragment 目的地的应用。主 Activity 与导航图相关联,且包含一个负责根据需要交换目的地的 NavHostFragment。在具有多个 Activity 目的地的应用中,每个 Activity 均拥有其自己的导航图。
通过 XML 添加 NavHostFragment
1
2
3
4
5
6
7
8
9
10
11
12
13
14
15
16
17
18
19
20
21
22
23
24
25
26
27
<?xml version="1.0" encoding="utf-8"?>
<android.support.constraint.ConstraintLayout
    xmlns:android="http://schemas.android.com/apk/res/android"
    xmlns:app="http://schemas.android.com/apk/res-auto"
    xmlns:tools="http://schemas.android.com/tools"
    android:layout_width="match_parent"
    android:layout_height="match_parent"
    tools:context=".MainActivity">

    <androidx.appcompat.widget.Toolbar
        .../>

    <fragment
        android:id="@+id/nav_host_fragment"
        android:name="androidx.navigation.fragment.NavHostFragment"
        android:layout_width="0dp"
        android:layout_height="0dp"
        app:layout_constraintLeft_toLeftOf="parent"
        app:layout_constraintRight_toRightOf="parent"
        app:layout_constraintTop_toTopOf="parent"
        app:layout_constraintBottom_toBottomOf="parent"
        app:defaultNavHost="true"
        app:navGraph="@navigation/nav_graph" />

    <com.google.android.material.bottomnavigation.BottomNavigationView
        .../>
</android.support.constraint.ConstraintLayout>
android:name属性包含NavHost实现的类名称。app:navGraph属性将 ``NavHostFragment` 与导航图相关联。导航图会在此 NavHostFragment 中指定用户可以导航到的所有目的地。app:defaultNavHost="true"属性确保您的 NavHostFragment 会拦截系统返回按钮。请注意,只能有一个默认 NavHost。如果同一布局(例如,双窗格布局)中有多个主机,请务必仅指定一个默认 NavHost。
向导航图添加目的地
您可以从现有的 Fragment 或 Activity 创建目的地。您还可以使用 Navigation Editor 创建新目的地,或创建占位符以便稍后替换为 Fragment 或 Activity。
Activity
1
2
3
4
5
<activity
    android:id="@+id/nav_video_learning"
    android:name="me.hacket.assistant.samples.ui.自定义控件.tipsview.GiftTipsView测试"
    android:label="音视频学习"
    tools:layout="@layout/activity_gift_tips_view_demo" />
Fragment
1
2
3
4
5
6
7
8
9
10
11
12
13
<fragment
    android:id="@+id/page1Fragment"
    android:name="me.hacket.assistant.samples.google.architecture.navigation.helloworld.MainPage1Fragment"
    android:label="fragment_page1"
    tools:layout="@layout/fragment_main_page1">
    <action
        android:id="@+id/action_page2"
        app:destination="@id/page2Fragment"
        app:enterAnim="@anim/slide_right_in"
        app:exitAnim="@anim/slide_left_out"
        app:popEnterAnim="@anim/slide_left_in"
        app:popExitAnim="@anim/slide_right_out" />
</fragment>
DialogFragment
1
2
3
4
5
6
7
8
9
10
11
12
13
<?xml version="1.0" encoding="utf-8"?>
<navigation xmlns:android="http://schemas.android.com/apk/res/android"
    xmlns:app="http://schemas.android.com/apk/res-auto"
    android:id="@+id/nav_graph">
    <dialog
        android:id="@+id/my_dialog_fragment"
        android:name="androidx.navigation.myapp.MyDialogFragment">
        <argument android:name="myarg" android:defaultValue="@null" />
            <action
                android:id="@+id/myaction"
                app:destination="@+id/another_destination"/>
    </dialog>
</navigation>
placeholder
您可以使用占位符来表示尚未实现的目的地。占位符充当目的地的视觉表示形式。在 Navigation Editor 中,您可以像使用任何其他目的地一样使用占位符。
您必须先将占位符的类属性更改为现有目的地,然后再运行应用。占位符不会导致编译错误,但如果您尝试导航到占位符目的地,则应用会抛出运行时异常
1
2
3
4
5
6
<?xml version="1.0" encoding="utf-8"?>
<navigation xmlns:android="http://schemas.android.com/apk/res/android"
    xmlns:app="http://schemas.android.com/apk/res-auto"
    android:id="@+id/nav_graph">
    <fragment android:id="@+id/placeholder2" />
</navigation>
目的地详解
点击一个目的地以将其选中,并注意 Attributes 面板中显示的以下属性:
Type字段指示在您的源代码中,该目的地是作为 Fragment、Activity 还是其他自定义类实现的。Label字段包含该目的地的 XML 布局文件的名称。ID字段包含该目的地的 ID,它用于在代码中引用该目的地。Class下拉列表显示与该目的地相关联的类的名称。您可以点击此下拉列表,将相关联的类更改为其他目的地类型
点击 Text 标签页可查看导航图的 XML 视图。XML 中同样包含该目的地的 id、name、label 和 layout 属性,如下所示:
1
2
3
4
5
6
7
8
9
10
11
<?xml version="1.0" encoding="utf-8"?>
<navigation xmlns:app="http://schemas.android.com/apk/res-auto"
    xmlns:tools="http://schemas.android.com/tools"
    xmlns:android="http://schemas.android.com/apk/res/android"
    app:startDestination="@id/blankFragment">
    <fragment
        android:id="@+id/blankFragment"
        android:name="com.example.cashdog.cashdog.BlankFragment"
        android:label="Blank"
        tools:layout="@layout/fragment_blank" />
</navigation>
将某个屏幕指定为起始目的地
起始目的地是用户打开您的应用时看到的第一个屏幕,也是用户退出您的应用时看到的最后一个屏幕。Navigation Editor 使用房子图标 来表示起始目的地。
所有目的地就绪后,您便可以选择起始目的地,具体操作步骤如下:
- 在
Design标签页中,点击相应目的地,使其突出显示。 - 点击
Assign start destination按钮小房子。或者,您可以右键点击该目的地,然后点击Set as Start Destination。
连接目的地
操作是指目的地之间的逻辑连接。操作在导航图中以箭头表示。操作通常会将一个目的地连接到另一个目的地
导航到目的地
导航到目的地是使用 NavController 完成的,后者是一个在 NavHost 中管理应用导航的对象。每个 NavHost 均有自己的相应 NavController。您可以使用以下方法之一检索 NavController:
Kotlin:
1
2
3
Fragment.findNavController()
View.findNavController()
Activity.findNavController(viewId: Int)
Java:
1
2
3
NavHostFragment.findNavController(Fragment)
Navigation.findNavController(Activity, @IdRes int viewId)
Navigation.findNavController(View)
使用 Safe Args 确保类型安全
要在目的地之间导航,建议使用 Safe Args Gradle 插件。该插件可以生成简单的对象和构建器类,这些类支持在目的地之间进行类型安全的导航和参数传递。
1
2
3
4
5
6
7
8
9
buildscript {
    repositories {
        google()
    }
    dependencies {
        def nav_version = "2.3.0-alpha01"
        classpath "androidx.navigation:navigation-safe-args-gradle-plugin:$nav_version"
    }
}
要生成适用于 Java 或 Java 和 Kotlin 混合模块的 Java 语言代码,请将以下行添加到应用或模块的 build.gradle 文件中:
1
apply plugin: "androidx.navigation.safeargs"
适用于 Kotlin 独有的模块的 Kotlin 代码:
1
apply plugin: "androidx.navigation.safeargs.kotlin"
您的
gradle.properties文件 中必须具有android.useAndroidX=true
启用 Safe Args 后,该插件会生成代码,其中包含您定义的每个操作的类和方法。对于每个操作,Safe Args 还会为每个源目的地(生成相应操作的目的地)生成一个类。生成的类的名称由源目的地类的名称和 “Directions” 一词组成
例如,如果目的地的名称为 SpecifyAmountFragment,则生成的类的名称为 SpecifyAmountFragmentDirections。生成的类为源目的地中定义的每个操作提供了一个静态方法。该方法会将任何定义的操作参数作为参数,并返回可传递到 navigate() 的 NavDirections 对象。
例如,假设我们的导航图包含一个操作,该操作将源目的地 SpecifyAmountFragment 和接收目的地 ConfirmationFragment 连接起来。
Safe Args 会生成一个 SpecifyAmountFragmentDirections 类,其中只包含一个 actionSpecifyAmountFragmentToConfirmationFragment() 方法(该方法会返回 NavDirections 对象)。然后,您可以将返回的 NavDirections 对象直接传递到 navigate(),如以下示例所示:
1
2
3
4
5
6
override fun onClick(view: View) {
    val action =
        SpecifyAmountFragmentDirections
            .actionSpecifyAmountFragmentToConfirmationFragment()
    view.findNavController().navigate(action)
}
传递参数
Fragment 传统传参数
传递参数:
1
2
3
4
5
//未采用safe args的传递方式
Bundle bundle = new Bundle();
bundle.putString("user_name", "Michael");
bundle.putInt("age", 30);
Navigation.findNavController(v).navigate(R.id.action_mainFragment_to_secondFragment, bundle);
接收参数:
1
2
3
4
5
6
7
8
//未采用safe args的接收方式
Bundle bundle = getArguments();
if(bundle != null) {
    String userName = bundle.getString("user_name");
    int age = bundle.getInt("age");
    TextView tvSub = view.findViewById(R.id.tvSub);
    tvSub.setText(userName + age);
}
SafeArgs
- 引入 gradle 插件
1
2
3
4
5
6
// 根目录build.gradle的buildscript/dependencies引入
def nav_version = "2.3.0-alpha01"
classpath "androidx.navigation:navigation-safe-args-gradle-plugin:$nav_version"

// build.gradle引入Gradle插件
apply plugin: "androidx.navigation.safeargs.kotlin"
- navigation graph 定义参数
1
2
3
4
5
6
7
8
9
10
11
12
13
14
15
16
17
18
19
20
21
22
23
24
25
26
27
28
29
30
31
<fragment
    android:id="@+id/userCenterFragment"
    android:name="me.hacket.assistant.samples.google.architecture.navigation.usercenter.fragment.UserCenterFragment"
    android:label="UserCenterFragment"
    tools:layout="@layout/fragment_main_user_center">
    <argument
        android:name="user_name"
        android:defaultValue="unknown"
        app:argType="string" />
    <argument
        android:name="user_name"
        android:defaultValue="28"
        app:argType="int" />
    <argument
        android:name="hobby"
        app:argType="reference" />
    <action
        android:id="@+id/action_userCenterInfoFragment"
        app:destination="@+id/user_center_info_graph"
        app:enterAnim="@anim/slide_right_in"
        app:exitAnim="@anim/slide_left_out"
        app:popEnterAnim="@anim/slide_left_in"
        app:popExitAnim="@anim/slide_right_out" />
    <action
        android:id="@+id/action_userLevelActivity"
        app:destination="@+id/userCenterLevelNav"
        app:enterAnim="@anim/slide_right_in"
        app:exitAnim="@anim/slide_left_out"
        app:popEnterAnim="@anim/slide_left_in"
        app:popExitAnim="@anim/slide_right_out" />
</fragment>
- SafeArgs 插件生成 xxxArgs 类和 xxxDirections 类
传递参数:
1
2
3
//通过safe args完成参数传递
Bundle bundle = new MainFragmentArgs.Builder().setUserName("Michael").setAge(30).build().toBundle();
Navigation.findNavController(v).navigate(R.id.action_mainFragment_to_secondFragment, bundle);
接收参数:
1
2
3
4
5
6
7
8
//通过safe args完成参数接收
Bundle bundle = getArguments();
if(bundle != null) {
    String userName = MainFragmentArgs.fromBundle(getArguments()).getUserName();
    int age = MainFragmentArgs.fromBundle(getArguments()).getAge();
    TextView tvSub = view.findViewById(R.id.tvSub);
    tvSub.setText(userName + age);
}
核心类
导航图 xml
Navigation 组件使用导航图管理应用导航。导航图是一种资源文件,其中包含您应用的所有目的地和逻辑连接(后者也称为 “ 操作 “,用户可以执行以从一个目的地导航到另一个目的地)。您可以使用 Android Studio 中的 Navigation Editor 管理应用的导航图。
Navigation Editor
设计导航图
顶级导航图
<navigation> 元素是导航图的根元素。当您向图表添加目的地和连接操作时,可以看到相应的 <destination> 和 <action> 元素在此处显示为子元素
嵌套导航图 <navigation>
可以嵌套导航视图,嵌套导航图用标签 <navigation> 包裹
嵌套导航图表(介绍了Navigation Editor操作)
navigation 包裹的嵌套导航图,外部引用也只能引入对外提供的
android:id,其里面的 id 外部是不知道的
库模块导航图 <include>
可通过 <include> 引用其他导航图
1
2
3
4
5
6
7
8
9
10
11
12
13
14
15
16
17
18
19
20
21
22
23
24
25
26
27
28
29
30
31
32
33
34
35
36
<!--nav_graph_user_center_user.xml-->
<?xml version="1.0" encoding="utf-8"?>
<navigation xmlns:android="http://schemas.android.com/apk/res/android"
    xmlns:app="http://schemas.android.com/apk/res-auto"
    xmlns:tools="http://schemas.android.com/tools"
    app:startDestination="@id/userCenterFragment">
    <fragment
        android:id="@+id/userCenterFragment"
        android:name="me.hacket.assistant.samples.google.architecture.navigation.usercenter.fragment.UserCenterFragment"
        android:label="UserCenterFragment"
        tools:layout="@layout/fragment_main_user_center">
        <action
            android:id="@+id/action_userCenterInfoFragment"
            app:destination="@id/user_center_info_graph"
            app:enterAnim="@anim/slide_right_in"
            app:exitAnim="@anim/slide_left_out"
            app:popEnterAnim="@anim/slide_left_in"
            app:popExitAnim="@anim/slide_right_out" />
    </fragment>
    <include app:graph="@navigation/nav_graph_user_center_user_info" />
</navigation>

<!--nav_graph_user_center_user_info.xml-->
<?xml version="1.0" encoding="utf-8"?>
<navigation xmlns:android="http://schemas.android.com/apk/res/android"
    xmlns:app="http://schemas.android.com/apk/res-auto"
    xmlns:tools="http://schemas.android.com/tools"
    android:id="@+id/user_center_info_graph"
    app:startDestination="@id/userCenterInfoFragment">
    <fragment
        android:id="@+id/userCenterInfoFragment"
        android:name="me.hacket.assistant.samples.google.architecture.navigation.usercenter.fragment.UserCenterInfoFragment"
        android:label="UserCenterInfoFragment"
        tools:layout="@layout/fragment_main_user_center_info">
    </fragment>
</navigation>
通过 include 的导航图,需要提供一个 id,否则报错,include 是导航图的文件名;include 的导航图,其他地方需要用到,他们的 destination 只能填写导航图的 android:id,其里面的 id 是不知道的,否则报下面的错。
1
java.lang.IllegalArgumentException: navigation destination me.hacket.assistant:id/userCenterInfoFragment referenced from action me.hacket.assistant:id/action_userCenterInfoFragment is unknown to this NavController
全局操作
您可以使用全局操作来创建多个目的地可以使用的常见操作。例如,您可能想要在不同的目的地中使用能够导航到同一应用主屏幕的按钮。
1
2
3
4
5
6
7
8
9
10
11
12
13
<?xml version="1.0" encoding="utf-8"?>
<navigation xmlns:app="http://schemas.android.com/apk/res-auto"
            xmlns:tools="http://schemas.android.com/tools"
            xmlns:android="http://schemas.android.com/apk/res/android"
            android:id="@+id/main_nav"
            app:startDestination="@id/mainFragment">

  ...

  <action android:id="@+id/action_global_mainFragment"
          app:destination="@id/mainFragment"/>

</navigation>
NavHost 接口
获取 NavController;显示导航图中目标的空白容器。导航组件包含一个默认 NavHost 实现 (NavHostFragment),可显示 Fragment 目标。
NavGraphFragment 导航界面的容器
默认的 Fragment 的容器
NavController
在 NavHost 中管理应用导航的对象。当用户在整个应用中移动时,NavController 会安排 NavHost 中目标内容的交换;在应用中导航时,您告诉 NavController,您想沿导航图中的特定路径导航至特定目标,或直接导航至特定目标。NavController 便会在 NavHost 中显示相应目标。
Navigation 分析
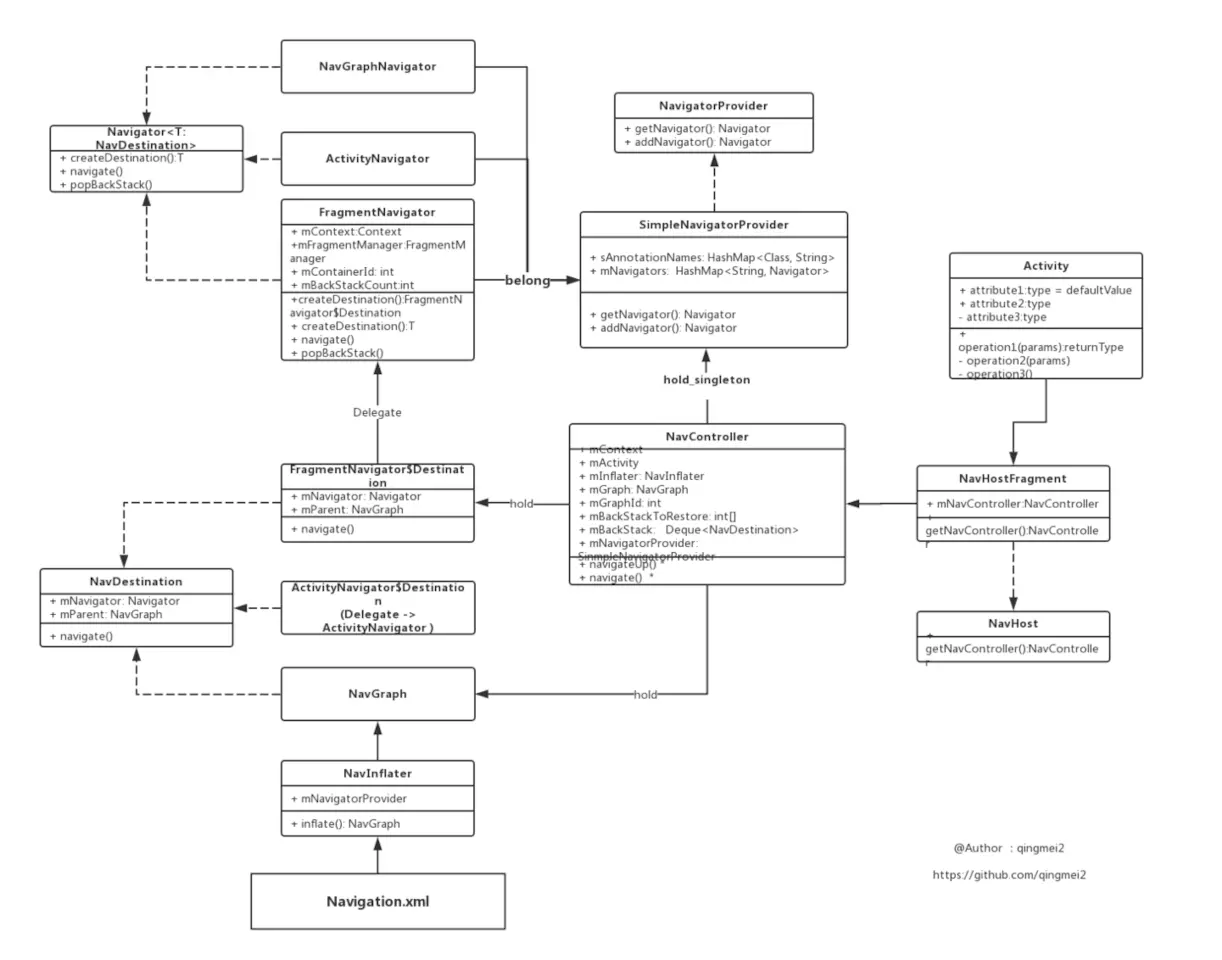
NavHostFragment
NavHostFragment 应当有两个作用:
- 作为 Activity 导航界面的载体
- 管理并控制导航的行为
导航界面的载体
在 NavHostFragment 的创建时,为它创建一个对应的 FrameLayout 作为 导航界面的载体
1
2
3
4
5
6
7
8
9
10
public View onCreateView(@NonNull LayoutInflater inflater, @Nullable ViewGroup container,
                         @Nullable Bundle savedInstanceState) {
    FragmentContainerView containerView = new FragmentContainerView(inflater.getContext());
    // When added via XML, this has no effect (since this FragmentContainerView is given the ID
    // automatically), but this ensures that the View exists as part of this Fragment's View
    // hierarchy in cases where the NavHostFragment is added programmatically as is required
    // for child fragment transactions
    containerView.setId(getContainerId());
    return containerView;
}
管理控制导航行为 NavController
代码设计应该遵循 单一职责原则,因此,我们应该将 管理并控制导航的行为 交给另外一个类,这个类的作用应该仅是 控制导航行为,因此我们命名为 NavController。
Fragment 理应持有这个 NavController 的实例,并将导航行为 委托 给它,这里我们将 NavController 的持有者抽象为一个 接口,以便于以后的拓展,就是 NavHost 接口
NavHost 获取 NavController
1
2
3
public interface NavHost {
    NavController getNavController();
}
推荐实例 NavHostController。
Navigation hosts must:
- 处理 NavController 的 save 和 restore 状态
- 调用
Navigation.setViewNavController(View, NavController)在其 root view - 系统后退事件交由 NavController,而不是手动调用
NavController.popBackStack()或NavHostController.setOnBackPressedDispatcher(androidx.activity.OnBackPressedDispatcher)
可选 Navigation host 考虑调用
NavHostController.setLifecycleOwner(LifecycleOwner)让 NavController 关联 LifecycleNavHostController.setViewModelStore(ViewModelStore)调用开启NavControllerViewModel,以便通过NavController#getViewModelStoreOwner(int)将 nav graph 保存在 ViewModel 生命周期内
为了保证导航的 安全,NavHostFragment 在其 作用域 内,理应 有且仅有一个 NavController 的实例。
调用 Navigation.findNavController(View),参数中传递任意一个 view 的引用似乎都可以获取 NavController,如何保证唯一?
1
2
3
4
5
6
7
8
9
10
11
private static NavController findViewNavController(@NonNull View view) {
    while (view != null) {
        NavController controller = getViewNavController(view);
        if (controller != null) {
            return controller;
        }
        ViewParent parent = view.getParent();
        view = parent instanceof View ? (View) parent : null;
    }
    return null;
}
findNavController(View)内部实现是通过 遍历 View 树,直到找到最底部 NavHostFragment 中的 NavController 对象,并将其返回
NavController 如何初始化?
在 NavHostFragment 中的 onCreate() 初始化,下面的操作都是根据 NavHost 注释应该提供的功能实现
1
2
3
4
5
6
7
8
9
10
11
12
13
14
15
16
17
18
19
20
21
22
23
24
25
26
27
28
29
30
31
32
33
34
35
36
37
38
39
40
41
42
43
44
45
46
47
48
// NavHostFragment
public void onCreate(@Nullable Bundle savedInstanceState) {
    super.onCreate(savedInstanceState);
    final Context context = requireContext();

    mNavController = new NavHostController(context); // new一个NavHostController
    mNavController.setLifecycleOwner(this); // 关联Lifecycle
    mNavController.setOnBackPressedDispatcher(requireActivity().getOnBackPressedDispatcher()); // back事件处理
    // Set the default state - this will be updated whenever
    // onPrimaryNavigationFragmentChanged() is called
    mNavController.enableOnBackPressed(
            mIsPrimaryBeforeOnCreate != null && mIsPrimaryBeforeOnCreate);
    mIsPrimaryBeforeOnCreate = null;
    mNavController.setViewModelStore(getViewModelStore()); // 关联ViewModel
    onCreateNavController(mNavController); // 添加默认FragmentNavigator,需要自定义Navigator,重写该方法

    // 下面就是状态的恢复和保存
    Bundle navState = null;
    if (savedInstanceState != null) {
        navState = savedInstanceState.getBundle(KEY_NAV_CONTROLLER_STATE);
        if (savedInstanceState.getBoolean(KEY_DEFAULT_NAV_HOST, false)) {
            mDefaultNavHost = true;
            getParentFragmentManager().beginTransaction()
                    .setPrimaryNavigationFragment(this)
                    .commit();
        }
        mGraphId = savedInstanceState.getInt(KEY_GRAPH_ID);
    }

    if (navState != null) {
        // Navigation controller state overrides arguments
        mNavController.restoreState(navState);
    }
    if (mGraphId != 0) {
        // Set from onInflate()
        mNavController.setGraph(mGraphId);
    } else {
        // See if it was set by NavHostFragment.create()
        final Bundle args = getArguments();
        final int graphId = args != null ? args.getInt(KEY_GRAPH_ID) : 0;
        final Bundle startDestinationArgs = args != null
                ? args.getBundle(KEY_START_DESTINATION_ARGS)
                : null;
        if (graphId != 0) {
            mNavController.setGraph(graphId, startDestinationArgs);
        }
    }
}
1
2
3
4
5
6
7
8
9
10
11
12
13
14
15
16
@Override
public void onViewCreated(@NonNull View view, @Nullable Bundle savedInstanceState) {
    super.onViewCreated(view, savedInstanceState);
    if (!(view instanceof ViewGroup)) {
        throw new IllegalStateException("created host view " + view + " is not a ViewGroup");
    }
    Navigation.setViewNavController(view, mNavController);
    // When added programmatically, we need to set the NavController on the parent - i.e.,
    // the View that has the ID matching this NavHostFragment.
    if (view.getParent() != null) {
        View rootView = (View) view.getParent();
        if (rootView.getId() == getId()) {
            Navigation.setViewNavController(rootView, mNavController);
        }
    }
}
在 onViewCreated,设置 Navigation.setViewNavController(view, mNavController);,保证 View 都可以获取到 NavController 实例。
NavController
NavController 的职责:
- 对 navigation 资源文件夹下 nav_graph.xml 的解析
- 通过解析 xml,获取所有 Destination(目标点)的 引用 或者 Class 的引用
- 记录当前栈中 Fragment 的顺序
- 管理控制 导航行为
对 navigation 资源文件夹下 nav_graph.xml 的解析
NavController 持有了一个 NavInflater,并通过 NavInflater 解析 xml 文件,通过 setGraph(),最终调用到 onGraphCreated
1
2
3
4
5
6
7
8
9
10
11
12
13
14
15
16
17
18
19
20
21
22
23
24
25
26
27
28
29
30
31
32
33
34
35
36
37
38
39
40
41
42
43
44
private void onGraphCreated(@Nullable Bundle startDestinationArgs) {
    if (mNavigatorStateToRestore != null) {
        ArrayList<String> navigatorNames = mNavigatorStateToRestore.getStringArrayList(
                KEY_NAVIGATOR_STATE_NAMES);
        if (navigatorNames != null) {
            for (String name : navigatorNames) {
                Navigator<?> navigator = mNavigatorProvider.getNavigator(name);
                Bundle bundle = mNavigatorStateToRestore.getBundle(name);
                if (bundle != null) {
                    navigator.onRestoreState(bundle);
                }
            }
        }
    }
    if (mBackStackToRestore != null) {
        for (Parcelable parcelable : mBackStackToRestore) {
            NavBackStackEntryState state = (NavBackStackEntryState) parcelable;
            NavDestination node = findDestination(state.getDestinationId());
            if (node == null) {
                throw new IllegalStateException("unknown destination during restore: "
                        + mContext.getResources().getResourceName(state.getDestinationId()));
            }
            Bundle args = state.getArgs();
            if (args != null) {
                args.setClassLoader(mContext.getClassLoader());
            }
            NavBackStackEntry entry = new NavBackStackEntry(mContext, node, args,
                    mLifecycleOwner, mViewModel,
                    state.getUUID(), state.getSavedState());
            mBackStack.add(entry);
        }
        updateOnBackPressedCallbackEnabled();
        mBackStackToRestore = null;
    }
    if (mGraph != null && mBackStack.isEmpty()) {
        boolean deepLinked = !mDeepLinkHandled && mActivity != null
                && handleDeepLink(mActivity.getIntent());
        if (!deepLinked) {
            // Navigate to the first destination in the graph
            // if we haven't deep linked to a destination
            navigate(mGraph, startDestinationArgs, null, null);
        }
    }
}
获取了所有 Destination(即 XXXFragment ) 的 Class 对象,并通过反射的方式,实例化对应的 Destination,通过一个队列保存:
1
2
3
4
5
private NavInflater mInflater;  //NavInflater
private NavGraph mGraph;        //解析xml,得到NavGraph
private int mGraphId;           //xml对应的id,比如 nav_graph_main
//所有Destination的队列,用来处理回退栈
private final Deque<NavDestination> mBackStack = new ArrayDeque<>();
NavGraph(NavDestination) 和 Navigator
NavDestination
导航的 Destination 抽象出来,这个类叫做 NavDestination ——无论 Fragment 也好,Activity 也罢,只要实现了这个接口,对于 NavController 来讲,他们都是 Destination(目标点) 而已。
Navigator
对于不同的 NavDestination 来讲,它们之间的导航方式是不同的,这完全有可能(比如 Activity 和 Fragment),如何根据不同的 NavDestination 进行不同的 导航处理 呢?
Google 的方式是通过抽象出一个类,这个类叫做 Navigator
1
2
3
4
5
6
7
8
9
10
11
12
public abstract class Navigator<D extends NavDestination> {
    //省略很多代码,包括部分抽象方法,这里仅阐述设计的思路!

    //导航
    public abstract void navigate(@NonNull D destination, @Nullable Bundle args,
                                     @Nullable NavOptions navOptions);
    //实例化NavDestination(就是Fragment)
    public abstract D createDestination();

    //后退导航
    public abstract boolean popBackStack();
}
Navigator(导航者) 的职责很单纯:
- 能够实例化对应的 NavDestination
- 能够指定导航
- 能够后退导航
不同的 Navigator 对应不同的 NavDestination,FragmentNavigator 对应的是 FragmentNavigator.Destination
以 FragmentNavigator 为例,我们来看看它是如何执行的职责:
1
2
3
4
5
6
7
8
9
10
11
12
13
14
15
16
17
18
19
20
21
22
23
24
25
26
27
public class FragmentNavigator extends Navigator<FragmentNavigator.Destination> {
    //省略大量非关键代码,请以实际代码为主!

    @Override
    public boolean popBackStack() {
        return mFragmentManager.popBackStackImmediate();
    }

    @NonNull
    @Override
    public Destination createDestination() {
        // 实际执行了好几层,但核心代码如下,通过反射实例化Fragment
        Class<? extends Fragment> clazz = getFragmentClass();
        return  clazz.newInstance();
    }

    @Override
    public void navigate(@NonNull Destination destination, @Nullable Bundle args,
                            @Nullable NavOptions navOptions) {
        // 实际上还是通过FragmentTransaction进行的跳转处理
        final Fragment frag = destination.createFragment(args);
        final FragmentTransaction ft = mFragmentManager.beginTransaction();
        ft.replace(mContainerId, frag);
        ft.commit();
        mFragmentManager.executePendingTransactions();
    }
}
NavController 初始时就添加了 2 中 Navigator:
1
2
3
4
5
6
7
8
9
10
11
12
public NavController(@NonNull Context context) {
    mContext = context;
    while (context instanceof ContextWrapper) {
        if (context instanceof Activity) {
            mActivity = (Activity) context;
            break;
        }
        context = ((ContextWrapper) context).getBaseContext();
    }
    mNavigatorProvider.addNavigator(new NavGraphNavigator(mNavigatorProvider));
    mNavigatorProvider.addNavigator(new ActivityNavigator(mContext));
}
Ref
- Android 官方架构组件 Navigation:大巧不工的 Fragment 管理框架
https://blog.csdn.net/mq2553299/article/details/80445952