Java多线程
多线程
线程基础
进程和线程的区别?
- 一个程序至少有一个进程,一个进程至少有一个线程
- 线程的划分尺度小于进程,使得多线程程序的并发性高
- 进程在执行过程中拥有独立的内存单元,而多个线程共享内存,从而极大地提高了程序的运行效率
- 进程是具有⼀定独⽴功能的程序关于某个数据集合上的⼀次运⾏活动,进程是系统进⾏资源分配和调度的⼀个独⽴单位。线程是进程的⼀个实体,是 CPU 调度和分派的基本单位,它是⽐进程更⼩的能独⽴运⾏的基本单位。线程⾃⼰基本上不拥有系统资源,只拥有⼀点在运⾏中必不可少的资源 (如程序计数器,⼀组寄存器和栈),但是它可与同属⼀个进程的其他的线程共享进程所拥有的全部资源
- 进程有独⽴的地址空间,⼀个进程崩溃后,在保护模式下不会对其它进程产⽣影响,⽽线程只是⼀个进程中的不同执⾏路径。线程有⾃⼰的堆栈和局部变量,但线程之间没有单独的地址空间,⼀个线程死掉就等于整个进程死掉,所以多进程的程序要⽐多线程的程序健壮,但在进程切换时,耗费资源较⼤,效率要差⼀些。
如何启动新的线程
- 继承 Thread 类
1
2
3
4
5
6
7
static class Thread1 extends Thread {
    @Override
    public void run() {
        super.run();
        System.out.println("继承thread");
    }
}
- 实现 Runnable 接口
1
2
3
4
5
6
static class Runnable1 implements Runnable {
    @Override
    public void run() {
        System.out.println("实现Runnable");
    }
}
线程的状态及状态转换
Java 中线程的状态分为 6 种:
- NEW:初始状态,新创建了一个线程对象,但还没有调用 start() 方法。
- RUNNABLE:运行状态,Java 线程中将就绪(ready)和运行中(running)两种状态笼统的称为运行状态。线程对象创建后,其他线程调用了该对象的 start() 方法,该状态的线程位于可运行线程池中,等待被线程调度选中,获取 CPU 使用权,以下几种方式会进入可运行状态:
- 调用 start() 方法
- 拿到对象锁
调用 yield() 方法,进入就绪状态
可运行状态的线程获得了 CPU 时间片,执行程序代码,就进入到了运行状态
- BLOCKED:阻塞状态, 进入 synchronized 锁代码块中,等待锁
- 等待 (WAITING):进入该状态的线程需要等待其他线程做出一些特定动作(通知或中断)。1
- 超时等待 (TIMED_WAITING):该状态不同于 WAITING,它可以在指定的时间后自行返回。
- 终止 (TERMINATED):表示该线程已经执行完毕。
线程状态转换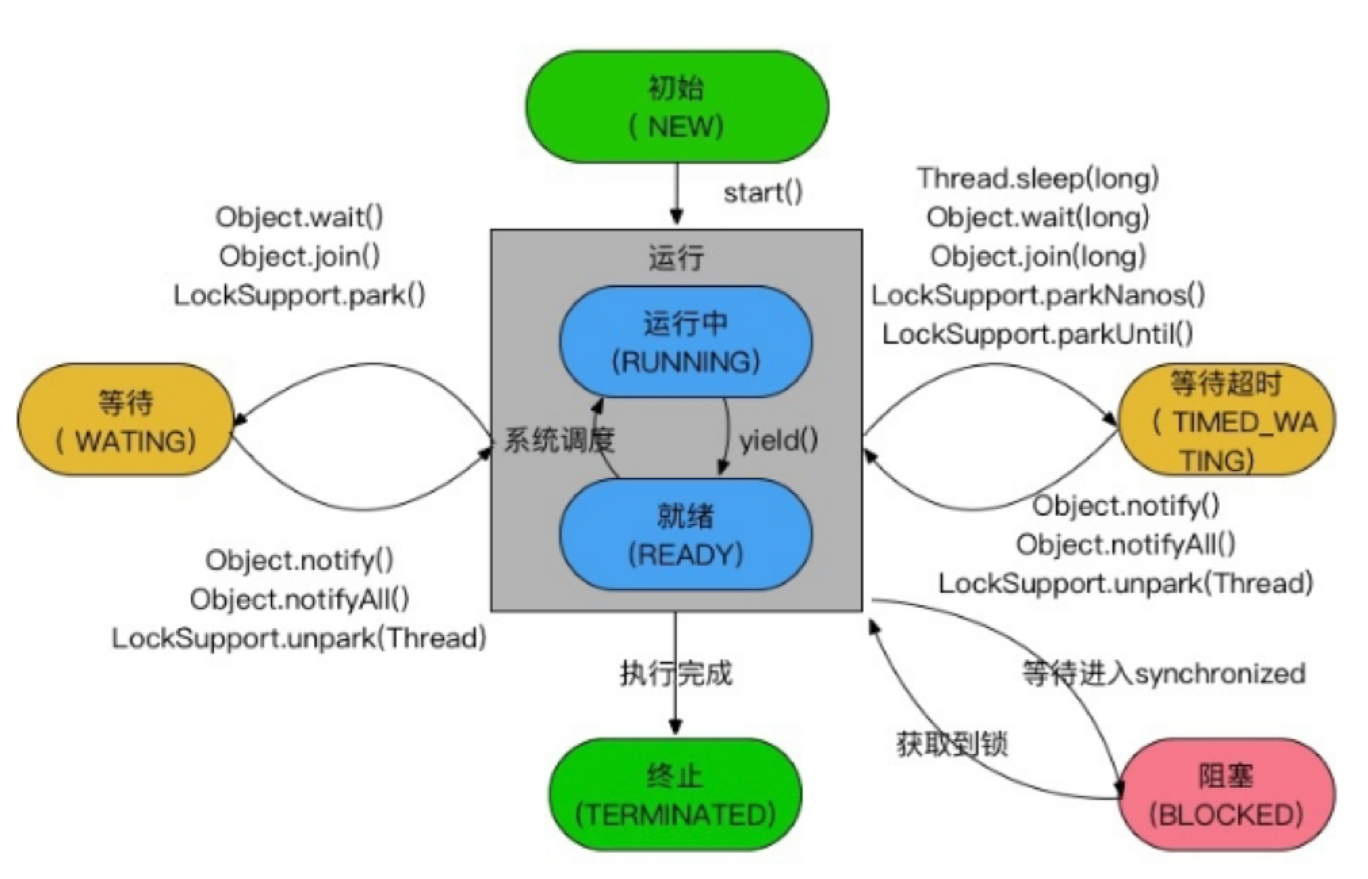
如何终止一个线程?
终止线程方式:
- 线程自然终止
run 方法执行完毕;抛出了一个未处理的异常导致线程提前结束
stop 方法,过时
不安全:stop 方法在终结一个线程时不会保证线程的资源正常释放,通常是没有给予线程完成资源释放工作的机会,会导致程序可能工作在不确定的状态。
- 使用 volatile boolean 变量退出标记,使线程正常退出,也就是 run 方法完成后线程终止
不建议自定义一个取消标志位来终止线程的运行,因为如果 run 方法有阻塞调用时会无法很快检测到取消标记,线程必须从阻塞调用返回后,才会检查这个取消标记位,这种情况下用中断更好;一般的阻塞方法如 sleep 本身支持中断的检查 处于死锁状态的线程无法被中断
- 中断 interrupt 推荐
使用 interrupt() 方法来中断;Java 中的线程是协作式的,不是抢占式的,线程通过检查自身的中断标记位是否被置为 true 来进行响应;线程通过
isInterrupted()或Thread.interrupted()来进行中断的判断
isInterrupted() 和 Thread.interrupted()
- isInterrupted() 是非静态的方法,获取该线程的中断状态,不会清空中断状态;可重复调用,中断清空前一直返回 true
- Thread.interrupted() 是静态方法,获取该线程的中断状态,会清空中断状态置为 false,重复调用后返回的是 false
终止线程池
shutdown 和 shutdownNow 关闭线程池自身以及它拥有的所有线程
- shutdown 关闭线程池
线程池不会立即退出,直到添加到线程池中的任务都已经处理完成后,才会退出
- shutdownNow 关闭线程池并中断任务
终止等待执行的线程,并返回它们的列表;调用线程的 interrupt() 试图停止所有正在执行的线程,如果线程没有 sleep、wait、Condition、定时锁时,interrupt 方法是无法中断当前线程的。所以 shutdownNow() 方法并不代表线程池就一定立即退出,它可能需要等待所有正在执行的任务都执行完成了才能退出
线程间协作
join
调用线程需等待该 join() 线程执行完成后,才能继续用下运行。thread.join() 方法的意义是抢占当前线程的执行时间切片,也就是说阻塞当前线程,运行调用了 join() 方法的 thread,当 thread 运行结束后,再运行当前线程。以实现线程的串行执行
如在 main 线程调用 thread.join(),那此时 main 会 wait,等 thread 执行完毕后再执行 main 剩余代码
1
2
3
ThreadA {
    ThreadB.join()
}
join 原理
以 ThreadA 线程调用 ThreadB.join() 方法为例说明:
1
2
3
4
5
6
7
8
9
10
11
12
13
14
15
16
17
18
19
20
21
22
23
24
25
26
27
28
29
30
31
32
33
34
35
36
37
38
39
40
41
42
43
44
45
46
47
48
49
// Thread.java

/**
 * Waits for this thread to die.
 */
public final void join() throws InterruptedException {
    // 直接调用另一个重载函数。
    join(0);
}

/**
 * Waits at most {@code millis} milliseconds for this thread to
 * die. A timeout of {@code 0} means to wait forever.
 *
 * <p> This implementation uses a loop of {@code this.wait} calls
 * conditioned on {@code this.isAlive}. As a thread terminates the
 * {@code this.notifyAll} method is invoked. It is recommended that
 * applications not use {@code wait}, {@code notify}, or
 * {@code notifyAll} on {@code Thread} instances.
 *
 */
public final synchronized void join(long millis)
throws InterruptedException {
    long base = System.currentTimeMillis();
    long now = 0;

    if (millis < 0) {
        throw new IllegalArgumentException("timeout value is negative");
    }

    if (millis == 0) {
        while (isAlive()) {
            // 当线程还处于存活状态时,就一直等待。
            wait(0);
        }
    } else {
        while (isAlive()) {
            // 等待时间没有直接使用参数指定的 millis,原因是为了保持退出循环的可能。
            long delay = millis - now;
            if (delay <= 0) {
                break;
            }
            // 当线程还处于存活状态时,就等待一段时间。
            wait(delay);
            // 更新 now 时间信息,是为了等待时间结束后,再次进到这个循环时能够由于 delay <= 0 而直接退出循环。
            now = System.currentTimeMillis() - base;
        }
    }
}
如何等待?
调用了 join 后,会一直等待这个线程的死亡,不然就一直 wait
如何停止?
当 while 条件不满足时,就不会 wait 了,那么 join 方法就执行完毕了,退出了 synchronized,也就释放了锁,后续代码就可以继续执行了
在 ThreadA 调用了 ThreadB.join 后,看源码可知,有一个 while 循环,只要 ThreadB 的 isAlive() 返回 true,那么 ThreadA 就会一直 wait(),直到 ThreadB 死亡了或者超时了,才会回到 ThreadA 代码继续执行。
Object.wait–notify(notifyAll)
需要写在 synchronized 代码块或方法里面,需要注意 wait 先于 notify 调用,否则会出现死锁。
wait 和 notify 标准写法:
1
2
3
4
5
6
7
8
9
10
11
12
13
14
15
// wait模板写法
synchronized(obj)
{
    while(!条件满足)
    {
        obj.wait();
    }
    doSomething();
}
// notify模板写法
synchronized(lock)
{
   更改条件为满足;
   obj.notify();
}
Condition.await–signal(signalAll)
搭配 ReentrantLock,指定唤醒,按组唤醒;更加安全和高效,通常来说比较推荐使用 Condition
CountDownLatch
什么是 CountDownLatch?
CountDownLatch 是个有用的工具类,利用它我们可以拦截一个或多个线程使其在某个条件成熟后再执行。
CountDownLatch 原理
它的内部提供了一个计数器,在构造闭锁时必须指定计数器的初始值,且计数器的初始值必须大于 0。另外它还提供了一个 countDown() 方法来操作计数器的值,每调用一次 countDown 方法计数器都会减 1,直到计数器的值减为 0 时就代表条件已成熟,所有因调用 await() 方法而阻塞的线程都会被唤醒。
- await() 让调用者线程进入阻塞,谁调用谁阻塞,直到 count=0 时才放心;不是 wait()
- countDown() 使得计数器的值 -1,当计数值为 0 时,阻塞线程被唤醒
CountDownLatch 用途
等待多个线程执行完毕再执行其他操作,被等待的线程是并行运行的
CyclicBarrier 同步屏障
CyclicBarrier 也叫同步屏障,在 JDK1.5 被引入,可以让一组线程达到一个屏障时被阻塞,直到最后一个线程达到屏障时,所以被阻塞的线程才能继续执行。
CyclicBarrier 好比一扇门,默认情况下关闭状态,堵住了线程执行的道路,直到所有线程都就位,门才打开,让所有线程一起通过。调用 await 表示该线程到达了,阻塞该线程,直到 parties 个线程都到达了屏障,继续执行
- 初始化时设置屏障数量
- 每调用一次 await 执行完毕后,屏障消除一个,所有的屏障都消除就可以运行屏障后续的逻辑
Semaphore
Semaphore 是一个计数信号量,从概念上将,Semaphore 包含一组许可证,如果有需要的话,每个 acquire() 方法都会阻塞,直到获取一个可用的许可证,每个 release() 方法都会释放持有许可证的线程,并且归还 Semaphore 一个可用的许可证。然而,实际上并没有真实的许可证对象供线程使用,Semaphore 只是对可用的数量进行管理维护。
信号量,常用于并发限流,基于 许可证 的并发控制
- acquire(int permits) 当前线程尝试去阻塞的获取 1 个许可证,此过程是阻塞的,当前线程获取了 1 个可用的许可证,则会停止等待,继续执行
- tryAcquire(int permits) 尝试获取许可证,立即返回
- tryAcquire(int permits, timeout)
- release(int permits) 当前线程释放 1 个可用的许可证
如何实现线程等待另外一个线程完成?
1、join
thread.join() 方法的意义是抢占当前线程的执行时间切片,也就是说阻塞当前线程,运行调用了 join() 方法的 thread,当 thread 运行结束后,再运行当前线程。以实现线程的串行执行。
在主线程调用子线程的 join,等待子线程执行完毕后,才执行主线程。
1
2
3
4
5
6
7
8
9
10
11
12
13
14
15
16
17
18
19
20
21
public class ThreadTest线程通信 {
    private int i = 0;
    /**
     * Thread.join
      */
    public void foo() {
        Thread t = new Thread(new Runnable() {
            @Override
            public void run() {
                i = 1;
            }
        });
        t.start();
        try {
            t.join();
        } catch (InterruptedException e) {
            e.printStackTrace();
        }
        System.out.print(i);
    }
}
2、CountDownLatch
CountDownLatch 初始化时有个计数器,每个线程调用 countDown() 方法使计数器 -1,主线程调用 await 方法阻塞等待,直到 CountDownLatch 计数器为 0 时才能 await() 处继续执行。
1
2
3
4
5
6
7
8
9
10
11
12
13
14
15
16
17
18
19
20
public class ThreadTest线程通信 {
    private int i = 0;
    public void foo1() {
        CountDownLatch cl = new CountDownLatch(1);
        Thread t = new Thread(new Runnable() {
            @Override
            public void run() {
                i = 1;
                cl.countDown();
            }
        });
        t.start();
        try {
            cl.await();
        } catch (InterruptedException e) {
            e.printStackTrace();
        }
        System.out.print(i);
    }
}
3、CyclicBarrier 同步屏障
CyclicBarrier 也叫同步屏障,在 JDK1.5 被引入,可以让一组线程达到一个屏障时被阻塞,直到最后一个线程达到屏障时,所以被阻塞的线程才能继续执行。
CyclicBarrier 好比一扇门,默认情况下关闭状态,堵住了线程执行的道路,直到所有线程都就位,门才打开,让所有线程一起通过。调用 await 表示该线程到达了,阻塞该线程,直到 parties 个线程都到达了屏障,继续执行
1
2
3
4
5
6
7
8
9
10
11
12
13
14
15
16
17
18
19
20
21
22
23
24
25
public class ThreadTest线程通信 {
    private int i = 0;
    public void foo2() {
        CyclicBarrier cl = new CyclicBarrier(2);
        Thread t = new Thread(new Runnable() {
            @Override
            public void run() {
                i = 1;
                try {
                    cl.await();
                } catch (InterruptedException | BrokenBarrierException e) {
                    e.printStackTrace();
                }
            }
        });
        t.start();

        try {
            cl.await();
        } catch (InterruptedException | BrokenBarrierException e) {
            e.printStackTrace();
        }
        System.out.print(i);
    }
}
ThreadLocal
什么是 ThreadLocal?
ThreadLocal 类用来提供线程内部的局部变量。这些变量在多线程环境下访问 (通过 get 或 set 方法访问) 时能保证各个线程里的变量相对独立于其他线程内的变量,ThreadLocal 实例通常来说都是 private static 类型。
总结:ThreadLocal 不是为了解决多线程访问共享变量安全问题;而是为每个线程创建一个单独的变量副本,提供了保持对象的方法和避免参数传递的复杂性;实现线程之间的数据隔离。
ThreadLocal 的主要应用场景为按线程多实例(每个线程对应一个实例)的对象的访问,并且这个对象很多地方都要用到。例如:同一个网站登录用户,每个用户服务器会为其开一个线程,每个线程中创建一个 ThreadLocal,里面存用户基本信息等,在很多页面跳转时,会显示用户信息或者得到用户的一些信息等频繁操作,这样多线程之间并没有联系而且当前线程也可以及时获取想要的数据。
ThreadLocal 原理
每个 Thread 内部有一个 threadLocals 变量,类型为 ThreadLocal.ThreadLocalMap
ThreadLocalMap 是一个 Map,保存的 Entry 是个弱引用,value 为对应的数据
set 存数据
拿到当前线程关联的 ThreadLocalMap,以当前 ThreadLocal 为 key 存储到当前线程的 threadLocals 中去
get 取数据
获取当前线程的 ThreadLocalMap threadLocals,以当前 ThreadLocal 实例为 key 去取数据
ThreadLocal 哪里用到了
- Android 中的 Looper sThreadLocal,将 Looper 对象保存到了 sThreadLocal 中,保证每个线程只能有一个 Looper 实例
- Android AnimationHandler,处理时间脉冲的类,提供给所有属性动画 ValueAnimators 使用
- Android Choreographer sThreadInstance
- RecyclerView prefetch sGapWorker 用来保存 GapWorker
ThreadLocal 使用小结
- 一个 ThreadLocal 实例可以被多个线程使用,因为每个线程中都有自己的 ThreadLocalMap,key 为 ThreadLocal
- 一个线程可以保存多个 ThreadLocal,保存在 threadLocals 中
ThreadLocal一般是作为private static final字段,避免 ThreadLocal 实例被 GC 回收了,导致 key 为 null- ThreadLocalMap 的 key 用的是 WeakReference,GC 时会被清理掉 key 为 null 的 value,但是还是建议你显示的做好 remove() 移除动作,否则容易造成内存泄漏(key 为 null 时,在下次 set/get/remove 前 value 泄漏了)
- 只能解决非引用的基本数据类型线程安全问题,引用类型解决不了
ThreadLocal 注意
ThreadLocal 不能解决共享变量的线程安全问题
的 ThreadLocal 绑定的是 Immutable 不可变变量,如字符串等,那结论尚能成立,但若绑定的是引用类型的变量那就不行,这是因为保存的是引用,一处修改,其他线程也都跟着修改了
解决传递参数的复杂性,在线程生命周期内传递
提供线程内的局部变量,这种变量在线程的生命周期内起作用,减少同一个线程内多个函数或者组件之间一些公共变量的传递的复杂度。但由于线程独享的特点被用来作为线程安全的一种解决方式,空间换时间。
ThreadLocal 内存泄漏问题
ThreadLocal 内存泄漏原因
threadLocalMap 使用 ThreadLocal 的弱引用作为 key,如果一个 ThreadLocal 不存在外部强引用时,Key(ThreadLocal) 势必会被 GC 回收,这样就会导致 ThreadLocalMap 中 key 为 null,而 value 还存在着强引用,只有 thead 线程退出以后,value 的强引用链条才会断掉。但如果当前线程再迟迟不结束的话,在这段时间这些 key 为 null 的 Entry 的 value 就会一直存在一条强引用链:
Thread Ref -> Thread -> ThreaLocalMap -> Entry -> value
在当前线程未结束这段时间,value 数据的 key 为 null,value 占用的内存就一直泄漏了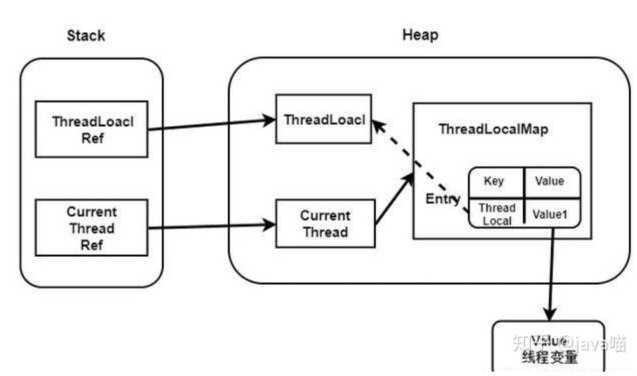
内存泄漏解决:
- 使用 ThreadLocal,建议用 static 修饰
static ThreadLocal<HttpHeader> headerLocal = new ThreadLocal();,避免 ThreadLocal 实例没有引用指向了,导致线程中的 threadLocals 的 key 为 null,只有 value - 使用完 ThreadLocal 后,执行 remove 操作,避免出现内存溢出情况。
为什么 ThreadLocalMap#Entry 的 key 使用弱引用而不是强引用?
- key 使用强引用
当 ThreadLocalMap 的 key 为强引用 ThreadLocal 时,当 ThreadLocalRef 断开时,这时 ThreadLocal 对象理应被 GC 回收。但因为 ThreadLocalMap 还持有 ThreadLocal 的强引用,如果没有手动从 ThreadLocalMap 中删除,ThreadLocal 不会被回收,导致 ThreadLocal 对象及关联的 value 内存泄漏 - key 使用弱引用
当 ThreadLocalMap 的 key 为弱引用回收 ThreadLocal 时,由于 ThreadLocalMap 持有 ThreadLocal 的弱引用,即使没有手动删除,ThreadLocal 也会被回收。当 key 为 null,在下一次 ThreadLocalMap 调用 set(),get(),remove() 方法的时候会被清除 value 值。
ThreadLocal 在线程池使用的问题
在线程池的线程使用 ThreadLocal 时,一个线程设置的数据可能残留在 ThreadLocal 里面,等下一个线程使用的时候可能直接拿到之前操作残留的数据,导致数据的污染问题。
ThreadLocal 和同步机制相比
在同步机制中,通过对象的锁机制保证同一时间只有一个线程访问变量。这时该变量是多个线程共享的,使用同步机制要求程序缜密地分析什么时候对变量进行读写,什么时候需要锁定某个对象,什么时候释放对象锁等繁杂的问题。
ThreadLocal 从另外一个角度来解决线程的并发访问,ThreadLocal 会为每个线程提供独立的变量副本 (threadLocals,其实就是个 ThreadLocalMap),从而隔离了多个线程对数据的访问冲突。因为每个线程都拥有自己的变量副本,从而没有必要对该变量进行同步了,只能解决非引用的基本数据类型线程安全问题。
同步机制采用了时间换空间的方式,而 ThreadLocal 采用了空间换时间的方法;同步机制仅提供一份变量,让不同的线程排队访问,而 ThreadLocal 为每个线程都提供了一份变量,可以同时访问而不互相影响。
面试题
wait、notify、sleep 相关题
wait、notify/nofityAll 有什么用?
- wait 当前线程进入阻塞状态 (BLOCKED),释放 monitor 同步监视器 (对象锁)
调用了 wait 后,线程会释放该对象的锁,然后该线程会被添加到该对象的等待队列中 (waiting queue),只要该线程在等待队列中,就会一直处于闲置状态,不会被调度执行;wait 方法会强迫线程先进行释放锁操作,所以调用 wait 时,线程必须已经获得锁,否则抛出异常;wait 总是在一个循环中被调用,挂起当前线程来等待 notify 或 notifyAll 的唤醒
- notify 唤醒同一个监视器对象上 wait 的一个线程,唤醒优先级最高的线程
当一个线程调用一个对象的 notify 方法时,调度器会从所有处于该对象等待队列 (waiting queue) 的线程中取出任意一个线程,将其添加到入口队列 (entry queue) 中,然后在入口队列中的多个线程就会竞争对象的锁,得到锁的线程就可以继续执行,如果等待队列中没有线程,notify 方法不会产生任何作用
- notifyAll 唤醒所有同一个监视器上 wait 的线程
notifyAll() 和 notify() 工作机制一样, 区别在于 notifyAll() 会将等待队列(waiting queue)中所有的线程都添加到入口队列中(entry queue)。
sleep 和 wait 的区别?
相同点:一旦执行方法,都可以使得当前的线程进入阻塞状态。
不同点:
- 两个方法声明的位置不同:Thread 类中的声明的静态方法 sleep()。Object 类中声明的成员方法 wait()
- 调用的要求不同:sleep() 可以在任何需要的场景下调用,wait() 必须在同步代码块 (
synchronized) 或者同步方法中调用。 - 最大不同是关于是否释放同步监视器:如果两个方法都使用在同步代码块或同步方法中,sleep() 不会释放锁资源但是会释放 CPU 资源,wait() 会释放锁资源以及 CPU 资源。
- wait 通常用于线程间交互,sleep 通常用于暂停执行,并且调用 wait 后,需要别的线程执行 notify/notifyAll 才能够重新获得 CPU 执行时间
线程 A 和线程 B 通过 wait/notify 通信时,lock 对象、线程 A 和线程 B 三者是一种什么关系?
1
2
3
4
5
6
7
8
9
10
11
12
13
14
15
16
17
18
19
20
21
22
23
24
25
26
27
28
29
30
31
32
public class WaitNotifyCase {
    public static void main(String[] args) {
        final Object lock = new Object();
        new Thread(new Runnable() {
            @Override
            public void run() {
                synchronized (lock) {
                    try {
                        TimeUnit.SECONDS.sleep(1);
                        lock.wait();
                    } catch (InterruptedException e) {
                        e.printStackTrace();
                    }
                }
            }
        }).start();
        new Thread(new Runnable() {
            @Override
            public void run() {
                synchronized (lock) {
                    try {
                        TimeUnit.SECONDS.sleep(5);
                    } catch (InterruptedException e) {
                        e.printStackTrace();
                    }
                    lock.notify();
                }
            }
        }).start();
    }
}
// 耗时大概是6000ms
- lock 对象维护了一个等待队列 (waiting queue);
- 线程 A 中执行 lock 的 wait 方法,把线程 A 保存到 lock 锁的阻塞队列中;
- 线程 B 中执行 lock 的 notify 方法,从 lock 锁的等待队列中取出线程 A 继续执行;若有多条线程被 lock 锁阻塞,则会随机唤醒一条线程继续执行。
- 若线程 B 中执行 lock.nofityAll 方法,则能一次性 唤醒 所有被 lock 锁 阻塞住的线程。
为什么 wait 和 notify/notifyAll 一定要在同步代码块或同步方法中的同步监视器使用?
wait()、notify()/notifyAll() 调用时必须加 synchronized(lock) 同步。
不放在 synchronized 代码块中使用会有什么问题?
1
2
3
4
5
public static void main(String[] args) throws InterruptedException {
    Object obj = new Object();
    obj.wait();
    obj.notify();
}
结果:
Exception in thread “main” java.lang.IllegalMonitorStateException at java.lang.Object.wait(Native Method) at java.lang.Object.wait(Object.java:502) at xxxx.main(XXX.java:254)
lost wake up 问题(多线程乱序导致 wait 未被唤醒)
wait/notify 如果不跟 synchronized 结合就会造成 lost wake up,难以唤醒 wait 的线程,所以单独使用会有问题。
来看看不使用 synchronized 会怎么样,假设有 2 个线程,分别做 2 件事情,T1 线程代码逻辑:
1
2
3
4
5
6
7
8
9
// 线程T1
while(!条件满足) // line 1
{
    obj.wait(); // line 2
}
doSomething();
// 线程T2
更改条件为满足; // line 1
obj.notify(); // line 2
多线程环境下没有 synchronized,没有锁的情况下可能会出现如下执行顺序情况:
- T1 line1 满足 while 条件
- T2 line1 执行
- T2 line2 执行,notify 发出去了
- T1 line2 执行,wait 再执行
这样的执行顺序导致了 notify 通知发出去了,但没有用,已经 wait 是在之后执行,所以有人说没有保证原子性,就是 line1 和 line2 是一起执行结束,这个也被称作 lost wake up 问题。解决方法就是可以利用 synchronized 来加锁。
为什么 wait() 和 notify() 方法要放在 Object 而不放在 Thread 里面?
因为 wait 和 notfiy 方法要在 synchronized 代码块中使用,
如果 wait 和 notify/notifyAll 不强制和 synchronized 一起使用,那么在多线程执行时,就会出现 wait 执行了一半,然后又执行了添加数据和 notify 的操作,从而导致线程一直休眠的缺陷,就是上面提到的 lost wake up 问题。
yield() 、sleep()、wait()、notify() 等方法对锁有何影响?
- yield() 使当前线程放弃当前分得的 CPU 时间,但是不使线程阻塞,即线程仍处于可执行状态,随时可能再次分得 CPU 时间。调用 yield() 的效果等价于调度程序认为该线程已执行了足够的时间从而转到另一个线程。由运行状态转到就绪状态。如果在 synchronized 代码中,不会释放锁。
- Thread.sleep() 使线程进入阻塞状态;如果在 synchronized 代码中,不会释放锁。
- Object.wait() 只有当前线程持有 Object 的 monitor(在 synchronized(Object)) 中才有效,使当前线程挂起直到 Object 上的 notify 被调用。wait 会释放当前线程持有的锁,而且当前被唤醒后,会重新去竞争锁,锁竞争到后才会执行 wait 方法后面的代码
- Object.notify() 调用 notify() 系列方法后,对锁无影响,线程只有在 synchronized 同步代码执行完后才会自然而然的释放锁,所以 notify() 系列方法一般都是 synchronized 同步代码的最后一行
手写一个生产者消费者模型
什么是生产者消费者模型
生产者消费者模式就是缓冲区,缓冲区就是一个队列,当队列满的时候,生产者会被阻塞;当队列为空的时候,消费者会被阻塞。
有多种方式实现,主要是 3 种:wait/notify、await/signal 和 BlockingQueue。
wait 和 notify/notifyAll 实现生产者消费者模型
- LOCK:锁,用一个 Object 实例即可
- count:缓冲区,生产者往里面放数据 count++,消费者从里面取数据 count–
- 生产者:缓冲区未满,count++,notify 消费者;缓冲区满的时候,生产者线程 wait,等待消费者线程 notify
- 消费者:缓冲区未空,count–,notify 生产者;缓冲区空的时候,消费者线程 wait,等待生产者线程 notify
1
2
3
4
5
6
7
8
9
10
11
12
13
14
15
16
17
18
19
20
21
22
23
24
25
26
27
28
29
30
31
32
33
34
35
36
37
38
39
40
41
42
43
44
45
46
47
48
49
50
51
52
53
54
55
56
57
58
59
public class ProducerCustomerWaitNotify {
    // 锁
    private static final Object LOCK = new Object();
    // 最大容量
    private static final int FULL = 10;
    // 商品
    private static int count = 0;
    // 生产者
    public static class Producer implements Runnable {
        @Override
        public void run() {
            while (true) {
                SleepTools.second(1); // sleep不能放到synchronized块,这样会导致持有锁休眠
                synchronized (LOCK) {
                    while (count >= FULL) { // 不能用if,不然Customer的notifyAll会导致count超过FULL
                        try {
                            System.out.println(Thread.currentThread().getName() + " 满了,生产者wait, count=" + count);
                            LOCK.wait();
                        } catch (InterruptedException e) {
                            e.printStackTrace();
                        }
                    }
                    count++;
                    System.out.println(Thread.currentThread().getName() + " 生产了一个 count=" + count);
                    LOCK.notifyAll();
                }
            }
        }
    }
    public static class Customer implements Runnable {
        @Override
        public void run() {
            while (true) {
                SleepTools.second(5);
                synchronized (LOCK) {
                    while (count <= 0) {
                        try {
                            System.out.println(Thread.currentThread().getName() + " 空了,消费者wait, count=" + count);
                            LOCK.wait();
                        } catch (InterruptedException e) {
                            e.printStackTrace();
                        }
                    }
                    count--;
                    System.out.println(Thread.currentThread().getName() + " 消费了一个 count=" + count);
                    LOCK.notifyAll();
                }
            }
        }
    }
    public static void main(String[] args) {
        for (int i = 0; i < 5; i++) {
            new Thread(new Producer(), "生产者-" + i).start();
        }
        for (int i = 0; i < 5; i++) {
            new Thread(new Customer(), "消费者-" + i).start();
        }
    }
}
await/signal 实现生产者消费者模型
- lock,锁,用 ReentrantLock+Condition
- count:缓冲区,生产者往里面放数据 count++,消费者从里面取数据 count–
- 使用两个条件队列 condition 来实现精确通知:一个 producerCondition 控制生产者,customerCondition 控制消费者
- 其他的基本同 wait/notify,只是 object.wait/notify 替换成 condition.await/signal
1
2
3
4
5
6
7
8
9
10
11
12
13
14
15
16
17
18
19
20
21
22
23
24
25
26
27
28
29
30
31
32
33
34
35
36
37
38
39
40
41
42
43
44
45
46
47
48
49
50
51
52
53
54
55
56
57
58
59
60
61
62
63
64
65
66
public class ProducerCustomerLockCondition {
    // 最大容量
    private static final int FULL = 10;
    // 商品
    private static int count = 0;
    private static final Lock lock = new ReentrantLock();
    private static final Condition producerCondition = lock.newCondition();
    private static final Condition customerCondition = lock.newCondition();
    // 生产者
    public static class Producer implements Runnable {
        @Override
        public void run() {
            while (true) {
                lock.lock();
                while (count >= FULL) { // 不能用if,不然Customer的notifyAll会导致count超过FULL
                    try {
                        System.out.println(Thread.currentThread().getName() + "】满了,生产者wait, count=" + count);
                        producerCondition.await();
                    } catch (InterruptedException e) {
                        e.printStackTrace();
                    }
                }
                try {
                    count++;
                    System.out.println(Thread.currentThread().getName() + "】生产了一个 count=" + count + " " + System.currentTimeMillis());
                    customerCondition.signal();
                } finally {
                    lock.unlock();
                }
                SleepTools.second(8); // 注意:sleep不能放到synchronized块,这样会导致持有锁休眠
            }
        }
    }
    public static class Customer implements Runnable {
        @Override
        public void run() {
            while (true) {
                lock.lock();
                while (count <= 0) {
                    try {
                        System.out.println(Thread.currentThread().getName() + "】空了,消费者wait, count=" + count);
                        customerCondition.await();
                    } catch (InterruptedException e) {
                        e.printStackTrace();
                    }
                }
                try {
                    count--;
                    System.out.println(Thread.currentThread().getName() + "】消费了一个 count=" + count + " " + System.currentTimeMillis());
                    producerCondition.signal();
                } finally {
                    lock.unlock();
                }
                SleepTools.second(4); // 要放锁外面,否则会持有锁睡眠,导致其他依赖该锁的现在一直阻塞着
            }
        }
    }
    public static void main(String[] args) {
        for (int i = 0; i < 1; i++) {
            new Thread(new Producer(), "生产者--->>>" + i).start();
        }
        for (int i = 0; i < 1; i++) {
            new Thread(new Customer(), "消费者<<<===" + i).start();
        }
    }
}
阻塞队列实现生产者消费者模型
- LinkedBolckingQueue 阻塞队列实现生产者消费者模型
1
2
3
4
5
6
7
8
9
10
11
12
13
14
15
16
17
18
19
20
21
22
23
24
25
26
27
28
29
30
31
32
33
34
35
36
37
38
39
40
41
42
43
public class ProducerCustomerLinkedBlockingQueue {
    private static LinkedBlockingQueue<String> blockingQueue = new LinkedBlockingQueue<>(10);
    static AtomicInteger i = new AtomicInteger(1);
    // 生产者
    public static class Producer implements Runnable {
        @Override
        public void run() {
            while (true) {
                SleepTools.second(3);

                try {
                    String val = "product_" + i.getAndIncrement();
                    blockingQueue.put(val);
                    System.out.println(Thread.currentThread().getName() + " 生产 " + val);
                } catch (InterruptedException e) {
                    e.printStackTrace();
                }
            }
        }
    }
    public static class Customer implements Runnable {
        @Override
        public void run() {
            while (true) {
                SleepTools.second(10);
                try {
                    String val = blockingQueue.take();
                    System.out.println(Thread.currentThread().getName() + " 消费 " + val);
                } catch (InterruptedException e) {
                    e.printStackTrace();
                }
            }
        }
    }
    public static void main(String[] args) {
        for (int i = 0; i < 3; i++) {
            new Thread(new Producer(), "生产者-" + i).start();
        }
        for (int i = 0; i < 2; i++) {
            new Thread(new Customer(), "消费者-" + i).start();
        }
    }
}
- SynchronousQueue 实现生产者消费者模型
特点:没有实际容量,生产者每一个 put,如果没有消费者 take 掉,生产者就阻塞;同样消费者 take 时,没有生产者 put 就一直阻塞着直到有生产者 put
1
2
3
4
5
6
7
8
9
10
11
12
13
14
15
16
17
18
19
20
21
22
23
24
25
26
27
28
29
30
31
32
33
34
35
36
37
38
39
40
41
42
43
44
45
46
47
public class ProducerCustomerLinkedBlockingQueue {

    private static LinkedBlockingQueue<String> blockingQueue = new LinkedBlockingQueue<>(10);
    static AtomicInteger i = new AtomicInteger(1);

    // 生产者
    public static class Producer implements Runnable {
        @Override
        public void run() {
            while (true) {
                SleepTools.second(3);

                try {
                    String val = "product_" + i.getAndIncrement();
                    blockingQueue.put(val);
                    System.out.println(Thread.currentThread().getName() + " 生产 " + val);
                } catch (InterruptedException e) {
                    e.printStackTrace();
                }
            }
        }
    }

    public static class Customer implements Runnable {
        @Override
        public void run() {
            while (true) {
                SleepTools.second(10);
                try {
                    String val = blockingQueue.take();
                    System.out.println(Thread.currentThread().getName() + " 消费 " + val);
                } catch (InterruptedException e) {
                    e.printStackTrace();
                }
            }
        }
    }

    public static void main(String[] args) {
        for (int i = 0; i < 3; i++) {
            new Thread(new Producer(), "生产者-" + i).start();
        }
        for (int i = 0; i < 2; i++) {
            new Thread(new Customer(), "消费者-" + i).start();
        }
    }
}
信号量 Semaphore 的实现(待实现)
三个线程如何顺序执行?
Thread join()
一个线程等待另外一个线程执行完毕后,再执行后续逻辑
- join 写在其他线程内部
1
2
3
4
5
6
7
8
9
10
11
12
13
14
15
16
17
18
19
20
21
22
23
24
25
26
27
28
29
30
31
32
33
34
35
36
37
38
39
private static void join1() throws InterruptedException {
    Thread t1 = new Thread("t1") {
        @Override
        public void run() {
            System.out.println(Thread.currentThread().getName() + "--run.");
            SleepTools.second(1);
        }
    };
    Thread t2 = new Thread("t2") {
        @Override
        public void run() {
            try {
                t1.join();
            } catch (InterruptedException e) {
                e.printStackTrace();
            }
            System.out.println(Thread.currentThread().getName() + "--run.");
            SleepTools.second(1);
        }
    };
    Thread t3 = new Thread("t3") {
        @Override
        public void run() {
            try {
                t2.join();
            } catch (InterruptedException e) {
                e.printStackTrace();
            }
            System.out.println(Thread.currentThread().getName() + "--run.");
            SleepTools.second(1);
        }
    };
    t1.start();
    t2.start();
    t3.start();
//        t1--run.
//        t2--run.
//        t3--run.
}
- join 写在线程外部
1
2
3
4
5
6
7
8
9
10
11
12
13
14
15
16
17
18
19
20
21
22
23
24
25
26
27
28
29
30
31
private static void join2() throws InterruptedException {
    Thread t1 = new Thread("t1") {
        @Override
        public void run() {
            System.out.println(Thread.currentThread().getName() + "--run.");
            SleepTools.second(1);
        }
    };
    Thread t2 = new Thread("t2") {
        @Override
        public void run() {
            System.out.println(Thread.currentThread().getName() + "--run.");
            SleepTools.second(1);
        }
    };
    Thread t3 = new Thread("t3") {
        @Override
        public void run() {
            System.out.println(Thread.currentThread().getName() + "--run.");
            SleepTools.second(1);
        }
    };
    t1.start();
    t1.join();
    t2.start();
    t2.join();
    t3.start();
//        t1--run.
//        t2--run.
//        t3--run.
}
CountDownLatch
拦截一个或多个线程使其在某个条件成熟后再执行
思路:
- 定义 2 个 CountDownLatch c2/c3
- c2 的 count=1 表示线程 2 等待线程 1
- c3 的 count=1 表示线程 3 等待线程 2
- 线程 1、线程 2 和线程 3 一起 start
- 线程 1,c2.countDown()
- 线程 2,c2.await(),c3.countDown()
- 线程 3,c3.await(0
- 线程 1 线程代码执行完毕后 c2.countDown(),唤醒线程 2
- 线程 2 线程代码执行完毕后 c3.countDown(),唤醒线程 3
代码:
1
2
3
4
5
6
7
8
9
10
11
12
13
14
15
16
17
18
19
20
21
22
23
24
25
26
27
28
29
30
31
32
33
34
35
36
37
38
39
private static void test2() throws InterruptedException {
    // 第2个线程,等待第1个线程完毕
    CountDownLatch c2 = new CountDownLatch(1);
    // 第3个线程,等待第2个线程完毕
    CountDownLatch c3 = new CountDownLatch(1);
    Thread t1 = new Thread("t1") {
        @Override
        public void run() {
            System.out.println(Thread.currentThread().getName() + ":" + i.getAndIncrement());
            c2.countDown();
        }
    };
    Thread t2 = new Thread("t2") {
        @Override
        public void run() {
            try {
                c2.await();
            } catch (InterruptedException e) {
                e.printStackTrace();
            }
            System.out.println(Thread.currentThread().getName() + ":" + i.getAndIncrement());
            c3.countDown();
        }
    };
    Thread t3 = new Thread("t3") {
        @Override
        public void run() {
            try {
                c3.await();
            } catch (InterruptedException e) {
                e.printStackTrace();
            }
            System.out.println(Thread.currentThread().getName() + ":" + i.getAndIncrement());
        }
    };
    t2.start();
    t3.start();
    t1.start();
}
FutureTask
FutureTask 是一个可取消的异步计算,FutureTask 实现了 Future 的基本方法,可以查询计算是否已经完成,还可以获取计算的结果,结果只可以在计算完成之后获取,get 方法会阻塞当计算没有完成的时候,一旦计算已经完成,那么计算就不能再次启动或是取消。
思路:
- 一个线程对应着一个 FutureTask
- 线程 2 等待线程 1 结果出来,线程 3 等待线程 2 的结果出来
代码:
1
2
3
4
5
6
7
8
9
10
11
12
13
14
15
16
17
18
19
20
21
22
23
24
25
26
27
28
29
30
31
32
33
34
35
36
37
38
39
public static void main(String[] args) {
    FutureTask<Integer> futureTask1 = new FutureTask<>(new Callable<Integer>() {
        @Override
        public Integer call() throws Exception {
            SleepTools.second(1);
            System.out.println(Thread.currentThread().getName() + "--run.");
            return 0;
        }
    });
    FutureTask<Integer> futureTask2 = new FutureTask<>(new Callable<Integer>() {
        @Override
        public Integer call() throws Exception {
            if (futureTask1.get() != null) {
                System.out.println(Thread.currentThread().getName() + "--run.");
            }
            SleepTools.second(1);
            return 0;
        }
    });
    FutureTask<Integer> futureTask3 = new FutureTask<>(new Callable<Integer>() {
        @Override
        public Integer call() throws Exception {
            if (futureTask2.get() != null) {
                System.out.println(Thread.currentThread().getName() + "--run.");
            }
            SleepTools.second(1);
            return 0;
        }
    });
    Thread t1 = new Thread(futureTask1, "t1");
    Thread t2 = new Thread(futureTask2, "t2");
    Thread t3 = new Thread(futureTask3, "t3");
    t2.start();
    t3.start();
    t1.start();
}
// t1--run.
// t2--run.
// t3--run.
wait/notify
思路:
- 定义 2 个 lock,一个 lock1 用于线程 2 等待线程 1 执行完毕,一个 lock2 用于线程 3 等待线程 2 执行完毕
- 定义两个变量分别代表线程 1 和线程 2 执行完毕
- 线程 2 等待 lock1 的唤醒,线程 3 等待 lock2 的唤醒
代码:
1
2
3
4
5
6
7
8
9
10
11
12
13
14
15
16
17
18
19
20
21
22
23
24
25
26
27
28
29
30
31
32
33
34
35
36
37
38
39
40
41
42
43
44
45
46
47
48
49
50
51
52
53
54
55
56
57
58
59
60
61
62
63
64
65
public class ThreadWait {

    // 等待线程1先执行完毕
    private static Object lock1 = new Object();
    // 等待线程2先执行完毕
    private static Object lock2 = new Object();

    /**
     * 为什么要加这两个标识状态?
     * 如果没有状态标识,当t1已经运行完了t2才运行,t2在等待t1唤醒导致t2永远处于等待状态
     */
    private static volatile boolean isThread1Run = false;
    private static volatile boolean isThread2Run = false;

    public static void main(String[] args) {
        Thread t1 = new Thread("t1") {
            @Override
            public void run() {
                System.out.println(Thread.currentThread().getName() + "--run.");
                SleepTools.second(1);
                isThread1Run = true;
                synchronized (lock1) {
                    lock1.notify();
                }
            }
        };
        Thread t2 = new Thread("t2") {
            @Override
            public void run() {
                SleepTools.second(2);
                if (!isThread1Run) { // 不加标记,t1运行完毕后,t2一直处于wait状态
                    synchronized (lock1) {
                        try {
                            lock1.wait();
                        } catch (InterruptedException e) {
                            e.printStackTrace();
                        }
                    }
                }
                synchronized (lock2) {
                    lock2.notify();
                }
                System.out.println(Thread.currentThread().getName() + "--run.");
            }
        };
        Thread t3 = new Thread("t3") {
            @Override
            public void run() {
                if (!isThread2Run) {
                    synchronized (lock2) {
                        try {
                            lock2.wait();
                        } catch (InterruptedException e) {
                            e.printStackTrace();
                        }
                    }
                }
                System.out.println(Thread.currentThread().getName() + "--run.");
            }
        };
        t3.start();
        t2.start();
        t1.start();
    }
}
Condition
- Condition.wait 类比 Object.wait
- Condition.signal 类比 Object.notify
1
2
3
4
5
6
7
8
9
10
11
12
13
14
15
16
17
18
19
20
21
22
23
24
25
26
27
28
29
30
31
32
33
34
35
36
37
38
39
40
41
42
43
44
45
46
47
48
49
50
51
52
53
54
55
56
57
58
59
60
61
62
63
public class ThreadCondition {
    private static ReentrantLock lock = new ReentrantLock();
    // 等待线程1先执行完毕
    private static Condition condition1 = lock.newCondition();
    // 等待线程2先执行完毕
    private static Condition condition2 = lock.newCondition();
    /**
     * 为什么要加这两个标识状态?
     * 如果没有状态标识,当t1已经运行完了t2才运行,t2在等待t1唤醒导致t2永远处于等待状态
     */
    private static volatile boolean isThread1Run = false;
    private static volatile boolean isThread2Run = false;
    public static void main(String[] args) {
        Thread t1 = new Thread("t1") {
            @Override
            public void run() {
                System.out.println(Thread.currentThread().getName() + "--run.");
                SleepTools.second(1);
                isThread1Run = true;
                lock.lock();
                condition1.signal();
                lock.unlock();
            }
        };
        Thread t2 = new Thread("t2") {
            @Override
            public void run() {
                SleepTools.second(2);
                if (!isThread1Run) { // 不加标记,t1运行完毕后,t2一直处于wait状态
                    lock.lock();
                    try {
                        condition1.await();
                    } catch (InterruptedException e) {
                        e.printStackTrace();
                    }
                    lock.unlock();
                }
                lock.lock();
                condition2.signal();
                lock.unlock();
                System.out.println(Thread.currentThread().getName() + "--run.");
            }
        };
        Thread t3 = new Thread("t3") {
            @Override
            public void run() {
                if (!isThread2Run) {
                    lock.lock();
                    try {
                        condition2.await();
                    } catch (InterruptedException e) {
                        e.printStackTrace();
                    }
                    lock.unlock();
                }
                System.out.println(Thread.currentThread().getName() + "--run.");
            }
        };
        t3.start();
        t2.start();
        t1.start();
    }
}
CyclicBarrier
CyclicBarrier(回环栅栏):通过它可以实现让一组线程等待至某个状态之后再全部同时执行。叫做回环是因为当所有等待线程都被释放以后,CyclicBarrier 可以被重用。我们暂且把这个状态就叫做 barrier,当调用 await() 方法之后,线程就处于 barrier 了。
1
2
3
4
5
6
7
8
9
10
11
12
13
14
15
16
17
18
19
20
21
22
23
24
25
26
27
28
29
30
31
32
33
34
35
36
37
38
39
40
41
42
43
44
45
46
47
48
49
public static void main(String[] args) {
    // 线程2的回环栅栏
    CyclicBarrier cyclicBarrier2 = new CyclicBarrier(2);
    // 线程3的回环栅栏
    CyclicBarrier cyclicBarrier3 = new CyclicBarrier(2);

    Thread t1 = new Thread() {
        @Override
        public void run() {
            System.out.println(Thread.currentThread().getName() + " run 1");
            try {
                cyclicBarrier2.await();
            } catch (Exception e) {
                e.printStackTrace();
            }
        }
    };
    Thread t2 = new Thread() {
        @Override
        public void run() {
            try {
                cyclicBarrier2.await();
            } catch (Exception e) {
                e.printStackTrace();
            }
            System.out.println(Thread.currentThread().getName() + " run 2");
            try {
                cyclicBarrier3.await();
            } catch (Exception e) {
                e.printStackTrace();
            }
        }
    };
    Thread t3 = new Thread() {
        @Override
        public void run() {
            try {
                cyclicBarrier3.await();
            } catch (Exception e) {
                e.printStackTrace();
            }
            System.out.println(Thread.currentThread().getName() + " run 3");
        }
    };

    t3.start();
    t2.start();
    t1.start();
}
newSingleThreadExecutor
串行执行所有任务。如果这个唯一的线程因为异常结束,那么会有一个新的线程来替代它。此线程池保证所有任务的执行顺序按照任务的提交顺序执行。
1
2
3
4
5
6
7
8
9
10
11
12
13
14
15
16
17
18
19
20
21
22
23
24
25
26
public static void main(String[] args) {
    final Thread t1 = new Thread(new Runnable() {
        public void run() {
            System.out.println(Thread.currentThread().getName() + " run 1");
            SleepTools.second(3);
        }
    }, "T1");
    final Thread t2 = new Thread(new Runnable() {
        public void run() {
            System.out.println(Thread.currentThread().getName() + " run 2");
            SleepTools.second(2);
        }
    }, "T2");
    final Thread t3 = new Thread(new Runnable() {
        public void run() {
            System.out.println(Thread.currentThread().getName() + " run 3");

        }
    }, "T3");

    // 使用 单个任务的线程池来实现。保证线程的依次执行
    ExecutorService executor = Executors.newSingleThreadExecutor();
    executor.submit(t1);
    executor.submit(t2);
    executor.submit(t3);
}
Semaphore 信号量
1
2
3
4
5
6
7
8
9
10
11
12
13
14
15
16
17
18
19
20
21
22
23
24
25
26
27
28
29
30
31
32
33
34
35
36
37
38
39
40
41
42
43
44
45
public static void main(String[] args) {
    Semaphore semaphore2 = new Semaphore(1);
    Semaphore semaphore3 = new Semaphore(1);
    Thread t1 = new Thread() {
        @Override
        public void run() {
            System.out.println(Thread.currentThread().getName() + " run 1");
            try {
                semaphore2.release();
            } catch (Exception e) {
                e.printStackTrace();
            }
        }
    };
    Thread t2 = new Thread() {
        @Override
        public void run() {
            try {
                semaphore2.acquire();
            } catch (Exception e) {
                e.printStackTrace();
            }
            System.out.println(Thread.currentThread().getName() + " run 2");
            try {
                semaphore3.release();
            } catch (Exception e) {
                e.printStackTrace();
            }
        }
    };
    Thread t3 = new Thread() {
        @Override
        public void run() {
            try {
                semaphore3.acquire();
            } catch (Exception e) {
                e.printStackTrace();
            }
            System.out.println(Thread.currentThread().getName() + " run 3");
        }
    };
    t3.start();
    t2.start();
    t1.start();
}
两组线程串行,组内线程并行
思路:
定义 1 个 CountDownLatch:c1
- c1 用于组 2 的线程等待组 1 所有线程执行完毕,组 2 线程 c1.await()
- 组 1 的一个线程执行完毕 c1 计数器减 1,组 1 线程 c1.countDown()
- 当组 1 所有线程执行完毕,那么组 2 线程开始执行
代码:
1
2
3
4
5
6
7
8
9
10
11
12
13
14
15
16
17
18
19
20
21
22
23
24
25
26
27
28
29
30
31
32
33
34
35
36
37
38
39
40
41
42
43
44
45
46
47
48
49
50
public class Test {
    public static void main(String[] args) {
        CountDownLatch c1 = new CountDownLatch(2);

        Thread t1 = new Thread(new Group1(c1), "group1-t1");
        Thread t2 = new Thread(new Group1(c1), "group1-t2");

        Thread t3 = new Thread(new Group2(c1), "group2-t1");
        Thread t4 = new Thread(new Group2(c1), "group2-t2");

        t1.start();
        t2.start();
        t3.start();
        t4.start();
    }

    private static class Group1 implements Runnable {
        private CountDownLatch countDownLatch1;

        public Group1(CountDownLatch countDownLatch1) {
            this.countDownLatch1 = countDownLatch1;
        }

        @Override
        public void run() {
            System.out.println(Thread.currentThread().getName() + "--run.");
            SleepTools.second(5);
            countDownLatch1.countDown();
        }
    }

    private static class Group2 implements Runnable {
        private CountDownLatch countDownLatch;

        public Group2(CountDownLatch countDownLatch) {
            this.countDownLatch = countDownLatch;
        }

        @Override
        public void run() {
            try {
                countDownLatch.await();
            } catch (InterruptedException e) {
                e.printStackTrace();
            }
            System.out.println(Thread.currentThread().getName() + "--run.");
            SleepTools.second(1);
        }
    }
}
Thread 和 Runnable 都重写 run 方法输出什么?
1
2
3
4
5
6
7
8
9
10
11
12
13
Thread thread = new Thread(new Runnable() {
    @Override
    public void run() {
        System.out.println("Runnable run");
    }
}) {
    @Override
    public void run() {
        super.run();
        System.out.println("Thread run");
    }
};
thread.start();
输出结果:
Runnable run
Thread run
如果只想输出 Thread 的 run 方法,那么将 super.run() 注释掉即可;如果只想输出 Runnable 中的 run 方法,那么 Thread 中的 run() 方法不要做任何操作。
这是 Thread 中的 run 方法:
1
2
3
4
5
6
7
private Runnable target;
@Override
public void run() {
    if (target != null) {
        target.run();
    }
}
看 thread 代码输出结果(考察线程间协作)
1
2
3
4
5
6
7
8
9
10
11
12
13
14
15
16
17
class A {
    private int i = 0;
    public void foo() {
        ......
        new Thread(new Runnable() {
            @Override
            public void run() {
                ......
                i = 1;
                ......
            }
        }).start();
        ......
        System.out.print(i);
        ......
    }
}
- 输出结果是什么?
可能为 0,也可能为 1
- 怎么保证输出都为 1?
thread.join()
1
2
3
4
5
6
7
8
9
10
11
12
13
14
15
16
17
18
19
public class ThreadTest {
    private int i = 0;
    public void foo() {
        CountDownLatch cl = new CountDownLatch(1);
        Thread t = new Thread(new Runnable() {
            @Override
            public void run() {
                i = 1;
            }
        });
        t.start();
        try {
            t.join();
        } catch (InterruptedException e) {
            e.printStackTrace();
        }
        System.out.print(i);
    }
}
- 除了 Thread.join 还有其他方式吗?
CountDownlatch、CyclicBarrier
1
2
3
4
5
6
7
8
9
10
11
12
13
14
15
16
17
18
19
20
public class ThreadTest {
    private int i = 0;
    public void foo() {
        CountDownLatch cl = new CountDownLatch(1);
        Thread t = new Thread(new Runnable() {
            @Override
            public void run() {
                i = 1;
                cl.countDown();
            }
        });
        t.start();
        try {
            cl.await();
        } catch (InterruptedException e) {
            e.printStackTrace();
        }
        System.out.print(i);
    }
}
1
2
3
4
5
6
7
8
9
10
11
12
13
14
15
16
17
18
19
20
21
22
public void foo2() {
    CyclicBarrier cl = new CyclicBarrier(2);
    Thread t = new Thread(new Runnable() {
        @Override
        public void run() {
            i = 1;
            try {
                cl.await();
            } catch (InterruptedException | BrokenBarrierException e) {
                e.printStackTrace();
            }
        }
    });
    t.start();

    try {
        cl.await();
    } catch (InterruptedException | BrokenBarrierException e) {
        e.printStackTrace();
    }
    System.out.print(i);
}
一个最简单的 app,默认有几个线程?
代码获取 app 的所有线程:
1
2
3
4
5
Thread.getAllStackTraces().forEach {
    var thread = it.key
    sb.append("${it.key.name}-${thread.threadGroup.name}")
    sb.append("\n")
}
一个 HelloWorld 进程的线程:
1
2
3
4
5
6
7
8
9
10
11
12
13
14
15
FinalizerDaemon-system
ReferenceQueueDaemon-system
HeapTaskDaemon-system
FinalizerWatchdogDaemon-system
Signal Catcher-system
Jit thread pool worker thread 0-system
Profile Saver-system

Binder:6300_1-main
Binder:6300_2-main
Binder:6300_3-main
Binder:6300_4-main
Binder:interceptor-main
RenderThread-main
main-main
在 ThreadGroup 下有两个静态成员变量,分别是 systemThreadGroup 和 mainThreadGroup,mainThreadGroup 其实也是 systemThreadGroup 的子线程组。
system
- Signal Catcher 是 ART 中用于处理几个特殊信号的线程,比如
kill -3这种方式可以 dump 出 ANR 信息 - HeapTaskDaemon 用来释放堆内存的
- ReferenceQueueDaemon 一些软、弱、虚引用的对象,当它们被回收时,会被添加到对应的 ReferenceQueue 中,这个操作就由她负责
- FinalizerDaemon 用来回调
即将被回收的对象的 finalize 方法
Java 对象有 finalize() 方法,如果一个类 override 了这个方法,并且方法体不为空,在 GC 前,GC 会将对象加入 FinalizerReference queue 中,而 FinalizerDaemon 就是负责不停地将 queue 里面的对象取出来,调用它的 finalize 方法,然后再释放掉。
- FinalizerWatchdogDaemon 监视 FinalizerDaemon 线程,如果在回调即将被回收的对象的 finalize 方法时超时了 10 秒,那么进程会被强行 kill 掉
- Profile Saver 和 Android7.0 加的混合编译有关,设备空闲时会根据 profile 对部分热点代码进行编译以提高运行速度,这个 profile 就是这个线程负责写入的
- Jit thread pool worker thread 0
main
- main 主线程
- Binder:6300_1-main、Binder:6300_2-main、Binder:6300_3-main、Binder:6300_4-main Binder 通讯线程
- RenderThread 用来同步渲染 BlockingGLTextureView 的线程
- Binder:interceptor