Gradle Project
Gradle 官方文档:Project (Gradle API 8.7)
什么是 Project?
Gradle 为每个 build. Gradle 都会创建一个相应的 Project 领域对象,在编写 Gradle 脚本时,我们实际上是在操作诸如 Project 这样的 Gradle 领域对象;每一个待编译的工程都叫做一个 Project。每一个 Project 在构建的时候都包含了一系列的 Task 。比如一个 Android APK 的编译可能包含:Java 源码编译 Task、资源编译 Task、JNI 编译 Task、lint 检查 Task、打包生成 APK 的 Task、签名 Task 等。
- 在 setting. Gradle 执行完毕后,为参与构建的 module 创建一个 Project 实例
- 每一个 build. Gradle 都有一个与之对应的 Project 实例
Project API
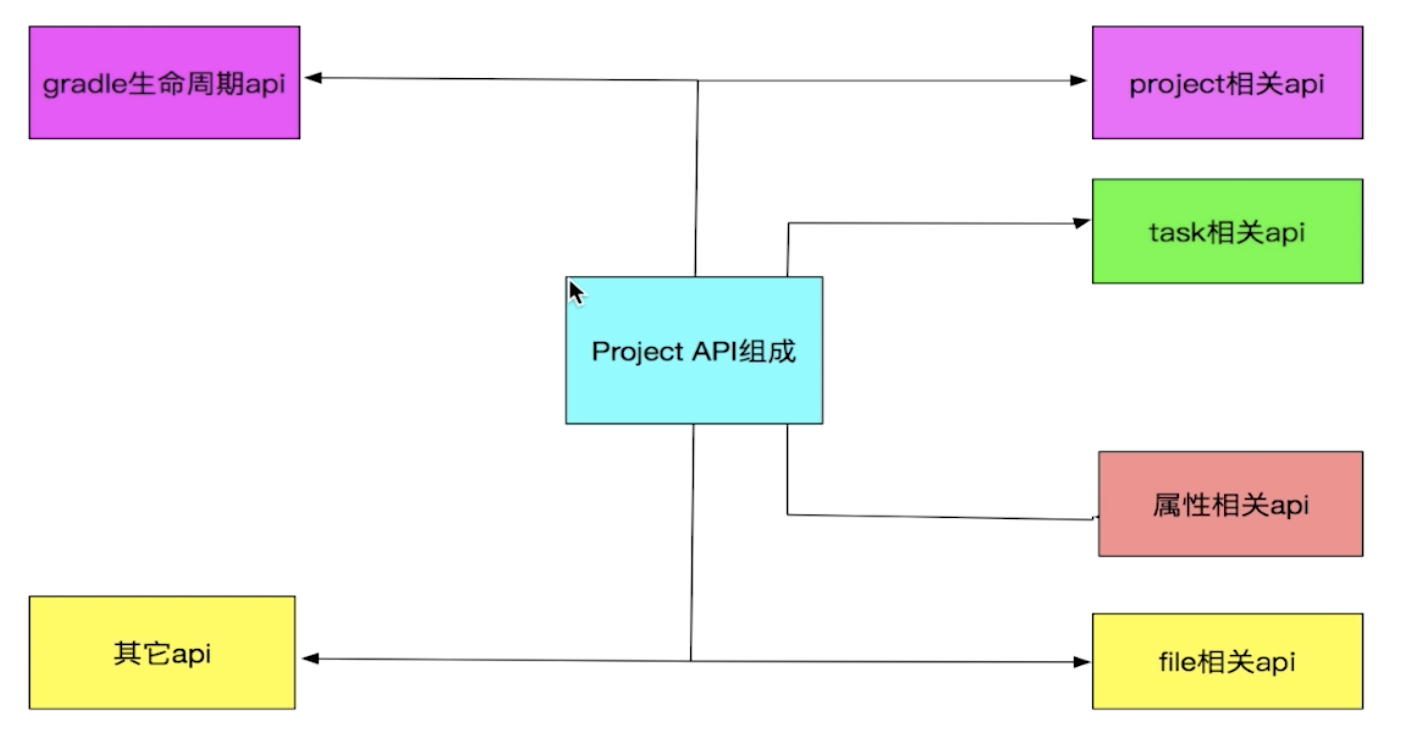
在 Project 中有很多的 API,但是根据它们的属性和用途我们可以将其分解为六大部分,如下图所示:
- Project API:让当前的 Project 拥有了操作它的父 Project 以及管理它的子 Project 的能力。
- Task 相关 API:为当前 Project 提供了新增 Task 以及管理已有 Task 的能力。由于 task 非常重要,我们将放到第四章来进行讲解。
- Project 属性相关的 Api:Gradle 会预先为我们提供一些 Project 属性,而属性相关的 api 让我们拥有了为 Project 添加额外属性的能力。
- File 相关 Api:Project File 相关的 API 主要用来操作我们当前 Project 下的一些文件处理。
- Gradle 生命周期 API:即我们在第二章讲解过的生命周期 API。
- 其它 API:添加依赖、添加配置、引入外部文件等等零散 API 的聚合。
project 相关 API
getAllProjects()
Set getAllprojects() 获取所有 project 的实例
1
2
3
4
5
6
7
8
9
10
11
12
13
14
| // root build.gradle
def getProjects() {
// 1、getAllprojects 方法返回一个包含根 project 与其子 project 的 Set 集合
// eachWithIndex 方法用于遍历集合、数组等可迭代的容器,
// 并同时返回下标,不同于 each 方法仅返回 project
this.getAllprojects().eachWithIndex { Project project, int index ->
// 2、下标为 0,表明当前遍历的是 rootProject
if (index == 0) {
println "Root Project is $project"
} else {
println "child Project is $project"
}
}
}
|
getSubProjects()
Set getSubprojects() 获取当前工程下所有子工程的实例
1
2
3
4
5
6
7
| // root build.gradle
def getSubProjects() {
// getSubprojects 方法返回一个包含子 project 的 Set 集合
this.getSubprojects().each { Project project ->
println "child Project is $project"
}
}
|
getParent()
Project getParent() 获取当前 project 的父类,需要注意的是,如果我们在根工程中使用它,获取的父类会为 null,因为根工程没有父类,所以这里我们直接在 app 的 build.gradle 下调用。
1
2
| // app build.gradle
project.getParent()
|
getRootProject()
Project getRootProject () 使用 getRootProject 即可在任意 build. Gradle 文件获取当前根工程的 project 实例
1
2
3
4
5
| // app build.gradle
def getRootPro() {
def rootProjectName = this.getRootProject().name
println "root project is $rootProjectName"
}
|
project()
project() 表示的是指定工程的实例,然后在闭包中对其进行操作。
1
2
| Project project(String path, Closure configureClosure);
// project 方法中两个参数,一个是指定工程的路径,另一个是用来配置该工程的闭包
|
案例:
1
2
3
4
5
6
7
8
9
| // 1、闭包参数可以放在括号外面
project("app") { Project project ->
apply plugin: 'com.android.application'
}
// 2、更简洁的写法是这样的:省略参数
project("app") {
apply plugin: 'com.android.application'
}
|
Project 属性
预定义属性
在 Project 接口里,仅仅预先定义了 7 个属性
1
2
3
4
5
6
7
8
9
10
11
12
13
14
15
16
17
18
19
20
21
22
23
24
25
| public interface Project extends Comparable<Project>, ExtensionAware, PluginAware {
/**
* 默认的工程构建文件名称
*/
String DEFAULT_BUILD_FILE = "build.gradle";
/**
* 区分开 project 名字与 task 名字的符号
*/
String PATH_SEPARATOR = ":";
/**
* 默认的构建目录名称
*/
String DEFAULT_BUILD_DIR_NAME = "build";
String GRADLE_PROPERTIES = "gradle.properties";
String SYSTEM_PROP_PREFIX = "systemProp";
String DEFAULT_VERSION = "unspecified";
String DEFAULT_STATUS = "release";
// ...
}
|
扩展属性 ext
Gradle 提供了 ext 关键字让我们有能力去定义自身所需要的扩展属性;自定义属性相较局部变量作用域更加广泛,可以跨 Task、Project 访问自定义属性,只要能访问这些属性所属的对象,那么这些属性就可以被访问到。
Android 开发中可以使用自定义属性单独定义版本号、版本名称以及用到的第三方库的版本,将其同意在单独的 gradle 文件中,各 Module 直接获取即可,不仅方便管理依赖库的版本,还在一定程度上提高工作效率。
- ext 应用 1:Android 统一配置和依赖管理配置
1
2
3
4
5
6
7
8
9
10
11
12
13
14
15
16
17
18
19
20
21
22
23
24
25
26
27
28
29
30
31
32
33
34
35
36
37
38
39
40
41
42
43
44
45
46
47
48
49
50
51
52
53
54
55
56
57
58
59
| ext {
android = [
compileSdkVersion : 27,
buildToolsVersion : "28.0.3"]
version = [
supportLibraryVersion : "28.0.0",
]
dependencies = [
// base
"appcompat-v7" : "com.android.support:appcompat-v7:${version["supportLibraryVersion"]}",
...
]
annotationProcessor = [
"glide_compiler" : "com.github.bumptech.glide:compiler:${version["glideVersion"]}",
]
apiFileDependencies = [
"launchstarter" : "libs/launchstarter-release-1.0.0.aar",
]
debugImplementationDependencies = [
"MethodTraceMan" : "com.github.zhengcx:MethodTraceMan:1.0.7"
]
releaseImplementationDependencies = [
"MethodTraceMan" : "com.github.zhengcx:MethodTraceMan:1.0.5-noop"
]
}
// 应用在build.gradle的dependencies {} 下配置:
dependencies {
// 在各个 moulde 下的 build.gradle 脚本下
def implementationDependencies = rootProject.ext.dependencies
def processors = rootProject.ext.annotationProcessor
def apiFileDependencies = rootProject.ext.apiFileDependencies
// 在各个 moulde 下的 build.gradle 脚本的 dependencies 闭包中
// 处理所有的 aar 依赖
apiFileDependencies.each { k, v -> api files(v)}
// 处理所有的 xxximplementation 依赖
implementationDependencies.each { k, v -> implementation v }
debugImplementationDependencies.each { k, v -> debugImplementation v }
// ...
// 处理 annotationProcessor 依赖
processors.each { k, v -> annotationProcessor v }
// 处理所有包含 exclude 的依赖
debugImplementationExcludes.each { entry ->
debugImplementation(entry.key) {
entry.value.each { childEntry ->
exclude(group: childEntry.key, module: childEntry.value)
}
}
}
}
|
- 在
gradle.properties 下定义扩展属性
除了使用 ext 扩展属性定义额外的属性之外,我们也可以在 gradle.properties 下定义扩展属性
1
2
3
4
5
| // 在 gradle.properties 中
mCompileVersion = 27
// 在 app moudle 下的 build.gradle 中
compileSdkVersion mCompileVersion.toInteger()
|
project.ext
1
| project.ext._pgyer_response_ = response
|
ProjectLayout
Gradle 中的 ProjectLayout 是一个用于描述项目结构的类。它提供了一种灵活的方式来定义项目的源代码、资源文件和其他文件的位置。
1
2
3
4
5
| public interface ProjectLayout {
Directory getProjectDirectory();
DirectoryProperty getBuildDirectory();
}
// 默认实现DefaultProjectLayout
|
获取 app 目录,build 目录
1
2
3
4
5
6
7
8
| println("layout=$layout")
println("layout.buildDirectory=${layout.buildDirectory.get()}")
println("layout.projectDirectory=${layout.projectDirectory.asFile}")
println("layout.buildDirectory.dir(\"output\")=${layout.buildDirectory.dir("output").get()}")
//layout=org.gradle.api.internal.file.DefaultProjectLayout@24141afb
//layout.buildDirectory=/Users/xxx/WorkSpace/GradlePluginDemos/GradlePlugin8.0-Kotlin-New/app/output
//layout.projectDirectory=/Users/xxx/WorkSpace/GradlePluginDemos/GradlePlugin8.0-Kotlin-New/app
//layout.buildDirectory.dir("output")=/Users/xxx/WorkSpace/GradlePluginDemos/GradlePlugin8.0-Kotlin-New/app/output/output
|
更改 build 目录、基于 build 获取目录
将 build 目录改成 output:
1
2
3
4
5
6
7
8
| // app build.gradle.kts
// Change the build directory.
// Don't need to update the task properties. These are automatically updated as the build directory changes
layout.buildDirectory = layout.projectDirectory.dir("output")
// 基于build获取目录
outputFile = layout.buildDirectory.file("two.txt")
|
文件相关 API
在 gradle 中,文件相关的 API 可以总结为如下两大类
1. 路径获取 API
1
2
3
4
5
6
7
8
9
10
| /**
* 路径获取 API
*/
println "the root file path is:" + getRootDir().absolutePath
println "this build file path is:" + getBuildDir().absolutePath
println "this Project file path is:" + getProjectDir().absolutePath
// the root file path is:/Users/quchao/Documents/main-open-project/Awesome-WanAndroid
// this build file path is:/Users/quchao/Documents/main-open-project/Awesome-WanAndroid/build
// this Project file path is:/Users/quchao/Documents/main-open-project/Awesome-WanAndroid
|
2. 文件操作相关 API
- 文件定位常用的文件定位 API 有
file/files。
1
2
3
4
5
6
7
8
9
10
11
12
13
14
15
16
17
18
19
20
21
22
23
24
25
26
27
28
29
30
31
32
33
34
35
| // 在 rootProject 下的 build.gradle 中
/**
* 文件定位之 file
*/
this.getContent("config.gradle")
def getContent(String path) {
try {
// 不同与 new file 的需要传入 绝对路径 的方式,
// file 从相对于当前的 project 工程开始查找
def mFile = file(path)
println mFile.text
} catch (GradleException e) {
println e.toString()
return null
}
}
/**
* 件定位之 files
*/
this.getContent("config.gradle", "build.gradle")
def getContent(String path1, String path2) {
try {
// 不同与 new file 的需要传入 绝对路径 的方式,
// file 从相对于当前的 project 工程开始查找
def mFiles = files(path1, path2)
println mFiles[0].text + mFiles[1].text
} catch (GradleException e) {
println e.toString()
return null
}
}
|
- 文件拷贝常用的文件拷贝 API 为
copy。
1
2
3
4
5
6
7
8
9
10
11
12
13
14
15
16
| /**
* 文件拷贝
*/
copy {
// 既可以拷贝文件,也可以拷贝文件夹
// 这里是将 app moudle 下生成的 apk 目录拷贝到
// 根工程下的 build 目录
from file("build/outputs/apk")
into getRootProject().getBuildDir().path + "/apk/"
exclude {
// 排除不需要拷贝的文件
}
rename {
// 对拷贝过来的文件进行重命名
}
}
|
- 文件树遍历使用
fileTree 将当前目录转换为文件数的形式,然后便可以获取到每一个树元素(节点)进行相应的操作。
1
2
3
4
5
6
7
8
9
10
11
12
| /**
* 文件树遍历
*/
fileTree("build/outputs/apk") { FileTree fileTree ->
fileTree.visit { FileTreeElement fileTreeElement ->
println "The file is $fileTreeElement.file.name"
copy {
from fileTreeElement.file
into getRootProject().getBuildDir().path + "/apkTree/"
}
}
}
|
subprojects 和 allprojects 的区别?
allprojects 是对所有 project 的配置,包括 Root Project;而 subprojects 是对所有 Child Project 的配置,不包括 Root Project
在 rootProject 下的 build.gradle 中,buildscript 的 repositories 和 allprojects 的 repositories 有什么区别?
1
2
3
4
5
6
7
8
9
10
11
12
13
14
15
16
17
18
19
20
21
22
23
| // root build.gradle
buildscript {
repositories {
jcenter()
google()
maven {
url 'https://maven.google.com/'
name 'Google'
}
}
dependencies {
classpath 'com.android.tools.build:gradle:2.3.3'
}
}
allprojects {
repositories {
jcenter()
google()
maven {
url "http://maven.xxxxxxxx/xxxxx"
}
}
}
|
buildscript 里是 gradle 脚本执行所需依赖,如上所示对应的是 maven 库和插件allprojects 里是项目本身需要的依赖,比如代码中某个类是打包到 maven 私有库中的,那么在 allprojects—>repositories 中需要配置 maven 私有库,而不是 buildscript 中,不然找不到。
其他 API
依赖相关 API
- 根项目下的
buildscript 中用于配置项目核心的依赖。
1
2
3
4
5
6
7
8
9
10
11
12
13
14
15
16
17
18
19
20
21
22
23
24
25
26
27
28
29
30
31
32
33
34
35
36
37
38
39
40
41
42
43
44
45
46
47
48
49
| // 原始使用示例:
buildscript { ScriptHandler scriptHandler ->
// 配置我们工程的仓库地址
scriptHandler.repositories { RepositoryHandler repositoryHandler ->
repositoryHandler.google()
repositoryHandler.jcenter()
repositoryHandler.mavenCentral()
repositoryHandler.maven { url 'https://maven.google.com' }
repositoryHandler.maven { url "https://plugins.gradle.org/m2/" }
repositoryHandler.maven {
url uri('../PAGradlePlugin/repo')
}
// 访问本地私有 Maven 服务器
repositoryHandler.maven {
name "personal"
url "http://localhost:8081:/JsonChao/repositories"
credentials {
username = "JsonChao"
password = "123456"
}
}
}
// 配置我们工程的插件依赖
dependencies { DependencyHandler dependencyHandler ->
dependencyHandler.classpath 'com.android.tools.build:gradle:3.1.4'
// ...
}
}
// 简化后的使用示例:
buildscript {
// 配置我们工程的仓库地址
repositories {
google()
jcenter()
mavenCentral()
maven { url 'https://maven.google.com' }
maven { url "https://plugins.gradle.org/m2/" }
maven {
url uri('../PAGradlePlugin/repo')
}
}
// 配置我们工程的插件依赖
dependencies {
classpath 'com.android.tools.build:gradle:3.1.4'
// ...
}
}
|
- App module 下的 dependencies 不同于根项目 buildscript 中的 dependencies 是用来配置我们 Gradle 工程的插件依赖的,而 app module 下的 dependencies 是用来为应用程序添加第三方依赖的
1
2
3
4
5
6
7
8
| implementation(rootProject.ext.dependencies.glide) {
// 排除依赖:一般用于解决资源、代码冲突相关的问题
exclude module: 'support-v4'
// 传递依赖:A => B => C ,B 中使用到了 C 中的依赖,
// 且 A 依赖于 B,如果打开传递依赖,则 A 能使用到 B
// 中所使用的 C 中的依赖,默认都是不打开,即 false
transitive false
}
|
外部命令执行
- 使用 Gradle 提供的
exec 来执行外部命令
1
2
3
4
5
6
7
8
9
10
11
12
13
14
15
16
17
18
| // 将当前工程下新生产的 APK 文件拷贝到 电脑下的 Downloads 目录中
task apkMove() {
doLast {
// 在 gradle 的执行阶段去执行
def sourcePath = this.buildDir.path + "/outputs/apk/speed/release/"
def destinationPath = "/Users/quchao/Downloads/"
def command = "mv -f $sourcePath $destinationPath"
exec {
try {
executable "bash"
args "-c", command
println "The command execute is success"
} catch (GradleException e) {
println "The command execute is failed"
}
}
}
}
|