Express
Express 入门
Express 介绍
Express 是一个保持最小规模的灵活的 Node.js Web 应用程序开发框架,为 Web 和移动应用程序提供一组强大的功能。
Express 和 http 模块类似,用来创建 Web 服务器的。
安装
1
2
3
npm install express@4.17.1
# 全局安装
npm install express -g
基本使用
Request 和 Response 对象
Request
首先是 Request 请求对象,通常我们习惯用 req 变量来表示:
req.body:客户端请求体的数据,可能是表单或 JSON 数据req.params:请求 URI 中的路径参数req.query:请求 URI 中的查询参数req.cookies:客户端的 cookies
Response
1
2
3
4
5
6
7
8
// 发送一串 HTML 代码
res.send('HTML String');

// 发送一个文件
res.sendFile('file.zip');

// 渲染一个模板引擎并发送
res.render('index');
Response 对象上的操作非常丰富,并且还可以链式调用:
1
2
// 设置状态码为 404,并返回 Page Not Found 字符串
res.status(404).send('Page Not Found');
send
res.send() ,把处理好的内容发送给 client
1
2
3
4
// 发送文本
res.send("Hello World!");
// 发送json
res.send({"name":"zhangsan","age":20});
GET
1
2
3
app.get('请求Url', function(req, res){
  // ...
});
- 参数 1:请求 Url
- 参数 2:请求对应的处理函数
- req 请求对象,包含了与请求相关的属性与方法
- res 响应对象,包含了与响应相关的属性与方法
示例:
1
2
3
4
5
6
7
8
9
10
11
12
13
14
15
16
17
18
19
20
21
22
23
24
25
26
27
28
var express = require('express');
var app = express();

app.use('/public', express.static('public'));

app.get('/index.html', function (req, res) {
   res.sendFile( __dirname + "/" + "index.html" );
})

app.get('/process_get', function (req, res) {

   // 输出 JSON 格式
   var response = {
       "first_name":req.query.first_name,
       "last_name":req.query.last_name
   };
   console.log(response);
   res.end(JSON.stringify(response));
})

var server = app.listen(8081, function () {

  var host = server.address().address
  var port = server.address().port

  console.log("应用实例,访问地址为 http://%s:%s", host, port)

})
POST
1
2
3
app.post('请求Url', function(req, res) {
  // ...
});
- 参数 1:请求 Url
- 参数 2:请求对应的处理函数
- req 请求对象,包含了与请求相关的属性与方法
- res 响应对象,包含了与响应相关的属性与方法
示例:
1
2
3
4
5
6
7
8
9
10
11
12
13
14
15
16
17
18
19
20
21
22
23
24
25
26
27
28
29
30
31
32
var express = require('express');
var app = express();
var bodyParser = require('body-parser');

// 创建 application/x-www-form-urlencoded 编码解析
var urlencodedParser = bodyParser.urlencoded({ extended: false })

app.use('/public', express.static('public'));

app.get('/index.html', function (req, res) {
   res.sendFile( __dirname + "/" + "index.html" );
})

app.post('/process_post', urlencodedParser, function (req, res) {

   // 输出 JSON 格式
   var response = {
       "first_name":req.body.first_name,
       "last_name":req.body.last_name
   };
   console.log(response);
   res.end(JSON.stringify(response));
})

var server = app.listen(8081, function () {

  var host = server.address().address
  var port = server.address().port

  console.log("应用实例,访问地址为 http://%s:%s", host, port)

})
托管静态资源
静态文件包括:
- JavaScript 文件
- image 图片
- css 文件
static 中间件
通常网站需要提供静态文件服务,例如图片、CSS 文件、JS 文件等等,而 Express 已经自带了静态文件服务中间件 express.static 使用方法:
1
express.static(root,[option])
例如,我们添加静态文件中间件如下,并指定静态资源根目录为 public:
1
2
3
4
5
6
7
8
9
// ...

app.use(express.static('public'));

app.get('/', (req, res) => {
  res.render('index');
});

// ...
假设项目的 public 目录里面有这些静态文件:
1
2
3
4
5
public
├── css
│   └── style.css
└── img
    └── tuture-logo.png
就可以分别通过以下路径访问:
http://localhost:3000/css/style.css http://localhost:3000/img/tuture-logo.png
托管多个静态资源目录
要托管多个资源目录,多次调用 express.static() 函数:
1
2
app.use(express.static('public'))
app.use(express.static('files'))
访问静态资源文件时,express.static 函数会根据目录的添加顺序查找所需的文件。
如果希望在托管的静态资源访问路径之前,挂载路径前缀,可以使用:
1
app.use('/public', express.static('public'));
现在可以通过带有/public 前缀地址来访问 public 目录中的文件:
http://127.0.0.1:3000/public/images/bg.jpg、http://127.0.0.1:3000/public/css/style.css
Express 路由
express 路由指的是客户端的请求与服务器处理函数之间的 映射关系 ,用来向特定的客户端请求返回对应数据的东西。
express 路由组成
express 路由分为 3 个部分,分别是请求的类型,请求的 URL 地址和处理函数,格式:
1
app.METHOD(PATH, HANDLER)
app就是一个 express 服务器对象METHOD可以是任何小写的 HTTP 请求方法,包括 get、post、put、delete 等等PATH是客户端访问的 URI,例如 / 或 /aboutHANDLER是路由被触发时的回调函数,在函数中可以执行相应的业务逻辑
如:
1
2
3
app.get("/", function (req, res) {
    res.send({"name":"zhangsan","age":20});
});
路由的匹配过程
- 按照路由的声明的先后顺序进行匹配
- 如果请求类型和请求 URL 同时匹配成功,才会调用对应的处理 function 处理
使用子路由拆分逻辑(模块化路由)
当我们的网站规模越来越大时,把所有代码都放在 app.js 中可不是一个好主意。” 拆分逻辑 “(或者说 “ 模块化 “)是最常见的做法,而在 Express 中,我们可以通过子路由 Router 来实现。
1
2
const express = require('express');
const router = express.Router();
express.Router 可以理解为一个迷你版的 app 对象,但是它功能完备,同样支持注册 中间件 和 路由:
1
2
3
4
5
6
// 注册一个中间件
router.use(someMiddleware);

// 添加路由
router.get('/hello', helloHandler);
router.post('/world', worldHandler);
由于 Express 中 “ 万物皆中间件 “ 的思想,一个 Router 也作为中间件加入到 app 中:
1
app.use('/say', router);
这样 router 下的全部路由都会加到 /say 之下,即相当于:
1
2
app.get('/say/hello', helloHandler);
app.post('/say/world', worldHandler);
示例:
- api.js
1
2
3
4
5
6
7
8
9
10
const express = require('express');
const router = express.Router();

router.get('/', (req, res) => {
  res.json({ name: '图雀社区', website: 'https://tuture.co' });
});
router.post('/new', (req, res) => {
  res.status(201).json({ msg: '新的篇章,即将开始' });
});
module.exports = router;
- index.js
1
2
3
4
5
6
7
8
9
10
11
12
13
14
15
16
17
18
19
20
const express = require('express');
const path = require('path');
const router = express.Router();

router.get("/", function (req, res) {
    res.send("出错了,联系hacket");
});

router.get("/onelink", function (req, res) {
    console.log('send onelink_test.html');
    const root = process.cwd();
    const file = path.join(root, 'public/onelink_test.html')
    res.sendFile(file);
});

router.get('/broken', (req, res) => {
    throw new Error('Broken!');
});

module.exports = router;
- app.js 入口
1
2
3
4
5
6
7
8
9
10
11
12
13
14
15
16
17
18
19
20
21
22
23
24
25
26
27
28
29
30
31
32
33
const express = require("express");
const app = express();
const PORT = 12345

const indexRouter = require('./routers/index');
const apiRouter = require('./routers/api');
// 子路由
app.use('/', indexRouter);
// 子路由
app.use('/api', apiRouter);

// 静态资源绑定
app.use(express.static('public'));

// 全局错误
app.use('*', (req, res) => {
  res.status(404).render('404', { url: req.originalUrl });
});

// 中间件
function loggingMiddleware(req, res, next) {
  const time = new Date();
  console.log(`[${time.toLocaleString()}] method=${req.method}, url=${req.url}, path=${req.path}`);
  next();
}
app.use(loggingMiddleware);


var server = app.listen(PORT, function () {
  var host = server.address().address;
  var port = server.address().port;
  console.log("Web Server running at http://%s:%s", host, port);
});
运行 nodemon app.js:
post http://10.102.230.2:12345/api/new
get http://10.102.230.2:12345/onelink
Express 中间件
理解中间件
中间件并不是 Express 独有的概念。相反,它是一种广为使用的软件工程概念(甚至已经延伸到了其他行业),是指将具体的业务逻辑和底层逻辑解耦的组件。换句话说,中间件就是能够适用多个应用场景、可复用性良好的代码。
Express 的简化版中间件流程如下图所示: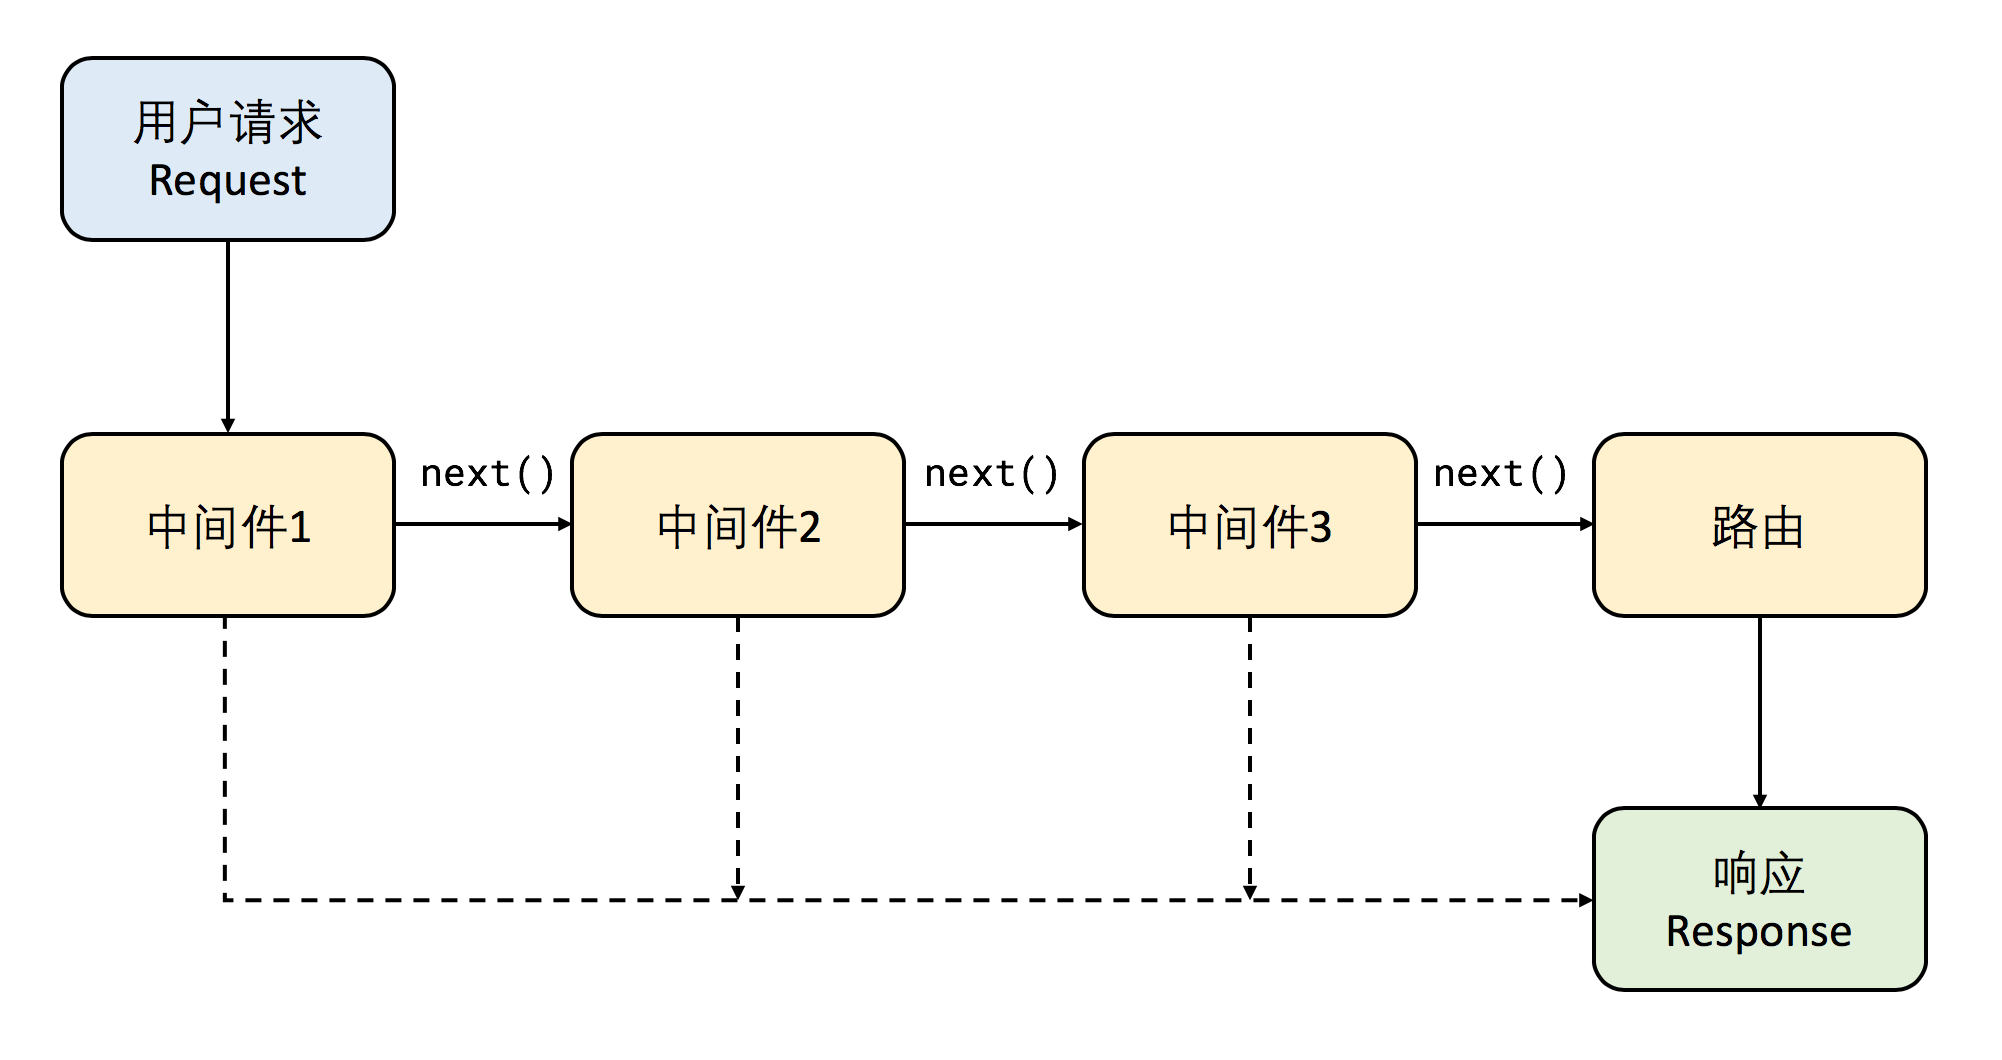 首先客户端向服务器发起请求,然后服务器依次执行每个中间件,最后到达路由,选择相应的逻辑来执行。有两点需要特别注意:
- 中间件是按顺序执行的,因此在配置中间件时顺序非常重要,不能弄错
- 中间件在执行内部逻辑的时候可以选择将请求传递给下一个中间件,也可以直接返回用户响应
Express 中间件的定义
在 Express 中,中间件就是一个函数:
1
2
3
4
function someMiddleware(req, res, next) {
  // 自定义逻辑
  next();
}
三个参数中,req 和 res 就是前面提到的 Request 请求对象和 Response 响应对象;而 next 函数则用来触发下一个中间件的执行。
如果忘记在中间件中调用 next 函数,并且又不直接返回响应时,服务器会直接卡在这个中间件不会继续执行下去。
在 Express 使用中间件有两种方式:全局中间件 和 路由中间件。
全局中间件
通过 app.use 函数就可以注册中间件,并且此中间件会在用户发起任何请求都可能会执行,例如:
1
app.use(someMiddleware);
示例:在终端打印客户端的访问时间、 HTTP 请求方法和 URI,名为 loggingMiddleware。代码如下:
1
2
3
4
5
6
7
8
9
10
11
12
13
14
15
16
17
18
19
20
21
22
23
24
25
26
const express = require("express");
const app = express();
const PORT = 12345

app.use(loggingMiddleware);

app.get("/", function (req, res) {
    res.send("出错了,联系Neo Zeng");
});

app.get("/onelink", function (req, res) {
    console.log('send onelink_test.html');
    res.sendFile(__dirname + "/onelink_test.html");
});

function loggingMiddleware(req, res, next) {
    const time = new Date();
    console.log(`[${time.toLocaleString()}] method=${req.method}, url=${req.url}, path=${req.path}`);
    next();
}

var server = app.listen(PORT, function () {
    var host = server.address().address;
    var port = server.address().port;
    console.log("Web Server running at http://%s:%s", host, port);
});
在中间件中写 console.log 语句是比较糟糕的做法,因为 console.log(包括其他同步的代码)都会阻塞 Node.js 的异步事件循环,降低服务器的吞吐率。在实际生产中,推荐使用第三方优秀的日志中间件,例如 morgan、winston 等等。
路由中间件
通过在路由定义时注册中间件,此中间件只会在用户访问该路由对应的 URI 时执行,例如:
1
2
3
app.get('/middleware', someMiddleware, (req, res) => {
  res.send('Hello World');
});
那么用户只有在访问 /middleware 时,定义的 someMiddleware 中间件才会被触发,访问其他路径时不会触发。
模板引擎渲染页面:express-generator
Express 对当今主流的模板引擎(例如 Pug、Handlebars、EJS 等等)提供了很好的支持,可以做到两行代码接入。
处理 404 和服务器错误
HTTP 错误一般分为两大类:
- 客户端方面的错误(状态码 4xx),例如访问了不存在的页面(404)、权限不够(403)等等
- 服务器方面的错误(状态码 5xx),例如服务器内部出现错误(500)或网关错误(503)等等
Express 中间件的运作流程: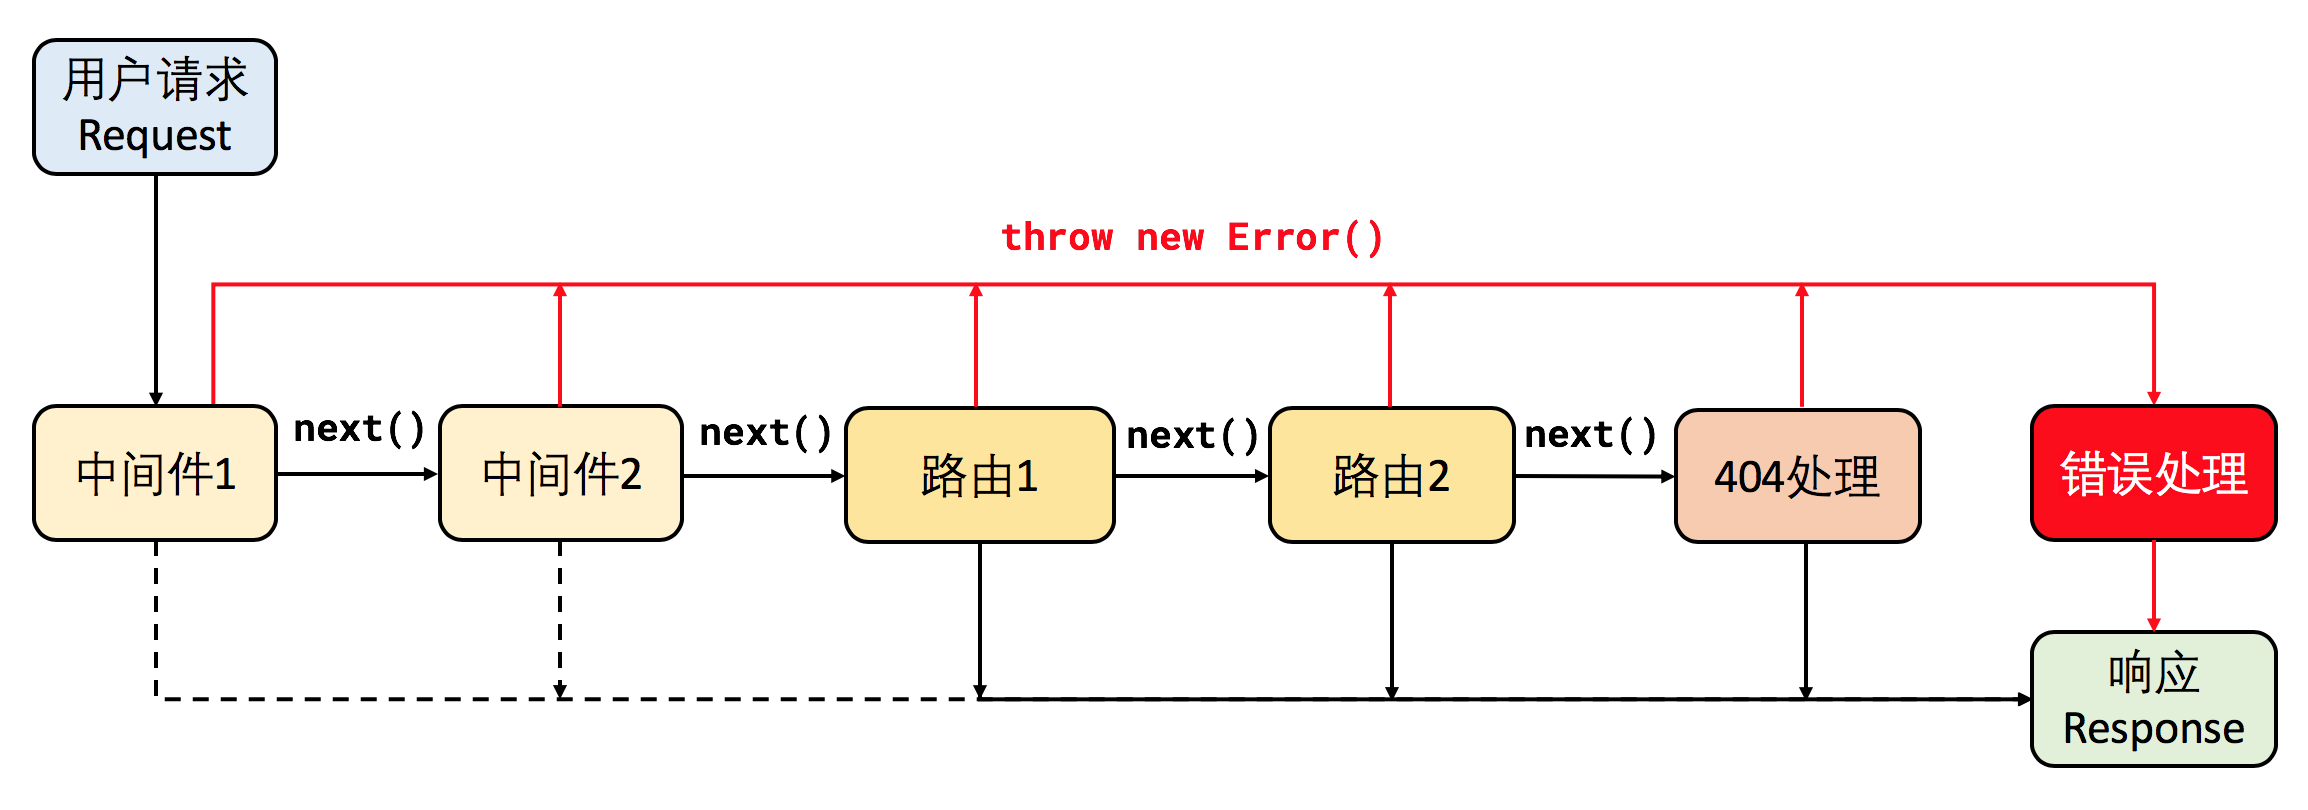
这张示意图和之前的图有两点重大区别:
- 每个路由定义本质上是一个中间件(更准确地说是一个中间件容器,可包含多个中间件),当 URI 匹配成功时直接返回响应,匹配失败时继续执行下一个路由
- 每个中间件(包括路由)不仅可以调用
next函数向下传递、直接返回响应,还可以抛出异常
从这张图就可以很清晰地看出怎么实现 404 和服务器错误的处理了:
- 对于 404,只需在所有路由之后再加一个中间件,用来接收所有路由均匹配失败的请求
- 对于错误处理,前面所有中间件抛出异常时都会进入错误处理函数,可以使用 Express 自带的,也可以自定义。
404 错误处理
在 Express 中,可以通过中间件的方式处理访问不存在的路径:
1
2
3
app.use('*', (req, res) => {
  // ...
});
* 表示匹配任何路径。将此中间件放在所有路由后面,即可捕获所有访问路径均匹配失败的请求。
500 错误处理
Express 已经自带了错误处理机制,服务器直接返回了出错的调用栈!很明显,向用户返回这样的调用栈不仅体验糟糕,而且大大增加了被攻击的风险。
实际上,Express 的默认错误处理机制可以通过设置 NODE_ENV 来进行切换。我们将其设置为生产环境 production,再开启服务器。
如果你在 Linux、macOS 或 Windows 下的 Git Bash 环境中,可以运行以下命令:
1
2
3
4
5
6
# Linux/macOS
NODE_ENV=production node app.js

# 如果你在 Windows 下的命令行,运行以下命令:
set NODE_ENV=production
node server.js
这时候访问 localhost:3000/broken 就会直接返回 Internal Server Error(服务器内部错误),不会显示任何错误信息: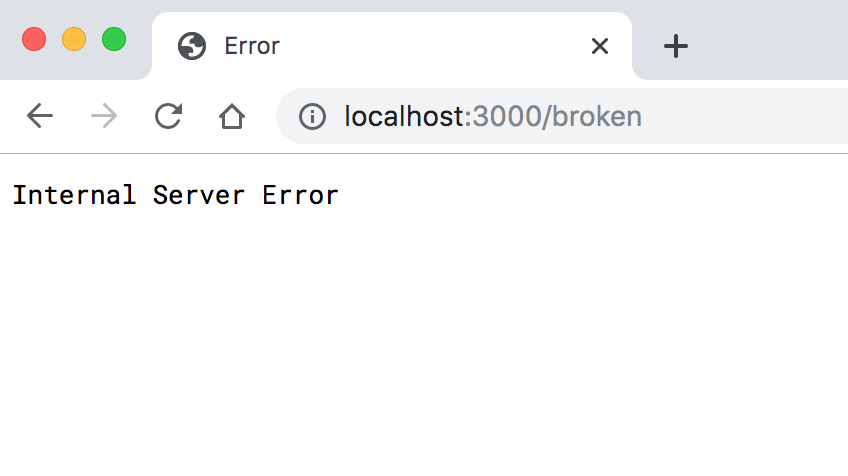 可以通过 Express 的自定义错误处理函数来解决,错误处理函数的形式如下:
1
2
3
4
5
6
function error(err, req, res, next) {
    // 处理错误逻辑
    console.error('500 error:', err);
    console.error(err.stack);
}
app.use(error);
实现自定义处理逻辑
1
2
3
4
5
6
7
8
9
10
11
12
13
14
15
// 中间件和其他路由 ...

app.use('*', (req, res) => {
  res.status(404).render('404', { url: req.originalUrl });
});

app.use((err, req, res, next) => {
  console.error(err.stack);
  res.status(500).render('500');
});

app.listen(port, () => {
  console.log(`Server running at http://${hostname}:${port}/`);
});
JSON API
Express 为我们封装了一个 json 方法,直接就可以将一个 JavaScript 对象作为 JSON 数据返回,例如:
1
res.json({ name: '百万年薪', price: 996 });
我们还可以指定状态码,例如:
1
res.status(502).json({ error: '公司关门了' });
注意
app.use的代码部分必须被定义在app.get的代码部分后面,否则后面 get 的页面出不来?
示例
Hello World
- 安装 express 模块
1
npm install express --save # 安装express并保存到依赖中
示例:编写 index.js 代码:
1
2
3
4
5
6
7
8
9
10
11
12
13
14
15
// 导入express模块
var express = require("express");
// 创建express实例
var app = express();

// 执行app.get()方法,当客户端以GET方法请求/路径时,执行回调函数
app.get("/", function (req, res) {
    res.send("Hello World!");
});
// 创建web服务器,监听12345端口
var server = app.listen(12345, function () {
    var host = server.address().address;
    var port = server.address().port;
    console.log("Web Server running at http://%s:%s", host, port);
});
运行:node index.js 浏览器输入:127.0.0.1:12345/
多个目录
app.js 代码中增加几个路由 url 代码,实际上也是某个业务所对应的页面:
1
2
3
4
5
6
7
8
9
10
11
12
13
14
15
16
17
18
19
20
21
22
23
24
25
26
// 导入express模块
var express = require('express')
// 创建一个express实例
var app = express();

// 执行app的get请求处理 ,处理访问根目录下的请求
app.get('/', function (req, res) {
   res.send('Hello World');
})

// 执行app的get请求处理,处理访问news目录下的请求
app.get('/news', function (req, res) {
   res.send('这是news版块页面');
})

// 执行app的get请求处理,处理访问ahout目录下的请求
app.get('/about', function (req, res) {
   res.send('这是about版块页面');
})

// 创建web服务,设定端口号和ip地址
var server = app.listen(8081, function () {
  var host = server.address().address
  var port = server.address().port
  console.log("应用实例,访问地址为 http://%s:%s", host, port)
})
发送文件
方式 1
- 先在项目根目录下创建一个 pages 目录,然后在里面新建一个 about.html 文件
1
2
3
4
5
6
7
8
9
10
11
12
13
14
15
16
17
<!DOCTYPE html>
<html lang="en">
  <head>
    <meta charset="UTF-8">
    <meta name="viewport" content="width=device-width, initial-scale=1.0">
    <title>Document</title>
    <style>
      .wrapper{font-size:36px;color:#f90;}
    </style>
  </head>
  <body>
    <div class="wrapper">
      about页面内容
    </div>
    <button id="test">click</button>
  </body>
</html>
- 接下来修改一下之前的 app.js 代码中的 about 目录请求部分代码:
1
2
3
4
5
6
7
8
9
10
11
12
13
14
15
// 导入express模块
var express = require("express");
// 创建express实例
var app = express();
// 执行app的get请求处理,处理访问ahout目录下的请求
app.get('/about', function (req, res) {
    res.sendFile( __dirname + "/pages/" + "about.html" );
 })

// 创建web服务器,监听12345端口
var server = app.listen(12345, function () {
    var host = server.address().address;
    var port = server.address().port;
    console.log("Web Server running at http://%s:%s", host, port);
});
- 执行 node app.js
方式 2:express 中间件
Express 提供了内置的中间件 express.static 来设置静态文件如:图片、CSS、JavaScript 等。我们可以使用 express.static 中间件来设置静态文件路径。例如如果将图片, CSS, JavaScript 文件放在 项目 public 目录下,使用的时候格式如下:
1
app.use('/public',express.static('public'))
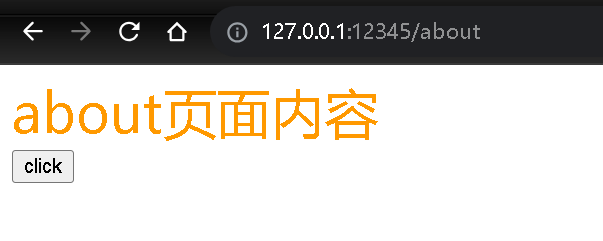
将 about.html 代码中的 css 样式分离出来单独存成一个文,并放在 css 目录下,如下结构: 此时 about.html 代码如下,特别注意引入外部 css 文件时的路径表达:
/pages/css/about.css
1
2
3
4
5
6
7
8
9
10
11
12
13
14
15
<!DOCTYPE html>
<html lang="en">
<head>
  <meta charset="UTF-8">
  <meta name="viewport" content="width=device-width, initial-scale=1.0">
  <title>Document</title>
  <link rel="stylesheet" type="text/css" href="/pages/css/about.css">  #引入外部css样式文件
</head>
<body>
  <div class="wrapper">
     about页面内容
  </div>
  <button id="test">click</button>
</body>
</html>
为了使得样式文件路径正确,这里还需要在 app.js 代码中增加一个使用静态资源中间件:
1
2
3
4
5
6
7
8
9
10
11
12
13
14
15
16
17
18
19
20
21
22
23
24
25
26
27
28
29
// 导入express模块
var express = require('express')
// 创建一个express实例
var app = express();

//  设定使用的静态资源路径
app.use('/pages',express.static('pages'))            #注意这里的中间件使用

// 执行app的get请求处理 ,处理访问根目录下的请求
app.get('/', function (req, res) {
   res.send('Hello World');
})

// 执行app的get请求处理,处理访问news目录下的请求
app.get('/news', function (req, res) {
   res.send('这是news版块页面');
})

// 执行app的get请求处理,处理访问ahout目录下的请求
app.get('/about', function (req, res) {
   res.sendFile( __dirname+"/pages/" + "about.html" );     #注意这里请求访问about.html页面
})

// 创建web服务,设定端口号和ip地址
var server = app.listen(8081, function () {
  var host = server.address().address
  var port = server.address().port
  console.log("应用实例,访问地址为 http://%s:%s", host, port)
})
执行 node app.js 时效果与方式 1 的效果完全一致