DataBinding基础
Data Binding 基本使用
什么是 DataBinding?
DataBinding 是 Google 在 Jetpack 中推出的一款数据绑定的支持库,利用该库可以实现在页面组件中直接绑定应用程序的数据源。使其维护起来更加方便,架构更明确简介。何为绑定:
- 数据直接绑定到 UI 上,数据改变时 UI 自动更新
- UI 上的数据绑定到变量中,当数据 (如 EditText 中的数据) 改变时自动更新
集成 Data Binding
- 在 build.grade 中添加以下代码
1
2
3
4
5
6
android {
    // ...
    buildFeatures {
        dataBinding true
    }
}
- 布局文件格式转换
1
2
3
4
5
6
7
8
9
10
11
12
13
14
15
16
17
<?xml version="1.0" encoding="utf-8"?>
<layout xmlns:android="http://schemas.android.com/apk/res/android">
   <data>
       <variable name="user" type="com.example.User"/>
   </data>
   <LinearLayout
       android:orientation="vertical"
       android:layout_width="match_parent"
       android:layout_height="match_parent">
       <TextView android:layout_width="wrap_content"
           android:layout_height="wrap_content"
           android:text="@{user.firstName}"/>
       <TextView android:layout_width="wrap_content"
           android:layout_height="wrap_content"
           android:text="@{user.lastName}"/>
   </LinearLayout>
</layout>
DataBinding 生成规则和 xml 标签
生成的 DataBinding 规则及生成路径
转换布局为支持 databinding
打开布局文件,选中根布局的 ViewGroup,按住 Alt + 回车键,点击 Convert to data binding layout,就可以生成 DataBinding 需要的布局规则
默认生成规则:
根据 xml 按照 _ 下划线标识来生成对应的文本,如 activity_main 生成的是:ActivityMainBinding。
生成路径:
- 生成的 XXXBinding 继承 ViewDataBinding,是个抽象类
可以在 build/generated/data_binding_base_class_source_out 目录下查看生成的类。
- 生成 XXXBinding 的实现类:XXXBindingImpl
在路径 build/generated/source/kapt
XML 中的标签
layout 标签
布局根节点必须是 <layout>,同时 layout 只能包含一个 data 标签,一个 View 布局标签 (View 标签就是普通的的布局),不能直接包含 <merge> 标签
data 标签
<data> 标签的内容即 DataBinding 的数据. data 标签只能存在一个,data 标签内进行变量声明和导入等
import 标签和 alias
<import> 标签导入需要的类的包(默认导入了 java/lang 包下的类 (String/Integer),可以直接使用被导入的类的静态方法)
- import 标签的 alias 属性
<variable> 标签如果需要导入 (import) 两个同名的类时可以使用 alias 属性 (别名属性)
1
2
3
<import type="com.example.home.data.User" />
<import type="com.examle.detail.data.User" alias="DetailUser" />
<variable name="user" type="DetailUser" />
variable 标签
<variable> 标签进行变量声明,声明能在该正常的 ui 布局内用到
- type 属性是要是要的 Model 类(全限定名);如果用了 import 就不需要全限定名了
- name 是在本 xml 对这个 type 的名字,不能包含
_
class 属性
data 标签下的 class 属性可以自定义 DataBinding 生成的类名以及生成的 Binding 的路径
1
2
3
4
5
<!--自定义类名,路径不变-->
<data class="CustomDataBinding"></data>

<!--自定义生成路径以及类型-->
<data class=".test.CustomDataBinding"></data> <!--自动在包名下生成包以及类-->
注意:
- 用 class 后,不管是改名还是改路径,生成在
build/generated/data_binding_base_class_source_out;- 没有代码自动补全
- 基本上不需要自定义路径
示例
1
2
3
4
5
6
7
8
9
10
11
12
13
14
15
16
17
18
19
20
21
<data>
<import type="com.example.model.Book" alias="mBook"/>
<import type="com.example.Utils.StringUtils"/>
<variable
name="book"
type="mBook"/>
<variable
name="books"
type="androidx.databinding.ObservableList<String>" />
<variable
name="bgColor"
type="java.lang.String" />
<!--导入类-->
<import type="com.liangfeizc.databindingsamples.basic.User" />
<!--因为User已经导入, 所以可以简写类名-->
<variable name="user" type="User" />
</data>
<TextView android:layout_width="wrap_content"
android:layout_height="wrap_content"
android:text="@{user.firstName}" />
Expression language 表达式语言
通用特性 Common features
表达式语言与 Java 表达式有很多相似之处
- 算术运算符
+ - / * % - 字符串连接运算符
+ - 逻辑运算符
&& ||,&&需要转义成& - 二元运算符
& | ^ - 一元运算符
+ - ! ~ - 移位运算符
>> >>> << - 比较运算符 == > < >= <= (请注意,
<需要转义为 <)
如
<variable name="sparse" type="SparseArray<String>"/>
- instanceOf
- 分组运算符
() - 字面量运算符
字符、字符串、数字、null - 类型转换
- 方法调用
- 字段访问
- 数组访问
[] - 三元运算符
?:
示例:
1
2
3
4
5
6
7
8
9
10
11
12
<!-- 内部使用字符串 & 字符拼接-->
<TextView
  android:layout_width="wrap_content"
  android:layout_height="wrap_content"
  android:text="@{`Age :` + String.valueOf(user.age)}"/>

<!-- 三目运算-->
<TextView
  android:layout_width="wrap_content"
  android:layout_height="wrap_content"
  android:visibility="@{user.isAdult ? View.VISIBLE : View.GONE}"/>
表达式插入字符串常量,字符串
@{
主布局:+catViewModel.name}
转义字符
在 xml 中转义是不可避免的,如 : 使用 && 是编译不通过的,需要使用转义字符 “&&”
附:常用的转义字符
| 显示结果 | 描述 | 转义字符 | 十进制 |
|---|---|---|---|
| 空格 | |||
| < | 小于号 | < | < |
| > | 大于号 | > | > |
| & | 与号 | & | & |
| ” | 引号 | ” | ” |
| ’ | 撇号 | ’ | ’ |
| × | 乘号 | × | × |
| ÷ | 除号 | ÷ | ÷ |
不支持的操作符 Missing operations
一些 Java 中的操作符在表达式语法中不能使用:
- this
- super
- new
- 显式泛型调用
<T>
Null 合并运算符
Null 合并运算符 ?? 会在非 null 的时候选择左边的操作,反之选择右边。left ?? right 操作符表示 left 不为 null 就选择 left,否则选择 right,和 Java/Kt 的三目运算符很像。
android:text=”@{user.displayName ?? user.lastName}” // 上面表达式等同于: android:text=”@{user.displayName != null ? user.displayName : user.lastName}”
属性引用 Property references
表达式可以从 field、getters 和 ObservableField 中获取值
android:text=”@{user.lastName}”
避免 NPE 异常 Avoiding null pointer exceptions
DataBinding 会避免 NPE 异常,如
@{user.name},如果 user 为 null,user.name 会被赋值为 null@{user.age},如果 user 为 null,age 为 int 类型,user.age 会被赋值为 0
引用 View 的属性 View references
可以引用另外一个 View,另外 View 根据其 id 转换为驼峰来引用
1
2
3
4
5
6
7
8
9
<EditText
    android:id="@+id/example_text"
    android:layout_height="wrap_content"
    android:layout_width="match_parent"/>
<TextView
    android:id="@+id/example_output"
    android:layout_width="wrap_content"
    android:layout_height="wrap_content"
    android:text="@{exampleText.text}"/>
Collections 集合操作符 []
arrays、list、sparse list 和 map 可以用 [] 操作符操作。
1
2
3
4
5
6
7
8
9
10
11
12
13
14
15
16
<data>
<import type="android.util.SparseArray"/>
<import type="java.util.Map"/>
<import type="java.util.List"/>
<variable name="list" type="List<String>"/>
<variable name="sparse" type="SparseArray<String>"/>
<variable name="map" type="Map<String, String>"/>
<variable name="index" type="int"/>
<variable name="key" type="String"/>
</data>
…
android:text="@{list[index]}"
…
android:text="@{sparse[index]}"
…
android:text="@{map[key]}"
对于带泛型的
List<String>,必须写成List<String>
如果是 Map:@{map[key],可以用这个 @{map.key}
字符串字面量 String literals
- 使用单引号把属性包起来,就可以很简单地在表达式中使用双引号:
android:text='@{map["firstName"]}' - 也可以用双引号引用,但必须是用 ````
1
2
android:text="@{map[`firstName`}"
android:text="@{map["firstName"]}"
资源 Resources
- 资源引用
表达式可以引用 APP 的资源:android:padding="@{large? @dimen/largePadding : @dimen/smallPadding}"
- format strings
android:text="@{@string/nameFormat(firstName, lastName)}"
或用属性引用的:android:text="@{@string/example_resource(user.lastName, exampleText.text)}"
- plurals strings 一个复数
android:text="@{@plurals/banana(bananaCount)}"
- 有多个复数参数
每个复数都需要带上:
1
2
3
  Have an orange
  Have %d oranges
android:text="@{@plurals/orange(orangeCount, orangeCount)}"
- 资源类型
| Type | Normal reference | Expression reference |
|---|---|---|
| String[] | @array | @stringArray |
| int[] | @array | @intArray |
| TypedArray | @array | @typedArray |
| Animator | @animator | @animator |
| StateListAnimator | @animator | @stateListAnimator |
| color int | @color | @color |
| ColorStateList | @color | @colorStateList |
上下文 context
DataBinding 本身提供了一个名为 context 的 Variable. 可以直接使用. 等同于 View 的 getContext()
1
android:text="@{context.getApplicationInfo().toString()}"
引用 viewModel
1
2
3
4
5
6
7
8
9
10
11
12
13
14
15
16
17
18
19
20
21
<?xml version="1.0" encoding="utf-8"?>
<layout xmlns:android="http://schemas.android.com/apk/res/android"
        xmlns:app="http://schemas.android.com/apk/res-auto">
     <data>
         <variable
          name="viewModel"
          type="com.package.ViewModel" />
        <import type="android.view.View"/>
    </data>
    <LinearLayout
        android:layout_width="match_parent"
        android:layout_height="match_parent"
        android:orientation="vertical">
        <TextView
            android:id="@+id/textView"
            android:layout_width="wrap_content"
            android:layout_height="wrap_content"
            android:visibility="@{viewmodel.hidden ? View.GONE:View.VISIBLE}"
            />
    </LinearLayout>
</layout>
Data Objects 数据对象
任何 POJO 对象都能用在 Data Binding 中,但是更改 POJO 并不会同步更新 UI。DataBinding 就可以让你的数据在变化时更新 UI,有三种不同的动态更新数据的机制:
- 自定义 BaseObservable 对象
- 内置的
ObservableFields - Observable 容器类
普通的 POJO
普通的 POJO 更改不会同步更新 UI
ObservableFields
创建 Observable 类还有有点麻烦的,如果想要省时,或者数据类的字段很少的话,可以使用 ObservableField 以及它的派生。
8 种基本类型的数据结构提供了专门的包装类
- ObservableBoolean
- ObservableByte
- ObservableChar
- ObservableShort
- ObservableInt
- ObservableLong
- ObservableFloat
- ObservableDouble
- ObservableParcelable // 实现了 Parcelable 接口的对象提供的包装类
ObservableField<T> 其他类型提供的包装类
属性值的变化监听 addOnPropertyChangedCallback
DataBinding 也有个数据变更监听器, 可以监听 Variable 的设置事件
1
2
3
4
5
6
7
8
9
10
11
12
13
14
15
16
17
18
class CatViewModel : ViewModel() {
    // 猫的名字用 ObservableField 包裹
    var name: ObservableField<String> = ObservableField<String>("hacket hhhh")
    init {
        name.addOnPropertyChangedCallback(object : OnPropertyChangedCallback() {
          /**
           * 会在DataBinding设置数据的时候回调
           * @param sender DataBinding生成的类
           * @param propertyId Variable的id
           */
            override fun onPropertyChanged(sender: Observable?, propertyId: Int) {
                val nameObservable = sender as? ObservableField<String>
                val value = nameObservable?.get()
                Log.d("hacket", "value=$value, propertyId=$propertyId, sender=$sender")
            }
        })
    }
}
当 key 是整数类型时,可以使用 ObservableArrayList :
1
2
3
4
ObservableArrayList<String> user = new ObservableArrayList<>();
user.add("Google");
user.add("Inc.");
user.add("17");
在布局文件中,使用下标获取列表数据:
Observable Collections 容器类
Observable 容器类允许使用 key 来获取这类数据。当 key 是类似 String 的一类引用类型时,使用 ObservableArrayMap 会非常方便。
- ObservableArrayList
- ObservableArrayMap
1
2
3
4
5
ObservableArrayMap<String, String> mUser = new ObservableArrayMap<>();
mUser.put("firstName", "Connor");
mUser.put("lastName", "Lin");
mUser.put("age", "28");
mBinding.setUser(mUser);
- 在布局中,可以用 String key 来获取 map 中的数据:
1
2
3
4
5
6
7
8
9
10
11
12
13
14
15
16
17
18
19
<data>
<import type="android.databinding.ObservableMap"/>
<variable name="user" type="ObservableMap<String, String>"/>
</data>
…
<TextView
android:layout_width="wrap_content"
android:layout_height="wrap_content"
android:text='@{user["firstName"]}'/>
<TextView
android:layout_width="wrap_content"
android:layout_height="wrap_content"
android:text='@{user["lastName"]}'/>
<TextView
android:layout_width="wrap_content"
android:layout_height="wrap_content"
android:text='@{user["age"]}'/>
- 在布局文件中,使用下标获取列表数据:
1
2
3
4
5
6
7
8
9
10
11
12
13
14
15
16
17
18
19
20
21
22
23
24
ObservableArrayList<String> user = new ObservableArrayList<>();
user.add("Google");
user.add("Inc.");
user.add("17");

<data>
    <import type="android.databinding.ObservableList"/>
    <variable name="user" type="ObservableList<String>"/>
</data>
…
<TextView
    android:layout_width="wrap_content"
    android:layout_height="wrap_content"
    android:text='@{userList[0]}'/>

<TextView
    android:layout_width="wrap_content"
    android:layout_height="wrap_content"
    android:text='@{userList[1]}'/>

<TextView
    android:layout_width="wrap_content"
    android:layout_height="wrap_content"
    android:text='@{userList[2]}'/>
BaseObservable
如果 DataBinding 提供的可观察数据类型都不能够满足你的业务,那么还是可以自定义的。 新建一个类,继承 BaseObservable,并创建一个属性,给这个属性加上 @Bindable 注解,然后重写该属性 setter 方法即可,BR 是编译阶段生成的一个类,功能与 R.java 类似,用 @Bindable 标记过 getter 方法会在 BR 中生成一个 entry。当数据发生变化时需要调用 notifyPropertyChanged(BR.firstName) 通知系统 BR.firstName 这个 entry 的数据已经发生变化以更新 UI。
@Bindable 注解 自定义可观察数据类型
该注解主要作用于get 方法或者是字段本身,作用是生成一个 BR 值供 notifyPropertyChanged 方法调用以更新数据:当字段中的数据被修改时,DataBinding 会自动刷新对应 UI
@Bindable作用在整个属性上,不能 private@Bindable只作用在 getter 上,可以 private
1
2
3
4
5
6
7
8
9
10
11
12
13
14
15
16
17
18
19
20
21
22
23
24
25
26
27
28
29
public class ObservableContact extends BaseObservable {
    private String mName;
    private String mPhone;

    public ObservableContact(String name, String phone) {
        mName = name;
        mPhone = phone;
    }

    @Bindable
    public String getName() {
        return mName;
    }

    public void setName(String name) {
        mName = name;
        notifyPropertyChanged(BR.name);
    }

    @Bindable
    public String getPhone() {
        return mPhone;
    }

    public void setPhone(String phone) {
        mPhone = phone;
        notifyPropertyChanged(BR.phone);
    }
}
Kotlin 版本:
1
2
3
4
5
6
7
8
9
10
11
12
13
14
15
16
17
18
19
20
21
22
23
24
25
26
27
28
29
30
31
32
33
34
35
36
37
38
39
40
41
42
43
44
45
46
47
48
49
50
51
52
53
/**
 *  继承BaseObservable的对象类,
 * 需要响应变化的字段,就在对应变量的get函数上加 @Bindable 。然后set中notifyChange kotlin的写法,免去了java的getter setter的方式
 * 成员属性需要响应变化的,就在其set函数中,notify一下属性变化,那么set的时候,dataBinding就会感知到。
 */
class ObUser() : BaseObservable() {

    // kotlin中类的构造函数可以多个,有主次之分,且次级构造函数必须调用主构造函数,如这里的this()
    constructor(name: String, age: Int, sex: Int, desc: String) : this() {
        this.name = name
        this.age = age
        // this.sex = sex
        this.desc = desc
    }

    // 这是单独在set上@bindable,name可以声明private
    var name: String = ""
        // kotlin的成员属性必须初始化(或者lateinit)
        set(value) {
            field = value // field赋值要放在notifyPropertyChanged前面,否则通知变化的还是旧值
            // BR.name表示通知name这个属性的变化。 notifyChange() 通知所有变化
            otifyPropertyChanged(BR.name) // 加了这个addOnPropertyChangedCallback才会回调
//          或 notifyChange()
        }
        @Bindable
        get() = field // Redundant getter

    // 这是在整个变量上声明@bindable,所以必须是public的
    @Bindable
    var age = 18
        set(value) {
            notifyPropertyChanged(BR.age)
            field = value
        }
        get() = field // Redundant getter

    val sex = 1

    var desc: String = ""
        set(value) {
            field = "$value\n set中多余的拼接" //描述
            notifyPropertyChanged(BR.desc)
        }
        @Bindable
        get() = field // Redundant getter

    var nick: String = ""

    override fun toString(): String {
        notifyChange()
        return "ObUser(name='$name', age=$age, sex=$sex, desc='$desc')"
    }
}
使用 BaseObservable 的几种方式
- 继承 BaseObservable 类,setter 用
@Bindable注解来标记;getter 用notifyPropertyChanged(BR.xxx);来更新 - 简化写法:只需要数据模型继承 BaseObservable 即可, 然后每次变更数据后调用 notify() 函数既可以刷新视图. 不需要注解
1
2
observableUser.name
observableUser.notifyChange()
- 如果你无法继承 BaseObservable可以通过实现接口方式也可以,查看 BaseObservable 实现的接口自己实现即可。
对于不能继承 BaseObservable,那就实现 Observable 接口呗,反正 BaseObservable 也是 Observable 接口的实现类。但问题是如何处理实体类中的 get/set 方法以及 Observable 接口中的两个方法:
addOnPropertyChangedCallback和removeOnPropertyChangedCallback。
好在 DataBinding 给出了解决方式,那就是PropertyChangeRegistry
1
2
3
4
5
6
7
8
9
10
11
12
13
14
15
16
17
18
19
20
21
22
23
24
25
26
27
28
29
30
31
32
33
34
35
36
37
38
39
40
41
42
43
44
45
46
47
48
49
50
51
52
53
54
55
56
57
58
public class User implements Observable {
    private PropertyChangeRegistry registry = new PropertyChangeRegistry();

    private String name;
    private int age;
    private String sex;
    private boolean isStudent;

    @Bindable
    public String getName() {
        return name;
    }

    public void setName(String name) {
        this.name = name;
        registry.notifyChange(this, BR.name);
    }

    @Bindable
    public int getAge() {
        return age;
    }

    public void setAge(int age) {
        this.age = age;
        registry.notifyChange(this, BR.age);
    }

    @Bindable
    public String getSex() {
        return sex;
    }

    public void setSex(String sex) {
        this.sex = sex;
        registry.notifyChange(this, BR.sex);
    }

    @Bindable
    public boolean isStudent() {
        return isStudent;
    }

    public void setStudent(boolean student) {
        isStudent = student;
        registry.notifyChange(this, BR.student);
    }

    @Override
    public void addOnPropertyChangedCallback(OnPropertyChangedCallback callback) {
        registry.add(callback);
    }

    @Override
    public void removeOnPropertyChangedCallback(OnPropertyChangedCallback callback) {
        registry.remove(callback);
    }
}
属性第一次改变时会回调两次, 之后都只回调一次. 如果使用 notifyChange() 不会得到 id(即 i 等于 0). 使用 notifyPropertyChanged(i) 就可以在回调里面得到 id
采用实现 Observable 接口的方式仍然需要为每个 get 方法添加 @Bindable 注解,并且只是换了个方式为 set 方法添加 notifyChange。但确确实实解决了问题。
BaseObservable 和 Observable 的区别
- BaseObservable 是实现了 Observable 的类, 帮我们实现了监听器的线程安全问题
- BaseObservable 使用了 PropertyChangeRegistry 来执行 OnPropertyChangedCallback
- 不推荐你直接实现 Observable.
BaseObservable 优缺点
优点
- 不会破坏程序的封装性
- 赋值、取值都符合正常编码风格
缺点
- 当字段比较多时,要为每个 get/set 方法都对应加上@Bindable 注解和 notifyPropertyChanged() 方法很浪费时间
- 手动添加@Bindable 注解和 notifyPropertyChanged() 极容易出错,比如 notifyPropertyChanged() 方法中的 BR 字段就容易写错。
为了让每个 get/set 方法都对应自动加上@Bindable 注解和 notifyPropertyChanged() 方法,用 AndroidStudio 插件 -dataBindingGenerator,专门用来生成上面说的那些代码。
属性设置
当绑定数据发生变动时,生成的 binding 类必须根据 binding 表达式调用 View 的 setter 函数。Data binding 框架内置了几种自定义赋值的方法:
- 自动设置属性
- 重命名属性
- 自定义属性设置
自动设置属性 自动调用 setter
DataBinding 对于自定义属性支持非常好, 只要 View 中包含 setter 方法就可以直接在布局中使用该属性 (这是因为 DataBinding 的库中官方已经帮你写好了很多自定义属性)。
setter 只支持单个参数
自定义布局 Card,并没有添加 declare-styleable,但是可以使用自动 setter 的特性来调用这些函数
1
2
3
4
5
6
7
8
<!-- 这里的object为自定义属性 -->
<me.hacket.assistant.samples.google.architecture.databinding.demos.demo2.view.Card
  background1="@{user.toString()}"
  background="@{user.toString()}"
  object="@{user}"
  android:layout_width="wrap_content"
  android:layout_height="wrap_content"
  android:background="@color/amber_50" />
Card:
1
2
3
4
5
6
7
8
9
10
11
12
13
14
15
16
17
class Card {
    // 自动 Setter
    public void setObject(User user) {
        Log.d("hacket", "setObject: " + user.toString());
        mFirstName.setText(user.getFirstName());
        mLastName.setText(user.getLastName());
        mAge.setText(String.valueOf(user.getAge()));
    }

    public void setBackground1(String color) {
        Log.w("hacket", "setBackground: " + color);
    }

    public void setBackground(String color) {
        Log.w("hacket", "setBackground: " + color);
    }
}
重命名属性 @BindingMethods
什么是 BindingMethods 及作用?
用于解决 xml 属性和 setter 方法不一致:用于当 View 中的某个属性与其对应的 setter 方法名称不对应时进行映射。
如 TextView 的属性
android:textColorHint与之作用相同的方法是 ` setHintTextColor ` 方法,此时属性名称与对应的 setter 方法名称不一致,这就需要使用 BindingMethods 注解将该属性与对应的 setter 方法绑定,这样 databinding 就能够按照属性值找到对应的 setter 方法了,databinding 已经处理了原生 View 中的像这种属性与 setter 方法不匹配的情况,来看一看源码中 TextView 中这些不匹配属性的处理,参考如下:
1
2
3
4
5
6
7
8
9
10
11
12
13
14
15
16
17
18
19
20
21
22
23
24
25
26
27
28
29
30
31
32
33
34
35
36
37
@RestrictTo(RestrictTo.Scope.LIBRARY)
@SuppressWarnings({"WeakerAccess", "unused"})
@BindingMethods({
    @BindingMethod(type = TextView.class, attribute = "android:autoLink", method = "setAutoLinkMask"),
    @BindingMethod(type = TextView.class, attribute = "android:drawablePadding", method = "setCompoundDrawablePadding"),
    @BindingMethod(type = TextView.class, attribute = "android:editorExtras", method = "setInputExtras"),
    @BindingMethod(type = TextView.class, attribute = "android:inputType", method = "setRawInputType"),
    @BindingMethod(type = TextView.class, attribute = "android:scrollHorizontally", method = "setHorizontallyScrolling"),
    @BindingMethod(type = TextView.class, attribute = "android:textAllCaps", method = "setAllCaps"),
    @BindingMethod(type = TextView.class, attribute = "android:textColorHighlight", method = "setHighlightColor"),
    @BindingMethod(type = TextView.class, attribute = "android:textColorHint", method = "setHintTextColor"),
    @BindingMethod(type = TextView.class, attribute = "android:textColorLink", method = "setLinkTextColor"),
    @BindingMethod(type = TextView.class, attribute = "android:onEditorAction", method = "setOnEditorActionListener"),
})
public class TextViewBindingAdapter {
    @BindingAdapter("android:text")
    public static void setText(TextView view, CharSequence text) {
        final CharSequence oldText = view.getText();
        if (text == oldText || (text == null && oldText.length() == 0)) {
            return;
        }
        if (text instanceof Spanned) {
            if (text.equals(oldText)) {
                return; // No change in the spans, so don't set anything.
            }
        } else if (!haveContentsChanged(text, oldText)) {
            return; // No content changes, so don't set anything.
        }
        view.setText(text);
    }

    @InverseBindingAdapter(attribute = "android:text", event = "android:textAttrChanged")
    public static String getTextString(TextView view) {
        return view.getText().toString();
    }
    // ...
}
@BindingMethods 属于一个容器,内部参数是一个@BindingMethod 数组;只能用于修饰类
@BindingAdapter 是创建一个新的函数功能给控件使用,那么 BindingMethod 就是引导 DataBinding 使用控件自身的函数
系统定义的@BindingMethods
对于 Android 框架中 View 中的一些属性,databinding 库已经使用 BindingMethods 已经做了属性自动查找匹配,那么当某些属性没有与之对应的 setter 方法时,需要自定义。
自定义 BindingMethod
注解参数:
- type: 字节码 即你的控件类
- attribute: XML 属性;如果属性名和@BindingAdapter 定义的 XML 属性相同会冲突报错
- method: 函数名 即控件中的函数名称;如果控件类中已经存在一个和你定义的属性相关联的函数 (例 setName 函数和 android:name 属性就相关联) 则会优先执行该函数
下面是 bg 属性和 setBackground 绑定
1
2
3
4
5
6
7
8
9
10
11
@BindingMethods({
    @BindingMethod(
        type = me.hacket.assistant.samples.google.architecture.databinding.demos.demo2.view.Card.class,
        attribute = "android:bg",
        method = "setBackground"),
})
public class Card extends LinearLayout {
    public void setBackground(String info) {
        Log.w("hacket", "setBackground: " + info);
    }
}
1
2
3
4
5
6
<!-- 这里的object为自定义属性 -->
<me.hacket.assistant.samples.google.architecture.databinding.demos.demo2.view.Card
  android:layout_width="wrap_content"
  android:layout_height="wrap_content"
  android:background="@color/amber_50"
  android:bg="@{user.toString()}" />
会有 log 输出:
setBackground: User{mFirstName=’hacket’, mLastName=’zeng’, mAge=28}
自定义属性设置 @BindingAdapter
@BindingAdapter 作用
用于添加支持自定义属性,或者是修改原有属性。注解值可以是已有的 xml 属性,例如 android:src、android:text 等,也可以自定义属性然后在 xml 中使用
@BindingAdapter 参数说明
1
2
3
4
5
6
7
8
9
10
11
12
@BindingAdapter(value = { "imageUrl", "error" }, requireAll = false)
public static void loadImage(ImageView view, String url, Drawable error) {
	Glide.with(view.getContext()).load(url).into(view);
}
<ImageView
   android:layout_width="match_parent"
   android:layout_height="200dp"
   app:error="@{@drawable/error}"
   wuyanzu:imageUrl="@{imageUrl}"
   app:onClickListener="@{activity.avatarClickListener}"
   />
- 修饰方法, 要求方法必须
public static - 第一个参数必须是控件或其父类
- 方法名随意
- requireAll 这个 boolean 类型是可选参数,可以要求是否所有参数都需要填写,默认 true;如果 requireAll 为 false,你没有填写的属性值将为 null,所以需要做非空判断
- 命名空间可以随意, 但是如果在 BindingAdapter 的数组内你定义了命名空间就必须完全遵守,如:
android:imageUrl - 如果你的数据初始化是在异步的,会回调方法但是数据为 null(成员默认值),所以我们必须要首先进行判空处理
- Kotlin 实现有两种方法:
object类+@JvmStatic注解;顶级函数
系统内置的 BindingAdapter
Android 属性已经内置一些 BindingAdapter。例如,这是一个 paddingLeft 的自定义 setter:
1
2
3
4
5
6
7
@BindingAdapter("android:paddingLeft")
public static void setPaddingLeft(View view, int padding) {
	view.setPadding(padding,
          view.getPaddingTop(),
          view.getPaddingRight(),
          view.getPaddingBottom());
}
覆盖 Android 原先的控件属性
1
2
3
4
5
6
7
8
9
10
11
@BindingAdapter("android:text")
public static void setText(Button view, String text) {
    view.setText(text + "-Button");
}

// xml
<Button
  android:layout_width="match_parent"
  android:layout_height="wrap_content"
  android:onClick="@{()->handler.onClick(image)}"
  android:text='@{"改变图片Url"}'/>
获取旧值再更新
Binding adapter 方法可以获取旧的赋值。只需要将旧值放置在前,新值放置在后:
1
2
3
4
5
6
7
8
9
10
11
12
@BindingAdapter("android:paddingLeft")
fun setPaddingLeft(view: View, oldPadding: Int, newPadding: Int) {
    Log.d("hacket", "setPaddingLeft oldPadding = $oldPadding, newPadding = $newPadding")
    if (oldPadding != newPadding) {
        view.setPadding(
            newPadding,
            view.paddingTop,
            view.paddingRight,
            view.paddingBottom
        )
    }
}
自定义属性:单个参数
BindingAdapter 案例:对于一个 ImageView ,我们希望在某个变量值发生变化时,可以动态改变显示的图片,此时就可以通过 BindingAdapter 来实现
- 静态函数
1
2
3
4
5
@BindingAdapter({"url"})
public static void loadImage(ImageView view, String url) {
    Log.e(TAG, "loadImage url : " + url);
}
- 在 xml 文件中关联变量值,bind 这个名称可以自定义
1
2
3
4
5
6
7
8
9
10
11
12
13
14
15
16
17
18
19
20
21
22
23
24
25
26
<?xml version="1.0" encoding="utf-8"?>
<layout xmlns:android="http://schemas.android.com/apk/res/android"
  xmlns:bind="http://schemas.android.com/apk/res-auto"
  xmlns:tools="http://schemas.android.com/tools">

  <data>
    <import type="com.leavesc.databinding_demo.model.Image" />
    <variable
      name="image"
      type="Image" />
  </data>

  <android.support.constraint.ConstraintLayout
    android:layout_width="match_parent"
    android:layout_height="match_parent"
    tools:context=".Main8Activity">

    <ImageView
      android:id="@+id/image"
      android:layout_width="wrap_content"
      android:layout_height="wrap_content"
      android:src="@drawable/ic_launcher_background"
      bind:url="@{image.url}" />

  </android.support.constraint.ConstraintLayout>
</layout>
自定义属性:多个参数
- 默认多个属性需全部使用才能使 BindingAdapter 正常工作,如果使用了其中的一些属性则不能正常编译通过
- 使用其中部分属性,
@BindingAdapter注解还有一个参数requireAll,requireAll 默认为 true,表示必须使用全部属性,将其设置为 false 就可以正常使用部分属性了
1
2
3
4
5
6
7
8
9
10
11
12
13
14
15
16
17
18
19
20
21
22
23
@BindingAdapter(value = ["imageUrl", "placeholder", "error"], requireAll = false)
fun loadImage(
    view: ImageView,
    url: String?,
    placeholder: Drawable? = null,
    error: Drawable? = null
) {
    Log.d("hacket", "loadImage4 url = $url, placeholder=$placeholder, error = $error")
    val options = RequestOptions().placeholder(placeholder).error(error)
    Glide.with(view).load(url).apply(options).into(view)
}
// xml
<ImageView
    android:layout_width="150dp"
    android:layout_height="150dp"
    app:error="@{@drawable/error}"
    app:placeholder="@{@drawable/ic_placeholder}"
    bind:imageUrl="@{`https://goss.veer.com/creative/vcg/veer/800water/veer-136599950.jpg`}" />
<ImageView
    android:layout_width="150dp"
    android:layout_height="150dp"
    app:placeholder="@{@drawable/ic_placeholder}"
    bind:imageUrl="@{`https://goss.veer.com/creative/vcg/veer/800water/veer-136599950.jpg`}" />
BindindAdapter IDE 提示
一般咱们自定义 bindadapter 的时候,xml 是没有提示的,咱们可以在 attrs.xml 里面写入咱们的 bind,这样就有提示了
@BindingConversion 转换器
属性值自动进行类型转换
BindingConversion作用
解决数据类型的转换问题
在某些情况下,在设置属性时类型之间必须进行转化,此时就可以借助注解 @BindingConversion 来完成类型之间的转换,比如 android:background 属性接收的是一个 Drawable 当我们在 databinding 的表达式中设置了一个颜色值,此时就需要 @BindingConversion
@BindingConversion 限制:
- 只能修饰
public static方法. - 任意位置任意方法名都不限制
- DataBinding 自动匹配被该注解修饰的方法和匹配参数类型
- 返回值类型必须和属性 setter 方法匹配, 且参数只能有一个
- 要求属性值必须是
@{xxx}DataBinding 表达式 - 定义了多个参数类型相同,返回类型相同但实现不一样的方法,会选择顺序靠后的方法
Conversion 案例 1:int 转成 ColorDrawable 和 ColorStateList
1
2
3
4
5
6
7
8
9
10
11
public class Converters {
    @BindingConversion
    public static ColorDrawable convertColorToDrawable(int color) {
        return new ColorDrawable(color);
    }
    @BindingConversion
    public static ColorStateList convertColorToColorStateList(int color) {
        return ColorStateList.valueOf(color);
    }
}
Conversion 案例 2:将 color 转成 Drawable
1
2
3
4
5
6
7
8
9
@BindingConversion
fun colorToDrawable(color: Int): ColorDrawable? {
    return ColorDrawable(color)
}
// xml
<ImageView
    android:layout_width="100dp"
    android:layout_height="100dp"
    app:background="@{true ? @color/purple_200 : @color/teal_200}" />
使用 @BindingConversion 注解时要使用相同类型
如上面的 android:background 属性不能这样使用:一个 color 类型,一个是 Drawable 类型
1
2
3
4
<ImageView
    android:layout_width="100dp"
    android:layout_height="100dp"
    app:background="@{true ? @color/purple_200 : @color/drawableBlue}" />
Conversion 和 BindingAdapter 同时存在时,Conversion 优先级高一点
DataBindingComponent
什么是 DataBindingComponent?
在 build/intermediates/classes 下面,可以找到 DataBindingComponent 类,包名为 android.databinding,每个 module 只会有一个该类——此接口在编译时生成,包含了所有用到的实例 BindingAdapters 的 getter 方法。
当一个 BindingAdapter 是一个实例方法(instance method),一个实现该方法的类的实例必须被实例化。这个生成的接口会包含每个声明 BindingAdapter 的类/接口的 get 方法。命名冲突会简单地加一个数字前缀到 get 方法前来解决。
DataBindingComponent 基本使用
对应的接口有:
- setDefaultComponent(DataBindingComponent)
- inflate(LayoutInflater, int, ViewGroup, boolean, DataBindingComponent), inflate 一个 binding layout 并返回新创建的 binding
- bind(View, DataBindingComponent), 根据给定的 layout root 返回 binding,如果没有则创建
第一个接口全局起作用,后两个接口仅对该语句 inflate 的布局起作用。
声明 BindingAdapter 及实现
1
2
3
4
5
6
7
8
9
10
11
12
13
14
15
16
17
18
19
20
21
22
23
24
25
26
27
28
29
30
31
32
33
34
35
36
37
38
39
40
41
42
43
/**
 * 我们声明一个抽象的adapter,在其中写上抽象方法来设置我们想要做data
 * binding的属性,这里我们直接干掉了TextView的android命名空间下的text和textColor两个属性。
 */
public abstract class MyBindingAdapter {
    // 这里的@BindingAdapter注解会让data binding在component中生成我们这个adapter的get方法(必须是非静态的)
    @BindingAdapter("android:text")
    public abstract void setText(TextView view, String value);

    @BindingAdapter("android:textColor")
    public abstract void setTextColor(TextView view, int value);
}
// 实现
public class ProductionBindingAdapter extends MyBindingAdapter {
    @Override
    public void setText(TextView view, String value) {
        Log.d("hacket", "ProductionBindingAdapter setText: " + value);
        view.setText(value + "- [production]by hacket");
    }
    @Override
    public void setTextColor(TextView view, int value) {
        Log.d("hacket", "ProductionBindingAdapter setTextColor: " + value);
        view.setTextColor(value);
    }
}
public class TestBindingAdapter extends MyBindingAdapter {
    @Override
    public void setText(TextView view, String value) {
        Log.d("hacket", "TestBindingAdapter setText: " + value);
        view.setText(value + "[test]by hacket");
    }
    @Override
    public void setTextColor(TextView view, int value) {
        Log.d("hacket", "TestBindingAdapter setTextColor: " + value);
        if (value == view.getContext()
                .getResources()
                .getColor(R.color.gray)) {
            view.setTextColor(view.getContext()
                    .getResources()
                    .getColor(R.color.colorPrimaryNight));
        }
    }
}
实现 DataBindingComponent
1
2
3
4
5
6
7
8
9
10
11
12
13
14
15
16
17
18
19
20
21
22
23
24
25
26
27
28
29
30
31
public class ProductionComponent implements DataBindingComponent {
    private MyBindingAdapter mAdapter = new ProductionBindingAdapter();
    @Override
    public MyBindingAdapter getMyBindingAdapter() {
        return mAdapter;
    }
    @Override
    public MyBindingAdapter2 getMyBindingAdapter2() {
        return null;
    }
    @Override
    public MyBindingAdapter3 getMyBindingAdapter3() {
        return null;
    }
}

public class TestComponent implements DataBindingComponent {
    private MyBindingAdapter mAdapter = new TestBindingAdapter();
    @Override
    public MyBindingAdapter getMyBindingAdapter() {
        return mAdapter;
    }
    @Override
    public MyBindingAdapter2 getMyBindingAdapter2() {
        return null;
    }
    @Override
    public MyBindingAdapter3 getMyBindingAdapter3() {
        return null;
    }
}
会生成在 build/generated/source/kapt/debug/androidx/databinding/DataBindingComponent.java
1
2
3
4
5
public interface DataBindingComponent {
    me.hacket.assistant.samples.google.architecture.databinding.databindingcomponent.adapter.MyBindingAdapter getMyBindingAdapter();
    me.hacket.assistant.samples.google.architecture.databinding.databindingcomponent.adapter.MyBindingAdapter2 getMyBindingAdapter2();
    me.hacket.assistant.samples.google.architecture.databinding.databindingcomponent.adapter.MyBindingAdapter3 getMyBindingAdapter3();
}
你有几个带了 @BindingAdapter(非静态?)注解的类,都会在这里生成
注入 Component 全局有效
1
2
3
4
5
6
val isTest = true
if (isTest) {
    DataBindingUtil.setDefaultComponent(ProductionComponent())
} else {
    DataBindingUtil.setDefaultComponent(TestComponent())
}
注入 Component 当前 inflate 有效
1
2
3
4
5
6
7
8
9
10
11
val isTest = true
val component = if (isTest) {
    ProductionComponent()
} else {
    TestComponent()
}
var binding = DataBindingUtil.setContentView<ActivityDataBindingComponentDemoBinding>(
    this,
    R.layout.activity_data_binding_component_demo,
    component
)
静态 adapter 方法使用 DataBindingComponent
DataBindingComponent 只需要作为方法的第一个参数就可以了
1
2
3
4
@BindingAdapter("android:src")
public static void loadImage(TestComponent component, ImageView view, String url) {
	// ...
}
注意
有 BindingAdapter 不是非静态的方法每个 DataBindingUtil 都需要设置 Component,否则运行时错误;或者设置 BindAdapter 为静态方法
1
2
3
4
5
6
7
8
9
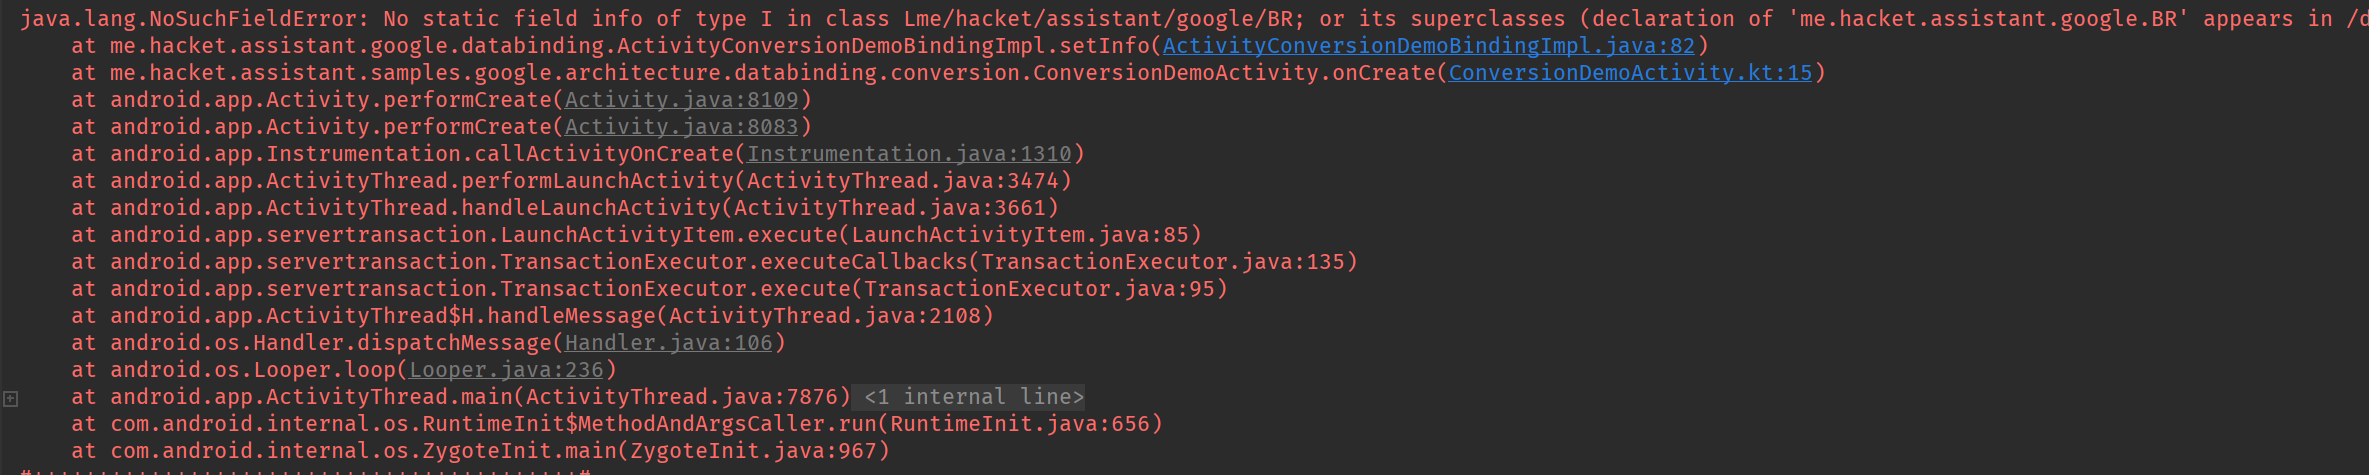
Caused by: java.lang.IllegalStateException: Required DataBindingComponent is null in class LayoutUserBindingImpl. A BindingAdapter in me.hacket.assistant.samples.google.architecture.databinding.databindingcomponent.adapter.MyBindingAdapter is not static and requires an object to use, retrieved from the DataBindingComponent. If you don't use an inflation method taking a DataBindingComponent, use DataBindingUtil.setDefaultComponent or make all BindingAdapter methods static.
at androidx.databinding.ViewDataBinding.ensureBindingComponentIsNotNull(ViewDataBinding.java:709)
at me.hacket.assistant.google.databinding.LayoutUserBindingImpl.<init>(LayoutUserBindingImpl.java:34)
at me.hacket.assistant.google.databinding.LayoutUserBindingImpl.<init>(LayoutUserBindingImpl.java:29)
at me.hacket.assistant.google.DataBinderMapperImpl.getDataBinder(DataBinderMapperImpl.java:331)
at androidx.databinding.MergedDataBinderMapper.getDataBinder(MergedDataBinderMapper.java:79)
at androidx.databinding.DataBindingUtil.bind(DataBindingUtil.java:199)
at androidx.databinding.ViewDataBinding.mapBindings(ViewDataBinding.java:1293)
at androidx.databinding.ViewDataBinding.mapBindings(ViewDataBinding.java:760)
这是因为在那个生成的 XXXDataBindingImpl 中会进行判断,如果 mBindingComponent==null 抛出异常
1
2
3
4
5
6
7
8
9
10
11
12
13
14
15
16
17
18
19
20
21
22
23
24
25
26
27
28
29
30
31
32
33
34
35
36
private LayoutUserBindingImpl(androidx.databinding.DataBindingComponent bindingComponent, View root, Object[] bindings) {
    super(bindingComponent, root, 1
        );
	// 对DataBindingComponent判空
    ensureBindingComponentIsNotNull(me.hacket.assistant.samples.google.architecture.databinding.databindingcomponent.adapter.MyBindingAdapter.class);
    this.mboundView0 = (android.widget.LinearLayout) bindings[0];
    this.mboundView0.setTag(null);
    this.mboundView1 = (androidx.appcompat.widget.AppCompatTextView) bindings[1];
    this.mboundView1.setTag(null);
    setRootTag(root);
    // listeners
    invalidateAll();
}
protected void ensureBindingComponentIsNotNull(Class<?> oneExample) {
    if (mBindingComponent == null) {
        String errorMessage = "Required DataBindingComponent is null in class " +
                getClass().getSimpleName() + ". A BindingAdapter in " +
                oneExample.getCanonicalName() +
                " is not static and requires an object to use, retrieved from the " +
                "DataBindingComponent. If you don't use an inflation method taking a " +
                "DataBindingComponent, use DataBindingUtil.setDefaultComponent or " +
                "make all BindingAdapter methods static.";
        throw new IllegalStateException(errorMessage);
    }
}
// executeBindings调用DataBindingComponent中BindingAdapter方法
@Override
protected void executeBindings() {
	// ...
    // batch finished
    if ((dirtyFlags & 0x3L) != 0) {
        // api target 1

        this.mBindingComponent.getMyBindingAdapter2().setText2(this.mboundView1, ouserToString);
    }
}
具体原因: 你的 DataBinding 用到了该 DataBindingComponent 中的非静态修饰的@BinderAdapter 方法,在其构造会进行判空处理,在 executeBindings 会调用 DataBindingComponent 中 @BindingAdapter 方法,如果没有传递 DataBindingComponent 会出现如上空指针异常,可用 DataBindingUtil.setDefaultComponent 设置全局的默认 Component;如果你的 DataBinding 没有调用 BindingAdapter 中的方法,就不会进行判空处理
DataBindingComponent 使用场景
- 换肤
- 打点
- 替换原生属性
DataBinding 单向绑定和双向绑定
见 DataBinding单向绑定和双向绑定
使用 DataBinding
Activity 中使用 databinding
- DataBindingUtil setContentView(@NonNull Activity activity, int layoutId)
- DataBindingUtil.inflate
1
2
3
4
5
6
7
8
9
10
public class MainActivity extends AppCompatActivity {
    private ActivityMainBinding mainBinding;
    @Override
    protected void onCreate(Bundle savedInstanceState) {
        super.onCreate(savedInstanceState);
        mainBinding = DataBindingUtil.setContentView(this,R.layout.activity_main);
        ...
    }
}
Fragment 中使用 databinding
Fragment, ListView, or RecyclerView 中获取 DataBinding
val listItemBinding = ListItemBinding.inflate(layoutInflater, viewGroup, false) // or val listItemBinding = DataBindingUtil.inflate(layoutInflater, R.layout.list_item, viewGroup, false)
1
2
3
4
5
6
7
8
9
10
11
public class TopFragment extends Fragment {
    private FragmentTopBinding topFragmentBinding;
    @Nullable
    @Override
    public View onCreateView(@NonNull LayoutInflater inflater, @Nullable ViewGroup container, @Nullable Bundle savedInstanceState) {
        topFragmentBinding = DataBindingUtil.inflate(inflater,R.layout.topfragment,container,false);
        return topFragmentBinding.getRoot();
    }
}
DataBinding 中的 include
如何传递 ViewModel 给 include 的布局?
传递变量基本规则:[命名空间:]include变量名="@{主布局变量名}"
- 使用 app 命名空间
- 在主 xml 需要将 ViewModel 传递给 include 的布局:
app:catViewModel2="@{catViewModel}",catViewModel2 是 include xml 中声明的 ViewModel 名字,catViewModel 是主 xml 的 ViewModel 名字- include 的布局需要在 data 标签声明能接收从主布局传递过来的 ViewModel,name 就是 catViewModel2
- 自定义命名空间:不用 app,用自定义的命名空间
- 使用命名空间:不需要命名空间
如何引用 include 布局中的控件?
需要在 include 标签加上 id,然后就通过 binding.includeId.xxx 引入 include 中的控件了
递给 include 布局 app:catViewModel2 生成的代码
主布局通过 app:xxx 来将值传递给 include 布局,xxx 就是需要在 include 布局的 variable 定义的 name,其对应在 include 布局中生成对应的 setter 方法。
1
2
3
<include
    layout="@layout/inlcude_databinding_test"
    app:catViewModel2="@{catViewModel}" />
在 IncludeDatabindingTestBinding.java 生成的代码片段:
1
2
3
4
5
6
7
8
9
10
public abstract class InlcudeDatabindingTestBinding extends ViewDataBinding {
    @Bindable
    protected CatViewModel mCatViewModel2;
    public abstract void setCatViewModel2(@Nullable CatViewModel catViewModel2);

    @Nullable
    public CatViewModel getCatViewModel2() {
    	return mCatViewModel2;
    }
}
对应的实现类:
1
2
3
4
5
6
7
8
9
10
public class InlcudeDatabindingTestBindingImpl extends InlcudeDatabindingTestBinding implements me.hacket.assistant.google.generated.callback.OnClickListener.Listener {
    public void setCatViewModel2(@Nullable me.hacket.assistant.samples.google.architecture.databinding.demo1.CatViewModel CatViewModel2) {
        this.mCatViewModel2 = CatViewModel2;
        synchronized(this) {
            mDirtyFlags |= 0x4L;
        }
        notifyPropertyChanged(BR.catViewModel2);
        super.requestRebind();
    }
}
示例:
直接看代码吧:
- 主 xml
1
2
3
4
5
6
7
8
9
10
11
12
13
14
15
16
17
18
19
20
21
22
23
24
25
26
27
28
29
30
31
32
33
34
35
36
37
38
39
40
41
42
43
44
45
46
47
48
49
50
51
52
53
54
55
56
57
<?xml version="1.0" encoding="utf-8"?>
<layout xmlns:android="http://schemas.android.com/apk/res/android"
    xmlns:app="http://schemas.android.com/apk/res-auto"
    xmlns:app_custom="http://schemas.android.com/apk/res-auto"
    xmlns:tools="http://schemas.android.com/tools">

    <data class="AMainBinding">

        <import type="android.view.View" />

        <import
            alias="CatVM"
            type="me.hacket.assistant.samples.google.architecture.databinding.demo1.CatViewModel" />

        <variable
            name="catViewModel"
            type="CatVM" />
    </data>

    <androidx.appcompat.widget.LinearLayoutCompat
        android:layout_width="match_parent"
        android:layout_height="match_parent"
        android:orientation="vertical"
        tools:context="me.hacket.assistant.samples.google.architecture.databinding.include.DataBindingIncludeActivity">

        <me.hacket.assistant.common.widget.CapsButton
            android:id="@+id/btn_change_text"
            android:layout_width="wrap_content"
            android:layout_height="wrap_content"
            android:onClick="@{(v)->catViewModel.btnClick(v)}"
            android:text="change text" />

        <TextView
            android:id="@+id/tv_name_ob2"
            android:layout_width="wrap_content"
            android:layout_height="wrap_content"
            android:text="@{catViewModel.name}"
            android:textSize="20sp"
            android:visibility="@{catViewModel.isShowName()?View.VISIBLE:View.INVISIBLE}"
            app:layout_constraintBottom_toBottomOf="parent"
            app:layout_constraintLeft_toLeftOf="parent"
            app:layout_constraintRight_toRightOf="parent"
            app:layout_constraintTop_toTopOf="parent" />

        <TextView
            android:id="@+id/tv_inlcude"
            android:layout_width="wrap_content"
            android:layout_height="wrap_content"
            android:hint="啊哈哈" />

        <include
            layout="@layout/inlcude_databinding_test"
            viewGone="@{true}" // 不用命名空间
            app:catViewModel2="@{catViewModel}" // 使用app命名空间
            app_custom:Count="@{100}" /> // 自定义命名空间
    </androidx.appcompat.widget.LinearLayoutCompat>
</layout>
- include xml
1
2
3
4
5
6
7
8
9
10
11
12
13
14
15
16
17
18
19
20
21
22
23
24
25
26
27
28
29
30
31
32
33
34
35
36
37
38
39
40
41
42
43
44
45
46
47
48
49
50
51
52
<?xml version="1.0" encoding="utf-8"?>
<layout xmlns:android="http://schemas.android.com/apk/res/android"
    xmlns:app="http://schemas.android.com/apk/res-auto"
    xmlns:tools="http://schemas.android.com/tools"
    tools:ignore="MissingDefaultResource">

    <data class="AIncludBinding">

        <import type="android.view.View" />

        <variable
            name="catViewModel2"
            type="me.hacket.assistant.samples.google.architecture.databinding.demo1.CatViewModel" />

        <variable
            name="viewGone"
            type="Boolean" />

        <variable
            name="count"
            type="Integer" />
    </data>

    <androidx.appcompat.widget.LinearLayoutCompat
        android:layout_width="match_parent"
        android:layout_height="wrap_content"
        android:orientation="vertical">

        <TextView
            style="@style/LabelText"
            android:text="include DataBinding测试" />

        <me.hacket.assistant.common.widget.CapsButton
            android:id="@+id/btn_change_text"
            android:layout_width="wrap_content"
            android:layout_height="wrap_content"
            android:onClick="@{(v2)->catViewModel2.btnClick2(v2,`hhhh`)}"
            android:text="change include text" />

        <TextView
            android:layout_width="wrap_content"
            android:layout_height="wrap_content"
            android:text="@{catViewModel2.name}"
            android:textSize="20sp"
            android:visibility="@{catViewModel2.isShowName()?View.VISIBLE:View.INVISIBLE}"
            app:layout_constraintBottom_toBottomOf="parent"
            app:layout_constraintLeft_toLeftOf="parent"
            app:layout_constraintRight_toRightOf="parent"
            app:layout_constraintTop_toTopOf="parent" />

    </androidx.appcompat.widget.LinearLayoutCompat>
</layout>
- ViewModel
1
2
3
4
5
6
7
8
9
10
11
12
13
14
15
16
class CatViewModel : ViewModel() {
    // 猫的名字用 ObservableField 包裹
    var name: ObservableField<String> = ObservableField<String>("hacket hhhh")
    // 是否显示猫的名字 用 ObservableBoolean
    var isShowName = ObservableBoolean(true)
    fun change() {
        name.set("ViewModel中改变的咖啡猫")
        isShowName.set(!isShowName.get())
    }
    fun btnClick(view: View) {
        name.set("hacket chagned.")
    }
    fun btnClick2(view: View, s: String) {
        name.set(s)
    }
}
- include 布局生成的 AIncludBinding 概要代码
1
2
3
4
5
6
7
8
9
10
11
12
13
14
15
16
17
18
19
20
21
22
23
public abstract class AIncludBinding extends ViewDataBinding {
    @Bindable
    protected CatViewModel mCatViewModel2;
    @Bindable
    protected Boolean mViewGone;
    @Bindable
    protected Integer mCount;
    public abstract void setCatViewModel2(@Nullable CatViewModel catViewModel2);
    @Nullable
    public CatViewModel getCatViewModel2() {
    	return mCatViewModel2;
    }
    public abstract void setViewGone(@Nullable Boolean viewGone);
    @Nullable
    public Boolean getViewGone() {
    return mViewGone;
    }
    public abstract void setCount(@Nullable Integer count);
    @Nullable
    public Integer getCount() {
    	return mCount;
    }
}
DataBinding 中的 ViewStub
ViewStub 示例
ViewStub 相比普通 View 有一些不同。ViewStub 一开始是不可见的,当它们被设置为可见,或者调用 inflate 方法时,ViewStub 会被替换成另外一个布局。
因为 ViewStub 实际上不存在于 View 结构中,binding 类中的类也得移除掉,以便系统回收。因为 binding 类中的 View 都是 final 的,所以 Android 提供了一个叫 ViewStubProxy 的类来代替 ViewStub 。开发者可以使用它来操作 ViewStub,获取 ViewStub inflate 时得到的视图。
但 inflate 一个新的布局时,必须为新的布局创建一个 binding。因此, ViewStubProxy 必须监听 ViewStub 的 ViewStub.OnInflateListener,并及时建立 binding。由于 ViewStub 只能有一个 OnInflateListener,你可以将你自己的 listener 设置在 ViewStubProxy 上,在 binding 建立之后, listener 就会被触发。
主布局
1
2
3
4
5
<ViewStub
    android:id="@+id/my_view_stub_id"
    android:layout_width="match_parent"
    android:layout_height="wrap_content"
    android:layout="@layout/layout_view_stub_test" />
获取到 ViewStub 对象,由此就可以来控制 ViewStub 的可见性
1
2
3
4
5
6
7
8
9
10
11
12
13
14
fun inflateViewStub(v: View) {
    // 设置 inflate 回调
    mBinding.myViewStubId.setOnInflateListener { stub, view -> // 得到 Binding 实例
        val binding: LayoutViewStubTestBinding? = DataBindingUtil.bind(view)
        val user =
            User("liang", "fei")
        binding?.user = user
    }

    // isInflated 是 DataBinding 自动生成的方法,不是 ViewStub 的方法。可用于判断是否已 inflate
    if (!mBinding.myViewStubId.isInflated) {
        mBinding.myViewStubId.viewStub?.inflate()
    }
}
如果需要为 ViewStub 绑定变量值,则 ViewStub 文件一样要使用 layout 标签进行布局,主布局文件使用自定义的 bind 命名空间将变量传递给 ViewStub:
1
2
3
4
5
6
<ViewStub
  android:id="@+id/view_stub"
  android:layout_width="match_parent"
  android:layout_height="wrap_content"
  android:layout="@layout/view_stub"
  bind:userInfo="@{userInfo}" />
如果在 xml 中没有使用 bind:userInfo="@{userInf}" 对 ViewStub 进行数据绑定,则可以等到当 ViewStub Inflate 时再绑定变量,此时需要为 ViewStub 设置 setOnInflateListener 回调函数,在回调函数中进行数据绑定
1
2
3
4
5
6
7
8
9
10
11
activityMain6Binding.viewStub.setOnInflateListener(new ViewStub.OnInflateListener() {
    @Override
    public void onInflate(ViewStub stub, View inflated) {
        //如果在 xml 中没有使用 bind:userInfo="@{userInf}" 对 viewStub 进行数据绑定
        //那么可以在此处进行手动绑定
        ViewStubBinding viewStubBinding = DataBindingUtil.bind(inflated);
        viewStubBinding.setUserInfo(user);
        Log.e(TAG, "onInflate");
    }
});
- isInflated 是 DataBinding 自动生成的方法,不是 ViewStub 的方法。可用于判断是否已 inflate,ViewStub 只能 inflate 一次
- OnInflateListener 是 inflate 监听
ViewStub 封装
1
2
3
4
5
6
7
8
9
10
11
12
13
14
15
16
17
18
19
20
21
22
23
24
25
26
27
28
29
30
31
32
33
34
35
36
37
38
39
40
41
/**
 * 获取 ViewStub 加载后的 DataBinding
 */
@Suppress("UNCHECKED_CAST")
fun <T : ViewDataBinding> ViewStubProxy.getInflatedBinding(): T? {
    return try {
        if (!isInflated) {
            viewStub?.inflate()
        }
        binding as? T
    } catch (e: Exception) {
        e.printStackTrace()
        null
    }
}

/**
 * 获取 ViewStub 加载后的 View
 */
@Suppress("UNCHECKED_CAST")
fun <T : View> ViewStubProxy.getInflatedView(): T? {
    return try {
        if (!isInflated) {
            viewStub?.inflate()
        } else {
            root
        } as? T
    } catch (e: Exception) {
        e.printStackTrace()
        null
    }
}

/**
 * 设置 ViewStub 不可见
 */
fun ViewStubProxy.setGoneIfInflated() {
    if (isInflated) {
        root.setVisibilityIfNeed(View.GONE)
    }
}
对 DataBinding 支持的封装
1
2
3
4
5
6
7
8
9
10
11
12
13
14
15
16
17
18
19
20
21
22
23
24
25
26
27
28
29
30
31
32
33
34
public static class ViewStubInflationProvoker implements ViewStub.OnInflateListener {

    @Nullable
    public static ViewStubInflationProvoker provideIf(boolean clause) {
        return clause ? new ViewStubInflationProvoker((stub, inflated) -> {}) : null;
    }

    private final ViewStub.OnInflateListener onInflateListener;

    public ViewStubInflationProvoker(ViewStub.OnInflateListener listener) {
        onInflateListener = listener;
    }

    @Override
    public void onInflate(ViewStub stub, View inflated) {
        onInflateListener.onInflate(stub, inflated);
    }
}

//根据listener是否为空控制viewStub可见性
@BindingAdapter("android:onInflate")
public static void setOnInflateListener(ViewStubProxy viewStubProxy, @Nullable ViewStub.OnInflateListener listener) {
    viewStubProxy.setOnInflateListener(listener);
    if (viewStubProxy.isInflated()) {
        viewStubProxy.getRoot().setVisibility(listener == null ? View.GONE : View.VISIBLE);
        return;
    }
    if (listener instanceof ViewStubInflationProvoker) {
        ViewStub viewStub = viewStubProxy.getViewStub();
        if (viewStub != null) {
            viewStub.inflate();
        }
    }
}
使用:
1
2
3
4
5
6
7
8
9
10
<ViewStub
android:id="@+id/vs_me_notifications"
android:layout_width="match_parent"
android:layout_height="wrap_content"
android:inflatedId="@+id/vs_me_notifications_ccc"
android:layout="@layout/layout_me_notifications_ccc"
android:onInflate="@{ViewStubInflationProvoker.provideIf((viewModel.showTopCCCTips&&!viewModel.hasRisk))}"
app:clickAction="@{tipsClickListener}"
app:viewModel="@{viewModel}"
tools:visibility="visible" />
DataBinding 之 merge 标签
Data binding 不支持直接包含 merge 节点,以下的代码不能正常运行,不能编译:
1
2
3
4
5
6
7
8
9
10
11
<?xml version="1.0" encoding="utf-8"?>
<layout xmlns:android="http://schemas.android.com/apk/res/android"
  xmlns:bind="http://schemas.android.com/apk/res-auto">
  <data>
    <variable name="user" type="com.connorlin.databinding.model.User"/>
  </data>
  <merge>
    <include layout="@layout/include"
      app:user="@{user}"/>
  </merge>
</layout>
DataBinding 之自定义 View
见 自定义View的点击、回调事件处理
DataBinding RecyclerView.Adapter
1
2
3
4
5
6
7
8
9
10
11
12
13
14
15
16
17
18
19
20
21
22
23
24
25
26
27
28
29
30
31
32
33
34
35
36
37
38
39
40
41
42
43
44
45
46
47
48
49
50
51
52
53
54
55
56
57
58
59
60
61
62
63
64
65
66
67
68
public class RecyclerAdapter extends RecyclerView.Adapter<RecyclerAdapter.BindingHolder> {
    private static final String ACTION_PRE = "com.databinding.action.";
    private String[] mType = new String[]{
            "Combine",
            "NormalObject",
            "Observer",
            "ObserverField",
            "ObserverCollection",
            "ViewStub",
            "Event",
            "AttributeSetters",
            "Converters",
            "Demo",
            "TwoWay"
    };

    private List<RecyclerItem> mRecyclerItemList = new ArrayList<>();

    public RecyclerAdapter() {
        mRecyclerItemList.clear();
        for(String str : mType) {
            RecyclerItem mRecyclerItem = new RecyclerItem(str, ACTION_PRE + str);
            mRecyclerItemList.add(mRecyclerItem);
        }
    }

    @Override
    public BindingHolder onCreateViewHolder(ViewGroup parent, int viewType) {
        RecyclerItemBinding binding =
                DataBindingUtil.inflate(LayoutInflater.from(parent.getContext()),
                        R.layout.recycler_item, parent, false);

        Presenter presenter = new Presenter();
        binding.setPresenter(presenter);

        BindingHolder holder = new BindingHolder(binding.getRoot());
        holder.setBinding(binding);
        return holder;
    }

    @Override
    public void onBindViewHolder(BindingHolder holder, int position) {
        // 动态绑定变量
        holder.getBinding().setVariable(BR.item, mRecyclerItemList.get(position));
        holder.getBinding().executePendingBindings();
    }

    @Override
    public int getItemCount() {
        return mRecyclerItemList.size();
    }

    public class BindingHolder extends RecyclerView.ViewHolder {
        private RecyclerItemBinding binding;

        public BindingHolder(View itemView) {
            super(itemView);
        }

        public RecyclerItemBinding getBinding() {
            return binding;
        }

        public void setBinding(RecyclerItemBinding binding) {
            this.binding = binding;
        }
    }
}
自定义 view
- Activity 布局
1
2
3
4
5
6
7
8
9
10
11
12
13
14
15
16
17
18
19
20
21
22
23
24
25
26
27
28
29
<?xml version="1.0" encoding="utf-8"?>
<layout xmlns:android="http://schemas.android.com/apk/res/android"
  xmlns:app="http://schemas.android.com/apk/res-auto">
  <data>
    <variable
      name="catViewModel"
      type="me.hacket.assistant.samples.google.architecture.databinding.demo1.CatViewModel" />
  </data>
	<LinearLayout
      android:layout_width="match_parent"
      android:layout_height="match_parent"
      android:orientation="vertical">
      <TextView
            android:id="@+id/tv_name_ob2"
            android:layout_width="wrap_content"
            android:layout_height="wrap_content"
            android:text="@{catViewModel.name}"
            android:textSize="20sp"
            android:visibility="@{catViewModel.isShowName()?View.VISIBLE:View.INVISIBLE}"
            app:layout_constraintBottom_toBottomOf="parent"
            app:layout_constraintLeft_toLeftOf="parent"
            app:layout_constraintRight_toRightOf="parent"
            app:layout_constraintTop_toTopOf="parent" />
    	<me.hacket.assistant.samples.google.architecture.databinding.demo1.CustomView
            android:id="@+id/custom_view"
            android:layout_width="match_parent"
            android:layout_height="wrap_content" />
  	</LinearLayout>
</layout>
- CustomView
1
2
3
4
5
6
7
8
9
10
11
12
13
14
15
16
17
18
19
class CustomView @JvmOverloads constructor(
    context: Context,
    attrs: AttributeSet? = null
) : LinearLayout(context, attrs) {
    val binding: DatabindingLayoutCustomBinding
    init {
        binding = DataBindingUtil.inflate(
            LayoutInflater.from(context),
            R.layout.databinding_layout_custom,
            this,
            true
        )
        tag = "layout/databinding_layout_custom_0"
    }
    fun bindViewModel(userViewModel: UserViewModel, catViewModel: CatViewModel) {
        binding.userViewModel = userViewModel
        binding.catViewModel = catViewModel
    }
}
- R.layout.databinding_layout_custom
1
2
3
4
5
6
7
8
9
10
11
12
13
14
15
16
17
18
19
20
21
22
23
24
25
26
27
28
29
30
31
32
33
34
35
36
37
38
39
40
<?xml version="1.0" encoding="utf-8"?>
<layout xmlns:android="http://schemas.android.com/apk/res/android"
  xmlns:app="http://schemas.android.com/apk/res-auto"
  xmlns:tools="http://schemas.android.com/tools">
  <data>
    <variable
      name="userViewModel"
      type="me.hacket.assistant.samples.google.architecture.databinding.demo1.UserViewModel" />
    <variable
      name="catViewModel"
      type="me.hacket.assistant.samples.google.architecture.databinding.demo1.CatViewModel" />

    <import type="android.view.View" />
  </data>

  <androidx.appcompat.widget.LinearLayoutCompat
    android:layout_width="match_parent"
    android:layout_height="match_parent"
    android:background="@color/blue_500"
    android:orientation="vertical">

    <TextView
      android:id="@+id/tv_name_ob2"
      android:layout_width="wrap_content"
      android:layout_height="wrap_content"
      android:text="@{catViewModel.name}"
      android:textSize="20sp"
      android:visibility="@{catViewModel.isShowName()?View.VISIBLE:View.INVISIBLE}"
      app:layout_constraintBottom_toBottomOf="parent"
      app:layout_constraintLeft_toLeftOf="parent"
      app:layout_constraintRight_toRightOf="parent"
      app:layout_constraintTop_toTopOf="parent"
      tools:text="fdafd" />
    <TextView
      android:layout_width="wrap_content"
      android:layout_height="wrap_content"
      android:text="@{userViewModel.userData.name}"
      tools:text="111111111111111" />
  </androidx.appcompat.widget.LinearLayoutCompat>
</layout>
- Activity 代码
1
2
3
4
5
6
7
8
9
class DataBindingOneWayActivity : AppCompatActivity() {
    override fun onCreate(savedInstanceState: Bundle?) {
        super.onCreate(savedInstanceState)
        val binding =
        DataBindingUtil.setContentView<ActivityBindingOneWayDemoBinding>(
            this, R.layout.activity_binding_one_way_demo)
        custom_view.bindViewModel(userViewModel, catViewModel)
    }
}
自定义 view 属性使用 databinding
DataBinding 点击事件处理
直接传递进来 click 不推荐
通过 ViewDataBinding 直接传递进来 click
1
2
3
4
5
6
7
8
9
10
11
12
13
14
15
16
// xml
<variable
    name="click"
    type="android.view.View.OnClickListener" />
    ...
<Button
    android:onClick="@{click}"
    android:id="@+id/bt1"
    android:layout_width="0dp"
    android:layout_height="wrap_content"
    android:layout_marginTop="20dp"
    android:layout_weight="1"
    android:text="绑定1" />

// Activity
binding.click = View.OnClickListener { Log.d("hacket", "click") }
通过 ViewModel(或者其他类) 的方法,可带可不带参数
xml 里的参数 (v),就是你的 Listener 方法的参数;如果 fun onVisibleChange(view: PushSubscribeTipsView, isVisible: Boolean),xml 就这样写:app:visibleListener=”@{(view,visible)->viewModel.onPushTipsVisibleChanged(visible)}
1、不带参数
- xml:
()->viewmodel.click() - ViewModel:
fun click()
2、带 View 共 1 个参数
- xml:
(v)->viewmodel.click(v) - ViewModel:
fun click(view: View)
3、带 View+ 其他参数共 2 个参数
- xml:
(v2)->catViewModel2.btnClick2(v2,hhhh) - ViewModel:
fun btnClick2(view: View, s: String)
4、带非 View 共 1 个参数
- xml:
()->viewmodel.click(viewmodel.nameLiveData) - ViewModel:
fun click(name:String)
1
2
3
4
5
6
7
8
9
10
11
12
13
14
15
16
17
18
19
20
21
22
23
24
25
26
27
28
29
30
31
32
33
34
35
36
37
38
39
40
41
42
43
44
45
46
47
48
49
50
51
52
53
54
55
56
57
58
// 1、不带参数
 <Button
    android:onClick="@{()->viewmodel.click()}"
    android:id="@+id/bt2"
    android:layout_width="0dp"
    android:layout_height="wrap_content"
    android:layout_marginTop="20dp"
    android:layout_weight="1"
    android:text="绑定2" />
// ViewModel中
fun click() {
	Toast.makeText(getApplication(), "绑定方式2", Toast.LENGTH_SHORT).show()
}


// 2、带View参数
<Button
    android:onClick="@{(view)->viewmodel.click(view)}"
    android:id="@+id/bt3"
    android:layout_width="0dp"
    android:layout_height="wrap_content"
    android:layout_marginTop="20dp"
    android:layout_weight="1"
    android:text="绑定3" />
// 代码
fun click(view: View) {
	Toast.makeText(getApplication(), "绑定方式3", Toast.LENGTH_SHORT).show()
}


// 带非View的参数
 <Button
    android:onClick="@{()->viewmodel.click(viewmodel.nameLiveData)}"
    android:id="@+id/bt4"
    android:layout_width="0dp"
    android:layout_height="wrap_content"
    android:layout_marginTop="20dp"
    android:layout_weight="1"
    android:text="绑定4" />
// 代码:带String参数
fun click(name:String){
	Toast.makeText(getApplication(), "绑定方式4$name", Toast.LENGTH_SHORT).show()
}

// 带其他类型的参数 且带View本身的参数
<Button
    android:onClick="@{(view)->viewmodel.click(view,viewmodel.nameLiveData)}"
    android:id="@+id/bt5"
    android:layout_width="0dp"
    android:layout_height="wrap_content"
    android:layout_marginTop="20dp"
    android:layout_weight="1"
    android:text="绑定5" />
// 代码:带View和其他类型参数
fun click(view:View, name:String){
	Toast.makeText(getApplication(), "绑定方式5$name", Toast.LENGTH_SHORT).show()
}
方法引用调用 click
直接调用某个类的方法,viewmodel::click,此时的 ViewModel 方法是必须带 View 本身的参数的
1
2
3
4
5
6
7
8
9
10
11
12
13
<Button
    android:onClick="@{viewmodel::click}"
    android:id="@+id/bt6"
    android:layout_width="0dp"
    android:layout_height="wrap_content"
    android:layout_marginTop="20dp"
    android:layout_weight="1"
    android:text="绑定6" />
// ViewModel里面,方法必须带View本身的参数
fun click(view: View) {
    Toast.makeText(getApplication(), "绑定方式3", Toast.LENGTH_SHORT).show()
}
ObservableField 通过 ObservableField 包裹一个 OnClickListener
1
2
3
4
5
6
7
8
9
10
11
12
13
14
15
<Button
    android:onClick="@{viewmodel.observableFieldClick}"
    android:id="@+id/bt7"
    android:layout_width="0dp"
    android:layout_height="wrap_content"
    android:layout_marginTop="20dp"
    android:layout_weight="1"
    android:text="绑定7" />
// Actvity里面设置给
viewModel.observableFieldClick.set(object :View.OnClickListener{
    override fun onClick(v: View?) {
        Toast.makeText(this@BindingActivity, "绑定方式7", Toast.LENGTH_SHORT).show()
    }
})
自定义 View 的点击、回调事件处理
提供单独只有 listener 的 BindAdapter
- PushSubscribeTipsView
1
2
3
4
5
6
7
8
9
10
11
12
13
14
15
16
17
18
19
20
21
22
23
class PushSubscribeTipsView @JvmOverloads constructor(
    context: Context, attrs: AttributeSet? = null
) : LinearLayout(context, attrs) {
    private var mOnOnVisibleChangeListener: OnVisibleChangeListener? = null
    override fun onVisibilityChanged(changedView: View, visibility: Int) {
        super.onVisibilityChanged(changedView, visibility)
        mOnOnVisibleChangeListener?.onVisibleChange(this, isVisible)
    }
    fun setOnVisibleChangeListener(listener: OnVisibleChangeListener?): PushSubscribeTipsView {
        mOnOnVisibleChangeListener = listener
        return this
    }
    fun interface OnVisibleChangeListener {
        fun onVisibleChange(view: PushSubscribeTipsView, isVisible: Boolean)
    }
    fun setOwner(owner: LifecycleOwner) {
        bindLifecycle(owner)
    }
    fun setVisible(outVisible: Boolean) {
        this.outVisible = outVisible
        // ...
    }
}
- xml
1
2
3
4
5
6
7
8
9
10
11
12
13
14
15
16
17
18
19
20
21
22
<?xml version="1.0" encoding="utf-8"?>
<layout xmlns:android="http://schemas.android.com/apk/res/android"
xmlns:app="http://schemas.android.com/apk/res-auto"
xmlns:tools="http://schemas.android.com/tools">
<data>
<import type="android.view.View" />
<variable
name="viewModel"
type="xxx.ViewModel" />
<variable
name="owner"
type="androidx.lifecycle.LifecycleOwner" />
</data>
<com.zzz.bussiness.push.PushSubscribeTipsView
android:id="@+id/push_tips"
android:layout_width="match_parent"
android:layout_height="wrap_content"
app:owner="@{owner}"
app:push_type="page_me"
app:visible="@{(!viewModel.showXXX&&!viewModel.hasXXX)}"
app:visibleListener="@{(view,visible)->viewModel.onPushTipsVisibleChanged(view,visible)}" />
</layout>
- ViewModel
1
2
3
fun onPushTipsVisibleChanged(view: PushSubscribeTipsView, visible: Boolean) {
    showPushTips.set(visible)
}
- 绑定 viewModel 和 owner
1
2
this.viewModel = this.viewModel?.loginViewModel
this.owner = mainMeFragment.viewLifecycleOwner
提供属性和 listener 的 BindAdapter
- AccountBindView
1
2
3
4
5
6
7
8
9
10
11
12
13
14
15
16
17
18
19
20
21
22
23
24
25
26
27
28
29
30
31
32
33
34
35
36
37
38
39
40
41
42
43
class AccountBindView @JvmOverloads constructor(
    context: Context, attrs: AttributeSet? = null
) : FrameLayout(context, attrs) {
    fun setOnAccountBindClickListener(
        listener: OnAccountBindClickListener?
    ): AccountBindView {
        this.mListener = listener
        return this
    }
    fun interface OnAccountBindClickListener {
        fun onAccountBindClick(
            v: View,
            type: String
        )
    }
    fun bind(
        type: String,
        subscribeStatus: Boolean,
        bindValue: CharSequence,
        availBindValue: CharSequence,
    ): AccountBindView {
        // ...
    }
}

object AccountBindViewBindingAdapter {
    @JvmStatic
    @BindingAdapter(value = ["type", "subscribeStatus", "bindValue", "availBindValue", "bindListener"], requireAll = false)
    fun bind(
        view: AccountBindView,
        type: String, //  类型,NotificationSubscribeType.EMAIL
        subscribeStatus: Boolean, // 是否已经订阅,已经订阅了就不显示Subscribable Account
        bindValue: CharSequence?,
        availBindValue: CharSequence?,
        bindListener: AccountBindView.OnAccountBindClickListener? = null
    ) {
        if (bindValue.isNullOrEmpty() && availBindValue.isNullOrEmpty()) {
            return
        }
        view.bind(type, subscribeStatus, bindValue ?: "", availBindValue ?: "")
        view.setOnAccountBindClickListener(bindListener)
    }
}
- xml
1
2
3
4
5
6
7
8
9
10
11
<xxx.AccountBindView
android:id="@+id/tvBindValue2"
android:layout_width="match_parent"
android:layout_height="wrap_content"
android:visibility="@{(!TextUtils.isEmpty(bean.bindValue) || !TextUtils.isEmpty(bean.availBindValue)) && !bean.noBindingRequired && model.newAccountBindAbt}"
app:subscribeStatus="@{bean.subscribeStatus}"
app:availBindValue="@{bean.availBindValue}"
app:bindListener="@{(v,type)->model.changeBindClick(type)}"
app:bindValue="@{bean.bindValue}"
app:type="@{bean.type}"
tools:visibility="visible" />
- viewModel
1
2
3
fun changeBindClick(type: String) {
    // ...
}
OnRebindCallback
该监听器可以监听到布局绑定的生命周期
1
2
3
4
5
6
7
8
9
10
11
12
13
14
15
16
17
18
19
20
21
22
23
24
25
26
27
28
binding.addOnRebindCallback(object : OnRebindCallback<ActivityBindingAdapterBinding>() {
    /**
     * 绑定之前
     * @param binding
     * @return 如果返回true就会绑定布局, 返回false则取消绑定
     */
    override fun onPreBind(binding: ActivityBindingAdapterBinding?): Boolean {
        val r = super.onPreBind(binding)
        Log.d("hacket", "onPreBind r=$r")
        return r
    }

    /**
     * 如果取消绑定则回调该方法(取决于onPreBind的返回值)
     * @param binding
     */
    override fun onCanceled(binding: ActivityBindingAdapterBinding?) {
        Log.w("hacket", "onCanceled")
    }

    /**
     * 绑定完成
     * @param binding
     */
    override fun onBound(binding: ActivityBindingAdapterBinding?) {
        Log.i("hacket", "onBound")
    }
})
DataBinding 思考
DataBinding 优缺点
DataBinding 优点
- 不需要 findViewById 了
- 减少了 Avtivity 和 Fragment 的逻辑处理,使 Activity 和 Fragment 逻辑更加清晰,容易维护
- 提高性能,避免内存泄漏 以及 空指针
- 双向绑定,当 View 改变的时候会通知 Model,当 Model 改变的时候会通知 View
DataBinding 缺点
- 很难定位 bug,当有个界面展示不对的时候,你不知道是 View 的问题,还是 Model 的问题,还是编写逻辑的问题
- xml 中 不能 Debug
- 双向绑定技术,不利于 View 的复用,因为一个 xml 里面绑定的一个 Model,有可能另一个界面 Model 就不一样了,所以无法复用了。除非你再手动转一下这个 Model
- xml 中写代码,感觉不够简洁
DataBinding 遇到的问题
找不到 BR 文件
原因: 布局没有用 DataBinding 来加载
1
2
3
4
5
6
class BindingAdapterActivity : AppCompatActivity() {
    override fun onCreate(savedInstanceState: Bundle?) {
        super.onCreate(savedInstanceState)
        setContentView(R.layout.activity_binding_adapter)
    }
}
解决: 用 DataBindingUtil 加载布局
1
2
3
4
5
6
7
8
9
class BindingAdapterActivity : AppCompatActivity() {
    override fun onCreate(savedInstanceState: Bundle?) {
        super.onCreate(savedInstanceState)
        var binding = DataBindingUtil.setContentView<ActivityBindingAdapterBinding>(
            this,
            R.layout.activity_binding_adapter
        )
    }
}
Failed resolution of: Landroidx/databinding/DataBinderMapperImpl
出错堆栈:
解决 1:databinding 开关未开
- 主 app 或 module app 都需要把 dataBinding 开关打开
- 添加 kapt 插件:
apply plugin: 'kotlin-kapt'
1
2
3
buildFeatures {
    dataBinding = true
}
如果还不行的话,看下在你的 app 工程有没有生成 DataBinderMapperImpl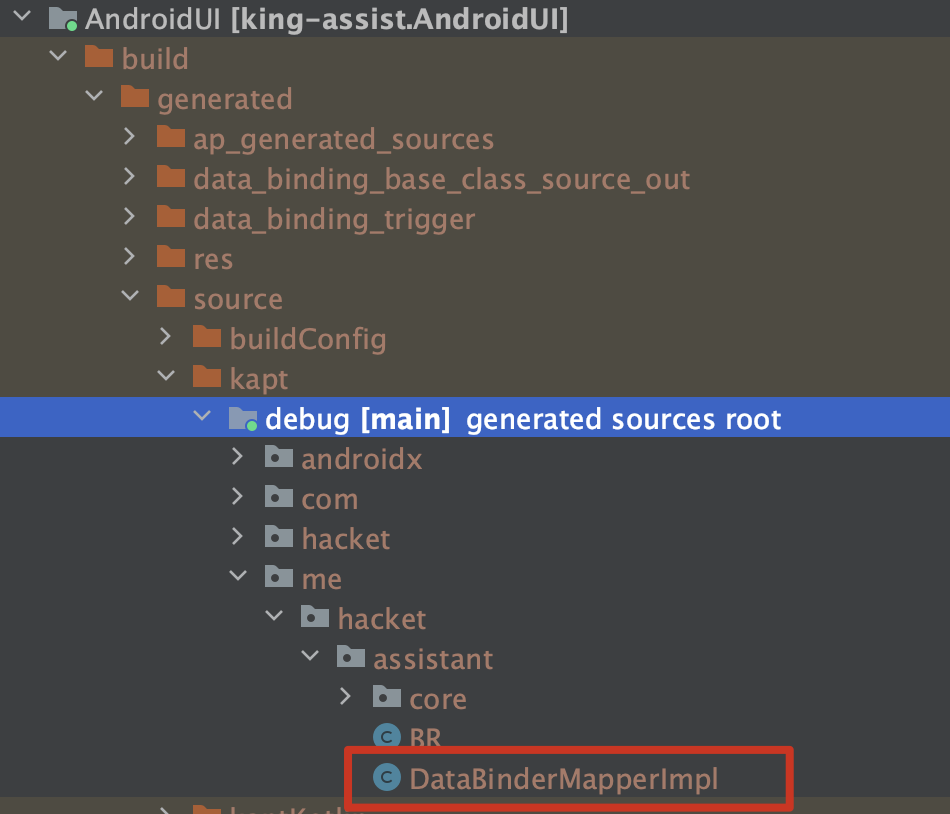
我的这个项目没有生成 DataBinderMapperImpl,是因为之前做编译优化禁用了 kapt 插件,导致生成不了
1
2
3
4
5
6
7
8
9
10
11
12
13
14
15
16
17
18
19
20
21
22
23
24
25
26
// 禁止模块添加kapt
project.afterEvaluate {
    android.applicationVariants.each { variant ->
        try {
            project.tasks.getByName("kapt${variant.name.capitalize()}Kotlin").enabled = false
            project.tasks.getByName("kaptGenerateStubs${variant.name.capitalize()}Kotlin").enabled = false
        } catch (Exception e) {
//            e.printStackTrace()
        }
        println("------>>>>>>>  task kapt${variant.name.capitalize()}Kotlin/kaptGenerateStubs${variant.name.capitalize()}Kotlin enabled=false. ")
    }
    def set = new HashSet<String>()
    try {
        android.applicationVariants.each { variant ->
            configurations.getByName("kapt").dependencies.each { dep ->
                set.add("${dep.getGroup()}:${dep.getName()}:${dep.getVersion()}")
            }
        }
    } catch (Exception e) {
        e.printStackTrace()
    }
    println("------>>>>>>> dependencies kapt size=${set.size()}")
    if (!set.isEmpty()) {
        throw new IllegalStateException("已禁止 ${project.name} 模块所有kapt,请勿添加新的kapt.")
    }
}
解决 2: KAPT 插件打开
- 加上 kapt 插件
到这里生成了 DataBinderMapperImpl 了,但是点进去 DataBinding 页面就崩溃了
原因是项目采用了组件化,有 2 个组件的 Manifest 的 packageName 事一样的,就会出现崩溃
解决 3: 不同组件 module 之间的 packageName 不能一样,需要改名
view must has a tag
编译错误?
- xml 重命名?