单向绑定(one way):(数据刷新视图:数据→UI)
单向绑定是指数据源改变之后会立马通知 XML 进行赋值改变,刷新 UI。下面的几种可以单向绑定:
- ObservableFields 扩展的属性
ObservableIntObservableField<T>
- BaseObservable 自定义属性
- ViewModel+ObservableField 扩展的属性
- ViewModel+LiveData
ObservableInt
ObservableField
1
2
3
4
5
6
7
8
9
10
11
12
13
14
15
16
17
18
19
20
21
22
23
24
25
26
27
28
29
30
31
| <?xml version="1.0" encoding="utf-8"?>
<layout xmlns:android="http://schemas.android.com/apk/res/android"
xmlns:app="http://schemas.android.com/apk/res-auto">
<data>
<variable
name="cat"
type="me.hacket.databindingdemos.demo1.Cat" />
<import type="android.view.View" />
</data>
<LinearLayout
android:layout_width="match_parent"
android:layout_height="match_parent"
android:orientation="vertical">
<TextView
android:id="@+id/tv_name_ob"
android:layout_width="wrap_content"
android:layout_height="wrap_content"
android:text="@{cat.name}"
android:textSize="20sp"
android:visibility="@{cat.isShowName()?View.VISIBLE:View.INVISIBLE}"
app:layout_constraintBottom_toBottomOf="parent"
app:layout_constraintLeft_toLeftOf="parent"
app:layout_constraintRight_toRightOf="parent"
app:layout_constraintTop_toTopOf="parent" />
<Button
android:id="@+id/bt_change"
android:layout_width="wrap_content"
android:layout_height="wrap_content"
android:text="change" />
</LinearLayout>
</layout>
|
1
2
3
4
5
6
7
8
9
10
11
12
13
14
15
16
| class Cat {
// 猫的名字用 ObservableField 包裹
var name: ObservableField<String> = ObservableField<String>()
// 是否显示猫的名字 用 ObservableBoolean
var isShowName = ObservableBoolean()
}
val binding = DataBindingUtil.setContentView<ActivityMainBinding>(this, R.layout.activity_main)
val cat = Cat()
cat.name = ObservableField("fff")
cat.isShowName = ObservableBoolean(true)
binding.cat = cat
binding.btChange.setOnClickListener {
cat.name.set("ObservableField 改变的咖啡猫")
cat.isShowName.set(!cat.isShowName.get())
}
|
ViewModel+ObservableField
1
2
3
4
5
6
7
8
9
10
11
12
13
14
15
16
17
18
19
20
21
22
23
24
25
26
27
28
29
30
| <layout xmlns:android="http://schemas.android.com/apk/res/android"
xmlns:app="http://schemas.android.com/apk/res-auto">
<data>
<variable
name="vm"
type="me.hacket.databindingdemos.demo1.CatViewModel" />
<import type="android.view.View" />
</data>
<LinearLayout
android:layout_width="match_parent"
android:layout_height="match_parent"
android:orientation="vertical">
<TextView
android:id="@+id/tv_name_ob2"
android:layout_width="wrap_content"
android:layout_height="wrap_content"
android:text="@{vm.name}"
android:textSize="20sp"
android:visibility="@{vm.isShowName()?View.VISIBLE:View.INVISIBLE}"
app:layout_constraintBottom_toBottomOf="parent"
app:layout_constraintLeft_toLeftOf="parent"
app:layout_constraintRight_toRightOf="parent"
app:layout_constraintTop_toTopOf="parent" />
<Button
android:id="@+id/bt_change2"
android:layout_width="wrap_content"
android:layout_height="wrap_content"
android:text="change ViewModel" />
</LinearLayout>
</layout>
|
1
2
3
4
5
6
7
8
9
10
11
12
13
14
15
16
17
18
19
| class CatViewModel : ViewModel() {
// 猫的名字用 ObservableField 包裹
var name: ObservableField<String> = ObservableField<String>("hacket hhhh")
// 是否显示猫的名字 用 ObservableBoolean
var isShowName = ObservableBoolean(false)
fun change() {
name.set("ViewModel中改变的咖啡猫")
isShowName.set(!isShowName.get())
}
}
private fun singleTest2(binding: ActivityMainBinding) {
val catViewModel = ViewModelProvider(this)[CatViewModel::class.java]
binding.vm = catViewModel
binding.lifecycleOwner = this
binding.btChange2.setOnClickListener {
catViewModel.change()
}
}
|
ViewModel+LiveData 平时用的最多
1
2
3
4
5
6
7
8
9
10
11
12
13
14
15
16
17
18
19
20
21
22
23
24
25
| <?xml version="1.0" encoding="utf-8"?>
<layout xmlns:android="http://schemas.android.com/apk/res/android"
xmlns:app="http://schemas.android.com/apk/res-auto">
<data>
<variable
name="userViewModel"
type="me.hacket.databindingdemos.demo1.UserViewModel" />
<import type="android.view.View" />
</data>
<LinearLayout
android:layout_width="match_parent"
android:layout_height="match_parent"
android:orientation="vertical">
<TextView
android:layout_width="wrap_content"
android:layout_height="wrap_content"
android:text="@{userViewModel.userData.name}" />
<Button
android:id="@+id/bt_change3"
android:layout_width="wrap_content"
android:layout_height="wrap_content"
android:text="change by LiveData" />
</LinearLayout>
</layout>
|
1
2
3
4
5
6
7
8
9
10
11
12
13
14
15
16
17
18
19
20
21
22
23
24
25
26
27
28
29
30
31
| data class User(var name: String = "", var age: Int = 0, var address: String)
class UserViewModel : ViewModel() {
var userData: MutableLiveData<User> = MutableLiveData()
init {
userData.value = User("张三", 24, "杭州")
// 延迟3秒后修改数据,UI自动更新
Thread {
SystemClock.sleep(3000)
userData.value!!.name = "李四"
userData.postValue(userData.value)
}.start()
}
fun change() {
val copy = userData.value?.copy()
copy?.name = "hacket"
userData.value = copy
}
override fun onCleared() {
Log.i("hacket", "onCleared:ViewModel 即将销毁")
}
}
// 使用
private fun singleTest3(binding: ActivityMainBinding) {
val userViewModel = ViewModelProvider(this)[UserViewModel::class.java]
binding.userViewModel = userViewModel
binding.lifecycleOwner = this
binding.btChange3.setOnClickListener {
userViewModel.change()
}
}
|
什么是双向绑定?
在 TextView 中,我们通过 dataBinding 把实体中的数据放到 TextView 中展示,这是从实体到 view 方向上的绑定;当 TextView 的数据发生改变时,比如我们手动输入了一些数据,我们通过 dataBinding 把 view 中的数据设置到对应的实体类的字段中,这是从 view 到实体类方向上的绑定,整合起来就是双向绑定。
使用双向绑定的场景并不多
双向绑定不足?
- 死循环绑定:因为数据源改变会通知 view 刷新,而 view 改变又会通知数据源刷新,这样一直循环往复,就形成了死循环绑定。
- 数据源中的数据有时需要经过转换才能在 view 中展示,而 view 中展示的内容也需要经过转换才能绑定到对应的数据源上。
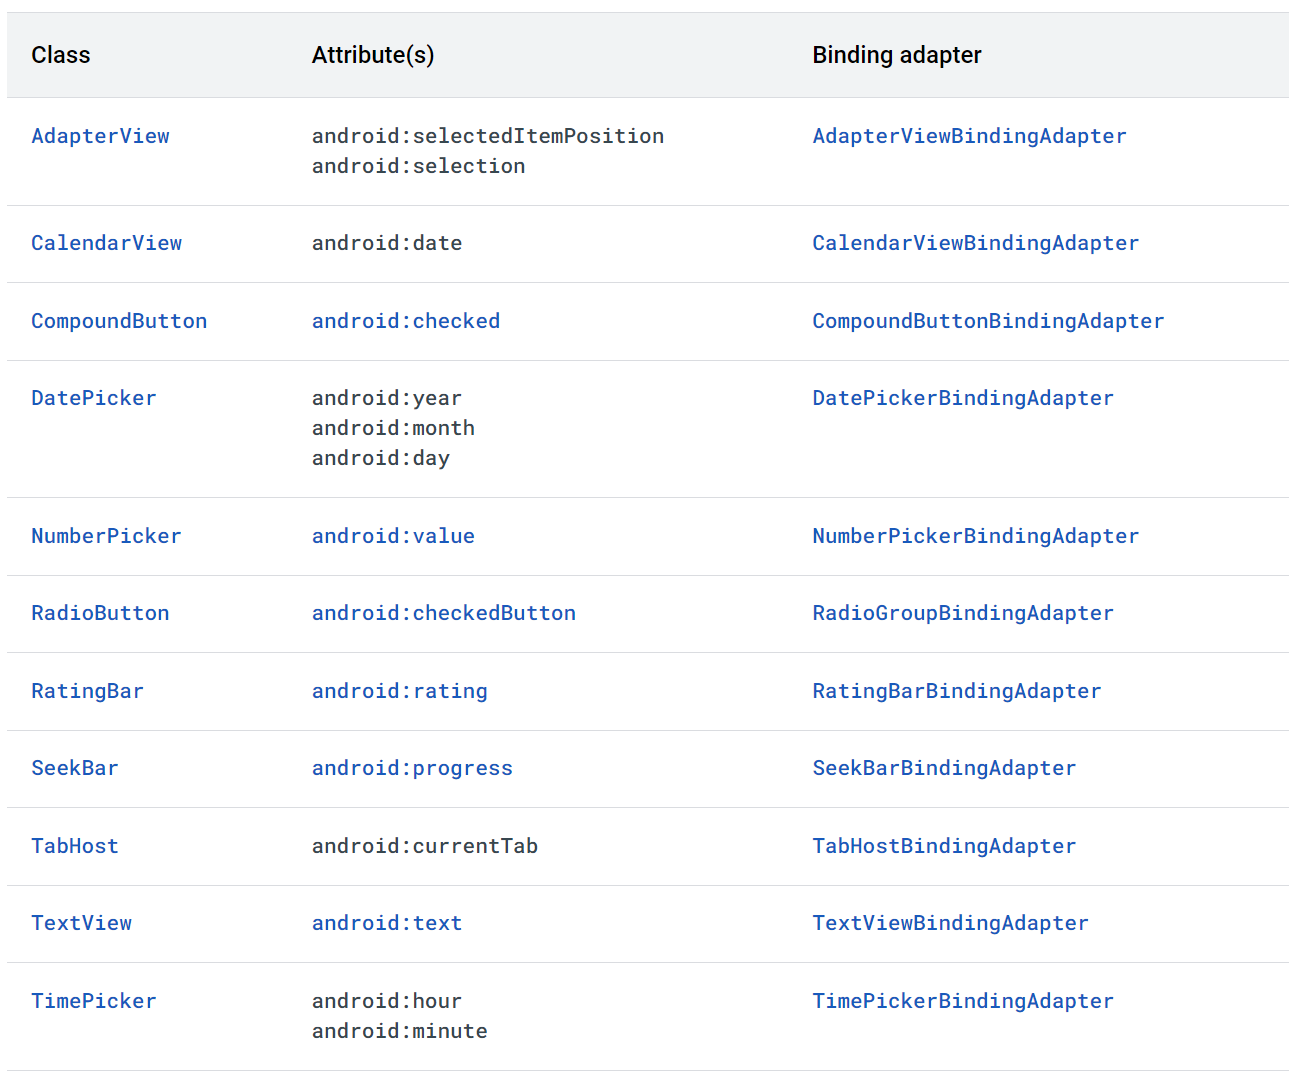
官方提供的支持双向绑定的 View
EditText 支持的双向绑定
拿 android:text 举例:当 EditText 的输入内容改变时,会同时同步到变量 teacher,绑定变量的方式比单向绑定多了一个等号: android:text="@={teacher.name}"
@={} 表示法(其中重要的是包含 “=” 符号)可接收属性的数据更改并同时监听用户更新
DataBinding 已经为我们自动实现了 android:text 这个属性的双向绑定的功能,主要实现类是 TextViewBindingAdapter。
自定义 View 双向绑定实现步骤
完全的双向数据绑定三个重要函数:
- setter(数据到视图):自定义@BindingAdapter,setter,用于解决循环更新死循环的问题
- getter(视图到数据):自定义一个@InverseBindingAdapter,用于解决 getter 问题,其 event 一般和 3 中的 InverseBindingListener 的属性名保持一致
- notify(通过 DataBinding 视图已经刷新可以更新更新数据 Model 了):自定义@BindindAdapter 解决 View 数据更新后,其
xxxAttrChanged 对应一个 InverseBindingLister,用于通知 DataBinding View 的数据已经更新,可以更新数据源了
setter 函数:
1
2
3
4
5
6
| @BindingAdapter("android:bindName")
fun TextView.setBindName(name:String?) {
if (name.isNullOrEmpty() && name != text) {
text = name
}
}
|
getter 函数:
1
2
3
4
5
6
| @InverseBindingAdapter(attribute = "android:bindName", event = "cus_event")
fun TextView.getBindName() : String {
// 这里你可以对视图上的数据进行处理最终设置给Model层
return text.toString()
}
|
notify 函数:视图变化后要通知 DataBinding 开始设置 Model 层,同样要用到 @BindingAdapter,不同的是参数要求要有 InverseBindingListener,一般为 xxxAttrChanged
1
2
3
4
5
6
7
8
9
10
| @BindingAdapter("cus_event")
fun TextView.notifyBindName( inverseBindingListener: InverseBindingListener){
// 这个函数是监听TextWatch 官方源码 当然不同的需求不同的监听器
doAfterTextChanged {
inverseBindingListener.onChange() // 这行代码执行即通知数据刷新
}
}
|
双向绑定示例
LiveData 双向绑定
比如 xml 里面 Textview 和 EditText 用的是一个 Model 的 nameLiveData ,此时你会看出来,TextView 单向绑定,EditText 双向绑定,当输入内容的时候 TextView 也会改变
1
2
3
4
5
6
7
8
9
10
11
12
13
14
15
16
17
18
19
20
21
22
23
24
25
26
27
28
| <?xml version="1.0" encoding="utf-8"?>
<layout xmlns:android="http://schemas.android.com/apk/res/android"
xmlns:app="http://schemas.android.com/apk/res-auto">
<data>
<variable
name="viewmodel"
type="me.hacket.databindingdemos.demo2.DataViewModel" />
</data>
<LinearLayout
android:layout_width="match_parent"
android:layout_height="match_parent"
android:orientation="vertical">
<TextView
android:id="@+id/tv_name_view_model"
android:layout_width="wrap_content"
android:layout_height="wrap_content"
android:layout_marginTop="20dp"
android:text="@{viewmodel.nameLiveData}"
android:textSize="20sp" />
<EditText
android:id="@+id/et_name"
android:layout_width="wrap_content"
android:layout_height="wrap_content"
android:layout_marginTop="20dp"
android:text="@={viewmodel.nameLiveData}"
android:textSize="20sp" />
</LinearLayout>
</layout>
|
这里 android:text="@{viewmodel.nameLiveData}" 对 text 进行设置
在 Edittext 中可以使用 android:text="@={viewmodel.nameLiveData}" 进行双向绑定,关键是这个 = 号;
1
2
3
4
5
6
7
8
9
10
11
12
13
14
15
16
17
18
19
| // ViewModel + LiveData
class DataViewModel : ViewModel() {
val nameLiveData = MutableLiveData<String>()
}
// 使用
class BindTwoDemoActivity : AppCompatActivity() {
override fun onCreate(savedInstanceState: Bundle?) {
super.onCreate(savedInstanceState)
val binding =
DataBindingUtil.setContentView<ActivityBindTwoDemoBinding>(
this,
R.layout.activity_bind_two_demo
)
binding.lifecycleOwner = this
val viewModel = ViewModelProvider(this)[DataViewModel::class.java]
binding.viewmodel = viewModel
}
}
|
双向绑定相关注解
@InverseBindingMethods 和@InverseBindingMethod
作用
@InverseBindingMethods 注解的作用与 @BindingMethods 类似,但是@InverseBindingMethods 是视图变更数据 (get 函数), 而 BindingMethods 是数据到视图 (set 函数)
如果说 BindingMethods 是关联 setter 方法和自定义属性, 那么 InverseBindingMethods 就是关联 getter 方法和自定义属性;
- 如果说 BindingMethods 是关联 setter 方法和自定义属性, 那么 InverseBindingMethods 就是关联 getter 方法和自定义属性;setter 是更新视图的时候使用,而 getter 方法是更新数据时候使用的
- @InverseBindingMethod 与@InverseBindingMethods 需要结合@BindingAdapter 注解才能发挥作用
@InverseBindingMethod 注解
1
2
3
4
5
6
7
8
9
10
11
12
13
14
15
16
17
18
19
20
| @Target(ElementType.ANNOTATION_TYPE)
public @interface InverseBindingMethod {
/**
* 控件的类字节码
*/
Class type();
/**
* 自定义的属性
*/
String attribute();
/**
* nitify函数的名称 即用于通知数据更新的函数
*/
String event() default "";
/**
* 控件自身的函数名称, 如果省略即自动生成为 {attribute}AttrChange
*/
String method() default "";
}
|
- type Class 类型,必填。如:SeekBar.class
- attribute String 类型,必填。 如:android:progress
- event String 类型,非必填,属性值的生成规则以及作用和@InverseBindingAdapter 中的 event 一样
- method String 类型,非必填,比如 SeeBar,它有 android:progress 属性,也有 getProgress() 方法,所以对于 SeekBar 的 android:progress 属性,不需要明确指定 method
1
2
3
4
5
6
7
8
9
| @InverseBindingMethods(
InverseBindingMethod(
type = CusView::class,
attribute = "android:bindName",
method = "getName", event = "cus_event"
)
)
object Adapter {
}
|
- 如果
attribute 属性值属于不存在的属性,则需要再创建一个 @BindingAdapter 自定义属性来处理
案例
但是到底该怎么结合@BindingAdapter 注解呢?换句话说@BindingAdapter 注解该怎么配合呢? 我们看一段代码,通过这段代码来讲解:
1
2
3
4
5
6
7
8
9
10
11
12
13
14
15
16
17
18
19
20
21
22
23
24
25
26
27
28
29
30
| @InverseBindingMethods({
@InverseBindingMethod(type = RatingBar.class, attribute = "android:rating"),
}) // 1
public class RatingBarBindingAdapter {
@BindingAdapter("android:rating")
public static void setRating(RatingBar view, float rating) {
if (view.getRating() != rating) { // 2、防止死循环
view.setRating(rating);
}
}
@BindingAdapter(value = {"android:onRatingChanged", "android:ratingAttrChanged"},
requireAll = false)
public static void setListeners(RatingBar view, final OnRatingBarChangeListener listener,
final InverseBindingListener ratingChange) {
if (ratingChange == null) {
view.setOnRatingBarChangeListener(listener);
} else {
view.setOnRatingBarChangeListener(new OnRatingBarChangeListener() {
@Override
public void onRatingChanged(RatingBar ratingBar, float rating, boolean fromUser) {
if (listener != null) {
listener.onRatingChanged(ratingBar, rating, fromUser);
}
ratingChange.onChange();
}
});
}
}
}
|
- 这段代码定义了 RatingBar 类的
android:rating 属性,但是没有定义 event 和 method 属性,既然没有定义,那么就采用默认值,我们就可以知道:event 的属性值为 android:ratingAttrChanged,method 的属性值为 getRating。这里就是需要@BindingAdapter 注解配合的一个地方。 - 为什么需要@BindingAdapter,防止死循环:RatingBar 中默认已经提供
android:rating 属性了,但是为什么还要用@BindingAdapter 重复定义一个一模一样的呢?原因就是为了防止死循环绑定。我们在上面通过@InverseBindingMethod 注解指定了 android:rating 属性需要支持双向绑定,那么自然要防止死循环绑定问题。 当我们通过@BindingAdapter 定义一个一模一样的 android:rating 属性时,一旦在布局文件中对这个属性使用了 dataBinding 表达式,那么 dataBinding 就会调用这里的 “setRating”方法,如果使用的dataBinding表达式是双向绑定表达式@={}`,那么就可以避免死循环绑定。这里是需要@BindingAdapter 注解配合的另一个地方。
@InverseBindingAdapter 视图通知数据刷新的
作用:
- 仅作用于方法,方法必须为公共静态方法
- 方法的第一个参数必须为 View,TextView
- 用于双向绑定
- 需要和@BindingAdapter 配合
注解说明
1
2
3
4
| public @interface InverseBindingAdapter {
String attribute();
String event() default "";
}
|
- attribute String 类型,必填,当值发生变化时,要从哪个属性中检索这个变化的值,如
android:text - event String 类型,非必填;如果填写,则使用填写的内容作为 event 的值;如果不填,在编译时会根据 attribute 的属性名再加上后缀 “AttrChanged” 生成一个新的属性
xxxAttrChanged 作为 event 的值,举个例子:attribute 属性的值为 “android:text”,那么默认会在 “android:text” 后面追加 “AttrChanged” 字符串,生成 “android:textAttrChanged” 字符串作为 event 的值 - event 属性的作用: 当 View 的值发生改变时用来通知 dataBinding 值已经发生改变了。开发者一般需要使用@BindingAdapter 创建对应属性来响应这种改变。
案例
1
2
3
4
5
6
7
8
9
10
11
12
13
14
15
16
17
18
19
20
21
22
23
24
25
26
27
28
29
30
31
32
33
34
35
36
37
38
39
40
41
42
43
44
45
| public class TabHostBindingAdapter {
@InverseBindingAdapter(attribute = "android:currentTab")
public static int getCurrentTab(TabHost view) {
return view.getCurrentTab();
}
@InverseBindingAdapter(attribute = "android:currentTab")
public static String getCurrentTabTag(TabHost view) {
return view.getCurrentTabTag();
}
@BindingAdapter("android:currentTab")
public static void setCurrentTab(TabHost view, int tab) {
if (view.getCurrentTab() != tab) {
view.setCurrentTab(tab);
}
}
@BindingAdapter("android:currentTab")
public static void setCurrentTabTag(TabHost view, String tabTag) {
if (view.getCurrentTabTag() != tabTag) {
view.setCurrentTabByTag(tabTag);
}
}
@BindingAdapter(value = {"android:onTabChanged", "android:currentTabAttrChanged"},
requireAll = false)
public static void setListeners(TabHost view, final OnTabChangeListener listener,
final InverseBindingListener attrChange) {
if (attrChange == null) {
view.setOnTabChangedListener(listener);
} else {
view.setOnTabChangedListener(new OnTabChangeListener() {
@Override
public void onTabChanged(String tabId) {
if (listener != null) {
listener.onTabChanged(tabId);
}
attrChange.onChange();
}
});
}
}
}
|
@InverseMethod 双向数据转换
@InverseMethod 注解解释:
@InverseMethod 注解是一个相对独立的注解,不需要其他注解的配合就能用,它的作用是为某个方法指定一个相反的方法,value 为必填属性,用来存放与当前方法对应的相反方法。
- InverseMethod 注解:该注解修饰的就是正方法,而 InverseMethod 接收一个参数 value,定义的就是反方法的名称
特点:
- 正方法与反转方法的参数数量必须相同
- 正方法的最后一个参数的类型与反转方法的返回值必须相同
- 正方法的返回值类型与反方法的最后一个参数类型相同
- 正方法: 是刷新视图的时候使用 (决定视图显示数据) 会回调两次
- 反方法: 是刷新数据的时候使用 (决定实体存储数据)
1
2
3
4
5
6
7
8
9
10
11
12
13
14
15
16
17
18
19
| object Bind {
// 正方法,@InverseMethod注解中的value定义的是反方法
@JvmStatic
@InverseMethod("intToString")
fun stringToInt(value: String): Int {
"stringToInt value=$value".logw()
return try {
Integer.parseInt(value)
} catch (e: Exception) {
-1
}
}
// 反方法
@JvmStatic
fun intToString(value: Int): String {
"intToString value=$value".logd()
return value.toString()
}
}
|
作用:
在一些特殊的业务场景中,可以大大简化我们的代码;数据源的数据需要进行转换后才能在 view 中展示,view 中展示的内容也需要经过转换才能绑定到对应的数据源上
案例 1:App 显示的订单类型和数据源的存储的类型不一致
在一些约车或者外卖等类型的 APP 中,都有订单类型这个字段,以约车 APP 为例,订单有立即单,预约单,接机单等其他订单类型,用户在提交订单后,在用户的订单列表或详情中是可以看到订单类型的,比如 “ 立即单 “,但是在服务端,存储立即单这个字段的时候,并不是直接存储 “ 立即单 “ 这几个字的,而是以字典表的形式来存储的,比如 “OT00001” 代表立即单,在开发中,我们肯定不能把 “OT00001” 展示到界面上给用户看吧,但是服务端给我们返回的 json 中就是 “OT00001”,所以我们在接收到 “OT00001” 时要把 “OT00001” 转换成 “ 立即单 “ 展示到界面上给用户看,这就是数据源中的数据需要经过转换才能在 view 中展示; 而如果用户修改了订单类型,然后提交到服务端去修改,我们肯定是以 “OT00001” 的形式提交到服务端的,但是用户在输入时却是以 “ 立即单 “ 的形式输入的,所以在提交服务端时,我们需要把 “ 立即单 “ 转换为 “OT00001” 再去提交到服务端,这就是 view 中展示的内容也需要经过转换才能绑定到对应的数据源上。
如果不使用 dataBinding,这些转换时机以及逻辑都要我们自己掌握,但是使用了 dataBinding 之后,这些操作都变得自动化,在你设置 “OT00001” 时,会自动转换为 “ 立即单 “ 在界面上展示,而当你输入 “ 立即单 “ 时,对应的实体类字段会自动变为 “OT00001”,这会大大节省我们的开发成本。
- 使用
@InverseMethod 定义转换方法
1
2
3
4
5
6
7
8
9
10
11
12
13
14
15
16
17
18
19
20
21
22
23
24
25
26
27
28
29
30
31
32
33
34
35
36
37
38
39
40
41
42
43
44
45
| public class InverseMethodDemo {
@InverseMethod("orderTypeToString")
public static String stringToOrderType(String value) {
if (value == null) {
return null;
}
switch (value) {
case "立即单":
return AppConstants.ORDER_TYPE_1;
case "预约单":
return AppConstants.ORDER_TYPE_2;
case "接机单":
return AppConstants.ORDER_TYPE_3;
case "送机单":
return AppConstants.ORDER_TYPE_4;
case "半日租单":
return AppConstants.ORDER_TYPE_5;
case "全日租单":
return AppConstants.ORDER_TYPE_6;
default:
return null;
}
}
public static String orderTypeToString(String code) {
if (code == null) {
return null;
}
switch (code) {
case AppConstants.ORDER_TYPE_1:
return "立即单";
case AppConstants.ORDER_TYPE_2:
return "预约单";
case AppConstants.ORDER_TYPE_3:
return "接机单";
case AppConstants.ORDER_TYPE_4:
return "送机单";
case AppConstants.ORDER_TYPE_5:
return "半日租单";
case AppConstants.ORDER_TYPE_6:
return "全日租单";
default:
return null;
}
}
}
|
- XML 中使用
1
2
3
4
5
6
7
8
9
10
11
12
13
14
15
16
17
18
19
20
21
22
| <?xml version="1.0" encoding="utf-8"?>
<layout xmlns:android="http://schemas.android.com/apk/res/android"
xmlns:app="http://schemas.android.com/apk/res-auto">
<data>
<import type="com.qiangxi.databindingdemo.databinding.method.InverseMethodDemo"/>
<variable
name="orderTypeCode"
type="String"/>
</data>
<LinearLayout
android:layout_width="match_parent"
android:layout_height="match_parent"
android:orientation="vertical">
<EditText
android:id="@+id/textView"
android:layout_width="match_parent"
android:layout_height="55dp"
android:gravity="center_horizontal"
android:text="@={InverseMethodDemo.orderTypeToString(orderTypeCode)}"/>
</LinearLayout>
</layout>
|
- 当使用
mBinding.setOrderTypeCode("OT00001") 时,EditText 中会自动展示 “ 立即单 “ - 当 EditText 中的内容修改为 “ 预约单 “ 时,orderTypeCode 字段值会自动变为 “OT00002”
注意
- 转换方法中要对参数进行判空,不然会引起空指针异常
- 记得使用双向绑定表达式,不然转换方法不起作用,双向绑定表达式的写法为
@={}
原理:当 EditText 中的内容修改为 “ 预约单 “ 时,orderTypeCode 字段值会自动变为 “OT00002”。这一步 dataBinding 是如何做到的?
1
2
3
4
5
6
7
8
9
10
11
12
13
14
15
16
17
18
19
20
21
22
23
24
25
26
27
28
29
30
| private androidx.databinding.InverseBindingListener tv3androidTextAttrChanged = new androidx.databinding.InverseBindingListener() {
@Override
public void onChange() {
// Inverse of InverseMethodDemo.orderTypeToString(ordercode.get())
// is ordercode.set((int) InverseMethodDemo.stringToOrderType(callbackArg_0))
java.lang.String callbackArg_0 = androidx.databinding.adapters.TextViewBindingAdapter.getTextString(tv3);
// localize variables for thread safety
// ordercode
androidx.databinding.ObservableInt ordercode = mOrdercode;
// ordercode != null
boolean ordercodeJavaLangObjectNull = false;
// ordercode.get()
int ordercodeGet = 0;
// InverseMethodDemo.orderTypeToString(ordercode.get())
java.lang.String inverseMethodDemoOrderTypeToStringOrdercode = null;
ordercodeJavaLangObjectNull = (ordercode) != (null);
if (ordercodeJavaLangObjectNull) {
// 第1次调用stringToOrderType(String)
me.hacket.assistant.samples.google.architecture.databinding.inverse.InverseMethodDemo.stringToOrderType(callbackArg_0);
// 第2次调用stringToOrderType(String)
ordercode.set(((int) (me.hacket.assistant.samples.google.architecture.databinding.inverse.InverseMethodDemo.stringToOrderType(callbackArg_0))));
}
}
};
// TextViewBindingAdapter.java
@InverseBindingAdapter(attribute = "android:text", event = "android:textAttrChanged")
public static String getTextString(TextView view) {
return view.getText().toString();
}
|
- 在
executeBindings() 中调用了 TextViewBindingAdapter.setTextWatcher,将 tv3androidTextAttrChanged(是一个InverseBindingListener) 传入了,这里会监听 EditText 的文本变化 - 当 EditText 的文本内容发生变化时,DataBinding 会调用
TextViewBindingAdapter 中的 getTextString() 方法获取当前输入框的文本内容 - 然后通过@InverseMethod 注解标记的转换方法
InverseMethodDemo.stringToOrderType("预约单"); 拿到对应的编码 “OT00002” - 为了让 orderTypeCode 字段值变为 “OT00002”,dataBinding 会调用
mBinding.setOrderTypeCode("OT00002") 真正的把 “OT00002” 赋值给 orderTypeCode 字段;这里 stringToOrderType(String) 会被调用 2 次
双向绑定总结
只要自定义双向绑定,都必须要有@BindingAdapter 注解的参与。
@InverseBindingMethod 与 @InverseBindingMethods + @BindingAdapter 可以实现双向绑定@InverseBindingAdapter + @BindingAdapter 也可以实现双向绑定@InverseMethod 是一个相对独立的注解,功能强大。
高级绑定
动态变量
有一些不可知的 binding 类。例如,RecyclerView.Adapter 可以用来处理不同布局,这样的话它就不知道应该使用哪一个 binding 类。而在 onBindViewHolder(VH, int) ) 的时候,binding 类必须被赋值。
在这种情况下,RecyclerView 的布局内置了一个 item 变量。 BindingHolder 有一个 getBinding 方法,返回一个 ViewDataBinding 基类
1
2
3
4
5
6
7
8
9
10
11
12
13
14
15
16
17
18
19
20
21
22
23
24
25
26
27
28
29
30
31
32
33
34
35
36
37
38
39
40
41
42
43
44
45
46
47
48
49
50
51
52
53
54
55
56
57
58
59
60
61
62
63
64
65
66
67
68
69
70
| public class RecyclerAdapter extends RecyclerView.Adapter<RecyclerAdapter.BindingHolder> {
private static final String ACTION_PRE = "hacket.databinding.action.";
private String[] mType = new String[]{
"Combine",
"NormalObject",
"Observer",
"ObserverField",
"ObserverCollection",
"ViewStub",
"Event",
"AttributeSetters",
"Converters",
"Demo",
"TwoWay"
};
private List<RecyclerItem> mRecyclerItemList = new ArrayList<>();
public RecyclerAdapter() {
mRecyclerItemList.clear();
for (String str : mType) {
RecyclerItem mRecyclerItem = new RecyclerItem(str, ACTION_PRE + str);
mRecyclerItemList.add(mRecyclerItem);
}
}
@Override
public BindingHolder onCreateViewHolder(ViewGroup parent, int viewType) {
DatabindingRecyclerItemBinding binding =
DataBindingUtil.inflate(LayoutInflater.from(parent.getContext()),
R.layout.databinding_recycler_item, parent, false);
Presenter presenter = new Presenter();
binding.setPresenter(presenter);
BindingHolder holder = new BindingHolder(binding.getRoot());
holder.setBinding(binding);
return holder;
}
@Override
public void onBindViewHolder(BindingHolder holder, int position) {
// 动态绑定变量
holder.getBinding().setVariable(BR.item, mRecyclerItemList.get(position));
holder.getBinding().executePendingBindings();
}
@Override
public int getItemCount() {
return mRecyclerItemList.size();
}
public class BindingHolder extends RecyclerView.ViewHolder {
private DatabindingRecyclerItemBinding binding;
public BindingHolder(View itemView) {
super(itemView);
}
public DatabindingRecyclerItemBinding getBinding() {
return binding;
}
public void setBinding(DatabindingRecyclerItemBinding binding) {
this.binding = binding;
}
}
}
|
executePendingBindings()
当你改变了数据以后 (在你设置了 Observable 观察器的情况下) 会马上刷新 ui,但是会在下一帧才会刷新 UI,存在一定的延迟时间。在这段时间内 hasPendingBindings() 会返回 true。如果想要同步 (或者说立刻) 刷新 UI 可以马上调用 executePendingBindings()。
后台线程
只要数据不是容器类,你可以直接在后台线程做数据变动。Data binding 会将变量/字段转为局部量,避免同步问题。
DataBinding 实战
自定义 View 的 setter/listener/单向绑定
setter 属性访问
- xml 中写的属性要和自定义 view 中的 setter 名称参数对应上;对应不上用
@BindingMethods 或 @BindingAdapter 来映射 - 如果要传递多个参数,用
@BindingAdapter 来定义多个参数
1
2
3
4
5
6
7
8
9
10
11
12
| @JvmStatic
@BindingAdapter(
value = ["listener","bindType", "bindValue", "availBindValue"],
requireAll = false
)
fun bind(
view: AccountBindView,
listener: AccountBindView.OnAccountBindClickListener?,
type: String, // 类型,NotificationSubscribeType.EMAIL
bindValue: ObservableField<String>,
availBindValue: ObservableField<String>,
)
|
@BindingAdapter 中的 value 可以定义多个参数,value 名不需要和 bind 方法的参数名一致,但是要保持顺序一致,不然对应不上;requireAll 表示所有的参数都必须,不传递的就是 null,要注意判空,避免 NPE- 如果参数是常量,也要用
@{} 包裹上,不然匹配不上,特别是 requireAll=true 的- 字符串:
app:bindType="@{email} - 数字:
app:bindType="@{1}"
@BindingAdapter 自定义的属性的基本类型可以用 ObservableField<T> 或 ObservableXXX- setter 是 String,可以用 String 或
ObservableField<String>
1
2
3
4
5
6
7
| @BindingAdapter(
value = ["bind2"],
requireAll = false
)
fun bind2(view: AccountBindView, bindText: String) {
view.setAccount(bindText)
}
|
在 xml 中可以使用:
1
2
3
4
5
6
7
8
9
10
11
12
13
14
15
16
| <me.hacket.assistant.samples.ui.customview.cases.multilangmultiline.AccountBindView
android:layout_width="match_parent"
android:layout_height="wrap_content"
android:layout_marginTop="@dimen/dk_dp_5"
android:background="@color/blue_400"
app:bind2="@{viewModel.account}" />
<me.hacket.assistant.samples.ui.customview.cases.multilangmultiline.AccountBindView
android:layout_width="match_parent"
android:layout_height="wrap_content"
android:layout_marginTop="@dimen/dk_dp_5"
android:background="@color/blue_400"
app:bind2="@{viewModel.account2}" />
var account = ObservableField<String>("ObservableField hacket")
var account2 = "hacket"
|
xml 中写 Listener
View 单个 Listener,单个方法的 Listener
1
2
3
4
5
6
7
8
9
10
11
12
13
14
15
16
17
18
19
20
21
22
23
24
25
26
27
28
29
30
| @JvmStatic
@BindingAdapter(
value = ["listener","bindType", "bindValue", "availBindValue"],
requireAll = false
)
fun bind(
view: AccountBindView,
listener: AccountBindView.OnAccountBindClickListener?,
type: String, // 类型,NotificationSubscribeType.EMAIL
bindValue: ObservableField<String>,
availBindValue: ObservableField<String>,
) {
if (bindValue.get().isNullOrEmpty() && availBindValue.get().isNullOrEmpty()) {
return
}
view.bind(type, bindValue, availBindValue)
view.setOnAccountBindClickListener(listener)
}
<me.hacket.assistant.samples.ui.customview.cases.multilangmultiline.AccountBindView
android:layout_width="match_parent"
android:layout_height="wrap_content"
android:layout_marginTop="@dimen/dk_dp_5"
android:background="@color/amber_50"
app:account_change="change"
app:account_label=""
app:account_name="shengfanzeng@gmail.com"
app:availBindValue="@{viewModel.availableValue}"
app:bindType="@{`email`}"
app:bindValue="@{viewModel.bindValue}"
app:listener="@{(v,type,subText)->viewModel.onChangedClick(v,type,subText)}" />
|
1
2
3
4
| fun onChangedClick(v: View, type: String, subText: String?) {
toast("onChangedClick")
"onChangedClick v=$v, type=$type, subText=$subText".logw()
}
|
View 单个 Listener,多个方法需要实现的 Listener
如果一个 Listener 中有多个需要实现的方法,上面 xml 写法会报错:Cannot assign callback expression to 'app:listener'
DataBinding 中 xml 的 Listener 只能用只有一个方法的接口,多个方法需要拆成多个接口
1
2
3
4
5
6
7
8
| interface OnAccountBindClickListener {
fun onAccountBindClick(
v: View,
type: String,
subscribeText: String?
)
fun onTextCopyed(v: View, text: String)
}
|
1
2
3
4
5
6
7
8
9
10
| interface OnBindClickListener {
fun onAccountBindClick(
v: View,
type: String,
subscribeText: String?
)
}
interface OnTextCopyedListener {
fun onTextCopyed(v: View, text: String)
}
|
1
2
3
4
5
6
7
8
9
10
11
12
13
14
15
16
17
18
19
20
21
22
23
24
25
26
27
28
29
30
| @BindingAdapter(
value = ["bindType", "bindValue", "availBindValue", "onBindClickListener", "onTextCopyedListener"],
requireAll = false
)
fun bind(
view: AccountBindView,
type: String, // 类型,NotificationSubscribeType.EMAIL
bindValue: ObservableField<String>,
availBindValue: ObservableField<String>,
onBindClickListener: OnBindClickListener?,
onTextCopyedListener: OnTextCopyedListener?,
) {
Log.i(
"account",
"bind type=$type, bindValue=${bindValue.get()}, availBindValue=${availBindValue.get()}, onBindClickListener=$onBindClickListener, onTextCopyedListener=${onTextCopyedListener}"
)
if (bindValue.get().isNullOrEmpty() && availBindValue.get().isNullOrEmpty()) {
return
}
view.bind(type, bindValue, availBindValue)
view.setOnAccountBindClickListener(object : AccountBindView.OnAccountBindClickListener {
override fun onAccountBindClick(v: View, type: String, subscribeText: String?) {
onBindClickListener?.onAccountBindClick(v, type, subscribeText)
}
override fun onTextCopyed(v: View, text: String) {
onTextCopyedListener?.onTextCopyed(v, text)
}
})
}
|
1
2
3
4
5
6
7
8
9
10
11
12
13
| <me.hacket.assistant.samples.ui.customview.cases.multilangmultiline.AccountBindView
android:layout_width="match_parent"
android:layout_height="wrap_content"
android:layout_marginTop="@dimen/dk_dp_5"
android:background="@color/amber_50"
app:account_change="change"
app:account_label=""
app:account_name="shengfanzeng@gmail.com"
app:availBindValue="@{viewModel.availableValue}"
app:bindType="@{`email`}"
app:bindValue="@{viewModel.bindValue}"
app:onBindClickListener="@{(v,type,subText)->viewModel.onChangedClick(v,type,subText)}"
app:onTextCopyedListener="@{(v,text)->viewModel.onTextCopyed(v,text)}" />
|
1
2
3
4
5
6
7
8
9
10
| class AccountViewModel : ViewModel() {
fun onChangedClick(v: View, type: String, subText: String?) {
toast("onChangedClick")
"onChangedClick v=$v, type=$type, subText=$subText".logw()
}
fun onTextCopyed(v: View, text: String) {
CompatUtil.copyToClipboard(text)
toast("onTextCopyed $text")
}
}
|
View 有多个 Listener
用 ListenerUtil.trackListener 把已经添加的 Listener 移除掉,具体可参考:TextViewBindingAdapter
1
2
3
4
5
6
7
8
9
10
11
12
13
14
15
16
17
18
19
20
21
22
23
24
25
26
27
28
29
30
31
32
33
34
35
36
37
38
39
40
41
42
| @BindingAdapter(value = {"android:beforeTextChanged", "android:onTextChanged",
"android:afterTextChanged", "android:textAttrChanged"}, requireAll = false)
publi void setTextWatcher(TextView view, final BeforeTextChanged before,
final OnTextChanged on, final AfterTextChanged after, final InverseBindingListener textAttrChanged) {
final TextWatcher newValue;
if (before == null && after == null && on == null && textAttrChanged == null) {
newValue = null;
} else {
newValue = new TextWatcher() {
@Override
public void beforeTextChanged(CharSequence s, int start, int count, int after) {
if (before != null) {
before.beforeTextChanged(s, start, count, after);
}
}
@Override
public void onTextChanged(CharSequence s, int start, int before, int count) {
if (on != null) {
on.onTextChanged(s, start, before, count);
}
if (textAttrChanged != null) {
textAttrChanged.onChange();
}
}
@Override
public void afterTextChanged(Editable s) {
if (after != null) {
after.afterTextChanged(s);
}
}
};
}
final TextWatcher oldValue = ListenerUtil.trackListener(view, newValue, R.id.textWatcher);
if (oldValue != null) {
view.removeTextChangedListener(oldValue);
}
if (newValue != null) {
view.addTextChangedListener(newValue);
}
}
|
双向绑定
遇到的问题
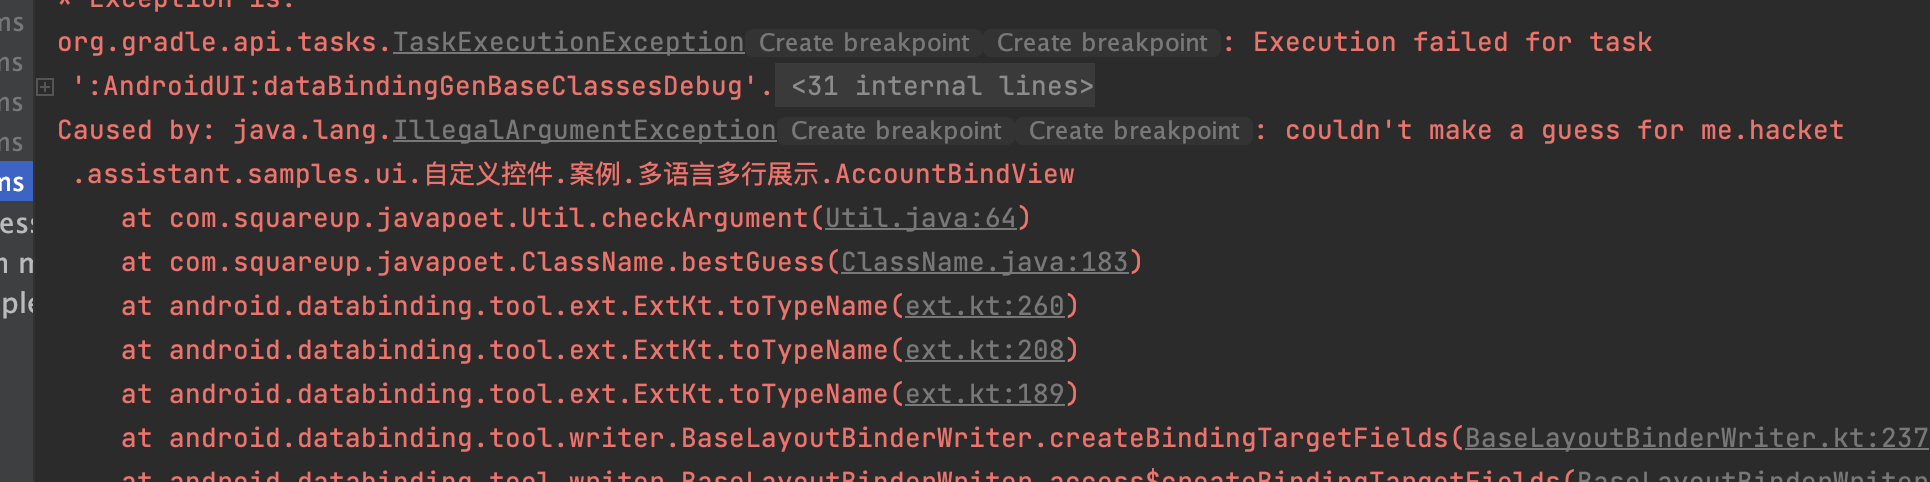
- 自定义 view 的路径有中文
- String 区分 java.lang.String 和 kotlin.String?
- XXXBinding on a null object reference
binding 的命名涉及到了关键字,如 field
1
2
3
4
5
| Caused by: java.lang.NullPointerException: Attempt to invoke virtual method 'void me.hacket.assistant.google.databinding.ActivityCustomViewTwoWayBinding.setData(androidx.databinding.ObservableInt)' on a null object reference
at me.hacket.assistant.samples.google.architecture.databinding.example.customviewtwoway.CustomViewTwoWayActivity.onCreate(CustomViewTwoWayActivity.kt:22)
at android.app.Activity.performCreate(Activity.java:8273)
at android.app.Activity.performCreate(Activity.java:8237)
at android.app.Instrumentation.callActivityOnCreate(Instrumentation.java:1341)
|
自定义 View 双向绑定
实现的效果
- 点击变更颜色为绿色的按钮后,两个 View 变更为绿色背景
- 点击下面方块后,变成蓝色

主要源码解释
@InverseBindingMethods
1
2
3
4
5
6
7
8
| @InverseBindingMethods({
@InverseBindingMethod(
type = ColorChangeView.class,
attribute = "color",
event = "colorAttrChanged", // 不是必须的,仅作标记用
method = "getColor" // 不是必须的,仅作标记用
)
})
|
从 attribute 获取 getter 时调用;默认就是 getXXX;event 用于当 View 的值发生改变时用来通知 dataBinding 值已经发生改变了,默认就是 xxxAttrChanged,需配合@BindingAdapter 使用
@InverseBindingAdapter
1
2
3
4
| @InverseBindingAdapter(attribute = "color", event = "colorAttrChanged")
public static int getColor(ColorChangeView view) {
return view.getColor();
}
|
@BindingAdapter
1
2
3
4
5
6
7
8
9
10
11
12
13
14
15
16
17
18
19
20
21
| @BindingAdapter(value = {"colorChangeListener", "colorAttrChanged"}, requireAll = false)
public static void setColorListener(
ColorChangeView view,
final ColorChangeListener listener,
final InverseBindingListener colorChange) {
ColorChangeListener newValue = (view1, color) -> {
if (listener != null) {
listener.onColorChange(view1, color);
}
if (colorChange != null) {
colorChange.onChange();
}
};
ColorChangeListener oldValue =
ListenerUtil.trackListener(view, newValue, view.getId());
if (oldValue != null) {
view.setOnColorChangeListener(null);
}
view.setOnColorChangeListener(newValue);
}
|
- 定义 Listener,当 View 的 color 变化时,通过 InverseBindingLister 告知 DataBinding 颜色已经变化了
完整源码
1
2
3
4
5
6
7
8
9
10
11
12
13
14
15
16
17
18
19
20
21
22
23
24
25
26
27
28
29
30
31
32
33
34
35
36
37
38
39
40
41
42
43
44
45
46
47
48
49
50
51
52
53
54
55
56
57
58
59
60
61
62
63
64
65
66
67
68
69
70
71
72
73
74
75
76
77
78
79
80
81
82
83
84
85
86
87
88
89
90
91
92
93
94
95
| @InverseBindingMethods({
@InverseBindingMethod(
type = ColorChangeView.class,
attribute = "color",
event = "colorAttrChanged", // 不是必须的,仅作标记用
method = "getColor" // 不是必须的,仅作标记用
)
})
public class ColorChangeView extends View {
private int mColor;
private ColorChangeListener mColorChangeListener;
public ColorChangeView(Context context) {
this(context, null);
}
public ColorChangeView(Context context, AttributeSet attrs) {
this(context, attrs, 0);
}
public ColorChangeView(Context context, AttributeSet attrs, int defStyleAttr) {
super(context, attrs, defStyleAttr);
}
public void setColor(int color) {
if (mColor != color) {
mColor = color;
setBackgroundColor(color);
if (mColorChangeListener != null) {
mColorChangeListener.onColorChange(this, color);
}
}
}
public int getColor() {
return mColor;
}
public void setOnColorChangeListener(ColorChangeListener listener) {
mColorChangeListener = listener;
}
@InverseBindingAdapter(attribute = "color", event = "colorAttrChanged")
public static int getColor(ColorChangeView view) {
return view.getColor();
}
@BindingAdapter("color")
public static void setColor(ColorChangeView view, int color) {
view.setColor(color);
// if (color != view.getColor()) {
// view.setColor(color);
// }
}
@BindingAdapter(value = {"colorChangeListener", "colorAttrChanged"}, requireAll = false)
public static void setColorListener(
ColorChangeView view,
final ColorChangeListener listener,
final InverseBindingListener colorChange) {
ColorChangeListener newValue = (view1, color) -> {
if (listener != null) {
listener.onColorChange(view1, color);
}
if (colorChange != null) {
colorChange.onChange();
}
};
ColorChangeListener oldValue =
ListenerUtil.trackListener(view, newValue, view.getId());
if (oldValue != null) {
view.setOnColorChangeListener(null);
}
view.setOnColorChangeListener(newValue);
}
}
// String和Color的互转
object ColorInverse {
@InverseMethod("colorToString")
@JvmStatic
@ColorInt
fun stringToColor(colorStr: String): Int {
return Color.parseColor(colorStr)
}
@JvmStatic
fun colorToString(@ColorInt color: Int): String {
return String.format("#%06X", 0xFFFFFF and color)
}
}
|
1
2
3
4
5
6
7
8
9
10
11
12
13
14
15
16
17
18
19
20
21
22
23
24
25
26
27
28
29
30
31
32
33
34
35
36
37
38
39
40
41
42
43
44
45
46
47
48
49
50
| <layout xmlns:android="http://schemas.android.com/apk/res/android"
xmlns:app="http://schemas.android.com/apk/res-auto">
<data>
<import type="androidx.databinding.ObservableField" />
<import type="me.hacket.assistant.samples.google.architecture.databinding.twoway.custom.ColorInverse" />
<variable
name="color"
type="ObservableField<String>" />
</data>
<LinearLayout
android:layout_width="match_parent"
android:layout_height="match_parent"
android:orientation="vertical">
<Button
android:id="@+id/btn_change_color"
android:layout_width="wrap_content"
android:layout_height="wrap_content"
android:text="更改颜色为绿色" />
<TextView
android:id="@+id/tv_info"
android:layout_width="wrap_content"
android:layout_height="wrap_content"
android:layout_marginTop="10dp"
android:layout_marginBottom="10dp" />
<TextView
android:id="@+id/tv_text"
android:layout_width="match_parent"
android:layout_height="50dp"
android:background="@{ColorInverse.stringToColor(color)}"
android:text="这是测试的TextView" />
<me.hacket.assistant.samples.google.architecture.databinding.twoway.custom.ColorChangeView
android:id="@+id/two_way_view"
android:layout_width="100dp"
android:layout_height="100dp"
android:layout_margin="@dimen/dp_10"
app:color="@={ColorInverse.stringToColor(color)}" />
</LinearLayout>
</layout>
|
1
2
3
4
5
6
7
8
9
10
11
12
13
14
15
16
17
18
19
20
21
22
23
24
25
26
27
28
29
30
31
32
| class ColorChangeTwoWayActivity : AppCompatActivity() {
override fun onCreate(savedInstanceState: Bundle?) {
super.onCreate(savedInstanceState)
val observableField = ObservableField<String>("#FF0000")
val binding = DataBindingUtil.setContentView<ActivityColorChangeTwoWayBinding>(
this,
R.layout.activity_color_change_two_way
)
binding.color = observableField
binding.btnChangeColor.setOnClickListener {
observableField.set("#00FF00")
}
binding.twoWayView.setOnClickListener {
binding.twoWayView.color = Color.BLUE
}
observableField.addOnPropertyChangedCallback(object :
androidx.databinding.Observable.OnPropertyChangedCallback() {
override fun onPropertyChanged(
sender: androidx.databinding.Observable?,
propertyId: Int
) {
val of = sender as ObservableField<String>
binding.tvInfo.text = "onPropertyChanged: ${of.get()}"
}
})
}
}
|
双向绑定 View 实战 2
判断一个 View 是否需要双向绑定?
就看这个 View 更新 UI 时,数据源是否需要变更
完整代码
1
2
3
4
5
6
7
8
9
10
11
12
13
14
15
16
17
18
19
20
21
22
23
24
25
26
27
28
29
30
31
32
33
34
35
36
37
38
39
40
41
42
43
44
45
46
47
| class MyView(context: Context, attr: AttributeSet) : View(context, attr) {
var number = 0
set(value) {
field = value
invalidate()
}
private val onNumberChangeListenerList = ArrayList<OnNumberChangeListener>()
private val paint = Paint()
init {
setOnClickListener {
number++
invalidate()
for (item in onNumberChangeListenerList) {
Log.i("hacket", "MyView onChange number=$number")
item.onChange(number)
}
}
}
@SuppressLint("DrawAllocation")
override fun onDraw(canvas: Canvas?) {
super.onDraw(canvas)
canvas!!
paint.color = Color.RED
canvas.drawRect(Rect(0, 0, width, height), paint)
paint.color = Color.YELLOW
paint.textSize = resources.displayMetrics.density * 20
canvas.drawText(number.toString(), width / 2f, height / 2f, paint)
}
fun addOnNumberChangeListener(listener: OnNumberChangeListener) {
onNumberChangeListenerList.add(listener)
}
fun removeOnNumberChangeListener(listener: OnNumberChangeListener) {
onNumberChangeListenerList.remove(listener)
}
interface OnNumberChangeListener {
fun onChange(number: Int)
}
}
|
1
2
3
4
5
6
7
8
9
10
11
12
13
14
15
16
17
18
19
20
21
22
23
24
25
26
27
28
29
30
31
32
33
34
35
36
37
38
39
40
41
42
43
44
45
| object TwoWayBind {
/**
* 用于把数据设置到View上,这里还需要添加判断数据是否重复,重复了就return,不然有概率会死循环
*/
@JvmStatic
@BindingAdapter("number")
fun setNumber(view: MyView, number: Int) {
if (view.number == number) {
return
}
"BindingAdapter setNumber=$number".logi()
view.number = number
}
/**
* 用于给框架提供数据,也就是要返回用于数据双向绑定的值。
*/
@JvmStatic
@InverseBindingAdapter(attribute = "number")
fun getNumber(view: MyView): Int {
"BindingAdapter getNumber=${view.number}".logi()
return view.number
}
/**
* 用于给框架设置数据变化监听,当监听到变化时,框架就会调用getNumber()来获取数据并应用到ViewMode上。
* (方法内部调用了一个ListenerUtil.trackListener()方法,这是官方的推荐的写法,用于监听器类型是集合的情况下,如果是set/get之类的那就直接set新的监听器即可。)
*/
@BindingAdapter("numberAttrChanged")
@JvmStatic
fun setNumberListener(view: MyView, listener: InverseBindingListener?) {
val newListener = object : MyView.OnNumberChangeListener {
override fun onChange(number: Int) {
"TwoWayBind onChange=$number".logw()
listener?.onChange()
}
}
val oldListener = ListenerUtil.trackListener(view, newListener, R.id.onNumberChangeListener) // <item name="onNumberChangeListener" type="id" />
oldListener?.apply {
view.removeOnNumberChangeListener(this)
}
view.addOnNumberChangeListener(newListener)
}
}
|
效果:

- 第一个方块写死了数字
- 第二个方块是单向绑定,所以点击 view 更新 ui 时,数据源并没有改变
- 第三个方块是双向绑定,所以当点击 view 更新 UI 时,数据源也跟着变了,对应的第二个方块也跟着变了