AndroidX KTX
core-ktx 模块
https://android.github.io/android-ktx/core-ktx/index.html
Core KTX 模块为属于 Android 框架的通用库提供扩展程序。要使用它,先需要引入下面的依赖:
1
| implementation("androidx.core:core-ktx:1.10.1")
|
Core KTX 模块内也包含了很多类和方法,主要分为:animation、 content、database、graphics、net、os、 text、transition、 util、view 等等。
view
View 是我们在 Android 中最常用的控件了。在 Core KTX 模块中就提供了很多对应的扩展方法。常用的扩展方法如下所示:
1
2
3
4
5
6
7
8
9
10
11
12
13
14
15
16
17
18
19
20
21
22
23
24
25
26
27
28
29
30
31
32
33
34
| // view 转 bitmap
view.drawToBitmap()
// 监听View的 OnAttach 事件,内部调用 addOnAttachStateChangeListener
// 方法,调用一次后就会移除监听
view.doOnAttach { }
// 监听View的 OnDetach 事件,只调用一次
view.doOnDetach { }
// 监听View的Layout事件,只调用一次
view.doOnLayout { }
// 同 doOnLayout 的作用。区别是如果View之前已经Layout了,doOnLayout会立即调用
// 而 doOnNextLayout 会等下一次Layout
view.doOnNextLayout { }
// 在 Draw 方法之前执行对应代码块,只执行一次
view.doOnPreDraw { }
// 对于TextView,core-ktx还提供了对应监听text变化的扩展方法
textView.doBeforeTextChanged { text, start, count, after -> }
textView.doOnTextChanged { text, start, before, count -> }
textView.doAfterTextChanged { }
textView.addTextChangedListener { }
// 更新View的可见性
view.isVisible = false
view.isInvisible = false
view.isGone = false
// 更新间距
view.updatePadding(left = 0, top = 0, right = 0, bottom = 0)
view.updateLayoutParams<LinearLayout.LayoutParams> {
width = 0
height = 0
gravity = Gravity.CENTER_HORIZONTAL
}
|
ViewGroupKt
1
2
3
4
5
6
7
8
9
10
11
12
13
14
15
| val group = LinearLayout(this)
val childView = TextView(this)
group.contains(childView)
group.forEach { }
group.forEachIndexed { index, view -> }
group.get(1)
group.isEmpty()
group.isNotEmpty()
val iterator = group.iterator()
group.plusAssign(childView) //添加View,相当于 addView
group.minusAssign(childView) //删除View,相当于 removeView
val marginLayoutParams = group.layoutParams as MarginLayoutParams
marginLayoutParams.setMargins(10, 5, 10, 5)
marginLayoutParams.updateMargins(20, 0, 20, 0) //left、right
marginLayoutParams.updateMarginsRelative(30, 10, 30, 10) //start、end
|
ViewKt
1
2
3
4
5
6
7
8
9
10
11
12
13
14
15
16
17
18
19
20
21
22
23
24
25
26
27
28
29
30
| val view = View(this)
view.doOnAttach {
}
view.doOnDetach {
}
view.doOnLayout {
}
view.doOnNextLayout {
}
view.doOnPreDraw {
}
view.setPadding(10,5,10,5)
val bitmap = view.drawToBitmap()
view.postDelayed(1000L) { //回调放在最后
}
view.postOnAnimationDelayed(1000L){
}
view.updateLayoutParams<MarginLayoutParams> {
this.marginStart = 20
this.width = 200
}
view.updatePadding(20,10,20,10) //left、right
view.updatePaddingRelative(30,5,30,5) //start、end
|
TextViewKt
TextView 监听便捷设置:
1
2
3
| textView.addTextChangedListener(onTextChanged = { text, start, before, count ->
Log.i(TAG,"onTextChanged:$text")
})
|
还可以直接注册其某一个方法
1
2
3
4
5
6
7
8
9
| textView.doBeforeTextChanged { text, start, count, after ->
Log.i(TAG, "onBeforeTextChanged:$text")
}
textView.doOnTextChanged { text, start, before, count ->
Log.i(TAG, "onTextChange:$text")
}
textView.doAfterTextChanged {
Log.i(TAG, "onAfterTextChanged")
}
|
graphics
在 graphics 模块中最常用的是 Bitmap、Drawable 以及 Canvas。它们的常用扩展方法如下所示:
1
2
3
4
5
6
7
8
9
10
11
12
13
14
15
16
17
18
19
20
21
22
23
24
| // Bitmap 与 Drawable 之间的相互转换
bitmap.toDrawable(resources)
drawable.toBitmap()
// 提供Canvas来绘制Bitmap的扩展方法
bitmap.applyCanvas {
drawColor(resources.getColor(R.color.purple_200))
}
// 使用Canvas绘制是,无需再调用 save 和 restoreToCount,内部
// 会帮你实现
canvas.withSave { }
// 和 withSave 类似,不同的是它先会执行了旋转操作
canvas.withRotation(degrees = 90f) { }
// 和 withSave 类似,不同的是它先会执行了裁剪操作
canvas.withClip(0, 0, 0, 0) { }
// 和 withSave 类似,不同的是它先会设置Matrix
canvas.withMatrix { }
// 和 withSave 类似,不同的是它先会执行了缩放操作
canvas.withScale { }
// 和 withSave 类似,不同的是它先会执行了偏转操作
canvas.withSkew { }
// 和 withSave 类似,不同的是它先会执行了位移作
canvas.withTranslation { }
|
bitmap
1
| val drawable = bitmap.toDrawable(resources)
|
1
2
3
4
5
6
7
8
9
10
11
| val bitmap = createBitmap(…).applyCanvas {
drawText(…)
drawLine(…)
drawRect(…)
}
val scaleBitmap = bitmap.scale(1280, 720) //创建缩放后的Bitmap
bitmap.contains(point)
bitmap.contains(pointF)
bitmap.get(10, 20) //获取指定位置的像素值
val color = resources.getColor(R.color.black)
bitmap.set(30, 50, color) //设置指定位置的像素颜色
|
drawable
1
| val drawable = color.toDrawable()
|
1
| val drawable = R.color.black.toDrawable()
|
1
2
| val bitmap = drawable.toBitmap() //不为空
val bitmap = drawable.toBitmapOrNull() //可为空
|
updateBounds 设置这个可绘制对象的边界
1
2
| drawable.setBounds(100, 50, 150, 200) //原方法
drawable.updateBounds(100,50,150,200) //使用Ktx
|
Icon
将 Bitmap、Uri、ByteArray 转化为 Icon:
1
2
3
4
| Bitmap.toAdaptiveIcon(): Icon
Bitmap.toIcon(): Icon
Uri.toIcon(): Icon
ByteArray.toIcon(): Icon
|
Canvas
Canvas.withClip 使用闭包,无需自己再 save() -> clip() 后,重置画布 restoreToCoun()
1
2
3
4
5
| val rect = RectF(100F, 50F, 200F, 150F)
canvas?.withClip(rect) {
this.drawArc()
this.drawText()
}
|
其他也是类似的
1
2
3
4
5
6
7
8
9
10
11
12
13
14
15
16
17
18
| canvas?.withScale {
}
canvas?.withRotation {
}
canvas?.withSave {
}
canvas?.withMatrix {
}
canvas?.withSkew{
}
canvas?.withTranslation{
}
|
ColorKt
1
2
3
4
5
6
7
| val color = R.color.teal_700
val alphaInt = color.component1() //相当于Color.alpha(),获取color的透明度
val redInt = color.component2() //相当于Color.red(),获取color的red值
val greenInt = color.component3() //Color.green(),获取color的green值
val blueInt = color.component4() //Color.blue(),获取color的blue值
val (alphaInt, redInt, greenInt, blueInt) = color //解构color,解构为透明度、red值,green值,blue值
|
Image
1
2
3
4
5
6
7
8
9
10
11
12
13
14
15
16
17
| // 利用Android9.0新增的ImageDecoder读取图片
val source: ImageDecoder.Source = ImageDecoder.createSource(contentResolver, imageUri)
// 从数据源解码得到图形信息
//原本的方式
val drawable: Drawable =
ImageDecoder.decodeDrawable(source, object : ImageDecoder.OnHeaderDecodedListener {
override fun onHeaderDecoded(
decoder: ImageDecoder,
info: ImageDecoder.ImageInfo,
source: ImageDecoder.Source
) {
}
})
//Ktx的方式
val drawable: Drawable = source.decodeDrawable { info, source -> }
ivPhoto.setImageDrawable(drawable) // 设置图像视图的图形对象
|
MatrixKt
Matrix 的便捷操作
1
2
3
4
5
6
| val rotationMatrix = rotationMatrix(…) //创建Matrix,并进行rotation操作
val scaleMatrix = scaleMatrix(…) //创建创建Matrix,并进行scale操作
val translationMatrix = translationMatrix(…) //创建创建Matrix,并进行translation操作
val newMatrix = rotationMatrix.times(scaleMatrix) //用这个矩阵乘以另一个矩阵并返回结果作为一个新矩阵
val matrixFloatArray = newMatrix.values() //获取矩阵的9个值,以长度为9的FloatArray数组表示
|
PathKt
Path 的便捷操作
1
2
3
4
5
6
7
8
| val path1 = Path()
val path2 = Path()
val path3 = path1 + path2
val path4 = path1 - path2
val path5 = path1 or path2
val path6 = path1 xor path2
val path7 = path1 and path2
val flatten = path1.flatten(0.5F)
|
PointKt
Point 的便捷操作
1
2
3
4
5
6
7
8
9
10
| val point1 = Point()
val point2 = Point()
val point3 = point1 + point2
val point4 = point1 - point2
val pointF = point1.toPointF()
val point5 = pointF.toPoint()
val point6 = -point1 //unaryMinus
val x = point1.component1() //获取point1.X
val y = point1.component2() //获取point1.Y
val (x2, y2) = point2 //解构,获取X和Y
|
PorterDuff.Mode
图层混合模式 PorterDuff.Mode 便捷操作
1
2
| val colorFilter = PorterDuff.Mode.SRC.toColorFilter(color)
val xferMode = PorterDuff.Mode.SRC.toXfermode()
|
RectKt
Rect 的便捷操作
1
2
3
4
5
6
7
8
9
10
11
12
13
14
15
| val rect1 = Rect()
val rect2 = Rect()
val rect3 = rect1 + rect2
val rect4 = rect1 - rect2
val rect5 = rect1 or rect2
val rect6 = rect1 xor rect2
val rect7 = rect1 and rect2
val contains = rect1.contains(rect2)
val rectF = rect1.toRectF()
val rect8 = rectF.toRect()
rect1.times(65) //等比例返回新Rect
rectF.times(0.12F)
val region99 = rect1.toRegion()
//rectF.transform(matrix) //根据matrix变化为新的RectF
val (left, top, right, bottom) = rect1 //解构,将rect拆分为left, top, right, bottom
|
RegionKt
Region 的便捷操作
1
2
3
4
5
6
7
8
9
10
11
12
| val region1 = Region()
val region2 = Region()
val region3 = region1 + region2
val region4 = region1 - region2
val region5 = region1 or region2
val region6 = region1 xor region2
val region7 = region1 and region2
val region8 = -region1 //unaryMinus
val region9 = !region1 //非运算
val iterator = region1.iterator()
region1.forEach { }
region1.contains(point1)
|
Shader
着色器
transform : 包装代码块之 Shader.getLocalMatrix 和 Shader.setLocalMatrix 之间
1
2
3
4
| val shader = Shader()
shader.transform {
this.setSkew() //this : Matrix
}
|
看下其内部实现
1
2
3
4
5
6
| public inline fun Shader.transform(block: Matrix.() -> Unit) {
val matrix = Matrix()
getLocalMatrix(matrix)
block(matrix)
setLocalMatrix(matrix)
}
|
animation
Android 的动画本身也有很多 Listener,对此 Android 的 core-ktx 也做了很多的扩展,代码如下所示:
1
2
3
4
5
6
7
8
| animator.doOnStart { }
animator.doOnPause { }
animator.doOnResume { }
animator.doOnEnd { }
animator.doOnRepeat { }
animator.doOnCancel { }
animator.addListener { }
animator.addPauseListener { }
|
Animator.addListener 简化
平时我们注册 Animator 监听的时候,需要去实现其每一个方法:
1
2
3
4
5
6
7
8
9
10
11
12
13
14
15
16
17
| animator.addListener(object : Animator.AnimatorListener{
override fun onAnimationStart(animation: Animator?) {
Log.i(TAG,"onAnimationStart")
}
override fun onAnimationEnd(animation: Animator?) {
Log.i(TAG,"onAnimationEnd")
}
override fun onAnimationCancel(animation: Animator?) {
Log.i(TAG,"onAnimationCancel")
}
override fun onAnimationRepeat(animation: Animator?) {
Log.i(TAG,"onAnimationRepeat")
}
})
|
而使用 KTX 我们可以只实现自己所需要的方法:
1
2
3
4
| val animator = ValueAnimator.ofInt(0, 100)
animator.addListener(onStart = {
Log.i(TAG,"onStart")
})
|
content
content.res
TypedArray:TypedArrayKt 定义了很多 getXXXXOrThrow 的扩展方法,我们看其内部代码,可以看到主要是在获取自定义属性之前,先去检查下这个属性是否存在,如果不存在,那就抛出异常。
我们以 getBooleanOrThrow 为例:
1
2
3
| val ta: TypedArray = context.obtainStyledAttributes(attrs, R.styleable.Topbar)
ta.getBooleanOrThrow()
ta.recycle()
|
来看下它源码:
1
2
3
4
5
6
7
8
9
10
| public fun TypedArray.getBooleanOrThrow(@StyleableRes index: Int): Boolean {
checkAttribute(index)
return getBoolean(index, false)
}
private fun TypedArray.checkAttribute(@StyleableRes index: Int) {
if (!hasValue(index)) {
throw IllegalArgumentException("Attribute not defined in set.")
}
}
|
可以看到,其获取自定义属性之前,都会先去调用 hasValue 判断该属性是否存在。
content
contentValuesOf
contentValuesOf 用于将若干个 Pair 转化为 ContentValues:
1
2
3
4
5
6
| val pair = Pair("key", true)
val pair2 = Pair("key2", "hello")
val contentValues = contentValuesOf(pair,pair2)
val result = contentValues.getAsBoolean("key")
val result2 = contentValues.getAsString("key2")
Log.i(TAG, "result:$result result2:$result2") //打印结果为result:true result2:heelo
|
ContentValues 和 Hash Table 都是一种存储的机制。两者的区别在于:
- contentValues 只能存储基本类型的数据,String,int 之类的,不能存储对象
- 而 Hash Table 却可以存储对象。
把数据插入数据库中时,首先要有一个 ContentValues 的对象:
ContentValues contentValues = new ContentValues();
contentValues.put(key,values);
SQLiteDataBase sdb;
sdb.insert(database_name,null,initialValues);
成功插入则返回记录的 id,否则返回 -1。
ContextKt
Context.getSystemService()
可以不用再传入 String,直接根据泛型返回 Service,比如我们这里获取 WindowManager
原本需要这样获取
1
2
3
4
| val windowManager1 : WindowManager = getSystemService(Context.WINDOW_SERVICE) as WindowManager
// 替换
val windowManager = getSystemService<WindowManager>()
|
Context.withStyledAttributes
自定义 View 中获取自定义属性,原本要这么写:
1
2
3
| val ta = context.obtainStyledAttributes(attrs, R.styleable.MyView)
val color = ta.getColor(R.styleable.MyView_titleTextColor, defColor)
ta.recycle()
|
现在可以这样写:
1
2
3
| context.withStyledAttributes(attrs, R.styleable.MyView, defStyleAttr, defStyleAttr) {
val color = ta.getColor(R.styleable.MyView_titleTextColor,defColor)
}
|
SharedPreferencesKt
更简单的使用 SharedPreferences
1
2
| val sharedPreferences = application.getSharedPreferences("sp", MODE_PRIVATE)
sharedPreferences.edit { putBoolean("key", value) }
|
net
net 模块比较简单,只提供了 Uri、file、String 之间的转化的扩展方法。代码如下:
1
2
3
| String.toUri() // 字符串转化为Uri
file.toUri() // 文件转化为 Uri
uri.toFile() // Uri转化为文件
|
os
Bundlekt
os 模块下有很多的扩展方法,但就 bundleOf 这一个扩展方法我觉得很有用。我们可以使用它往 Bundle 添加各种的 value 对象。
Pair 转 Bundle
1
2
3
4
5
6
7
8
| bundleOf(
"key1" to 123,
"key2" to "123",
"key3" to true,
"key4" to 'k',
"key5" to emptyList<String>(),
"key6" to Bundle(),
)
|
TraceKt
systrace 性能优化 : 结合 Android 内核的数据,生成 Html 报告
将代码块包装在 TraceCompat.beginSection(sectionName) 和 TraceCompat.endSection() 之间
1
2
3
| trace("sectionName") {
//真正执行的代码,会统计这部分代码的执行时间等
}
|
SpannableStringBuilder
便捷地创建富文本
1
2
3
4
5
6
7
8
9
10
11
12
13
14
15
16
17
18
19
20
21
22
23
24
25
26
27
28
29
| val spannedString = buildSpannedString {
bold {
}
color(color) {
}
underline {
}
backgroundColor(color) {
}
italic {
}
scale(1.5F) {
}
strikeThrough { //删除线
}
subscript{ //下标
}
superscript{ //上标
}
}
|
text
1
2
3
4
5
6
7
8
9
10
11
12
13
14
15
16
17
| //是否只包含数字,相当于 TextUtils.isDigitsOnly
String.isDigitsOnly()
//获取字符串去除头尾空格之后的长度,相当于 TextUtils.getTrimmedLength
String.trimmedLength()
// 便携地创建富文本
val spannedString = buildSpannedString {
bold {} // 加粗
color(color) {} // 颜色
underline {} // 下划线
backgroundColor(color) {} //背景颜色
italic {} // 斜体
scale(1.5F) {} // 缩放
strikeThrough {} //删除线
subscript{} //下标
superscript{} //上标
}
|
Fragment ktx
引入依赖:
1
2
3
| dependencies {
implementation("androidx.fragment:fragment-ktx:1.6.2")
}
|
Fragment 常用的扩展方法如下:
1
2
3
4
5
6
7
8
9
10
11
12
13
14
15
16
17
18
19
20
21
22
23
24
25
| // 通过 commit 方法来简化 commit 操作
fragmentManager().commit {
addToBackStack("...")
setCustomAnimations(
R.anim.enter_anim,
R.anim.exit_anim)
add(fragment, "...")
}
// 通过 commitNow 方法来简化 commitNow 操作
fragmentManager().commitNow {
addToBackStack("...")
setCustomAnimations(
R.anim.enter_anim,
R.anim.exit_anim)
add(fragment, "...")
}
// 通过kotlin委托的方式,获取当前Fragment下的 viewModel
val viewModel by viewModels<MyViewModel>()
// 通过kotlin委托的方式,获取activity下的 viewModel,同一个activity下的不同Fragment
// 可以共享同一个viewModel
val viewModel by activityViewModels<MyViewModel>()
|
Lifecycle KTX
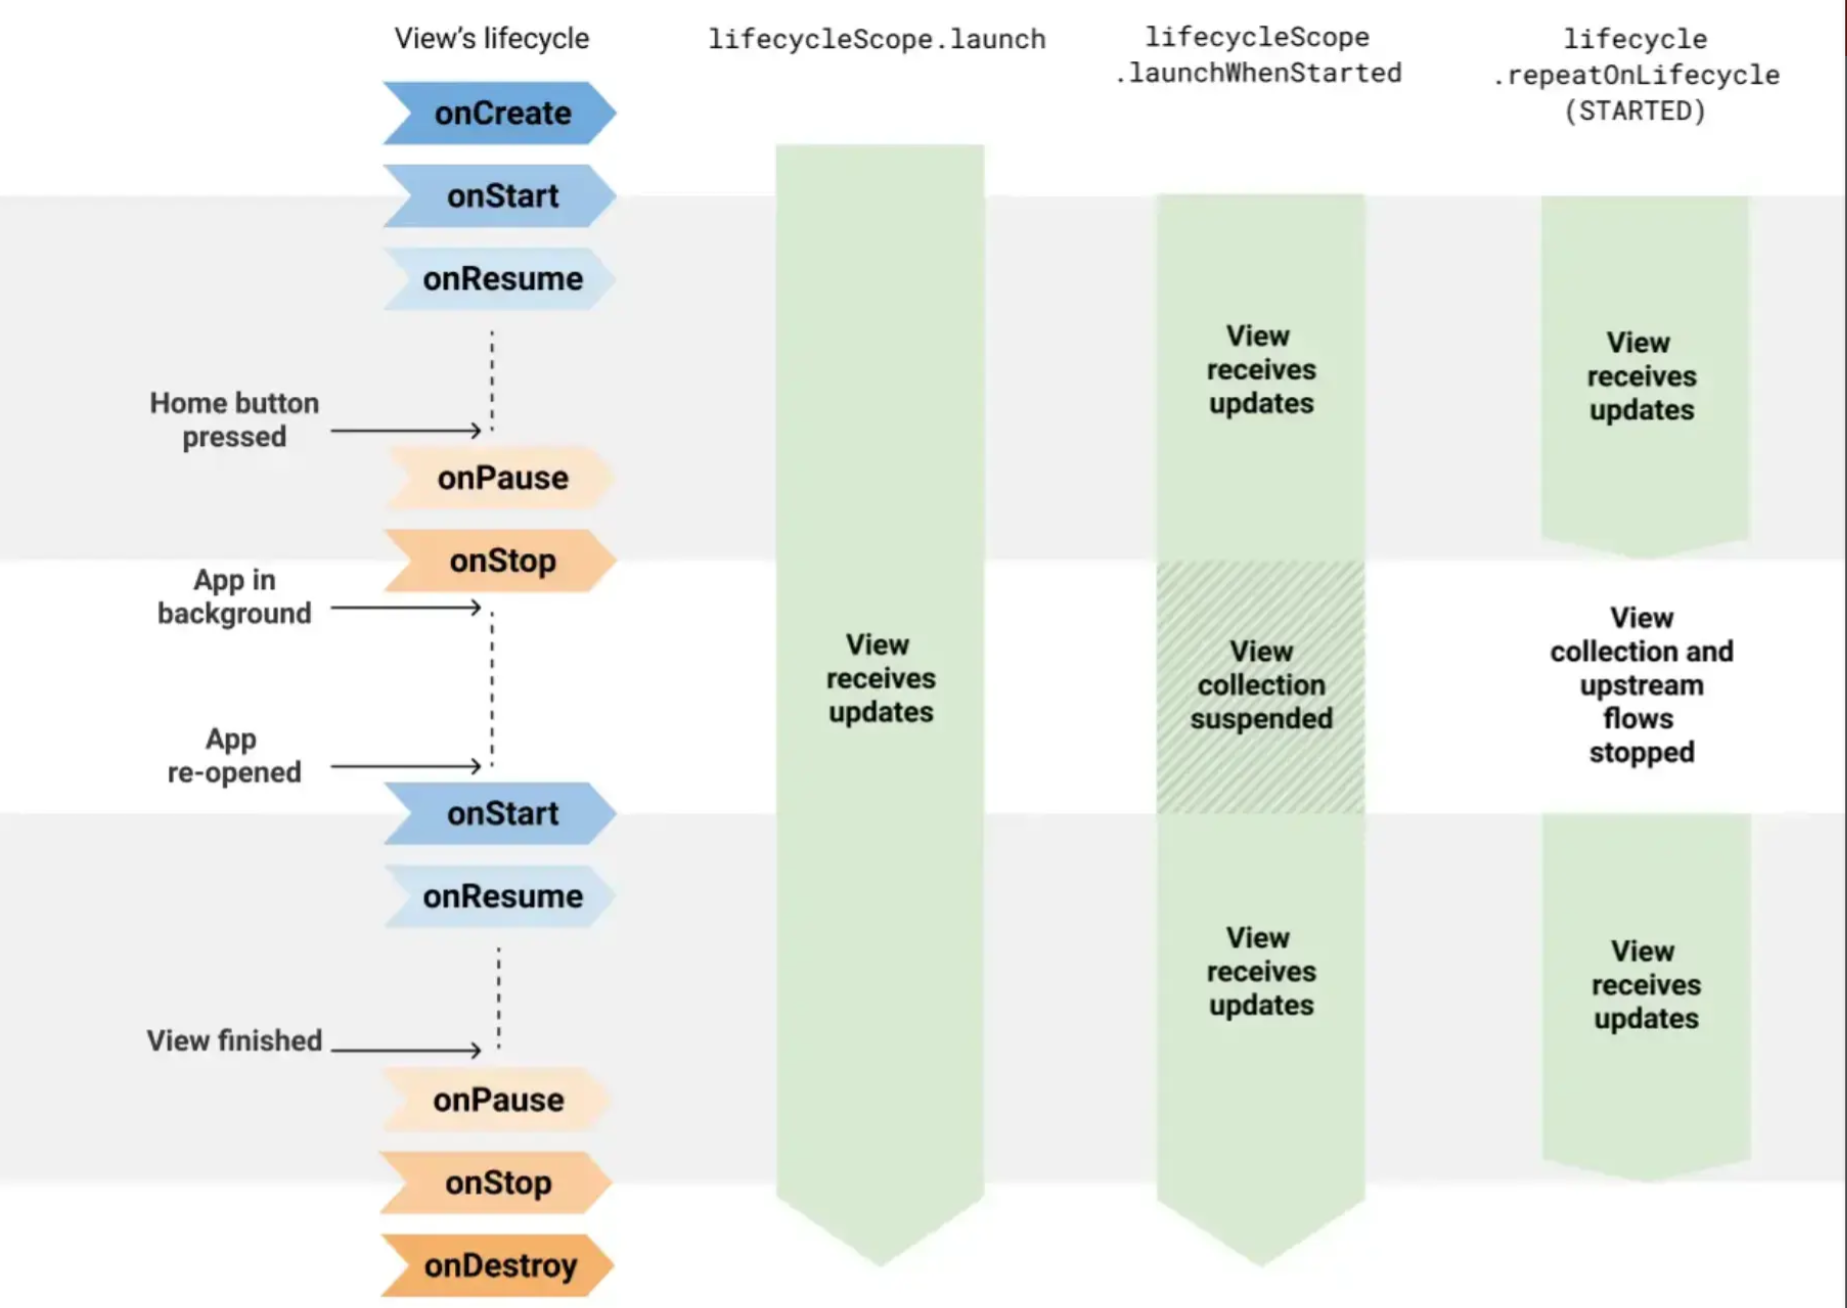
Lifecycle KTX 是 Google 提供的一种在指定的生命周期更方便地执行代码的方式。通过它的 API,我们就可以通过简单的方式来实现复杂的操作。其中最重要的是 lifecycleScope,它是 Lifecycle KTX 提供的监听 Lifecycle 的协程 Scope。通过它启动的协程会在生命周期进入 DESTROY 时取消通过它启动的协程任务。
上图是 launchWhenStarted 和 repeatOnLifecycle 比较优势图。
可以看到:
- launchWhenStarted 可以指定在
onStart 的生命周期执行协程协程代码,并在生命周期状态低于指定状态时挂起就会挂起协程。类似的方法还有 launchWhenCreated、launchWhenResumed。 - repeatOnLifecycle(Lifecycle.State.STARTED) 则会在指定
onStart 的生命周期执行协程协程代码,生命周期状态低于指定状态时就会取消协程的执行。然后在 onStart 时重新开始执行。 - withStarted 与 launchWhenStarted 类似,区别是 withStarted 需要在
lifecycleScope.launch 中使用,其执行代码块不能使用挂起函数。
1
2
3
4
5
6
7
8
9
10
11
12
13
| lifecycleScope.launch {
lifecycle.repeatOnLifecycle(Lifecycle.State.STARTED) {
//可以使用挂起函数
delay(1000)
}
lifecycle.withStarted {
//不可以使用挂起函数
}
}
lifecycleScope.launchWhenStarted {
//可以使用挂起函数
delay(1000)
}
|
ViewModel ktx
与 lifecycleScope 类似,ViewModel 也有一个 viewModelScope,它们的作用类似。viewModelScope 启动的协程会在 ViewModel 清除(onCleared)后自动取消。
LiveData ktx
添加依赖:
1
2
3
| dependencies {
implementation("androidx.lifecycle:lifecycle-livedata-ktx:2.8.1")
}
|
LiveData ktx 主要提供了 liveData 来与协程一起使用,代码示例如下:
1
2
3
4
| val user: LiveData<User> = liveData {
val data = database.loadUser() // loadUser is a suspend function.
emit(data)
}
|