Android Studio
Android Studio 基本设置
Version Control
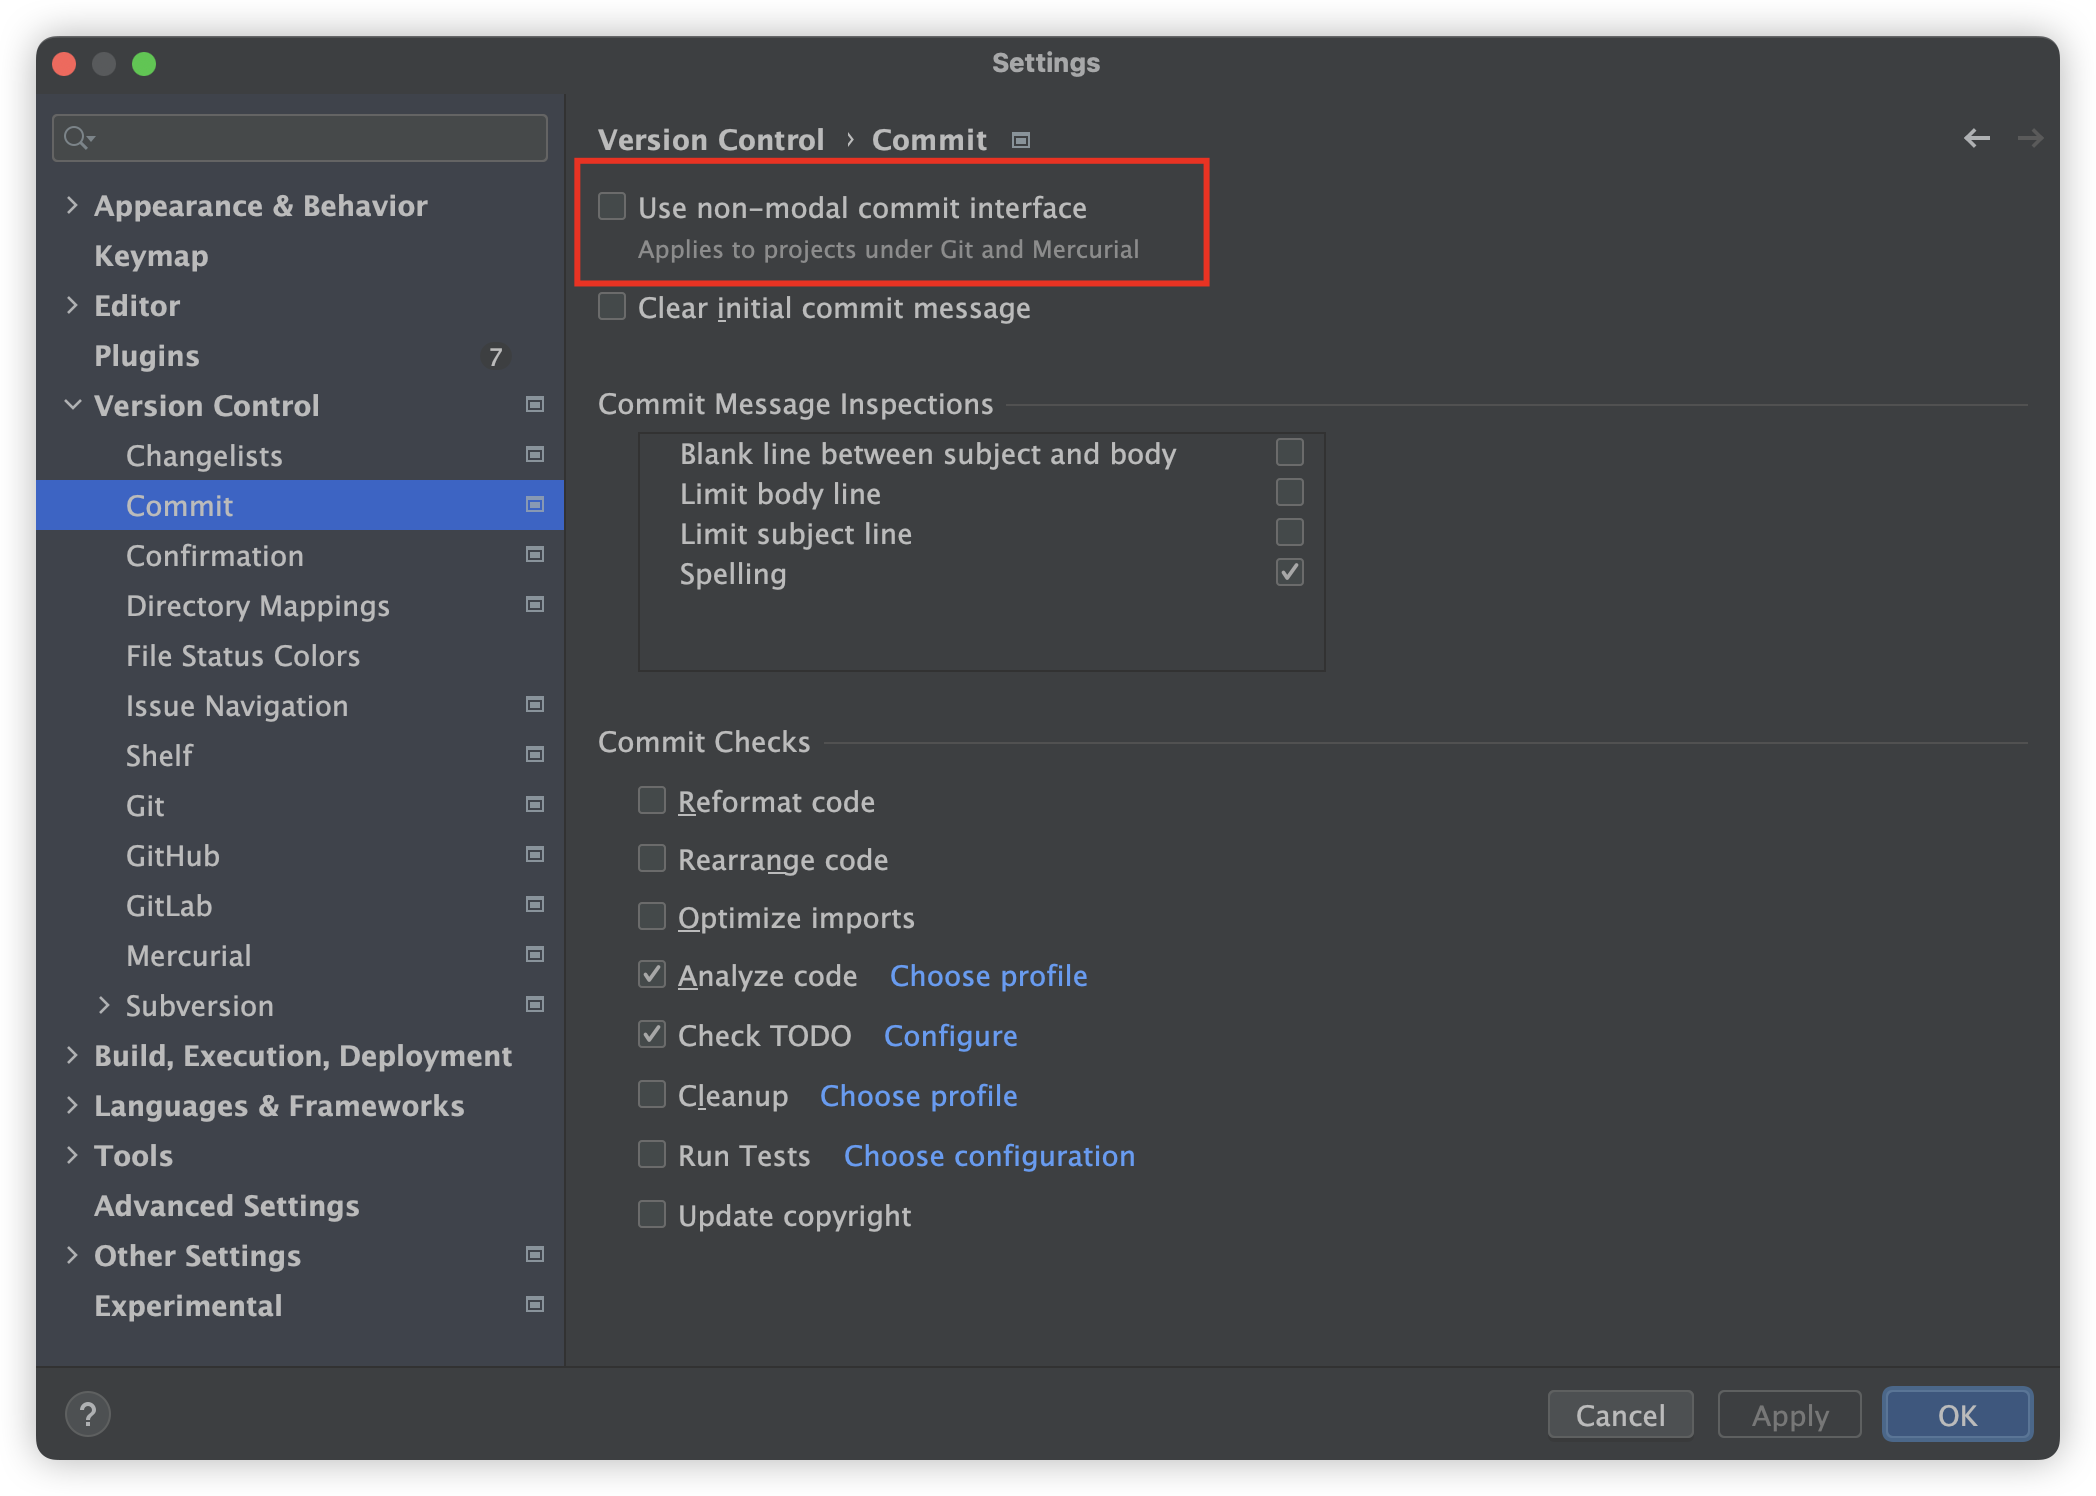
git 没有显示 Local Changes 界面
Setting -> Version Control-> commit -> 把 use non-modal commit interface 的勾去掉,如下图所示
Editor
Code style
- 设置 Tab 空格数,按语言来设置
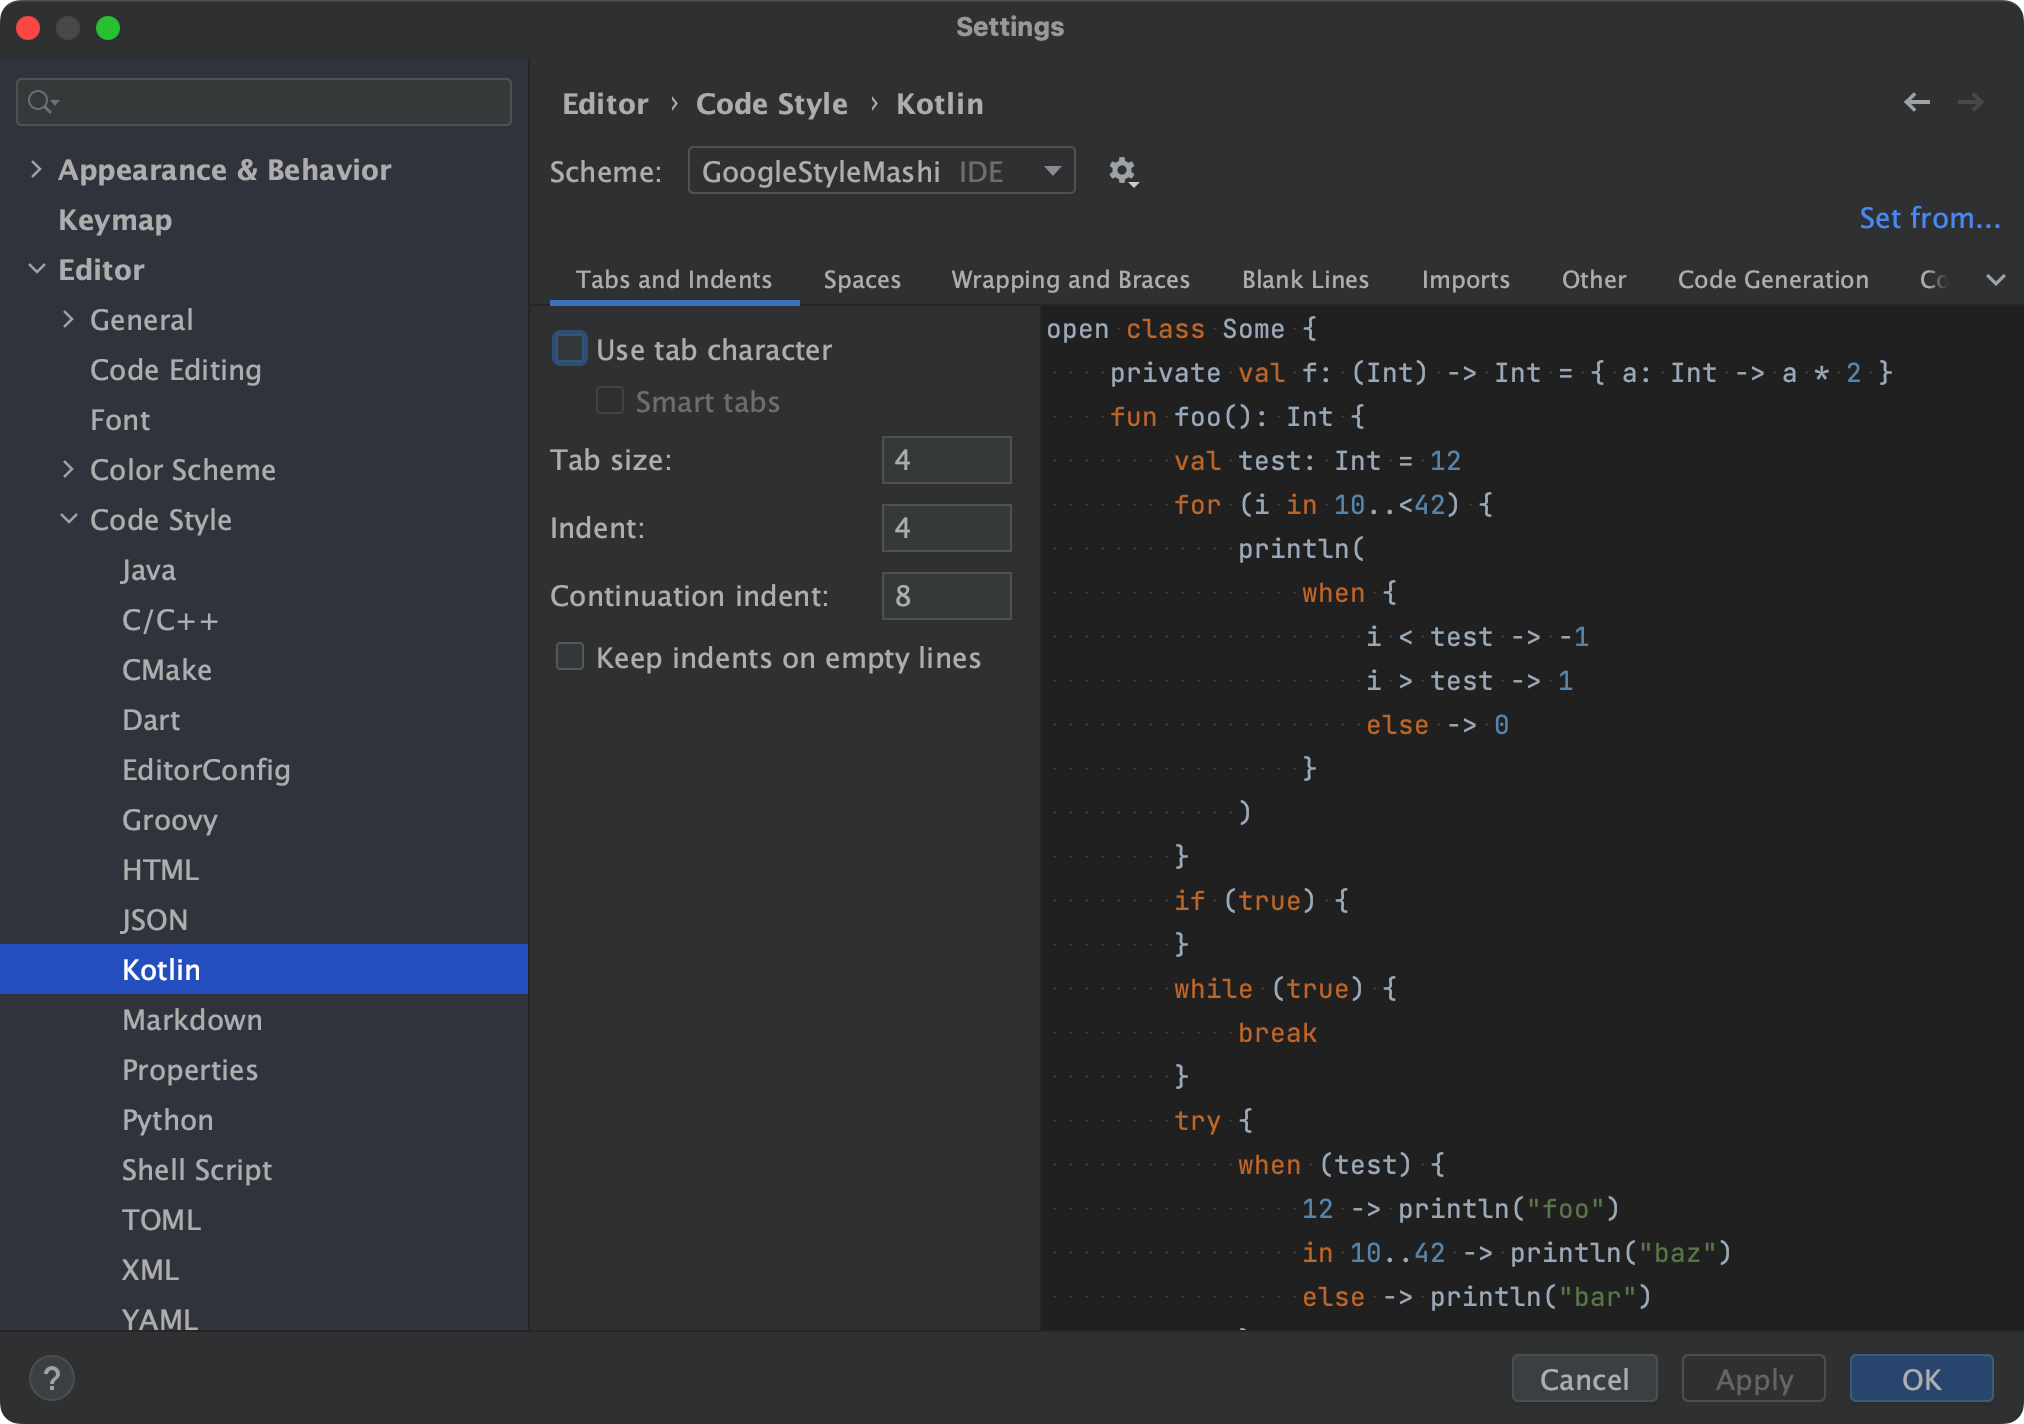
- 格式化缩进 4 个空格变成 8 个空格
转到 settings->editor->code style, 进去 general,然后取消选中 “enable EditorConfig support”.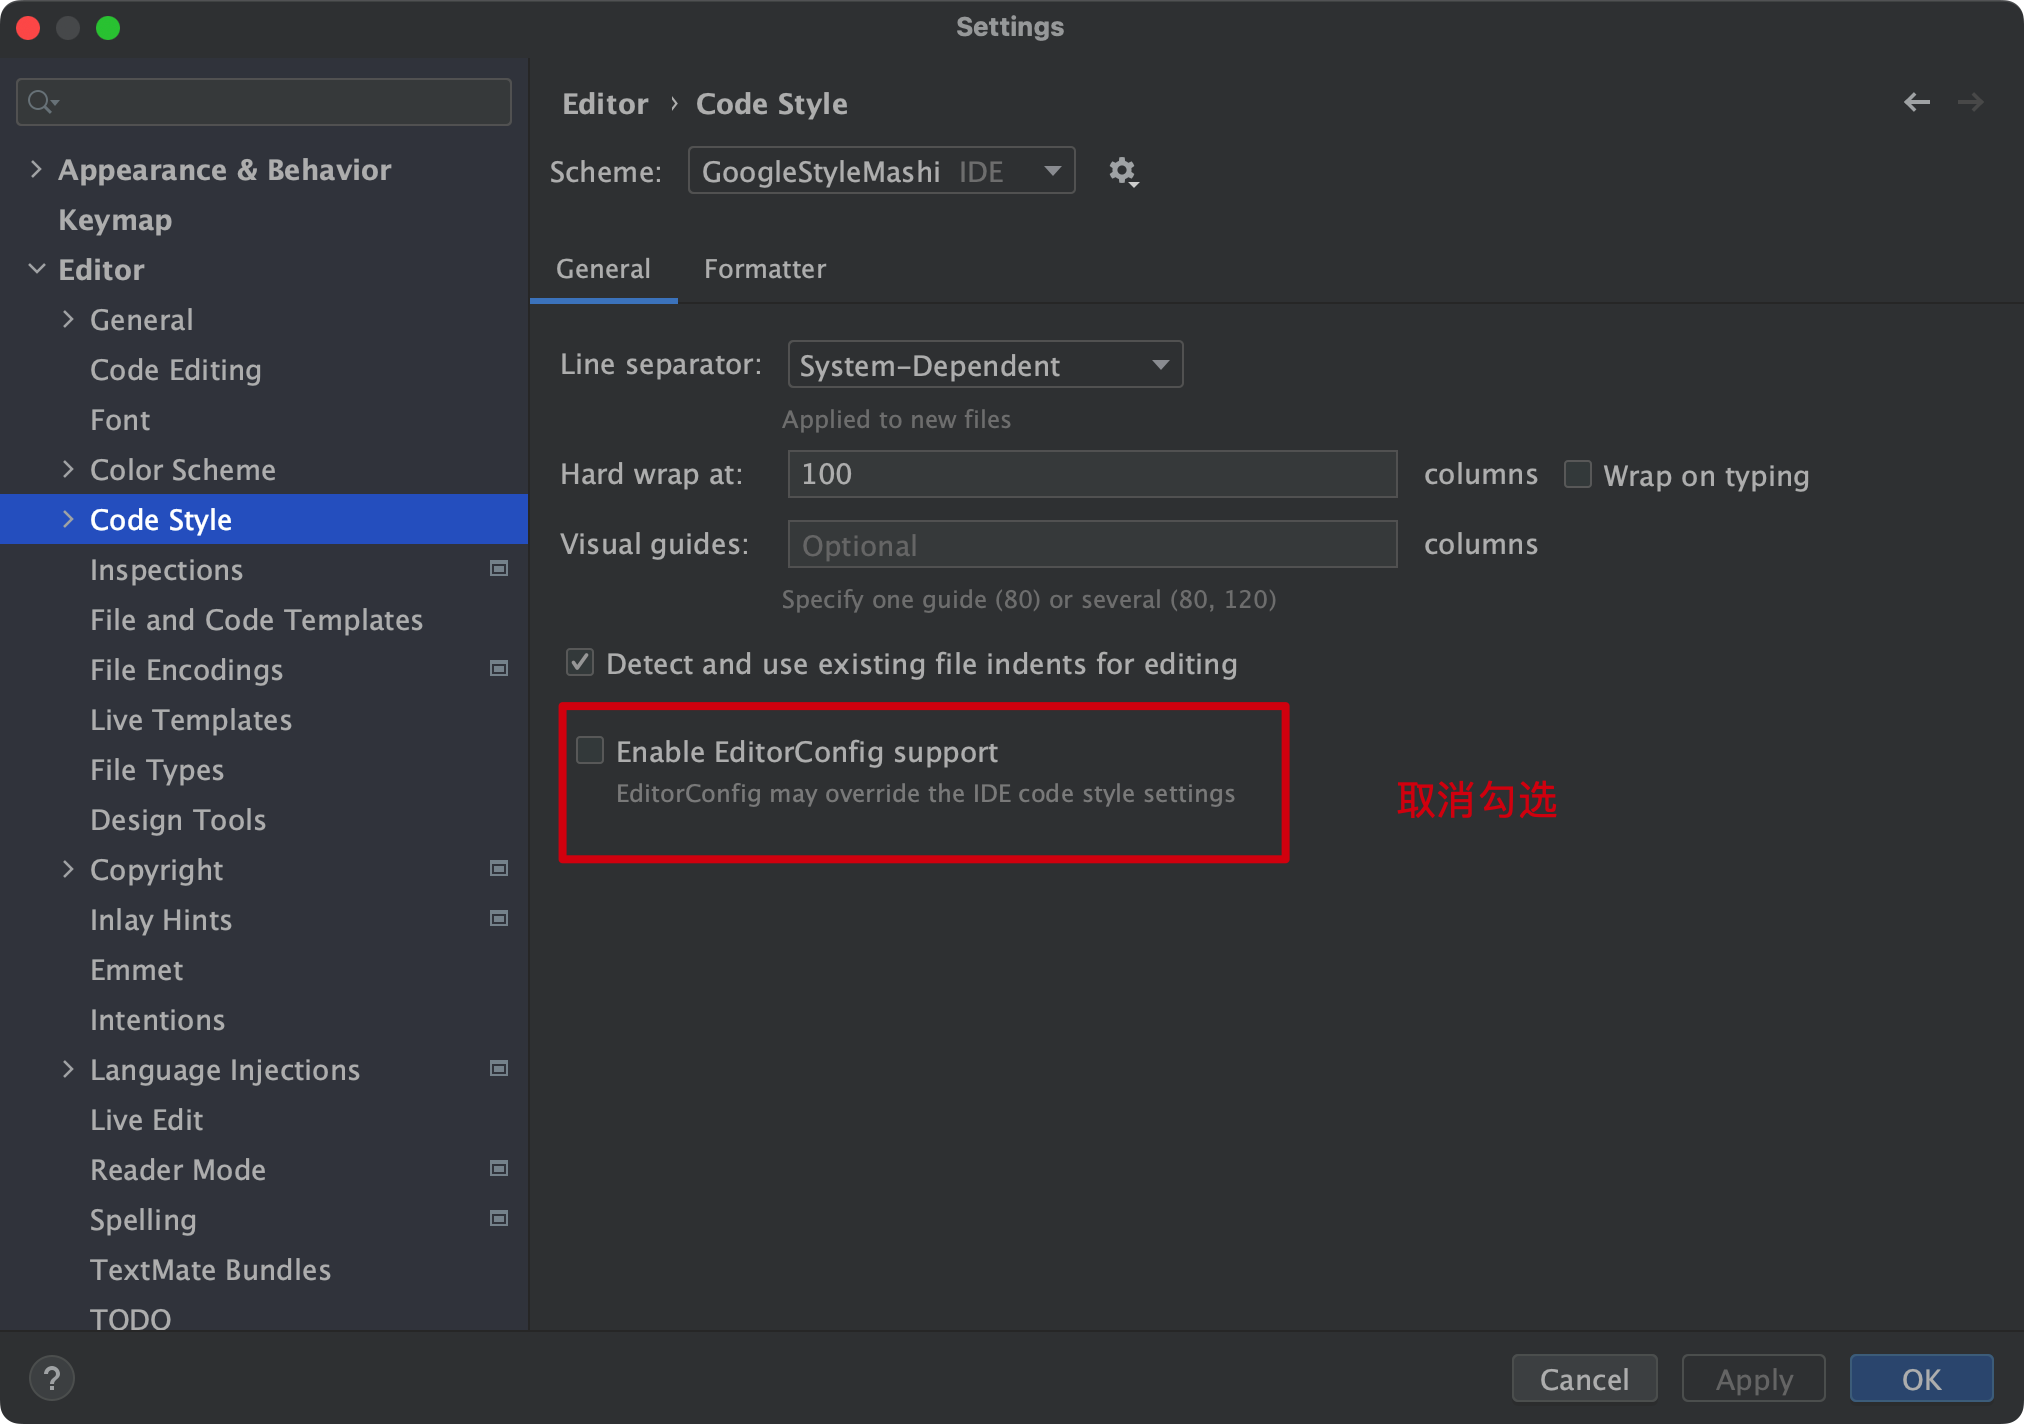
新版 Logcat
界面
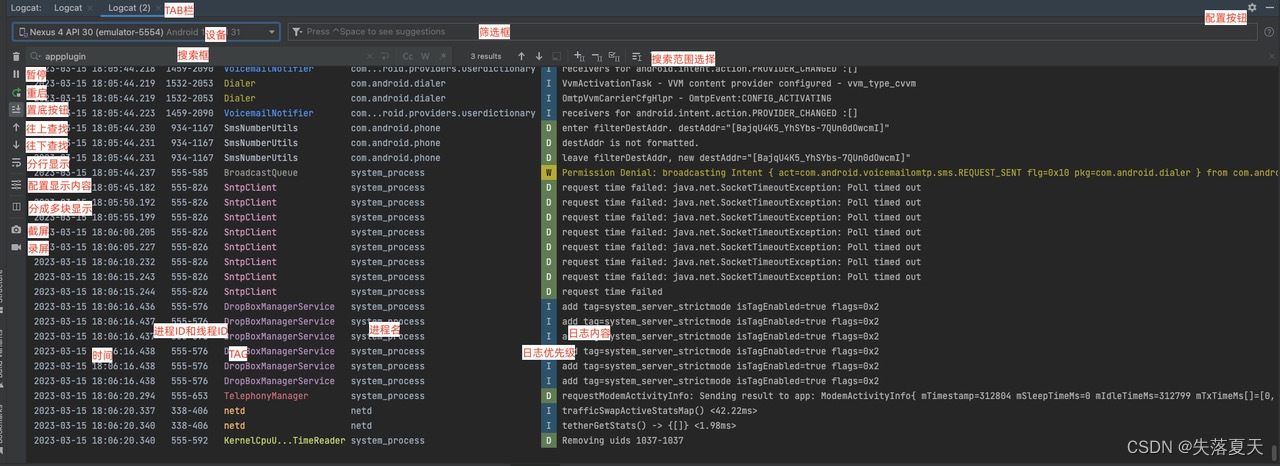
使用键值对搜索查询日志
- 包名/进程名
- Package:xxx
- Package: mime 当前调试的 app
- Log Tag
- Tag:xxx
- 日志级别:verbose/debug/info/warn/error/assert 六种级别
- Level:debug
- 内容:支持模糊搜索
- Message:xxx
- 时间:关键词 age,我们可以通过这个关键词对日志以时间纬度进行一定的筛选;筛选时间指的是以电脑时间对日志的时间进行筛选
| 单位 | 介绍 |
|---|---|
| s | 秒 |
| m | 分钟 |
| h | 小时 |
| d | 天 |
- Age: 10 m 筛选 10 分钟内的所有日志
- 多选
- logcat 筛选框中,如果同时输入多个条件,默认情况下不同类型的筛选,是且的关系,如:
message:level level:warn - 如果是相同类型的筛选,则默认是或的关系,如:
message:level message:info - 如果相同类型仍然进行且的筛选,则我们需要改一下筛选条件,如:
message:level & message:warn - 多选:或满足 message 中包含 level 或者日志等于大于等于 warn 的才显示:如
message:level | level:warn
- logcat 筛选框中,如果同时输入多个条件,默认情况下不同类型的筛选,是且的关系,如:
- 复杂场景组合
我想监控从 A 应用点击按钮开始,跳转到 B 应用页面的完整日志流程,其中就包含了多种条件的组合。
- 进程名为 com.Xt.Appplugin (应用 A),system_server (系统应用) 或 com.Xt.Client (应用 B)
- Tag 为 lxltest 或者 Activity
- 日志级别为 debug
(process:system_server | process:com.xt.appplugin | process:com.xt.client) & level:debug & (tag:lxltest | tag:Activity)
- 否定和正则表达式
以下字段支持否定和正则表达式匹配:tag、package、message 和 line。
- 否定的表示方式是在字段名称前面加上 -。例如,-tag: MyTag 匹配 tag 不包含字符串 MyTag 的日志条目。
- 正则表达式匹配通过在字段名称中附加 ~ 来表示。例如 tag~: My.*Tag。
- 否定和正则表达式修饰符可以结合使用。例如,-tag~: My.*Tag。
AS 编辑窗口最大数目限制修改 (默认 10 页)
android studio 打开的页面数
用 android studio 看系统源码的时候,发现 android studio 打开的代码窗口数最大只有 10 个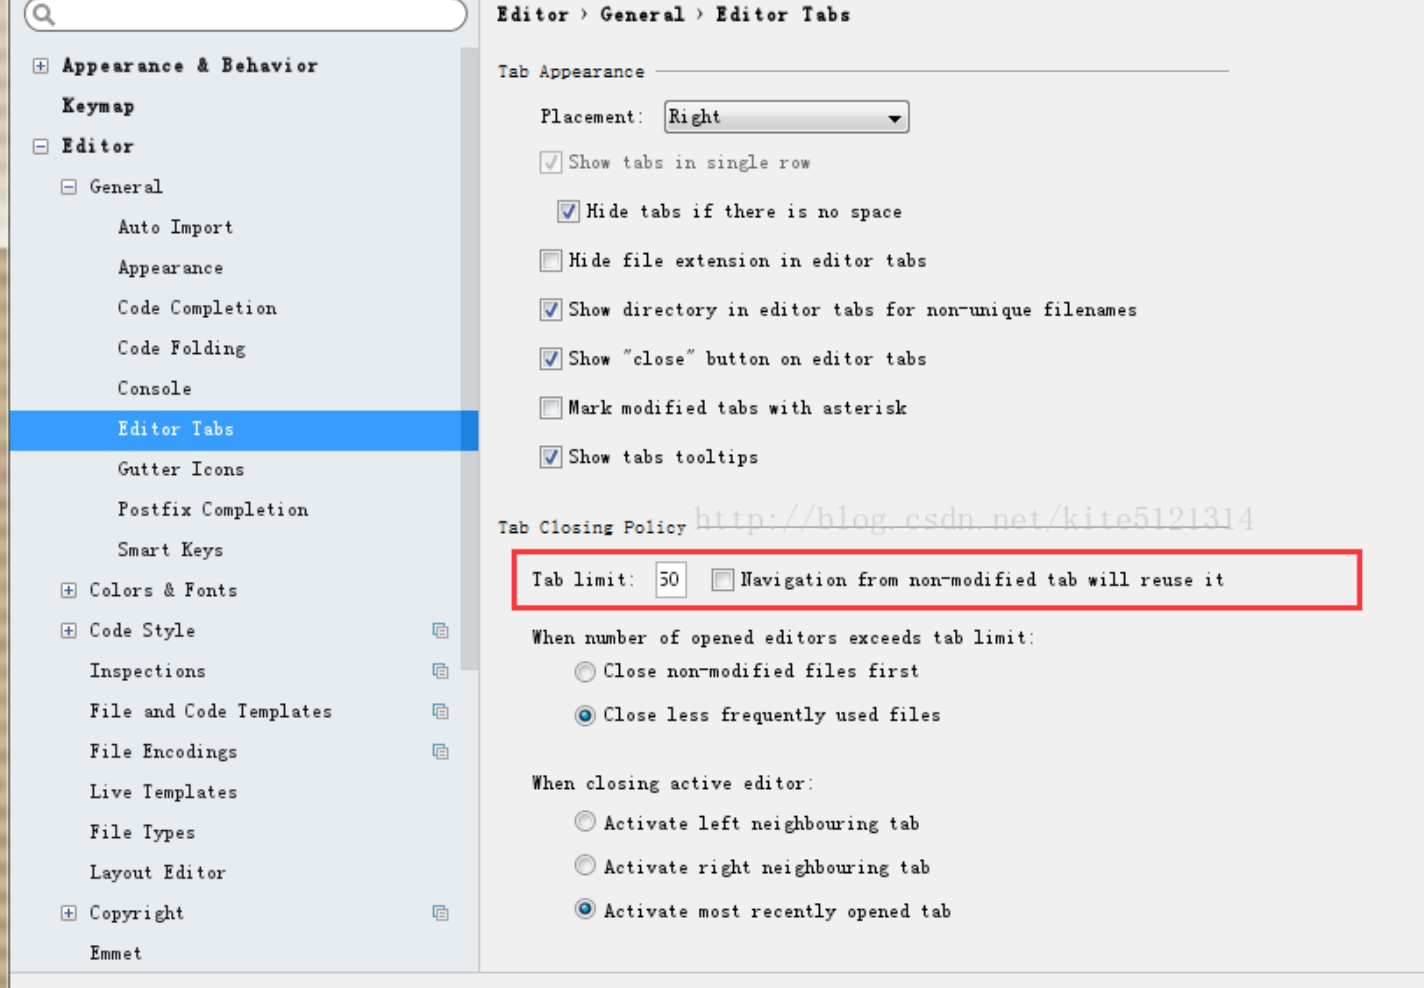
Mac OS 上用命令行通过 AS 来打开 Android 项目
可以在 ~/.bash_profile 或 ~/.zshrc 文件中加上一句脚本,然后可以用 AndroidStudio 命令代替 open -a /Applications/Android\ Studio.app 命令
1
2
# Android Studio 打开命令
alias as="open -a /Applications/Android\ Studio.app"
如果是 zsh
1
source ~/.zshrc
举例子,clone 一个项目,直接命令行用 as 打开
1
2
git clone git@github.com:Gurupreet/ComposeCookBook.git
as .
Editor-fold 和 region As 中折叠代码块
editor-fold
1
2
3
//<editor-fold defaultstate="collapsed" desc="重置选中的数据">
fun resetSelectInfo() {}
//</editor-fold>
快捷键:ctrl+option+t,选择 <editor-fold> Comments
region
1
2
3
4
5
6
7
8
9
10
11
12
13
//region 你好
override fun onDestroy() {
    super.onDestroy()
    toast("binding==null(${getBinding() == null}), binding.name==null(${getBinding().name == null})")
}

override fun init(binding: ActivityViewBindingHelloWorldBinding) {
    binding.name.text = "ViewBinding name"
    binding.button.setOnClickListener {
        toast("ViewBinding button toast")
    }
}
//endregion
快捷键:ctrl+option+t,选择 region Comments
Android Studio settings
- settings_mac_si_20250207.zip
https://raw.githubusercontent.com/hacket/ObsidianOSS/master/obsidian/settings_mac_si_20240920.zip
Android Studio 技巧
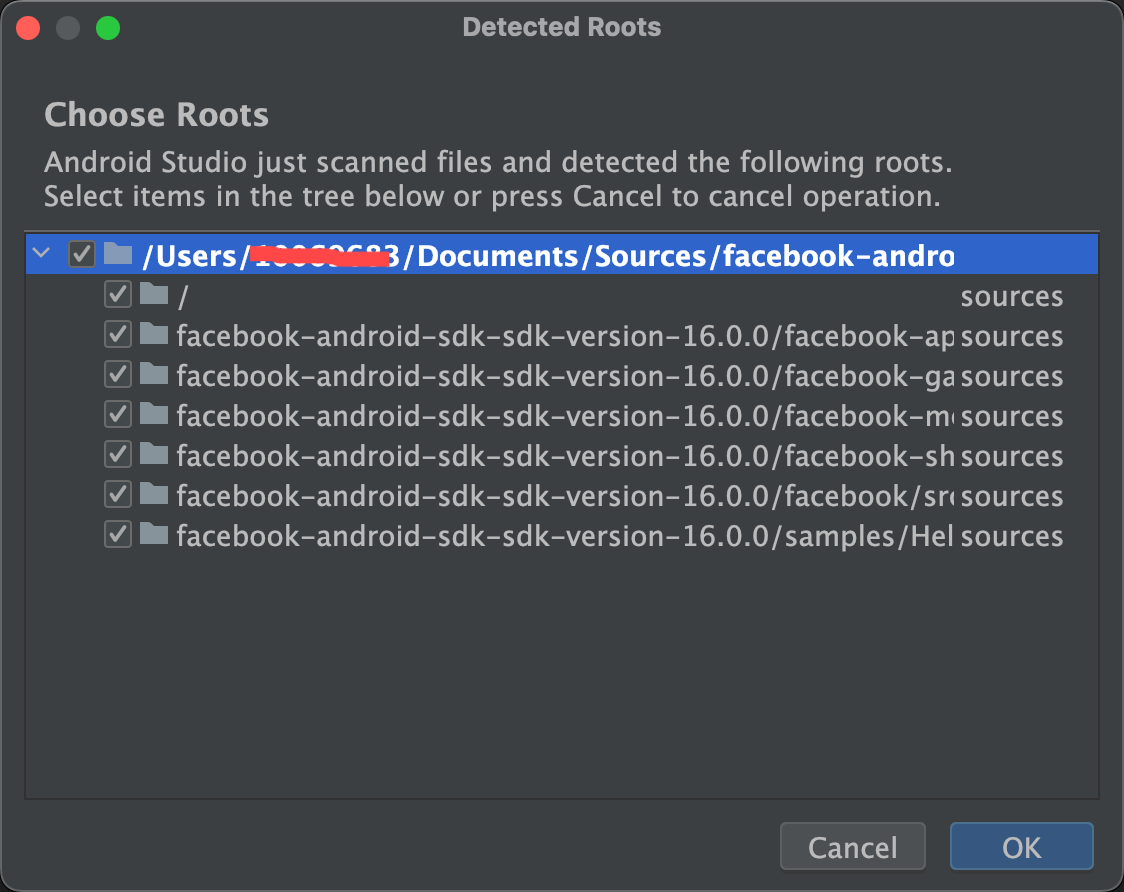
Android Studio 查看不了三方 kotlin 库源码
问题:点击看不到源码, Download Sources 也没用
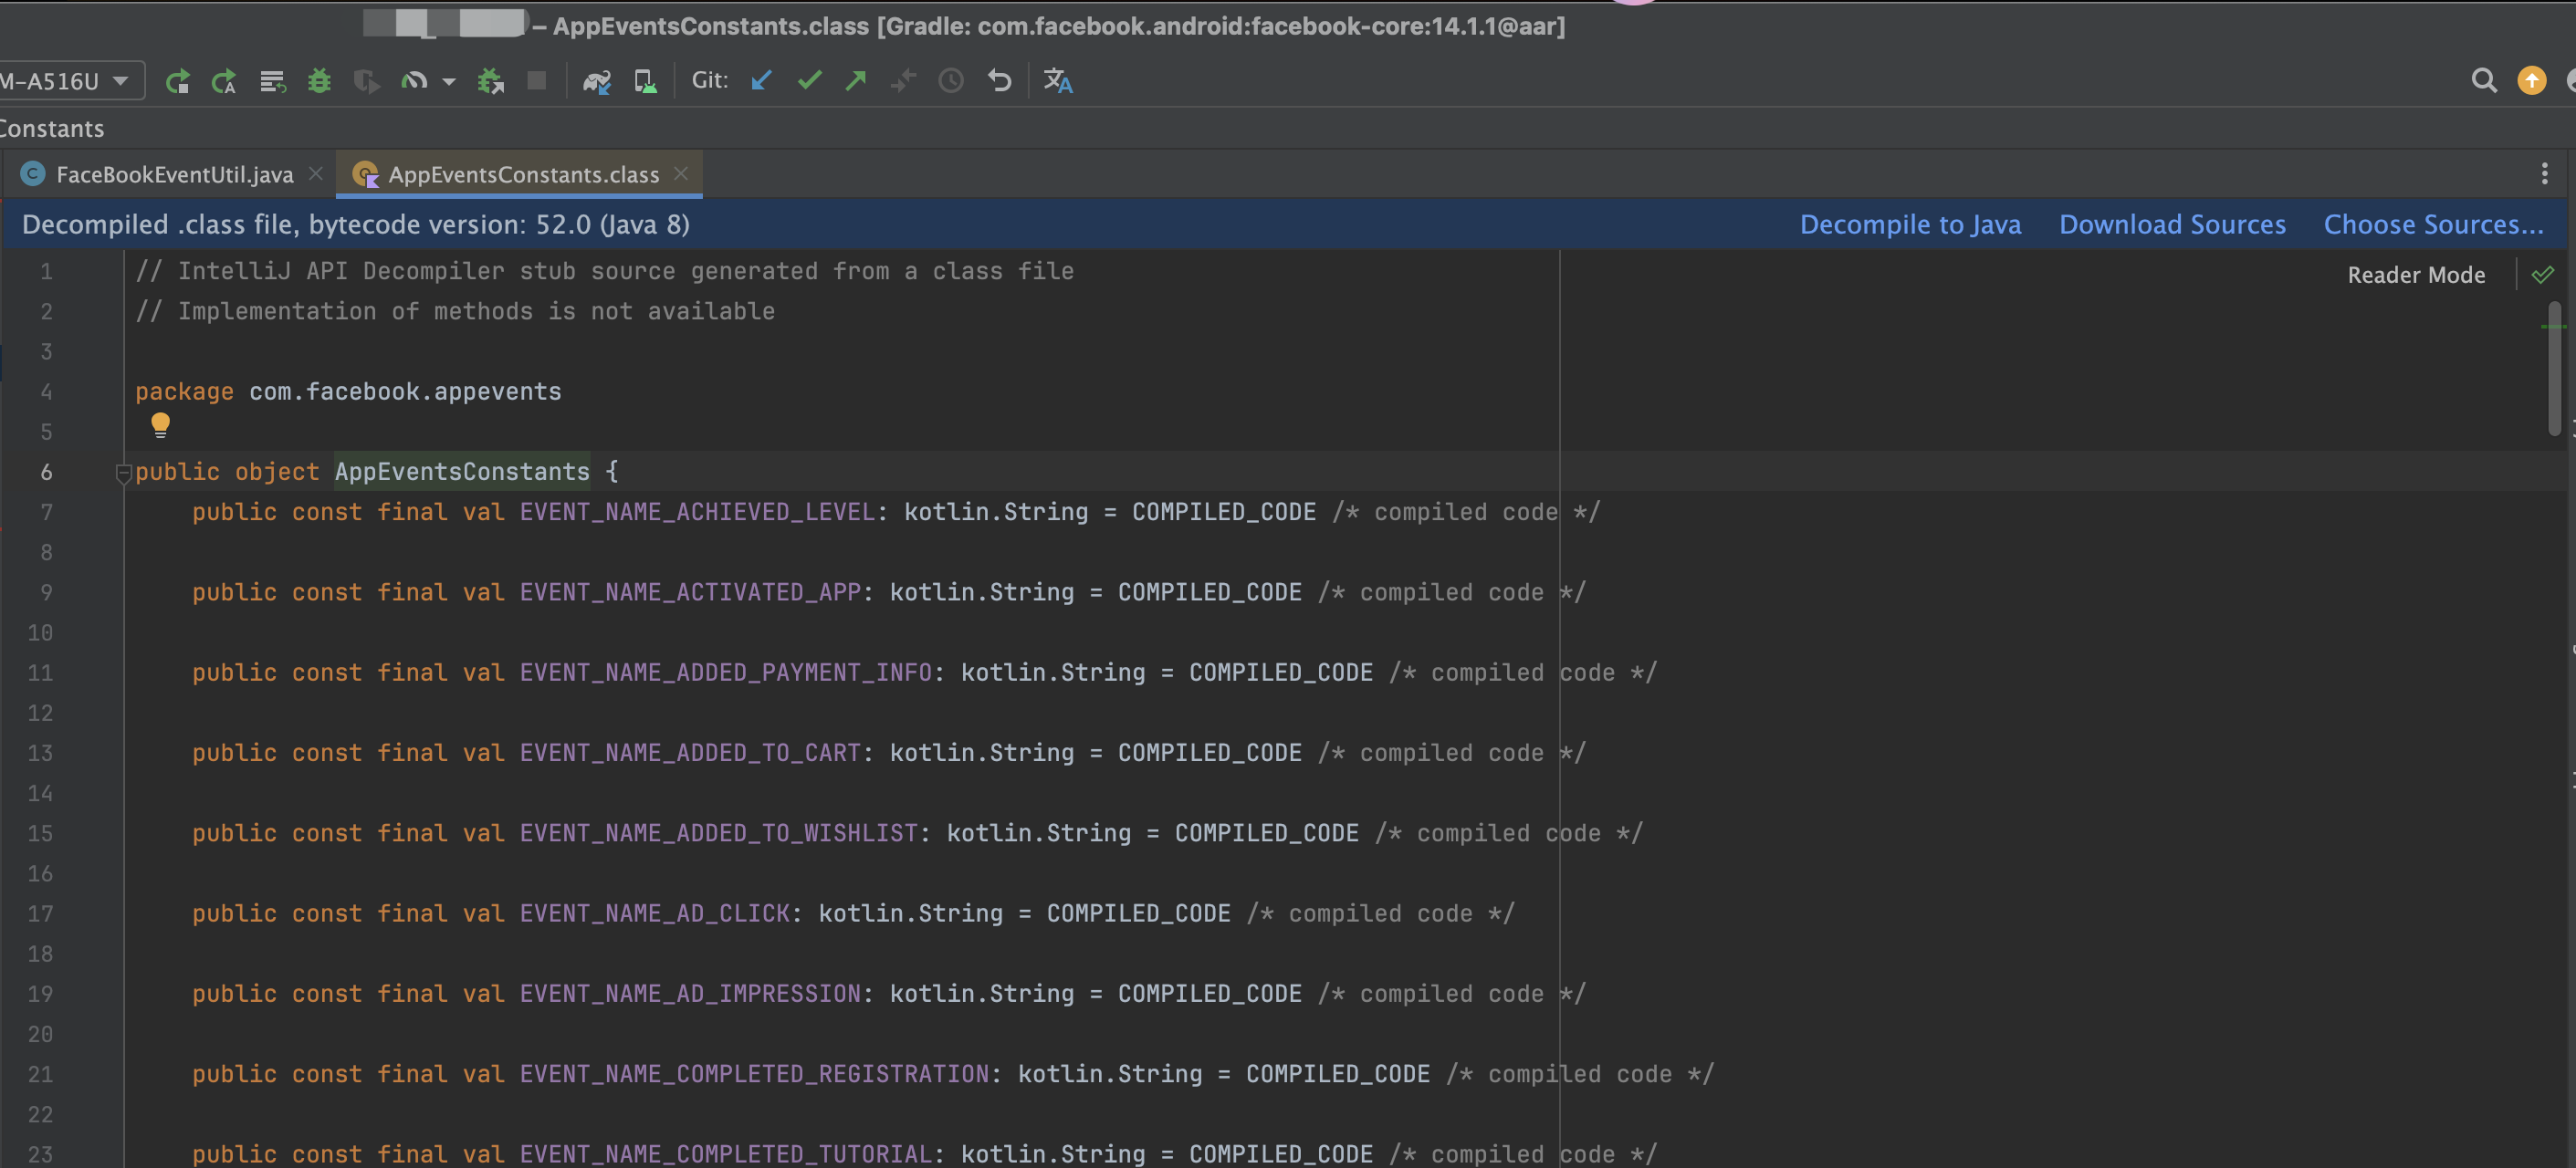
解决:
- 先下载库源码 Release sdk-version-16.0.0 · facebook/facebook-android-sdk · GitHub
- Choose Source:选择下载好的源码
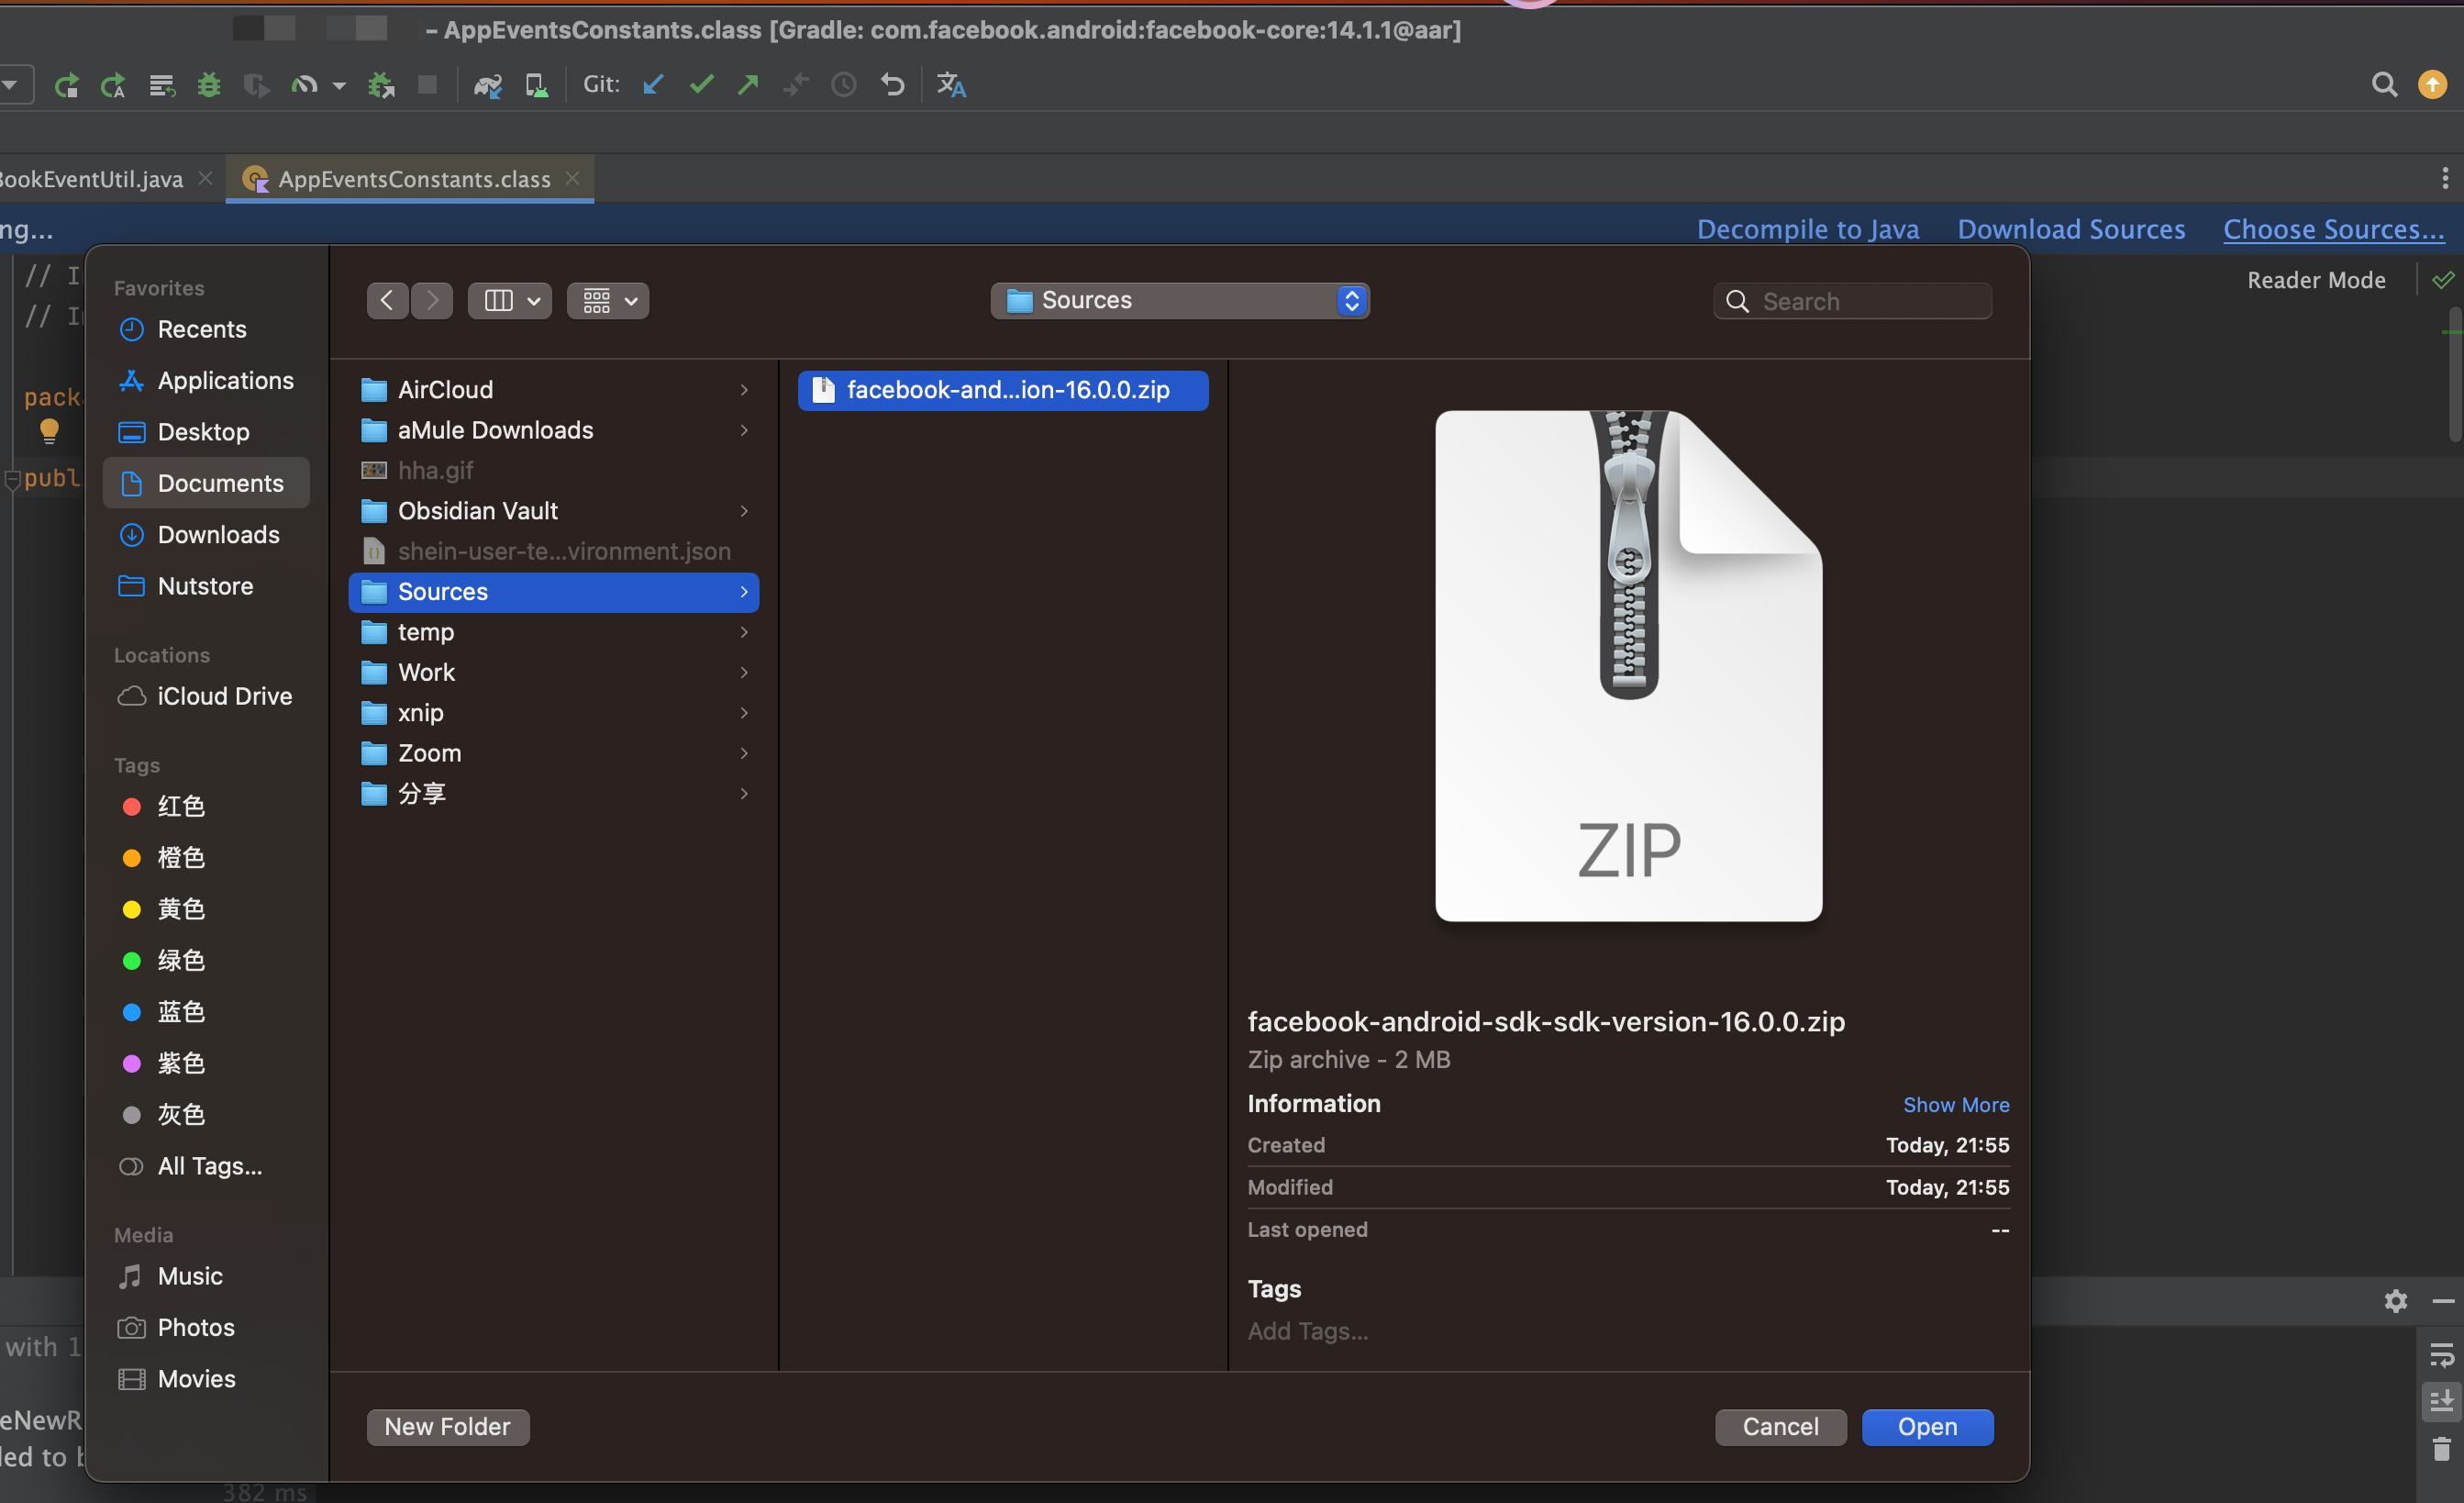
- 选择 Roots,就可以查看源码了
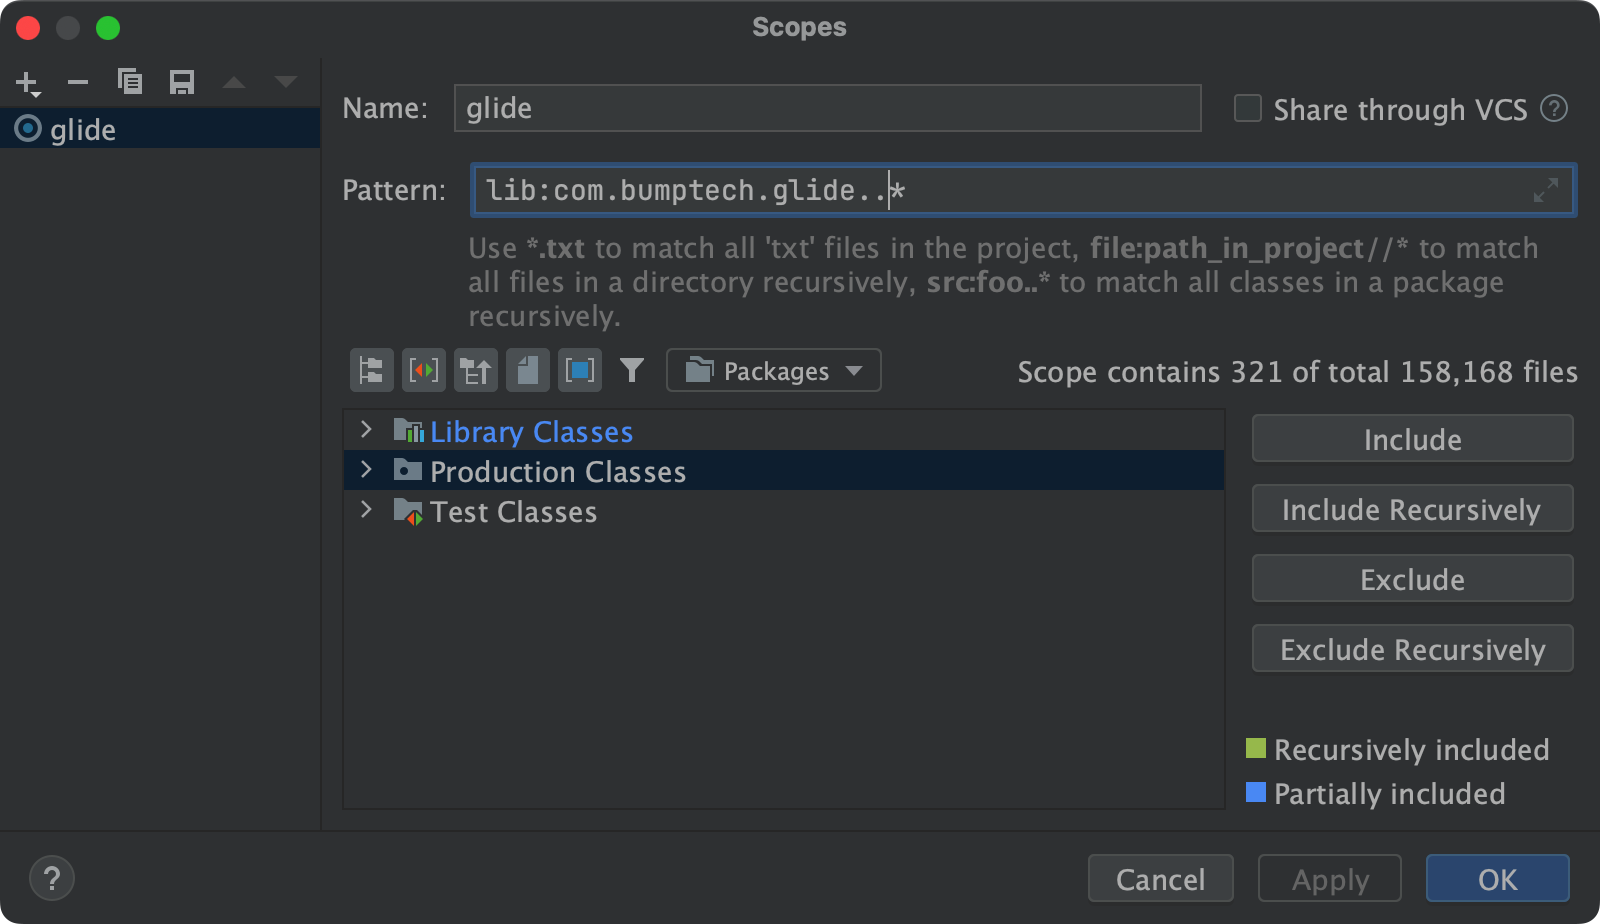
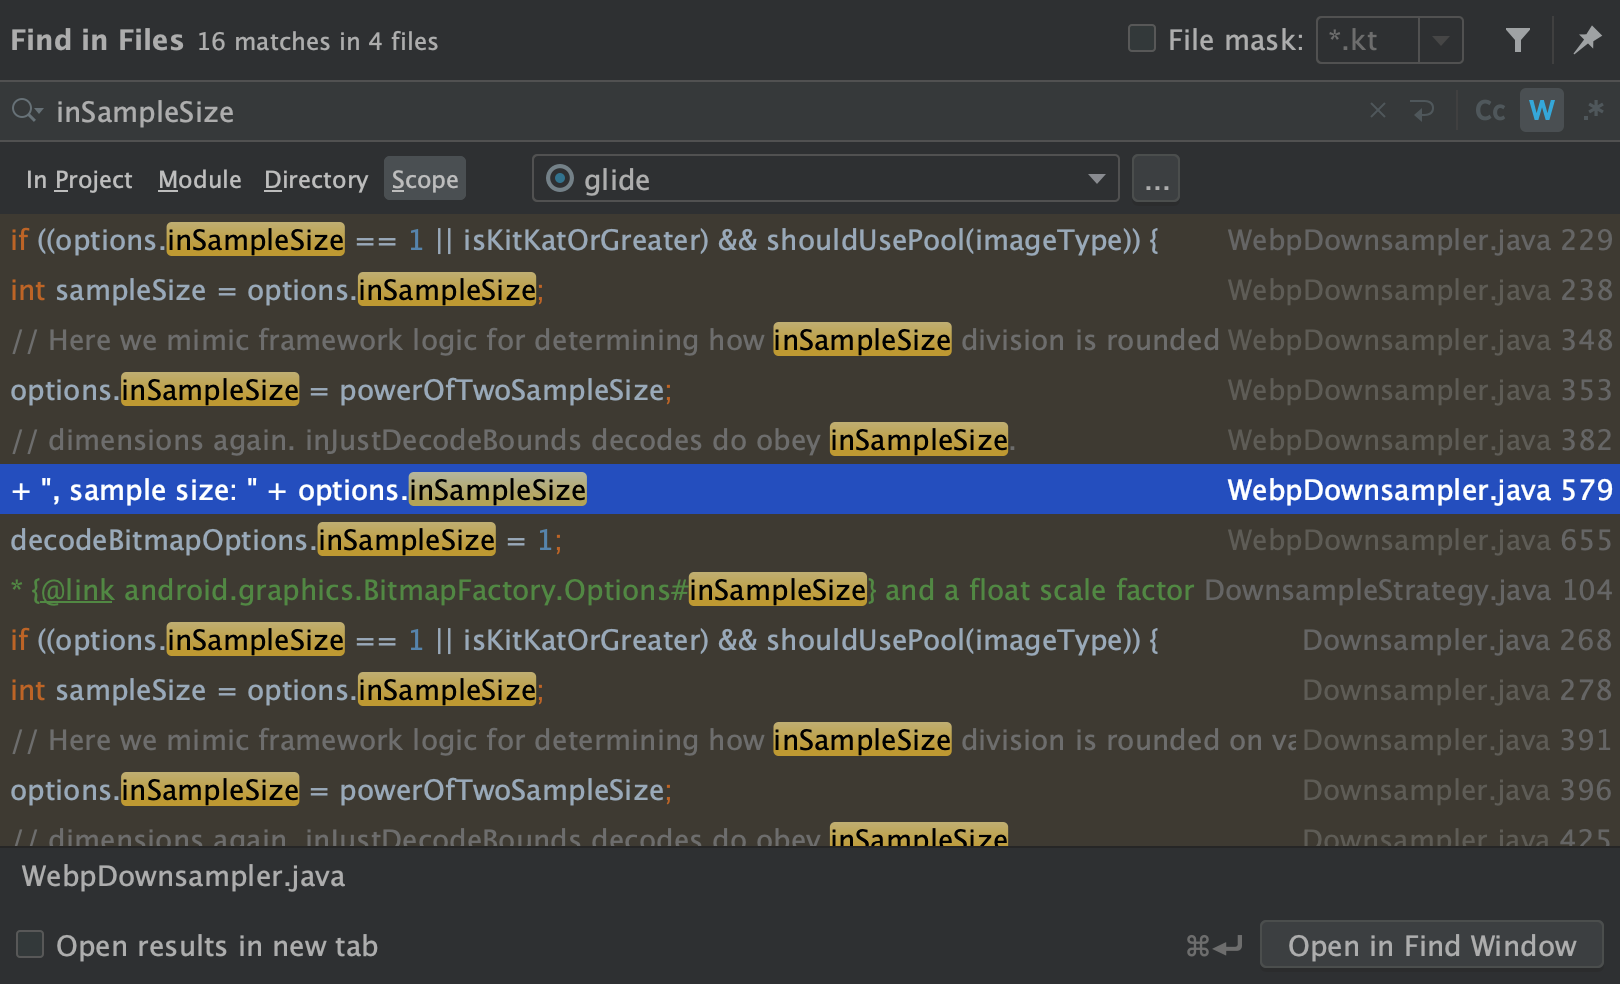
自定义搜索 Scope
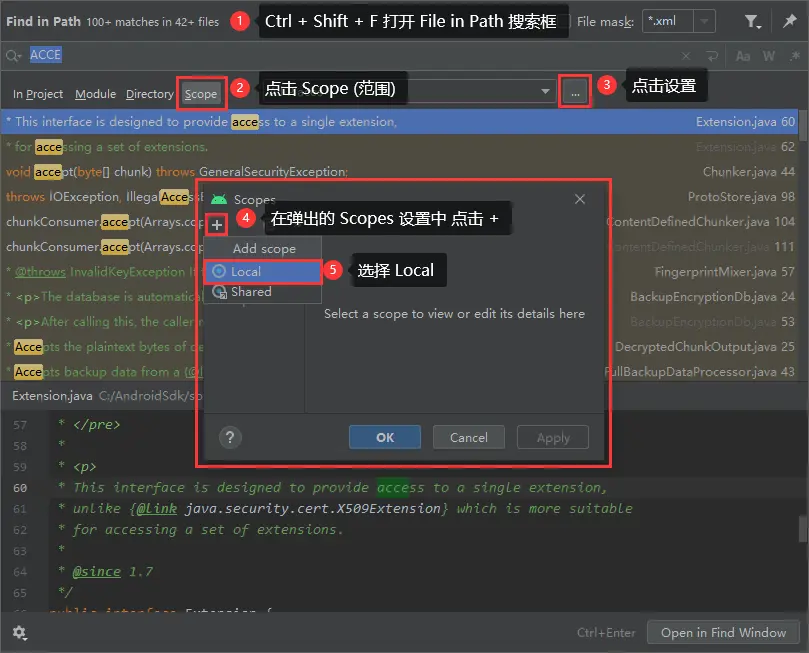
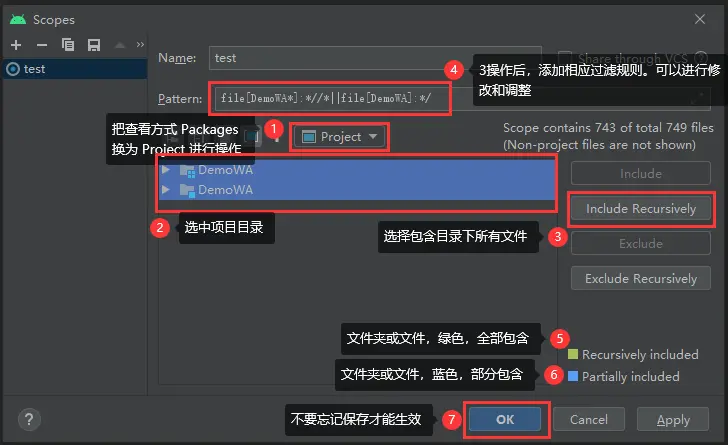
案例: 搜索 Glide 库中的采样率 inSampleSize
改 Manifest 的 package name
改了 Manifest 的 package name,主要会涉及 2 个地方的修改
- R 文件的导包
- BuildConfig 的导包�
- Manifest 组件的 name 导包
R 文件的导包修改:
- 在项目的根目录
右键→Replace in Path
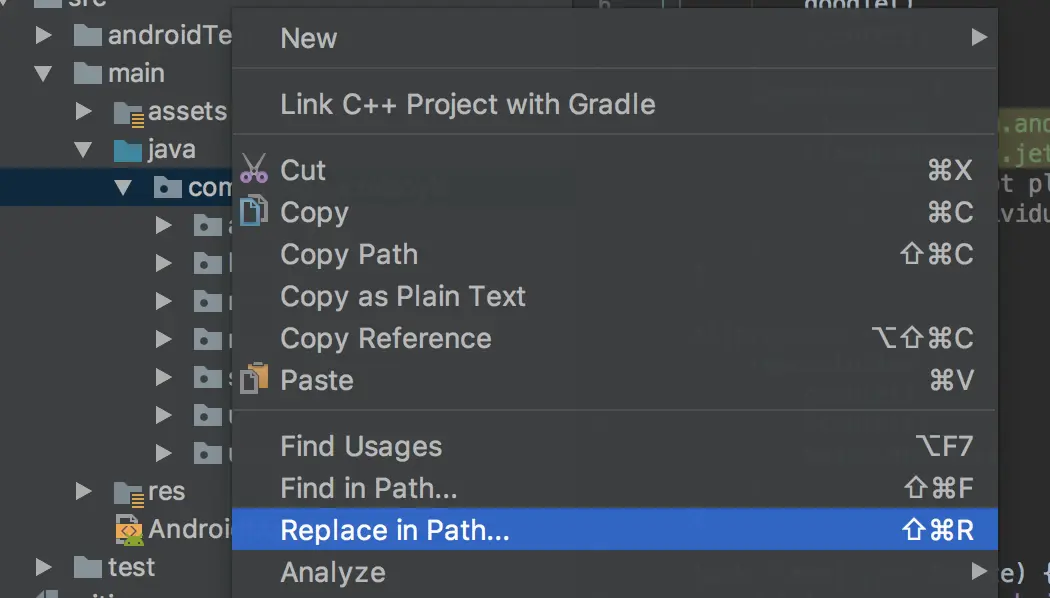
- 替换
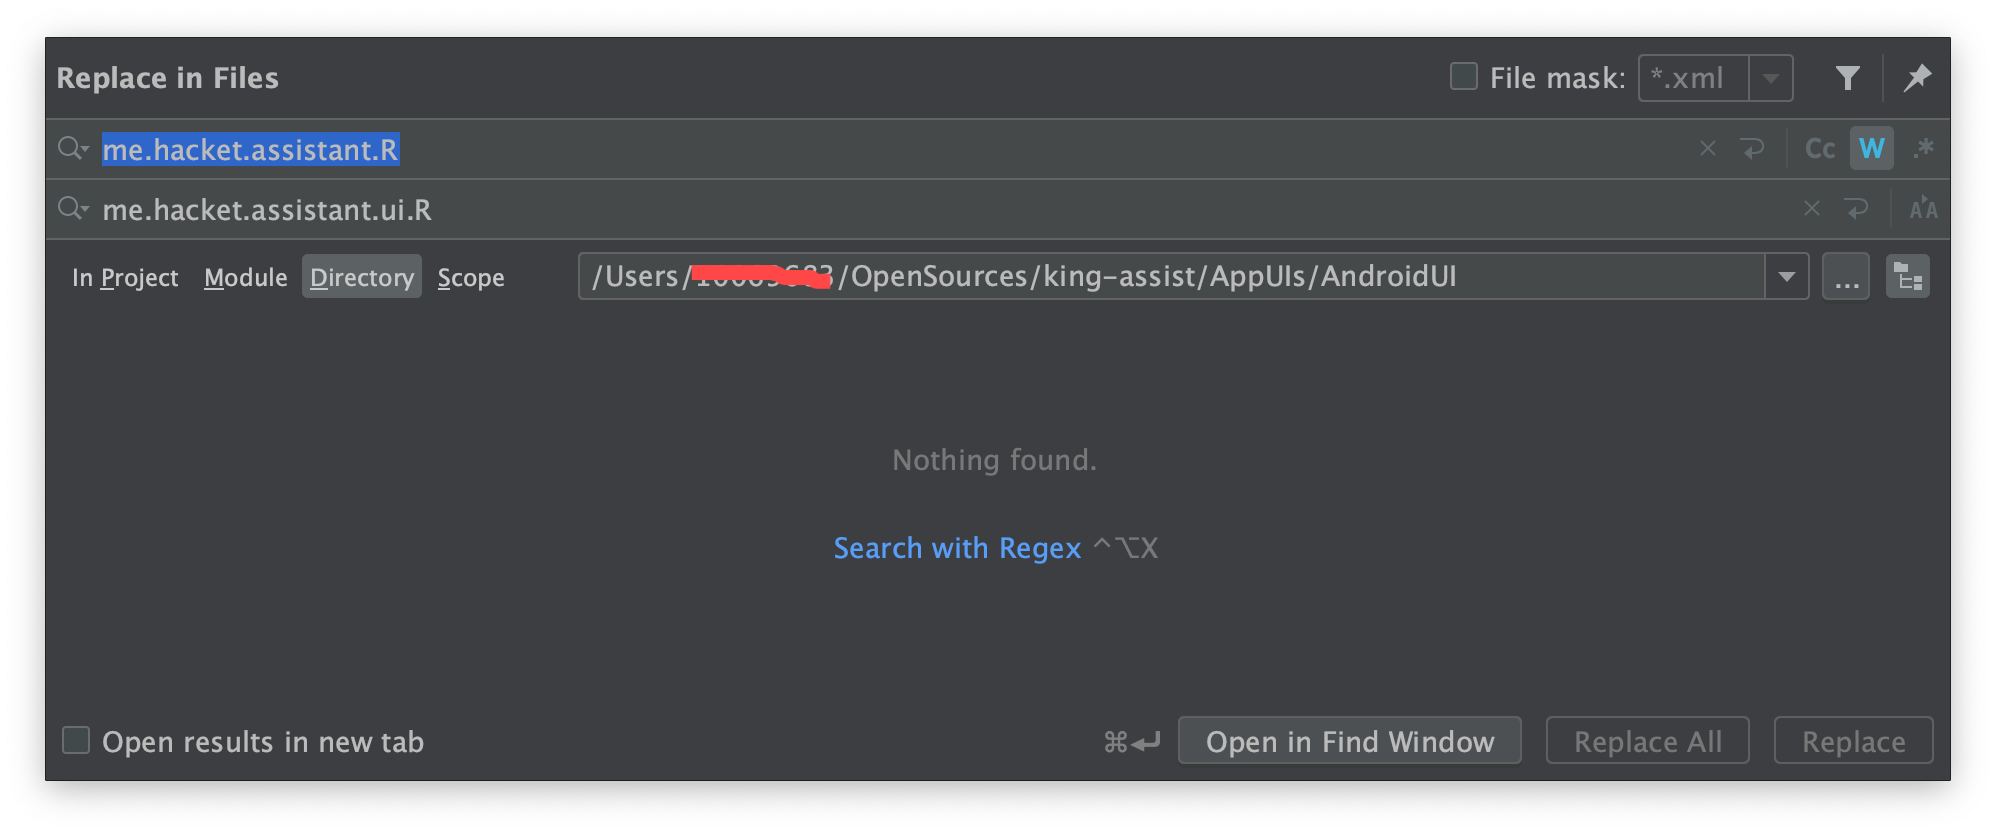
Manifest 的导包修改:

当前源码引用外部仓库时看不到 git 信息
需要将外部仓库的 git root 信息加到 Android Studio 中
解决 1:./idea/vcs.xml
1
2
3
4
5
6
7
8
9
10
11
12
13
14
15
16
17
18
19
20
21
22
23
24
25
26
27
28
29
30
31
32
33
34
35
36
37
38
39
40
41
42
43
44
45
46
47
48
<?xml version="1.0" encoding="UTF-8"?>
<project version="4">
  <component name="VcsDirectoryMappings">
    <mapping directory="" vcs="Git" />
    <mapping directory="$PROJECT_DIR$/../si_account_android" vcs="Git" />
    <mapping directory="$PROJECT_DIR$/../si_addcart_android" vcs="Git" />
    <mapping directory="$PROJECT_DIR$/../si_address_android" vcs="Git" />
    <mapping directory="$PROJECT_DIR$/../si_basic_android" vcs="Git" />
    <mapping directory="$PROJECT_DIR$/../si_buyers_show_android" vcs="Git" />
    <mapping directory="$PROJECT_DIR$/../si_cart_android" vcs="Git" />
    <mapping directory="$PROJECT_DIR$/../si_cart_api_android" vcs="Git" />
    <mapping directory="$PROJECT_DIR$/../si_cashier_desk_android" vcs="Git" />
    <mapping directory="$PROJECT_DIR$/../si_ccc_android" vcs="Git" />
    <mapping directory="$PROJECT_DIR$/../si_component_promotion_android" vcs="Git" />
    <mapping directory="$PROJECT_DIR$/../si_coupon_android" vcs="Git" />
    <mapping directory="$PROJECT_DIR$/../si_customer_service_android" vcs="Git" />
    <mapping directory="$PROJECT_DIR$/../si_dynamic_android" vcs="Git" />
    <mapping directory="$PROJECT_DIR$/../si_gals_android" vcs="Git" />
    <mapping directory="$PROJECT_DIR$/../si_giftcard_android" vcs="Git" />
    <mapping directory="$PROJECT_DIR$/../si_global_configs_android" vcs="Git" />
    <mapping directory="$PROJECT_DIR$/../si_goods_android" vcs="Git" />
    <mapping directory="$PROJECT_DIR$/../si_goods_detail_android" vcs="Git" />
    <mapping directory="$PROJECT_DIR$/../si_guide_android" vcs="Git" />
    <mapping directory="$PROJECT_DIR$/../si_http_android" vcs="Git" />
    <mapping directory="$PROJECT_DIR$/../si_httpdns_android" vcs="Git" />
    <mapping directory="$PROJECT_DIR$/../si_language_android" vcs="Git" />
    <mapping directory="$PROJECT_DIR$/../si_live_android" vcs="Git" />
    <mapping directory="$PROJECT_DIR$/../si_main_android" vcs="Git" />
    <mapping directory="$PROJECT_DIR$/../si_message_android" vcs="Git" />
    <mapping directory="$PROJECT_DIR$/../si_order_android" vcs="Git" />
    <mapping directory="$PROJECT_DIR$/../si_outfit_android" vcs="Git" />
    <mapping directory="$PROJECT_DIR$/../si_payment_android" vcs="Git" />
    <mapping directory="$PROJECT_DIR$/../si_point_android" vcs="Git" />
    <mapping directory="$PROJECT_DIR$/../si_router_android" vcs="Git" />
    <mapping directory="$PROJECT_DIR$/../si_search_android" vcs="Git" />
    <mapping directory="$PROJECT_DIR$/../si_security_android" vcs="Git" />
    <mapping directory="$PROJECT_DIR$/../si_setting_android" vcs="Git" />
    <mapping directory="$PROJECT_DIR$/../si_trail_android" vcs="Git" />
    <mapping directory="$PROJECT_DIR$/../si_user_platform_android" vcs="Git" />
    <mapping directory="$PROJECT_DIR$/../si_userkit_android" vcs="Git" />
    <mapping directory="$PROJECT_DIR$/../si_wallet_android" vcs="Git" />
    <mapping directory="$PROJECT_DIR$/../si_welcome_android" vcs="Git" />
    <mapping directory="$PROJECT_DIR$/../si_wing_android" vcs="Git" />
    <mapping directory="$PROJECT_DIR$/../si_wish_android" vcs="Git" />
    <mapping directory="$PROJECT_DIR$/../si_zebra_android" vcs="Git" />
    <mapping directory="$PROJECT_DIR$/../suikit_android" vcs="Git" />
  </component>
</project>
解决 2: 将红色框目录加进来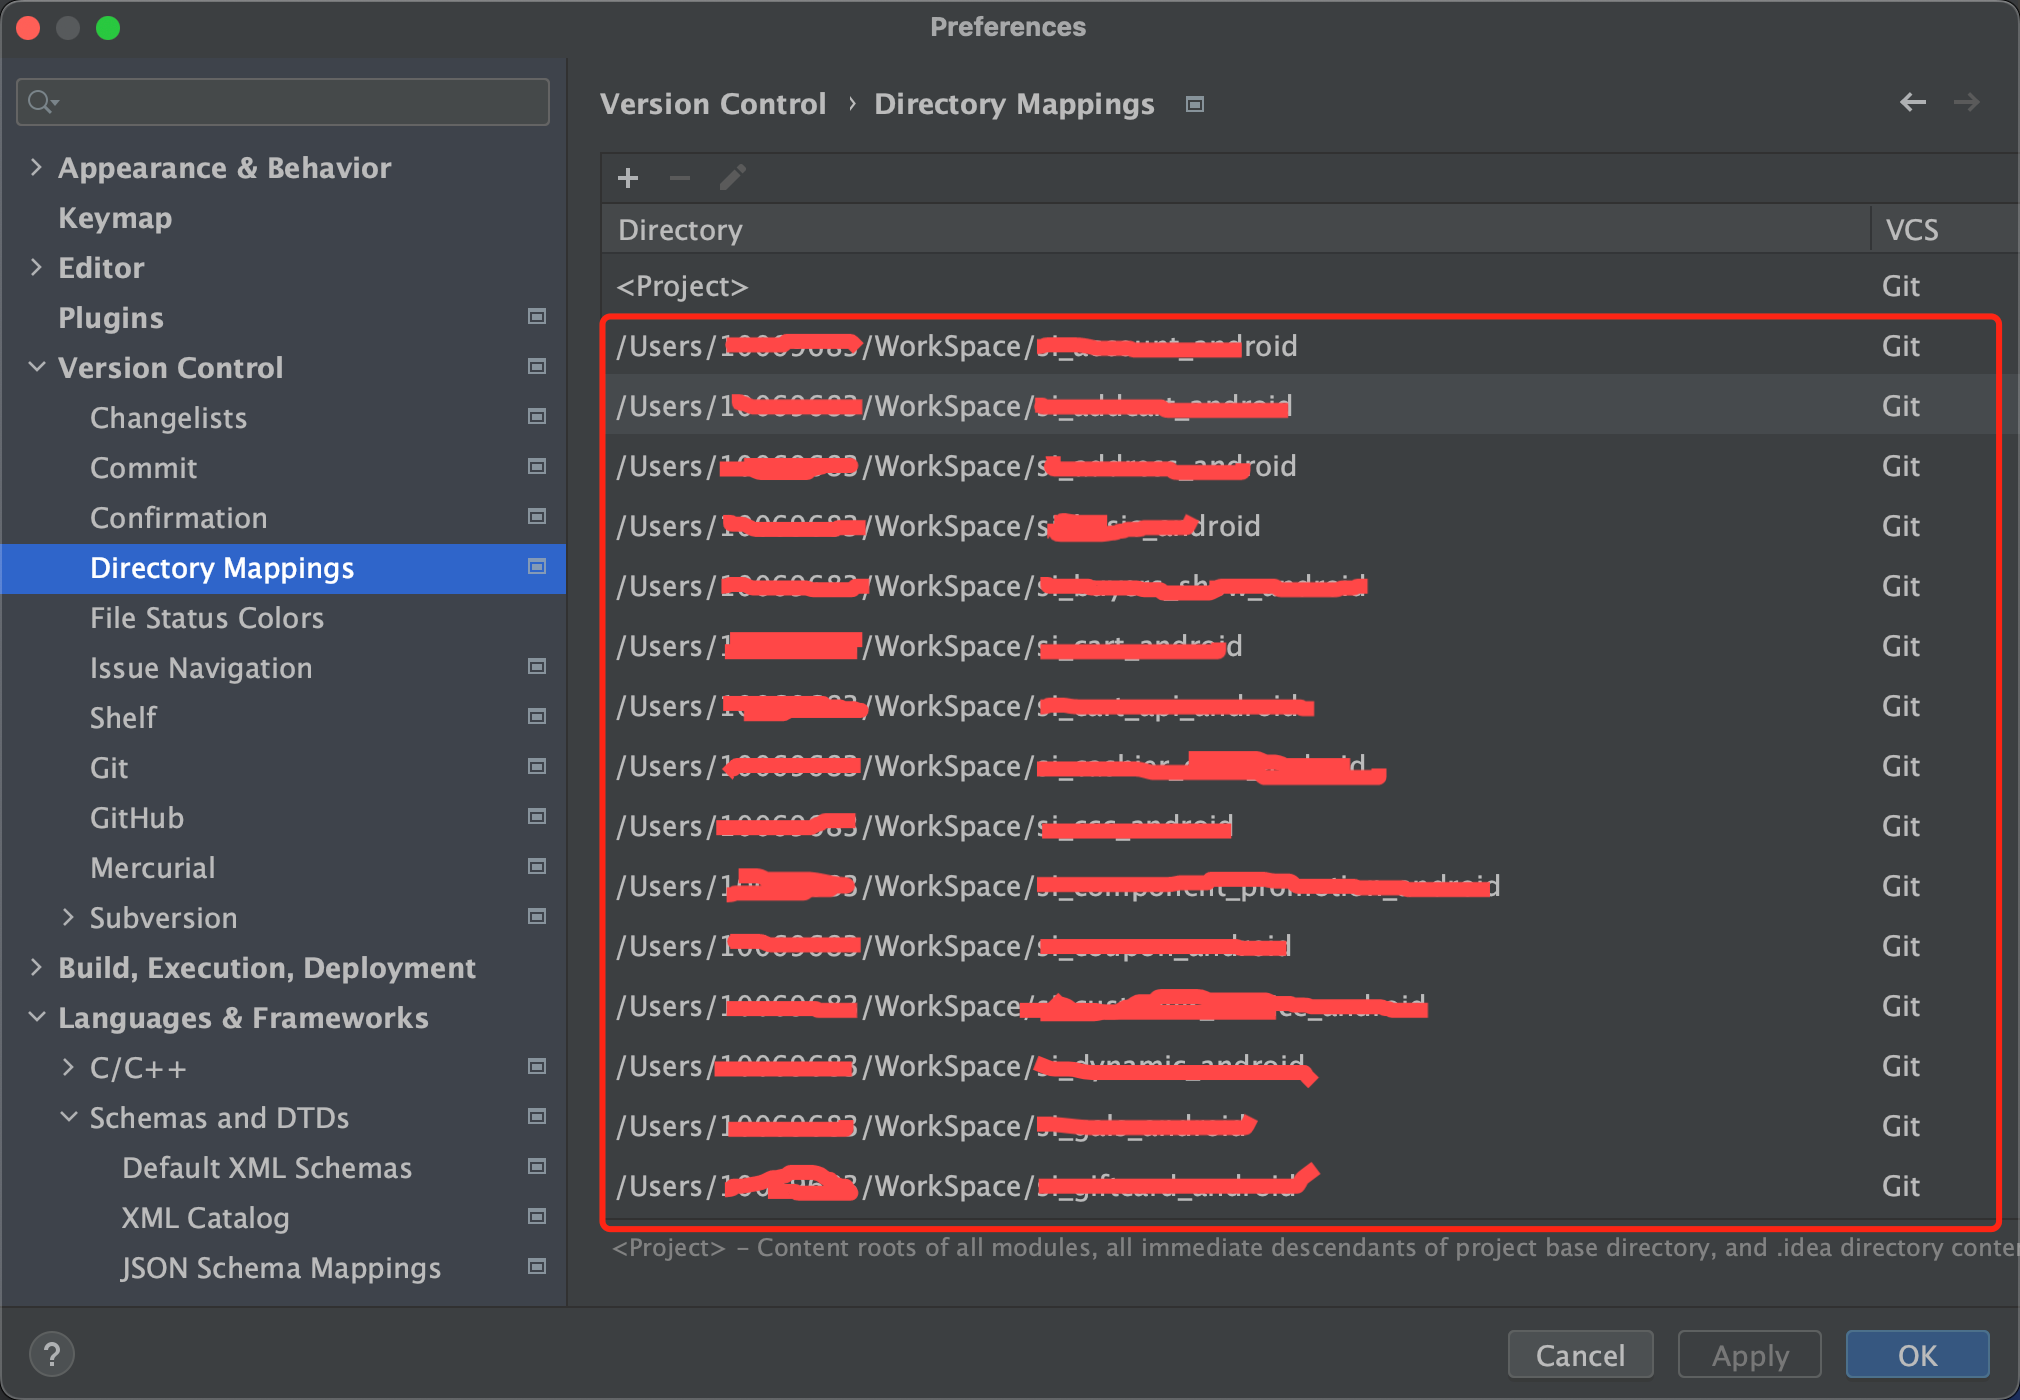
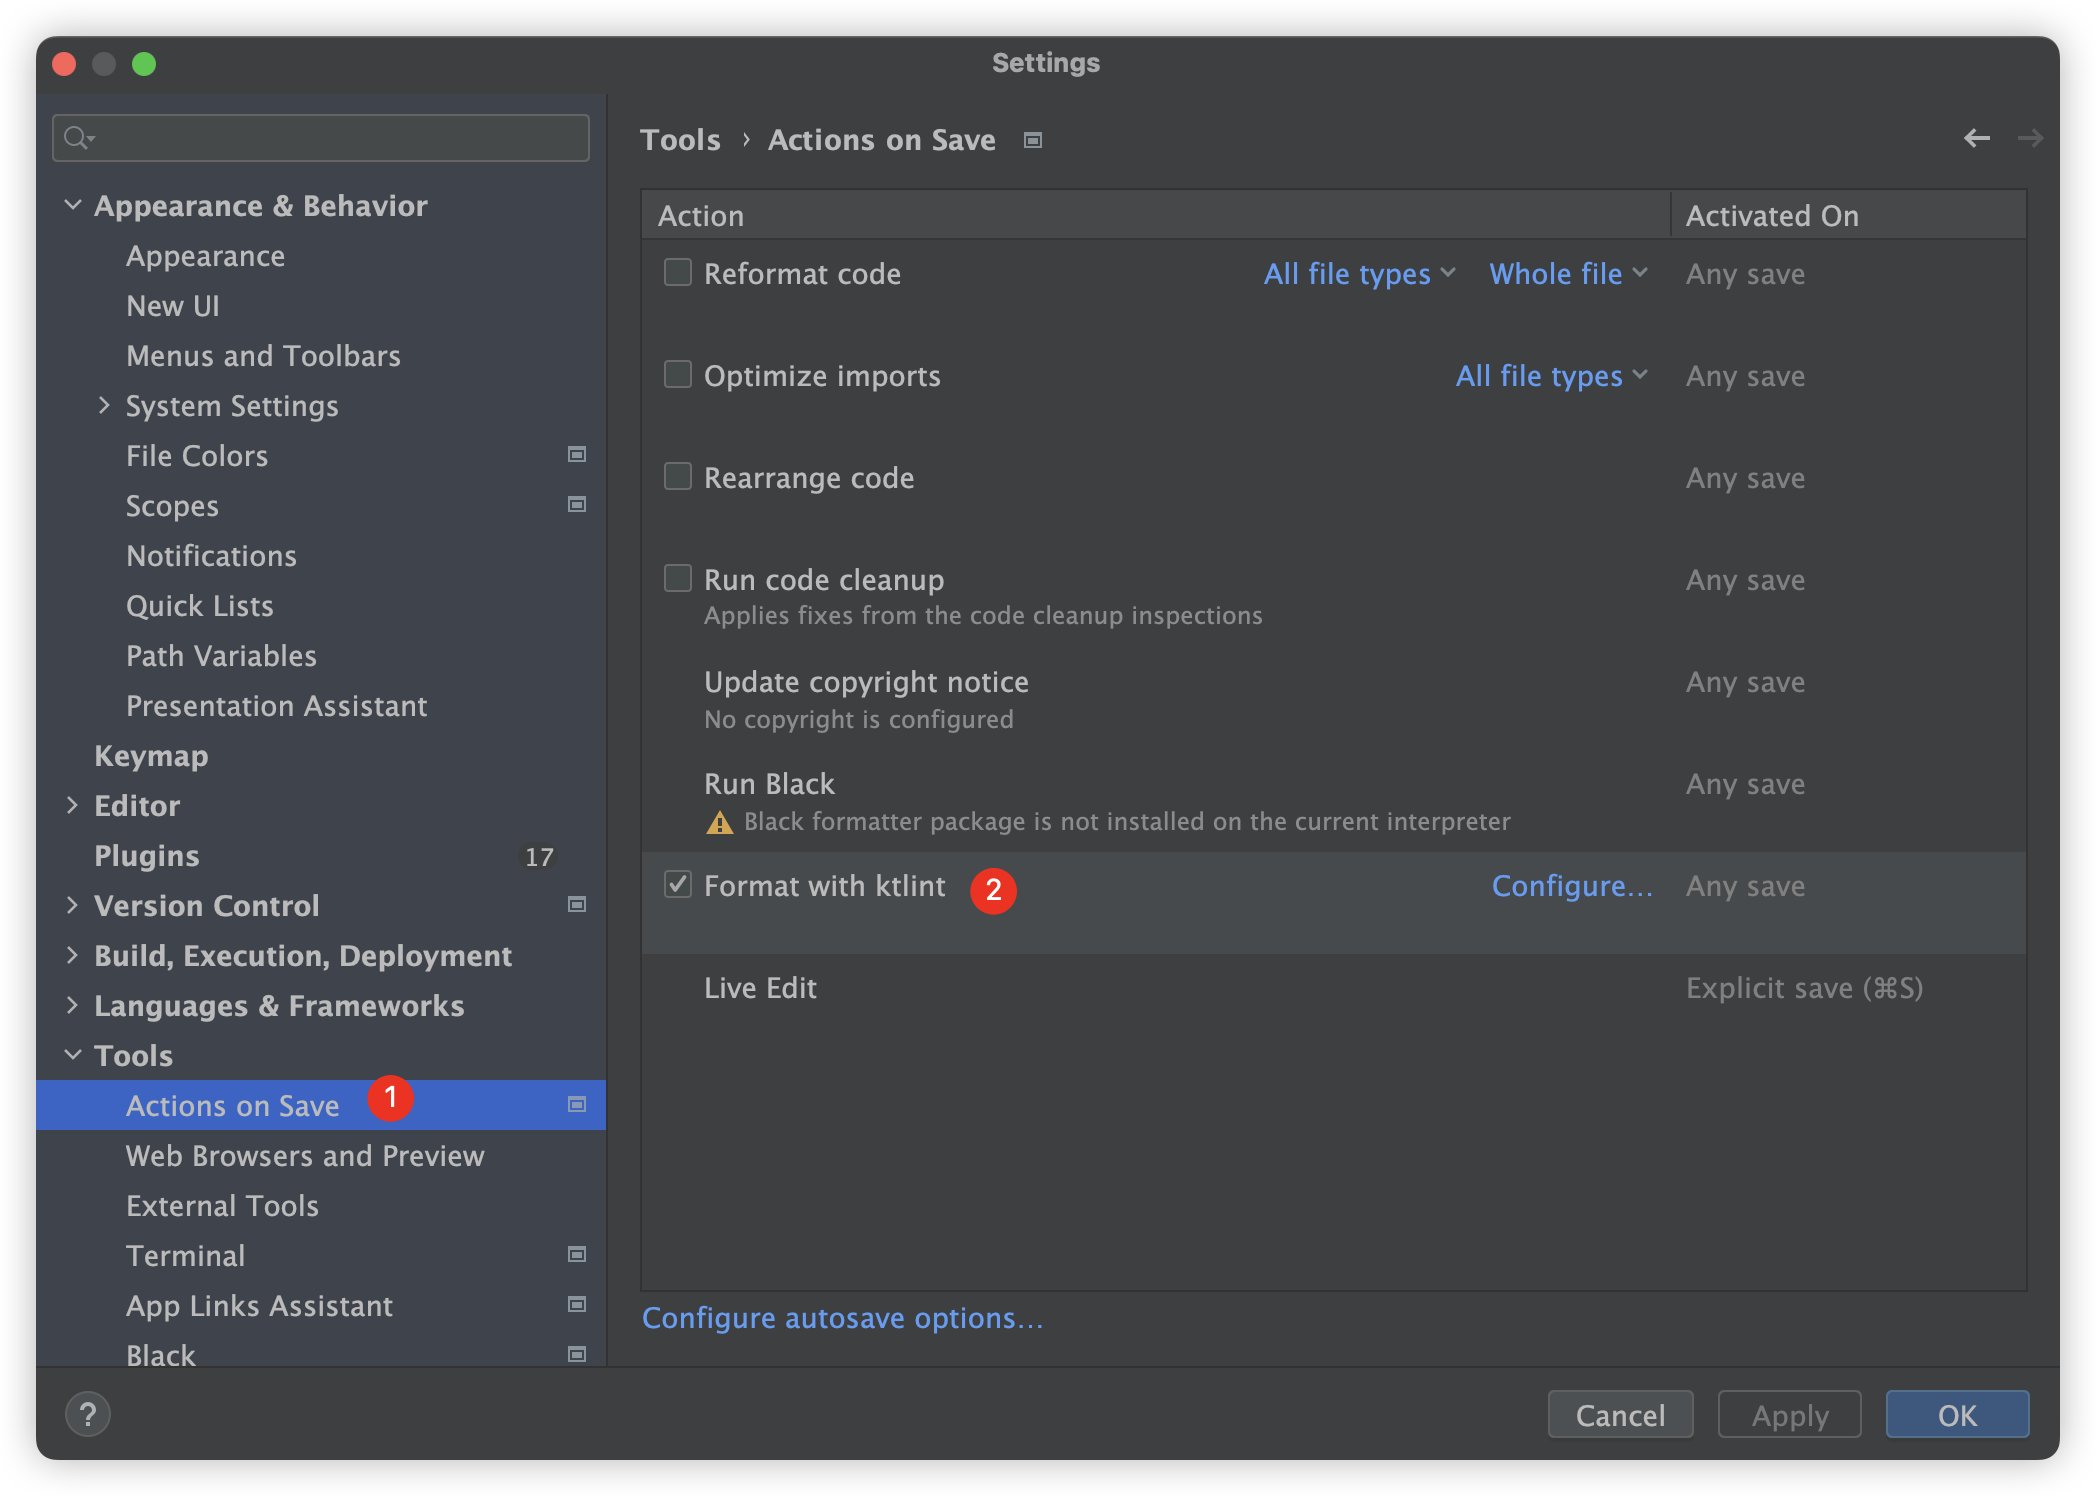
设置 Android Studio 在保存时自动对代码进行格式化
路径:File - Settings - Tools - Actions on Save
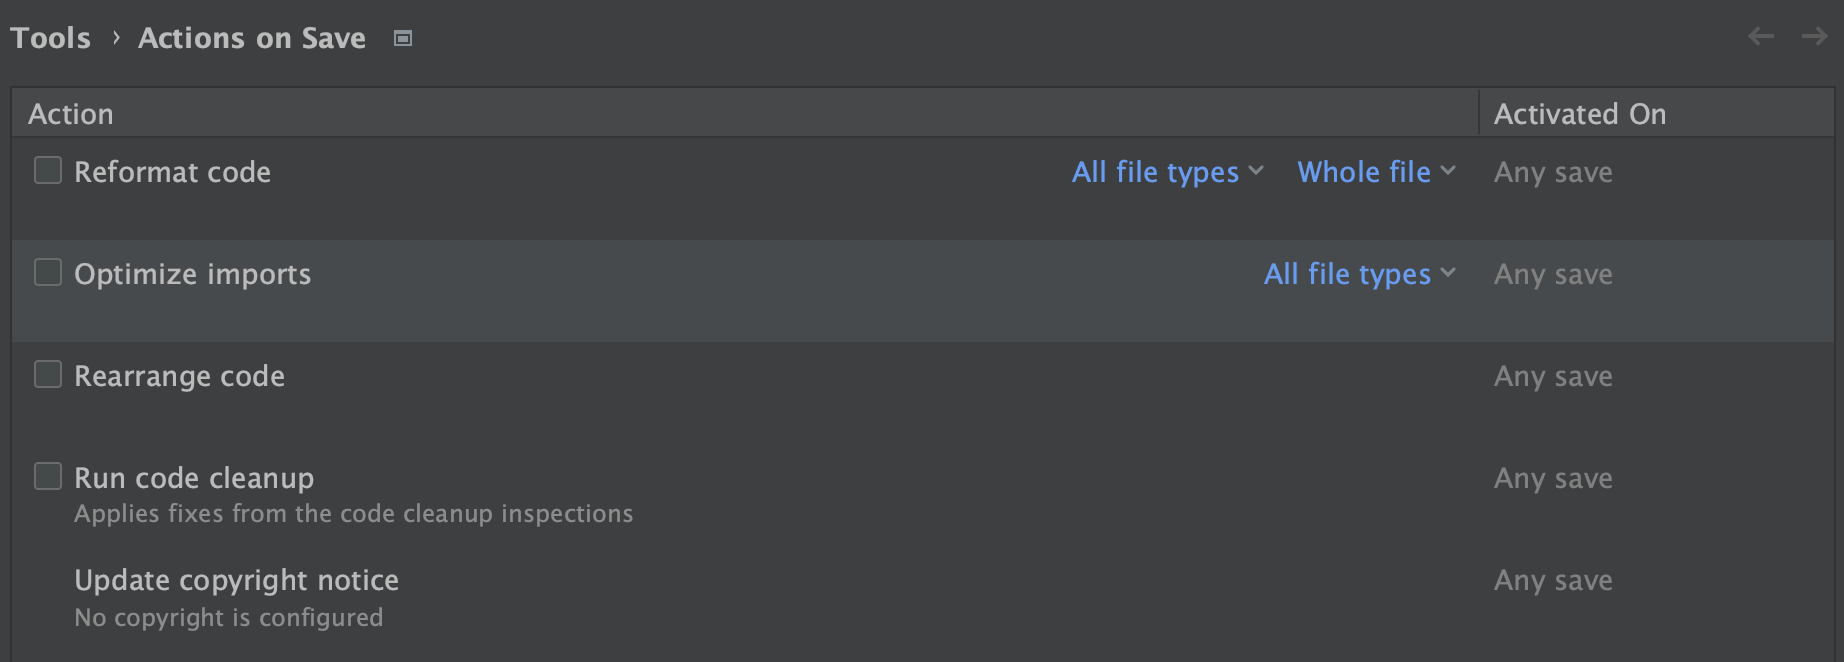
- Reformat code 格式化代码
- Optimize imports:对引用的清理也非常需要,否则会遗留一堆无用的引用。但也会带来一些不便,就是反复尝试一些代码端时,需要来回重新 import。
- Rearrange code (建议禁用。若开启,会导致 XML 中组件顺序被调换)
- Run code cleanup
去掉自动格式化
AS 设置三种 Templates
Postfix Completion 后缀模板 (系统默认,不能修改)
Editor→General→Postfix Completion
Custom Postfix Templates 自定义后缀模板(第三方插件,可自定义规则)
科学上网,Custom Postfix Templates 设置会卡住
Edit the templates 自定义插件模板定义
入口:快捷键:Alt+Shift+P 快速调出编辑脚本或 Tools→Custom Postfix Templates→ Edit Templates for Current Language
路径: ~/Library/Application Support/AndroidStudio4.0/intellij-postfix-templates_templates/templates/kotlin 每个语言一个目录
语法:
1
2
3
4
.TEMPLATE_NAME : TEMPLATE_DESCRIPTION
    TEMPLATE_RULE1
    TEMPLATE_RULE2
    // ...
MATCHING_TYPE 类型匹配(每种语言的不太一样)
Java 类型
In Java the MATCHING_TYPE can be either a Java class name or one of the following special types:
Kotlin 类型
In Kotlin the MATCHING_TYPE has to be ANY.
TEMPLATE_CODE
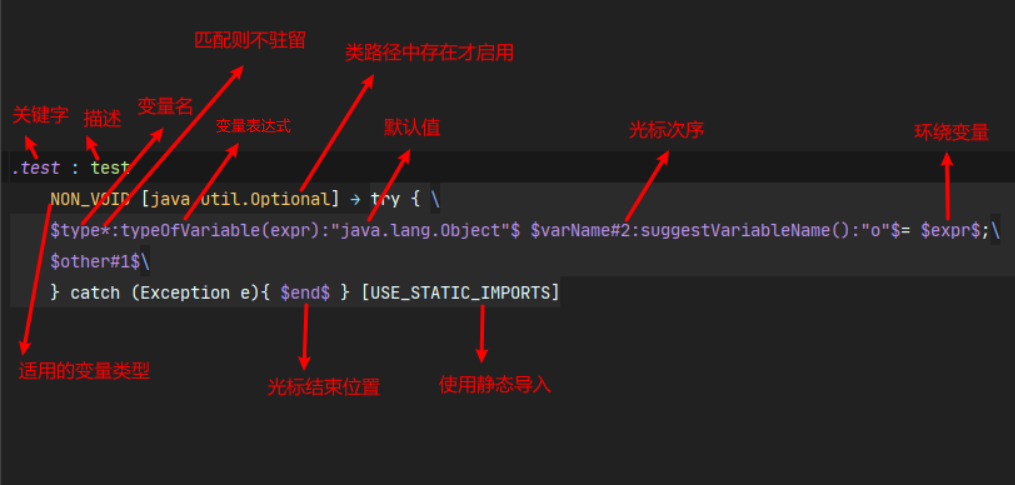
特殊变量
$expr$应用该 template 的表达式自身$END$光标最后的位置
自定义变量和用户交互
1
$NAME#NO:EXPRESSION:DEFAULT_VALUE$
- NAME 变量名;变量名后加
*跳过用户交互 - NO (optional) 变量名的交互顺序
- EXPRESSION (optional) a live template macro used to generate a replacement
- DEFAULT_VALUE (optional) 默认值
- 显示多行用
\连接
Template Examples
- Artificial example showing variable reordering, variable reusage, interaction skipping, macros, and default values:
1
2
.test : test
    NON_VOID → "$user*#1:user()$: $second#3:className()$ + $first#2::"1st"$ + $first$" + $expr$
- Real world example: Write a variable to the debug log, including the developer name, the class name, and method name:
1
2
.logd : log a variable
    NON_VOID → Log.d("$user*:user():"MyTag"$", "$className*:className()$ :: $methodName*:methodName()$): $expr$="+$expr$);
- Multi-line template:
1
2
3
4
.for : iterate over ...
    ITERABLE_OR_ARRAY → for ($ELEMENT_TYPE:iterableComponentType(expr):"java.lang.Object"$ $VAR:suggestVariableName()$ : $expr$) {\
      $END$\
    }
常用模板
1
2
3
4
5
6
7
8
9
10
11
12
13
14
15
16
17
18
19
20
21
22
23
24
25
26
27
28
29
30
31
32
33
34
35
36
37
38
39
40
41
42
43
44
45
46
47
48
49
50
51
52
.timber : logcat with timber
    ANY → Timber.d("$expr$ = %s",$expr$$END$);

.if : if
    ANY -> if($expr$)  { \
		$END$ \
	}

.forUntil : for Until(不包括)
	ANY -> for(i in 0 until $expr$) { \
		$END$ \
	}

.forIn : for in(包括)
	ANY -> for(i in 0 .. $expr$) { \
		$END$ \
	}

.logv : Log.v
	ANY -> Log.v("$tag*#1:kotlinClassName():""$", "[$className*#2:kotlinClassName():""$ $methodName*#3:kotlinFunctionName():""$] $expr$ $END$ ")
.logd : Log.d
	ANY -> Log.d("$tag*#1:kotlinClassName():""$", "[$className*#2:kotlinClassName():""$ $methodName*#3:kotlinFunctionName():""$] $expr$ $END$ )
.logi : Log.i
	ANY -> Log.i("$tag*#1:kotlinClassName():""$", "[$className*#2:kotlinClassName():""$ $methodName*#3:kotlinFunctionName():""$] $expr$ $END$ )
.logw : Log.w
	ANY -> Log.w("$tag*#1:kotlinClassName():""$", "[$className*#2:kotlinClassName():""$ $methodName*#3:kotlinFunctionName():""$] $expr$ $END$ )
.loge : Log.e
	ANY -> Log.e("$tag*#1:kotlinClassName():""$", "[$className*#2:kotlinClassName():""$ $methodName*#3:kotlinFunctionName():""$] $expr$ $END$ )

.logUtil_v : LogUtils.v
	ANY -> LogUtils.v("$tag*#1:kotlinClassName():""$", "[$className*#2:kotlinClassName():""$ $methodName*#3:kotlinFunctionName():""$] $expr$ $END$ ")
.logUtil_d : LogUtils.d
	ANY -> LogUtils.d("$tag*#1:kotlinClassName():""$", "[$className*#2:kotlinClassName():""$ $methodName*#3:kotlinFunctionName():""$] $expr$ $END$ ")
.logUtil_i : LogUtils.i
	ANY -> LogUtils.i("$tag*#1:kotlinClassName():""$", "[$className*#2:kotlinClassName():""$ $methodName*#3:kotlinFunctionName():""$] $expr$ $END$ ")
.logUtil_w : LogUtils.w
	ANY -> LogUtils.w("$tag*#1:kotlinClassName():""$", "[$className*#2:kotlinClassName():""$ $methodName*#3:kotlinFunctionName():""$] $expr$ $END$ ")
.logUtil_e : LogUtils.e
	ANY -> LogUtils.e("$tag*#1:kotlinClassName():""$", "[$className*#2:kotlinClassName():""$ $methodName*#3:kotlinFunctionName():""$] $expr$ $END$ ")

.scl : setOnClickListener
	ANY -> $expr$.setOnClickListener {\
		$END$\
	}

.ttl : Toast show LONG
	ANY -> Toast.makeText($tag*#1:classNameKt():""$@this, $expr$$END$, Toast.LENGTH_LONG).show()\
	 $END$ \

.tts : Toast show SHORT
	ANY -> Toast.makeText($tag*#1:kotlinClassName():""$@this, $expr$$END$, Toast.LENGTH_SHORT).show()\
	 $END$ \
Live Templates
Live Templates 定义: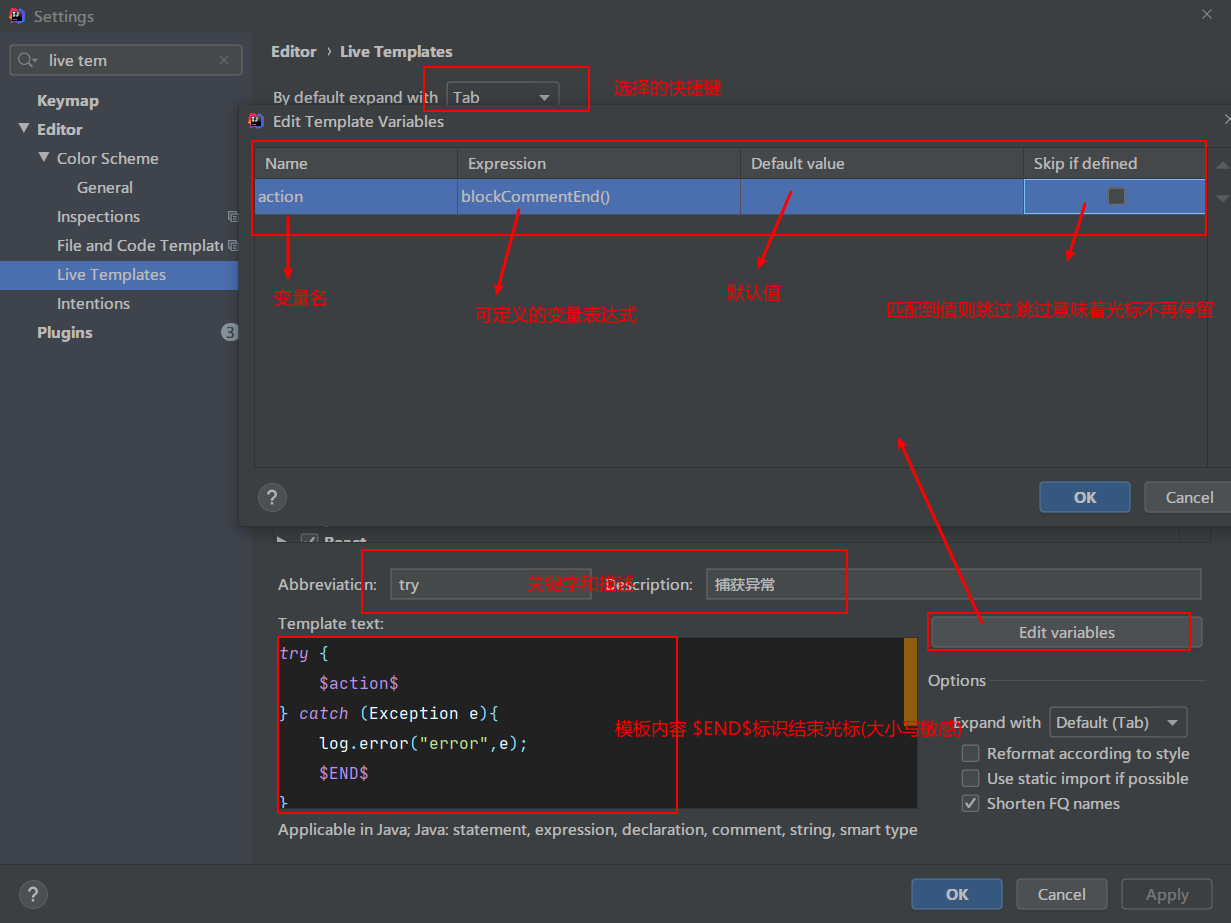
自定义 Live Template
- 首先建立一个 Template Group,路径
Editor→Live Templates,以后自定义的都放这里面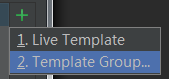
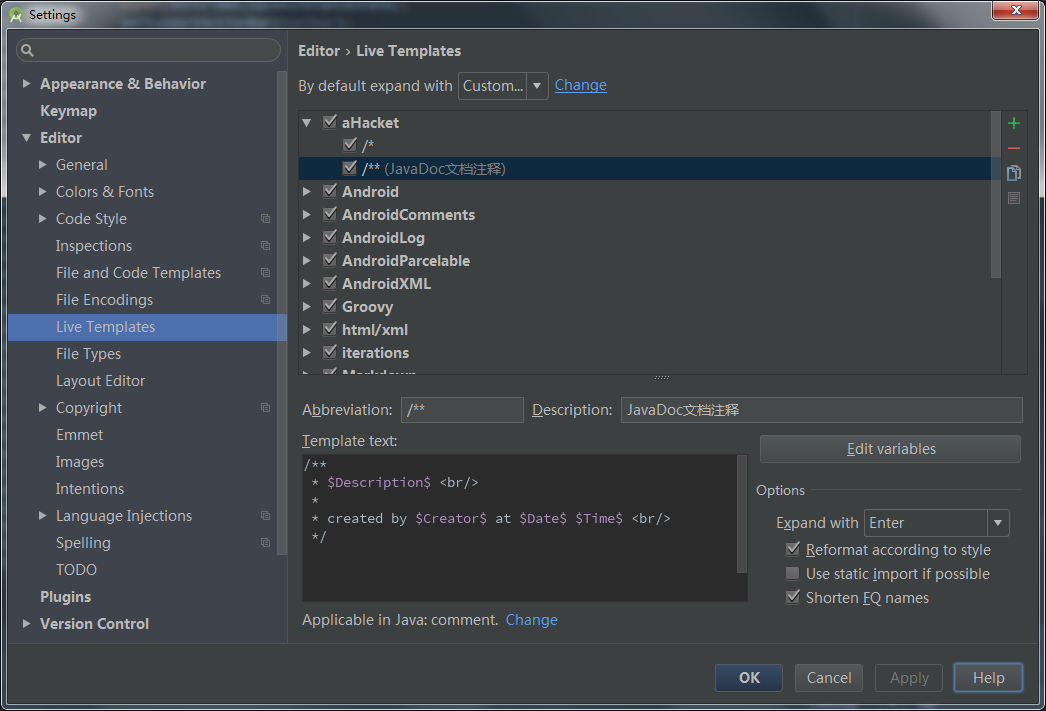
- 建立一个文档注释为/**的
1
2
3
4
Abbreviation 为缩写
Description 为描述
Template text 为模板
Options→Expand with,按什么生效,有Enter,Tab,Space
- Edit variables(先输入
$VAR$,Edid variable编辑变量值)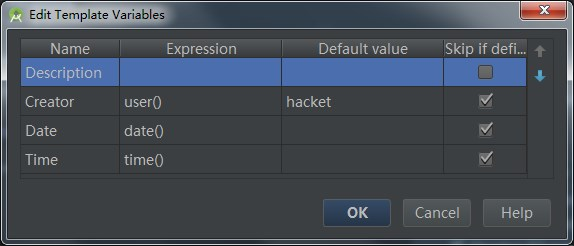
这里的 Expression 填什么可以参考官方网站的说明:https://www.jetbrains.com/idea/help/live-template-variables.html
Java 和 Kotlin 的 Expression 比如类名调用,是不一样的,要注意区分
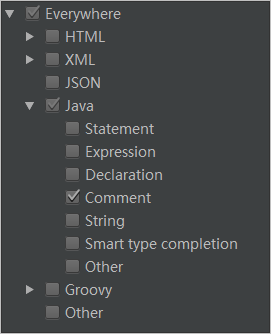
- Application in 作用在哪
Ref
- Android Studio 增加函数注释模板
http://www.cnblogs.com/zgz345/p/4994885.html - 让你变懒的 ANDROID STUDIO LIVE TEMPLATES
http://stormzhang.com/2016/08/21/android-studio-live-templates/
An #androidDev collection of Live Templates for Android Studio
https://github.com/keyboardsurfer/idea-live-templates
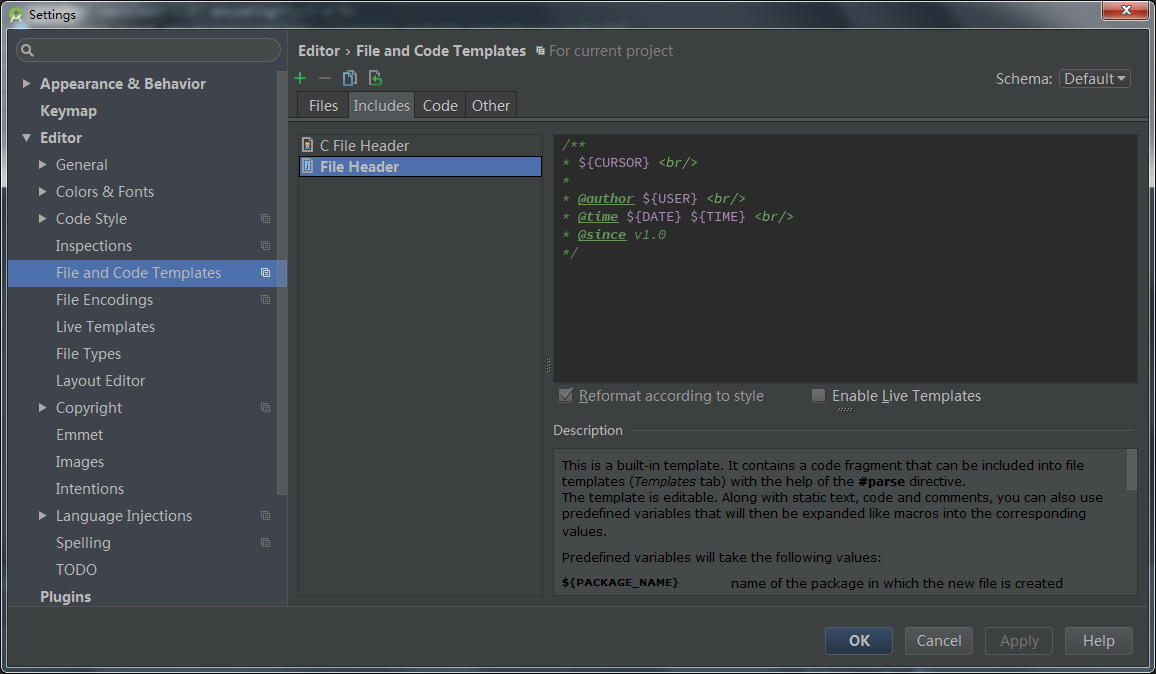
File and Code Templates 配置新建文件模板
1、新建 Class, Activity 等的类注释
路径:Editor→Code Style→File and Code Templates→Includes→File Header
1
2
3
4
5
6
7
/**
 *  <br/>
 *
 * @author ${USER} <br/>
 * @time ${DATE} ${TIME} <br/>
 * @since v1.0
 */
其他的文件很多引用该文件
1
#parse("File Header.java")
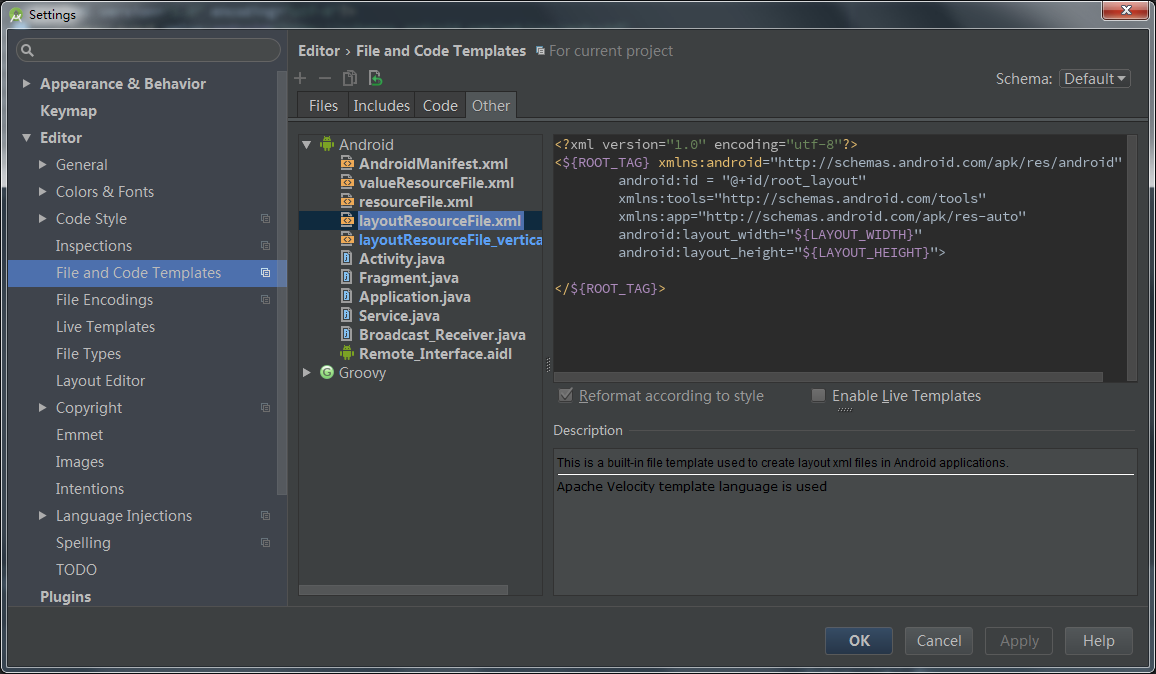
2、新建的布局文件增加 app 和 tools 名称空间声明以及 +id
其中 app 自定义属性用到,tools 进行布局预览可以用到
1
2
3
android:id="@+id/root_layout"
xmlns:app="http://schemas.android.com/apk/res-auto"
xmlns:tools="http://schemas.android.com/tools"
全部:
1
2
3
4
5
6
7
8
9
<?xml version="1.0" encoding="utf-8"?>
<${ROOT_TAG} xmlns:android="http://schemas.android.com/apk/res/android"
        android:id = "@+id/root_layout"
        xmlns:tools="http://schemas.android.com/tools"
        xmlns:app="http://schemas.android.com/apk/res-auto"
        android:layout_width="${LAYOUT_WIDTH}"
        android:layout_height="${LAYOUT_HEIGHT}">

</${ROOT_TAG}>