Android Notification
Android Notification
通知栏发展史
Android 通知栏从最初的 Android1.1 系统一直到如今的 7.X 版本,发生了翻天覆地的变化。从图中可以看出,1.X-2.2 版本的通知栏采用了白色背景和黑色字体;2.3-4.X 版本,默认背景变成了黑色,而主标题采用白色字体,内容为灰色字体。从 Android5.0 开始,又更改为白色背景和黑色字体。这只是原生的 Android 系统通知栏默认颜色,许多厂商对每个 Android 的版本都尝试了各式各样的修改。
Android 1.X 修改记录
Android 1.X 版本也就是第一个 Android 诞生的版本。从 Android1.1 版本开始,提供基本的通知栏消息功能,包含小图标、主标题、副标题和时间这四个元素。右上角有一个清除通知栏消息的按钮。需要说明的是,Android 从一开始就提供了清除通知栏消息的功能并且保留至今,而 iOS 到现在都没有提供清除按钮。
Android 2.X 修改记录
Android 2.X 版本的通知栏消息功能上并未发生变化,右上角的 clear notifications 缩减为了 clear。2.2 版本以前沿用了 1.5 的通知栏样式,从 2.3 版本开始重新设计,改成了暗色背景。
Android 3.X 修改记录
Android 3.X 版本是专为 Pad 而设计的系统。通知栏消息带来了一些新的功能:
- 非永久的通知栏消息的右边增加了 “X” 按钮,点击后该条通知可以立即清除
- 增加了 RemoteControlClient,即远程控制媒体应用的功能
- 增加了 LargeIcon,可以使用大图展示通知栏消息
Android 4.1 (Android JellyBean API16~18)修改记录
Android 4.1 版本的通知栏在 3.X 版本的基础上进行了大量修改。增加了不少新功能:
- 增加了通知栏样式 (Style)
- 增加了通知栏按钮
- 支持通知栏展示的优先级配置
- 通知栏背景改为黑色透明
通知栏样式 (Style)
Android 4.1 通知栏最大的变化就是增加了丰富多样的 Style 样式。通过设置样式,可以展示更大区域的通知消息,如展示大图和多行文字,也可以展示类似邮箱收发信的样式,同时支持自定义按钮并增加点击事件。但需要注意的是,只有最顶部的那条通知栏消息可以默认展示 Style 样式,其他消息默认是以普通样式展示。Style 可以通过 Notification.Builder.setStyle(Style) 进行设置。具体支持的样式有:
- Notification.BigPictureStyle
大图样式,即除了普通的通知栏消息内容外,可以在通知栏消息下方展示一张大图,最大高度支持 256dp。
- Notification.BigTextStyle
多行文字样式,可以支持多行文字的展示。经测试,在不同手机上能够支持的行数不一样,测试过的机子,最大支持 12 行。
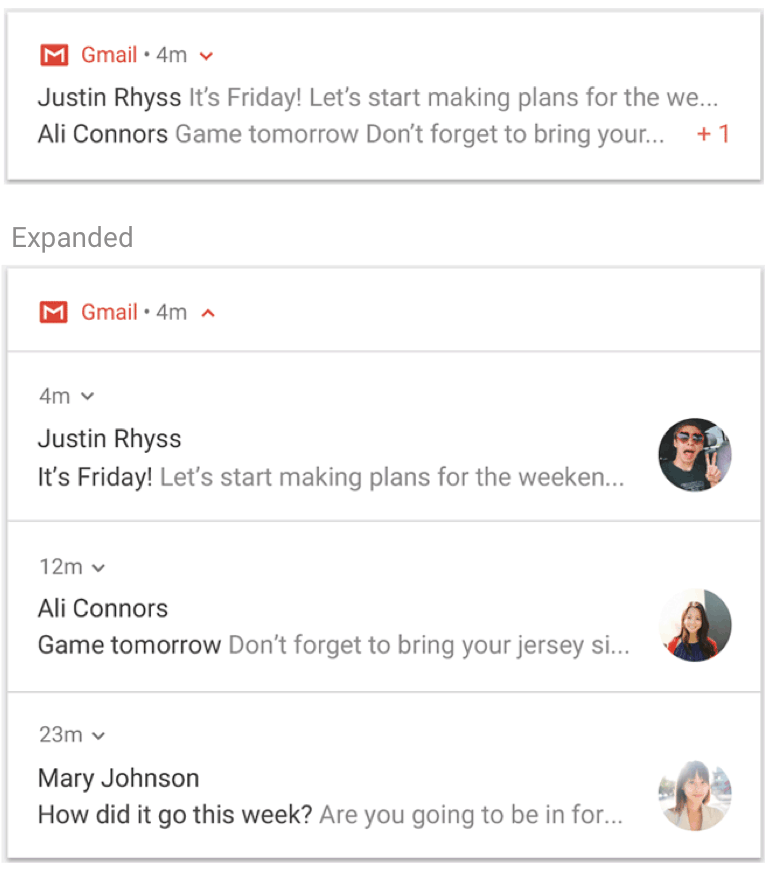
- Notification.InboxStyle
收件箱样式。支持展示具有一串消息内容的会话样式,适用于短信、邮件、IM 等。
通知栏按钮 Action
通知栏消息不管是普通样式还是 Style 样式,都支持两个按钮同时出现在一条通知栏消息的底部,通过这两个按钮,可以自定义一系列动作,包括回复信息和邮件,点赞等。通过 Notification.Builder.addAction(Action) 添加按钮。
通知栏优先级
Android 4.1 通知栏增加了优先级的配置,优先级高的消息可以展示在最上方。
谷歌设计优先级的初衷是根据不同的优先级来防止用户整天被各种莫名其妙的通知栏消息骚扰,重要的通知则应该适当提高优先级,使得用户可以快速地看到并回应,不重要的通知则降低优先级,防止用户被打扰。
优先级一共有 5 个级别,分别是:
1
2
3
4
5
6
7
8
9
10
// 默认优先级
public static final int PRIORITY_DEFAULT = 0;
// 低优先级
public static final int PRIORITY_LOW = -1;
// 最低优先级
public static final int PRIORITY_MIN = -2;
// 高优先级
public static final int PRIORITY_HIGH = 1;
// 最高优先级
public static final int PRIORITY_MAX = 2;
Android 4.3 修改记录
Android 4.3 通知栏没有发生大的变化。主要增加了两个小功能:
- 增加了
Notification AccessApi,允许可穿戴设备远程控制通知栏消息。 - 增加了
NotificationListenerService,允许接收到系统通知栏列表的变化
Android 5.X (Android L API21-22)修改记录
Android 5.X 系统相较于以前的版本,可以说是一个真正可以和 iOS 抗衡的系统。材料设计给 Android 系统注入了新的活力,相应的通知栏消息也相较于上一个版本进行了改版。主要变化:
- 通知栏修改为白色背景,暗色字体,以适应材料设计风格。
- 新增勿扰模式下阻止所有声音和震动,8.0 后可以根据渠道分别设置
- 新增横幅通知:增加了
Heads-up通知,即通过状态栏浮动窗口展示通知消息 - 新增锁屏通知:锁屏状态下,可以控制通知栏消息的隐私程度
Android5.0 支持锁屏通知,Android8.0 开始,可以在通知渠道设置启用和禁止锁屏通知
- 其他
- 系统会忽略所有
non-alpha通道的图标,包括按钮图标和主图标。 - 可以通过
setColor()方法在图标后设置一个背景色。 - 通知消息的声音将通过
STREAM_RING或者STREAM_NOTIFICATION控制,以前是通过STREAM_MUSIC控制。 - 移除了
RemoteControlClient,更改为NotificationCompat.MediaStyle实现
- 系统会忽略所有
Android 6.X (Android M API23)修改记录
- 移除了
Notification.setLatestEventInfo()方法,通过持有Notification.Builder,然后使用 build() 方法可以更新同一个通知栏实例。 - 允许用户控制应用通知的优先级。
- 加入了免打扰模式(Do Not Disturb)。
Android 7.X (Android N API24-25)修改记录
- 通知栏样式全面改版,小图标在左上角,大图标在右边,小图标、App 应用名、副标题、数量和时间在第一行,第二行是主标题,第三行是内容。
- 支持通知分组消息 group notifications,相似的消息在达到一定数量后会按照消息组来显示
默认是 4 条分组消息折叠
- 增加了
Notification.DecoratedCustomViewStyle()和Notification.DecoratedMediaCustomViewStyle(),帮助更好的装饰带有 RemoteViews 的通知栏消息。 - 需要动态设置
Builder.setShowWhen(true)才会显示时间。 - 支持 Action 的直接回复,通过
RemoteInput实现,且回复的消息内容支持立即添加到通知栏。 - 增加了
NotificationManager.areNotificationsEnabled告知应用是否开启了通知权限。
Android 8.x(Android O API26-27)
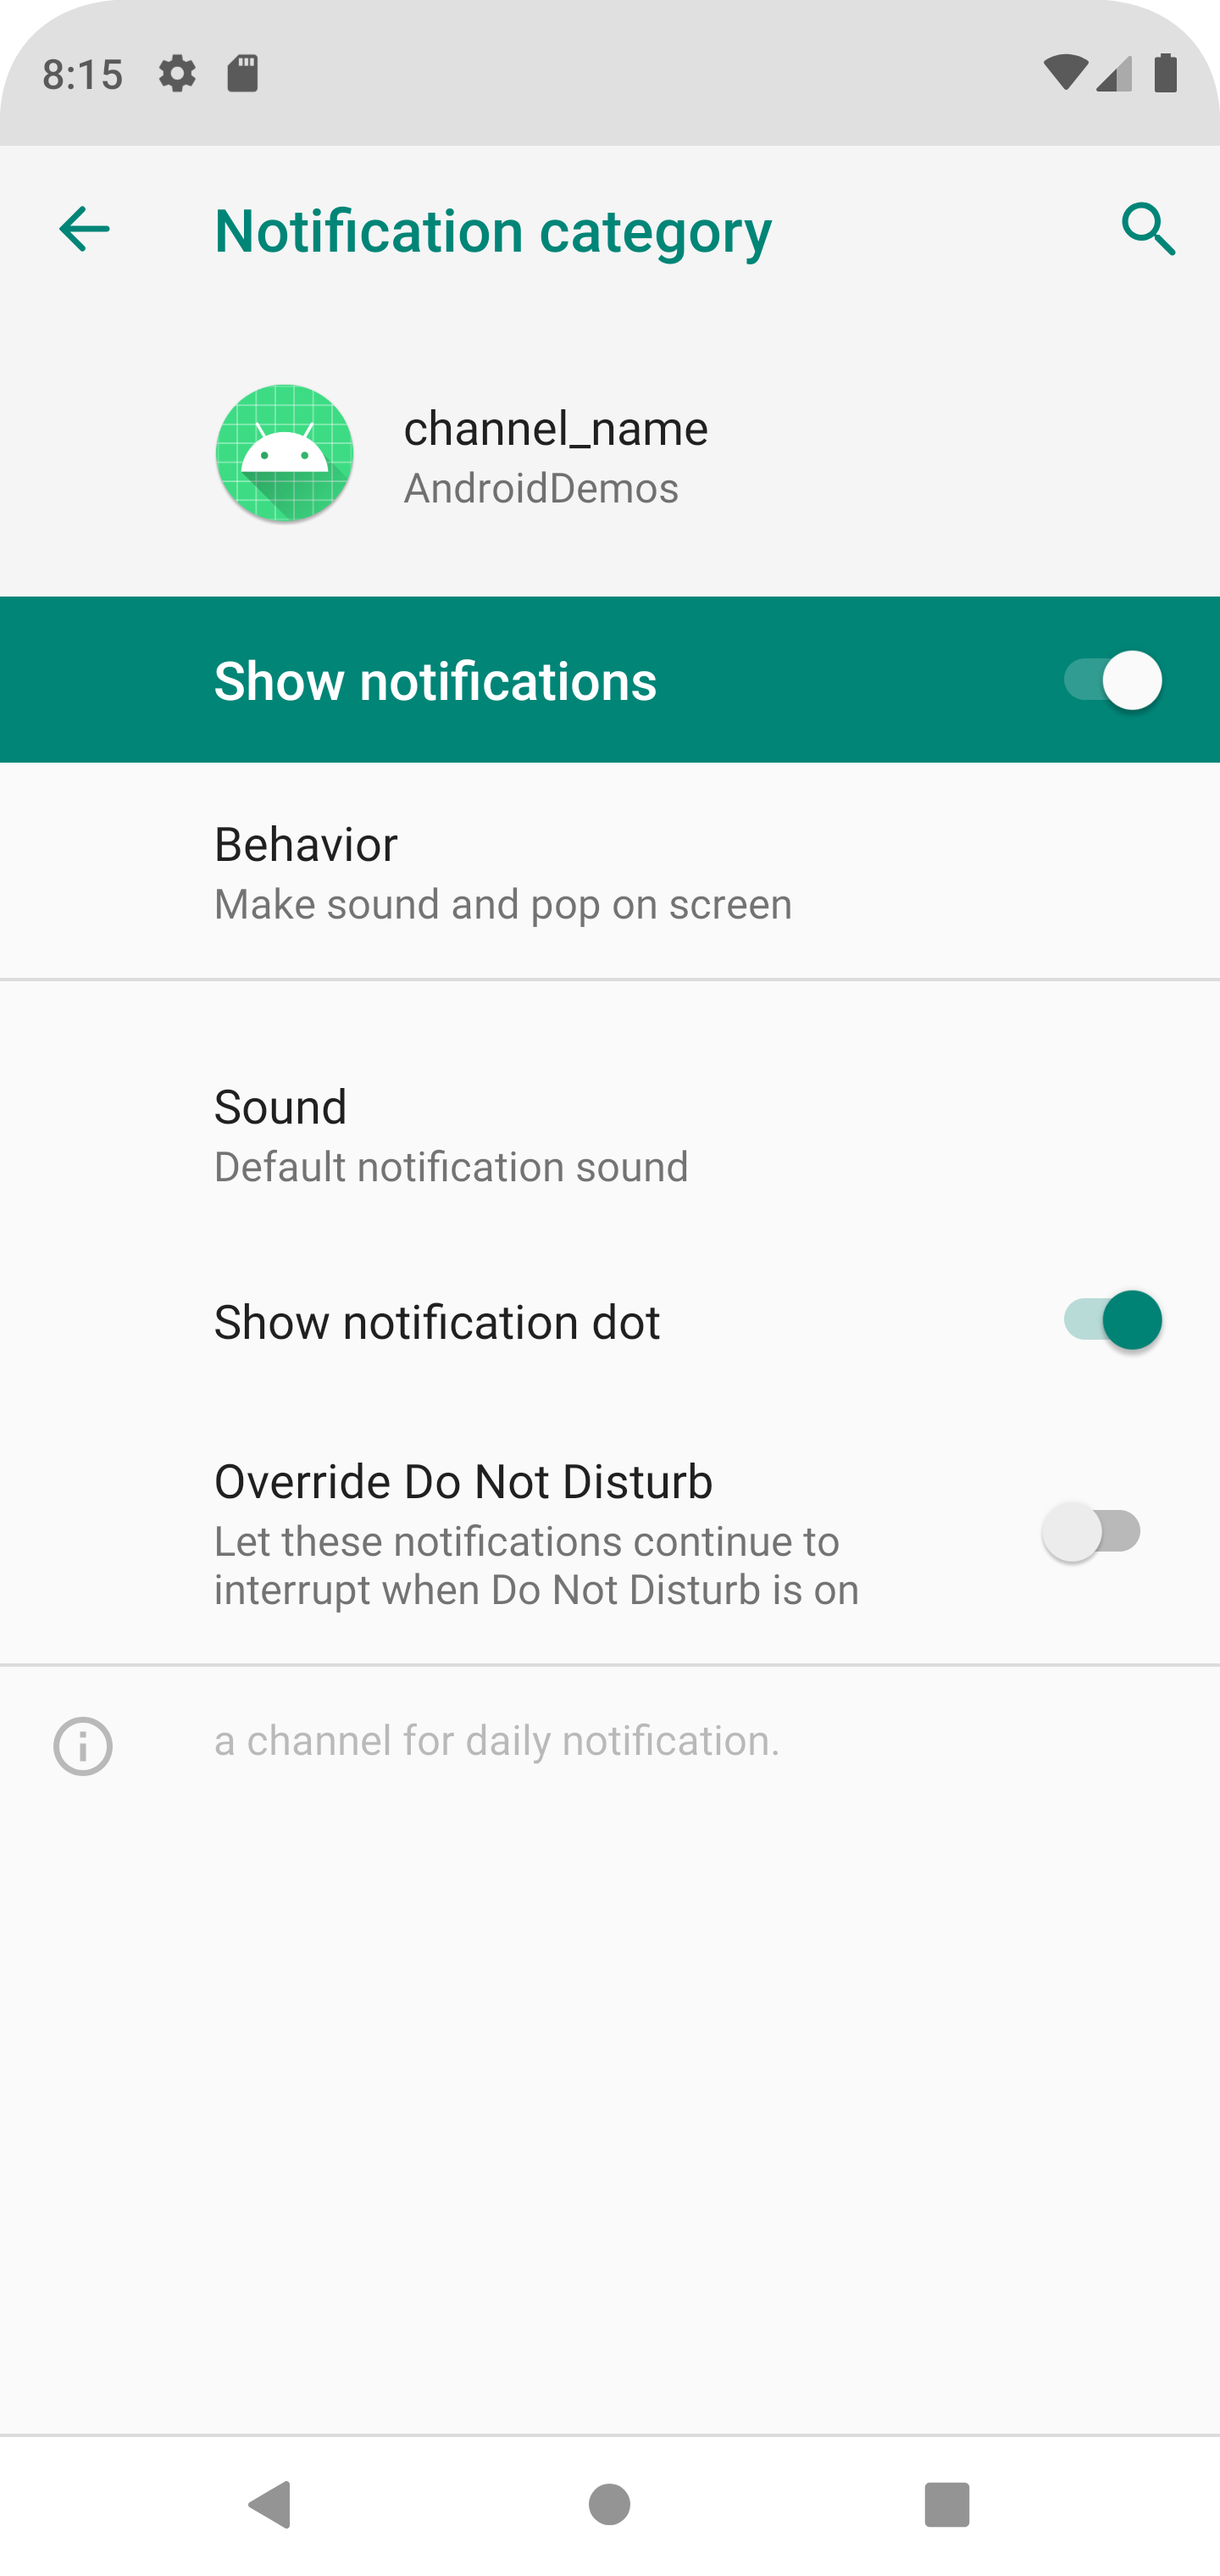
- Notification Channels 通知渠道
Android O 还引入了通知渠道,开发者可以让用户对不同种类的通知进行精细控制,用户可以单独拦截或更改每个渠道的行为,而不是统一管理应用的所有通知。
举个例子,用户可以分别控制微信群组和微信个人在通知栏的显示级别,群组消息混杂,可以调整较低的显示级别;而个人消息相对重要,可以调整为较高的级别。
- Notification Priority and Importance
Android O 系统弃用了旧的通知栏优先级,并提出了通知栏消息重要性这个概念。通知栏上的消息展示顺序不再由优先级控制,也无法使用重要性来控制。重要性可以控制消息展示在什么地方,例如默认级别 IMPORTANCE_DEFAULT(3) 可以展示在任意地方,如通知栏、状态栏、锁屏,可以发出通知声音,但不直接展示给用户,即不会弹出 Heads-up 通知。重要性一共有 6 个级别:
- IMPORTANCE_NONE(0)
- IMPORTANCE_MIN(1)
- IMPORTANCE_LOW(2)
- IMPORTANCE_DEFAULT(3)
- IMPORTANCE_HIGH(4) Heads-up 通知(状态栏悬浮)
- IMPORTANCE_MAX(5)
开发者只能设置 IMPORTANCE_NONE(0) 至 IMPORTANCE_HIGH(4) 级别,最高级别不能通过代码控制。重要性控制也是针对通知渠道级别的
- Snoozing
有点类似闹钟的打盹儿功能。用户可以让一条打盹儿了的通知栏消息再次出现在通知栏上。开发者可以移除或更新一条打盹儿消息,但更新这条消息不会让已经处于打盹儿状态的通知栏消息再次展示到通知栏上。
- Notification timeouts
创建一条通知栏消息时,支持设置消息有效期,超过有效期后通知栏消息会被系统取消。通过 Notification.Builder.setTimeout() 方法设置。
- Notification dismissal
新系统提供了 API,区分一条通知是被用户移除或者被应用(即开发者)移除。通过 NotificationListenerService.onNotificationRemoved() 方法可以监听得到。
- Background colors 背景颜色
新系统提供了 API 设置通知栏消息的背景颜色。值得注意的是,应当谨慎使用这个 API,只有当消息非常紧急,必须通知到用户的时候,才需要设置背景色。
例如,可以为一个正在导航的应用,或者来电设置一个背景色。可以通过
Notification.Builder.setColor()或者Notification.Builder.setColorized()设置。
疑惑。之前 Notification.Builder.setColor() 这个方法在 Android N 上设置的是通知栏消息第一行的颜色,包括图标、应用名称、副标题等。而在 Android O 上变成了修改整个消息的背景色?需要测试一下。
- Messaging style
设置了 Messaging style 风格的消息在新系统上能够展示更多的内容。消息导向 (messaging-related) 的通知栏消息应该使用 MessageStyle 风格代替原生消息。开发者也可以使用新的 addHistoricMessage() 方法将消息添加到通知栏中,以便提供对话的上下文信息。
- 通知角标:8.0 开始,支持设置通知时桌面的角标是否显示
1
2
3
4
val mChannel = NotificationChannel(id, name, importance).apply {
    description = descriptionText
    setShowBadge(false)
}
- 通知限制:8.1 开始,每秒发出的通知声音不能超过一次。
Android10.x(Android Q API29)
- 全屏意图
10.0 全屏意图需要在 manifest 中申请 USE_FULL_SCREEN_INTENT 权限
Android12.x(Android S API31)
- PendingIntent flag
在 Android12 的设备 PendingIntent 需要加上这 2 个 flag 之一,否则报错
java.lang.IllegalArgumentException: me.hacket.assistant.samples: Targeting S+ (version 31 and above) requires that one of FLAG_IMMUTABLE or FLAG_MUTABLE be specified when creating a PendingIntent.
Android11,PendingIntent 默认加了 FLAG_MUTABLE;Android12 必须显示的指定 FLAG_IMMUTABLE 或者 FLAG_MUTABLE,推荐用 FLAG_IMMUTABLE;仅当某些功能依赖于修改底层意图时才应使用 FLAG_MUTABLE,例如任何需要与 reply 或 bubble 一起使用的 PendingIntent。
1
2
3
4
5
6
val flag = if (Build.VERSION.SDK_INT >= Build.VERSION_CODES.S) {
    PendingIntent.FLAG_IMMUTABLE
} else {
    PendingIntent.FLAG_UPDATE_CURRENT
}
PendingIntent.getActivity(applicationContext, 0, intent, flag)
- 自定义通知
从 12.0 开始,将不支持完全自定义的通知,会提供 Notification.DecoratedCustomViewStyle 替代
- 解锁设备
12.0 及以上,可以设置需要解锁设备才能操作:setAuthenticationRequired
1
2
3
4
5
val moreSecureNotification = Notification.Builder(context, NotificationListenerVerifierActivity.TAG)
    .addAction(...)
    // from a lock screen.
    .setAuthenticationRequired(true)
    .build()
- 通知栏 UI 缩紧
安卓 12(targetSdk >= 32)自定义通知的显示区域在收紧(折叠时高度上限为 64dp,展开时高度上限为 256dp),系统强制显示通知的小图标,包括常驻通知,显示区域为图中阴影部分
在 Android12 通知 UI 的显示可能会异常,可以对 Android11 和 Android12 提供 2 套布局
Android13.x(Android T API33)
Notification 适配
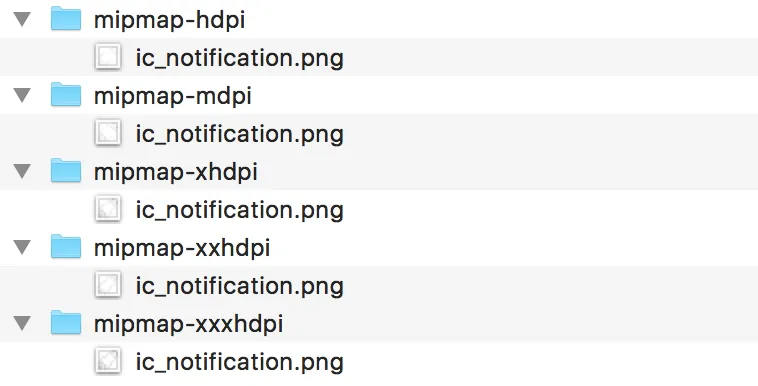
Notification icon 尺寸
1
2
3
4
5
MDPI - 24 x 24  (drawable-mdpi)
HDPI - 36 x 36  (drawable-hdpi)
XHDPI - 48 x 48  (drawable-xhdpi)
XXHDPI - 72 x 72  (drawable-xxhdpi)
XXXHDPI - 96 x 96  (drawable-xxxhdpi)
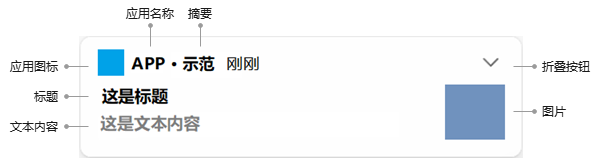
基本 Notification
Notification 常用 API
| API | 描述 |
|---|---|
| setContentTitle | 标题 |
| setContentText | 内容 |
| setSubText | 子标题 |
| setLargeIcon | 大图标 |
| setSmallIcon | 小图标 |
| setContentIntent | 点击时意图,clear all 或者滑掉单条消息会回调;但 cancel 不会回调 |
| setDeleteIntent | 删除时意图 |
| setFullScreenIntent | 全屏通知点击意图,来电、响铃 |
| setAutoCancel | 点击自动取消 |
| setCategory | 通知类别,适用 “ 勿扰模式 “ |
| setVisibility | 屏幕可见性,适用 “ 锁屏状态 “ |
| setNumber | 通知项数量 |
| setWhen | 通知时间 |
| setShowWhen | 是否显示通知时间 |
| setSound | 提示音 |
| setVibrate | 震动 |
| setLights | 呼吸灯 |
| setPriority | 优先级,7.0 |
| setTimeoutAfter | 定时取消,8.0 及以后 |
| setProgress | 进度 |
| setStyle | 通知样式,BigPictureStyle、BigTextStyle、MessagingStyle、InboxStyle、DecoratedCustomViewStyle |
| addAction | 通知上的操作,Android10.0 |
| setGroup | 分组 Android7.0 及以上 |
| setColor | 背景颜色 |
| setTicker(CharSequence) | 设置收到通知时在顶部显示的文字信息 |
| setAutoCancel(boolean) | 用户点击 Notification 点击面板后是否让通知取消 (默认不取消) |
| setTimeoutAfter | 设置 Notification 超时,超时过后消息消失,8.0 及以上,单位秒 |
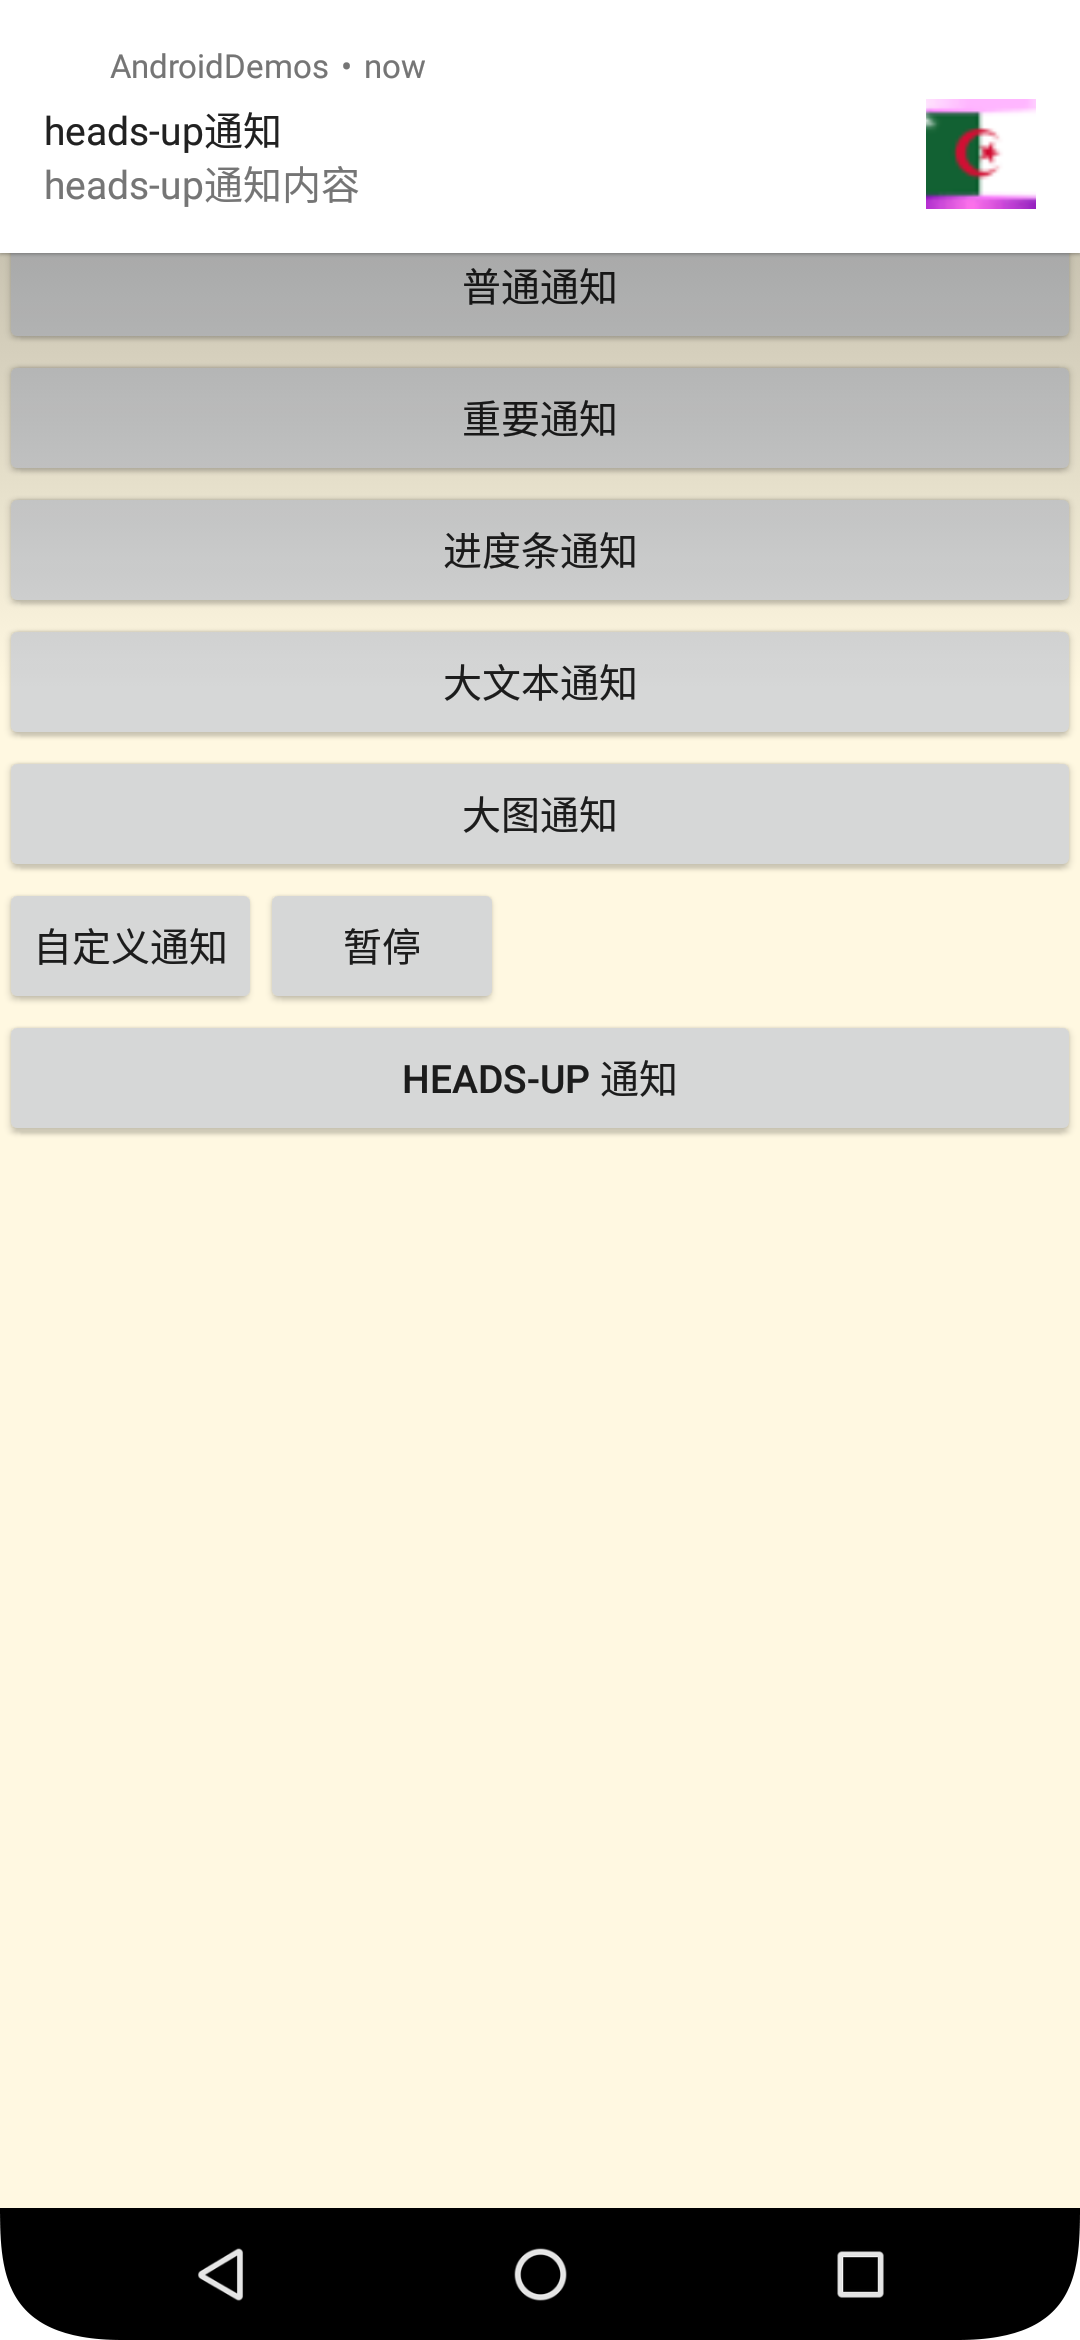
普通通知
1
2
3
4
5
6
7
8
9
10
11
12
13
14
15
16
17
18
19
20
21
22
23
24
25
26
27
28
29
30
31
32
33
34
35
36
37
38
39
40
41
42
43
44
45
46
47
48
49
50
51
52
53
54
private var mNormalChannelId = "normal_channel_id"
private fun createNotificationForNormal() {
    createNotificationChannel(
        mNormalChannelId,
        "普通通知",
        NotificationManager.IMPORTANCE_DEFAULT
    )
    // 点击意图 // setDeleteIntent 移除意图
    val pendingIntent = getPendingIntent()
    // 构建配置
    val mBuilder = NotificationCompat.Builder(this, mNormalChannelId)
        .setContentTitle("普通通知") // 标题
        .setContentText("普通通知内容") // 文本
        .setSmallIcon(R.drawable.ic_notitification) // 小图标
        .setLargeIcon(BitmapFactory.decodeResource(resources, R.drawable.aljly)) // 大图标
        .setPriority(NotificationCompat.PRIORITY_DEFAULT) // 7.0 设置优先级,8.0在Channel中设置
        .setContentIntent(pendingIntent) // 跳转配置
        .setAutoCancel(true) // 是否自动消失(点击)or mManager.cancel(mNormalNotificationId)、cancelAll、setTimeoutAfter()
    // 发起通知
    mManager.notify(NOTIFICATION_ID, mBuilder.build())
}
private fun getPendingIntent(): PendingIntent {
    val funIntent = Intent(this, ArticleActivity::class.java)
    // 点击后跳转到ArticleActivity
    funIntent.putExtra("key_article_nun", "第一篇")
    val pendingIntent: PendingIntent =
        PendingIntent.getActivity(
            this, REQUEST_CODE_SENDER_DAILY, funIntent,
            if (Build.VERSION.SDK_INT >= Build.VERSION_CODES.S) {
                PendingIntent.FLAG_MUTABLE
            } else {
                PendingIntent.FLAG_UPDATE_CURRENT
            }
        )
    return pendingIntent
}
private fun createNotificationChannel(channelId: String, channelName: String, importance: Int) {
    // 适配8.0及以上 创建渠道
    if (Build.VERSION.SDK_INT >= Build.VERSION_CODES.O) {
        val dailyChannel: NotificationChannel = NotificationChannel(
            channelId,
            channelName,
            importance
        ).apply {
            // 设置一些参数,可以参考API文档自行设置
            setShowBadge(true) // 是否在桌面显示角标
            enableLights(true)
            enableVibration(true)
            lightColor = Color.RED
            description = "普通通知的渠道描述"
        }
        mManager.createNotificationChannel(dailyChannel)
    }
}
发起一个普通通知的几个要素:
- setContentTitle 标题
- setContentText 内容
- setSmallIcon 小图标
- setLargeIcon 大图标
- setPriority 优先级 or 重要性(7.0 和 8.0 的方式不同,8.0 在 NotificationChannel 中设置)
- setContentIntent 点击意图
- setAutoCancel 点击通知后是否自动取消
- notify 发起通知
重要通知
重要通知,优先级设置最高,会直接显示在屏幕内(前台),而不是只有通知抽屉里。
1
2
3
4
5
6
7
8
9
10
11
12
13
14
15
16
17
private fun createNotificationForHigh() {
    val actionPendingIntent = getPendingIntent("action")
    val contentPendingIntent = getPendingIntent("content")
    val mBuilder = NotificationCompat.Builder(this, mHighChannelId)
        .setContentTitle("重要通知")
        .setContentText("重要通知内容")
        .setSmallIcon(R.mipmap.ic_launcher)
        .setLargeIcon(BitmapFactory.decodeResource(resources, R.drawable.ic_avatar))
        .setPriority(NotificationCompat.PRIORITY_HIGH)
        .setAutoCancel(true)
        .setNumber(999) // 自定义桌面通知数量
        .setContentIntent(contentPendingIntent) // 点击跳转
        .addAction(R.drawable.lb_ic_actions_right_arrow, "去看看", actionPendingIntent)// 通知上的操作
        .setCategory(NotificationCompat.CATEGORY_MESSAGE) // 通知类别,"勿扰模式"时系统会决定要不要显示你的通知
        .setVisibility(NotificationCompat.VISIBILITY_PRIVATE) // 屏幕可见性,锁屏时,显示icon和标题,内容隐藏
    mManager.notify(NOTIFICATION_ID_HIGH, mBuilder.build())
}
- setNumber 桌面通知数量
- addAction 在通知下添加一个自定义操作,Android4.1 及以上功能;基于 expanded notifications
在 Android10.0 及以上,系统也会默认识别并添加一些操作,比如短信通知上的「复制验证码」。
- setCategory 通知类别,” 勿扰模式 “ 时系统会决定要不要显示你的通知
- setVisibility 屏幕可见性,锁屏时,显示 icon 和标题,内容隐藏,解锁查看全部
进度条通知
1
2
3
4
5
6
7
8
9
10
11
12
13
14
15
16
17
18
private fun createNotificationForProgress() {
    val progressMax = 100
    val progressCurrent = 30
    val mBuilder = NotificationCompat.Builder(this, mNormalChannelId)
        .setContentTitle("进度通知")
        .setContentText("下载中:$progressCurrent%")
        .setSmallIcon(R.mipmap.ic_launcher)
        .setLargeIcon(
            BitmapFactory.decodeResource(
                resources,
                R.drawable.block_canary_notification
            )
        )
        // 第3个参数indeterminate,false表示确定的进度,比如100,true表示不确定的进度,会一直显示进度动画,直到更新状态下载完成,或删除通知
        .setProgress(progressMax, progressCurrent, false)

    mManager.notify(NOTIFICATION_ID_NORMAL, mBuilder.build())
}
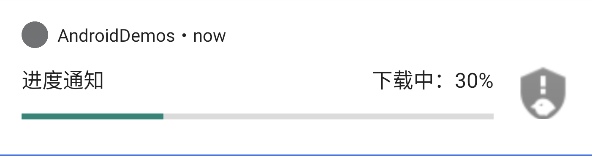
setProgress 配置进度,接收 3 个参数:
- max 最大值
- progress 当前进度
- indeterminate false 表示确定的进度,比如 100,true 表示不确定的进度,会一直显示进度动画,直到更新状态完成,或删除通知
更新进度也还是通过 setProgress,修改当前进度值即可
更新分为两种情况:
- 更新进度:修改进度值即可
- 下载完成:总进度与当前进度都设置为 0 即可,同时更新文案
注意:如果有多个进度通知,如何更新到指定的通知,是通过 NotificationId 匹配的。
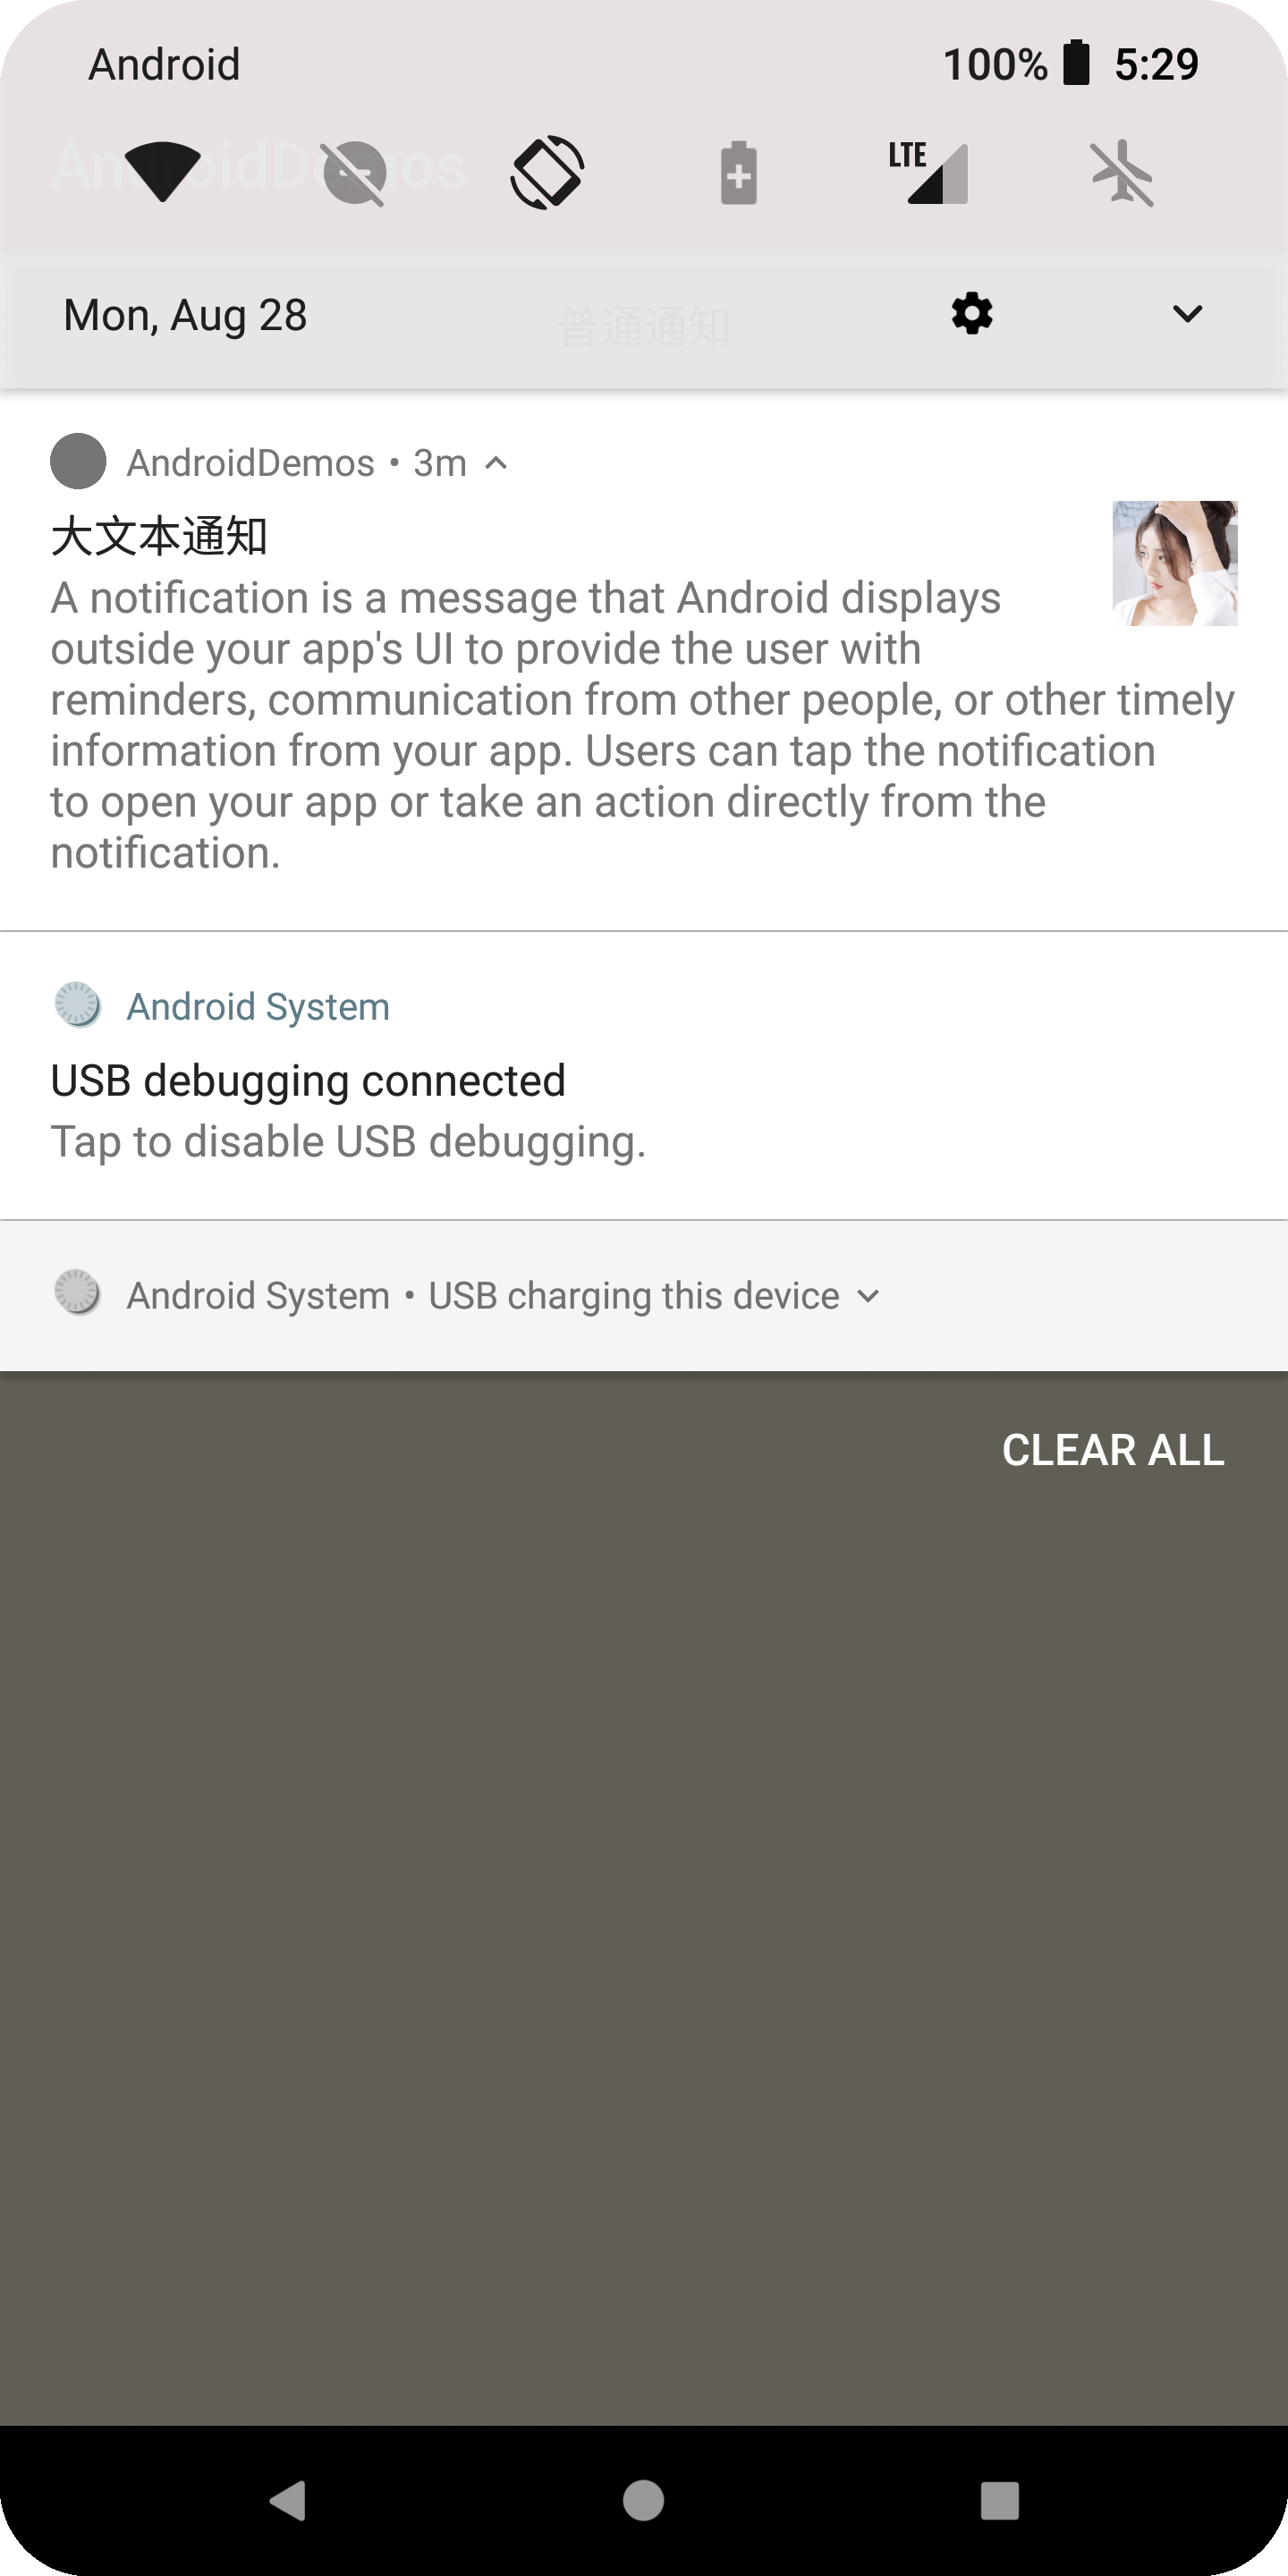
大文本通知
1
2
3
4
5
6
7
8
9
10
11
12
private fun createNotificationForBigText() {
    val bigText =
        "A notification is a message that Android displays outside your app's UI to provide the user with reminders, communication from other people, or other timely information from your app. Users can tap the notification to open your app or take an action directly from the notification."
    val mBuilder = NotificationCompat.Builder(this, mNormalChannelId)
        .setContentTitle("大文本通知")
        .setStyle(NotificationCompat.BigTextStyle().bigText(bigText))
        .setSmallIcon(R.mipmap.ic_launcher)
        .setLargeIcon(BitmapFactory.decodeResource(resources, R.drawable.ic_avatar))
        .setAutoCancel(true)
    val mBigTextNotificationId = 12345
    mManager.notify(mBigTextNotificationId, mBuilder.build())
}
- setStyle(NotificationCompat.BigTextStyle().bigText(bigText))
通知内容默认最多显示一行,超出会被裁剪,且无法展开,在内容透出上体验非常不好,展示的内容可能无法吸引用户去点击查看,也就有了大文本通知的这种方式
一劳永逸的做法就是无论内容有多少行,都用大文本的这种方式通知,具体展示让系统自己去适配

默认是展开的,点击箭头可以把文本内容收起来
定时取消 (Android 8.0 及 +)
在 Android 中设置通知的过期时间可以通过设置其过期时间戳来实现。通过 Notification.Builder 的 setTimeoutAfter 方法,你可以指定通知何时过期并自动取消。
- Android 8.0(API 级别 26)及以上:
- 需要创建通知渠道。
- 可以使用
Notification.Builder的setTimeoutAfter方法。
- Android 8.0 以下:
- 无法使用通知渠道和
setTimeoutAfter方法。 - 需要通过其他方式手动管理通知的过期时间,例如使用
Handler或AlarmManager。
- 无法使用通知渠道和
1
2
3
4
5
6
7
8
9
10
11
12
13
14
15
16
17
18
19
20
21
22
23
24
25
26
27
28
29
30
31
public class NotificationHelper {

    private static final String CHANNEL_ID = "example_channel_id";
    private static final int NOTIFICATION_ID = 1;

    public static void showNotification(Context context) {
        NotificationManager notificationManager = (NotificationManager) context.getSystemService(Context.NOTIFICATION_SERVICE);

        // 创建NotificationChannel(仅在Android 8.0及以上需要)
        if (Build.VERSION.SDK_INT >= Build.VERSION_CODES.O) {
            NotificationChannel channel = new NotificationChannel(
                CHANNEL_ID,
                "Example Channel",
                NotificationManager.IMPORTANCE_DEFAULT
            );
            notificationManager.createNotificationChannel(channel);
        }

        // 创建Notification对象并设置过期时间
        Notification notification = new Notification.Builder(context, CHANNEL_ID)
            .setContentTitle("Example Notification")
            .setContentText("This is a notification with a timeout.")
            .setSmallIcon(R.drawable.ic_notification) // 需要一个有效的图标资源
            .setTimeoutAfter(60000) // 设置通知过期时间为1分钟(60000毫秒)
            .build();

        // 显示通知
        notificationManager.notify(NOTIFICATION_ID, notification);
    }
}
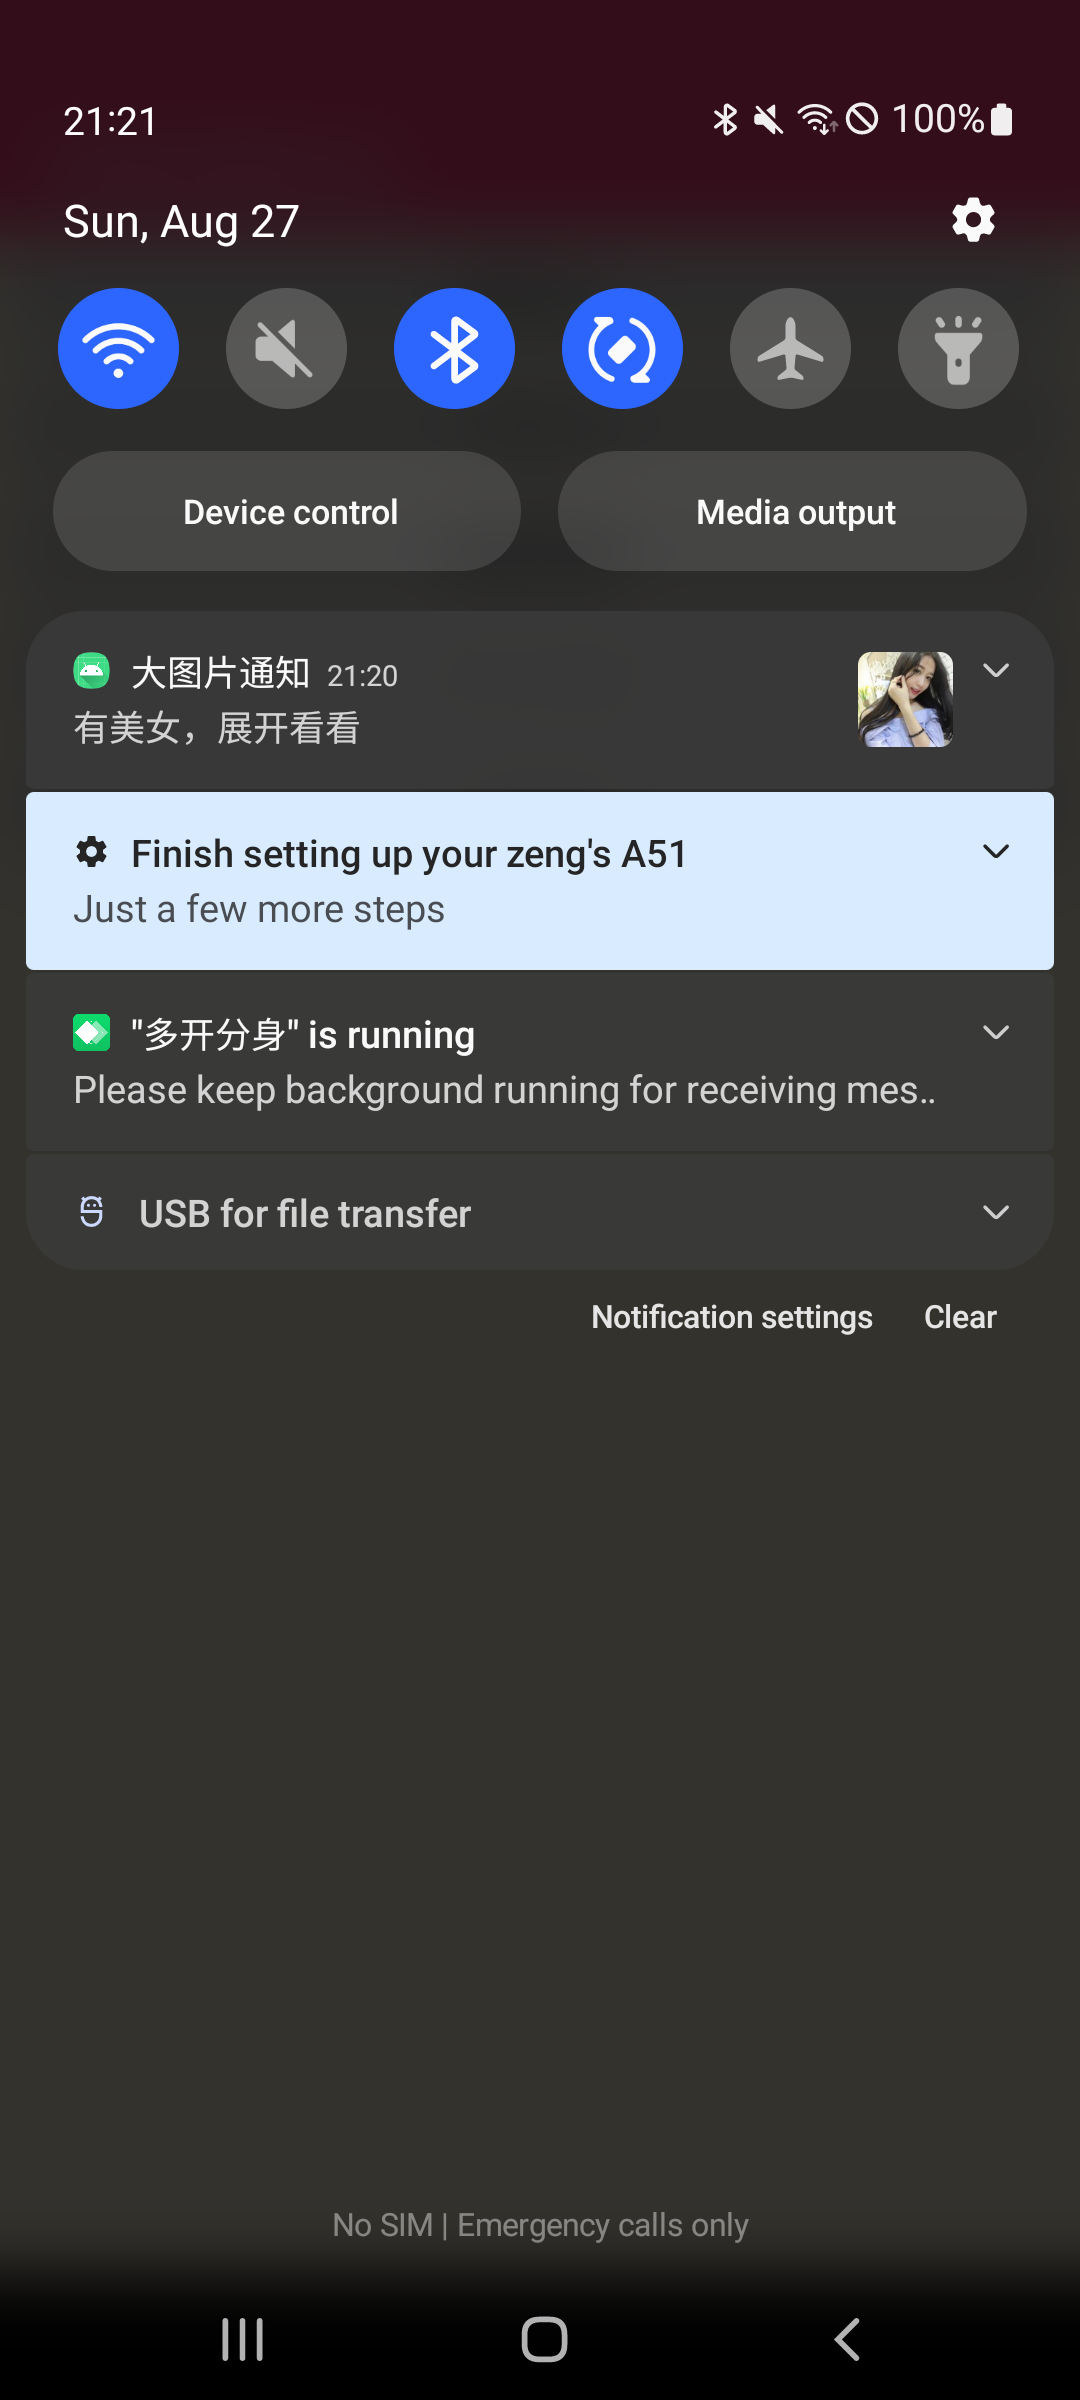
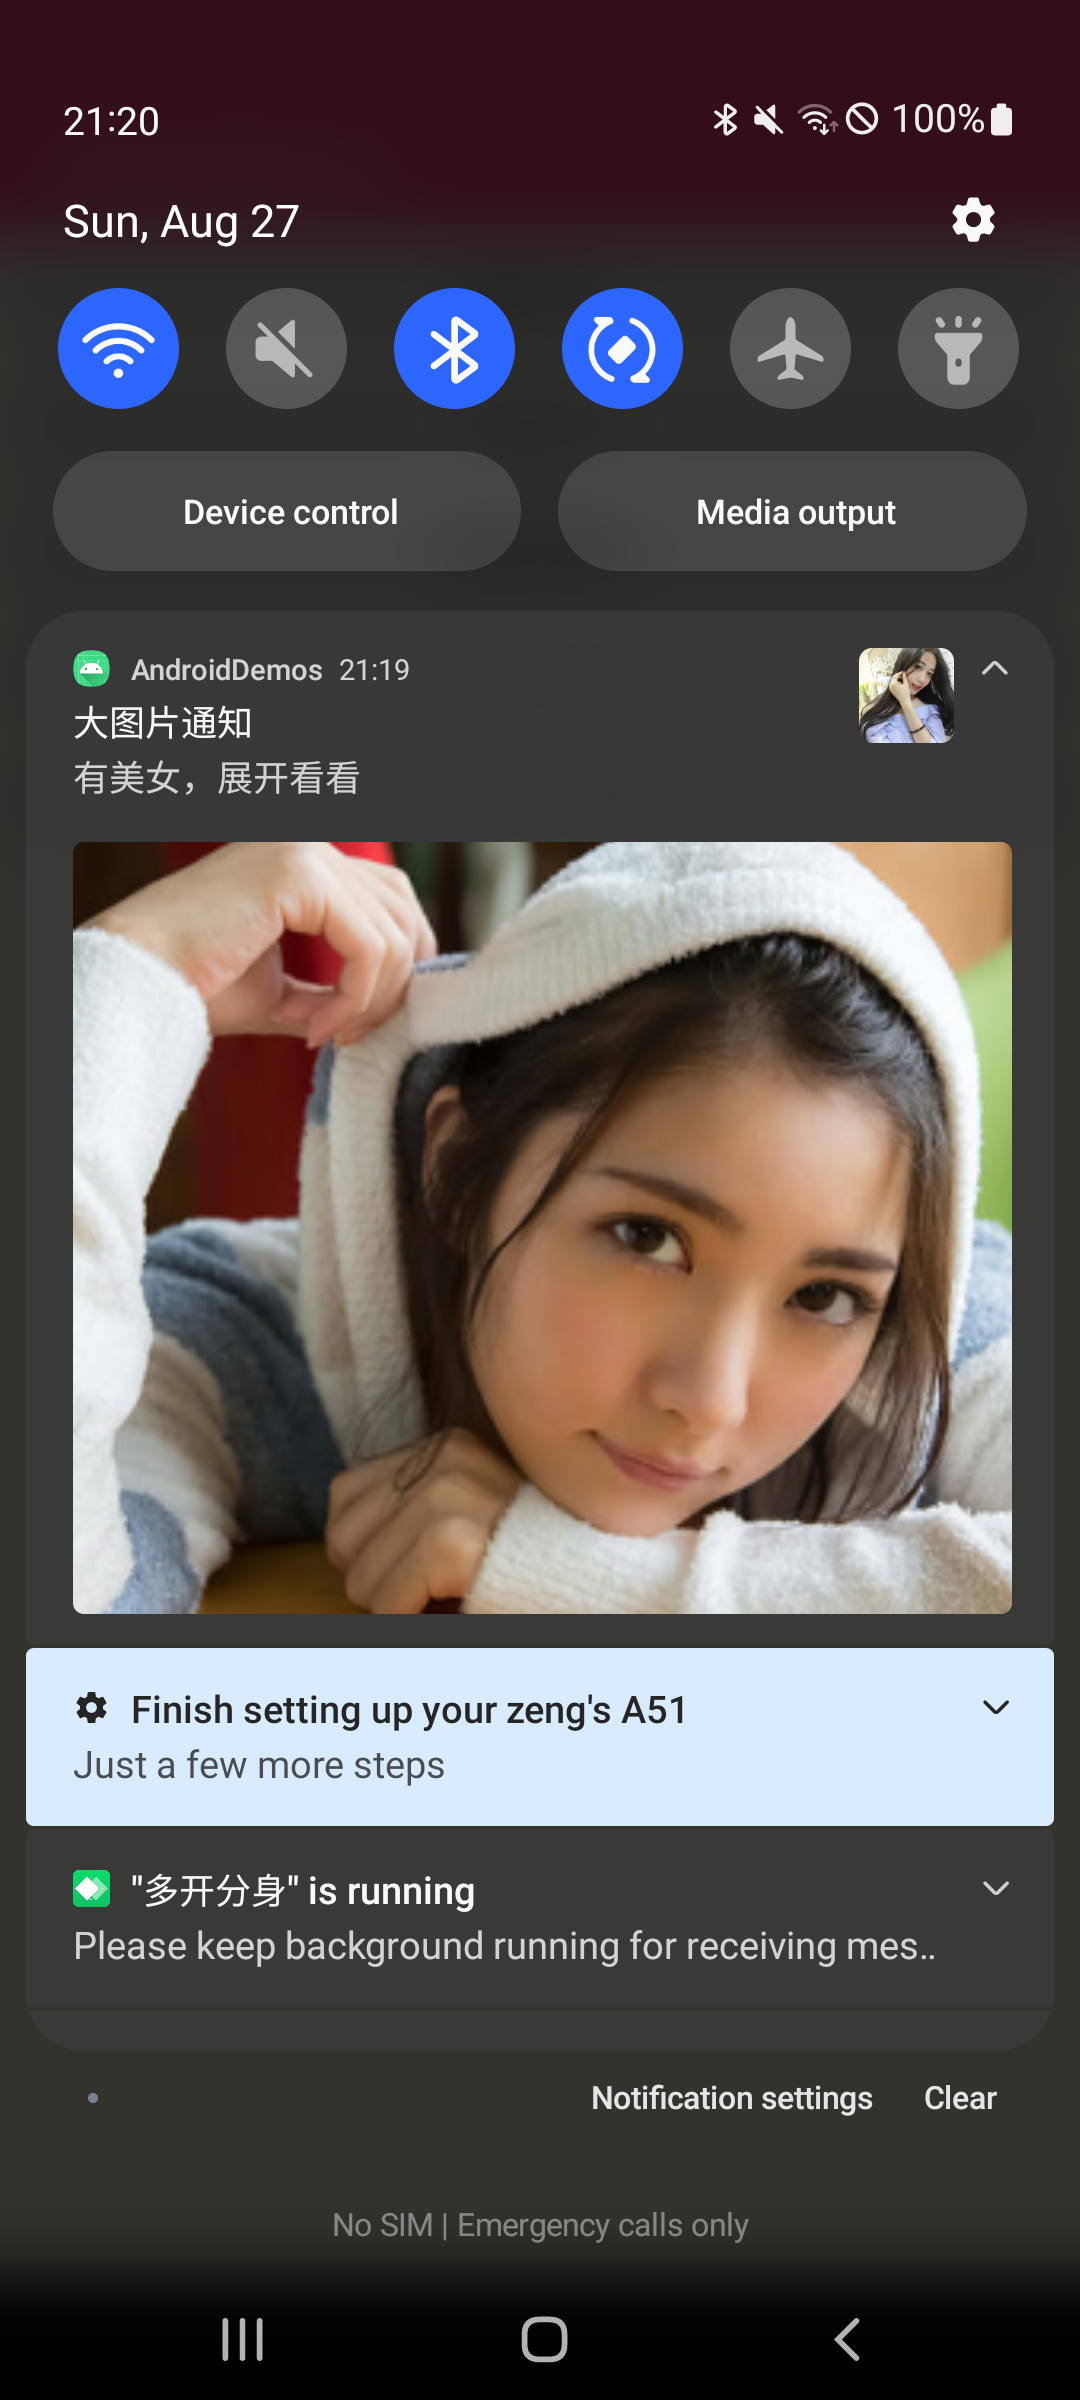
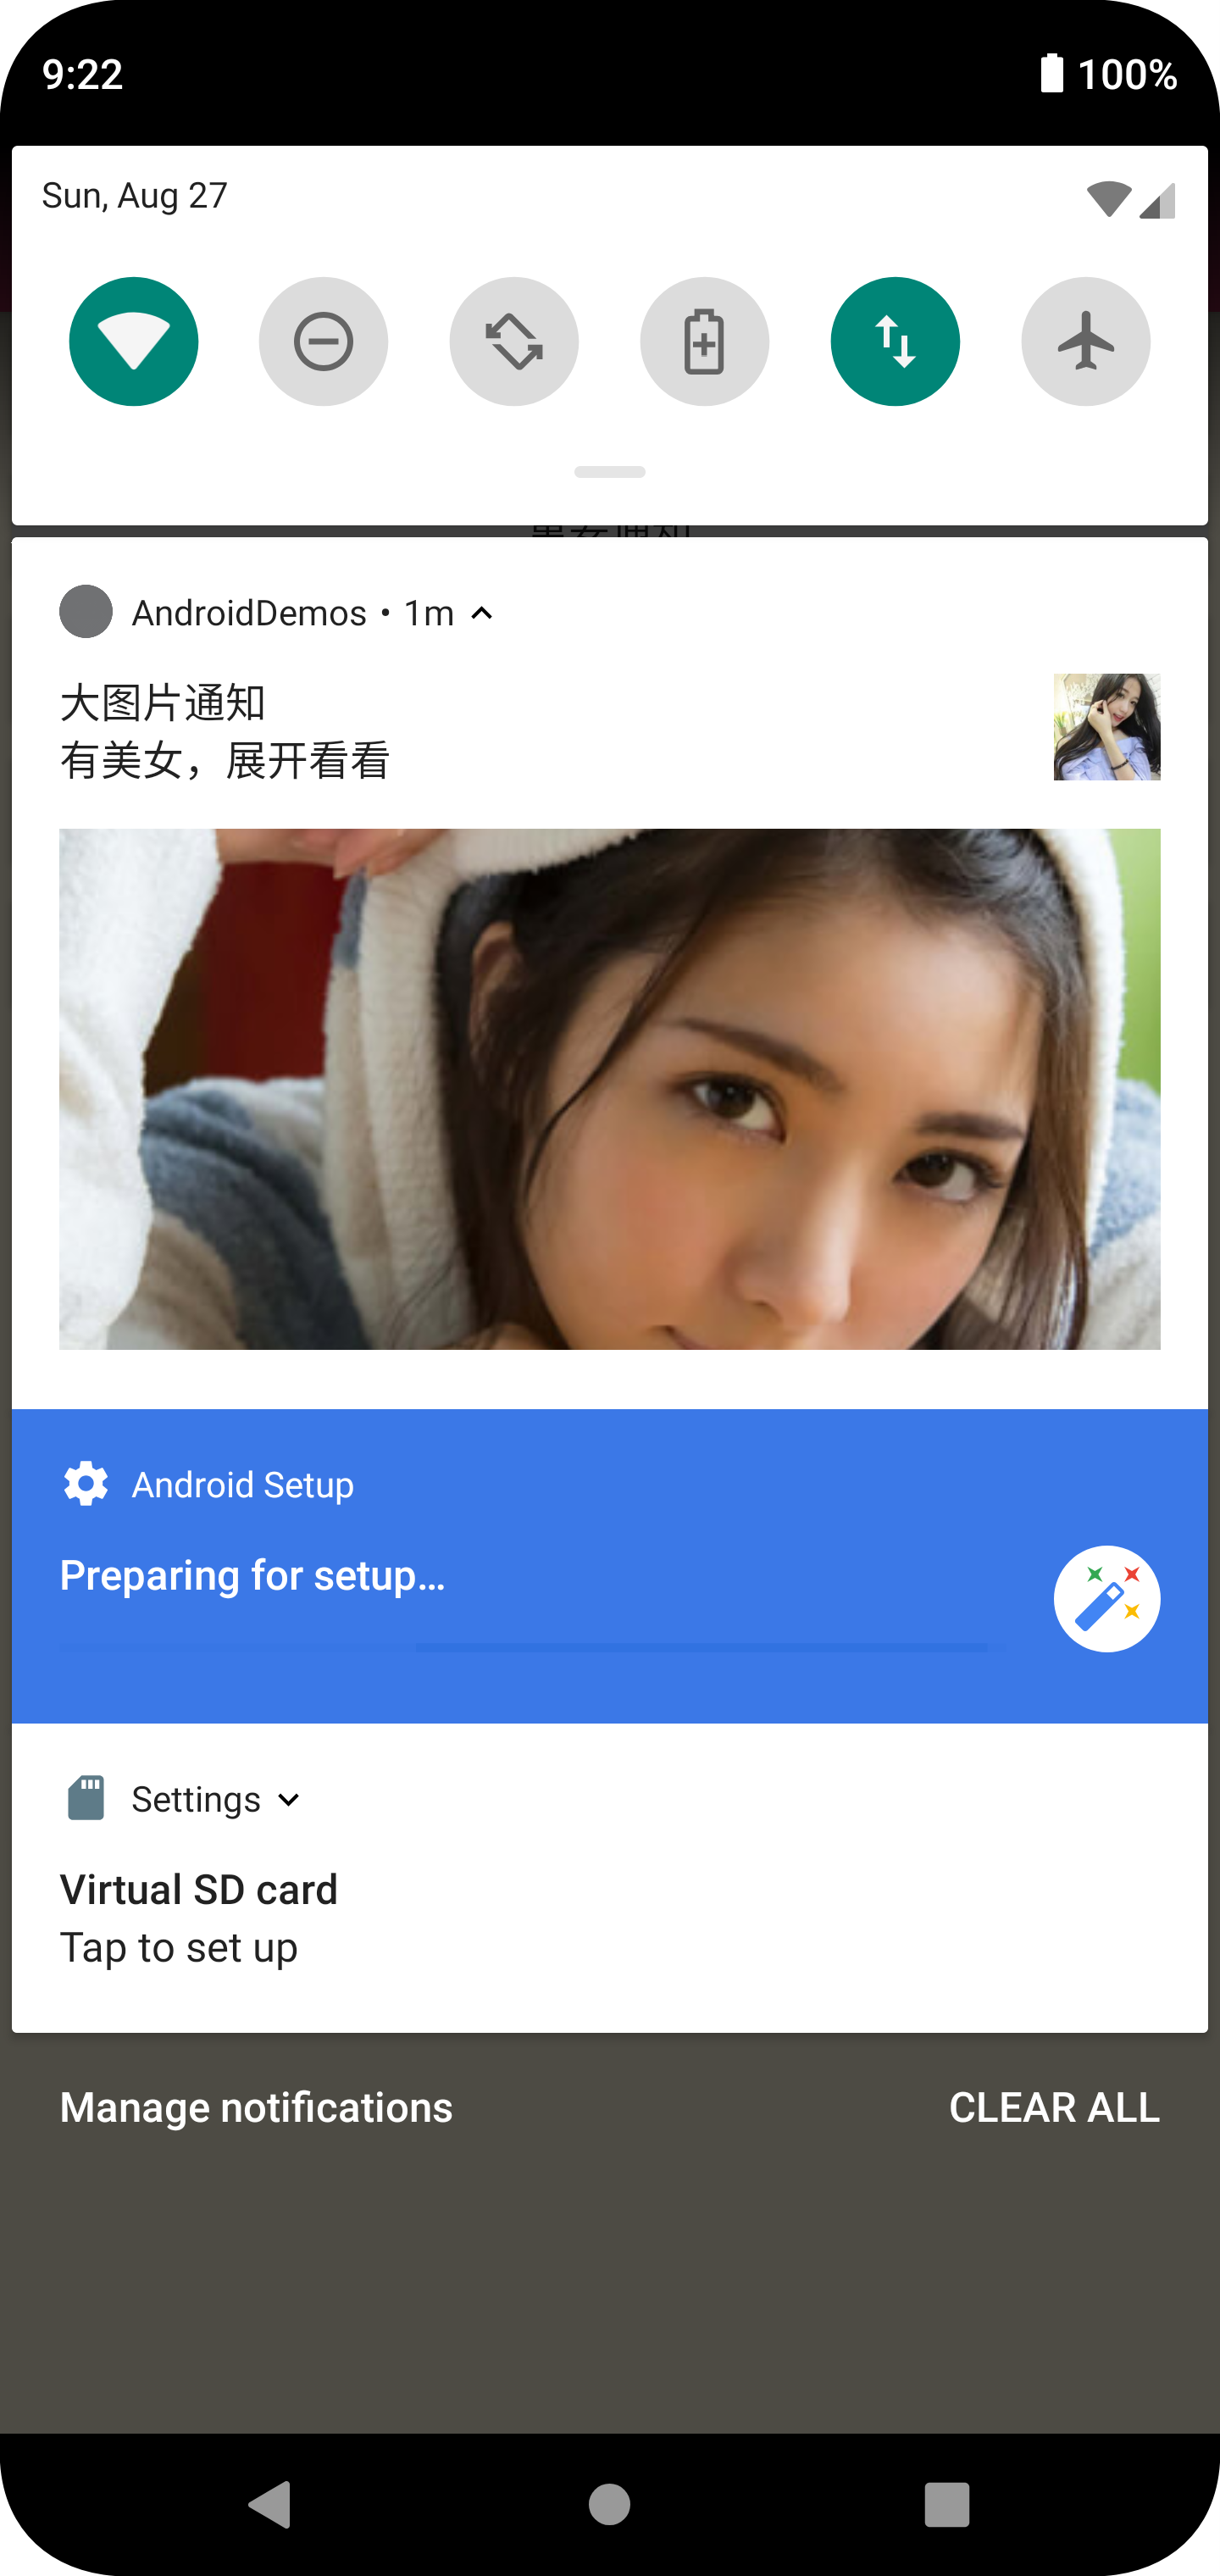
大图片通知
1
2
3
4
5
6
7
8
9
10
11
12
private fun createNotificationForBigImage() {
    val bigPic = BitmapFactory.decodeResource(resources, R.drawable.bg_girl)
    val mBuilder = NotificationCompat.Builder(this, mNormalChannelId)
        .setContentTitle("大图片通知")
        .setContentText("有美女,展开看看")
        .setStyle(NotificationCompat.BigPictureStyle().bigPicture(bigPic))
        .setSmallIcon(R.mipmap.ic_launcher)
        .setLargeIcon(BitmapFactory.decodeResource(resources, R.drawable.girl5))
        .setAutoCancel(true)
    val mBigImageNotificationId = 11111
    mManager.notify(mBigImageNotificationId, mBuilder.build())
}
- setStyle(NotificationCompat.BigPictureStyle().bigPicture(bigPic))
当已有多条通知时,默认是合并的,并不是展开的,所以可以通过 setContentText(“ 有美女,展开看看 “) 加个提示。默认是 4 条会进行分组合并折叠起来。
三星 A51 效果,默认是收起来的,点击展开:
原始设备会展示不全,会被裁剪,要注意大图的尺寸:
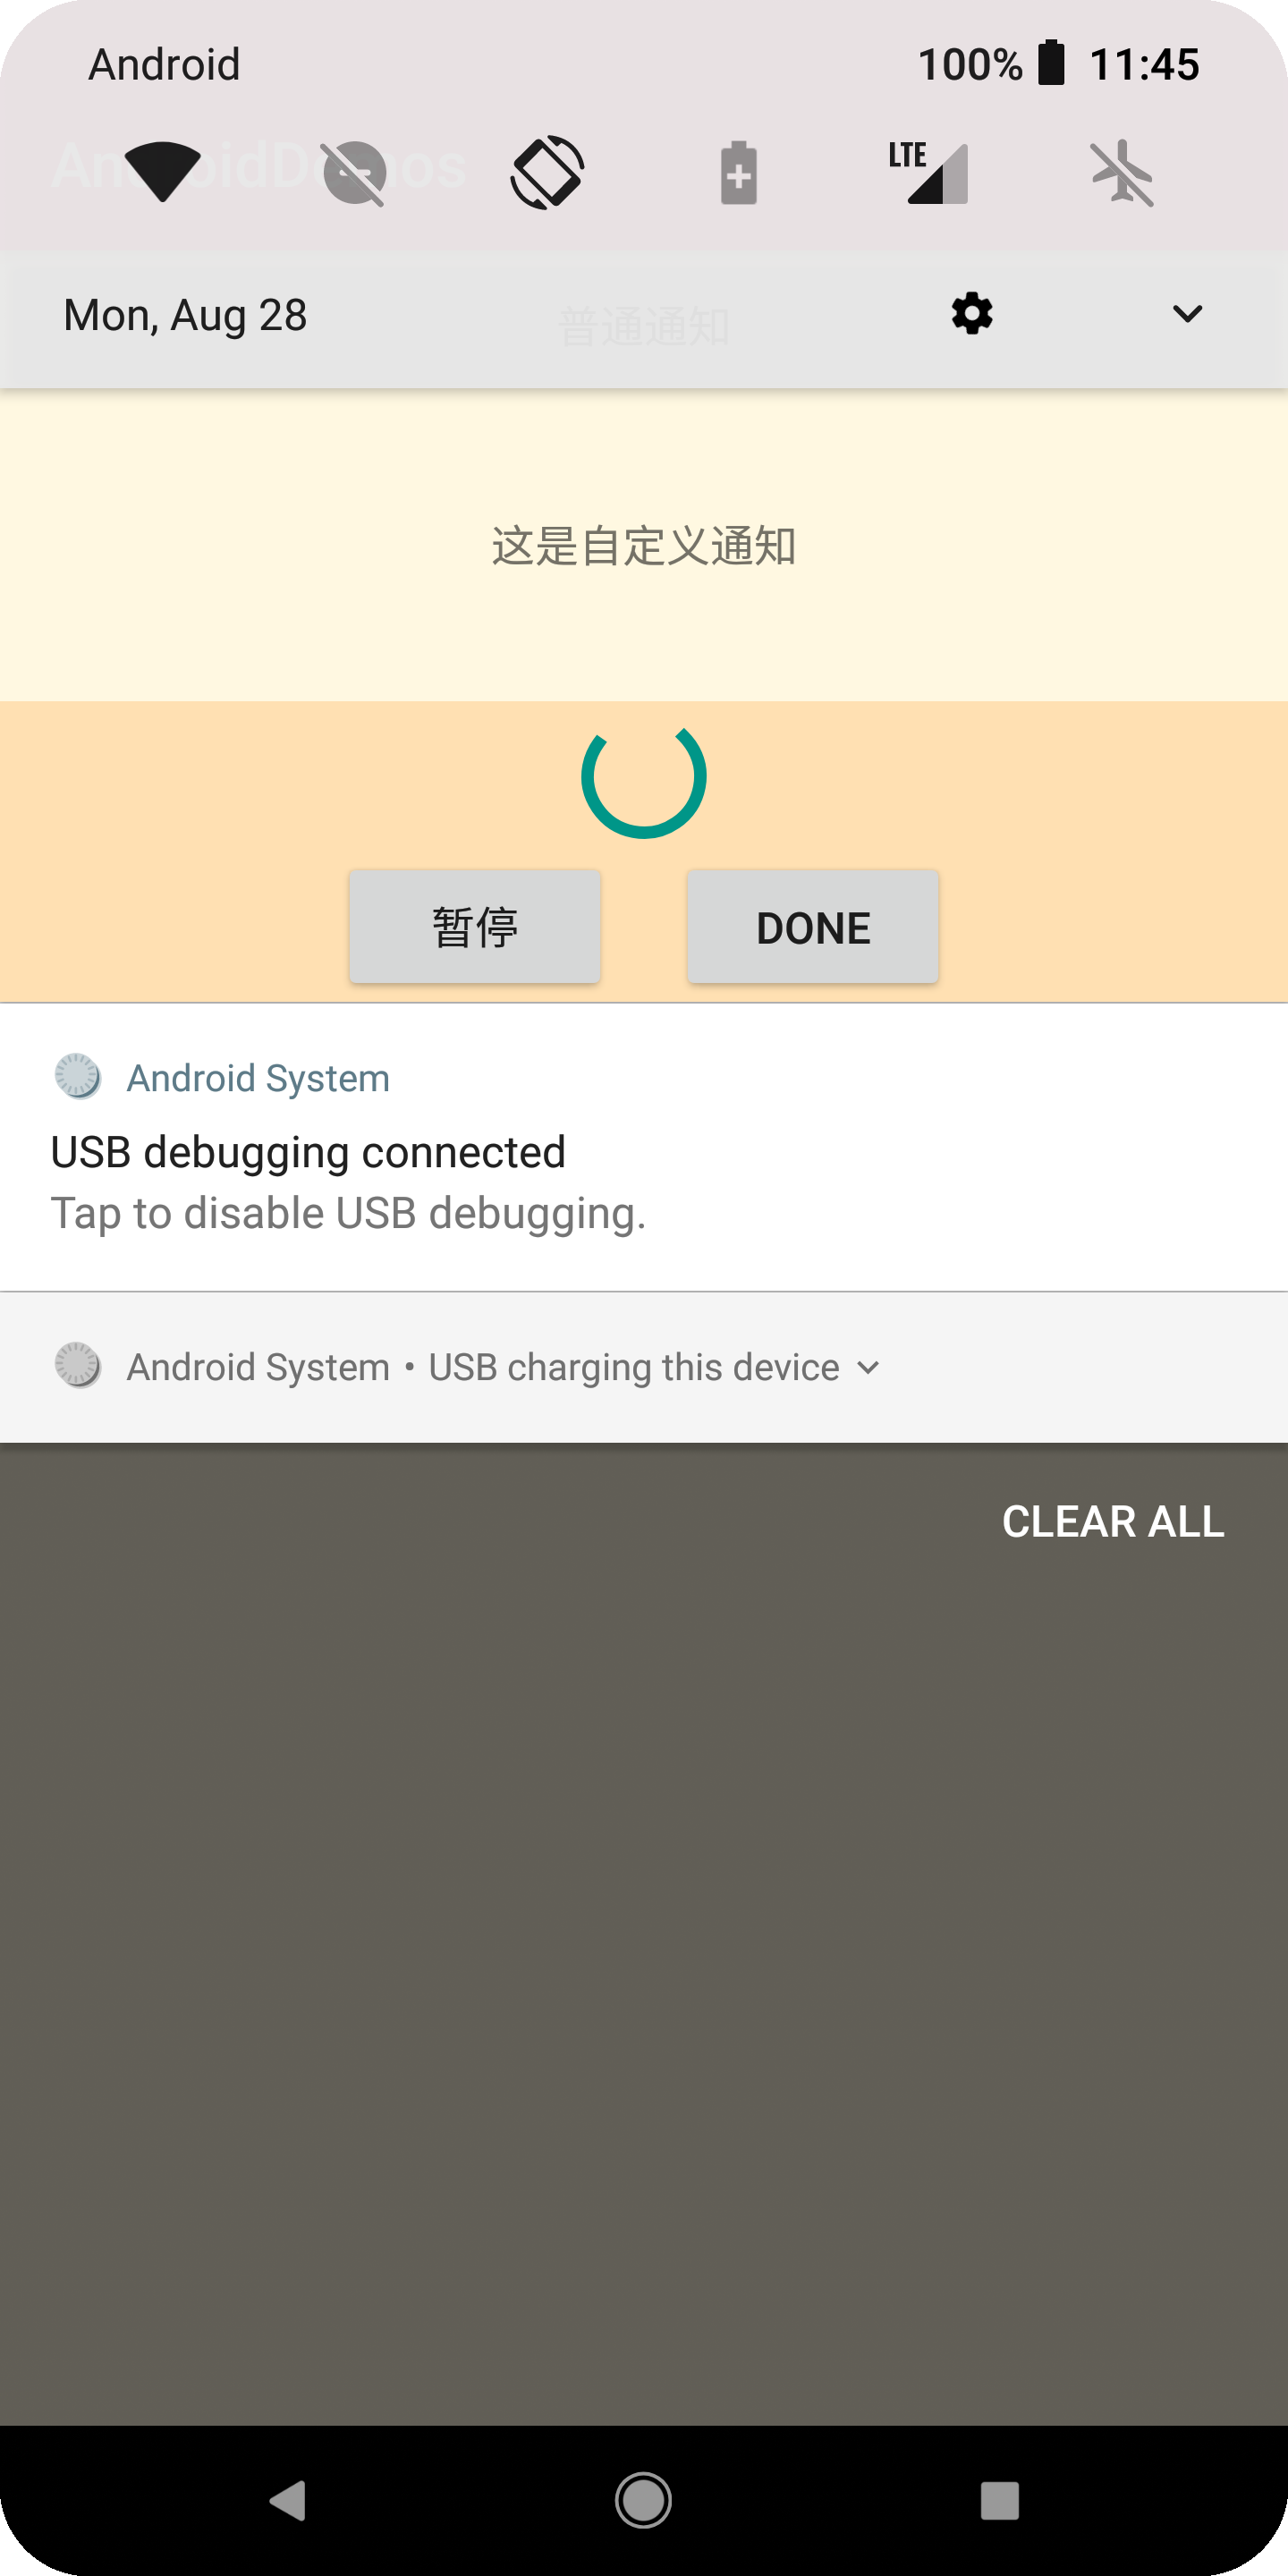
自定义通知
通过 RemoteViews 构建自定义布局 view。因为 RemoteViews 并不是一个真正的 view,它只是一个 view 的描述,事件处理上还是要借助 PendingIntent
- setCustomContentView 默认布局显示,即折叠状态下的布局
- setCustomBigContentView 展开状态下的布局
折叠状态下,可能会展示一些基础信息,拿播放器举例,比如当前歌曲名称、歌手、暂停、继续、下一首等,就差不多展示不下了。
展开状态下,就可以提供更多的信息,比如专辑信息,歌手信息等。
这两种状态下默认的布局高度:
- 折叠视图布局,48dp
- 展开视图布局,252dp
1
2
3
4
5
6
7
8
9
10
11
12
13
14
15
16
17
18
19
20
21
22
23
24
25
26
27
28
29
30
31
32
33
34
35
36
37
38
39
40
41
42
43
44
45
46
47
48
49
50
51
52
53
54
55
56
57
58
59
60
61
62
63
64
65
66
67
68
private fun createNotificationForCustom() {
    // 适配8.0及以上
    val mCustomChannelId = "custom_channel_id"
    val mCustomChannelName = "自定义通知"
    if (Build.VERSION.SDK_INT >= Build.VERSION_CODES.O) {
        val channel = NotificationChannel(
            mCustomChannelId,
            mCustomChannelName,
            NotificationManager.IMPORTANCE_DEFAULT
        )
        mManager.createNotificationChannel(channel)
    }

    // 适配12.0及以上
    val mFlag = if (Build.VERSION.SDK_INT >= Build.VERSION_CODES.S) {
        PendingIntent.FLAG_IMMUTABLE
    } else {
        PendingIntent.FLAG_UPDATE_CURRENT
    }

    // 添加自定义通知view
    val views = RemoteViews(packageName, R.layout.layout_notification)

    // 添加暂停继续事件
    val mStopAction = "me.hacket.action.stop"
    val intentStop = Intent(mStopAction)
    val pendingIntentStop = PendingIntent.getBroadcast(this, 0, intentStop, mFlag)
    views.setOnClickPendingIntent(R.id.btn_pause, pendingIntentStop)

    // 添加完成事件
    val mDoneAction = "me.hacket.action.done"
    val intentDone = Intent(mDoneAction)
    val pendingIntentDone = PendingIntent.getBroadcast(this, 0, intentDone, mFlag)
    views.setOnClickPendingIntent(R.id.btn_done, pendingIntentDone)

    // 创建Builder
    val mBuilder = NotificationCompat.Builder(this, mCustomChannelId)
        .setSmallIcon(R.mipmap.ic_launcher)
        .setLargeIcon(
            BitmapFactory.decodeResource(
                resources,
                R.drawable.block_canary_notification
            )
        )
        .setAutoCancel(true)
        .setCustomContentView(views)
        .setCustomBigContentView(views)// 设置自定义通知view
    // 发起通知
    val mCustomNotificationId = 6
    mManager.notify(mCustomNotificationId, mBuilder.build())
}

// BroadcastReceiver
registerReceiver(
    object : BroadcastReceiver() {
        override fun onReceive(context: Context?, intent: Intent?) {
            toast("收到广播 done")
        }
    }, IntentFilter("me.hacket.action.done")
)
registerReceiver(
    object : BroadcastReceiver() {
        override fun onReceive(context: Context?, intent: Intent?) {
            mIsStop = !mIsStop
            toast("收到广播 stop,更新ui为继续")
        }
    }, IntentFilter("me.hacket.action.stop")
)
布局:
1
2
3
4
5
6
7
8
9
10
11
12
13
14
15
16
17
18
19
20
21
22
23
24
25
26
27
28
29
30
31
32
33
34
35
36
37
38
39
<?xml version="1.0" encoding="utf-8"?>
<LinearLayout xmlns:android="http://schemas.android.com/apk/res/android"
    android:layout_width="match_parent"
    android:layout_height="match_parent"
    android:background="@color/orange_100"
    android:orientation="vertical">

    <TextView
        android:layout_width="match_parent"
        android:layout_height="@dimen/dp_100"
        android:background="@color/amber_50"
        android:gravity="center"
        android:minHeight="@dimen/dp_100"
        android:text="这是自定义通知" />

    <ProgressBar
        android:layout_width="match_parent"
        android:layout_height="wrap_content"
        android:progress="30" />

    <LinearLayout
        android:layout_width="match_parent"
        android:layout_height="wrap_content"
        android:gravity="center">

        <Button
            android:id="@+id/btn_pause"
            android:layout_width="wrap_content"
            android:layout_height="wrap_content"
            android:text="暂停" />

        <Button
            android:id="@+id/btn_done"
            android:layout_width="wrap_content"
            android:layout_height="wrap_content"
            android:layout_marginStart="20dp"
            android:text="Done" />
    </LinearLayout>
</LinearLayout>
效果:
更新:
- 因为 RemoteViews 并不能直接操作 view,可以通过广播的方式,对该条通知的构建配置重新设置,以达到更新的效果
- 更新 notification 的 ui 时,notification id 要一样
RemoteViews
RemoteViews 不是一个 View
RemoteView 只支持以下几种布局:
- AdapterViewFlipper
- FrameLayout
- GridLayout
- GridView
- LinearLayout
- ListView
- RelativeLayout
- StackView
- ViewFlipper
- 不支持 ConstraintLayout
支持的控件有:
- AnalogClock
- Button
- Chronometer
- ImageButton
- ImageView
- ProgressBar
- TextClock
- TextView
RemoteViews 只支持以上的控件,不支持它们的子类和其他 View,当然也不支持自定义 View;如 EditText 也不支持
API 31 之后还支持以下的控件:
- CheckBox
- RadioButton
- RadioGroup
- Switch
PendingIntent
- 删除时的广播
1
2
3
4
5
6
7
8
9
10
11
12
13
14
15
16
17
18
19
20
21
22
23
24
25
26
27
28
29
30
31
32
33
34
35
36
private fun createNotificationForNormal() {
    // 点击意图 // setDeleteIntent 移除意图
    val pendingIntent = getPendingIntent("normal notification")
    // 构建配置
    val deletePendingIntent = getDeletePendingIntent("delete notification")
    val mBuilder = NotificationCompat.Builder(this, mNormalChannelId)
        .setContentTitle("普通通知") // 标题
        .setContentText("普通通知内容") // 文本
        .setSmallIcon(R.drawable.ic_notitification) // 小图标
        .setLargeIcon(BitmapFactory.decodeResource(resources, R.drawable.aljly)) // 大图标
        .setPriority(NotificationCompat.PRIORITY_DEFAULT) // 7.0 设置优先级
        .setContentIntent(pendingIntent) // 跳转配置
        .setDeleteIntent(deletePendingIntent) // 移除配置
        .setAutoCancel(true) // 是否自动消失(点击)or mManager.cancel(mNormalNotificationId)、cancelAll、setTimeoutAfter()
    // 发起通知
    val normalNotificationId = 1
    mManager.notify(normalNotificationId, mBuilder.build())
}
private fun getDeletePendingIntent(value: String = "default"): PendingIntent {
    val action = "me.hacket.action.delete"
    val intent = Intent(action)
    intent.putExtra("data", value)

    val mFlag = if (Build.VERSION.SDK_INT >= Build.VERSION_CODES.S) {
        PendingIntent.FLAG_MUTABLE
    } else {
        PendingIntent.FLAG_UPDATE_CURRENT
    }
    return PendingIntent.getBroadcast(this, 0, intent, mFlag)
}
open class DeletePendingReceiver : BroadcastReceiver() {
    override fun onReceive(context: Context?, intent: Intent?) {
        val data = intent?.getStringExtra("data")
        Toast.makeText(context, "删除通知 $data", Toast.LENGTH_SHORT).show()
    }
}
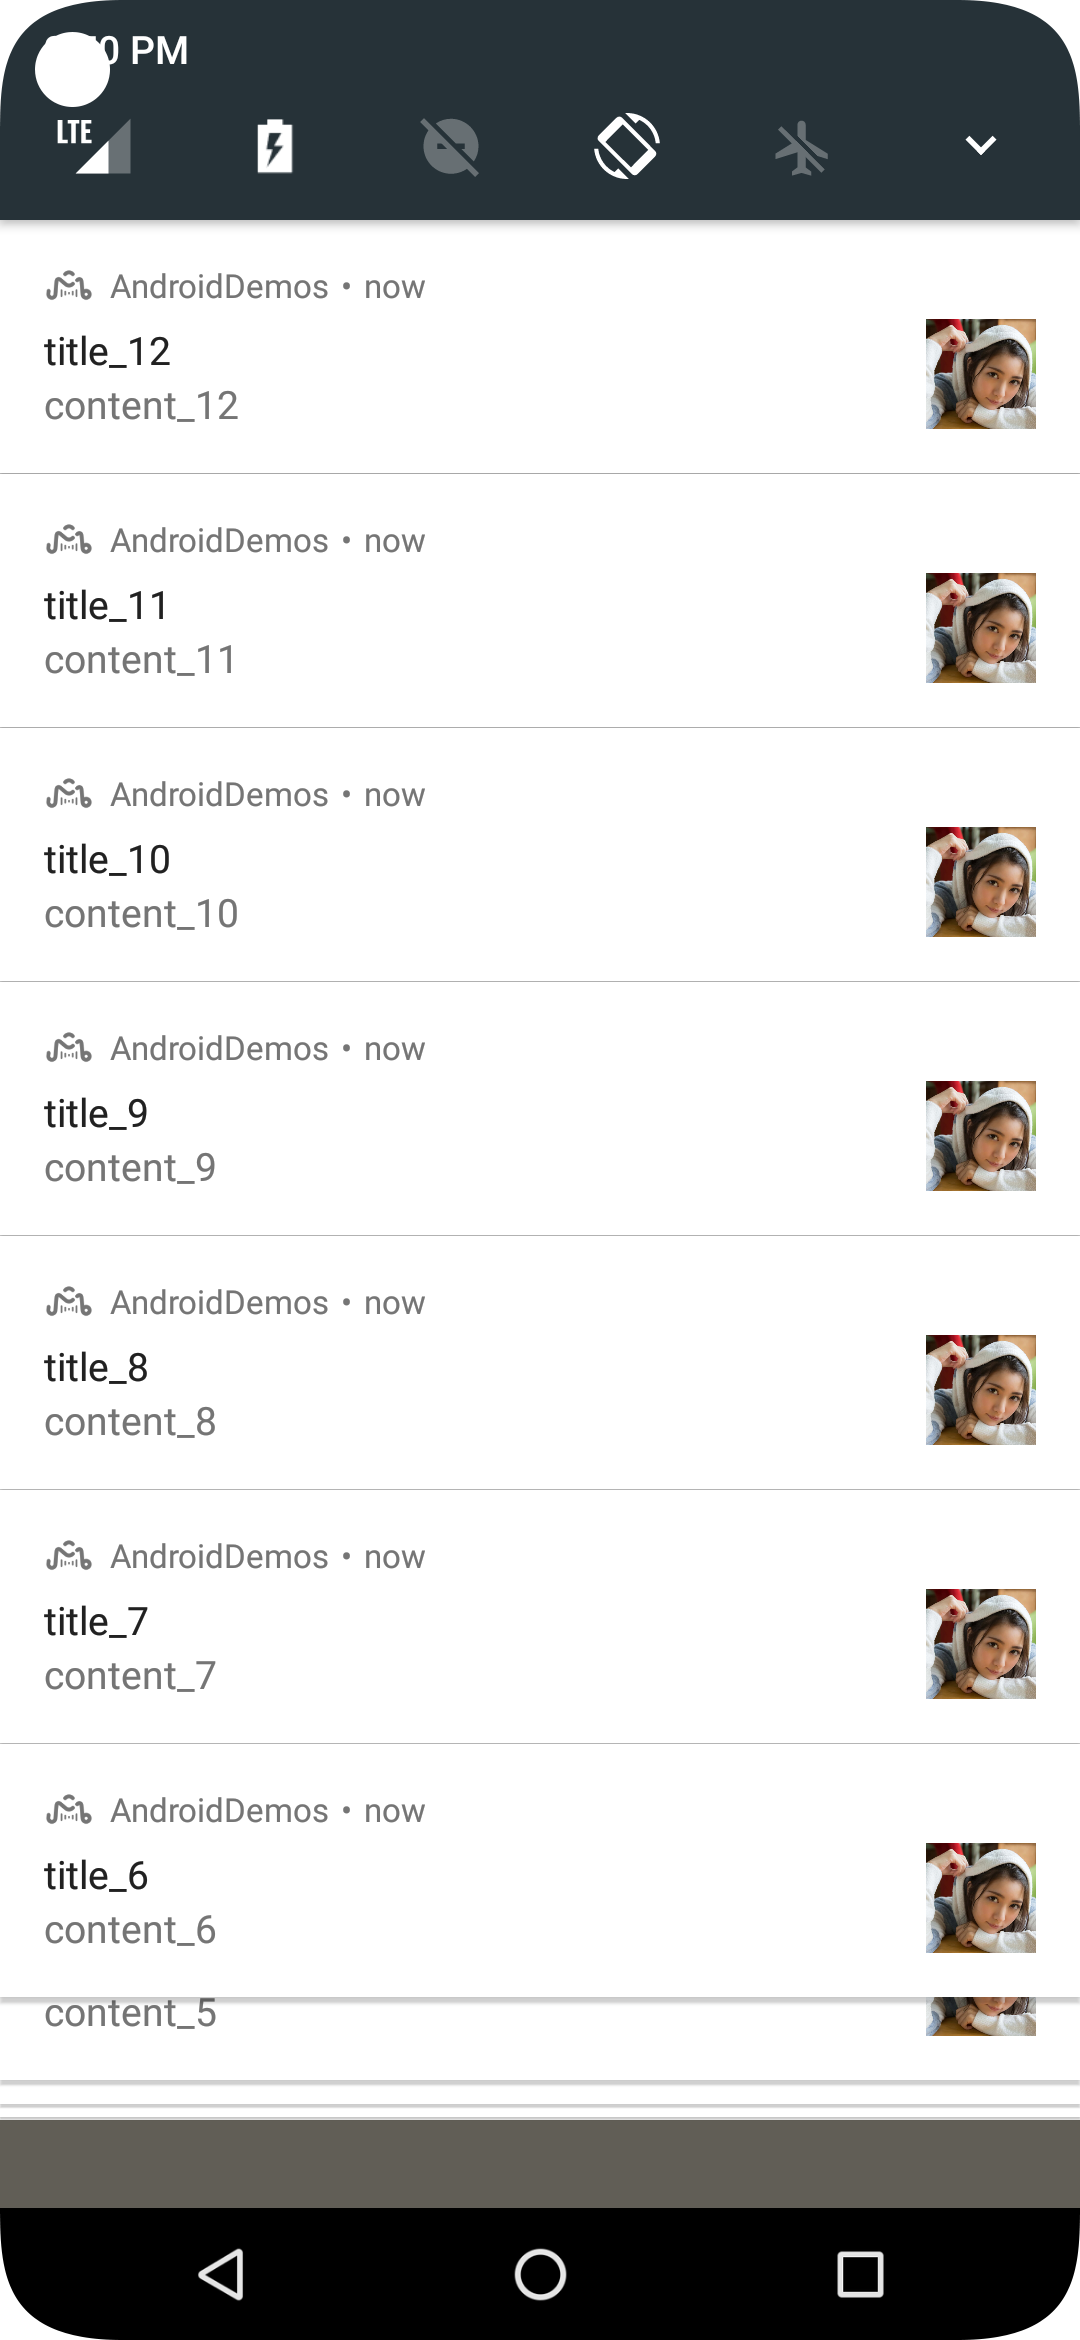
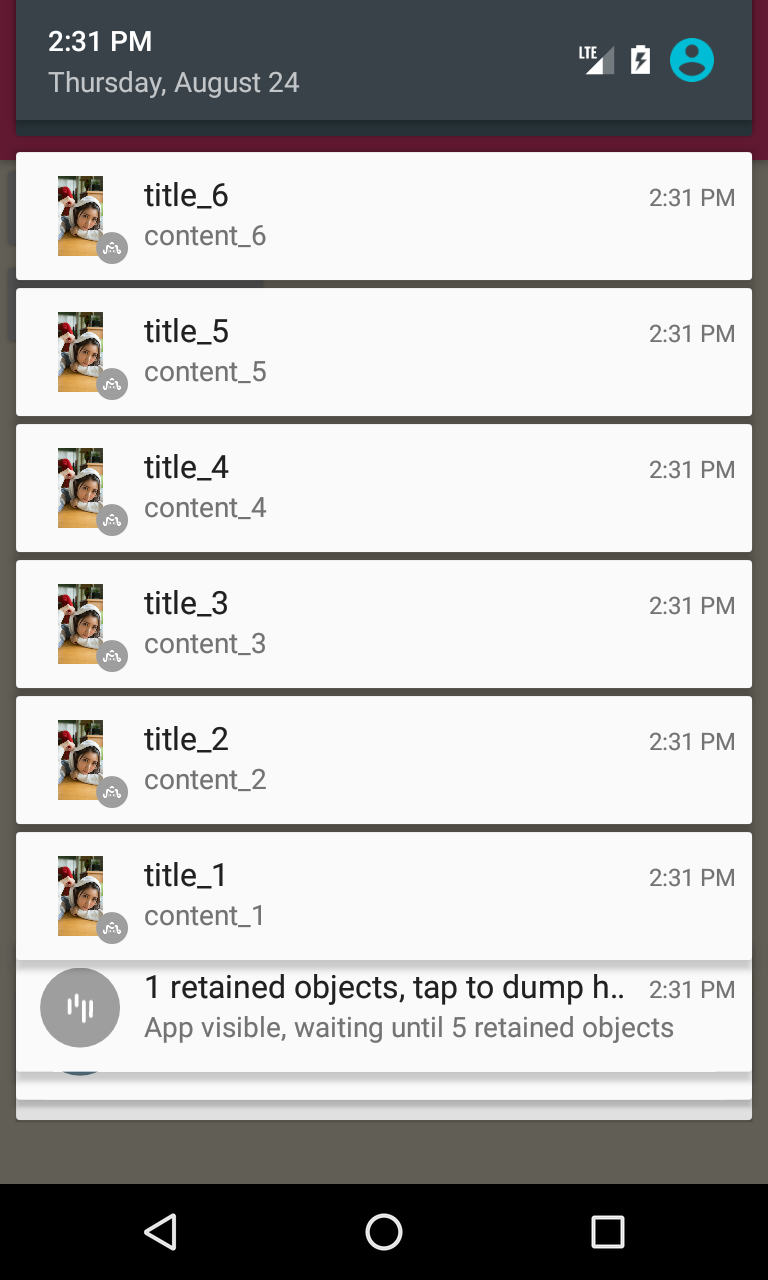
group notifications (Android7.0 及以上 API24 Android N)
group notifications 概述
分组通知,类似 iOS 的折叠通知?
- Android7.0 及以上可以将相关的消息放到一组,例如新到来邮件 notification
 and expanded (bottom) notification group.”)
- 通过一条单独的 notification summary 将所有 group notification 总结起来
- notifications group 和 notification channels 不同,详细见下面介绍
Automatic grouping
如果您的应用发送 4 个或更多 notification 并且未指定一个 group key,系统会在 Android 7.0 及更高版本上自动对它们进行分组。
Automatic grouping 行为可能因某些设备类型而异。为了在所有设备和版本上提供最佳体验,如果您知道必须对通知进行分组,请指定 group key 和 group summary 以确保它们已分组。
注意:**如果设置了 setGroup 不会触发自动分组
示例:
1
2
3
4
5
6
7
8
9
10
11
12
13
14
private var notificationId = 1
private fun create() {
    val largeBm = BitmapFactory.decodeResource(resources, R.drawable.bg_girl)
    val newMessageNotification = NotificationCompat.Builder(this, CHANNEL_ID)
        .setSmallIcon(R.drawable.ic_notitification)
        .setContentTitle("title")
        .setContentText("content")
        .setLargeIcon(largeBm)
//            .setGroup(GROUP_KEY_WORK_EMAIL) // 设置了不会自动折叠了
        .setPriority(NotificationCompat.PRIORITY_HIGH)
        .build()
    notificationManager.notify(notificationId, newMessageNotification)
    notificationId++
}
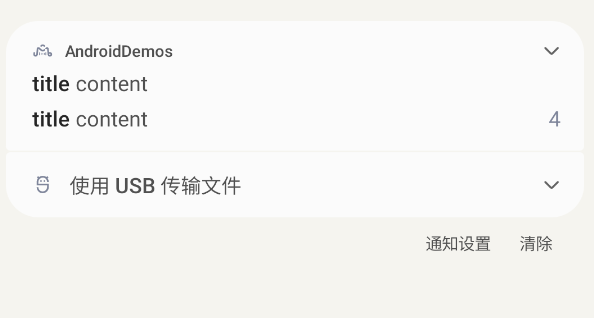
- 原始系统是 4 条就自动分组了,最多显示 8 条,超过了 8 条还会显示到来的消息数量,但只会保留最新的 8 条消息
- MIUI 13 国内版,4 条就会自动分组
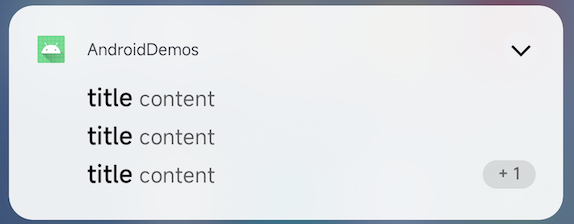
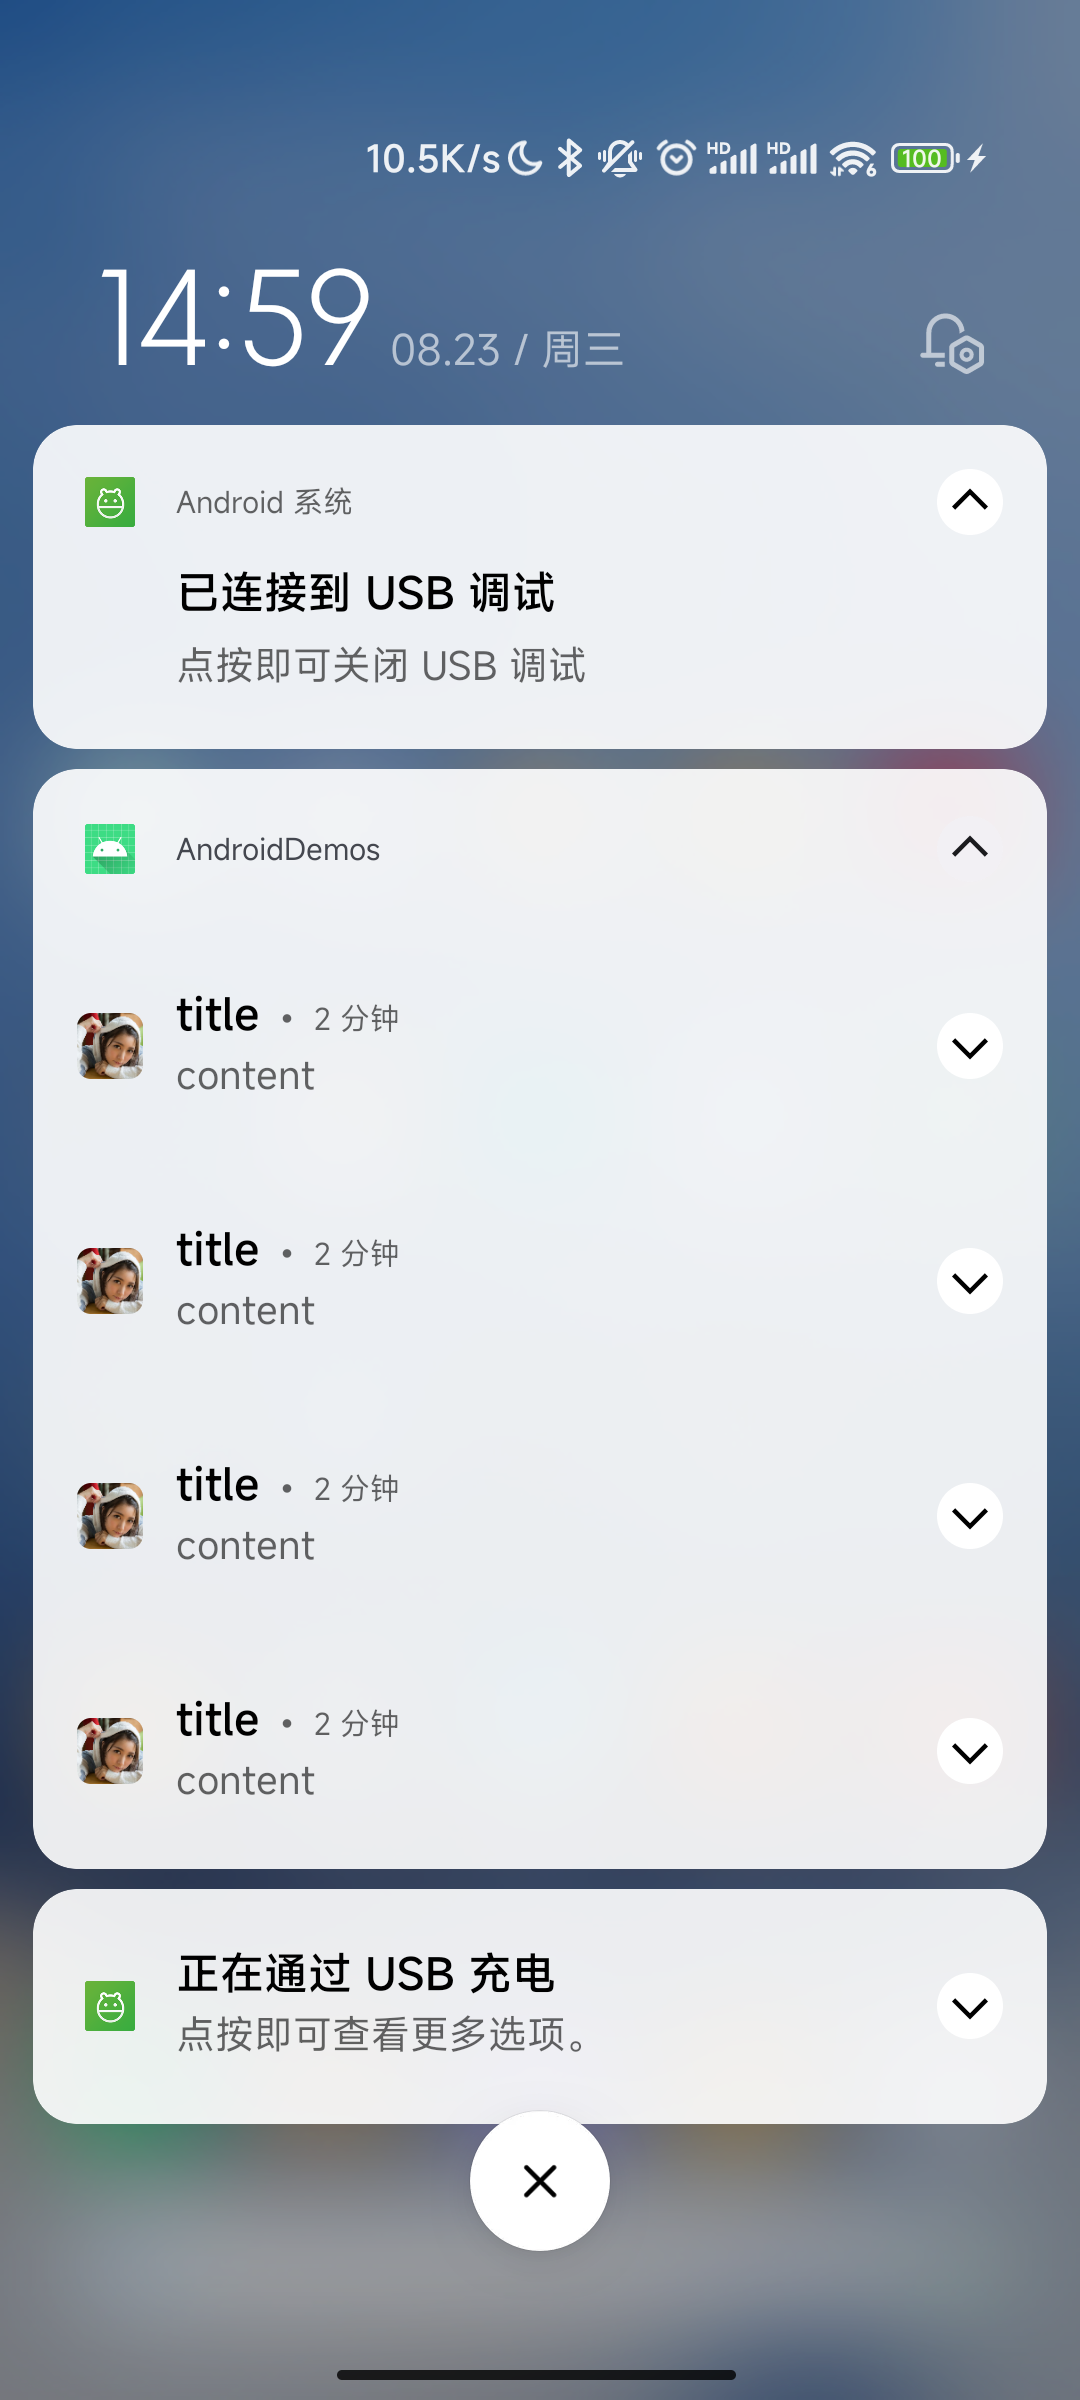
- 三星 A51,4 条自动分组
create group notification
- 定义一个唯一的字符串 group,
setGroup设置分组 - 消息默认按发送时间来排序,可以通过
setSortKey()来排序
1
2
3
4
5
6
7
8
9
val largeBm = BitmapFactory.decodeResource(resources, R.drawable.bg_girl)
val newMessageNotification = NotificationCompat.Builder(this, CHANNEL_ID)
    .setSmallIcon(R.drawable.ic_notitification)
    .setContentTitle("title_$notificationId")
    .setContentText("content_$notificationId")
    .setLargeIcon(largeBm)
    .setGroup(GROUP_KEY_WORK_EMAIL) // 设置了不会自动折叠了
    .setPriority(NotificationCompat.PRIORITY_HIGH)
    .build()
- 设置了
setGroup,未设置setGroupSummary,Notification 不会分组到一起,group Notification 必须要设置一个 summary notification
Create a notification channel group
创建 notification channel group
1
2
3
4
5
6
// The id of the group.
val groupId = "my_group_01"
// The user-visible name of the group.
val groupName = getString(R.string.group_name)
val notificationManager = getSystemService(Context.NOTIFICATION_SERVICE) as NotificationManager
notificationManager.createNotificationChannelGroup(NotificationChannelGroup(groupId, groupName))
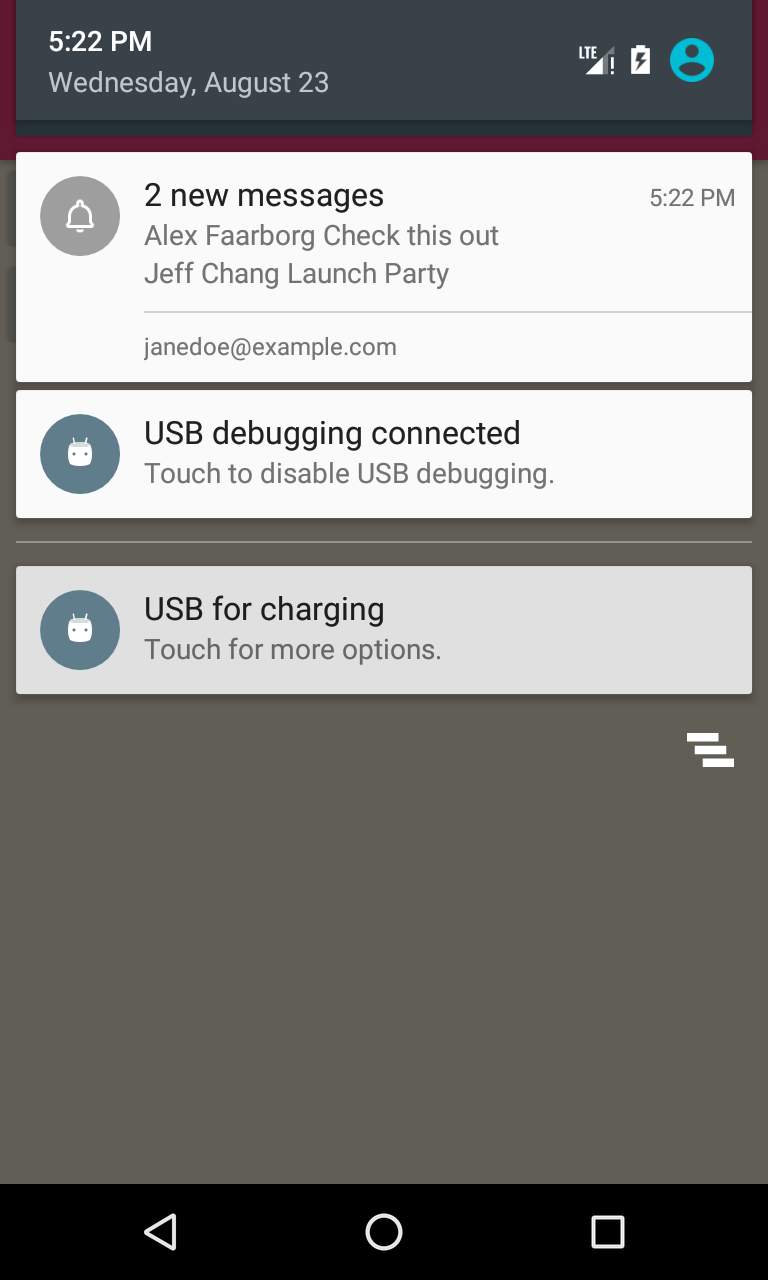
summary notification
- 调用 setGroup 和子 notification 保持一致的 group
- 调用
setGroupSummary(true) - summary notification 的 title 和 content 不会展示
1
2
3
4
5
6
7
8
9
10
11
12
13
14
15
16
17
18
19
20
21
22
23
24
25
26
27
28
29
30
31
32
33
34
35
36
37
38
39
40
41
42
43
44
private fun createGroupNotification() {
    // Use constant ID for notifications used as group summary.
    val CHANNEL_ID = "channel_id"
    val SUMMARY_ID = 0x1001
    val GROUP_KEY_WORK_EMAIL = "com.android.example.WORK_EMAIL"
    val newMessageNotification1 = NotificationCompat.Builder(this, CHANNEL_ID)
        .setSmallIcon(R.drawable.ic_notitification)
        .setContentTitle("Alex Faarborg")
        .setContentText("You will not believe...")
        .setGroup(GROUP_KEY_WORK_EMAIL)
        .build()

    val newMessageNotification2 = NotificationCompat.Builder(this, CHANNEL_ID)
        .setSmallIcon(R.drawable.ic_notitification)
        .setContentTitle("Jeff Chang")
        .setContentText("Please join us to celebrate the...")
        .setGroup(GROUP_KEY_WORK_EMAIL)
        .build()

    val summaryNotification = NotificationCompat.Builder(this, CHANNEL_ID)
        .setContentTitle("New mail from $GROUP_KEY_WORK_EMAIL")
        // Set content text to support devices running API level < 24.
        .setContentText("Two new messages")
        .setSmallIcon(R.drawable.ic_family_notifications)
        // Build summary info into InboxStyle template.
        .setStyle(NotificationCompat.InboxStyle()
            .addLine("Alex Faarborg Check this out")
            .addLine("Jeff Chang Launch Party")
            .setBigContentTitle("2 new messages")
            .setSummaryText("janedoe@example.com"))
        // Specify which group this notification belongs to.
        .setGroup(GROUP_KEY_WORK_EMAIL)
        // Set this notification as the summary for the group.
        .setGroupSummary(true)
        .build()

    val emailNotificationId1 = 1
    val emailNotificationId2 = 2
    NotificationManagerCompat.from(this).apply {
        notify(emailNotificationId1, newMessageNotification1)
        notify(emailNotificationId2, newMessageNotification2)
        notify(SUMMARY_ID, summaryNotification)
    }
}
summary notification 在不同的版本表现不一样:
- Android7.0(API24) 以下,只会展示 summary notification 这一条,子 notification 会被隐藏,点击 summary notification 也展开不了
- Android7.0 及以上,会展示 summary notification 这条,子 notification 可以点击展开和收起
如何设置通知不分组折叠?
- 使用 setGroup() 方法,并将 group 参数设置为空字符串即可禁用通知分组
不设置 setGroup,设置 setGroupSummary(false) 还是会自动通知分组
- Android7.0 及以上
- Android7.0 以下,不会
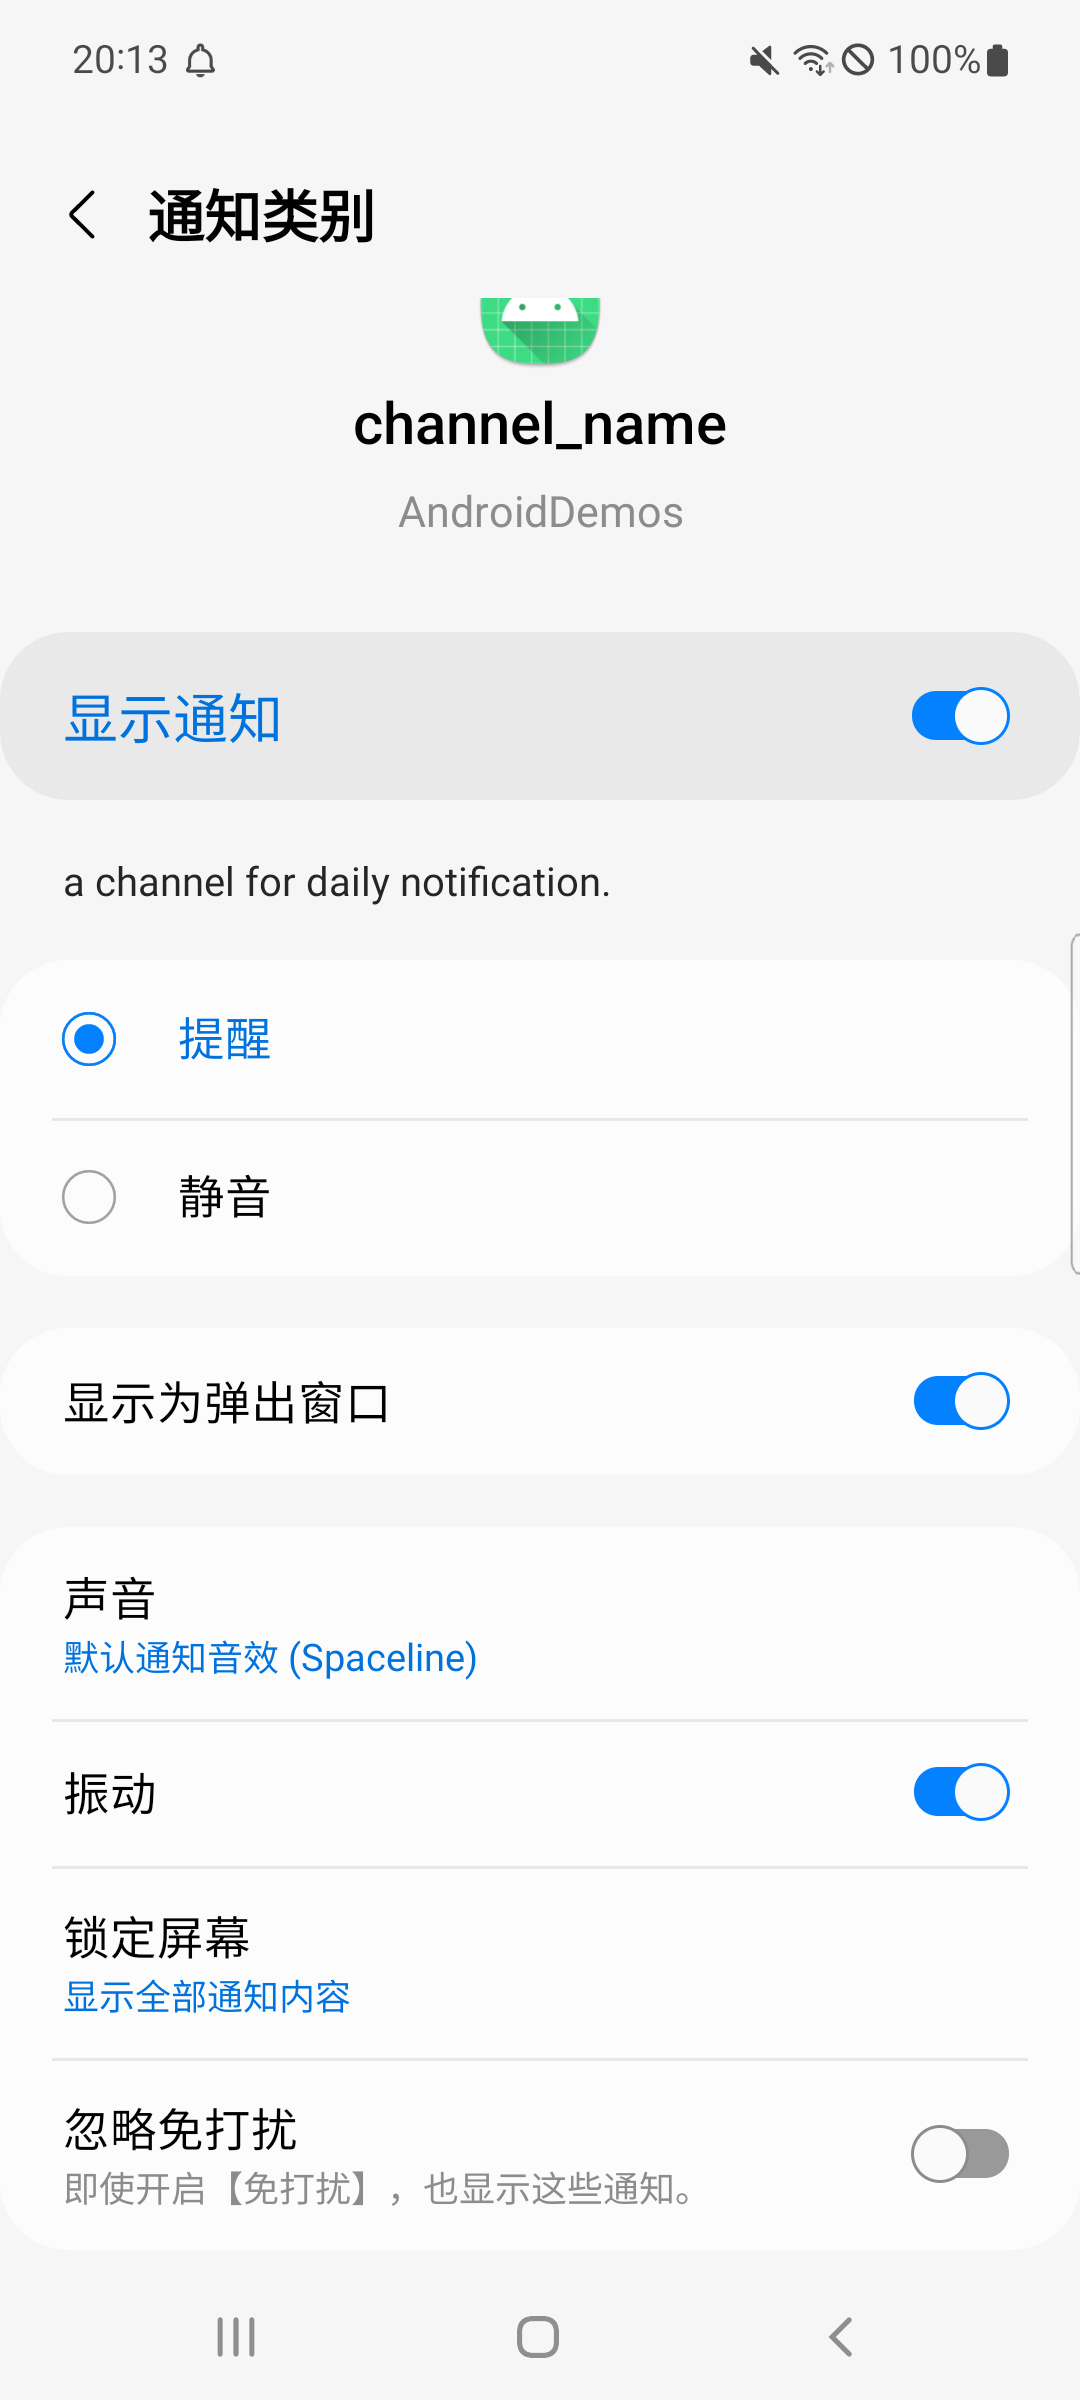
notification channels (Android8.0 AndroidO API26)
notification channels 概述
notification channel,通知渠道,或者叫通知类别。从 Android8.0(API26)起,所有的 Notification 必须指定一个 channel,可以单独对 channel 内的 Notification 做展示、声音的控制及其他的一些设置
当一个 notification channel 被创建后,App 就不能改变了该 channel 内的 notification 的行为了,完全交给用户来控制了,用户可以在设置页更改行为,但 App 可以改 channel 的 name 和 desc。
Android8.0 和之前对比
创建 notification channel
NotificationChannel 定义
1
NotificationChannel(String id, CharSequence name, @Importance int importance)
- id a unique channel ID 渠道 ID,必须唯一,且不超过 40 个字符;建议放到单独的常量类中去
- name user-visible name 渠道名,用户在设置中看到的
- importance importance level;重要程度,Android8.0 之前用 setPriority;不同 level 的通知表现不一样
NotificationChannel 方法
- 8.0 以前通知栏的提示音,提示音,振动,呼吸灯等效果使用方法 setDefaults(),setSound(),setVibrate() 等方法设置的;悬浮框,是否折叠等效果则是由 setPriority() 设置优先级函数来控制的;
但是这些函数在 8.0 以后会失效,而是使用由渠道重要等级来代替。
- 8.0 以前通知栏需要 setPriority() 优先级>=PRIORITY_DEFAULT,并且设置了 setDefaults(),setSound(),setVibrate() 等方法设置才会有提示音。
- 8.0 以后,需要合理设置渠道重要等级,合理划分,不重要的通知应设置低等级,避免频繁骚扰而被关闭。
- 渠道重要等级的提示效果只在 8.0 以上起作用,为了兼容低版本系统,最好是合理设置渠道重要等级的同时使用 setDefaults()&setPriority() 等函数设置提示效果。
1
2
3
4
5
6
7
8
9
10
11
12
13
14
setDefaults(int):向通知添加声音、闪灯和振动效果的最简单、使用默认(defaults)属性,可以组合多个属性。
setDefaults(Notification.DEFAULT_SOUND) //获取默认铃声
Notification.DEFAULT_VIBRATE(添加默认震动提醒);
Notification.DEFAULT_SOUND(添加默认声音提醒);
Notification.DEFAULT_LIGHTS(添加默认三色灯/呼吸灯提醒)
Notification.DEFAULT_ALL(添加默认以上3种全部提醒)

setVibrate(long[]):设置振动方式,比如:setVibrate(new long[] {0,300,500,700});延迟0ms,然后振动300ms,在延迟500ms,接着再振动700ms。
setLights(int argb, int onMs, int offMs):设置三色灯,参数依次是:灯光颜色,亮持续时间,暗的时间,不是所有颜色都可以,这跟设备有关,有些手机还不带三色灯;
另外,还需要为Notification设置flags为Notification.FLAG_SHOW_LIGHTS才支持三色灯提醒!

setSound(Uri):设置接收到通知时的铃声,可以用系统的,也可以自己设置,例子如下:
setSound(Uri.parse(“file:///sdcard/xx/xx.mp3”)) //获取自定义铃声
setSound(Uri.withAppendedPath(Audio.Media.INTERNAL_CONTENT_URI, “5”))//获取Android多媒体库内的铃声
示例:
1
2
3
4
5
6
7
8
9
10
11
12
13
14
15
16
17
private fun createNotificationChannel(channelId: String, channelName: String, importance: Int) {
    if (Build.VERSION.SDK_INT >= Build.VERSION_CODES.O) {
        val dailyChannel: NotificationChannel = NotificationChannel(
            channelId,
            channelName,
            importance
        ).apply {
            setShowBadge(true) // 桌面角标
            enableLights(true) // 通知灯
            enableVibration(true) // 震动
//                setSound()
            description = "a channel for daily notification. " // 通知渠道描述
            lightColor = Color.RED // 通知灯颜色
        }
        notificationManager.createNotificationChannel(dailyChannel)
    }
}
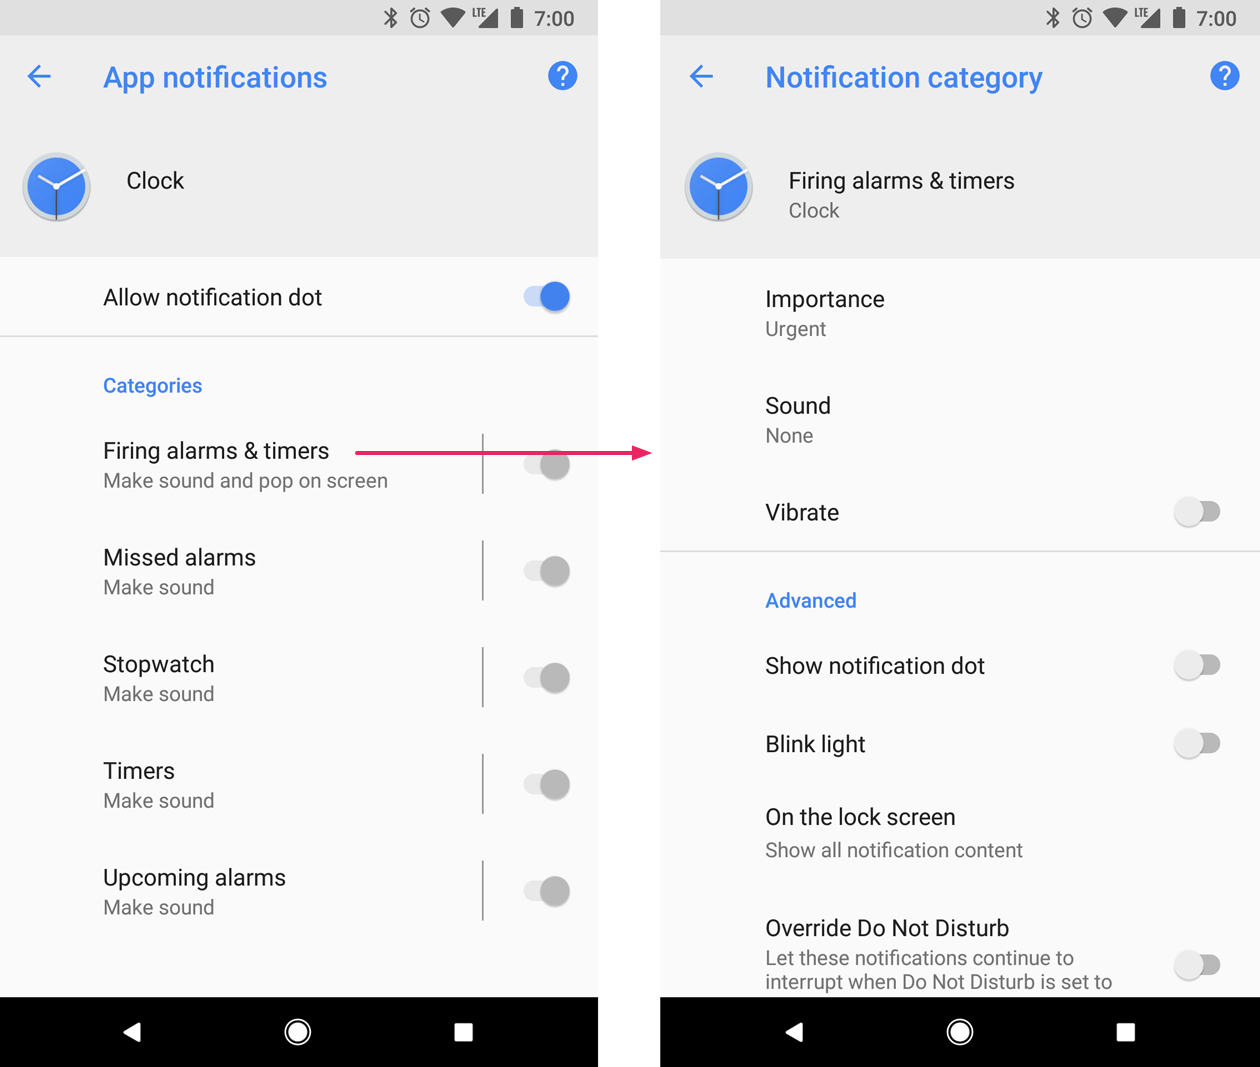
notification importance level
不同的 importance 的 notification 的行为不太一样
- Android24 以下,用 setPriority
- Android24 及以上,用 channel importance
| User-visible importance level | Importance (Android 8.0 and higher) | Priority (Android 7.1 and lower) |
|---|---|---|
| IMPORTANCE_MAX Unused,没用。最大等级,测试效果上与 IMPORTANCE_HIGH 完全一致 | PRIORITY_MAX 重要而紧急的通知,通知用户这个事件是时间上紧迫的或者需要立即处理的。 | |
| Urgent Makes a sound and appears as a heads-up notification. | IMPORTANCE_HIGH 在通知栏可见,有提示音,会横幅弹出 | PRIORITY_HIGH 高优先级用于重要的通信内容,例如短消息或者聊天,这些都是对用户来说比较有兴趣的。 |
| High Makes a sound. | IMPORTANCE_DEFAULT 在通知栏可见,有提示音,不会横幅弹出 | PRIORITY_DEFAULT 默认优先级用于没有特殊优先级分类的通知。 |
| Medium Makes no sound. | IMPORTANCE_LOW 在通知栏可见,不会有提示音,不会横幅弹出 | PRIORITY_LOW 低优先级可以通知用户但又不是很紧急的事件。 |
| Low Makes no sound and doesn’t appear in the status bar. | IMPORTANCE_MIN 通知栏会被折叠显示,没有提示。 | PRIORITY_MIN 用于后台消息 (例如天气或者位置信息)。最低优先级通知将只在状态栏显示图标,只有用户下拉通知抽屉才能看到内容。 |
| None Makes no sound and doesn’t appear in the status bar or shade. | IMPORTANCE_NONE 通知栏完全不显示,没有提示。也是通知栏管理设置为关闭时的状态。 | N/A |
打开notification channel设置页面
1
2
3
4
5
val intent = Intent(Settings.ACTION_CHANNEL_NOTIFICATION_SETTINGS).apply {
    putExtra(Settings.EXTRA_APP_PACKAGE, packageName)
    putExtra(Settings.EXTRA_CHANNEL_ID, myNotificationChannel.getId())
}
startActivity(intent)
删除notification channel
1
2
3
4
// The id of the channel.
val notificationManager = getSystemService(Context.NOTIFICATION_SERVICE) as NotificationManager
val id: String = "my_channel_01"
notificationManager.deleteNotificationChannel(id)
Heads-up notification 横幅通知
在 Android5.0 后,Notification 开始支持 Heads Up 模式。该模式下,不需要下拉通知栏就直接显示出来 ,悬挂在屏幕上方,并且焦点不变,仍在用户操作的界面。因此,不会打断用户的操作,通知过几秒就会自动消失。
可能会触发提醒式通知的条件有如下 3 种:
- 用户的 Activiity 处于全屏模式(应用使用 fullScreenIntent)
- 通知的优先级很高,且在搭载 Android 7.1(API 级别 25)及更低版本的设备上使用铃声或震动
- 在搭载 Android 8.0(API 级别为 26)及更高版本的设备上,通知渠道的重要程度比较高
注意:需要在设置中开启横幅通知权限(在设置通知管理中,不同 ROM 存在差异,原生系统没有这个权限)
示例:
1
2
3
4
5
6
7
8
9
10
11
12
13
14
15
16
17
18
19
20
private fun createNotificationForHeadsUp() {
    val headsUpChannelId = "heads_up_channel_id"
    createNotificationChannel(
        headsUpChannelId,
        "普通通知",
        NotificationManager.IMPORTANCE_MAX
    )
    val pendingIntent = getPendingIntent("heads-up notification")
    val mBuilder = NotificationCompat.Builder(this, headsUpChannelId)
        .setContentTitle("heads-up通知") // 标题
        .setContentText("heads-up通知内容") // 文本
        .setSmallIcon(R.drawable.ic_notitification) // 小图标
        .setLargeIcon(BitmapFactory.decodeResource(resources, R.drawable.aljly)) // 大图标
        .setPriority(NotificationCompat.PRIORITY_MAX) // 7.0 设置优先级
        .setContentIntent(pendingIntent) // 跳转配置
        .setFullScreenIntent(pendingIntent, true) // 悬挂式通知,Android8.0以下
        .setAutoCancel(true) // 点击自动取消
    val normalNotificationId = 10
    mManager.notify(normalNotificationId, mBuilder.build())
}
兼容问题:
- 在华为 Mate8(Android 7.0)上,调用 setFullScreenIntent 反而无法实现 Heads Up – 待验证
厂商 notification 适配
Huawei
华为通知栏样式
华为通知分类
MIUI9.0 不重要通知
自 MIUI 9 开始,MIUI 新增了通知过滤的功能
通知过滤是指通过分析用户对通知的操作,来个性化地确定通知的重要与不重要,然后将不重要的通知收纳进一个统一的页面
注意:在不重要通知里的消息不会自动 group 了
如何关闭?
设置→通知与控制中心→通知显示设置→通知过滤(关闭)
通知权限检测
如何检测应用通知权限是否开启?
https://developer.android.com/guide/topics/ui/notifiers/notifications.html
https://github.com/android-cn/android-discuss/issues/610
- 一般情况下,Api 19 以前是没有通知管理的,默认都是开启,不用管。
- Api 19 – 24 虽加入了通知管理功能,但没有开放检测是否开启了通知的接口,开发者只能用反射来获取权限值。
- Api 24 以上,NotificationManager 提供了 areNotificationsEnabled() 方法检测通知权限。
support 包已经考虑了以上场景,在 24.1.0 开放了 areNotificationsEnabled(),在 19 以下默认返回 true,19-24 返回对应反射值,24 以上用原生 NotificationManager 检测。 - Android8.0 权限适配
1
NotificationManagerCompat.areNotificationsEnabled();
源码:
1
2
3
4
5
6
7
8
9
10
11
12
13
14
15
16
17
18
19
20
21
22
23
24
public boolean areNotificationsEnabled() {
    if (Build.VERSION.SDK_INT >= 24) {
        return mNotificationManager.areNotificationsEnabled();
    } else if (Build.VERSION.SDK_INT >= 19) {
        AppOpsManager appOps =
                (AppOpsManager) mContext.getSystemService(Context.APP_OPS_SERVICE);
        ApplicationInfo appInfo = mContext.getApplicationInfo();
        String pkg = mContext.getApplicationContext().getPackageName();
        int uid = appInfo.uid;
        try {
            Class<?> appOpsClass = Class.forName(AppOpsManager.class.getName());
            Method checkOpNoThrowMethod = appOpsClass.getMethod(CHECK_OP_NO_THROW, Integer.TYPE, Integer.TYPE, String.class);
            Field opPostNotificationValue = appOpsClass.getDeclaredField(OP_POST_NOTIFICATION);
            int value = (int) opPostNotificationValue.get(Integer.class);
            return ((int) checkOpNoThrowMethod.invoke(appOps, value, uid, pkg)
                    == AppOpsManager.MODE_ALLOWED);
        } catch (ClassNotFoundException | NoSuchMethodException | NoSuchFieldException
                | InvocationTargetException | IllegalAccessException | RuntimeException e) {
            return true;
            }
        } else {
            return true;
        }
    }
- 适配不同版本的权限检测
1
2
3
4
5
6
7
8
9
10
11
12
13
14
15
16
17
18
19
20
21
22
23
24
25
26
27
28
29
30
31
32
fun isNotificationEnabled(context: Context): Boolean {
    return if (Build.VERSION.SDK_INT >= Build.VERSION_CODES.O) {
        try {
            // 所有通道都关闭检测为通知关闭,只要有一个通道开启,就默认为开启了通知
            if (NotificationManagerCompat.from(context).areNotificationsEnabled()) {
                val channels =
                    (context.getSystemService(Context.NOTIFICATION_SERVICE) as NotificationManager).notificationChannels
                if (channels.isEmpty()) {
                    return true
                }
                channels.forEach {
                    if (it.importance != NotificationManager.IMPORTANCE_NONE) {
                        return true
                    }
                }
            }
            false
        } catch (e: Exception) {
            try {
                NotificationManagerCompat.from(context).areNotificationsEnabled()
            } catch (ignore: Exception) {
                true
            }
        }
    } else {
        try {
            NotificationManagerCompat.from(context).areNotificationsEnabled()
        } catch (ignore: Exception) {
            true
        }
    }
}
国内 Rom 通知权限
通知权限不属于运行时权限
- oppo/vivo 手机有的 App 通知权限默认打开,有的未打开;应该是有白名单机制,收费或者根据用户量来定的
如何跳转通知权限设置页?
需要根据 api 版本兼容:
1
2
3
4
5
6
7
8
9
10
11
12
13
14
15
16
17
18
19
20
21
22
23
24
25
26
27
28
29
30
31
32
33
/**
 * 指定app的通知设置界面
 */
fun getNotificationSettingIntent(packageName: String, uid: Int?): Intent {
    val intent = Intent()
    try {
        intent.action = Settings.ACTION_APP_NOTIFICATION_SETTINGS

        // 8.0及以后版本使用这两个extra.  >=API 26
        intent.putExtra(Settings.EXTRA_APP_PACKAGE, packageName)
        if (uid != null) {
            intent.putExtra(Settings.EXTRA_CHANNEL_ID, uid)
        }

        //5.0-7.1 使用这两个extra.  <= API 25, >=API 21
        intent.putExtra("app_package", packageName)
        if (uid != null) {
            intent.putExtra("app_uid", uid)
        }
    } catch (e: Exception) {
        e.printStackTrace()
        //其他低版本或者异常情况,走该节点。进入APP设置界面
        intent.action = Settings.ACTION_APPLICATION_DETAILS_SETTINGS
        intent.putExtra("package", packageName)
    }
    return intent
}

fun getNotificationSettingIntent(context: Context): Intent {
    val packageName = context.packageName
    val uid = context.applicationInfo.uid
    return getNotificationSettingIntent(packageName, uid)
}
兼容
华为 v10,EMIUI8.0,跳转不过去,报错,只能跳转到应用详情页
1
2
3
4
5
6
7
8
9
// Binder call failed.java.lang.SecurityException: get package info: Neither user 1210052 nor current process has android.permission.INTERACT_ACROSS_USERS.

Intent intent = new Intent(Settings.ACTION_APPLICATION_DETAILS_SETTINGS);
Uri uri = Uri.fromParts("package", context.getPackageName(), null);
intent.setData(uri);
ResolveInfo resolveInfo = context.getPackageManager().resolveActivity(intent, 0);
if (resolveInfo != null) {
    context.startActivity(intent);
}
通知适配坑
顶部状态栏 (StatusBar) 小图标显示异常 Android5.x
现象: 当通知来的时候,如果不在通知栏浏览,会在顶部状态栏出现一个向上翻滚动画的通知消息,这条通知消息左边是一个小图标。部分系统这个小图标显示异常,是一个纯灰色的正方形,
如下图:

解决: 首先产生灰色图标的原因就是 5.0 系统引入了材料设计,谷歌强制使用带有 alpha 通道的图标,并且 RGB 的 alpha 值必须是 0(实测不为 0 也是可以的,但系统会忽略所有 RGB 值)。因此,使用 JPG 的图片是不行的,最好的代替方案就是一张背景透明的 PNG 图片可以修改尺寸。
类似的问题:通知栏小图标显示成灰色
解决:将小图标替换为透明背景的 PNG 图片
notification icon 标准
- 背景必須透明
- 只能使用「白色」
- 不可使用任何「漸層」或「Alpha」
- 尺寸為:24dp * 24dp
輸出尺寸
1
2
3
4
5
mdpi:24px * 24px
hdpi:36px * 36px
xhdpi:48px * 48px
xxhdpi:72px *72px
xxxhdpi:96px * 96px
通知栏更新频率
每个应用基本都有自更新的逻辑,App 开机的时候提示用户升级,点击升级按钮后在 Notification 出现一个下载带进度条的通知。应用一般是在开启一个工作线程在后台下载,然后在下载的过程中通过回调更新通知栏中的进度条。我们知道,下载进度的快慢是不可控的,如果每次下载中的回调都去更新通知栏,那么可能几百毫秒、几十毫秒、甚至几毫秒就更新一次通知栏,应用可能就会 ANR,甚至崩溃。
解决:控制通知栏更新频率,一般控制在 0.5s 或者 1s 就可以了。在某一个更新时间间隔内下载的进度回调直接丢弃,需要注意的是下载完成的回调,需要实时回调通知栏消息显示下载完成。
推送 sdk 前后台判断逻辑不一致的问题
问题详情: 为了提升推送到达,app 接入了小米推送的 SDK。小米推送分为通知栏消息和透传消息,通知栏消息属于系统级推送,在 MIUI 的机子上可以在进程被杀死的情况下也能收到应用推送。然而有个问题,小米认为应用在前台时,不会回调任何方法;小米认为应用在后台的时候,收到通知栏消息的同时,会回调 onNotificationMessageArrived 方法。这时候就要小心翼翼地处理这条消息了。因为如果你的应用前后台判断逻辑和小米的不一样,那么就有可能小米帮你发了一条通知栏消息,你自己又发了一遍,造成通知栏消息的重复发送。另一方面,在 7.0 系统的机子上,主标题和小图标的颜色是可以改变的,目前小米推送 SDK 没有开放这个接口供调用方定制。
FCM 是判断前后台来区分通知消息和数据消息。
解决: 前后台判断的问题。应用是否在后台可以根据以下代码进行判断。在 Android 5.0 以上,可以通过 ActivityManager.RunningAppProcessInfo 判断,Android 5.0 及以下版本通过 ActivityManager.RunningTaskInfo 判断。经测试,这个方案在 Android 4.4 以上结果是可以完全匹配的。
1
2
3
4
5
6
7
8
9
10
11
12
13
14
15
16
17
18
19
20
21
22
public static boolean isAppInBackgroundInternal(Context context) {
    ActivityManager manager = (ActivityManager) context.getSystemService(Context.ACTIVITY_SERVICE);
    if (Build.VERSION.SDK_INT > Build.VERSION_CODES.LOLLIPOP) {
        List<ActivityManager.RunningAppProcessInfo> runningProcesses = manager.getRunningAppProcesses();
        if (!ListUtils.isEmpty(runningProcesses)) {
            for (ActivityManager.RunningAppProcessInfo runningProcess : runningProcesses) {
                if (runningProcess.importance == ActivityManager.RunningAppProcessInfo.IMPORTANCE_FOREGROUND) {
                    return false;
                }
            }
        }
    } else {
        List<ActivityManager.RunningTaskInfo> task = manager.getRunningTasks(1);
        if (!ListUtils.isEmpty(task)) {
            ComponentName info = task.get(0).topActivity;
            if (null != info) {
                return !isKaolaProcess(info.getPackageName());
            }
        }
    }
    return true;
}