Android系统事件分发整体架构
事件分发整体架构
总结
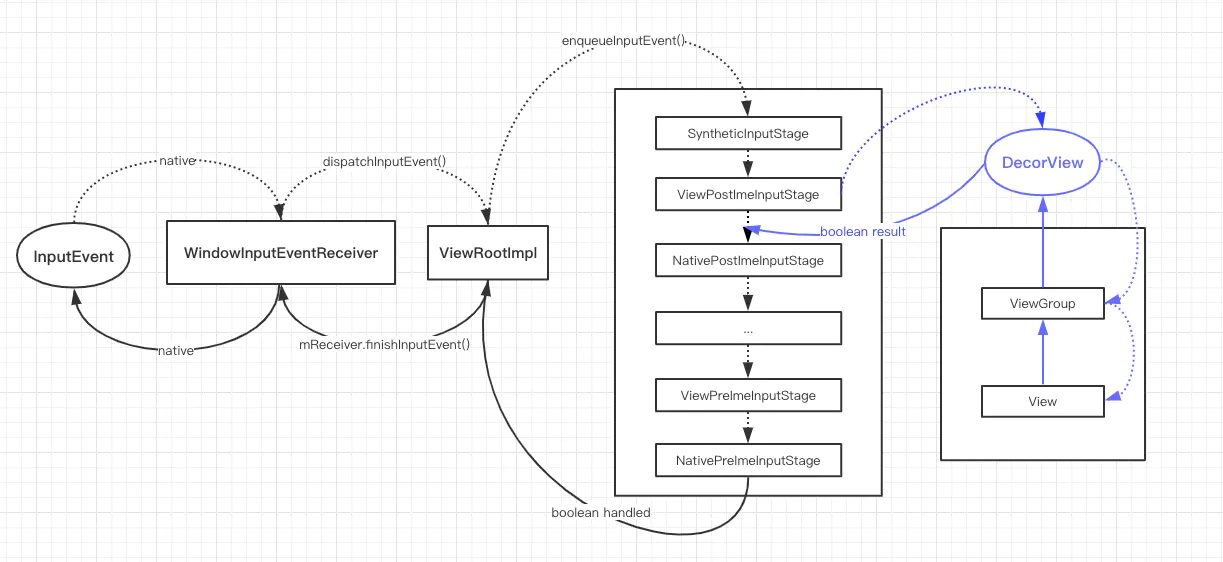
- 事件分发通过一条 InputStage 链来分发各种事件,触摸事件在 ViewPostImeInputStage 处理,不管事件是否消费,所有的 InputStage 都会被调用
- UI 事件分发只是整个事件分发的一小部分

- UI 触摸事件整体事件分发流程
1
2
3
4
5
6
7
8
9
10
11
12
13
14
15
16
17
18
19
20
21
22
InputEventReceiver#dispatchInputEvent(native调用,事件分发开始) →
WindowInputEventReceiver#onInputEvent(ViewRootImpl内部类) →
ViewRootImpl#enqueueInputEvent →
ViewRootImpl#doProcessInputEvents →
ViewRootImpl#deliverInputEvent →
EarlyPostImeInputStage#deliver(QueuedInputEvent) →
EarlyPostImeInputStage#onProcess →
EarlyPostImeInputStage#apply →
NativePostImeInputStage#deliver(QueuedInputEvent) →
NativePostImeInputStage#onProcess (这里进行UI事件分发) →
NativePostImeInputStage#apply →
ViewPostImeInputStage#deliver(QueuedInputEvent) →
ViewPostImeInputStage#onProcess →
ViewPostImeInputStage#apply →
ViewPostImeInputStage#deliver(QueuedInputEvent) →
ViewPostImeInputStage#onProcess →
ViewPostImeInputStage#apply →
SyntheticInputStage#deliver(QueuedInputEvent) →
SyntheticInputStage#forward →
SyntheticInputStage#finishInputEvent →
InputEventReceiver#finishInputEvent(native调用,事件分发结束)
InputEventReceiver#nativeFinishInputEvent
- DecorView 有两个职责
- 作为 View 树根节点,将事件分发给 Window.Callback(Activity、Dialog);
- 作为 ViewGroup,将事件分发给其子 View 或自身 onTouchEvent
基础
Android 系统中将输入事件定义为 InputEvent,而 InputEvent 根据输入事件的类型又分为了 KeyEvent 和 MotionEvent,前者对应键盘事件,后者则对应屏幕触摸事件,这些事件统一由系统输入管理器 InputManager 进行分发。
InputManager 系统输入管理器
InputManager 作用
InputManager 负责从硬件接收输入事件 InputEvent,并将事件分发给当前激活的窗口(Window)处理
InputManager 何时创建?
在系统启动的时候,SystemServer 会启动窗口管理服务 WindowManagerService,WindowManagerService 在启动的时候就会通过启动系统输入管理器 InputManager 来负责监控键盘消息。
SystemServer 进程中包含着各种各样的系统服务,比如 ActivityManagerService、WindowManagerService 等等,SystemServer 由 zygote 进程启动, 启动过程中对 WindowManagerService 和 InputManagerService 进行了初始化:
1
2
3
4
5
6
7
8
9
10
11
12
public final class SystemServer {

  private void startOtherServices() {
     // 初始化 InputManagerService
     InputManagerService inputManager = new InputManagerService(context);
     // WindowManagerService 持有了 InputManagerService
     WindowManagerService wm = WindowManagerService.main(context, inputManager,...);

     inputManager.setWindowManagerCallbacks(wm.getInputMonitor());
     inputManager.start();
  }
}
InputManagerService 的构造器中,通过调用 native 函数,通知 native 层级初始化 InputManager:
1
2
3
4
5
6
7
8
9
10
public class InputManagerService extends IInputManager.Stub {

  public InputManagerService(Context context) {
    // ...通知native层初始化 InputManager
    mPtr = nativeInit(this, mContext, mHandler.getLooper().getQueue());
  }

  // native 函数
  private static native long nativeInit(InputManagerService service, Context context, MessageQueue messageQueue);
}
SystemServer 会启动窗口管理服务 WindowManagerService,WindowManagerService 在启动的时候就会通过 InputManagerService 启动系统输入管理器 InputManager 来负责监控键盘消息。
Window 应用 UI
应用层级的 UI
ViewRootImpl WMS 和 Window 的纽带
InputManager 和 UI 之间的通信
ViewRootImpl 作用
ViewRootImpl 作为链接 WindowManager 和 DecorView 的纽带,同时实现了 ViewParent 接口,ViewRootImpl 作为整个控件树的根部,它是 View 树正常运作的动力所在,控件的测量、布局、绘制以及输入事件的分发都由 ViewRootImpl 控制。
ViewRootImpl 何时被创建?
1
2
3
4
5
6
7
8
9
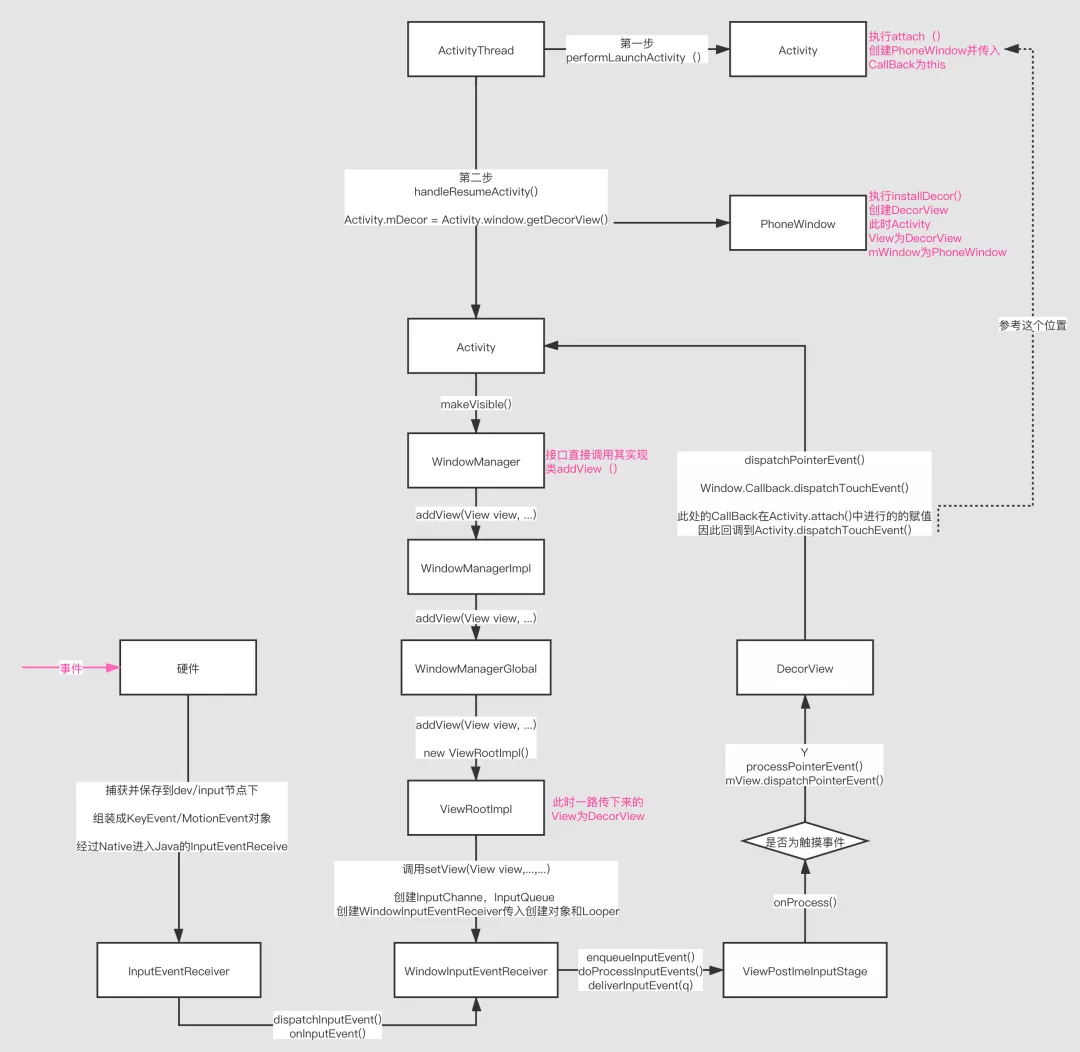
ActivityThread#handleLaunchActivity() →
ActivityThread#performLaunchActivity() →
ActivityThread#handleResumeActivity() →
ActivityThread#performResumeActivity() →
Activity#onResume()/makeVisible() →
WindowManager#addView(View view/*DecorView*/, ViewGroup.LayoutParams params) →
WindowManagerImpl#addView() →
WindowManagerGlobal#addView() (new ViewRootImpl)→
ViewRootImpl#setView(View view, WindowManager.LayoutParams attrs, View panelParentView) →
ViewRootImpl 是在 Activity#onResume 后,通过 WindowManager#addView 后创建的
InputChannel 事件通信渠道
Android 中 Window 和 InputManagerService 之间的通信实际上使用的 InputChannel,InputChannel 是一个 pipe,底层实际是通过 socket 进行通信。在 ViewRootImpl.setView() 过程中,也会同时注册 InputChannel
1
public final class InputChannel implements Parcelable { }
InputChannel 实现了 Parcelable,所以它可以通过 Binder 传输。具体是通过 addDisplay() 将当前 window 加入到 WindowManagerService 中管理:
1
2
3
4
5
6
7
8
9
10
11
12
13
14
public final class ViewRootImpl {

    public void setView(View view, WindowManager.LayoutParams attrs, View panelParentView) {
        requestLayout();
        // ...
        // 创建InputChannel
        mInputChannel = new InputChannel();
        // 通过Binder在SystemServer进程中完成InputChannel的注册
        mWindowSession.addToDisplay(mWindow, mSeq, mWindowAttributes,
                getHostVisibility(), mDisplay.getDisplayId(),
                mAttachInfo.mContentInsets, mAttachInfo.mStableInsets,
                mAttachInfo.mOutsets, mInputChannel);
    }
}
在 SystemServer 进程中,WindowManagerService 根据当前的 Window 创建了 SocketPair 用于跨进程通信,同时并对 App 进程中传过来的 InputChannel 进行了注册,这之后,ViewRootImpl 里的 InputChannel 就指向了正确的 InputChannel, 作为 Client 端,其 fd 与 SystemServer 进程中 Server 端的 fd 组成 SocketPair, 它们就可以双向通信了。
事件整体分发流程
事件捕获
硬件捕获事件保存到 dev/input 节点,InputManager 负责将从硬件捕获的事件分发给激活的 Window,它们之间的通过 InputChannel 通信。而每个 Window 又绑定一个 ViewRootImpl,事件会分发到 ViewRootImpl;Android 提供了 InputEventReceiver 类,以接收分发这些事件:
1
2
3
4
5
6
7
8
9
public abstract class InputEventReceiver {
    // Called from native code.
    private void dispatchInputEvent(int seq, InputEvent event, int displayId) {
        onInputEvent(event);
    }
    public void onInputEvent(InputEvent event) {
        finishInputEvent(event, false);
    }
}
InputEventReceiver 是一个抽象类,其默认的实现是将接收到的输入事件直接消费掉,因此真正的实现是 ViewRootImpl.WindowInputEventReceiver 类
1
2
3
4
5
6
7
8
9
10
11
12
13
14
15
16
17
18
19
20
public final class ViewRootImpl {

    final class WindowInputEventReceiver extends InputEventReceiver {
    @Override
     public void onInputEvent(InputEvent event, int displayId) {
         // 将输入事件加入队列
         enqueueInputEvent(event, this, 0, true);
     }
    }
    // InputEventReceiver
    public abstract class InputEventReceiver {
        // Called from native code.
        private void dispatchInputEvent(int seq, InputEvent event) {
            onInputEvent(event);
        }
        public void onInputEvent(InputEvent event) {
            finishInputEvent(event, false);
        }
    }
}
输入事件加入队列之后,接下来就是对事件的分发了。
设计者在这里使用了经典的 责任链 模式:对于一个输入事件的分发而言,必然有其对应的消费者,在这个过程中为了使多个对象都有处理请求的机会,从而避免了请求的发送者和接收者之间的耦合关系。将这些对象串成一条链,并沿着这条链一直传递该请求,直到有对象处理它为止。
事件分发
UI 层级的事件分发只是完整事件分发流程的一部分
在 WindowInputEventReceiver#onInputEvent 调用 enqueueInputEvent 将事件 QueuedInputEvent 添加到事件队列,QueuedInputEvent 是一个单链表
1
2
3
4
5
6
7
8
9
10
11
12
13
14
15
16
17
18
19
20
21
22
23
24
25
26
27
28
29
30
31
32
33
34
35
36
37
// ViewRootImpl Android29
void enqueueInputEvent(InputEvent event,
    InputEventReceiver receiver, int flags, boolean processImmediately) {
    QueuedInputEvent q = obtainQueuedInputEvent(event, receiver, flags);
    QueuedInputEvent last = mPendingInputEventTail;
    if (last == null) {
        mPendingInputEventHead = q;
        mPendingInputEventTail = q;
    } else {
        last.mNext = q;
        mPendingInputEventTail = q;
    }
    mPendingInputEventCount += 1;
    if (processImmediately) { // 一般为true
        doProcessInputEvents();
    } else {
        scheduleProcessInputEvents();
    }
}
void doProcessInputEvents() {
    QueuedInputEvent q = mPendingInputEventHead;
    deliverInputEvent(q);
}
private void deliverInputEvent(QueuedInputEvent q) {
    InputStage stage;
    if (q.shouldSendToSynthesizer()) {
        stage = mSyntheticInputStage;
    } else {
        stage = q.shouldSkipIme() ? mFirstPostImeInputStage : mFirstInputStage;
    }
    if (stage != null) {
        handleWindowFocusChanged();
        stage.deliver(q);
    } else {
        finishInputEvent(q);
    }
}
在 doProcessInputEvents 又调用 deliverInputEvent,将事件交给 InputStage#deliver 分发。
事件分发的整个责任链设计了
InputStage类作为基类,作为责任链中的模版,并实现了若干个子类,为输入事件按顺序分阶段进行分发处理:
InputStage
1
2
3
4
5
6
7
8
9
10
11
12
13
14
15
16
17
18
19
20
21
22
23
24
25
26
27
28
29
30
31
32
33
34
35
36
37
38
39
40
41
42
43
44
45
46
47
48
49
50
51
52
53
abstract class InputStage {
    private final InputStage mNext;

    protected static final int FORWARD = 0; // 交给下一个链处理标记
    protected static final int FINISH_HANDLED = 1; // 当前InputStage已经处理了
    protected static final int FINISH_NOT_HANDLED = 2; // 当前InputStage未处理

    // 构造时将下一个链传进来
    public InputStage(InputStage next) {
        mNext = next;
    }

    // 分发事件
    public final void deliver(QueuedInputEvent q) {
        if ((q.mFlags & QueuedInputEvent.FLAG_FINISHED) != 0) { // 事件已经被处理了 如果事件未结束,交给链下一个InputStage处理
            forward(q);
        } else if (shouldDropInputEvent(q)) { // 丢弃事件,view被移除 或 window没有focus了
            finish(q, false);
        } else { // 分发事件
            apply(q, onProcess(q));
        }
    }

    // 当前Stage对事件的处理结果
    protected int onProcess(QueuedInputEvent q) {
        return FORWARD; // 默认是事件交给链上的下一个Stage处理
    }

    // 如果有下一个Stage,继续分发事件
    protected void forward(QueuedInputEvent q) {
        onDeliverToNext(q);
    }
    protected void onDeliverToNext(QueuedInputEvent q) {
        if (mNext != null) {
            mNext.deliver(q);
        } else {
            finishInputEvent(q);
        }
    }

    // 根据链上当前Stage#onProcess处理的结果来决定是否分发事件
    protected void apply(QueuedInputEvent q, int result) {
        if (result == FORWARD) { // 继续分发给链上下一个Stage
            forward(q);
        } else if (result == FINISH_HANDLED) { // 事件被处理
            finish(q, true);
        } else if (result == FINISH_NOT_HANDLED) { // 事件未被处理
            finish(q, false);
        } else {
            throw new IllegalArgumentException("Invalid result: " + result);
        }
    }
}
InputStage 的子类:
1
2
3
4
5
6
7
8
9
// InputStage的子类,象征事件分发的各个阶段
final class ViewPreImeInputStage extends InputStage {}
final class EarlyPostImeInputStage extends InputStage {}
final class ViewPostImeInputStage extends InputStage {} // View的触摸事件的处理是ViewPostImeInputStage,source为InputDevice.SOURCE_CLASS_POINTER
final class SyntheticInputStage extends InputStage {}
abstract class AsyncInputStage extends InputStage {}
final class NativePreImeInputStage extends AsyncInputStage {}
final class ImeInputStage extends AsyncInputStage {}
final class NativePostImeInputStage extends AsyncInputStage {}
InputStage 分类
- SyntheticInputStage 综合性处理阶段,主要针对轨迹球、操作杆、导航面板及未捕获的事件使用键盘进行处理:
1
2
3
4
5
6
7
8
9
10
11
12
13
14
15
16
17
18
19
20
21
22
23
24
25
final class SyntheticInputStage extends InputStage {
    @Override
    protected int onProcess(QueuedInputEvent q) {
        q.mFlags |= QueuedInputEvent.FLAG_RESYNTHESIZED;
        if (q.mEvent instanceof MotionEvent) {
            final MotionEvent event = (MotionEvent)q.mEvent;
            final int source = event.getSource();
            if ((source & InputDevice.SOURCE_CLASS_TRACKBALL) != 0) {
                mTrackball.process(event);
                return FINISH_HANDLED;
            } else if ((source & InputDevice.SOURCE_CLASS_JOYSTICK) != 0) {
                mJoystick.process(event);
                return FINISH_HANDLED;
            } else if ((source & InputDevice.SOURCE_TOUCH_NAVIGATION)
                    == InputDevice.SOURCE_TOUCH_NAVIGATION) {
                mTouchNavigation.process(event);
                return FINISH_HANDLED;
            }
        } else if ((q.mFlags & QueuedInputEvent.FLAG_UNHANDLED) != 0) {
            mKeyboard.process((KeyEvent)q.mEvent);
            return FINISH_HANDLED;
        }
        return FORWARD;
    }
}
- ImeInputStage 输入法事件处理阶段,会从事件中过滤出用户输入的字符,如果输入的内容无法被识别,则将输入事件向下一个阶段继续分发:
1
2
3
4
5
6
7
8
9
10
11
12
13
14
15
16
17
18
19
20
21
22
final class ImeInputStage extends AsyncInputStage {
    @Override
    protected int onProcess(QueuedInputEvent q) {
        if (mLastWasImTarget && !isInLocalFocusMode()) {
            InputMethodManager imm = mContext.getSystemService(InputMethodManager.class);
            if (imm != null) {
                final InputEvent event = q.mEvent;
                if (DEBUG_IMF) Log.v(mTag, "Sending input event to IME: " + event);
                int result = imm.dispatchInputEvent(event, q, this, mHandler);
                if (result == InputMethodManager.DISPATCH_HANDLED) {
                    return FINISH_HANDLED;
                } else if (result == InputMethodManager.DISPATCH_NOT_HANDLED) {
                    // The IME could not handle it, so skip along to the next InputStage
                    return FORWARD;
                } else {
                    return DEFER; // callback will be invoked later
                }
            }
        }
        return FORWARD;
    }
}
- ViewPostImeInputStage 视图输入处理阶段,这里将 InputEvent 转化为 MotionEvent,主要处理按键、轨迹球、手指触摸及一般性的运动事件,触摸事件的分发对象是 View,这也正是我们熟悉的 UI 层级的事件分发 流程的起点:
1
2
3
4
5
6
7
8
9
10
11
12
13
14
15
16
17
18
19
20
21
22
23
24
25
26
27
28
29
30
31
32
33
34
final class ViewPostImeInputStage extends InputStage {
    @Override
    protected int onProcess(QueuedInputEvent q) {
        if (q.mEvent instanceof KeyEvent) {
            return processKeyEvent(q);
        } else {
            final int source = q.mEvent.getSource();
            if ((source & InputDevice.SOURCE_CLASS_POINTER) != 0) {
                return processPointerEvent(q);
            } else if ((source & InputDevice.SOURCE_CLASS_TRACKBALL) != 0) {
                return processTrackballEvent(q);
            } else {
                return processGenericMotionEvent(q);
            }
        }
    }
    private int processPointerEvent(QueuedInputEvent q) {
        final MotionEvent event = (MotionEvent)q.mEvent;

        mAttachInfo.mUnbufferedDispatchRequested = false;
        mAttachInfo.mHandlingPointerEvent = true;
        boolean handled = mView.dispatchPointerEvent(event); // DecorView
        maybeUpdatePointerIcon(event);
        maybeUpdateTooltip(event);
        mAttachInfo.mHandlingPointerEvent = false;
        if (mAttachInfo.mUnbufferedDispatchRequested && !mUnbufferedInputDispatch) {
            mUnbufferedInputDispatch = true;
            if (mConsumeBatchedInputScheduled) {
                scheduleConsumeBatchedInputImmediately();
            }
        }
        return handled ? FINISH_HANDLED : FORWARD;
    }
}
- 如果构建 InputStage chain?在 ViewRootImpl#setView 构建的
1
2
3
4
5
6
7
8
9
10
11
12
13
mSyntheticInputStage = new SyntheticInputStage();
InputStage viewPostImeStage = new ViewPostImeInputStage(mSyntheticInputStage);
InputStage nativePostImeStage = new NativePostImeInputStage(viewPostImeStage,
        "aq:native-post-ime:" + counterSuffix);
InputStage earlyPostImeStage = new EarlyPostImeInputStage(nativePostImeStage);
InputStage imeStage = new ImeInputStage(earlyPostImeStage,
        "aq:ime:" + counterSuffix);
InputStage viewPreImeStage = new ViewPreImeInputStage(imeStage);
InputStage nativePreImeStage = new NativePreImeInputStage(viewPreImeStage,
        "aq:native-pre-ime:" + counterSuffix);

mFirstInputStage = nativePreImeStage;
mFirstPostImeInputStage = earlyPostImeStage;
ViewPostImeInputStage
1
2
3
4
5
6
7
8
9
10
// InputStage
public final void deliver(QueuedInputEvent q) {
    if ((q.mFlags & QueuedInputEvent.FLAG_FINISHED) != 0) {
        forward(q);
    } else if (shouldDropInputEvent(q)) {
        finish(q, false);
    } else {
        apply(q, onProcess(q));
    }
}
在 InputStage#deliver 中,如果事件未结束,调用 apply 将 onProcess 的结果传递进去
在 ViewPostImeInputStage#onProcess(),判断如果是触摸事件,调用 processPointerEvent()
1
2
3
4
5
6
7
8
9
10
11
12
13
14
15
16
17
18
19
20
21
22
23
24
25
26
27
28
29
30
31
32
33
34
final class ViewPostImeInputStage extends InputStage {
    @Override
    protected int onProcess(QueuedInputEvent q) {
        if (q.mEvent instanceof KeyEvent) {
            return processKeyEvent(q);
        } else {
            final int source = q.mEvent.getSource();
            if ((source & InputDevice.SOURCE_CLASS_POINTER) != 0) {
                return processPointerEvent(q);
            } else if ((source & InputDevice.SOURCE_CLASS_TRACKBALL) != 0) {
                return processTrackballEvent(q);
            } else {
                return processGenericMotionEvent(q);
            }
        }
    }
    private int processPointerEvent(QueuedInputEvent q) {
        final MotionEvent event = (MotionEvent)q.mEvent;

        mAttachInfo.mUnbufferedDispatchRequested = false;
        mAttachInfo.mHandlingPointerEvent = true;
        boolean handled = mView.dispatchPointerEvent(event); // DecorView
        maybeUpdatePointerIcon(event);
        maybeUpdateTooltip(event);
        mAttachInfo.mHandlingPointerEvent = false;
        if (mAttachInfo.mUnbufferedDispatchRequested && !mUnbufferedInputDispatch) {
            mUnbufferedInputDispatch = true;
            if (mConsumeBatchedInputScheduled) {
                scheduleConsumeBatchedInputImmediately();
            }
        }
        return handled ? FINISH_HANDLED : FORWARD; // 如果handled返回true,事件分发结束了
    }
}
在 processPointerEvent() 然后内部调用 mView.dispatchPointerEvent(),此时的 mView 为 DecorView,DecorView 没有实现该方法,调用的是 View#dispatchPointerEvent,最后会辗转调用到了 DecorView.dispatchTouchEvent()。
DecorView
在 View#dispatchPointerEvent 判断是否是 touchEvent,然后调用 DecorView#dispatchTouchEvent,其实就是 ViewGroup#dispatchTouchEvent,在 VG#dispatchTouchEvent 中通过 mWindow.getCallback() 获取 Window.Callback 然后调用 Window.Callback.dispatchTouchEvent(),这个 Callback 就是 PhoneWindow 里的 mCallback,而 mCallback 则是 Activity 的 attach() 赋值的,此处也就自然调用到了 Activity 中,
1
2
3
4
5
6
7
8
9
10
11
12
13
14
15
16
// View
public final boolean dispatchPointerEvent(MotionEvent event) {
    if (event.isTouchEvent()) {
        return dispatchTouchEvent(event);
    } else {
        return dispatchGenericMotionEvent(event);
    }
}

// DecorView
@Override
public boolean dispatchTouchEvent(MotionEvent ev) {
    final Window.Callback cb = mWindow.getCallback();
    return cb != null && !mWindow.isDestroyed() && mFeatureId < 0
            ? cb.dispatchTouchEvent(ev) : super.dispatchTouchEvent(ev);
}
如果 Window 没有设置 Window.Callback==null,调用的就是 super.dispatchTouchEvent(ev) 及 View#dispatchTouchEvent(ev)。否则调用的 cb.dispatchTouchEvent,Activity 实现了 Window.Callback,最后回到了 Activity 的 dispatchTouchEvent;其他 Dialog,PopupWindow 具体要看有没有实现这个 Window.Callback
1
2
3
4
5
6
7
8
9
10
11
public class Activity implements Window.Callback {
    public boolean dispatchTouchEvent(MotionEvent ev) {
        if (ev.getAction() == MotionEvent.ACTION_DOWN) {
            onUserInteraction();
        }
        if (getWindow().superDispatchTouchEvent(ev)) {
            return true;
        }
        return onTouchEvent(ev);
    }
}
DecorView 的双重职责
1
2
3
4
5
6
7
8
9
10
11
12
13
14
15
16
17
18
19
20
21
22
23
24
25
26
27
28
29
30
31
32
33
34
35
36
37
38
// 伪代码
public class DecorView extends FrameLayout {

    // 0.这个是继承View的,在ViewRootImpl#ViewPostImeInputStage#onProcess#processPointerEvent调用
    public final boolean dispatchPointerEvent(MotionEvent event) {
        if (event.isTouchEvent()) {
            return dispatchTouchEvent(event);
        } else {
            return dispatchGenericMotionEvent(event);
        }
    }

    // 1.将事件分发给Activity
    @Override
    public boolean dispatchTouchEvent(MotionEvent ev) {
      return window.getActivity().dispatchTouchEvent(ev)
    }

    // 4.执行ViewGroup 的 dispatchTouchEvent
    public boolean superDispatchTouchEvent(MotionEvent event) {
      return super.dispatchTouchEvent(event);
    }
}

// 2.将事件分发给Window
public class Activity {
    public boolean dispatchTouchEvent(MotionEvent ev) {
      return getWindow().superDispatchTouchEvent(ev);
    }
}

// 3.将事件再次分发给DecorView
public class PhoneWindow extends Window {
    @Override
    public boolean superDispatchTouchEvent(MotionEvent event) {
      return mDecor.superDispatchTouchEvent(event);
    }
}
DecorView 作为 View 树的根节点,接收到屏幕触摸事件 MotionEvent 时,应该通过递归的方式将事件分发给子 View,这似乎理所当然。但实际设计中,设计者将 DecorView 接收到的事件首先分发给了 Activity,Activity 又将事件分发给了其 Window,最终 Window 才将事件又交回给了 DecorView,形成了一个小的循环
1
2
3
4
5
6
7
8
9
ViewRootImpl.ViewPostImeInputStage#onProcess →
ViewRootImpl.ViewPostImeInputStage#processPointerEvent →
DecorView#dispatchPointerEvent(这里其实调用的View#dispatchPointerEvent) →
View#dispatchPointerEvent →
DecorView#dispatchTouchEvent →
Activity#dispatchTouchEvent →
PhoneWindow#superDispatchTouchEvent →
DecorView#superDispatchTouchEvent →
ViewGroup#dispatchTouchEvent
事实上 DecorView 这样设计,是 面向对象程序设计 中灵活运用 多态这一特征的有力体现——对于 DecorView 而言,它承担了 2 个职责:
- 在接收到输入事件时,DecorView 不同于其它 View,它需要先将事件转发给最外层的 Activity,使得开发者可以通过重写 Activity.onTouchEvent() 函数以达到对当前屏幕触摸事件拦截控制的目的,这里 DecorView 履行了自身(根节点)特殊的职责;
- 从 Window 接收到事件时,作为 View 树的根节点,将事件分发给子 View,这里 DecorView 履行了一个普通的 View 的职责。
UI 层级事件分发
现在进入 UI 层级的事件分发,如果是 Activity,这个 window 是 PhoneWindow,mDecor 是 DecorView
1
2
3
4
5
6
// PhoneWindow Android29
private DecorView mDecor;
@Override
public boolean superDispatchTouchEvent(MotionEvent event) {
    return mDecor.superDispatchTouchEvent(event);
}
然后调用 DecorView#superDispatchTouchEvent,最终调用 ViewGroup#dispatchTouchEvent
1
2
3
4
// DecorView Android29
public boolean superDispatchTouchEvent(MotionEvent event) {
    return super.dispatchTouchEvent(event);
}
下面就是正常的 UI 层级的事件分发了,见 UI层级事件分发-事件分发(ViewGroup)
事件分发结果的返回
真正从 Native 层的 InputManager 接收输入事件的是 ViewRootImpl 的 WindowInputEventReceiver 对象,既然负责输入事件的分发,自然也负责将事件分发的结果反馈给 Native 层,作为事件分发的结束:
1
2
3
4
5
6
7
8
9
10
11
12
13
14
15
16
17
18
19
20
public final class ViewRootImpl {
  final class WindowInputEventReceiver extends InputEventReceiver {
    @Override
     public void onInputEvent(InputEvent event, int displayId) {
         // 【开始】将输入事件加入队列,开始事件分发
         enqueueInputEvent(event, this, 0, true);
     }
  }
}

// ViewRootImpl.WindowInputEventReceiver 是其子类,因此也持有finishInputEvent函数
public abstract class InputEventReceiver {
  private static native void nativeFinishInputEvent(long receiverPtr, int seq, boolean handled);

  public final void finishInputEvent(InputEvent event, boolean handled) {
     //...
     // 【结束】调用native层函数,结束应用层的本次事件分发
     nativeFinishInputEvent(mReceiverPtr, seq, handled);
  }
}
从前面的 InputStage 我们知道,在 InputStage 的子类重写的 onProcess 方法中,根据处理结果,会返回 InputStage#FORWARD/FINISH_HANDLED/FINISH_NOT_HANDLED,然后在 InputStage#apply 根据 onProcess 处理结果,分别调用 forward()/finish(),在 finish 中,添加事件结束标记 QueuedInputEvent.FLAG_FINISHED 或未结束 QueuedInputEvent.FLAG_FINISHED_HANDLED
1
2
3
4
5
6
7
8
// InputStage
protected void finish(QueuedInputEvent q, boolean handled) {
    q.mFlags |= QueuedInputEvent.FLAG_FINISHED;
    if (handled) {
        q.mFlags |= QueuedInputEvent.FLAG_FINISHED_HANDLED;
    }
    forward(q);
}
然后调用 forward,最后走到最后一个 InputStage,SyntheticInputStage#onDeliverToNext,此时 mNext 为 null,调用 InputStage#finishInputEvent 结束了事件
Activity 中事件分发最终流程图
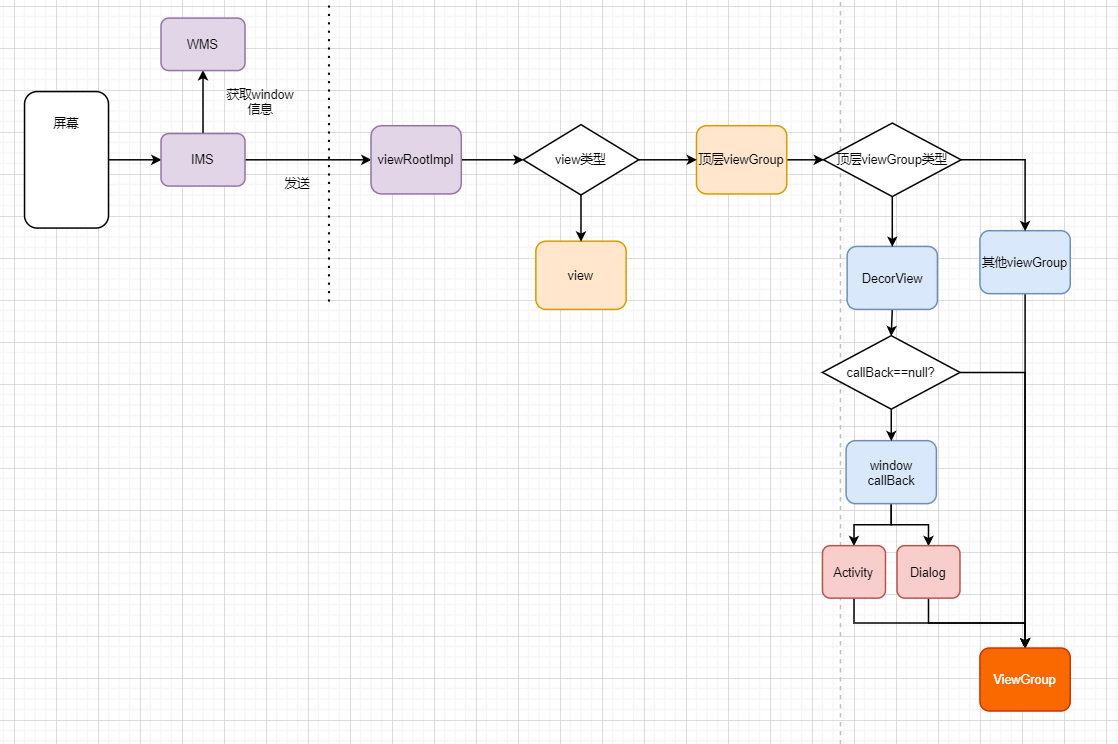
ViewRootImpl 是如何分发事件
1
2
3
4
5
6
7
8
9
10
11
12
final class ViewPostImeInputStage extends InputStage {
    protected int onProcess(QueuedInputEvent q) {
        // ...
        return processPointerEvent(q);
        // ...
    }
    private int processPointerEvent(QueuedInputEvent q) {
        // 这个mView就是ViewRootImpl,Activity和Dialog是DecorView,PopupWindow是PopupDecorView
        boolean handled = mView.dispatchPointerEvent(event);
        return handled ? FINISH_HANDLED : FORWARD;
    }
}
mView 是哪里来的?
mView 是在 ViewRootImpl 的 setView 中调用:
1
2
3
4
5
6
7
8
9
View mView;
// ViewRootImpl
public void setView(View view, WindowManager.LayoutParams attrs, View panelParentView,  int userId) {
    synchronized (this) {
        if (mView == null) {
            mView = view;
        }
    }
}
那么 ViewRootImpl 又是怎么调用的?
1
2
3
4
WindowManager.addView(View,ViewGroup.LayoutParams) → // 注意这里的view
WindowManagerImpl.addView(View,ViewGroup.LayoutParams) →
WindowManagerGlobal.addView(View,ViewGroup.LayoutParams,Display,parentWindow,userId) →
ViewRootImpl.setView(view,attrs,panelParentView,userId)
可以看到 ViewRootImpl 是在 WindowManagerGlobal.addView 添加的。
所以通过 WindowManager.addView(View) 添加 view 的时候,mView 就是参数 view
mView.dispatchPointerEvent
ViewRootImpl 管理一棵 view 树,View 树的最外层是 ViewGroup,而 ViewGroup 继承于 view。因此整一棵 view 树,从外部可以看做一个 view。viewRootImpl 接收到触摸信息之后,经过处理之后,封装成 MotionEvent 对象发送给他所管理的 view,由 View 自己进行分发。
1
2
3
4
5
6
7
8
// View
public final boolean dispatchPointerEvent(MotionEvent event) {
    if (event.isTouchEvent()) {
        return dispatchTouchEvent(event);
    } else {
        return dispatchGenericMotionEvent(event);
    }
}
- mView 大多数情况下是 DecorView,也有不是的比如 PopupDecorView
- DecorView 和 PopupDecorView 都是 FrameLayout,它们都没有重写 dispatchPointerEvent(),这里只看触摸事件,所以我们只需要看 dispatchTouchEvent
DecorView
Activity 和 Dialog,window 是 PhoneWindow,顶层的 ViewGroup 为 DecorView,因此会调用 DecorView 的 dispatchTouchEvent 方法进行分发。
1
2
3
4
5
6
// DecorView.java api29
public boolean dispatchTouchEvent(MotionEvent ev) {
    final Window.Callback cb = mWindow.getCallback();
    return cb != null && !mWindow.isDestroyed() && mFeatureId < 0
            ? cb.dispatchTouchEvent(ev) : super.dispatchTouchEvent(ev);
}
这里的 windowCallBack 是一个接口,他里面包含了一些 window 变化的回调方法,其中就有 dispatchTouchEvent ,也就是事件分发方法。
1. 如果 window callBack 对象不为空,则调用 callBack 对象的分发方法进行分发
- Activity 实现了 Window.CallBack 接口,并在创建布局的时候,把自己设置给了 DecorView,因此在 Activity 的布局界面中,DecorView 会把事件分发给 Activity 进行处理。
- Dialog 的布局界面中,会分发给实现了 callBack 接口的 Dialog
2. 如果 window callBack 对象为空,则调用父类 ViewGroup 的事件分发方法进行分发
如果顶层的 viewGroup 不是 DecorView,那么对调用对应 view 的 dispatchTouchEvent 方法进行分发。例如,顶层的 view 是一个 Button,那么会直接调用 Button 的 dispatchTouchEvent 方法;如果顶层 viewGroup 子类没有重写 dispatchTouchEvent 方法,那么会直接调用 ViewGroup 默认的 dispatchTouchEvent 方法。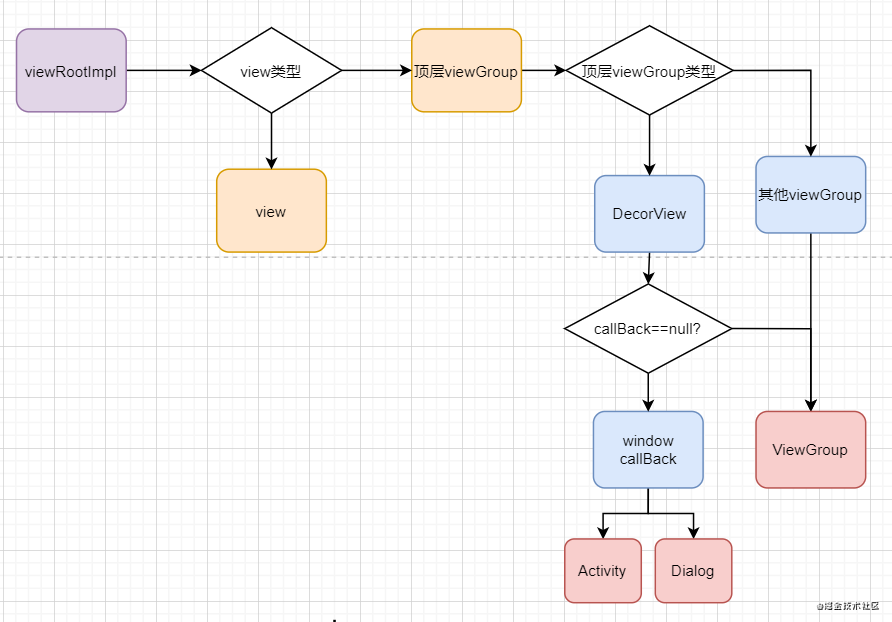
- viewRootImpl 会直接调用管理的 view 的 dispatchTouchEvent 方法,根据具体的 view 的类型,调用具体的方法。
- view 树的根 view 可能是一个 view,也可能是一个 viewGroup,view 会直接处理事件,而 viewGroup 则会进行分发。
- DecorView 重写了 dispatchTouchEvent 方法,会先判断是否存在 callBack,优先调用 callBack 的方法,也就是把事件传递给了 Activity。
- 其他的 viewGroup 子类会根据自身的逻辑进行事件分发。
PopupDecorView
下面就进入到了 PupupDocorView,具体看下章节的 不同组件对于事件的分发
自定义 View
这个就看自己的处理流程了,如果不处理 dispatchTouchEvent 的话,默认就走 View 那套事件分发
不同组件对于事件的分发
触摸事件是先发送到 ViewRootImpl,然后由 ViewRootImpl 调用其所管理的 view 的方法进行事件分发。按照正常的流程,view 会按照控件树向下去分发。而事件却到了 activity、dialog,就是因为 DecorView/PopupDocorView 这个 “ 叛徒 “ 的存在。
Activity 处理事件分发
前面我们知道,会回调 Window.Callback 的 dispatchTouchEvent,而 Activity 实现了该方法:
1
2
3
4
5
6
7
8
9
10
11
12
13
14
15
// Activity.java api29
public boolean dispatchTouchEvent(MotionEvent ev) {
    // down事件,回调onUserInteraction方法
    // 这个方法是个空实现,给开发者去重写
    if (ev.getAction() == MotionEvent.ACTION_DOWN) {
        onUserInteraction();
    }
    // getWindow返回的就是PhoneWindow实例
    // 直接调用PhoneWindow的方法
    if (getWindow().superDispatchTouchEvent(ev)) {
        return true;
    }
    // 如果前面分发过程中事件没有被处理,那么调用Activity自身的方法对事件进行处理
    return onTouchEvent(ev);
}
Dialog 处理事件分发
Dialog 和 Activity 类似,也实现了 Window.Callback 接口,直接看 dispatchTouchEvent:
1
2
3
4
5
6
7
// Dialog.java api29
public boolean dispatchTouchEvent(@NonNull MotionEvent ev) {
    if (mWindow.superDispatchTouchEvent(ev)) {
        return true;
    }
    return onTouchEvent(ev);
}
这里的 mWindow,就是 Dialog 内部维护的 PhoneWindow 实例,接下去的逻辑就和 Activity 的流程一样了。
PopupWindow 处理事件分发
PopupWindow 他的根 View 是 PopupDecorView,而不是 DecorView。虽然他的名字带有 DecorView,但是却和 DecorView 一点关系都没有,他是直接继承于 FrameLayout。我们看到他的事件分发方法:
1
2
3
4
5
6
7
// PopupWindow.PopupDecorView.java api29
public boolean dispatchTouchEvent(MotionEvent ev) {
    if (mTouchInterceptor != null && mTouchInterceptor.onTouch(this, ev)) {
        return true;
    }
    return super.dispatchTouchEvent(ev);
}
mTouchInterceptor 是一个拦截器,我们可以手动给 PopupWindow 设置拦截器。时间会优先交给拦截器处理,如果没有拦截器或拦截器没有消费事件,那么才会交给 ViewGroup 去进行分发。
WM 添加自定义 View 事件处理
如果未自定义处理,那么走 View 默认那套事件处理流程
最终流程
Ref
[x] 反思 Android 事件分发机制的设计与实现
https://juejin.cn/post/6844903926446161927
从事件分发整体分析,很不错
- Android 的事件到底是怎么来的?
https://mp.weixin.qq.com/s/nxiPBMyRzhkU_dwTqnp_rA
分析事件来源
- Android Input
https://www.jianshu.com/p/2bff4ecd86c9
FrameWork Android input 框架