Android实现圆角
Android 实现圆角
shape xml
1
2
3
4
5
6
7
8
<shape xmlns:android="http://schemas.android.com/apk/res/android">
    <solid android:color="#ffffff" />
    <stroke
        android:width="0.8dp"
        android:color="#ffffff" />

    <corners android:radius="10dp" />
</shape>
其实这样的操作只不过是改变背景而已,它可能会出现内部内容穿透的效果。
View 使用 ViewOutlineProvider 裁剪制作圆角或者倒角 (API21 及以上)
ViewOutlineProvider 介绍
什么是 ViewOutlineProvider?
ViewOutlineProvider 是 Android 中用于定义视图(View)轮廓(Outline)的核心类,主要用于实现视图的形状裁剪(Clipping)和阴影(Elevation)效果。它是 Android 5.0(API 21)引入的图形渲染优化的一部分,能够在不修改视图内容的情况下,通过定义轮廓影响视图的显示边界和阴影形状。
Outline(轮廓): 表示一个视图的几何形状边界。可以是矩形、圆角矩形、圆形或自定义路径。
ViewOutlineProvider 分类
ViewOutlineProvider 内置三种默认的实现 BACKGROUND、BOUNDS、PADDED_BOUNDS:
BACKGROUND
BACKGROUND:使用视图的背景(Background)来确定轮廓边界 (如果视图没有背景,则轮廓将不会生效)。视图的背景可以是一个 Drawable,例如 ShapeDrawable 或 BitmapDrawable。轮廓会根据背景的形状进行调整。
适用场景:当你需要根据视图的背景来设置轮廓时,例如背景是一个圆形或椭圆形的 Drawable。
BOUNDS
BOUNDS:使用视图的边界(Bounds)来确定轮廓边界。轮廓会根据视图的宽高来设置,形成一个矩形轮廓。
适用场景:当你需要一个简单的矩形轮廓时,例如给一个普通的 View 添加圆角效果。
PADDED_BOUNDS
PADDED_BOUNDS:使用视图的边界加上内边距(Padding)来确定轮廓边界。轮廓会根据视图的宽高和内边距来设置,形成一个矩形轮廓。
适用场景:当你需要在视图的内边距之外添加轮廓时,例如给一个有内边距的 View 添加圆角效果。
ViewOutlineProvider (轮廓提供者的使用步骤)
- 自定义 ViewOutlineProvider,并重写 getOutline 方法来提取轮廓;
- 通过
view.setClipToOutline(true)方法来开启组件的裁剪功能; - 通过
view.setOutlineProvider(new MyViewOutlineProvider())方法设置自定义的轮廓提供者来完成裁剪。
API
getOutline(View view, Outline outline)
为视图生成轮廓。
view:需要设置轮廓的视图。outline:用于接收轮廓数据的对象。- 关键操作:
- 通过
outline的方法(如setRoundRect()、setOval()、setPath())定义形状。 - 必须确保视图的尺寸(
view.getWidth()和view.getHeight())已确定。
- 通过
setClipToOutline(boolean clip)
启用或禁用视图内容按轮廓裁剪。
- 限制:
- 仅对不透明背景的视图有效。
- 某些复杂轮廓(如路径)可能无法触发硬件加速裁剪。
ViewOutlineProvider 功能
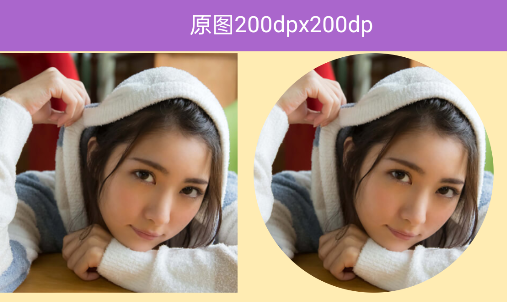
setOval 圆形
1
2
3
4
5
6
7
8
9
10
11
fun setOvalClick(view: View) {
	val viewOutlineProvider =
		object : ViewOutlineProvider() {
			override fun getOutline(view: View?, outline: Outline?) {
				// 裁剪成一个圆形
				outline?.setOval(0, 0, view!!.width, view.height)
			}
		}
	imageview.outlineProvider = viewOutlineProvider
	imageview.clipToOutline = !imageview.clipToOutline
}
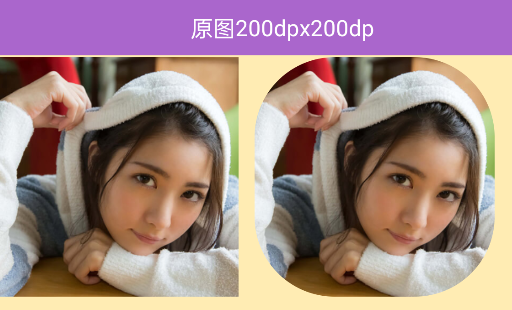
setRoundRect 圆角
4 个圆角
1
2
3
4
5
6
7
8
9
10
11
fun setRoundRectClick(view: View) {
	val viewOutlineProvider =
		object : ViewOutlineProvider() {
			override fun getOutline(view: View?, outline: Outline?) {
				// 裁剪成一个圆角
				outline?.setRoundRect(0, 0, view!!.width, view.height, 50F.dp)
			}
		}
	imageview.outlineProvider = viewOutlineProvider
	imageview.clipToOutline = !imageview.clipToOutline
}
效果:
top left 圆角
1
2
3
4
5
6
7
8
9
10
11
fun setRoundRectClickTopLeft(view: View) {
	val viewOutlineProvider =
		object : ViewOutlineProvider() {
			override fun getOutline(view: View?, outline: Outline?) {
				// 裁剪成一个圆角
				outline?.setRoundRect(0, 0, view!!.width + 50.dp, view.height + 50.dp, 50F.dp)
			}
		}
	imageview.outlineProvider = viewOutlineProvider
	imageview.clipToOutline = !imageview.clipToOutline
}
效果:
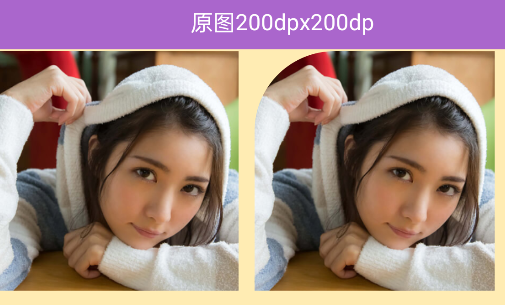
为什么是 right 和 bottom + 50.dp?
这是因为要 setRoundRect 是一个矩形,向右和向下移动 50dp,画出来的刚好是左上角 radius=50dp 的圆角
setRect 裁剪
1
2
3
4
5
6
7
8
9
10
11
12
13
14
15
16
17
18
19
20
21
22
23
private var mViewRect: Rect? = null
fun setRectClick(view: View) {
    if (Build.VERSION.SDK_INT >= Build.VERSION_CODES.LOLLIPOP) {
        val viewOutlineProvider =
            @RequiresApi(Build.VERSION_CODES.LOLLIPOP) object : ViewOutlineProvider() {
                override fun getOutline(view: View?, outline: Outline?) {
                    if (mViewRect != null) {
                        outline?.setRect(mViewRect!!)
                    }
                }
            }
        imageview.outlineProvider = viewOutlineProvider
        imageview.clipToOutline = !imageview.clipToOutline

        mViewRect = Rect(
            imageview.width / 6,
            imageview.height / 8,
            imageview.width * 5 / 6,
            imageview.height * 7 / 8
        )
        imageview.invalidateOutline() // API21
    }
}

setPath 设置投影
1
2
3
4
5
6
7
8
9
10
11
12
13
14
15
view.setElevation(5);
view.setOutlineProvider(new ViewOutlineProvider() {
    @Override
    public void getOutline(View view, Outline outline) {
      	//你可以用 Path 指定任何的形状,前提是凸多边形
        //这里设置投影的位置从右下角开始,投影形状是矩形
        Path path = new Path();
        path.moveTo(view.getWidth(), view.getHeight());
        path.lineTo(view.getWidth(), view.getHeight() * 2);
        path.lineTo(view.getWidth() * 2, view.getHeight() * 2);
        path.lineTo(view.getWidth() * 2, view.getHeight());
        path.close();
        outline.setConvexPath(path); // Android30过期了,用setPath
    }
});
OutlineProvider 圆角封装
1
2
3
4
5
6
7
8
9
10
11
12
13
14
15
16
17
18
19
20
21
22
23
24
25
26
27
28
29
30
31
32
33
34
35
36
37
38
39
40
41
42
43
44
45
46
47
48
49
50
class RoundedCornersOutlineProvider(
    val radius: Float? = null,
    private val topLeft: Float? = null,
    private val topRight: Float? = null,
    private val bottomLeft: Float? = null,
    private val bottomRight: Float? = null,
) : ViewOutlineProvider() {

    private val topCorners = topLeft != null && topLeft == topRight
    private val rightCorners = topRight != null && topRight == bottomRight
    private val bottomCorners = bottomLeft != null && bottomLeft == bottomRight
    private val leftCorners = topLeft != null && topLeft == bottomLeft
    private val topLeftCorner = topLeft != null
    private val topRightCorner = topRight != null
    private val bottomRightCorner = bottomRight != null
    private val bottomLeftCorner = bottomLeft != null

    override fun getOutline(view: View, outline: Outline) {
        val left = 0
        val top = 0
        val right = view.width
        val bottom = view.height

        if (radius != null) {
            val cornerRadius = radius //.typedValue(resources).toFloat()
            outline.setRoundRect(left, top, right, bottom, cornerRadius)
        } else {
            val cornerRadius = topLeft ?: topRight ?: bottomLeft ?: bottomRight ?: 0F

            when {
                topCorners -> outline.setRoundRect(left, top, right, bottom + cornerRadius.toInt(), cornerRadius)
                bottomCorners -> outline.setRoundRect(left, top - cornerRadius.toInt(), right, bottom, cornerRadius)
                leftCorners -> outline.setRoundRect(left, top, right + cornerRadius.toInt(), bottom, cornerRadius)
                rightCorners -> outline.setRoundRect(left - cornerRadius.toInt(), top, right, bottom, cornerRadius)
                topLeftCorner -> outline.setRoundRect(
                    left, top, right + cornerRadius.toInt(), bottom + cornerRadius.toInt(), cornerRadius
                )
                bottomLeftCorner -> outline.setRoundRect(
                    left, top - cornerRadius.toInt(), right + cornerRadius.toInt(), bottom, cornerRadius
                )
                topRightCorner -> outline.setRoundRect(
                    left - cornerRadius.toInt(), top, right, bottom + cornerRadius.toInt(), cornerRadius
                )
                bottomRightCorner -> outline.setRoundRect(
                    left - cornerRadius.toInt(), top - cornerRadius.toInt(), right, bottom, cornerRadius
                )
            }
        }
    }
}
使用:
- RTL 使用
1
2
3
4
5
6
7
8
9
10
11
12
13
14
15
16
17
cardView.outlineProvider = if (DirectionHelper.isRtl()) {
    RoundedCornersOutlineProvider(
        corner,
        rightTopCorner,
        leftTopCorner,
        rightBottomCorner,
        leftBottomCorner
    )
} else {
    RoundedCornersOutlineProvider(
        corner,
        leftTopCorner,
        rightTopCorner,
        leftBottomCorner,
        rightBottomCorner
    )
}
- 四个圆角
1
2
3
4
view.outlineProvider = RoundedCornersOutlineProvider(
	radiusPx = cornerRadius
)
view.clipToOutline = true

- 底部 2 个圆角
1
2
3
4
5
view.outlineProvider = RoundedCornersOutlineProvider(
	bottomLeft = cornerRadius,
	bottomRight = cornerRadius
)
view.clipToOutline = true

示例
setPath 裁剪圆角
示例: 裁剪 RecyclerView 倒数第 2 个 item 元素的底部 2 个圆角,上面不要裁剪
1
2
3
4
5
6
7
8
9
10
11
12
13
14
15
16
17
18
19
20
21
22
23
24
25
26
27
28
29
30
31
32
33
34
35
36
37
38
39
40
41
42
43
44
45
46
47
48
49
50
51
52
53
54
55
56
57
58
59
60
61
62
63
64
65
66
class SpecialBottomDecoration(
    private val cornerRadius: Float = 12F.dp(),
    private val bgColor: Int = ViewUtil.getColor(R.color.sui_color_black_alpha11)
) : RecyclerView.ItemDecoration() {
    override fun onDraw(c: Canvas, parent: RecyclerView, state: RecyclerView.State) {
        parent.forEachVisibleChild { view, position ->
            if (isSecondLastItem(parent, view)) {
                drawBottomRoundCornerRoundedCornersOutlineProvider(c, view)
            }
        }
    }
    val path = Path()
	private fun drawBottomRoundCornerPath(c: Canvas, view: View) {
	    val radiusPx = cornerRadius
	    view.outlineProvider = object : ViewOutlineProvider() {
	        override fun getOutline(view: View, outline: Outline) {
	            path.moveTo(view.width.toFloat(), 0f)
	            path.moveTo(view.width.toFloat(), view.height.toFloat() - radiusPx)
	            // 右下角
	            path.arcTo(
	                view.width - cornerRadius * 2f,
	                view.height - cornerRadius * 2f,
	                view.width.toFloat(),
	                view.height.toFloat(),
	                0f,
	                90f,
	                false
	            )
	            path.lineTo(view.width.toFloat(), view.height.toFloat())
	            // 左下角
	            path.lineTo(cornerRadius * 2f, view.height.toFloat())
	            path.arcTo(
	                0f,
	                view.height - cornerRadius * 2f,
	                cornerRadius * 2f,
	                view.height.toFloat(),
	                90f,
	                90f,
	                false
	            )
	            path.lineTo(0f, view.height.toFloat())
	            path.lineTo(0f, 0f)
	            path.lineTo(view.width.toFloat(), 0f)
	            path.close()
	            if (Build.VERSION.SDK_INT >= Build.VERSION_CODES.R) {
	                outline.setPath(path)
	            } else {
	                outline.setConvexPath(path)
	            }
	        }
	    }
	    view.clipToOutline = true
	}
	private fun isSecondLastItem(parent: RecyclerView, view: View): Boolean {
        val adapter = parent.adapter ?: return false
        val position = parent.getChildAdapterPosition(view)
        return position == adapter.itemCount - 2
    }

    private inline fun RecyclerView.forEachVisibleChild(action: (View, Int) -> Unit) {
        for (i in 0 until childCount) {
            val child = getChildAt(i)
            action(child, getChildAdapterPosition(child))
        }
    }
}
效果:
动态修改轮廓
1
2
3
4
5
6
7
8
9
// 动态改变圆角大小
view.setOutlineProvider(new ViewOutlineProvider() {
    @Override
    public void getOutline(View view, Outline outline) {
        float radius = isExpanded ? 24f : 12f;
        outline.setRoundRect(0, 0, view.getWidth(), view.getHeight(), radius);
    }
});
view.invalidateOutline(); // 强制刷新轮廓
与动画结合
1
2
3
4
5
6
7
ValueAnimator animator = ValueAnimator.ofFloat(0f, 12f);
animator.addUpdateListener(animation -> {
    float radius = (float) animation.getAnimatedValue();
    view.setOutlineProvider(new BottomCornersOutlineProvider(radius));
    view.invalidateOutline();
});
animator.start();
Outline 和 shape 对比
Outline 相对于 shape 来说,是真正的实现边缘裁切的,shape 其实只是设置背景而已,它的 view 的范围还是那个正方形的范围。最明显的表现于,shape 如果内容填满布局,会看到内容超出圆角,而 Outline 不会。当然如果你 shape 配合 padding 的话肯定也不会出现这种情况。
使用 Outline 也需要注意,一般的机子会在当范围超过圆之后,会一直显示圆。比如你设置 radius 为 50 是圆角的效果,但是甚至成 100 已经是整个边是半圆,这时你设 200 会发现还是半圆,但是在某些机子上 200 会变成圆锥,所以如果要做半圆的效果也需要去计算好 radius
CardView 实现圆角和圆形
1
2
3
4
5
6
7
8
9
10
11
12
13
<android.support.v7.widget.CardView
    android:layout_width="100dp"
    android:layout_height="100dp"
    android:layout_gravity="center"
    android:layout_marginTop="10dp"
    app:cardCornerRadius="50dp">

    <ImageView
        android:layout_width="100dp"
        android:layout_height="100dp"
        android:scaleType="centerCrop"
        android:src="@drawable/girl" />
</android.support.v7.widget.CardView>
设置 CardView 的 cardCornerRadius 属性,如果要展示指定的圆角,把这个值设置成你想要的圆角值就行,如果展示为圆形,首先要设置 CardView 长宽等值,而且 cardCornerRadius 为长宽的一半
BitmapShader
BitmapShader 圆角边框
1
2
3
4
5
6
7
8
9
10
11
12
13
14
15
16
17
18
19
20
21
22
23
24
25
26
27
28
29
30
31
32
33
34
35
36
37
38
39
/**
 * 通过BitmapShader 圆角边框
 */
public static Bitmap getRoundBitmapByShader(Bitmap bitmap, int outWidth, int outHeight, int radius, int boarder) {
    if (bitmap == null) {
        return null;
    }
    int width = bitmap.getWidth();
    int height = bitmap.getHeight();
    float widthScale = outWidth * 1f / width;
    float heightScale = outHeight * 1f / height;

    Matrix matrix = new Matrix();
    matrix.setScale(widthScale, heightScale);
    //创建输出的bitmap
    Bitmap desBitmap = Bitmap.createBitmap(outWidth, outHeight, Bitmap.Config.ARGB_8888);
    //创建canvas并传入desBitmap,这样绘制的内容都会在desBitmap上
    Canvas canvas = new Canvas(desBitmap);
    Paint paint = new Paint(Paint.ANTI_ALIAS_FLAG);
    //创建着色器
    BitmapShader bitmapShader = new BitmapShader(bitmap, Shader.TileMode.CLAMP, Shader.TileMode.CLAMP);
    //给着色器配置matrix
    bitmapShader.setLocalMatrix(matrix);
    paint.setShader(bitmapShader);
    //创建矩形区域并且预留出border
    RectF rect = new RectF(boarder, boarder, outWidth - boarder, outHeight - boarder);
    //把传入的bitmap绘制到圆角矩形区域内
    canvas.drawRoundRect(rect, radius, radius, paint);

    if (boarder > 0) {
        //绘制boarder
        Paint boarderPaint = new Paint(Paint.ANTI_ALIAS_FLAG);
        boarderPaint.setColor(Color.GREEN);
        boarderPaint.setStyle(Paint.Style.STROKE);
        boarderPaint.setStrokeWidth(boarder);
        canvas.drawRoundRect(rect, radius, radius, boarderPaint);
    }
    return desBitmap;
}