Android中的ClassLoader
Android 中的 ClassLoader
Android 中 ClassLoader 的种类
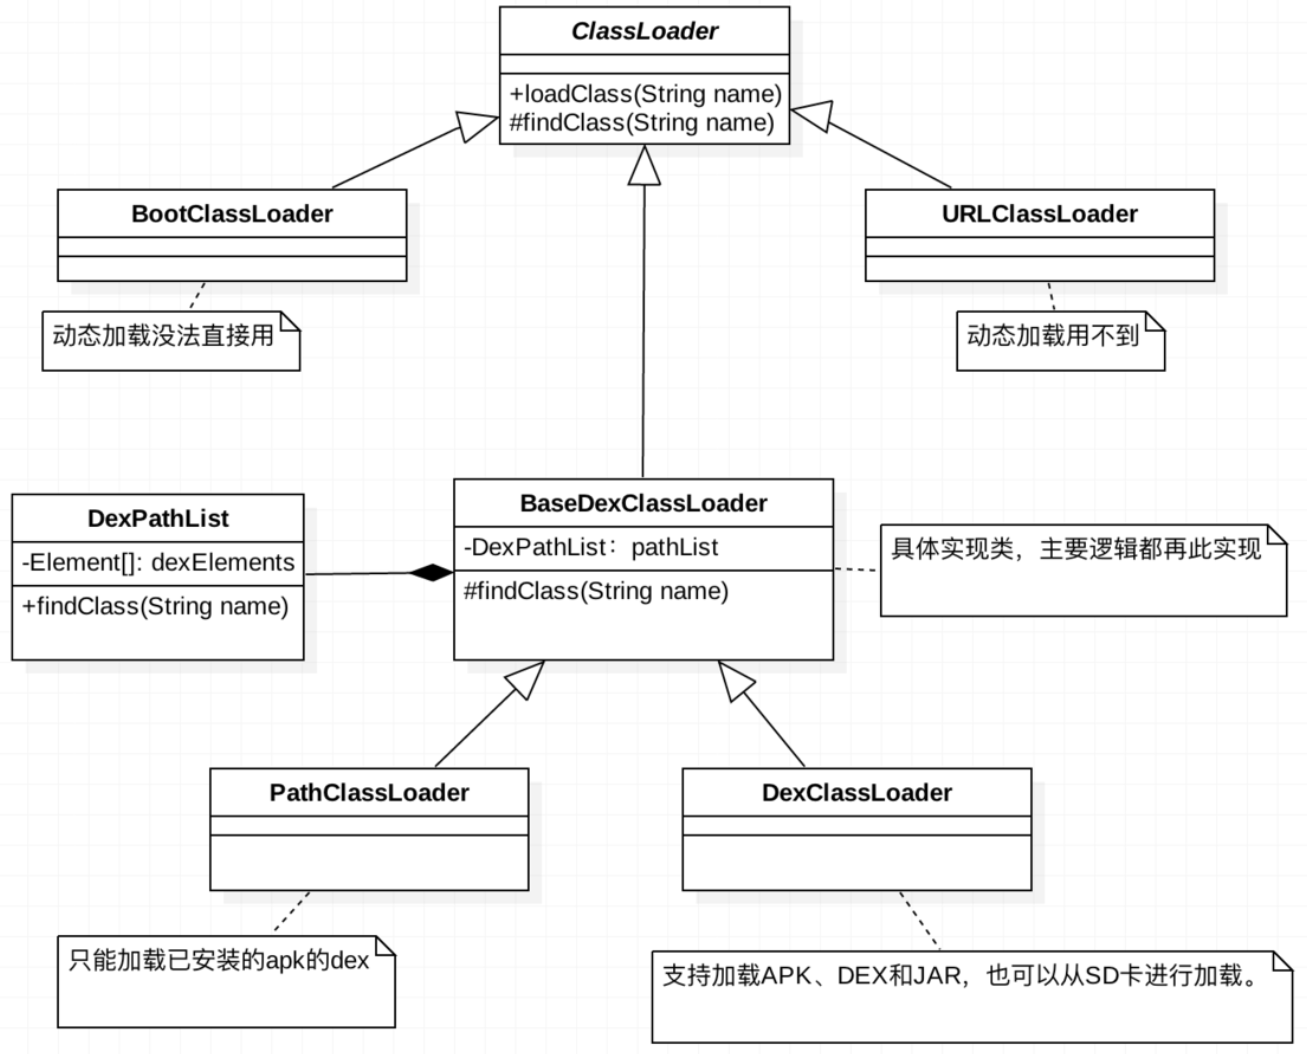
BootClassLoader 系统预加载用的
加载 Android 中 Framework 层的字节码文件,类似 JVM 中的 Bootstrap ClassLoader 的作用
PathClassLoader 给系统、应用程序加载 class 用的
类似 JVM 中的 Application ClassLoader 的作用。PathClassLoader 只能加载 dex 文件,我们的 apk 安装之后会在 /data/dalvik-cache 目录产生对应的 dex (odex) 文件 (art 虚拟机是 oat 文件),而 PathClassLoader 要加载 apk 的时候会到这个文件夹下找对应的 dex 文件。Context.GetClassLoader () 返回的是 PathClassLoader。
DexClassLoader 加载 apk、dex 和 zip 文件用的
类似 JVM 中的自定义 ClassLoader 的作用。DexClassLoader 可以加载 apk、dex 和 jar 等文件,用来实现动态加载机制的关键,加载一个外部的 apk 文件,实现完全解耦的模块式开发。
PathClassLoader 和 DexClassLoader
Android 8.0 (Android 26) 之前
在 8.0(API 26)之前,它们⼆者的唯⼀区别是第⼆个参数optimizedDirectory,它是⽣成的 odex(优化的 dex)存放的路径。PathClassloader 直接为空,而 DexClassLoader 是使用用户传进来的路径,所以 DexClassLoader 能够加载未安装的 apk/jar/dex,而 PathDexClassLoader 只能加载系统中已经安装过的 apk。
DexClassLoader 的参数含义:
- DexPath:dex 文件以及包含 dex 的 apk ⽂件或 jar ⽂件的路径,多个路径⽤⽂件分隔符分隔,默认⽂件分隔符为:。
- OptimizedDirectory:Android 系统存放 ODEX ⽂件的路径。PathClassLoader 中默认使⽤ “/data/dalvik-cache”,⽽ DexClassLoader 则需要我们指定 ODEX 优化⽂件的存放路径。
- LibrarySearchPath:所使⽤到的 C/C++ 库的存放路径。
- Parent:这个参数的主要作⽤是保留 java 中 ClassLoader 的委托机制。
Android 8.0 及以上
两者完全一样了
BaseDexClassLoader
BaseDexClassLoader 是 PathClassLoader 和 DexClassLoader 的父类
Android 中 ClassLoader 源码分析
涉及的类,在 framework 层可以找到源码:\android4.2_aosp_jb422\libcore\dalvik\src\main\java\dalvik\system\
- BaseDexClassLoader.java
- DexClassLoader.java
- PathClassLoader.java
- DexPathList.java
- DexFile.java
Context.getClassLoader()
实现在 ContextImpl:
在 ActivityThread 中:
1
2
3
4
5
6
// ActivityThread.java
private void attach(boolean system, long startSeq) {
	ContextImpl context = ContextImpl.createAppContext(this, getSystemContext().mPackageInfo);
	mInitialApplication = context.mPackageInfo.makeApplication(true, null);
	mInitialApplication.onCreate();
}
接着看 ContextImpl.createAppContext()
1
2
3
4
5
6
7
8
9
10
11
12
13
14
15
16
// ContextImpl.java
@UnsupportedAppUsage
static ContextImpl createAppContext(ActivityThread mainThread, LoadedApk packageInfo) {
    return createAppContext(mainThread, packageInfo, null);
}

static ContextImpl createAppContext(ActivityThread mainThread, LoadedApk packageInfo,
        String opPackageName) {
    if (packageInfo == null) throw new IllegalArgumentException("packageInfo");
    ContextImpl context = new ContextImpl(null, mainThread, packageInfo,
        ContextParams.EMPTY, null, null, null, null, null, 0, null, opPackageName);
    context.setResources(packageInfo.getResources());
    context.mContextType = isSystemOrSystemUI(context) ? CONTEXT_TYPE_SYSTEM_OR_SYSTEM_UI
            : CONTEXT_TYPE_NON_UI;
    return context;
}
ContextImpl 构造函数倒数第 2 个参数是 ClassLoader,这里都是传的 null。
在 ContextImpl.getClassLoader() 方法中:
1
2
3
4
5
// ContextImpl.java
@Override
public ClassLoader getClassLoader() {
    return mClassLoader != null ? mClassLoader : (mPackageInfo != null ? mPackageInfo.getClassLoader() : ClassLoader.getSystemClassLoader());
}
如果 mClassLoader 为空,从 LoadedApk 中拿 ClassLoader,最终是从 ClassLoader.getSystemClassLoader(),最后创建的是 PathClassLoader:
1
2
3
4
5
6
7
8
9
10
11
12
13
14
15
16
17
18
19
20
21
// ClassLoader.java
private static ClassLoader createSystemClassLoader() {
	String classPath = System.getProperty("java.class.path", ".");
	String librarySearchPath = System.getProperty("java.library.path", "");

	// String[] paths = classPath.split(":");
	// URL[] urls = new URL[paths.length];
	// for (int i = 0; i < paths.length; i++) {
	// try {
	// urls[i] = new URL("file://" + paths[i]);
	// }
	// catch (Exception ex) {
	// ex.printStackTrace();
	// }
	// }
	//
	// return new java.net.URLClassLoader(urls, null);

	// TODO Make this a java.net.URLClassLoader once we have those?
	return new PathClassLoader(classPath, librarySearchPath, BootClassLoader.getInstance());
}
parent 是 BootClassLoader.getInstance()
初始化
初始化 ClassLoader,自定义或者使用系统默认的 ClassLoader 作为 parent
1
2
3
4
5
6
7
8
9
10
11
12
13
14
15
16
17
18
19
20
21
// 系统ClassLoader作为parent,其实是个PathClassLoader
protected ClassLoader() {
    this(checkCreateClassLoader(), getSystemClassLoader());
}
// 自己定义父ClassLoader
protected ClassLoader(ClassLoader parent) {
    this(checkCreateClassLoader(), parent);
}

 private ClassLoader(Void unused, ClassLoader parent) {
    this.parent = parent;
}
// 系统ClassLoader
static private class SystemClassLoader {
    public static ClassLoader loader = ClassLoader.createSystemClassLoader();
}
// 获取父ClassLoader
@CallerSensitive
public static ClassLoader getSystemClassLoader() {
    return SystemClassLoader.loader;
}
查找 class 过程 loadClass (name)
loadClass 过程:通过指定的 binary name 加载 class。该方法的默认实现搜索 class 遵循下面的顺序:
- 调用
findLoadedClass(String)检查要加载的 class 是否已经加载了。 - 调用
loadClass()方法通过父 ClassLoader。如果 parent 为 null,那么会使用 vm 内置的 ClassLoader。 - 调用
findClass(String)方法查找要加载的 class。
如果通过以上步骤找到了要加载的 class,那么这个 resolve flag 会为 true。
分析入口:
public Class<?> loadClass(String name)
ClassLoader. LoadClass 源码:
1
2
3
4
5
6
7
8
9
10
11
12
13
14
15
16
17
18
19
20
21
22
23
24
25
26
27
28
29
30
31
32
33
34
35
36
37
38
39
40
41
42
43
44
45
46
47
48
49
50
51
52
53
54
public Class<?> loadClass(String name) throws ClassNotFoundException {
    return loadClass(name, false);
}

protected Class<?> loadClass(String name, boolean resolve)
    throws ClassNotFoundException
{
        // First, check if the class has already been loaded
        Class c = findLoadedClass(name); // 检查name对应的class是否已经load进虚拟机了
        if (c == null) { // 没有load进来
            long t0 = System.nanoTime();
            try {
                if (parent != null) { // 父ClassLoader不为null
                    c = parent.loadClass(name, false); // 调用父ClassLoader查找
                } else { // 没有指定parent
                    c = findBootstrapClassOrNull(name); // ClassLoader抽象类没有实现,返回null
                }
            } catch (ClassNotFoundException e) {
                // ClassNotFoundException thrown if class not found
                // from the non-null parent class loader
            }

            if (c == null) { // parent没有找到name对应的class
                // If still not found, then invoke findClass in order
                // to find the class.
                long t1 = System.nanoTime();
                c = findClass(name); // 调用自己的findClass()

                // this is the defining class loader; record the stats
            }
        }
        return c;
}

// 查找name是否已经加载:如果找到,返回虚拟机查找到的并初始化的class;否则返回null表没找到
protected final Class<?> findLoadedClass(String name) {
    ClassLoader loader;
    if (this == BootClassLoader.getInstance())
        loader = null;
    else
        loader = this;
    return VMClassLoader.findLoadedClass(loader, name);
}

// 查找Bootstrap ClassLoader:抽象ClassLoader类,没有实现该方法
private Class findBootstrapClassOrNull(String name)
{
    return null;
}

// 查找class:交由具体的实现者实现查找过程
protected Class<?> findClass(String name) throws ClassNotFoundException {
    throw new ClassNotFoundException(name);
}
可以看出在加载类时,首先判断这个类是否直接被加载过,如果有则直接返回该 Class;如果没有则尝试 parent ClassLoader 进行加载,若加载不成功才在自己的 findClass (name) 中进行加载。这和 JVM 中常见的双亲委托机制一致的。当前可以重写 loadClass () 方法破坏双亲委托机制,只不过这是一种被推荐的实现类加载器的机制,不提供覆盖 loadClass () 方法,而应该把自己的类加载逻辑写到 findClass() 方法中去。
分析具体的实现者 findClass () 过程
上面分析了,具体的查找 class 方法在 findClass () 方法中,这个是需要被子类实现的。Android 中用的是 BaseDexClassLoader。BaseDexClassLoader 有两个子类 PathClassLoader 和 DexClassLoader,它的构造方法中有 4 个参数,分别为:public BaseDexClassLoader(String dexPath, File optimizedDirectory,String libraryPath, ClassLoader parent)
- dexPath
指目标类所在的 APK 或 jar 文件的路径, 类装载器将从该路径中寻找指定的目标类, 该类必须是 APK 或 jar 的全路径. 如果要包含多个路径, 路径之间必须使用特定的分割符分隔, 特定的分割符可以使用 System.GetProperty (“path. Separtor”) 获得,android 中为冒号 (:)。上面 “ 支持加载 APK、DEX 和 JAR,也可以从 SD 卡进行加载 “ 指的就是这个路径,最终做的是将 dexPath 路径上的文件 ODEX 优化到内部位置 optimizedDirectory,然后再进行加载。 - optimizedDirectory
由于 dex 文件被包含在 APK 中或者 Jar 文件中,因此在装载目标类之前需要先从 APK 或 jar 文件中解压出 dex 文件,该参数就是制定解压出的 dex 文件存放的路径。这也是对 APK 中 dex 根据平台进行 ODEX 优化的过程。其实 APK 是一个程序压缩包,里面包含 dex 文件,ODEX 优化就是把包里面的执行程序提取出来,变成 ODEX 文件,因为提取出来了,系统第一次启动的时候就少了去解压程序压缩包的程序,少了一个解压的过程,这样的话系统启动就加快了。为什么说是第一次呢?是因为 DEX 版本的也只有第一次会解压执行程序到 /data/dalvik-cache(针对 PathClassLoader)或者 optimizedDirectory (针对 DexClassLoader)目录,之后也是直接读取目录下的的 dex 文件,所以第二次启动就和正常的差不多了。当然这只是简单的理解,实际生成的 ODEX 还有一定的优化作用。ClassLoader 只能加载内部存储路径中的 dex 文件,所以这个路径必须为内部路径。 - libraryPath
指目标类中所使用的 C/C++ 库存放的路径。用冒号分隔,可能为 null。 - parent
指该类加载器的父类加载器
PathClassLoader. Java
1
2
3
4
5
6
7
8
9
public class PathClassLoader extends BaseDexClassLoader {
    public PathClassLoader(String dexPath, ClassLoader parent) {
        super(dexPath, null, null, parent);
    }
    public PathClassLoader(String dexPath, String libraryPath,
            ClassLoader parent) {
        super(dexPath, null, libraryPath, parent);
    }
}
看到 PathClassLoader 的 optimizedDirectory 都为 null。也就是没设置优化后的存放路径,默认路径在 /data/dalvik-cache。
PathClassLoader 是用来加载 Android 系统类和应用的类,并且不建议开发者使用。
DexClassLoader. Java
1
2
3
4
5
6
public class DexClassLoader extends BaseDexClassLoader {
    public DexClassLoader(String dexPath, String optimizedDirectory,
            String libraryPath, ClassLoader parent) {
        super(dexPath, new File(optimizedDirectory), libraryPath, parent);
    }
}
DexClassLoader 支持加载包含 classes. Dex 入口的 jar、apk。一般用它作为动态加载的类加载器。
所以,具体的 findClass () 逻辑在 BaseDexClassLoader 中实现的。
BaseDexClassLoader 的 findClass()
首先看到 BaseDexClassLoader 的 findClass () 方法,发现调用的是 pathList 的 findClass() 方法
1
2
3
4
5
6
7
8
9
private final DexPathList pathList;
@Override
protected Class<?> findClass(String name) throws ClassNotFoundException {
    Class clazz = pathList.findClass(name);
    if (clazz == null) {
        throw new ClassNotFoundException("Didn't find class \"" + name + "\" on path: " + originalPath);
    }
    return clazz;
}
可以看出,BaseDexClassLoader 中有个 pathList 对象,最终调用的都是 DexPathList 的 findClass (name) 方法。
DexPathList 的 findClass (name)
- 我们来看
DexPathList
我们来到 DexPathList,找到findClass()方法,发现调用了 DexFile 的loadClassBinaryName()方法,而 DexFile 在一个dexElements变量中; - 发现
dexElements是一个Element[]数组类型,也就是说 DexPathList 中存在一个Element[] dexElements数组,在 DexPathList 的构造方法中,通过makeDexElements()方法返回的
其实 dexElements 就是 dexPath 传入的原始的 dex (apk、jar、zip) 文件在 optimizedDirectory 文件夹中生成相应的优化后的 odex 文件,dexElements 数组就是这些 odex 文件的集合,如果不分 dex 包一般这个数组只有一个 Element 元素,也就是只有一个 DexFile 文件,而对于类加载,就是遍历这个集合,通过 DexFile 去寻找,最终调用 native 方法的 defineClass() 方法。 - 在
makeDexElements()方法中发现,调用的是loadDexFile()方法 - 最后发现是调用的
DexFile.loadDex()方法,我们看 DexFile
1
2
3
4
5
6
7
8
9
10
11
12
13
14
15
16
17
18
19
20
21
22
23
24
25
26
27
28
29
30
31
32
33
34
35
36
37
38
39
40
41
42
43
44
45
46
47
48
49
50
51
52
53
54
55
56
57
58
59
60
61
62
63
64
65
66
67
68
69
70
71
72
73
74
75
76
77
78
79
80
81
82
83
84
85
// # DexPathList
private final Element[] dexElements;

// 参数1:definingContext,要查找的class的ClassLoader
// 参数2:dexPath,一系列dex/resource路径,冒号分隔
// 参数3:libraryPath,一系列native库路径,冒号分隔
// 参数4:optimizedDirectory,优化的dex存放的目录,null为系统默认目录
public DexPathList(ClassLoader definingContext, String dexPath,
        String libraryPath, File optimizedDirectory) {
    // ...
    this.definingContext = definingContext;
    this.dexElements =
        makeDexElements(splitDexPath(dexPath), optimizedDirectory);
    this.nativeLibraryDirectories = splitLibraryPath(libraryPath);
}

public Class findClass(String name) {
    for (Element element : dexElements) {
        DexFile dex = element.dexFile;

        if (dex != null) {
            Class clazz = dex.loadClassBinaryName(name, definingContext);
            if (clazz != null) {
                return clazz;
            }
        }
    }
    return null;
}
// make一个dex/resource path的数组,或只有一个element的数组
private static Element[] makeDexElements(ArrayList<File> files,
        File optimizedDirectory) {
    ArrayList<Element> elements = new ArrayList<Element>();

    /*
     * Open all files and load the (direct or contained) dex files
     * up front.
     */
    for (File file : files) {
        File zip = null;
        DexFile dex = null;
        String name = file.getName();

        if (name.endsWith(DEX_SUFFIX)) { // 如果是原始dex文件,不是在zip/jar里面
            // Raw dex file (not inside a zip/jar).
            try {
                dex = loadDexFile(file, optimizedDirectory);
            } catch (IOException ex) {
                System.logE("Unable to load dex file: " + file, ex);
            }
        } else if (name.endsWith(APK_SUFFIX) || name.endsWith(JAR_SUFFIX)
                || name.endsWith(ZIP_SUFFIX)) { // 是apk、jar、zip
            zip = file;

            try {
                dex = loadDexFile(file, optimizedDirectory);
            } catch (IOException ignored) {
                /*
                 * IOException might get thrown "legitimately" by
                 * the DexFile constructor if the zip file turns
                 * out to be resource-only (that is, no
                 * classes.dex file in it). Safe to just ignore
                 * the exception here, and let dex == null.
                 */
            }
        } else {
            System.logW("Unknown file type for: " + file);
        }
        if ((zip != null) || (dex != null)) {
            elements.add(new Element(file, zip, dex));
        }
    }
    return elements.toArray(new Element[elements.size()]);
}

// 构建DexFile实例
private static DexFile loadDexFile(File file, File optimizedDirectory)
        throws IOException {
    if (optimizedDirectory == null) {
        return new DexFile(file);
    } else {
        String optimizedPath = optimizedPathFor(file, optimizedDirectory);
        return DexFile.loadDex(file.getPath(), optimizedPath, 0);
    }
}
DexFile 的 loadDex()
- 在 loadDex () 方法中,我们返回了 DexFile 实例
- 再回到 DexPathList 的 findClass () 方法中去,调用了 DexFile 的
loadClassBinaryName()方法 - 最后我们发现调用的是一个 native 方法来查找 Class 对象
1
2
3
4
5
6
7
8
9
10
11
12
13
// 目的是用来下载和执行应用外的dex文件;这个函数不能在application直接调用,而应该用DexClassLoader。
static public DexFile loadDex(String sourcePathName, String outputPathName,
    int flags) throws IOException {
    return new DexFile(sourcePathName, outputPathName, flags);
}

// 让name的class匹配CLassLoader的语义
public Class loadClassBinaryName(String name, ClassLoader loader) {
    return defineClass(name, loader, mCookie);
}

// 最终调用的是一个native方法
private native static Class defineClass(String name, ClassLoader loader, int cookie);
最终查找流程: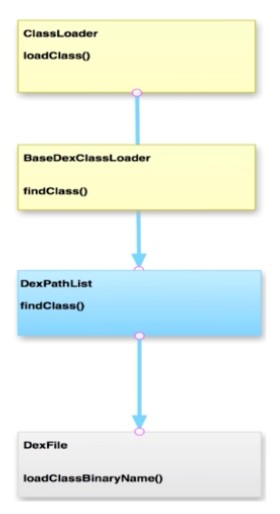
Android 中 Context 的 getClassLoader() 探索
Context.getClassLoader ()
Context 是一个抽象类,具体的实现者为 ContextImpl (源码位于:\frameworks\base\core\java\android\app),查看其对 getClassLoader() 的实现:
1
2
3
4
@Override
public ClassLoader getClassLoader() {
    return mPackageInfo != null ? mPackageInfo.getClassLoader() : ClassLoader.getSystemClassLoader();
}
如果 mPackageInfo 不为 null,那么就调用它的 getClassLoader() 方法;否则调用 ClassLoader.getSystemClassLoader();。这个 mPackageInfo 又是什么,其实是一个 LoadedApk实例。
1
/*package*/ LoadedApk mPackageInfo;
LoadedApk 对象是 apk 在内存中的表示,通过这个 LoadedApk 对象可以拿到 apk 中的代码和资源,甚至里面 Activity 和 Service 等信息。
那么它何时何地创建的呢?如果了解 Activity 的启动流程,就明白了。在 ActivityThread 里面有一个 HashMap 类型的成员变量 mPackages,根据键 (packagename) 存储对应的 LoadedApk 对象。启动 Activity 的时候要调用 LoadedApk 的 getClassLoader () 方法,来加载对应的 Activity class 文件,然后通过反射创建这个 Activity 实例;那么获取这个对象,会先去 mPackages 中去查找有没有缓存,如果没有就创建一个新的 LoadedApk 对象。
mPackages 在 ActivityThread 中的定义:
1
2
3
4
5
6
7
8
9
10
11
12
13
14
15
16
17
18
19
20
21
22
23
24
25
26
27
28
29
30
31
32
33
34
35
36
final HashMap<String, WeakReference<LoadedApk>> mPackages = new HashMap<String, WeakReference<LoadedApk>>();

private LoadedApk getPackageInfo(ApplicationInfo aInfo, CompatibilityInfo compatInfo,
        ClassLoader baseLoader, boolean securityViolation, boolean includeCode) {
    synchronized (mPackages) {
        // 尝试获取缓存信息
        WeakReference<LoadedApk> ref;
        if (includeCode) {
            ref = mPackages.get(aInfo.packageName);
        } else {
            ref = mResourcePackages.get(aInfo.packageName);
        }
        LoadedApk packageInfo = ref != null ? ref.get() : null;
        if (packageInfo == null || (packageInfo.mResources != null
                && !packageInfo.mResources.getAssets().isUpToDate())) {
            if (localLOGV) Slog.v(TAG, (includeCode ? "Loading code package "
                    : "Loading resource-only package ") + aInfo.packageName
                    + " (in " + (mBoundApplication != null
                            ? mBoundApplication.processName : null)
                    + ")");
            // 缓存没有命中,直接new
            packageInfo =
                new LoadedApk(this, aInfo, compatInfo, this, baseLoader,
                        securityViolation, includeCode &&
                        (aInfo.flags&ApplicationInfo.FLAG_HAS_CODE) != 0);
            // 更新缓存
            if (includeCode) {
                mPackages.put(aInfo.packageName,
                        new WeakReference<LoadedApk>(packageInfo));
            } else {
                mResourcePackages.put(aInfo.packageName,
                        new WeakReference<LoadedApk>(packageInfo));
            }
        }
        return packageInfo;
    }
下面看上面使用到的 LoadedApk 的构造函数,其实 LoadedApk 还有一个构造函数,在 ContextImpl 创建自己的实例的同时创建其 LoadedApk 的成员变量的时候使用了。
1
2
3
4
5
6
7
8
9
10
11
12
13
14
15
16
17
18
19
20
21
// 被ActivityThread调用
public LoadedApk(ActivityThread activityThread, ApplicationInfo aInfo,CompatibilityInfo compatInfo,ActivityThread mainThread, ClassLoader baseLoader,boolean securityViolation, boolean includeCode) {
    // ...

    if (mAppDir == null) {
        if (ActivityThread.mSystemContext == null) { // 这个context很重要,一个ActivityThread只有这一个,是静态全局的
            ActivityThread.mSystemContext =
                ContextImpl.createSystemContext(mainThread);
            ActivityThread.mSystemContext.getResources().updateConfiguration(
                     mainThread.getConfiguration(),
                     mainThread.getDisplayMetricsLocked(
                             Display.DEFAULT_DISPLAY, compatInfo),
                     compatInfo);
            //Slog.i(TAG, "Created system resources "
            //        + mSystemContext.getResources() + ": "
            //        + mSystemContext.getResources().getConfiguration());
        }
        mClassLoader = ActivityThread.mSystemContext.getClassLoader(); // 这个ClassLoader就是最后返回的那个ClassLoader
        mResources = ActivityThread.mSystemContext.getResources();
    }
}
看到这,我们只要最终这个 ClassLoader 的来源是从 Context 来的,也就是 ActivityThread 的 mSystemContext 里面的 Context。我们看下 mSystemContext 的创建过程:
1
2
3
4
5
static ContextImpl createSystemContext(ActivityThread mainThread) {
    final ContextImpl context = new ContextImpl();
    context.init(Resources.getSystem(), mainThread, Process.myUserHandle());
    return context;
}
最终调用的代码,就是开始 ContextImpl 的 getClassLoader () 方法,并且 mPackageInfo 为 null,所以最终调用的是 ClassLoader.getSystemClassLoader(),所以最终结论就是系统 ClassLoader 是通过 ClassLoader.getSystemClassLoader() 创建。
ClassLoader.getSystemClassLoader()
上源码:
1
2
3
4
5
6
7
8
9
10
11
12
13
14
public static ClassLoader getSystemClassLoader() {
    return SystemClassLoader.loader;
}

static private class SystemClassLoader {
    public static ClassLoader loader = ClassLoader.createSystemClassLoader();
}

private static ClassLoader createSystemClassLoader() {
    String classPath = System.getProperty("java.class.path", ".");
    String librarySearchPath = System.getProperty("java.library.path", "");
    // TODO Make this a java.net.URLClassLoader once we have those?
    return new PathClassLoader(classPath, librarySearchPath, BootClassLoader.getInstance());
}
createSystemClassLoader() 的官方说明:
1
2
3
Create the system class loader. Note this is NOT the bootstrap class
loader (which is managed by the VM). We use a null value for the parent
to indicate that the bootstrap loader is our parent.
创建系统的 ClassLoader(其实是 PathClassLoader)。(注意:这不是 bootstrap ClassLoader(被虚拟机管理的 ClassLoader))。我们使用 null 作为我们 BootClassLoader 的 parent 来表明 bootstrap 就是我们的 BootClassLoader 的 parent。这里充分说明了 Android 系统不是使用的 java 原生的 bootstrap 来加载,而是使用自己创建的 ClassLoader(其实是 BootClassLoader)。
取代 jvm 中第一级的 bootstrap(Bootstrap ClassLoader)的是用 null(bootstrap 不是一个 ClassLoader 对象,所以他的子级 ClassLoader 调用 getParent () 返回的是 null),
而取代 jvm 中第二级的 ClassLoader (Extension ClassLoader) 使用的是 android 中创建的最基层的 BootClassLoader(也就是 PathClassLoader 的 parent)。
取代 jvm 中第三级的 ClassLoader(Application ClassLoader)使用的是 PathClassLoader,其 parent 为 BootClassLoader。
这个 BootClassLoader 是单例的,所以全局只有一个,我们也可以得出,系统所有执行装载类的操作,都会执行到这个对象:
1
2
3
4
5
6
7
8
9
10
11
12
@FindBugsSuppressWarnings("DP_CREATE_CLASSLOADER_INSIDE_DO_PRIVILEGED")
public static synchronized BootClassLoader getInstance() {
    if (instance == null) {
        instance = new BootClassLoader();
    }

    return instance;
}

public BootClassLoader() {
    super(null);
}
总结
- Android 系统最顶级的 ClassLoader 是
BootClassLoader(类似 JVM 中第二级的 ext ClassLoader),而用来加载系统的类是使用 PathClassLoader,parent 为 BootClassLoader(类似 JVM 中第三级加载 classpath 的 App ClassLoader) - Android 系统的 PathClassLoader 的 dexPath(要加载类的路径),指向当前 apk 安装的路径,然后使用 DexFile 来解析对应的 dex 文件,装载里面的 class
- DexClassLoader,主要用于加载外部插件,也就是可以直接加载一个 apk 文件,现在的插件化动态加载机制,热修复等都要使用到它的特性,当然直接使用里面的 DexFile 直接加载 dex 文件也是可以(AndFix 就是这样做的)
Reference
- 热修复入门:Android 中的 ClassLoader
http://jaeger.itscoder.com/android/2016/08/27/android-classloader.html
JVM ClassLoader 和 Android ClassLoader 异同
相同点
Android 类加载器和 Java 的类加载器工作机制是类似的,使用双亲委托机制
不同点
- 加载的字节码不同 Android 虚拟机运行的是 dex 字节码,Java 虚拟机运行的 class 字节码。
- 类加载器不同以及类加载器的类体系结构不同
- BootClassLoader 和 Java 的 BootStrapClassLoader 区别:Android 虚拟机中 BootClassLoader 是 ClassLoader 内部类,由 java 代码实现而不是 c++ 实现,是 Android 平台上所有 ClassLoader 的最终 parent,这个内部类是包内可见, 所以我们没法使用。 Java 虚拟机中 BootStrapClassLoader 是由原生代码 (C++) 编写的,负责加载 java 核心类库 (例如 rt.Jar 等)
- ClassLoader 类中的 findBootstrapClassOrNull 方法,android sdk 直接返回 null,JDK 会去调用 native 方法 findBootstrapClass