06 Python IO
文件
读写文件前,我们先必须了解一下,在磁盘上读写文件的功能都是由操作系统提供的,现代操作系统不允许普通的程序直接操作磁盘,所以,读写文件就是请求操作系统打开一个文件对象(通常称为文件描述符),然后,通过操作系统提供的接口从这个文件对象中读取数据(读文件),或者把数据写入这个文件对象(写文件)。
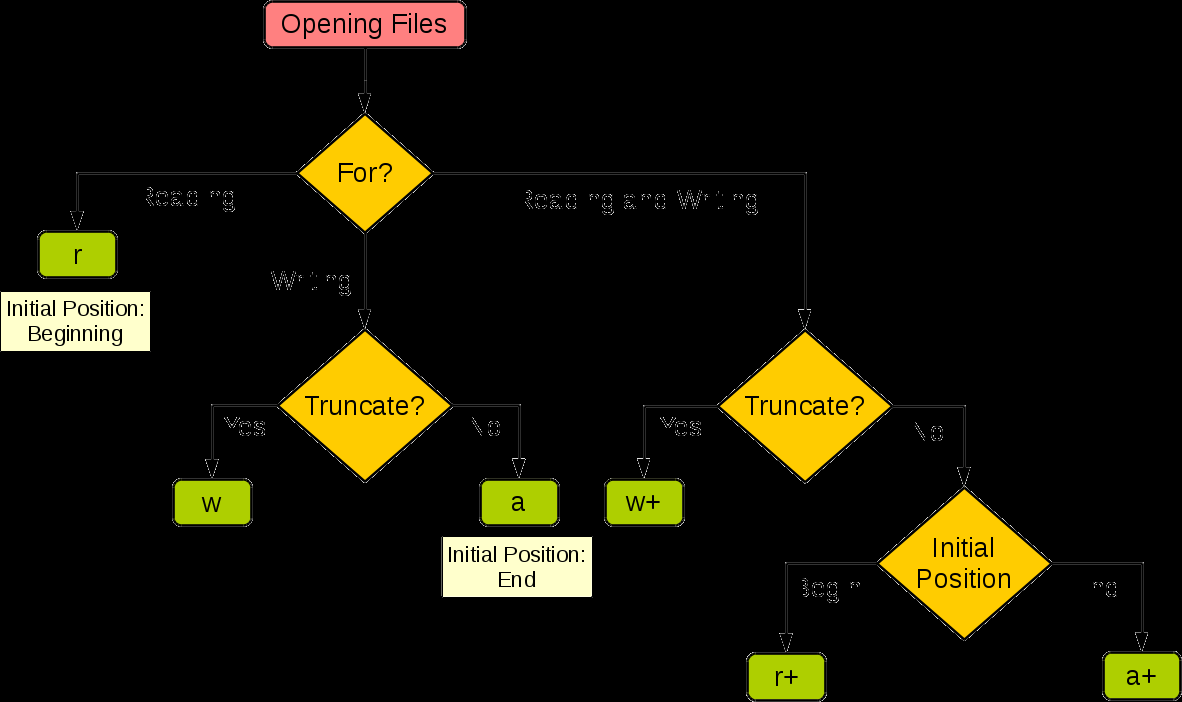
通过 Python 内置的 open 函数,我们可以指定文件名、操作模式、编码信息等来获得操作文件的对象,接下来就可以对文件进行读写操作了。这里所说的操作模式是指要打开什么样的文件(字符文件还是二进制文件)以及做什么样的操作(读、写还是追加),具体的如下表所示。
| 操作模式 | 具体含义 |
|---|---|
'r' | 读取 (默认) |
'w' | 写入(会先截断之前的内容) |
'x' | 写入,如果文件已经存在会产生异常 |
'a' | 追加,将内容写入到已有文件的末尾 |
'b' | 二进制模式 |
't' | 文本模式(默认) |
'+' | 更新(既可以读又可以写) |
根据应用程序的需要来设置操作模式:
读写文本文件
读文本
读取文本文件时,需要在使用 open 函数时指定好带路径的文件名(可以使用相对路径或绝对路径)并将文件模式设置为 'r'(如果不指定,默认值也是 'r'),然后通过 encoding 参数指定编码(如果不指定,默认值是 None,那么在读取文件时使用的是操作系统默认的编码),如果不能保证保存文件时使用的编码方式与 encoding 参数指定的编码方式是一致的,那么就可能因无法解码字符而导致读取失败。下面的例子演示了如何读取一个纯文本文件。
1
2
3
4
5
6
7
def main():
    f = open('test.txt', 'r', encoding='utf-8')
    print(f.read())
    f.close()

if __name__ == '__main__':
    main()
如果 open 函数指定的文件并不存在或者无法打开,那么将引发异常状况导致程序崩溃,修改下:
1
2
3
4
5
6
7
8
9
10
11
12
13
14
15
16
17
18
19
20
21
22
23
24
25
26
27
28
29
30
31
32
33
34
35
36
37
38
def main():
    f = None
    try:
        f = open('致橡树.txt', 'r', encoding='utf-8')
        print(f.read())
    except FileNotFoundError:
        print('无法打开指定的文件!')
    except LookupError:
        print('指定了未知的编码!')
    except UnicodeDecodeError:
        print('读取文件时解码错误!')
    finally:
        if f:
            f.close()


if __name__ == '__main__':
    main()


# 或者for-in每行readline
import time
def main():
    # 一次性读取整个文件内容
    with open('致橡树.txt', 'r', encoding='utf-8') as f:
        print(f.read())

    # 通过for-in循环逐行读取
    with open('致橡树.txt', mode='r') as f:
        for line in f:
            print(line, end='')
            time.sleep(0.5)
    print()

    # 读取文件按行读取到列表中
    with open('致橡树.txt') as f:
        lines = f.readlines()
    print(lines)
异常
在 Python 中,我们可以将那些在运行时可能会出现状况的代码放在 try 代码块中,在 try 代码块的后面可以跟上一个或多个 except 来捕获可能出现的异常状况,最后我们使用 finally 代码块来关闭打开的文件,释放掉程序中获取的外部资源,由于 finally 块的代码不论程序正常还是异常都会执行到(甚至是调用了 sys 模块的 exit 函数退出 Python 环境,finally 块都会被执行,因为 exit 函数实质上是引发了 SystemExit 异常),因此我们通常把 finally 块称为 “ 总是执行代码块 “,它最适合用来做释放外部资源的操作。如果不愿意在 finally 代码块中关闭文件对象释放资源,也可以使用上下文语法,通过 with 关键字指定文件对象的上下文环境并在离开上下文环境时自动释放文件资源。
1
2
3
4
5
6
7
8
9
10
11
12
13
14
def main():
    try:
        with open('致橡树.txt', 'r', encoding='utf-8') as f:
            print(f.read())
    except FileNotFoundError:
        print('无法打开指定的文件!')
    except LookupError:
        print('指定了未知的编码!')
    except UnicodeDecodeError:
        print('读取文件时解码错误!')


if __name__ == '__main__':
    main()
写文本文件
要将文本信息写入文件文件也非常简单,在使用 open 函数时指定好文件名并将文件模式设置为 'w' 即可。注意如果需要对文件内容进行追加式写入,应该将模式设置为 'a'。如果要写入的文件不存在会自动创建文件而不是引发异常。
下面的例子演示了如何将 1-9999 之间的素数分别写入三个文件中(1-99 之间的素数保存在 a.txt 中,100-999 之间的素数保存在 b.txt 中,1000-9999 之间的素数保存在 c.txt 中)。
1
2
3
4
5
6
7
8
9
10
11
12
13
14
15
16
17
18
19
20
21
22
23
24
25
26
27
28
29
30
31
32
33
34
35
36
37
from math import sqrt


def is_prime(n):
    """判断素数的函数"""
    assert n > 0
    for factor in range(2, int(sqrt(n)) + 1):
        if n % factor == 0:
            return False
    return True if n != 1 else False


def main():
    filenames = ('a.txt', 'b.txt', 'c.txt')
    fs_list = []
    try:
        for filename in filenames:
            fs_list.append(open(filename, 'w', encoding='utf-8'))
        for number in range(1, 10000):
            if is_prime(number):
                if number < 100:
                    fs_list[0].write(str(number) + '\n')
                elif number < 1000:
                    fs_list[1].write(str(number) + '\n')
                else:
                    fs_list[2].write(str(number) + '\n')
    except IOError as ex:
        print(ex)
        print('写文件时发生错误!')
    finally:
        for fs in fs_list:
            fs.close()
    print('操作完成!')


if __name__ == '__main__':
    main()
读写二进制文件
1
2
3
4
5
6
7
8
9
10
11
12
13
14
15
16
def main():
    try:
        with open('guido.jpg', 'rb') as fs1:
            data = fs1.read()
            print(type(data))  # <class 'bytes'>
        with open('吉多.jpg', 'wb') as fs2:
            fs2.write(data)
    except FileNotFoundError as e:
        print('指定的文件无法打开.')
    except IOError as e:
        print('读写文件时出现错误.')
    print('程序执行结束.')


if __name__ == '__main__':
    main()
读写 JSON 文件
JSON 的数据类型和 Python 的数据类型是很容易找到对应关系的,如下面两张表所示。
| JSON | Python |
|---|---|
| object | dict |
| array | list |
| string | str |
| number (int / real) | int / float |
| true / false | True / False |
| null | None |
| Python | JSON |
|---|---|
| dict | object |
| list, tuple | array |
| str | string |
| int, float, int- & float-derived Enums | number |
| True / False | true / false |
| None | null |
| json 模块主要有四个比较重要的函数,分别是: |
dump- 将 Python 对象按照 JSON 格式序列化到文件中dumps- 将 Python 对象处理成 JSON 格式的字符串load- 将文件中的 JSON 数据反序列化成对象loads- 将字符串的内容反序列化成 Python 对象
序列化:
1
2
3
4
5
6
7
8
9
10
11
12
13
14
15
16
17
18
19
20
21
22
23
24
25
import json


def main():
    mydict = {
        'name': '骆昊',
        'age': 38,
        'qq': 957658,
        'friends': ['王大锤', '白元芳'],
        'cars': [
            {'brand': 'BYD', 'max_speed': 180},
            {'brand': 'Audi', 'max_speed': 280},
            {'brand': 'Benz', 'max_speed': 320}
        ]
    }
    try:
        with open('data.json', 'w', encoding='utf-8') as fs:
            json.dump(mydict, fs)
    except IOError as e:
        print(e)
    print('保存数据完成!')


if __name__ == '__main__':
    main()
下面的例子演示了如何使用 requests 模块(封装得足够好的第三方网络访问模块)访问网络 API 获取国内新闻,如何通过 json 模块解析 JSON 数据并显示新闻标题,这个例子使用了 天行数据 提供的国内新闻数据接口,其中的 APIKey 需要自己到该网站申请。
1
2
3
4
5
6
7
8
9
10
11
12
13
import requests
import json


def main():
    resp = requests.get('http://api.tianapi.com/guonei/?key=APIKey&num=10')
    data_model = json.loads(resp.text)
    for news in data_model['newslist']:
        print(news['title'])


if __name__ == '__main__':
    main()
StringIO 和 BytesIO
很多时候,数据读写不一定是文件,也可以在内存中读写。
StringIO
StringIO 顾名思义就是在内存中读写 str。
要把 str 写入 StringIO,我们需要先创建一个 StringIO,然后,像文件一样写入即可:
1
2
3
4
5
6
7
8
9
10
>>> from io import StringIO
>>> f = StringIO()
>>> f.write('hello')
5
>>> f.write(' ')
1
>>> f.write('world!')
6
>>> print(f.getvalue()) # getvalue()方法用于获得写入后的str。
hello world!
要读取 StringIO,可以用一个 str 初始化 StringIO,然后,像读文件一样读取:
1
2
3
4
5
6
7
8
9
10
11
>>> from io import StringIO
>>> f = StringIO('Hello!\nHi!\nGoodbye!')
>>> while True:
...     s = f.readline()
...     if s == '':
...         break
...     print(s.strip())
...
Hello!
Hi!
Goodbye!
BytesIO
StringIO 操作的只能是 str,如果要操作二进制数据,就需要使用 BytesIO。
BytesIO 实现了在内存中读写 bytes,我们创建一个 BytesIO,然后写入一些 bytes:
1
2
3
4
5
6
>>> from io import BytesIO
>>> f = BytesIO()
>>> f.write('中文'.encode('utf-8')) # 写入的不是str,而是经过UTF-8编码的bytes。
6
>>> print(f.getvalue())
b'\xe4\xb8\xad\xe6\x96\x87'
和 StringIO 类似,可以用一个 bytes 初始化 BytesIO,然后,像读文件一样读取:
1
2
3
4
>>> from io import BytesIO
>>> f = BytesIO(b'\xe4\xb8\xad\xe6\x96\x87')
>>> f.read()
b'\xe4\xb8\xad\xe6\x96\x87'
操作文件和目录
Python 内置的 os 模块也可以直接调用操作系统提供的接口函数来操作文件和目录。
环境变量
在操作系统中定义的环境变量,全部保存在 os.environ 这个变量中,可以直接查看:
1
2
>>> os.environ
environ({'VERSIONER_PYTHON_PREFER_32_BIT': 'no', 'TERM_PROGRAM_VERSION': '326', 'LOGNAME': 'michael', 'USER': 'michael', 'PATH': '/usr/bin:/bin:/usr/sbin:/sbin:/usr/local/bin:/opt/X11/bin:/usr/local/mysql/bin', ...})
要获取某个环境变量的值,可以调用 os.environ.get('key') :
1
2
3
4
>>> os.environ.get('PATH')
'/usr/bin:/bin:/usr/sbin:/sbin:/usr/local/bin:/opt/X11/bin:/usr/local/mysql/bin'
>>> os.environ.get('x', 'default')
'default'
操作文件和目录
操作文件和目录的函数一部分放在 os 模块中,一部分放在 os.path 模块中。
查看、创建和删除目录
1
2
3
4
5
6
7
8
9
10
# 查看当前目录的绝对路径:
>>> os.path.abspath('.')
'/Users/michael'
# 在某个目录下创建一个新目录,首先把新目录的完整路径表示出来:
>>> os.path.join('/Users/michael', 'testdir')
'/Users/michael/testdir'
# 然后创建一个目录:
>>> os.mkdir('/Users/michael/testdir')
# 删掉一个目录:
>>> os.rmdir('/Users/michael/testdir')
把两个路径合成一个时,不要直接拼字符串,而要通过 os.path.join() 函数,这样可以正确处理不同操作系统的路径分隔符。
同样的道理,要拆分路径时,也不要直接去拆字符串,而要通过 os.path.split() 函数,这样可以把一个路径拆分为两部分,后一部分总是最后级别的目录或文件名:
1
2
>>> os.path.split('/Users/michael/testdir/file.txt')
('/Users/michael/testdir', 'file.txt')
os.path.splitext() 可以直接让你得到文件扩展名,很多时候非常方便:
1
2
>>> os.path.splitext('/path/to/file.txt')
('/path/to/file', '.txt')
这些合并、拆分路径的函数并不要求目录和文件要真实存在,它们只对字符串进行操作。
文件操作
1
2
3
4
# 对文件重命名:
>>> os.rename('test.txt', 'test.py')
# 删掉文件:
>>> os.remove('test.py')
复制文件的函数居然在 os 模块中不存在!原因是复制文件并非由操作系统提供的系统调用。
幸运的是 shutil 模块提供了 copyfile() 的函数,你还可以在 shutil 模块中找到很多实用函数,它们可以看做是 os 模块的补充。
最后看看如何利用 Python 的特性来过滤文件。比如我们要列出当前目录下的所有目录,只需要一行代码:
1
2
[x for x in os.listdir('.') if os.path.isdir(x)]
#['.lein', '.local', '.m2', '.npm', '.ssh', '.Trash', '.vim', 'Applications', 'Desktop', ...]
要列出所有的 .py 文件,也只需一行代码:
1
2
3
[x for x in os.listdir('.') if os.path.isfile(x) and os.path.splitext(x)[1]=='.py']

#['apis.py', 'config.py', 'models.py', 'pymonitor.py', 'test_db.py', 'urls.py', 'wsgiapp.py']