04.Spring AOP
AOP 基础
代理模式
代理模式是 Spring AOP 的底层
静态代理
- 抽象角色:一般会使用接口或者抽象类来解决;
- 真实角色:被代理的角色;
- 代理角色:代理真实角色,代理真实角色后,我们一般会做一些附属操作;
- 客户:访问代理角色的人
- 抽象角色:接口
1
2
3
4
// 租房
public interface Rent {
    public void rent();
}
- 真实角色
1
2
3
4
5
6
// 房东
public class Host implements Rent {
    public void rent(){
        System.out.println("房东要出租房子?");
    }
}
- 代理角色
1
2
3
4
5
6
7
8
9
10
11
12
13
14
15
16
17
18
19
20
21
22
23
24
25
26
27
28
29
30
31
32
public class Proxy {
    private Host host;

    public Proxy() {
    }

    public Proxy(Host host) {
        this.host = host;
    }

    public void rent(){
        seeHouse();
        host.rent();
        contract();
        fare();
    }

    // 看房
    public void seeHouse(){
        System.out.println("中介带你看房!");
    }

    // 收中介费
    public void fare(){
        System.out.println("收中介费!");
    }

    // 签合同
    public void contract(){
        System.out.println("和你签合同!");
    }
}
- 客户端访问代理角色
1
2
3
4
5
6
7
8
9
10
11
public class Client {
    public static void main(String[] args) {
        // 房东要租房子
        Host host = new Host();
//        host.rent();
        // 代理,中介帮房东租房子,但是呢?代理角一般会有一些附属操作!
        Proxy proxy = new Proxy(host);
        // 直接找中介租房
        proxy.rent();
    }
}
代理模式的好处:
- 可以使得我们的真实角色更加纯粹,不再去关注一些公共的事情。
- 公共的业务由代理来完成,实现了业务的分工。
- 公共业务发生扩展时,方便集中管理。
缺点:
- 一个真实角色就会产生一个代理角色;代码量会翻倍,开发效率会变低。
动态代理
- 动态代理和静态代理角色一样;
- 动态代理的代理类是动态生成的,不是我们直接写好的;
- 动态代理分为两大类:基于接口的动态代理,基于类的动态代理。
- 基于接口——JDK 动态代理【我们在这里使用】
- 基于类——
cglib - Java 字节码实现:
javasist
- 需要了解两个类:
InvocationHandler、Proxy
动态代理处理中介问题
- 抽象角色
1
2
3
4
// 租房
public interface Rent {
    public void rent();
}
- 真实角色
1
2
3
4
5
6
// 房东
public class Host implements Rent {
    public void rent(){
        System.out.println("房东要出租房子?");
    }
}
- 代理角色
1
2
3
4
5
6
7
8
9
10
11
12
13
14
15
16
17
18
19
20
21
22
23
24
25
26
27
28
29
30
31
32
33
34
35
36
37
38
39
40
41
42
43
// 会用这个类,自动生成代理类
public class ProxyInvocationHandler implements InvocationHandler {

    // 被代理的接口
    private Rent rent;

    public void setRent(Rent rent){
        this.rent = rent;
    }

//            Foo f = (Foo) Proxy.newProxyInstance(Foo.class.getClassLoader(),
//            new Class<?>[] { Foo.class },
//            handler);

    // 生成得到代理类
    public Object getProxy(){
        return Proxy.newProxyInstance(this.getClass().getClassLoader(),rent.getClass().getInterfaces(),this);
    }

    // 处理代理实例,并返回代理结果
    public Object invoke(Object proxy, Method method, Object[] args) throws Throwable {
        // 动态代理本质:利用反射机制实现!
        Object result = method.invoke(rent, args);
        seeHouse();
        fare();
        return result;
    }

    // 看房
    public void seeHouse(){
        System.out.println("中介带你看房!");
    }

    // 收中介费
    public void fare(){
        System.out.println("收中介费!");
    }

    // 签合同
    public void contract(){
        System.out.println("和你签合同!");
    }
}
- Client
1
2
3
4
5
6
7
8
9
10
11
12
13
14
15
16
public class Client {
    public static void main(String[] args) {
        // 真实角色
        Host host = new Host();

        // 代理角色
        ProxyInvocationHandler handler = new ProxyInvocationHandler();

        // 通过调用程序来处理角色,来处理我们要调用的接口对象!
        handler.setRent(host);

        Rent proxy = (Rent) handler.getProxy(); // 动态生成对应的代理类!

        proxy.rent();
    }
}
通用的动态代理实现的类
1
2
3
4
5
6
7
8
9
10
11
12
13
14
15
16
17
18
19
20
21
22
23
24
25
26
27
28
// 会用这个类,自动生成代理类
public class ProxyInvocationHandler implements InvocationHandler {

    // 被代理的接口
    private Object target;

    public void setTarget(Object target){
        this.target = target;
    }

    // 生成得到代理类
    public Object getProxy(){
        return Proxy.newProxyInstance(this.getClass().getClassLoader(),target.getClass().getInterfaces(),this);
    }

    // 处理代理实例,并返回代理结果
    public Object invoke(Object proxy, Method method, Object[] args) throws Throwable {
        // 动态代理本质:利用反射机制实现!
        log(method.getName());
        Object result = method.invoke(target, args);
        return result;
    }

    public void log(String methodName){
        System.out.println("执行了"+methodName+"方法");
    }
}
什么是 AOP?
- AOP(Aspect Oriented Programming) 意为:面向切面编程,通过预编译方式和运行期动态代理实现程序功能的统一维护的一种技术。
- AOP 是 OOP 的延续,是软件开发中的一个热点,也是 Spring 框架中的一个重要内容,是函数式编程的一种衍生范型。
- 利用 AOP 可以对业务逻辑的各个部分进行隔离,从而使得业务逻辑各部分之间的耦合度降低,提高程序的可重用性,同时提高了开发的效率。
- AOP 在不改变原有代码的情况下 , 去增加新的功能。
OOP 是一种编程思想,那么 AOP 也是一种编程思想,编程思想主要的内容就是指导程序员该如何编写程序,所以它们两个是不同的 编程范式。
Aspect 是一种新的模块化机制,用来描述分散在对象、类或函数中的横切关注点(crosscutting concern)。从关注点中分离出横切关注点是面向切面的程序设计的核心概念。分离关注点使解决特定领域问题的代码从业务逻辑中独立出来,业务逻辑的代码中不再含有针对特定领域问题代码的调用,业务逻辑同特定领域问题的关系通过切面来封装、维护,这样原本分散在整个应用程序中的变动就可以很好地管理起来。
名词概念
Spring AOP 延用了 AspectJ 中的概念,使用了 AspectJ 提供的 jar 包中的注解。也就是 Spring AOP 里面的概念和术语,并不是 Spring 独有的,而是和 AOP 相关的。
| 术语 | 概念 |
|---|---|
| Aspect | 切面是 Pointcut 和 Advice 的集合,一般单独作为一个类。Pointcut 和 Advice 共同定义了关于切面的全部内容,它是什么时候,在何时和何处完成功能。 |
| Joinpoint | 这表示你的应用程序中可以插入 AOP 方面的一点。也可以说,这是应用程序中使用 Spring AOP 框架采取操作的实际位置。 |
| Advice | 这是在方法执行之前或之后采取的实际操作。 这是在 Spring AOP 框架的程序执行期间调用的实际代码片段。 |
| Pointcut | 这是一组一个或多个切入点,在切点应该执行 Advice。 您可以使用表达式或模式指定切入点 |
| Introduction | 引用允许我们向现有的类添加新的方法或者属性 |
| Weaving | 创建一个被增强对象的过程。这可以在编译时完成(例如使用 AspectJ 编译器),也可以在运行时完成。Spring 和其他纯 Java AOP 框架一样,在运行时完成织入。 |
还有一些注解,表示 Advice 的类型,或者说增强的时机,看过之后的示例之后会更加的清楚。
| 术语 | 概念 |
|---|---|
| Before | 在方法被调用之前执行增强 |
| After | 在方法被调用之后执行增强 |
| After-returning | 在方法成功执行之后执行增强 |
| After-throwing | 在方法抛出指定异常后执行增强 |
| Around | 在方法调用的前后执行自定义的增强行为(最灵活的方式) |
AOP 在 Spring 中的作用
- 横切关注点:跨越应用程序多个模块的方法或功能。即是,与我们业务逻辑无关的,但是我们需要关注的部分,就是横切关注点。如日志 , 安全 , 缓存 , 事务等等 …
- 切面(ASPECT):横切关注点被模块化的特殊对象。即,它是一个类。
- 通知(Advice):切面必须要完成的工作。即,它是类中的一个方法。
- 目标(Target):被通知对象。
- 代理(Proxy):向目标对象应用通知之后创建的对象。
- 切入点(PointCut):切面通知 执行的 “ 地点 “ 的定义。
- 连接点(JointPoint):与切入点匹配的执行点。
SpringAOP 中,通过 Advice 定义横切逻辑,Spring 中支持 5 种类型的 Advice:
@MethodBeforeAdvice前置通知,方法前@AfterReturingAdvice后置通知,方法后@MethodInterceptor环绕通知,方法前后@ThrowsAdvice异常抛出通知,方法抛出异常@introductionInterceptor引介通知,类中增加新的方法属性
Spring AOP 核心概念
- 连接点 (JoinPoint):程序执行过程中的任意位置,粒度为执行方法、抛出异常、设置变量等
- 在 SpringAOP 中,理解为方法的执行
1
2
3
4
5
6
@Aspect
public class MyAdvice {
	@Around("pt()")
	public Object around(ProceedingJoinPoint pjp) throws Throwable {
	}
}
- 切入点 (Pointcut): 匹配连接点的式子
- 在 SpringAOP 中,一个切入点可以描述一个具体方法,也可也匹配多个方法
- 一个具体的方法: 如 com.example.dao 包下的 BookDao 接口中的无形参无返回值的 save 方法
- 匹配多个方法: 所有的 save 方法,所有的 get 开头的方法,所有以 Dao 结尾的接口中的任意方法,所有带有一个参数的方法
- 连接点范围要比切入点范围大,是切入点的方法也一定是连接点,但是是连接点的方法就不一定要被增强,所以可能不是切入点。
- 在 SpringAOP 中,一个切入点可以描述一个具体方法,也可也匹配多个方法
1
2
3
4
5
6
7
@Aspect
public class MyAdvice {

    @Pointcut("execution(* com.example.dao.BookDao.*d*(..))")
    private void pt() {
    }
}
- 通知 (Advice): 在切入点处执行的操作,也就是共性功能
- 在 SpringAOP 中,功能最终以方法的形式呈现
- 通知类:定义通知的类
- 切面 (Aspect): 描述通知与切入点的对应关系。
1
2
3
4
@Component
@Aspect
public class MyAdvice {
}
Spring AOP 示例
目录结构: 
- 依赖
1
2
3
4
5
6
7
8
9
10
11
12
13
14
15
16
17
18
19
<dependencies>
	<dependency>
		<groupId>org.springframework</groupId>
		<artifactId>spring-context</artifactId>
		<version>5.2.10.RELEASE</version>
	</dependency>
	<!--引入AOP-->
	<dependency>
		<groupId>org.springframework</groupId>
		<artifactId>spring-aop</artifactId>
		<version>5.2.7.RELEASE</version>
	</dependency>
	<!--AOP 织入器-->
	<dependency>
		<groupId>org.aspectj</groupId>
		<artifactId>aspectjweaver</artifactId>
		<version>1.9.4</version>
	</dependency>
</dependencies>
- SpringConfig
1
2
3
4
5
@Configuration
@ComponentScan("com.example")
@EnableAspectJAutoProxy // 开启注解格式AOP功能
public class SpringConfig {
}
- DAO
1
2
3
4
5
6
7
8
9
10
11
12
13
14
15
16
17
18
19
20
21
22
23
24
25
26
27
28
29
30
31
32
33
34
35
36
37
38
package com.example.dao;
public interface BookDao {
    public void save();
    public void update();
    public void delete();
    public void select();
}

package com.example.dao.impl;
import com.example.dao.BookDao;
import org.springframework.stereotype.Repository;
@Repository
public class BookDaoImpl implements BookDao {

    public void save() {
        // 记录程序当前执行执行(开始时间)
        long startTime = System.currentTimeMillis();
        // 业务执行万次
        for (int i = 0; i < 10000; i++) {
            System.out.println("book dao save ...");
        }
        // 记录程序当前执行时间(结束时间)
        long endTime = System.currentTimeMillis();
        // 计算时间差
        long totalTime = endTime - startTime;
        // 输出信息
        System.out.println("执行万次消耗时间:" + totalTime + "ms");
    }
    public void update() {
        System.out.println("------------book dao update ...");
    }
    public void delete() {
        System.out.println("---------------book dao delete ...");
    }
    public void select() {
        System.out.println("===================book dao select ...");
    }
}
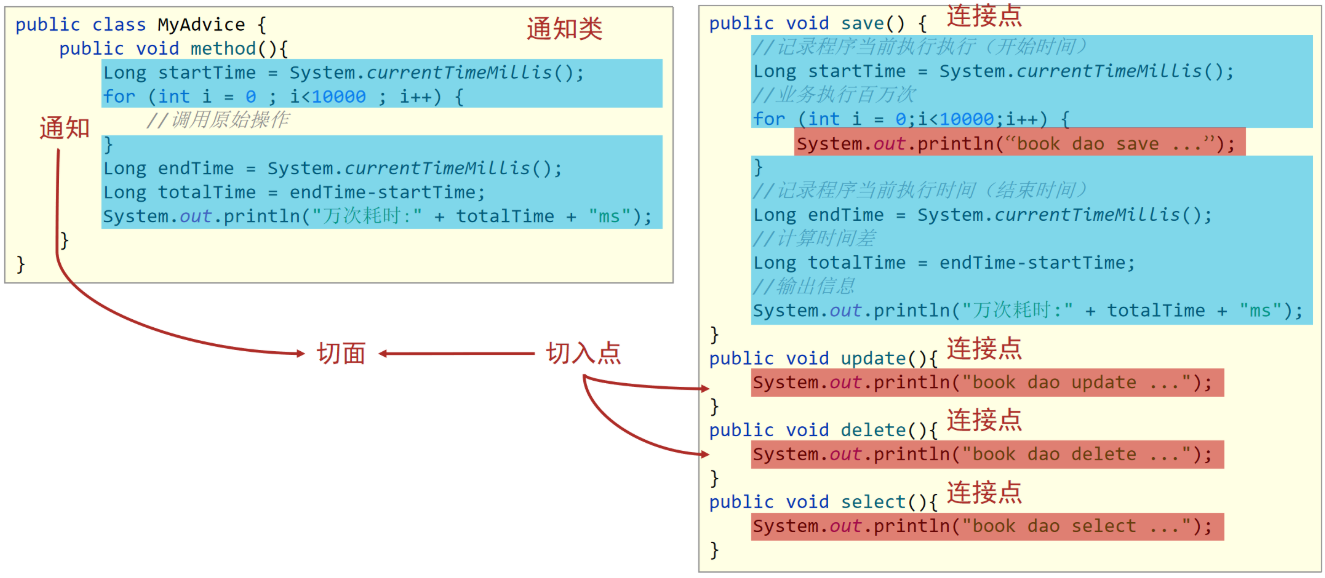
- 定义通知类和通知 MyAdvice
通知就是将共性功能抽取出来后形成的方法,共性功能指的就是当前系统时间的打印。
类名和方法名没有要求,可以任意。
1
2
3
4
5
6
7
8
9
10
11
12
13
14
15
16
17
18
19
20
21
22
23
24
25
26
27
28
29
30
31
32
package com.example.aop;

import org.aspectj.lang.ProceedingJoinPoint;
import org.aspectj.lang.annotation.Around;
import org.aspectj.lang.annotation.Aspect;
import org.aspectj.lang.annotation.Pointcut;
import org.springframework.stereotype.Component;

@Component
@Aspect  // 将通知类配给容器并标识其为切面类
public class MyAdvice {

    @Pointcut("execution(* com.example.dao.BookDao.*d*(..))")
    // - 切入点定义依托一个不具有实际意义的方法进行,即无参数、无返回值、方法体无实际逻辑。
    private void pt() {
    }

	// 制作切面
    @Around("pt()")
    public Object around(ProceedingJoinPoint pjp) throws Throwable {
        System.out.println("------------------------------");
        long startTime = System.currentTimeMillis();
        for (int i = 0; i < 10000; i++) {
            //调用原始操作
            pjp.proceed();
        }
        long endTime = System.currentTimeMillis();
        long totalTime = endTime - startTime;
        System.out.println("执行万次消耗时间:" + totalTime + "ms");
        return null;
    }
}
切面是用来描述通知和切入点之间的关系,如何进行关系的绑定?
绑定切入点与通知关系,并指定通知添加到原始连接点的具体执行==位置==
- 测试
1
2
3
4
5
6
7
8
9
10
11
12
13
14
15
16
17
package com.example;

import com.example.config.SpringConfig;
import com.example.dao.BookDao;
import org.springframework.context.ApplicationContext;
import org.springframework.context.annotation.AnnotationConfigApplicationContext;

public class App {
    public static void main(String[] args) {
        ApplicationContext ctx = new AnnotationConfigApplicationContext(SpringConfig.class);
        BookDao bookDao = ctx.getBean(BookDao.class);
//        bookDao.save(); // 手写,执行10w次,输出耗时
//        bookDao.update();  // aop,执行10w次,输出耗时
//        bookDao.delete();  // aop,执行10w次,输出耗时
        bookDao.select();  // 没有aop,执行1次,不输出耗时
    }
}
相关注解
@EnableAspectJAutoProxy
| 名称 | @EnableAspectJAutoProxy |
|---|---|
| 类型 | 配置类注解 |
| 位置 | 配置类定义上方 |
| 作用 | 开启注解格式 AOP 功能 |
@Aspect
| 名称 | @Aspect |
|---|---|
| 类型 | 类注解 |
| 位置 | 切面类定义上方 |
| 作用 | 设置当前类为 AOP 切面类 |
@Pointcut
| 名称 | @Pointcut |
|---|---|
| 类型 | 方法注解 |
| 位置 | 切入点方法定义上方 |
| 作用 | 设置切入点方法 |
| 属性 | value(默认):切入点表达式 |
@Before
| 名称 | @Before | |
|---|---|---|
| 类型 | 方法注解 | |
| 位置 | 通知方法定义上方 | |
| 作用 | 设置当前通知方法与切入点之间的绑定关系,当前通知方法在原始切入点方法前运行 |
Spring AOP 工作流程
由于 AOP 是基于 Spring 容器管理的 bean 做的增强,所以整个工作过程需要从 Spring 加载 bean 说起:
流程 1:Spring 容器启动
- 容器启动就需要去加载 bean,哪些类需要被加载呢?
- 需要被增强的类,如:
BookServiceImpl - 通知类,如:MyAdvice
- 注意此时 bean 对象还没有创建成功
流程 2: 读取所有切面配置中的切入点
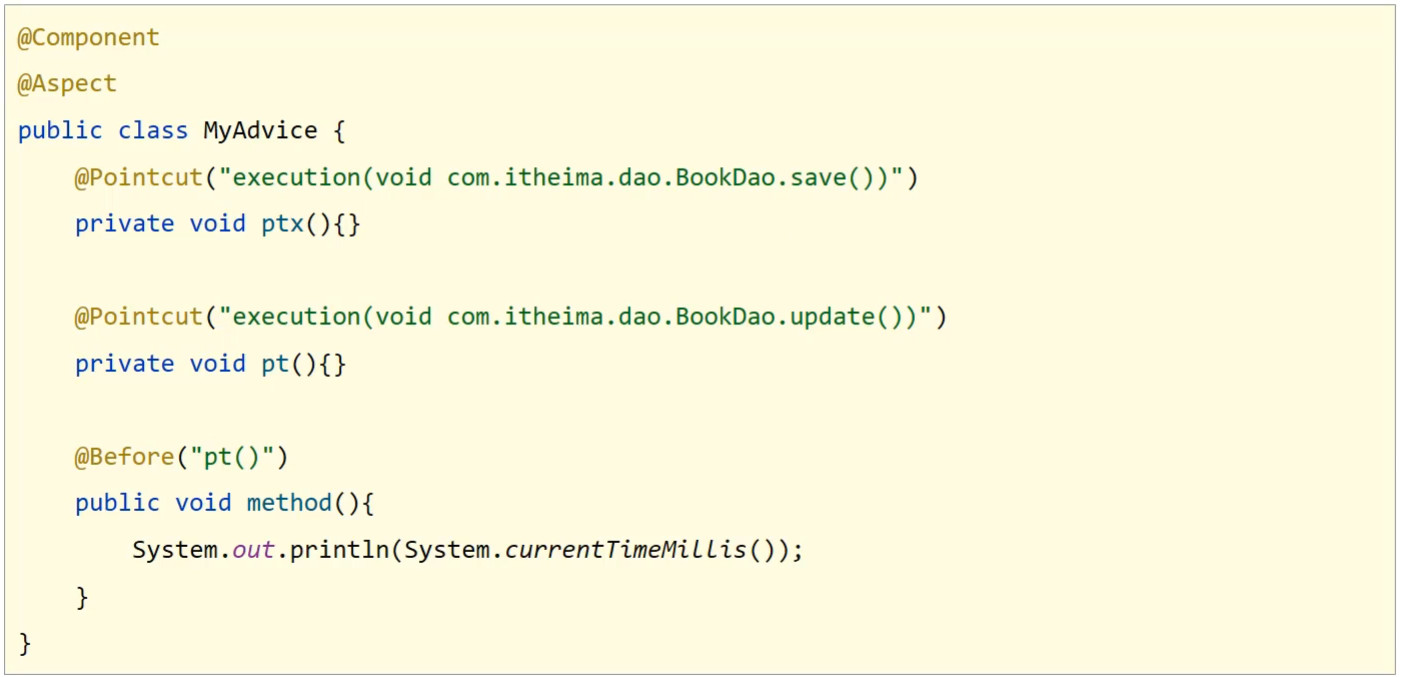
- 上面这个例子中有两个切入点的配置,但是第一个
ptx()并没有被使用,所以不会被读取。
流程 3: 初始化 bean
判定 bean 对应的类中的方法是否匹配到任意切入点
- 注意第 1 步在容器启动的时候,bean 对象还没有被创建成功。
- 要被实例化 bean 对象的类中的方法和切入点进行匹配
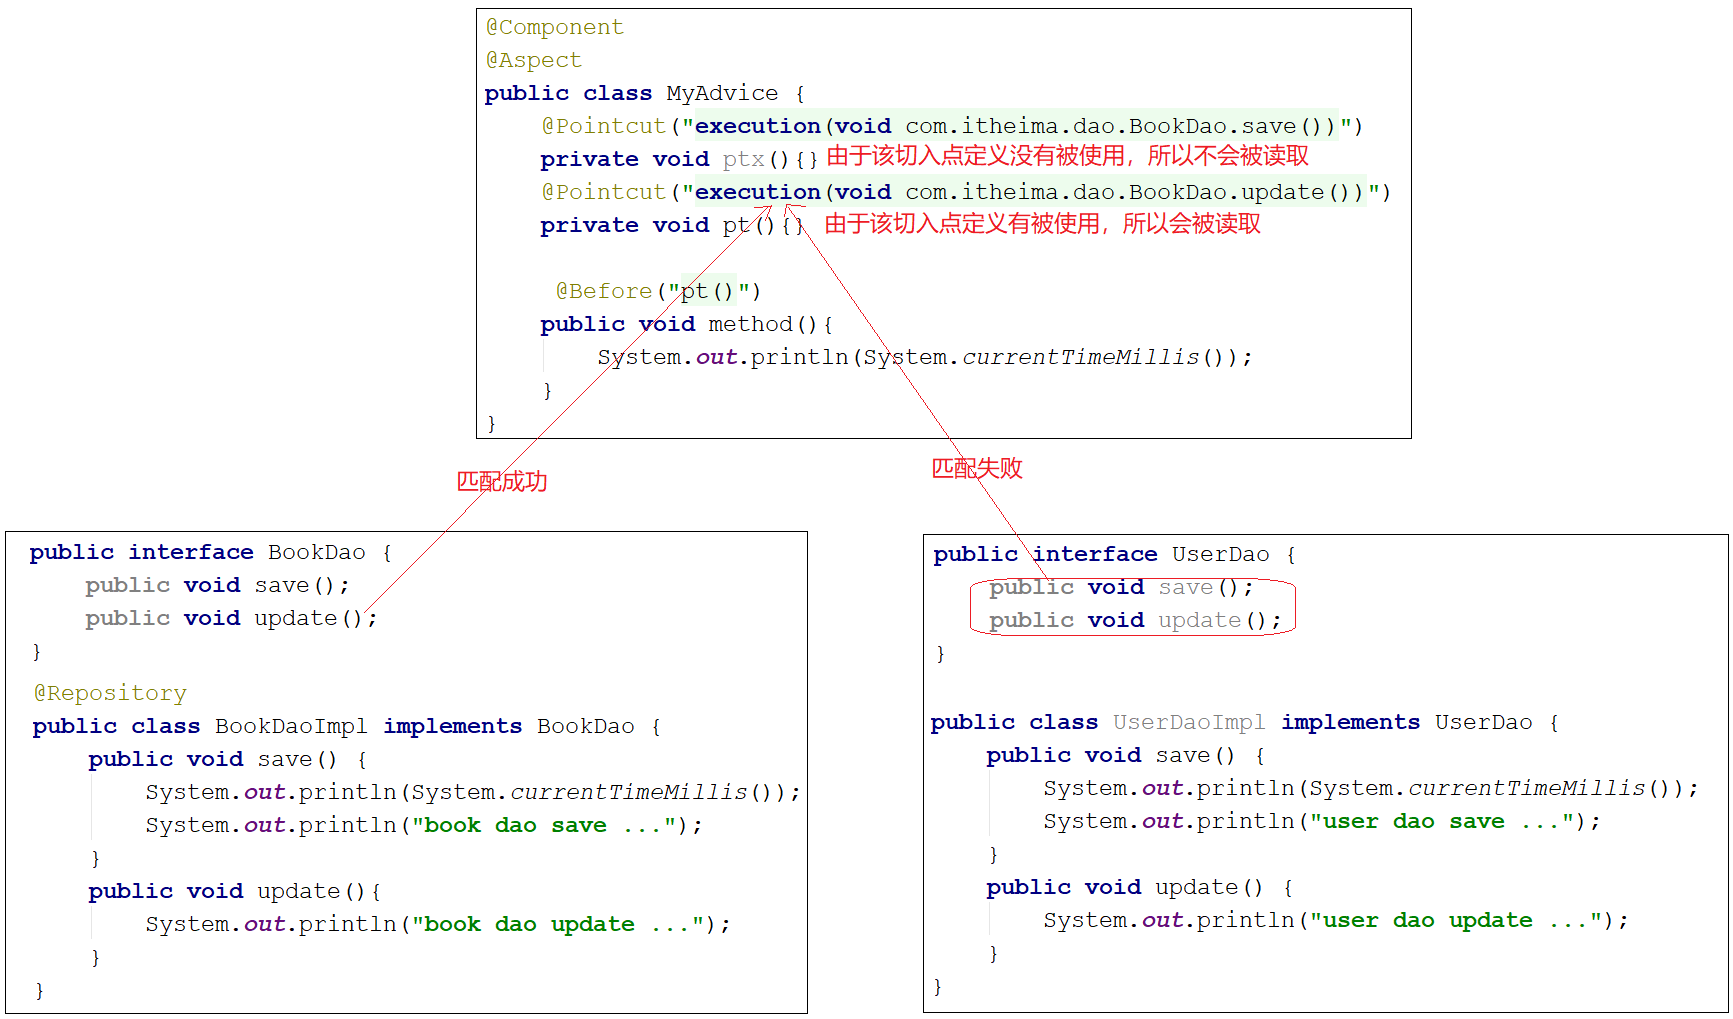
- 匹配失败,创建原始对象,如
UserDao- 匹配失败说明不需要增强,直接调用原始对象的方法即可。
- 匹配成功,创建原始对象(==目标对象==)的==代理==对象,如:
BookDao- 匹配成功说明需要对其进行增强
- 对哪个类做增强,这个类对应的对象就叫做目标对象
- 因为要对目标对象进行功能增强,而采用的技术是动态代理,所以会为其创建一个代理对象
- 最终运行的是代理对象的方法,在该方法中会对原始方法进行功能增强
验证容器中是否为代理对象
为了验证 IOC 容器中创建的对象和我们刚才所说的结论是否一致,首先先把结论理出来:
- 如果目标对象中的方法会被增强,那么容器中将存入的是目标对象的代理对象
- 如果目标对象中的方法不被增强,那么容器中将存入的是目标对象本身。
验证思路
1.要执行的方法,不被定义的切入点包含,即不要增强,打印当前类的 getClass() 方法 2.要执行的方法,被定义的切入点包含,即要增强,打印出当前类的 getClass() 方法 3.观察两次打印的结果
流程 4: 获取 bean 执行方法
- 获取的 bean 是原始对象时,调用方法并执行,完成操作
- 获取的 bean 是代理对象时,根据代理对象的运行模式运行原始方法与增强的内容,完成操作
Spring AOP 配置管理
Spring AOP 切入点表达式
对于 AOP 中切入点表达式,我们总共会学习三个内容,分别是 语法格式、通配符 和 书写技巧。
语法格式
描述方式一:执行 com.example.dao 包下的 BookDao 接口中的无参数 update 方法
1
execution(void com.example.dao.BookDao.update())
描述方式二:执行 com.example.dao.impl 包下的 BookDaoImpl 类中的无参数 update 方法
1
execution(void com.example.dao.impl.BookDaoImpl.update())
因为调用接口方法的时候最终运行的还是其实现类的方法,所以上面两种描述方式都是可以的。
对于切入点表达式的语法为:
1
切入点表达式标准格式:动作关键字(访问修饰符  返回值  包名.类/接口名.方法名(参数) 异常名)
于这个格式,我们不需要硬记,通过一个例子,理解它:
1
"execution(public User com.example.service.UserService.findById(int))"
- execution:动作关键字,描述切入点的行为动作,例如 execution 表示执行到指定切入点
- public: 访问修饰符,还可以是 public,private 等,可以省略
- User:返回值,写返回值类型
- com.example.service:包名,多级包使用点连接
- UserService: 类/接口名称
- findById:方法名
- int: 参数,直接写参数的类型,多个类型用逗号隔开
- 异常名:方法定义中抛出指定异常,可以省略
切入点表达式就是要找到需要增强的方法,所以它就是对一个具体方法的描述,但是方法的定义会有很多,所以如果每一个方法对应一个切入点表达式,想想这块就会觉得将来编写起来会比较麻烦,有没有更简单的方式呢?
就需要用到通配符。
通配符
我们使用通配符描述切入点,主要的目的就是简化之前的配置,具体都有哪些通配符可以使用?
*: 单个独立的任意符号,可以独立出现,也可以作为前缀或者后缀的匹配符出现1 2
execution(public * com.example.*.UserService.find*(*)) // 匹配com.example包下的任意包中的UserService类或接口中所有find开头的带有一个参数的方法
..:多个连续的任意符号,可以独立出现,常用于简化包名与参数的书写
1
2
  execution(public User com..UserService.findById(..))
  // 匹配com包下的任意包中的UserService类或接口中所有名称为findById的方法
+:专用于匹配子类类型
1
execution(* *..*Service+.*(..))
这个使用率较低,描述子类的,咱们做 JavaEE 开发,继承机会就一次,使用都很慎重,所以很少用它。Service+,表示所有以 Service 结尾的接口的子类。
1
2
3
4
5
6
7
8
9
10
11
12
13
14
15
16
17
18
19
20
21
22
23
24
25
26
27
28
29
30
31
32
33
34
35
36
37
38
execution(void com.example.dao.BookDao.update())
// 匹配接口,能匹配到

execution(void com.example .dao.impl.BookDaoImpl.update())
// 匹配实现类,能匹配到

execution(* com.example.dao.impl.BookDaoImpl.update())
// 返回值任意,能匹配到

execution(* com.example.dao.impl.BookDaoImpl.update(*))
// 返回值任意,但是update方法必须要有一个参数,无法匹配,要想匹配需要在update接口和实现类添加参数

execution(void com.*.*.*.*.update())
// 返回值为void, com包下的任意包三层包下的任意类的update方法,匹配到的是实现类,能匹配

execution(void com.*.*.*.update())
//  返回值为void,com包下的任意两层包下的任意类的update方法,匹配到的是接口,能匹配

execution(void *..update())
//  返回值为void,方法名是update的任意包下的任意类,能匹配

execution(* *..*(..))
// 匹配项目中任意类的任意方法,能匹配,但是不建议使用这种方式,影响范围广

execution(* *..u*(..))
// 匹配项目中任意包任意类下只要以u开头的方法,update方法能满足,能匹配

execution(* *..*e(..))
// 匹配项目中任意包任意类下只要以e结尾的方法,update和save方法能满足,能匹配

execution(void com..*())
// 返回值为void,com包下的任意包任意类任意方法,能匹配,*代表的是方法

execution(* com.example.*.*Service.find*(..))
// 将项目中所有业务层方法的以find开头的方法匹配

execution(* com.example.*.*Service.save*(..))
// 将项目中所有业务层方法的以save开头的方法匹配
后面两种更符合我们平常切入点表达式的编写规则
书写技巧
对于切入点表达式的编写其实是很灵活的,那么在编写的时候,有没有什么好的技巧让我们用用:
- 所有代码按照标准规范开发,否则以下技巧全部失效
- 描述切入点通常描述接口,而不描述实现类, 如果描述到实现类,就出现紧耦合了
- 访问控制修饰符针对接口开发均采用 public 描述(==可省略访问控制修饰符描述==)
- 返回值类型对于增删改类使用精准类型加速匹配,对于查询类使用 * 通配快速描述
- 包名书写尽量不使用..匹配,效率过低,常用做单个包描述匹配,或精准匹配
- 接口名/类名 书写名称与模块相关的采用匹配,例如 UserService 书写成 *Service,绑定业务层接口名
- 方法名书写以动词进行精准匹配,名词采用 _ 匹配,例如 getById 书写成
getBy,selectAll书写成selectAll
- 方法名书写以动词进行精准匹配,名词采用 _ 匹配,例如 getById 书写成
- 参数规则较为复杂,根据业务方法灵活调整
- 通常不使用异常作为匹配规则
Spring AOP 通知类型
1
@Before("pt()")
它所代表的含义是将 通知 添加到 切入点 方法执行的==前面==。除了这个注解外,还有没有其他的注解。
类型介绍
AOP 通知描述了抽取的共性功能,根据共性功能抽取的位置不同,最终运行代码时要将其加入到合理的位置
通知具体要添加到切入点的哪里?
共提供了 5 种通知类型:
- 前置通知
- 后置通知
- ==环绕通知 (重点)==
- 返回后通知 (了解)
- 抛出异常后通知 (了解)
为了更好的理解这几种通知类型,我们来看一张图:
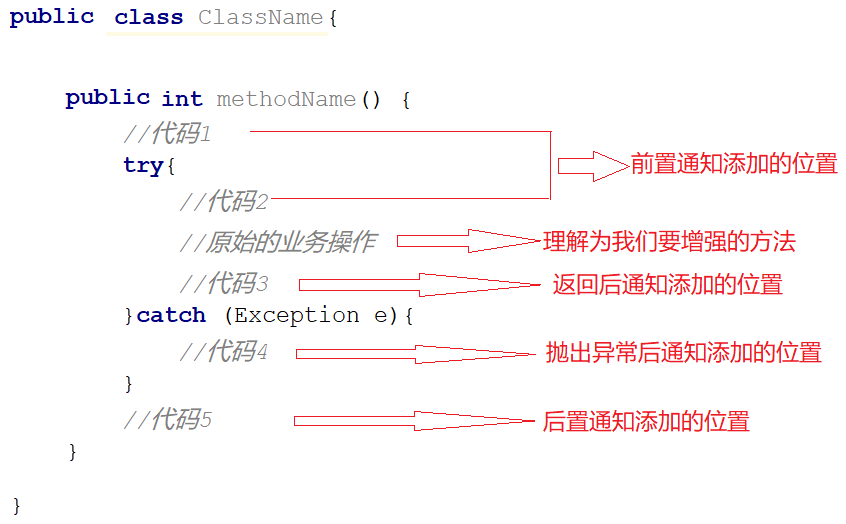
(1) 前置通知,追加功能到方法执行前,类似于在代码 1 或者代码 2 添加内容
(2) 后置通知,追加功能到方法执行后,不管方法执行的过程中有没有抛出异常都会执行,类似于在代码 5 添加内容
(3) 返回后通知,追加功能到方法执行后,只有方法正常执行结束后才进行,类似于在代码 3 添加内容,如果方法执行抛出异常,返回后通知将不会被添加
(4) 抛出异常后通知,追加功能到方法抛出异常后,只有方法执行出异常才进行,类似于在代码 4 添加内容,只有方法抛出异常后才会被添加
(5) 环绕通知,环绕通知功能比较强大,它可以追加功能到方法执行的前后,这也是比较常用的方式,它可以实现其他四种通知类型的功能,具体是如何实现的,需要我们往下学习。
前置通知 @Before
修改 MyAdvice,在 before 方法上添加 @Before注解
1
2
3
4
5
6
7
8
9
10
11
12
@Component
@Aspect
public class MyAdvice {
    @Pointcut("execution(void com.example.dao.BookDao.update())")
    private void pt(){}

    @Before("pt()")
    //此处也可以写成 @Before("MyAdvice.pt()"),不建议
    public void before() {
        System.out.println("before advice ...");
    }
}
调用 BookDao.update() 时,会先输出:before advice …
后置通知 @After
1
2
3
4
5
6
7
8
9
10
11
12
13
14
15
@Component
@Aspect
public class MyAdvice {
    @Pointcut("execution(void com.example.dao.BookDao.update())")
    private void pt(){}

    @Before("pt()")
    public void before() {
        System.out.println("before advice ...");
    }
    @After("pt()")
    public void after() {
        System.out.println("after advice ...");
    }
}
环绕通知 @Around
1
2
3
4
5
6
7
8
9
10
11
12
@Component
@Aspect
public class MyAdvice {
@Pointcut("execution(void com.example.dao.BookDao.update())")
private void pt(){}
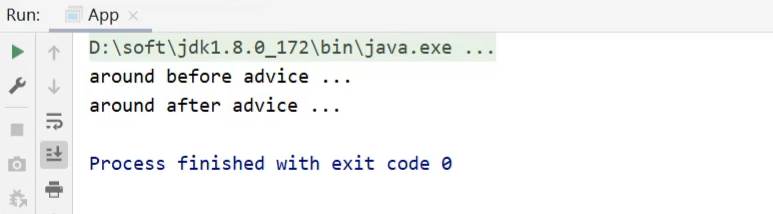
@Around("pt()")
public void around(){
System.out.println("around before advice ...");
System.out.println("around after advice ...");
}
}
运行结果中,通知的内容打印出来,但是原始方法的内容却没有被执行。
|  |
因为环绕通知需要在原始方法的前后进行增强,所以环绕通知就必须要能对原始操作进行调用,具体如何实现?
1
2
3
4
5
6
7
8
9
10
11
12
13
14
@Component
@Aspect
public class MyAdvice {
@Pointcut("execution(void com.example.dao.BookDao.update())")
private void pt(){}
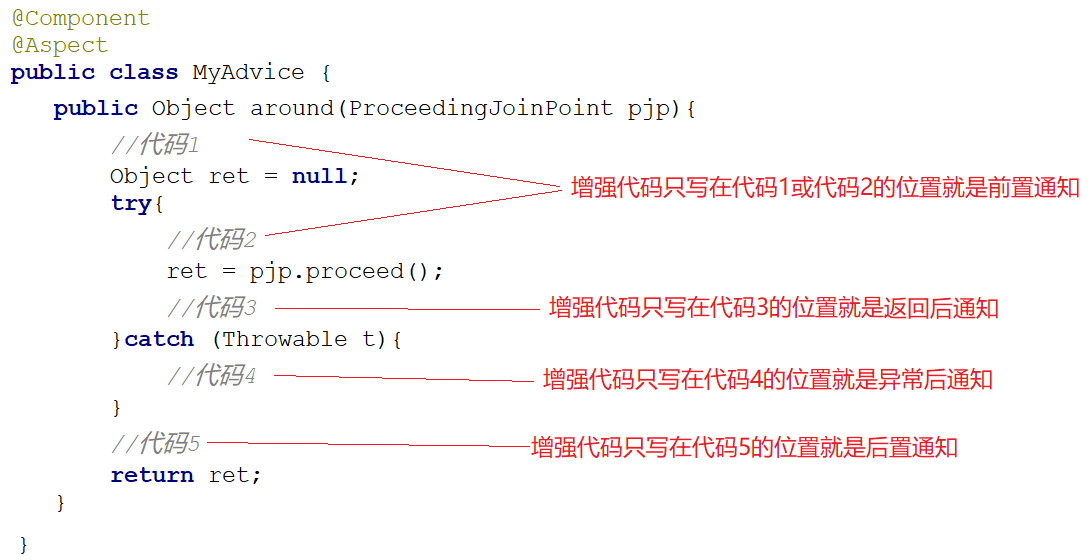
@Around("pt()")
public void around(ProceedingJoinPoint pjp) throws Throwable{
System.out.println("around before advice ...");
// 表示对原始操作的调用
pjp.proceed();
System.out.println("around after advice ...");
}
}
说明: proceed() 为什么要抛出异常?
1
2
3
4
5
6
7
8
9
10
11
public interface ProceedingJoinPoint extends JoinPoint {
    void set$AroundClosure(AroundClosure var1);

    default void stack$AroundClosure(AroundClosure arc) {
        throw new UnsupportedOperationException();
    }

    Object proceed() throws Throwable;

    Object proceed(Object[] var1) throws Throwable;
}
原始方法有返回值的处理
1
2
3
4
5
6
7
8
9
10
11
12
13
14
15
16
17
18
19
20
21
22
23
24
@Component
@Aspect
public class MyAdvice {
    @Pointcut("execution(int com.example.dao.BookDao.select())")
    private void pt2(){}

    @Around("pt2()")
    public Object aroundSelect(ProceedingJoinPoint pjp) throws Throwable {
        System.out.println("around before advice ...");
        //表示对原始操作的调用
        Object ret = pjp.proceed();
        System.out.println("around after advice ...");
        return ret;
    }
}
// 测试
public class App {
    public static void main(String[] args) {
        ApplicationContext ctx = new AnnotationConfigApplicationContext(SpringConfig.class);
        BookDao bookDao = ctx.getBean(BookDao.class);
        int num = bookDao.select();
        System.out.println(num);
    }
}
所以如果我们使用环绕通知的话,要根据原始方法的返回值来设置环绕通知的返回值。
为什么返回的是 Object 而不是 int 的主要原因是 Object 类型更通用。
在环绕通知中是可以对原始方法返回值就行修改的。
环绕通知实现其他通知
思考下环绕通知是如何实现其他通知类型的功能的?
因为环绕通知是可以控制原始方法执行的,所以我们把增强的代码写在调用原始方法的不同位置就可以实现不同的通知类型的功能,如:
返回后通知 @AfterReturning
1
2
3
4
5
6
7
8
9
10
11
@Component
@Aspect
public class MyAdvice {
    @Pointcut("execution(int com.example.dao.BookDao.select())")
    private void pt2(){}

    @AfterReturning("pt2()")
    public void afterReturning() {
        System.out.println("afterReturning advice ...");
    }
}
| 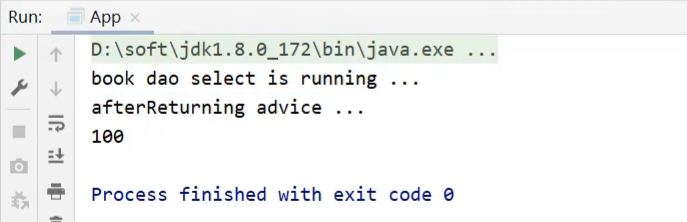 |
注意: 返回后通知是需要在原始方法 select 正常执行后才会被执行,如果 select() 方法执行的过程中出现了异常,那么返回后通知是不会被执行。后置通知是不管原始方法有没有抛出异常都会被执行。
异常后通知 @AfterThrowing
1
2
3
4
5
6
7
8
9
10
11
@Component
@Aspect
public class MyAdvice {
    @Pointcut("execution(int com.example.dao.BookDao.select())")
    private void pt2(){}

    @AfterThrowing("pt2()")
    public void afterThrowing() {
        System.out.println("afterThrowing advice ...");
    }
}

注意: 异常后通知是需要原始方法抛出异常,可以在 select() 方法中添加一行代码 int i = 1/0 即可。如果没有抛异常,异常后通知将不会被执行。
通知类型总结
@After
| 名称 | @After |
|---|---|
| 类型 | 方法注解 |
| 位置 | 通知方法定义上方 |
| 作用 | 设置当前通知方法与切入点之间的绑定关系,当前通知方法在原始切入点方法后运行 |
@AfterReturning
| 名称 | @AfterReturning |
|---|---|
| 类型 | 方法注解 |
| 位置 | 通知方法定义上方 |
| 作用 | 设置当前通知方法与切入点之间绑定关系,当前通知方法在原始切入点方法正常执行完毕后执行 |
@AfterThrowing
| 名称 | @AfterThrowing |
|---|---|
| 类型 | 方法注解 |
| 位置 | 通知方法定义上方 |
| 作用 | 设置当前通知方法与切入点之间绑定关系,当前通知方法在原始切入点方法运行抛出异常后执行 |
@Around
| 名称 | @Around |
|---|---|
| 类型 | 方法注解 |
| 位置 | 通知方法定义上方 |
| 作用 | 设置当前通知方法与切入点之间的绑定关系,当前通知方法在原始切入点方法前后运行 |
==环绕通知注意事项==
- 环绕通知必须依赖形参
ProceedingJoinPoint才能实现对原始方法的调用,进而实现原始方法调用前后同时添加通知 - 通知中如果未使用
ProceedingJoinPoint对原始方法进行调用将跳过原始方法的执行 - 对原始方法的调用可以不接收返回值,通知方法设置成 void 即可,如果接收返回值,最好设定为 Object 类型
- 原始方法的返回值如果是 void 类型,通知方法的返回值类型可以设置成 void,也可以设置成 Object
- 由于无法预知原始方法运行后是否会抛出异常,因此环绕通知方法必须要处理 Throwable 异常
Spring AOP 使用
Spring 2.0 之后,Spring AOP 有了两种配置方式。
- schema-based:Spring 2.0 以后使用 XML 的方式来配置,使用 命名空间
<aop /> - @AspectJ 配置:Spring 2.0 以后提供的注解方式。这里虽然叫做
@AspectJ,但是这个和 AspectJ 其实没啥关系。
示例
1
2
3
4
5
6
7
8
9
10
11
12
13
14
15
16
17
18
19
20
21
22
23
24
25
26
@Repository
public class BookDaoImpl implements BookDao {
    public void save() {
        // 记录程序当前执行执行(开始时间)
        Long startTime = System.currentTimeMillis();
        // 业务执行万次
        for (int i = 0;i<10000;i++) {
            System.out.println("book dao save ...");
        }
        // 记录程序当前执行时间(结束时间)
        Long endTime = System.currentTimeMillis();
        // 计算时间差
        Long totalTime = endTime-startTime;
        // 输出信息
        System.out.println("执行万次消耗时间:" + totalTime + "ms");
    }
    public void update(){
        System.out.println("book dao update ...");
    }
    public void delete(){
        System.out.println("book dao delete ...");
    }
    public void select(){
        System.out.println("book dao select ...");
    }
}
对于 save 方法中有计算万次执行消耗的时间。
xml
导入依赖
1
2
3
4
5
<dependency>
	<groupId>org.aspectj</groupId>
	<artifactId>aspectjweaver</artifactId>
	<version>1.9.4</version>
</dependency>
方式一:使用 Spring 接口 MethodBeforeAdvice
- 前置增强类,后置增强类
1
2
3
4
5
6
7
8
9
10
11
12
13
14
15
16
17
18
19
20
public class BeforeLog implements MethodBeforeAdvice {
    // method:要执行的目标对象的方法
    // args:参数
    // target:目标对象
    @Override
    public void before(Method method, Object[] args, Object target) throws Throwable {
        System.out.println(target.getClass().getName() + "的" + method.getName() + "方法准备执行了");
    }
}

public class AfterLog implements AfterReturningAdvice {
    // returnValue:返回值
    // method:被调用的方法
    // args:被调用的方法的对象的参数
    // target:被调用的目标对象
    public void afterReturning(Object returnValue, Method method, Object[] args, Object target) throws Throwable {
        System.out.println("执行了" + method.getName() + target.getClass().getName()
                + "的" + "返回结果为:" + returnValue);
    }
}
- UserService
1
2
3
4
5
6
7
8
9
10
11
12
13
14
15
16
17
18
19
20
21
22
public interface UserService {
    public int add();
    public void delete();
    public void select();
    public void update();
}

public class UserServiceImpl implements UserService {
    public int add() {
        System.out.println("增加了一个用户");
        return 1;
    }
    public void delete() {
        System.out.println("删除了一个用户");
    }
    public void select() {
        System.out.println("查询了一个用户");
    }
    public void update() {
        System.out.println("更新了一个用户");
    }
}
- Spring 的文件中注册 , 并实现 AOP 切入实现 , 注意导入约束。
1
2
3
4
5
6
7
8
9
10
11
12
13
14
15
16
17
18
19
20
21
22
23
24
25
26
27
28
29
30
31
32
<?xml version="1.0" encoding="UTF-8"?>
<beans xmlns="http://www.springframework.org/schema/beans"
       xmlns:xsi="http://www.w3.org/2001/XMLSchema-instance"
       xmlns:context="http://www.springframework.org/schema/context"
       xmlns:aop="http://www.springframework.org/schema/aop"
       xsi:schemaLocation="http://www.springframework.org/schema/beans
       http://www.springframework.org/schema/beans/spring-beans.xsd
       http://www.springframework.org/schema/context
       http://www.springframework.org/schema/context/spring-context.xsd
       http://www.springframework.org/schema/aop
       http://www.springframework.org/schema/aop/spring-aop.xsd">
    <!-- 通过注解的方式注入 -->
    <context:component-scan base-package="me.hacket.spring.model"/>

    <!-- 注册bean -->
    <bean id="userService" class="me.hacket.aop.UserServiceImpl"/>
    <bean id="beforeLog" class="me.hacket.aop.BeforeLog"/>
    <bean id="afterLog" class="me.hacket.aop.AfterLog"/>

    <!-- 方式一:使用原生Spring API接口 -->
    <!-- 配置AOP:需要导入AOP的约束 -->
    <aop:config>
        <!-- 切入点:expression:表达式 , execution(要执行的位置!* * * *) -->
        <aop:pointcut id="pointcut" expression="execution(* me.hacket.aop.UserServiceImpl.*(..))"/>
        <!-- 执行环绕增加! advice-ref执行方法 , pointcut-ref切入点 -->
        <aop:advisor advice-ref="beforeLog" pointcut-ref="pointcut"/>
        <aop:advisor advice-ref="afterLog" pointcut-ref="pointcut"/>
    </aop:config>

</beans>

// Spring的Aop就是将公共的业务 (日志,安全等) 和领域业务结合起来,当执行领域业务时,将会把公共业务加进来。实现公共业务的重复利用,其本质还是动态代理。
- 测试
1
2
3
4
5
6
7
8
9
10
11
12
@Test
public void testAOP() {
	// 1.创建spring的ioc容器
	ApplicationContext ctx = new ClassPathXmlApplicationContext("applicationContext.xml");
	// 2.从ioc容器中获取bean实例
	UserService userService = (UserService) ctx.getBean("userService");
	// 3.使用bean
	userService.add();
	userService.delete();
	userService.select();
	userService.update();
}
- 输出
1
2
3
4
5
6
7
8
9
10
11
12
me.hacket.aop.UserServiceImpl的add方法准备执行了
增加了一个用户
执行了addme.hacket.aop.UserServiceImpl的返回结果为:1
me.hacket.aop.UserServiceImpl的delete方法准备执行了
删除了一个用户
执行了deleteme.hacket.aop.UserServiceImpl的返回结果为:null
me.hacket.aop.UserServiceImpl的select方法准备执行了
查询了一个用户
执行了selectme.hacket.aop.UserServiceImpl的返回结果为:null
me.hacket.aop.UserServiceImpl的update方法准备执行了
更新了一个用户
执行了updateme.hacket.aop.UserServiceImpl的返回结果为:null
方式二:自定义类实现 AOP xml
主要是切面定义。
- 写一个切入类
1
2
3
4
5
6
7
8
9
public class DiyPointCut {
    public void before2() {
        System.out.println("方法执行前");
    }

    public void after() {
        System.out.println("方法执行后");
    }
}
- 在 Spring 中配置:
applicationContext2.xml
1
2
3
4
5
6
7
8
9
10
11
12
13
14
15
16
17
18
19
20
21
22
23
24
25
<?xml version="1.0" encoding="UTF-8"?>
<beans xmlns="http://www.springframework.org/schema/beans"
       xmlns:xsi="http://www.w3.org/2001/XMLSchema-instance"
       xmlns:aop="http://www.springframework.org/schema/aop"
       xsi:schemaLocation="http://www.springframework.org/schema/beans
       http://www.springframework.org/schema/beans/spring-beans.xsd
       http://www.springframework.org/schema/aop
       http://www.springframework.org/schema/aop/spring-aop.xsd">

    <!-- 方式二:自定义切面 -->
    <bean id="diy" class="me.hacket.aop.custom.DiyPointCut"/>
    <bean id="userService" class="me.hacket.aop.UserServiceImpl"/>

    <aop:config>
        <!--自定义切面,ref要引用的类-->
        <aop:aspect ref="diy">
            <!--切入点-->
            <aop:pointcut id="pointcut" expression="execution(* me.hacket.aop.UserServiceImpl.*(..))"/>
            <!--前置通知-->
            <aop:before method="before2" pointcut-ref="pointcut"/>
            <!--后置通知-->
            <aop:after method="after" pointcut-ref="pointcut"/>
        </aop:aspect>
    </aop:config>
</beans>
- 测试
1
2
3
4
5
6
7
8
9
10
@Test
public void testAOP2() {
	ApplicationContext context = new ClassPathXmlApplicationContext("applicationContext2.xml");
	// 动态代理代理的是接口
	UserService userService = context.getBean("userService", UserService.class);
	userService.select();
	userService.add();
	userService.delete();
	userService.update();
}
方式三:使用注解 @EnableAspectJAutoProxy
开启@AspectJ 注解配置方式
开启 @AspectJ 的注解配置方式,有两种方式
- 在 XML 中配置:
1
<aop:aspectj-autoproxy/>
- 使用
@EnableAspectJAutoProxy注解
1
2
3
4
5
@Configuration
@EnableAspectJAutoProxy
public class Config {

}
开启了上述配置之后,所有在容器中,被 @AspectJ 注解的 bean 都会被 Spring 当做是 AOP 配置类,称为一个 Aspect。
这里有个要注意的地方,@AspectJ 注解只能作用于 Spring Bean 上面,所以你用 @Aspect 修饰的类要么是用 @Component 注解修饰,要么是在 XML 中配置过的。
比如下面的写法:
1
2
3
4
5
6
7
8
9
10
11
12
// 有效的AOP配置类
@Aspect
@Component
public class MyAspect {
 	//....
}

// 如果没有在XML配置过,那这个就是无效的AOP配置类
@Aspect
public class MyAspect {
 	//....
}
proxy-target-class
通过 AOP 命名空间的 <aop:aspectj-autoproxy /> 声明自动为 Spring 容器中那些配置 @aspectJ 切面的 bean 创建代理,织入切面。当然,Spring 在内部依旧采用 AnnotationAwareAspectJAutoProxyCreator 进行自动代理的创建工作,但具体实现的细节已经被 <aop:aspectj-autoproxy/> 隐藏起来了
<aop:aspectj-autoproxy/> 有一个 proxy-target-class 属性,
- 默认为 false,表示使用 JDK 动态代理织入增强,当配为
<aop:aspectj-autoproxy poxy-target-class=“true”/>时,表示使用CGLib动态代理技术织入增强。不过即使proxy-target-class设置为 false,如果目标类没有声明接口,则 spring 将自动使用CGLib动态代理。 - 定义切面
1
2
3
4
5
6
7
8
9
10
11
12
13
14
15
16
17
18
19
20
21
22
23
24
25
26
27
28
// 使用注解方式实现AOP
@Aspect // 标注这个类是一个切面
public class AnnotationPointCut {
    @Before("execution(* me.hacket.aop.UserServiceImpl.*(..))")
    public void before() {
        System.out.println("---------方法执行前---------");
    }

    @After("execution(* me.hacket.aop.UserServiceImpl.*(..))")
    public void after() {
        System.out.println("---------方法执行后---------");
    }

    // 在环绕增强中,我们可以给定一个参数,代表我们要获取处理切入的点
    @Around("execution(* me.hacket.aop.UserServiceImpl.*(..))")
    public Object around(ProceedingJoinPoint jp) throws Throwable {
        System.out.println("环绕前");
        Signature signature = jp.getSignature();
        System.out.println("签名:" + signature); // 获得签名

        // 执行目标方法:proceed
        Object proceed = jp.proceed();
        System.out.println("环绕后");

        System.out.println(proceed);
        return proceed;
    }
}
applicationContext3.xml
1
2
3
4
5
6
7
8
9
10
11
12
13
14
15
16
<?xml version="1.0" encoding="UTF-8"?>
<beans xmlns="http://www.springframework.org/schema/beans"
       xmlns:xsi="http://www.w3.org/2001/XMLSchema-instance"
       xmlns:aop="http://www.springframework.org/schema/aop"
       xsi:schemaLocation="http://www.springframework.org/schema/beans
       http://www.springframework.org/schema/beans/spring-beans.xsd
       http://www.springframework.org/schema/aop
       http://www.springframework.org/schema/aop/spring-aop.xsd">

    <bean id="userService" class="me.hacket.aop.UserServiceImpl"/>

    <!-- 第三种方法:使用注解方式实现 -->
    <bean id="annotationPointCut" class="me.hacket.aop.custom.AnnotationPointCut"/>
    <!-- 开启注解支持 -->
    <aop:aspectj-autoproxy proxy-target-class="true"/>
</beans>
- 测试
1
2
3
4
5
6
7
8
9
10
@org.junit.Test
public void testAOP3() {
	ApplicationContext context = new ClassPathXmlApplicationContext("applicationContext3.xml");
	// 动态代理代理的是接口
	UserService userService = context.getBean("userService", UserService.class);
	userService.select();
	userService.add();
	userService.delete();
	userService.update();
}
- 结果
1
2
3
4
5
6
7
8
9
10
11
12
13
14
15
环绕前
签名:void me.hacket.aop.UserServiceImpl.select()
---------方法执行前---------
查询了一个用户
---------方法执行后---------
环绕后
null
环绕前
签名:int me.hacket.aop.UserServiceImpl.add()
---------方法执行前---------
增加了一个用户
---------方法执行后---------
环绕后
1
// ...
纯 Java+ 注解实现 IoC
目标类
1
2
3
4
5
6
7
8
9
10
11
12
13
14
package me.hacket.aop.target;
import java.util.Date;
public interface DateSvc {
    void printDate(Date date);
}

//@Service("dateSvc")
@Component("dateSvc")
public class DateSvcImpl implements DateSvc {
    @Override
    public void printDate(Date date) {
        System.out.println(new SimpleDateFormat("yyyy-MM-dd HH:mm:ss").format(date));
    }
}
1
2
3
4
5
6
7
8
9
10
11
12
package me.hacket.aop.target;
public interface TestSvc {
    void process();
}

@Service("testSvc")
public class TestSvcImpl implements TestSvc {
    @Override
    public void process() {
        System.out.println("test svc is working");
    }
}
配置 Pointcut (增强的切入点)
Pointcut 在大部分地方被翻译成切点,用于定义哪些方法需要被增强或者说需要被拦截。
在 Spring 中,我们可以认为 Pointcut 是用来匹配 Spring 容器中所有满足指定条件的 bean 的方法。
1
2
3
4
5
6
7
8
9
10
11
12
13
package me.hacket.aop.pointcut;

import org.aspectj.lang.annotation.Aspect;
import org.aspectj.lang.annotation.Pointcut;

import org.springframework.stereotype.Component;

@Aspect
@Component
public class PointCutConfig {
    @Pointcut("within(me.hacket.aop.target..*)")
    public void inSvcLayer() {}
}
下面完整列举一下 Pointcut 的匹配方式:
- execution:匹配方法签名
1
2
3
// 指定的方法
@Pointcut("execution(* testExecution(..))")
public void anyTestMethod() {}
这个最简单的方式就是上面的例子,"execution(* testExecution(..))" 表示的是匹配名为 testExecution 的方法,* 代表任意返回值,(..) 表示零个或多个任意参数。
- within: 指定所在类或所在包下面的方法(Spring AOP 独有)
1
2
3
4
5
6
@Aspect
@Component
public class PointCutConfig {
    @Pointcut("within(me.hacket.aop.target..*)") // ".." 代表包及其子包
    public void inSvcLayer() {}
}
- @annotation:方法上具有特定的注解
1
2
3
 // 指定注解
@Pointcut("@annotation(ric.study.demo.aop.HaveAop)")
public void withAnnotation() {}
- bean(idOrNameOfBean):匹配 bean 的名字(Spring AOP 独有)
1
2
3
 // controller 层
@Pointcut("bean(testController)")
public void inControllerLayer() {}
上述是日常使用中常见的几种配置方式,有更细的匹配需求的,可以参考这篇文章:
| [Introduction to Pointcut Expressions in Spring | Baeldung](https://www.baeldung.com/spring-aop-pointcut-tutorial) |
Pointcut 的配置 官方建议
1
2
3
When working with enterprise applications, you often want to refer to modules of the application and particular sets of operations from within several aspects. We recommend defining a "SystemArchitecture" aspect that captures common pointcut expressions for this purpose. A typical such aspect would look as follows:

// 意思就是,如果你是在开发企业级应用,Spring 建议你使用 SystemArchitecture这种切面配置方式,即将一些公共的PointCut 配置全部写在这个一个类里面维护。官网文档给的例子像下面这样(它文中使用 XML 配置的,所以没加@Component注解)
1
2
3
4
5
6
7
8
9
10
11
12
13
14
15
16
17
18
19
20
21
22
23
24
25
26
27
28
29
30
31
32
33
34
35
36
37
38
39
40
41
42
43
44
45
46
47
48
49
50
51
52
53
54
package com.xyz.someapp;

import org.aspectj.lang.annotation.Aspect;
import org.aspectj.lang.annotation.Pointcut;

@Aspect
public class SystemArchitecture {

  /**
   * A join point is in the web layer if the method is defined
   * in a type in the com.xyz.someapp.web package or any sub-package
   * under that.
   */
  @Pointcut("within(com.xyz.someapp.web..*)")
  public void inWebLayer() {}

  /**
   * A join point is in the service layer if the method is defined
   * in a type in the com.xyz.someapp.service package or any sub-package
   * under that.
   */
  @Pointcut("within(com.xyz.someapp.service..*)")
  public void inServiceLayer() {}

  /**
   * A join point is in the data access layer if the method is defined
   * in a type in the com.xyz.someapp.dao package or any sub-package
   * under that.
   */
  @Pointcut("within(com.xyz.someapp.dao..*)")
  public void inDataAccessLayer() {}

  /**
   * A business service is the execution of any method defined on a service
   * interface. This definition assumes that interfaces are placed in the
   * "service" package, and that implementation types are in sub-packages.
   *
   * If you group service interfaces by functional area (for example,
   * in packages com.xyz.someapp.abc.service and com.xyz.def.service) then
   * the pointcut expression "execution(* com.xyz.someapp..service.*.*(..))"
   * could be used instead.
   */
  @Pointcut("execution(* com.xyz.someapp.service.*.*(..))")
  public void businessService() {}

  /**
   * A data access operation is the execution of any method defined on a
   * dao interface. This definition assumes that interfaces are placed in the
   * "dao" package, and that implementation types are in sub-packages.
   */
  @Pointcut("execution(* com.xyz.someapp.dao.*.*(..))")
  public void dataAccessOperation() {}

}
上面这个 SystemArchitecture 很好理解,该 Aspect 定义了一堆的 Pointcut,随后在任何需要 Pointcut 的地方都可以直接引用。
配置切点,代表着我们想让程序拦截哪一些方法,但程序需要怎么对拦截的方法进行增强,就是后面要介绍的配置 Advice。
配置 Advice
注意,实际开发过程当中,Aspect 类应该遵守单一职责原则,不要把所有的 Advice 配置全部写在一个 Aspect 类里面。
先直接上示例代码,里面包含了 Advice 的几种配置方式
1
2
3
4
5
6
7
8
9
10
11
12
13
14
15
16
17
18
19
20
21
22
23
24
25
26
27
28
29
30
31
32
33
34
35
36
37
38
39
40
41
42
43
44
45
46
47
48
49
50
51
52
53
54
/**
 * 注:实际开发过程当中,Advice应遵循单一职责,不应混在一起
 */
@Aspect
@Component
public class GlobalAopAdvice {

    @Before("ric.study.demo.aop.SystemArchitecture.dataAccessOperation()")
    public void doAccessCheck() {
        // ... 实现代码
    }

    // 实际使用过程当中 可以像这样把Advice 和 Pointcut 合在一起,直接在Advice上面定义切入点
    @Before("execution(* ric.study.demo.dao.*.*(..))")
    public void doAccessCheck() {
        // ... 实现代码
    }

    // 在方法
    @AfterReturning("ric.study.demo.aop.SystemArchitecture.dataAccessOperation()")
    public void doAccessCheck() {
        // ... 实现代码
    }

    // returnVal 就是相应方法的返回值
    @AfterReturning(
        pointcut="ric.study.demo.aop.SystemArchitecture.dataAccessOperation()",
        returning="returnVal")
    public void doAccessCheck(Object returnVal) {
        //  ... 实现代码
    }

    // 异常返回的时候
    @AfterThrowing("ric.study.demo.aop.SystemArchitecture.dataAccessOperation()")
    public void doRecoveryActions() {
        // ... 实现代码
    }

    // 注意理解它和 @AfterReturning 之间的区别,这里会拦截正常返回和异常的情况
    @After("ric.study.demo.aop.SystemArchitecture.dataAccessOperation()")
    public void doReleaseLock() {
        // 通常就像 finally 块一样使用,用来释放资源。
        // 无论正常返回还是异常退出,都会被拦截到
    }

    // 这种最灵活,既能做 @Before 的事情,也可以做 @AfterReturning 的事情
    @Around("ric.study.demo.aop.SystemArchitecture.businessService()")
    public Object doBasicProfiling(ProceedingJoinPoint pjp) throws Throwable {
       	//  target 方法执行前... 实现代码
        Object retVal = pjp.proceed();
        //  target 方法执行后... 实现代码
        return retVal;
    }
}
在某些场景下,我们想在@Before 的时候,去获取方法的入参,比如进行一些日志的记录,我们可以通过 org.aspectj.lang.JoinPoint 来实现。上文中的 ProceedingJoinPoint 就是其子类。
1
2
3
4
@Before("...")
public void logArgs(JoinPoint joinPoint) {
    System.out.println("方法执行前,打印入参:" + Arrays.toString(joinPoint.getArgs()));
}
再举个与之对应的,方法返参打印:
1
2
3
4
@AfterReturning( pointcut="...", returning="returnVal")
public void logReturnVal(Object returnVal) {
    System.out.println("方法执行后,打印返参:" + returnVal));
}
示例:
1
2
3
4
5
6
7
8
9
10
11
12
13
14
15
16
17
18
19
20
21
22
23
24
25
package me.hacket.aop.advice;

import org.aspectj.lang.JoinPoint;
import org.aspectj.lang.annotation.Before;

import java.util.Arrays;

@Component
@Aspect
public class ServiceLogAspect {

    // 拦截,打印日志,并且通过JoinPoint 获取方法参数
    @Before("me.hacket.aop.pointcut.PointCutConfig.inSvcLayer()")
    public void logBeforeSvc(JoinPoint joinPoint) {
        System.out.println("在service 方法执行前 打印第 1 次日志");
        System.out.println("拦截的service 方法的方法签名: " + joinPoint.getSignature());
        System.out.println("拦截的service 方法的方法入参: " + Arrays.toString(joinPoint.getArgs()));
    }

    // 这里是Advice和Pointcut 合在一起配置的方式
    @Before("within(me.hacket.aop.target..*)")
    public void logBeforeSvc2() {
        System.out.println("在service的方法执行前 打印第 2 次日志");
    }
}
开启@AspectJ 注解配置方式,并启动
1
2
3
4
5
6
7
8
9
10
11
12
13
14
15
16
17
18
19
20
21
22
23
24
25
package me.hacket;
import me.hacket.aop.target.DateSvc;
import me.hacket.aop.target.TestSvc;
import org.springframework.context.annotation.AnnotationConfigApplicationContext;
import org.springframework.context.annotation.ComponentScan;
import org.springframework.context.annotation.Configuration;
import org.springframework.context.annotation.EnableAspectJAutoProxy;
import java.util.Date;
@Configuration
@EnableAspectJAutoProxy
@ComponentScan("me.hacket.aop")
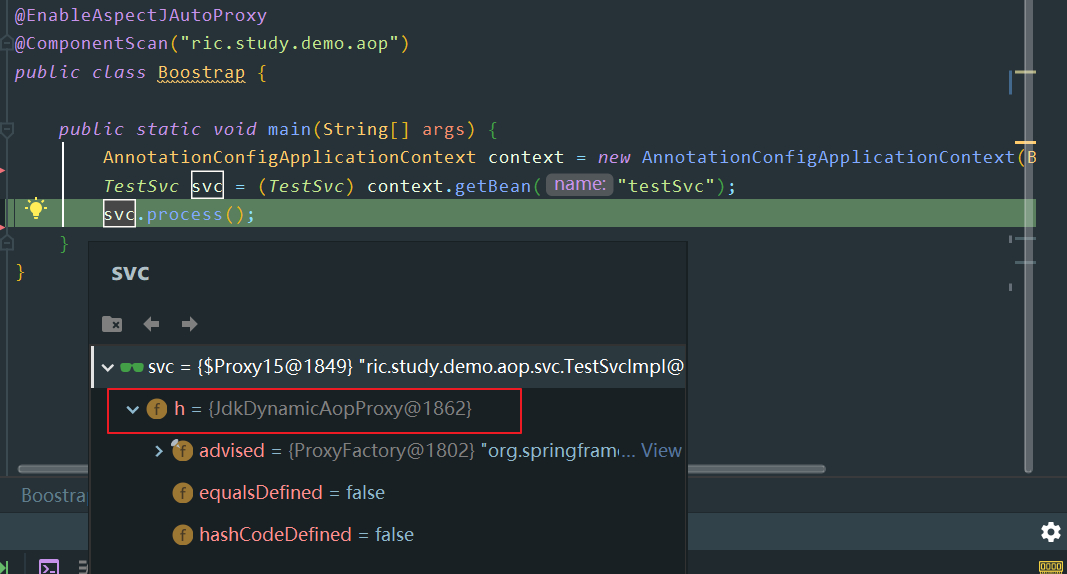
public class Boostrap {
public static void main(String[] args) {
AnnotationConfigApplicationContext context = new AnnotationConfigApplicationContext(Boostrap.class);
TestSvc svc = (TestSvc) context.getBean("testSvc");
svc.process();
System.out.println("==================");
DateSvc dateSvc = (DateSvc) context.getBean("dateSvc");
dateSvc.printDate(new Date());
}
}
输出:
1
2
3
4
5
6
7
8
9
10
11
在service 方法执行前 打印第 1 次日志
拦截的service 方法的方法签名: void me.hacket.aop.target.TestSvc.process()
拦截的service 方法的方法入参: []
在service的方法执行前 打印第 2 次日志
test svc is working
==================
在service 方法执行前 打印第 1 次日志
拦截的service 方法的方法签名: void me.hacket.aop.target.DateSvc.printDate(Date)
拦截的service 方法的方法入参: [Tue Nov 12 01:02:47 CST 2024]
在service的方法执行前 打印第 2 次日志
2024-11-12 01:02:47
JDK 动态代理和 Cglib
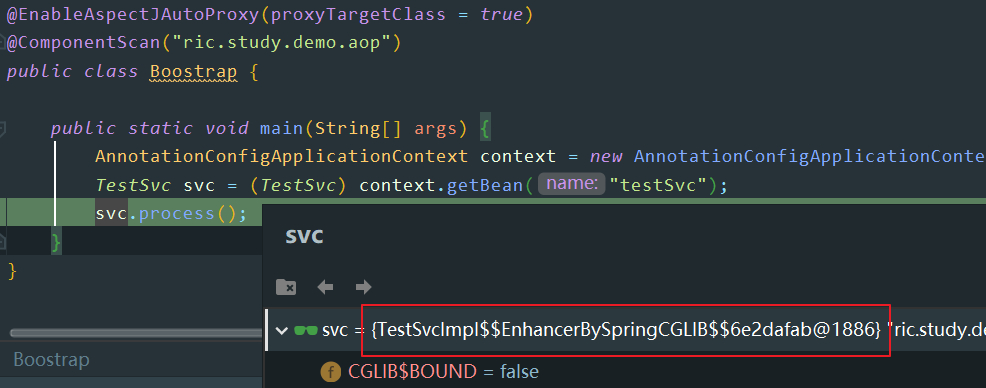
Spring AOP 在目标类有实现接口的时候,会使用 JDK 动态代理来生成代理类,我们结合上面的 DEMO 看看,
如果我们想不管是否有实现接口,都是强制使用 Cglib 的方式来实现怎么办?
Spring 提供给了我们对应的配置方式,也就是 proxy-target-class.
1
2
3
4
注解方式:
//@EnableAspectJAutoProxy(proxyTargetClass = true) // 这样子就是默认使用CGLIB
XML方式:
<aop:config proxy-target-class="true">
改了之后,