04 .WorkManager原理
WorkManager 核心组件
- Worker:Worker 是后台任务执行的主体,继承自 Worker 类并重写 doWork() 方法来实现具体的后台逻辑。
- WorkRequest:它定义了要执行的任务,包括具体的 Worker 类、执行约束、初始延迟等。
- WorkInfo:提供了对工作状态的查询,可以知道任务是否成功执行、是否失败等。
- WorkManager:是整个后台任务调度系统的管理者,负责将 WorkRequest 转换成内部的 WorkSpec 并加入到工作队列中。
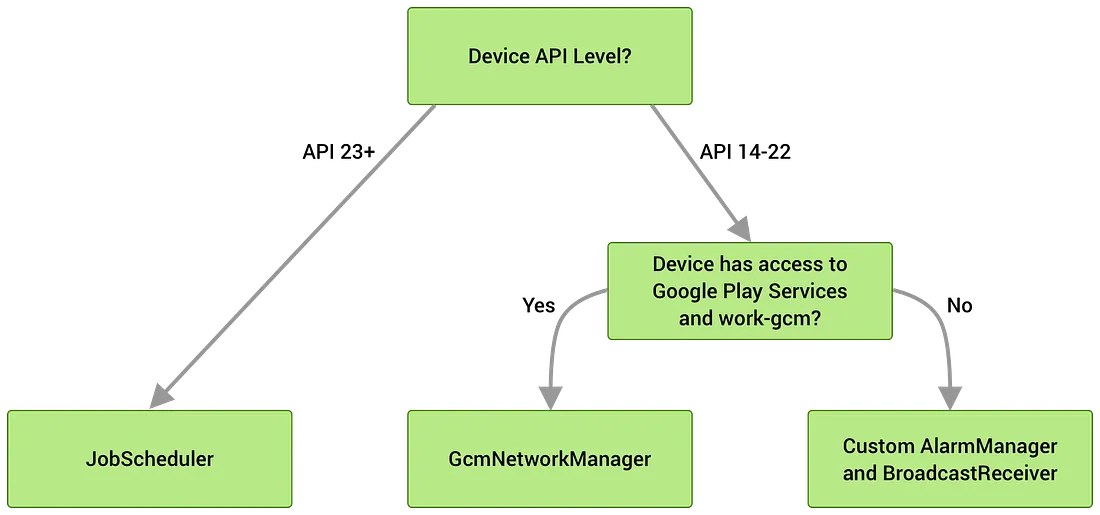
- if
API level > 23, Work Manager executes theJob Scheduler - if
API level < 23, Work Manager checks the availability of Google Play Services (because some Chinese devices cannot access Google Play Services) if NO, it executes Custom Class that is a mix ofAlarm ManagerandBroadcastReceiver
WorkManager 工作原理解析
- 创建
- WorkManager 的初始化
- WorkRequest 的创建
- 非约束条件任务的执行
- 带约束条件任务的执行
测试源码:
1
2
3
4
5
6
7
8
9
10
11
val work1Request = OneTimeWorkRequestBuilder<Worker1>().build()
WorkManager.getInstance(this).enqueue(work1Request)

class Worker1(appContext: Context, workerParams: WorkerParameters) :
    Worker(appContext, workerParams) {

    override fun doWork(): Result {
        Thread.sleep(5000)
        return Result.success()
    }
}
WorkManager 和 WorkRequest 创建
WorkManager 的初始化
在默认的情况下,WorkManager 并不是在我们调用 WorkManager.getInstance() 时创建的。通过反编译一下 APK,会发现在 AndroidManifest.xml 文件中注册了名为 WorkManagerInitializer 的 ContentProvider。因此 WorkManager 在 App 冷启动的时候已经被创建。
1
2
3
4
5
6
7
<!--AndroidManifest.xml-->
<provider
	android:name="androidx.work.impl.WorkManagerInitializer"
	android:exported="false"
	android:multiprocess="true"
	android:authorities="com.jandroid.multivideo.workmanager-init"
	android:directBootAware="false" />
WorkManagerInitializer 类:
1
2
3
4
5
6
7
8
9
10
11
12
13
14
15
16
17
18
19
20
public final class WorkManagerInitializer implements Initializer<WorkManager> {
    private static final String TAG = Logger.tagWithPrefix("WrkMgrInitializer");
    @NonNull
    @Override
    public WorkManager create(@NonNull Context context) {
        // Initialize WorkManager with the default configuration.
        Logger.get().debug(TAG, "Initializing WorkManager with default configuration.");
        WorkManager.initialize(context, new Configuration.Builder().build());
        return WorkManager.getInstance(context);
    }
    @NonNull
    @Override
    public List<Class<? extends androidx.startup.Initializer<?>>> dependencies() {
        return Collections.emptyList();
    }
}
// class WorkManager
public static void initialize(@NonNull Context context, @NonNull Configuration configuration) {
    WorkManagerImpl.initialize(context, configuration);
}
由于 WorkManager 是个单例,在此时 WorkManager 就已经被初始化了。在 initialize() 之前,会创建一个默认的 Configuration。Configuration 设置了许多属性,用来管理和调度工作的方式。通常我们使用 WorkManager 默认创建的 Configuration 即可。如需使用自己的 Configuration,可参考官方文档,有明确的使用说明。
继续看 initialize() 的实现:
1
2
3
4
5
6
7
8
9
10
11
12
13
14
15
16
17
18
19
20
21
22
23
24
25
26
27
28
29
30
// class WorkManager
public static void initialize(@NonNull Context context, @NonNull Configuration configuration) {
    WorkManagerImpl.initialize(context, configuration);
}
// class WorkManagerImpl
private static WorkManagerImpl sDelegatedInstance = null;
private static WorkManagerImpl sDefaultInstance = null;
@RestrictTo(RestrictTo.Scope.LIBRARY_GROUP)
public static void initialize(@NonNull Context context, @NonNull Configuration configuration) {
	synchronized (sLock) {
		if (sDelegatedInstance != null && sDefaultInstance != null) {
			throw new IllegalStateException("WorkManager is already initialized.  Did you "
					+ "try to initialize it manually without disabling "
					+ "WorkManagerInitializer? See "
					+ "WorkManager#initialize(Context, Configuration) or the class level "
					+ "Javadoc for more information.");
		}

		if (sDelegatedInstance == null) {
			context = context.getApplicationContext();
			if (sDefaultInstance == null) {
				sDefaultInstance = new WorkManagerImpl(
						context,
						configuration,
						new WorkManagerTaskExecutor(configuration.getTaskExecutor()));
			}
			sDelegatedInstance = sDefaultInstance;
		}
	}
}
此时 sDelegatedInstance 为 null,WorkManager 会先创建一个默认的 WorkManagerTaskExecutor 对象,用来执行 WorkManager 的任务。之后创建一个 WorkManagerImpl 对象:
1
2
3
4
5
6
7
8
9
10
11
12
13
14
15
16
17
18
19
20
21
22
23
public WorkManagerImpl(
	@NonNull Context context,
	@NonNull Configuration configuration,
	@NonNull TaskExecutor workTaskExecutor) {
this(context,
	configuration,
	workTaskExecutor,
	context.getResources().getBoolean(R.bool.workmanager_test_configuration));
}
public WorkManagerImpl(
		@NonNull Context context,
		@NonNull Configuration configuration,
		@NonNull TaskExecutor workTaskExecutor,
		boolean useTestDatabase) {
	this(context,
			configuration,
			workTaskExecutor,
			WorkDatabase.create(
					context.getApplicationContext(),
					workTaskExecutor.getBackgroundExecutor(),
					useTestDatabase)
	);
}
WorkManager 在此时创建了数据库。WorkDatabase.create() 将任务列表序列化到本地,记录每一个任务的属性,执行条件,执行顺序及执行状态等。从而保证任务在冷启动或硬件重启后,可以根据条件继续执行。
接着看 this() 的实现:
1
2
3
4
5
6
7
8
9
10
11
12
13
14
15
16
17
public WorkManagerImpl(
		@NonNull Context context,
		@NonNull Configuration configuration,
		@NonNull TaskExecutor workTaskExecutor,
		@NonNull WorkDatabase database) {
	Context applicationContext = context.getApplicationContext();
	Logger.setLogger(new Logger.LogcatLogger(configuration.getMinimumLoggingLevel()));
	List<Scheduler> schedulers =
			createSchedulers(applicationContext, configuration, workTaskExecutor);
	Processor processor = new Processor(
			context,
			configuration,
			workTaskExecutor,
			database,
			schedulers);
	internalInit(context, configuration, workTaskExecutor, database, schedulers, processor);
}
createSchedulers()根据系统 Build Version 创建不同的Schedulers进行任务调度Processor()用来管理Schedulers的执行internalInit()真正的初始化
createSchedulers
先看 WorkManagerImpl.createSchedulers(),返回一个 Scheduler 的 List
1
2
3
4
5
6
7
8
9
10
11
public List<Scheduler> createSchedulers(
		@NonNull Context context,
		@NonNull Configuration configuration,
		@NonNull TaskExecutor taskExecutor) {

	return Arrays.asList(
			Schedulers.createBestAvailableBackgroundScheduler(context, this),
			// Specify the task executor directly here as this happens before internalInit.
			// GreedyScheduler creates ConstraintTrackers and controllers eagerly.
			new GreedyScheduler(context, configuration, taskExecutor, this));
}
由此可见,WorkManager 创建了两个 Scheduler:
- 分别为执行非约束非周期性任务的
GreedyScheduler - 和执行约束性周期性任务的
SystemJobScheduler/GcmBasedScheduler/SystemAlarmScheduler。
GreedyScheduler
GreedyScheduler() 是常驻的
1
2
3
4
5
6
/**
 * A greedy {@link Scheduler} that schedules unconstrained, non-timed work.  It intentionally does
 * not acquire any WakeLocks, instead trying to brute-force them as time allows before the process * gets killed.
 * * @hide
 */
public class GreedyScheduler implements Scheduler, WorkConstraintsCallback, ExecutionListener {}
GreedyScheduler 是 WorkManager 内部用于立即执行 不受约束、非定时任务 的调度器。它不会主动维持任务的执行环境(如获取 WakeLock),而是尽可能地在应用进程允许的情况下执行任务。
如
createBestAvailableBackgroundScheduler
接下来看 createBestAvailableBackgroundScheduler() 的实现。
1
2
3
4
5
6
7
8
9
10
11
12
13
14
15
16
17
18
19
20
21
22
23
24
25
26
27
28
29
30
31
32
33
34
// Schedulers.java v2.7.1
static Scheduler createBestAvailableBackgroundScheduler(
		@NonNull Context context,
		@NonNull WorkManagerImpl workManager) {

	Scheduler scheduler;

	if (Build.VERSION.SDK_INT >= WorkManagerImpl.MIN_JOB_SCHEDULER_API_LEVEL) { // API23
		scheduler = new SystemJobScheduler(context, workManager);
		setComponentEnabled(context, SystemJobService.class, true);
		Logger.get().debug(TAG, "Created SystemJobScheduler and enabled SystemJobService");
	} else {
		scheduler = tryCreateGcmBasedScheduler(context);
		if (scheduler == null) {
			scheduler = new SystemAlarmScheduler(context);
			setComponentEnabled(context, SystemAlarmService.class, true);
			Logger.get().debug(TAG, "Created SystemAlarmScheduler");
		}
	}
	return scheduler;
}
public static final String GCM_SCHEDULER = "androidx.work.impl.background.gcm.GcmScheduler";
@Nullable
private static Scheduler tryCreateGcmBasedScheduler(@NonNull Context context) {
    try {
        Class<?> klass = Class.forName(GCM_SCHEDULER);
        Scheduler scheduler =
                (Scheduler) klass.getConstructor(Context.class).newInstance(context);
        Logger.get().debug(TAG, String.format("Created %s", GCM_SCHEDULER));
        return scheduler;
    } catch (Throwable throwable) {
        Logger.get().debug(TAG, "Unable to create GCM Scheduler", throwable);
        return null;    }
}
这段代码对 build version 进行了判断。
>=23,则返回SystemJobScheduler(),即利用JobScheduler进行任务管理。<23的时候先尝试使用GcmScheduler进行管理。若无法创建GcmScheduler则返回SystemAlarmScheduler()使用AlamManager进行任务管理。返回的这个Scheduler是用来执行周期性,或者有约束性的任务。
Processor
1
2
3
4
5
6
7
8
9
10
11
12
13
14
15
16
17
public WorkManagerImpl(
		@NonNull Context context,
		@NonNull Configuration configuration,
		@NonNull TaskExecutor workTaskExecutor,
		@NonNull WorkDatabase database) {
	Context applicationContext = context.getApplicationContext();
	Logger.setLogger(new Logger.LogcatLogger(configuration.getMinimumLoggingLevel()));
	List<Scheduler> schedulers =
			createSchedulers(applicationContext, configuration, workTaskExecutor);
	Processor processor = new Processor(
			context,
			configuration,
			workTaskExecutor,
			database,
			schedulers);
	internalInit(context, configuration, workTaskExecutor, database, schedulers, processor);
}
Processor 存储了 Configuration,TaskExecutor,WorkDatabase,schedulers 等,用来在适当的时机进行任务调度。再来看 internalInit():
1
2
3
4
5
6
7
8
9
10
11
12
13
14
15
16
17
18
19
20
21
22
23
24
25
private void internalInit(@NonNull Context context,
		@NonNull Configuration configuration,
		@NonNull TaskExecutor workTaskExecutor,
		@NonNull WorkDatabase workDatabase,
		@NonNull List<Scheduler> schedulers,
		@NonNull Processor processor) {

	context = context.getApplicationContext();
	mContext = context;
	mConfiguration = configuration;
	mWorkTaskExecutor = workTaskExecutor;
	mWorkDatabase = workDatabase;
	mSchedulers = schedulers;
	mProcessor = processor;
	mPreferenceUtils = new PreferenceUtils(workDatabase);
	mForceStopRunnableCompleted = false;

	// Check for direct boot mode
	if (Build.VERSION.SDK_INT >= Build.VERSION_CODES.N && context.isDeviceProtectedStorage()) {
		throw new IllegalStateException("Cannot initialize WorkManager in direct boot mode");
	}

	// Checks for app force stops.
	mWorkTaskExecutor.executeOnBackgroundThread(new ForceStopRunnable(context, this));
}
记录了 Configuration,TaskExecutor,WorkDatabase,schedulers,Processor 等。
然后我们看最后一行执行语句,启动了一个 ForceStopRunnable,这个 Runnable 是干什么用的呢?直接看 run() 的实现:
1
2
3
4
5
6
7
8
9
10
11
12
13
14
15
16
17
18
19
20
21
22
23
24
25
26
27
28
29
30
31
32
33
34
35
36
37
38
39
40
41
42
43
44
45
46
47
48
49
50
51
52
53
54
55
56
57
@Override
public void run() {
	try {
		if (!multiProcessChecks()) {
			return;
		}
		while (true) {
			// Migrate the database to the no-backup directory if necessary.
			WorkDatabasePathHelper.migrateDatabase(mContext);
			// Clean invalid jobs attributed to WorkManager, and Workers that might have been
			// interrupted because the application crashed (RUNNING state).
			Logger.get().debug(TAG, "Performing cleanup operations.");
			try {
				forceStopRunnable();
				break;
			} catch (SQLiteCantOpenDatabaseException
					| SQLiteDatabaseCorruptException
					| SQLiteDatabaseLockedException
					| SQLiteTableLockedException
					| SQLiteConstraintException
					| SQLiteAccessPermException exception) {
				mRetryCount++;
				if (mRetryCount >= MAX_ATTEMPTS) {
					// ForceStopRunnable is usually the first thing that accesses a database
					// (or an app's internal data directory). This means that weird
					// PackageManager bugs are attributed to ForceStopRunnable, which is
					// unfortunate. This gives the developer a better error
					// message.
					String message = "The file system on the device is in a bad state. "
							+ "WorkManager cannot access the app's internal data store.";
					Logger.get().error(TAG, message, exception);
					IllegalStateException throwable = new IllegalStateException(message,
							exception);
					InitializationExceptionHandler exceptionHandler =
							mWorkManager.getConfiguration().getExceptionHandler();
					if (exceptionHandler != null) {
						Logger.get().debug(TAG,
								"Routing exception to the specified exception handler",
								throwable);
						exceptionHandler.handleException(throwable);
						break;
					} else {
						throw throwable;
					}
				} else {
					long duration = mRetryCount * BACKOFF_DURATION_MS;
					Logger.get()
							.debug(TAG, String.format("Retrying after %s", duration),
									exception);
					sleep(mRetryCount * BACKOFF_DURATION_MS);
				}
			}
		}
	} finally {
		mWorkManager.onForceStopRunnableCompleted();
	}
}
- 升级数据库
这个 Runnable 的作用就是在 WorkManager 初始化过程中,发现了未完成的,需要重新执行的任务,或者 app 被强制 kill 的情况下,直接对 Scheduler 进行调度。到此,一个 WorkManager 的初始化流程就完成了。
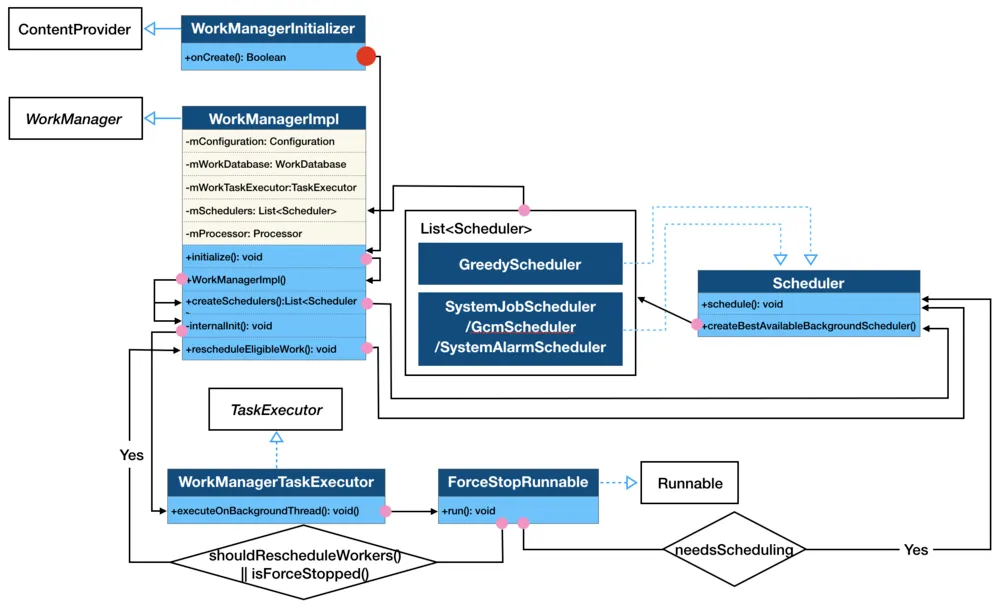
初始化小结
WorkManager的初始化是在 app 冷启动后,由WorkManagerInitializer这个ContentProvider执行的。- 初始化过程包含了
Configuration,WorkManagerTaskExecutor,WorkDatabase,Schedulers,Processor等的初始化过程。 - Schedulers 有两个。
- (1)
GreedyScheduler: 执行没有任何约束的非周期性的任务。 - (2)
SystemJobScheduler/GcmBasedScheduler/SystemAlarmScheduler: 执行周期性或者有约束性的任务。优先返回 SystemJobScheduler,在 build version 小于 23 的情况下先尝试返回 GcmBasedScheduler,若返回为空再返回 SystemAlarmScheduler。
- (1)
- 初始化的最后,会根据情况找到需要被执行的任务进行调度执行。
- WorkManager 初始化流程图
WorkRequest 的创建
以 OneTimeWorkRequest 为例:val work1Request = OneTimeWorkRequestBuilder<Worker1>().build()
1
2
3
4
5
6
7
8
9
10
11
12
13
14
15
// OneTimeWorkRequest.Builder
public Builder(@NonNull Class<? extends ListenableWorker> workerClass) {
	super(workerClass);
	mWorkSpec.inputMergerClassName = OverwritingInputMerger.class.getName();
}
// WorkRequest.Builder
UUID mId;
WorkSpec mWorkSpec;
Set<String> mTags = new HashSet<>();
Builder(@NonNull Class<? extends ListenableWorker> workerClass) {
    mId = UUID.randomUUID();
    mWorkerClass = workerClass;
    mWorkSpec = new WorkSpec(mId.toString(), workerClass.getName());
    addTag(workerClass.getName());
}
OneTimeWorkRequest为builder对象创建了WorkSpec对象用来保存任务 id 和类名- 其中
id是通过UUID自动生成的。 request的tag默认是通过类名生成的,外部也可调用addTag()方法设置标签。另外为WorkSpec设置了默认的任务输入流的合并规则:OverwritingInputMerger。
接着看 build() 方法:
1
2
3
4
5
6
7
8
9
10
11
12
13
14
15
16
17
18
19
20
21
22
23
24
25
public final @NonNull W build() {
	W returnValue = buildInternal();
	Constraints constraints = mWorkSpec.constraints;
	// Check for unsupported constraints.
	boolean hasUnsupportedConstraints =
			(Build.VERSION.SDK_INT >= 24 && constraints.hasContentUriTriggers())
					|| constraints.requiresBatteryNotLow()
					|| constraints.requiresCharging()
					|| (Build.VERSION.SDK_INT >= 23 && constraints.requiresDeviceIdle());
	if (mWorkSpec.expedited) {
		if (hasUnsupportedConstraints) {
			throw new IllegalArgumentException(
					"Expedited jobs only support network and storage constraints");
		}
		if (mWorkSpec.initialDelay > 0) {
			throw new IllegalArgumentException("Expedited jobs cannot be delayed");
		}
	}
	// Create a new id and WorkSpec so this WorkRequest.Builder can be used multiple times.
	mId = UUID.randomUUID();
	mWorkSpec = new WorkSpec(mWorkSpec);
	mWorkSpec.id = mId.toString();
	return returnValue;
}
abstract @NonNull W buildInternal();
在 buildInternal() 拿到 OneTimeWorkRequest 对象之后,为 Builder 创建了一个新的 WorkSpec 对象,并赋予了新的 UUID。虽然与原先的 WorkSpec 对象中每个属性的值是一致的,但指向了不同的内存地址。这么做的目的是为了这个 Builder 对象可被重复利用。好了,现在我们一个任务的 WorkRequest 创建就完成了。
buildInternal() 方法返回了一个 WorkRequest 对象,这是个抽象方法,在子类 OneTimeWorkRequest.Builder 中的实现如下:
1
2
3
4
5
6
7
8
9
10
11
12
// OneTimeWorkRequest
@Override
@NonNull OneTimeWorkRequest buildInternal() {
	if (mBackoffCriteriaSet && Build.VERSION.SDK_INT >= 23
		&& mWorkSpec.constraints.requiresDeviceIdle()) {
		throw new IllegalArgumentException("Cannot set backoff criteria on an idle mode job");
	}
	return new OneTimeWorkRequest(this);
}
OneTimeWorkRequest(Builder builder) {
    super(builder.mId, builder.mWorkSpec, builder.mTags);
}
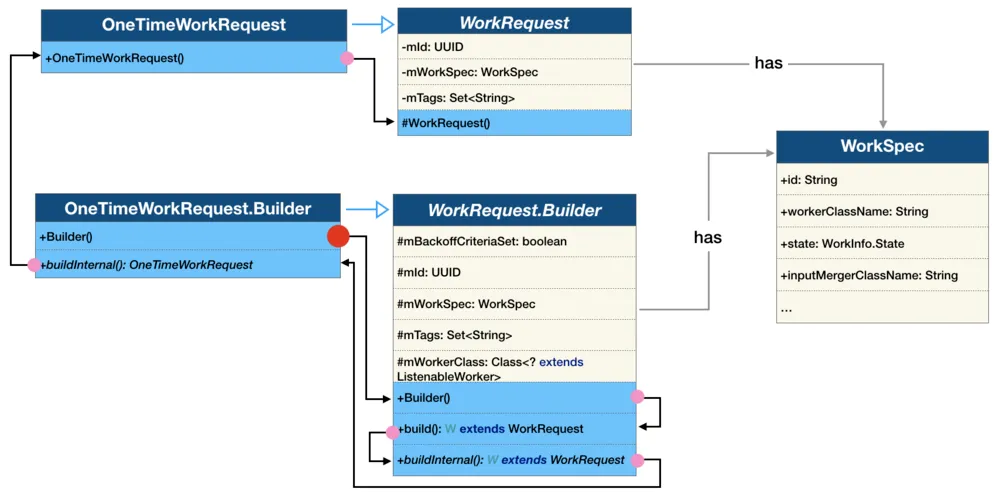
小结
总结:
WorkRequest 的创建是为了持有三个重要的成员变量。分别是:
- mId: 由 UUID 生成的任务 id。
- mWorkSpec: 每个任务的属性。
- mTags: 每个任务的标签。
流程图:
非约束条件任务的执行过程
OneTime 一次性任务
以 OneTimeWorkRequest 为例:
1
WorkManager.getInstance(this).enqueue(work1Request)
WorkManager.getInstance() 获取到的是 WorkManagerImpl
1
2
3
4
5
6
7
// WorkManagerImpl.java
@Override
@NonNull
public Operation enqueue(@NonNull List<? extends WorkRequest> requests) {
	// ...
	return new WorkContinuationImpl(this, requests).enqueue();
}
创建一个 WorkContinuationImpl() 对象,再执行 enqueue() 方法。WorkContinuationImpl 是 WorkContinuation 的子类。用来把多个 OneTimeWorkRequest 根据需求串行,并行或合并处理。我们熟悉的 then(),combine(),enqueue() 等都是这个类的方法。
1
2
3
4
5
6
7
8
9
10
11
12
13
14
15
16
17
18
19
20
21
22
23
24
// WorkContinuationImpl.java
public WorkContinuationImpl(@NonNull WorkManagerImpl workManagerImpl,
		@Nullable String name,
		@NonNull ExistingWorkPolicy existingWorkPolicy,
		@NonNull List<? extends WorkRequest> work,
		@Nullable List<WorkContinuationImpl> parents) {
	mWorkManagerImpl = workManagerImpl;
	mName = name;
	mExistingWorkPolicy = existingWorkPolicy;
	mWork = work;
	mParents = parents;
	mIds = new ArrayList<>(mWork.size());
	mAllIds = new ArrayList<>();
	if (parents != null) {
		for (WorkContinuationImpl parent : parents) {
			mAllIds.addAll(parent.mAllIds);
		}
	}
	for (int i = 0; i < work.size(); i++) {
		String id = work.get(i).getStringId();
		mIds.add(id);
		mAllIds.add(id);
	}
}
WorkContinuation 保存了任务相关的所有信息,如 WorkManager,WorkRequest,父 WorkContinuation 等。
继续看 WorkContinuationImpl 的 enqueue() 方法的实现:
1
2
3
4
5
6
7
8
9
10
11
12
13
14
15
16
// WorkContinuationImpl.java
@Override
public @NonNull Operation enqueue() {
	// Only enqueue if not already enqueued.
	if (!mEnqueued) {
		// The runnable walks the hierarchy of the continuations
		// and marks them enqueued using the markEnqueued() method, parent first.
		EnqueueRunnable runnable = new EnqueueRunnable(this);
		mWorkManagerImpl.getWorkTaskExecutor().executeOnBackgroundThread(runnable);
		mOperation = runnable.getOperation();
	} else {
		Logger.get().warning(TAG,
				String.format("Already enqueued work ids (%s)", TextUtils.join(", ", mIds)));
	}
	return mOperation;
}
WorkManager 的 TaskExecutor 执行了 EnqueueRunnable。EnqueueRunnable 中 run() 的实现:
1
2
3
4
5
6
7
8
9
10
11
12
13
14
15
16
17
18
// EnqueueRunnable.java
@Override
public void run() {
	try {
		// ...
		boolean needsScheduling = addToDatabase();
		if (needsScheduling) {
			// Enable RescheduleReceiver, only when there are Worker's that need scheduling.
			final Context context =
					mWorkContinuation.getWorkManagerImpl().getApplicationContext();
			PackageManagerHelper.setComponentEnabled(context, RescheduleReceiver.class, true);
			scheduleWorkInBackground();
		}
		mOperation.setState(Operation.SUCCESS);
	} catch (Throwable exception) {
		mOperation.setState(new Operation.State.FAILURE(exception));
	}
}
addToDatabase()的作用是把WorkSpec存入到数据库,并对任务的状态进行校验。成功返回 true。PackageManagerHelper.setComponentEnabled()开启了RescheduleReceiver。通过反编译我们得知这个Receiver是在AndroidManifest中注册的,默认是 disable 的。监听了开机 (BOOT_COMPLETED),时间变化 (TIME_SET),时区变化 (TIMEZONE_CHANGED) 这三个广播。
1
2
3
4
5
6
7
8
9
10
11
12
13
<receiver
	android:name="androidx.work.impl.background.systemalarm.RescheduleReceiver"
	android:directBootAware="false"
	android:enabled="false"
	android:exported="false"
	android:process=":worker1"
	tools:targetApi="n">
	<intent-filter>
		<action android:name="android.intent.action.BOOT_COMPLETED" />
		<action android:name="android.intent.action.TIME_SET" />
		<action android:name="android.intent.action.TIMEZONE_CHANGED" />
	</intent-filter>
</receiver>
scheduleWorkInBackground()实现
1
2
3
4
5
6
7
8
@VisibleForTesting
public void scheduleWorkInBackground() {
	WorkManagerImpl workManager = mWorkContinuation.getWorkManagerImpl();
	Schedulers.schedule(
			workManager.getConfiguration(),
			workManager.getWorkDatabase(),
			workManager.getSchedulers());
}
这部分就是任务调度的实现。拿到 WorkManager 对象后调用了 Schedulers.schedule() 方法,传入了 Configuration, WorkDatabase, Scheduler 这三个对象。执行 schedule() 方法:
1
2
3
4
5
6
7
8
9
10
11
12
13
14
15
16
17
18
19
20
21
22
23
24
25
26
27
28
29
30
31
32
33
34
35
36
37
38
39
40
41
42
43
44
45
46
47
48
49
50
51
52
53
54
55
56
57
58
59
60
61
62
63
64
65
66
67
68
69
70
71
72
73
74
75
76
77
78
79
// Schedulers.java
public class Schedulers {

    public static final String GCM_SCHEDULER = "androidx.work.impl.background.gcm.GcmScheduler";
    private static final String TAG = Logger.tagWithPrefix("Schedulers");

    /**
     * Schedules {@link WorkSpec}s while honoring the {@link Scheduler#MAX_SCHEDULER_LIMIT}.
     *
     * @param workDatabase The {@link WorkDatabase}.
     * @param schedulers   The {@link List} of {@link Scheduler}s to delegate to.
     */
    public static void schedule(
            @NonNull Configuration configuration,
            @NonNull WorkDatabase workDatabase,
            List<Scheduler> schedulers) {
        if (schedulers == null || schedulers.size() == 0) {
            return;
        }

        WorkSpecDao workSpecDao = workDatabase.workSpecDao();
        List<WorkSpec> eligibleWorkSpecsForLimitedSlots;
        List<WorkSpec> allEligibleWorkSpecs;

        workDatabase.beginTransaction();
        try {
            // Enqueued workSpecs when scheduling limits are applicable.
            eligibleWorkSpecsForLimitedSlots = workSpecDao.getEligibleWorkForScheduling(
                    configuration.getMaxSchedulerLimit());

            // Enqueued workSpecs when scheduling limits are NOT applicable.
            allEligibleWorkSpecs = workSpecDao.getAllEligibleWorkSpecsForScheduling(
                    MAX_GREEDY_SCHEDULER_LIMIT);

            if (eligibleWorkSpecsForLimitedSlots != null
                    && eligibleWorkSpecsForLimitedSlots.size() > 0) {
                long now = System.currentTimeMillis();

                // Mark all the WorkSpecs as scheduled.
                // Calls to Scheduler#schedule() could potentially result in more schedules
                // on a separate thread. Therefore, this needs to be done first.
                for (WorkSpec workSpec : eligibleWorkSpecsForLimitedSlots) {
                    workSpecDao.markWorkSpecScheduled(workSpec.id, now);
                }
            }
            workDatabase.setTransactionSuccessful();
        } finally {
            workDatabase.endTransaction();
        }

        if (eligibleWorkSpecsForLimitedSlots != null
                && eligibleWorkSpecsForLimitedSlots.size() > 0) {

            WorkSpec[] eligibleWorkSpecsArray =
                    new WorkSpec[eligibleWorkSpecsForLimitedSlots.size()];
            eligibleWorkSpecsArray =
                    eligibleWorkSpecsForLimitedSlots.toArray(eligibleWorkSpecsArray);

            // Delegate to the underlying schedulers.
            for (Scheduler scheduler : schedulers) {
                if (scheduler.hasLimitedSchedulingSlots()) {
                    scheduler.schedule(eligibleWorkSpecsArray);
                }
            }
        }

        if (allEligibleWorkSpecs != null && allEligibleWorkSpecs.size() > 0) {
            WorkSpec[] enqueuedWorkSpecsArray = new WorkSpec[allEligibleWorkSpecs.size()];
            enqueuedWorkSpecsArray = allEligibleWorkSpecs.toArray(enqueuedWorkSpecsArray);
            // Delegate to the underlying schedulers.
            for (Scheduler scheduler : schedulers) {
                if (!scheduler.hasLimitedSchedulingSlots()) {
                    scheduler.schedule(enqueuedWorkSpecsArray);
                }
            }
        }
    }
    // ...
}
- 先进行了一系列的数据库操作,然后开始根据条件每个任务进行调度。其中
eligibleWorkSpecs返回的是在ENQUEUED状态下,未被执行且未被取消的WorkSpec列表,然后更新这些任务的request状态到数据库。 - 最后遍历
schedulers调用scheduler.schedule()对每个任务进行调度处理。由于示例代码创建的是没有约束的一次性任务,所以看一下GreedyScheduler对于schedule()方法的实现:
1
2
3
4
5
6
7
8
9
10
11
12
13
14
15
16
17
18
19
20
21
22
23
24
25
26
27
28
29
30
31
32
33
34
35
36
37
38
39
40
41
42
43
44
45
46
47
48
49
50
51
52
53
54
55
56
57
58
59
60
61
62
63
// GreedyScheduler.java
@Override
public void schedule(@NonNull WorkSpec... workSpecs) {
	if (mInDefaultProcess == null) {
		checkDefaultProcess();
	}

	if (!mInDefaultProcess) {
		Logger.get().info(TAG, "Ignoring schedule request in a secondary process");
		return;
	}

	registerExecutionListenerIfNeeded();

	// Keep track of the list of new WorkSpecs whose constraints need to be tracked.
	// Add them to the known list of constrained WorkSpecs and call replace() on
	// WorkConstraintsTracker. That way we only need to synchronize on the part where we
	// are updating mConstrainedWorkSpecs.
	Set<WorkSpec> constrainedWorkSpecs = new HashSet<>();
	Set<String> constrainedWorkSpecIds = new HashSet<>();

	for (WorkSpec workSpec : workSpecs) {
		long nextRunTime = workSpec.calculateNextRunTime();
		long now = System.currentTimeMillis();
		if (workSpec.state == WorkInfo.State.ENQUEUED) {
			if (now < nextRunTime) {
				// Future work
				if (mDelayedWorkTracker != null) {
					mDelayedWorkTracker.schedule(workSpec);
				}
			} else if (workSpec.hasConstraints()) {
				if (SDK_INT >= 23 && workSpec.constraints.requiresDeviceIdle()) {
					// Ignore requests that have an idle mode constraint.
					Logger.get().debug(TAG,
							String.format("Ignoring WorkSpec %s, Requires device idle.",
									workSpec));
				} else if (SDK_INT >= 24 && workSpec.constraints.hasContentUriTriggers()) {
					// Ignore requests that have content uri triggers.
					Logger.get().debug(TAG,
							String.format("Ignoring WorkSpec %s, Requires ContentUri triggers.",
									workSpec));
				} else {
					constrainedWorkSpecs.add(workSpec);
					constrainedWorkSpecIds.add(workSpec.id);
				}
			} else {
				Logger.get().debug(TAG, String.format("Starting work for %s", workSpec.id));
				mWorkManagerImpl.startWork(workSpec.id);
			}
		}
	}

	// onExecuted() which is called on the main thread also modifies the list of mConstrained
	// WorkSpecs. Therefore we need to lock here.
	synchronized (mLock) {
		if (!constrainedWorkSpecs.isEmpty()) {
			Logger.get().debug(TAG, String.format("Starting tracking for [%s]",
					TextUtils.join(",", constrainedWorkSpecIds)));
			mConstrainedWorkSpecs.addAll(constrainedWorkSpecs);
			mWorkConstraintsTracker.replace(mConstrainedWorkSpecs);
		}
	}
}
WorkSpec 是 ENQUEUED 的状态;非周期性任务;非延迟任务;非撤销的任务;没有其它约束的任务 满足这五个条件后,直接调用:
1
2
3
4
5
6
7
8
9
// GreedyScheduler
mWorkManagerImpl.startWork(workSpec.id);

// WorkManagerImpl.java
public void startWork(String workSpecId, WorkerParameters.RuntimeExtras runtimeExtras) {
    mWorkTaskExecutor
		.executeOnBackgroundThread(
			new StartWorkRunnable(this, workSpecId, runtimeExtras));
}
WorkTaskExecutor 对任务进行了调度。StartWorkRunnable 的 run() 的实现:
1
2
3
4
5
// StartWorkRunnable.java
@Override
public void run() {
	mWorkManagerImpl.getProcessor().startWork(mWorkSpecId, mRuntimeExtras);
}
StartWorkRunnable 会将任务的信息交给 Processor,由 Processor 调用 startWork() 去执行任务:
1
2
3
4
5
6
7
8
9
10
11
12
13
14
15
16
17
18
19
20
21
22
23
24
25
26
27
28
29
30
31
32
33
34
35
36
37
// Processor.java
public boolean startWork(
		@NonNull String id,
		@Nullable WorkerParameters.RuntimeExtras runtimeExtras) {

	WorkerWrapper workWrapper;
	synchronized (mLock) {
		// Work may get triggered multiple times if they have passing constraints
		// and new work with those constraints are added.
		if (isEnqueued(id)) {
			Logger.get().debug(
					TAG,
					String.format("Work %s is already enqueued for processing", id));
			return false;
		}

		workWrapper =
				new WorkerWrapper.Builder(
						mAppContext,
						mConfiguration,
						mWorkTaskExecutor,
						this,
						mWorkDatabase,
						id)
						.withSchedulers(mSchedulers)
						.withRuntimeExtras(runtimeExtras)
						.build();
		ListenableFuture<Boolean> future = workWrapper.getFuture();
		future.addListener(
				new FutureListener(this, id, future),
				mWorkTaskExecutor.getMainThreadExecutor());
		mEnqueuedWorkMap.put(id, workWrapper);
	}
	mWorkTaskExecutor.getBackgroundExecutor().execute(workWrapper);
	Logger.get().debug(TAG, String.format("%s: processing %s", getClass().getSimpleName(), id));
	return true;
}
startWork() 方法中创建了一个 WorkerWrapper 的 Runnable 对象,交由 WorkTaskExecutor 调度处理。WorkerWrapper 的 run() 方法的实现:
1
2
3
4
5
6
7
8
9
10
11
12
13
14
15
16
17
18
19
20
21
22
23
24
25
26
27
28
29
30
31
32
33
34
35
36
37
38
39
40
41
42
43
44
45
46
47
48
49
50
51
52
53
54
55
56
57
58
59
60
61
62
63
64
65
66
67
68
69
70
71
72
73
74
75
76
77
78
79
80
81
82
83
84
85
86
87
88
89
90
91
92
93
94
95
96
97
98
99
100
101
102
103
104
105
106
107
108
109
110
111
112
113
114
115
116
117
118
119
120
121
122
123
124
125
126
127
128
129
130
131
132
133
134
135
136
137
138
139
140
141
142
143
144
145
146
147
148
149
150
151
152
153
154
155
156
157
158
159
160
161
162
163
164
165
166
167
168
169
170
171
172
173
174
175
176
177
178
179
180
// WorkerWrapper.java
public void run() {
	mTags = mWorkTagDao.getTagsForWorkSpecId(mWorkSpecId);
	mWorkDescription = createWorkDescription(mTags);
	runWorker();
}
private void runWorker() {
    if (tryCheckForInterruptionAndResolve()) {
        return;
    }

    mWorkDatabase.beginTransaction();
    try {
        mWorkSpec = mWorkSpecDao.getWorkSpec(mWorkSpecId);
        if (mWorkSpec == null) {
            Logger.get().error(
                    TAG,
                    String.format("Didn't find WorkSpec for id %s", mWorkSpecId));
            resolve(false);
            mWorkDatabase.setTransactionSuccessful();
            return;        }

        // Do a quick check to make sure we don't need to bail out in case this work is already
        // running, finished, or is blocked.        if (mWorkSpec.state != ENQUEUED) {
            resolveIncorrectStatus();
            mWorkDatabase.setTransactionSuccessful();
            Logger.get().debug(TAG,
                    String.format("%s is not in ENQUEUED state. Nothing more to do.",
                            mWorkSpec.workerClassName));
            return;        }

        // Case 1:
        // Ensure that Workers that are backed off are only executed when they are supposed to.        // GreedyScheduler can schedule WorkSpecs that have already been backed off because        // it is holding on to snapshots of WorkSpecs. So WorkerWrapper needs to determine        // if the ListenableWorker is actually eligible to execute at this point in time.
        // Case 2:        // On API 23, we double scheduler Workers because JobScheduler prefers batching.        // So is the Work is periodic, we only need to execute it once per interval.        // Also potential bugs in the platform may cause a Job to run more than once.
        if (mWorkSpec.isPeriodic() || mWorkSpec.isBackedOff()) {
            long now = System.currentTimeMillis();
            // Allow first run of a PeriodicWorkRequest
            // to go through. This is because when periodStartTime=0;            // calculateNextRunTime() always > now.            // For more information refer to b/124274584            boolean isFirstRun = mWorkSpec.periodStartTime == 0;
            if (!isFirstRun && now < mWorkSpec.calculateNextRunTime()) {
                Logger.get().debug(TAG,
                        String.format(
                                "Delaying execution for %s because it is being executed "
                                        + "before schedule.",
                                mWorkSpec.workerClassName));
                // For AlarmManager implementation we need to reschedule this kind  of Work.
                // This is not a problem for JobScheduler because we will only reschedule                // work if JobScheduler is unaware of a jobId.                resolve(true);
                mWorkDatabase.setTransactionSuccessful();
                return;            }
        }

        // Needed for nested transactions, such as when we're in a dependent work request when
        // using a SynchronousExecutor.        mWorkDatabase.setTransactionSuccessful();
    } finally {
        mWorkDatabase.endTransaction();
    }

    // Merge inputs.  This can be potentially expensive code, so this should not be done inside
    // a database transaction.    Data input;
    if (mWorkSpec.isPeriodic()) {
        input = mWorkSpec.input;
    } else {
        InputMergerFactory inputMergerFactory = mConfiguration.getInputMergerFactory();
        String inputMergerClassName = mWorkSpec.inputMergerClassName;
        InputMerger inputMerger =
                inputMergerFactory.createInputMergerWithDefaultFallback(inputMergerClassName);
        if (inputMerger == null) {
            Logger.get().error(TAG, String.format("Could not create Input Merger %s",
                    mWorkSpec.inputMergerClassName));
            setFailedAndResolve();
            return;        }
        List<Data> inputs = new ArrayList<>();
        inputs.add(mWorkSpec.input);
        inputs.addAll(mWorkSpecDao.getInputsFromPrerequisites(mWorkSpecId));
        input = inputMerger.merge(inputs);
    }

    final WorkerParameters params = new WorkerParameters(
            UUID.fromString(mWorkSpecId),
            input,
            mTags,
            mRuntimeExtras,
            mWorkSpec.runAttemptCount,
            mConfiguration.getExecutor(),
            mWorkTaskExecutor,
            mConfiguration.getWorkerFactory(),
            new WorkProgressUpdater(mWorkDatabase, mWorkTaskExecutor),
            new WorkForegroundUpdater(mWorkDatabase, mForegroundProcessor, mWorkTaskExecutor));

    // Not always creating a worker here, as the WorkerWrapper.Builder can set a worker override
    // in test mode.    if (mWorker == null) {
        mWorker = mConfiguration.getWorkerFactory().createWorkerWithDefaultFallback(
                mAppContext,
                mWorkSpec.workerClassName,
                params);
    }

    if (mWorker == null) {
        Logger.get().error(TAG,
                String.format("Could not create Worker %s", mWorkSpec.workerClassName));
        setFailedAndResolve();
        return;    }

    if (mWorker.isUsed()) {
        Logger.get().error(TAG,
                String.format("Received an already-used Worker %s; WorkerFactory should return "
                        + "new instances",
                        mWorkSpec.workerClassName));
        setFailedAndResolve();
        return;    }
    mWorker.setUsed();

    // Try to set the work to the running state.  Note that this may fail because another thread
    // may have modified the DB since we checked last at the top of this function.    if (trySetRunning()) {
        if (tryCheckForInterruptionAndResolve()) {
            return;
        }

        final SettableFuture<ListenableWorker.Result> future = SettableFuture.create();
        final WorkForegroundRunnable foregroundRunnable =
                new WorkForegroundRunnable(
                        mAppContext,
                        mWorkSpec,
                        mWorker,
                        params.getForegroundUpdater(),
                        mWorkTaskExecutor
                );
        mWorkTaskExecutor.getMainThreadExecutor().execute(foregroundRunnable);

        final ListenableFuture<Void> runExpedited = foregroundRunnable.getFuture();
        runExpedited.addListener(new Runnable() {
            @Override
            public void run() {
                try {
                    runExpedited.get();
                    Logger.get().debug(TAG,
                            String.format("Starting work for %s", mWorkSpec.workerClassName));
                    // Call mWorker.startWork() on the main thread.
                    mInnerFuture = mWorker.startWork();
                    future.setFuture(mInnerFuture);
                } catch (Throwable e) {
                    future.setException(e);
                }
            }
        }, mWorkTaskExecutor.getMainThreadExecutor());

        // Avoid synthetic accessors.
        final String workDescription = mWorkDescription;
        future.addListener(new Runnable() {
            @Override
            @SuppressLint("SyntheticAccessor")
            public void run() {
                try {
                    // If the ListenableWorker returns a null result treat it as a failure.
                    ListenableWorker.Result result = future.get();
                    if (result == null) {
                        Logger.get().error(TAG, String.format(
                                "%s returned a null result. Treating it as a failure.",
                                mWorkSpec.workerClassName));
                    } else {
                        Logger.get().debug(TAG, String.format("%s returned a %s result.",
                                mWorkSpec.workerClassName, result));
                        mResult = result;
                    }
                } catch (CancellationException exception) {
                    // Cancellations need to be treated with care here because innerFuture
                    // cancellations will bubble up, and we need to gracefully handle that.                    Logger.get().info(TAG, String.format("%s was cancelled", workDescription),
                            exception);
                } catch (InterruptedException | ExecutionException exception) {
                    Logger.get().error(TAG,
                            String.format("%s failed because it threw an exception/error",
                                    workDescription), exception);
                } finally {
                    onWorkFinished();
                }
            }
        }, mWorkTaskExecutor.getBackgroundExecutor());
    } else {
        resolveIncorrectStatus();
    }
}
- 先创建一个
WorkerParameters对象。 - 然后调用
mConfiguration.getWorkerFactory().createWorkerWithDefaultFallback()方法创建Worker对象,返回的就是我们自己的Woker对象,即Worker1的实例。之后交由WorkTaskExecutor调度处理。在run()方法的实现,我们看到调用了mWorker.startWork()方法: ListenableWorker是个抽象类,是所有Worker的父类。Worker1也继承Worker类,startWork()在Worker中的实现:
1
2
3
4
5
6
7
8
9
10
11
12
13
14
15
16
17
18
// Worker
@Override
public final @NonNull ListenableFuture<Result> startWork() {
	mFuture = SettableFuture.create();
	getBackgroundExecutor().execute(new Runnable() {
		@Override
		public void run() {
			try {
				Result result = doWork();
				mFuture.set(result);
			} catch (Throwable throwable) {
				mFuture.setException(throwable);
			}

		}
	});
	return mFuture;
}
在 run() 的实现执行了 doWork() 方法,即执行了我们 Worker1 的 doWork() 方法。
1
2
3
4
5
6
7
8
9
// Worker1
class Worker1(appContext: Context, workerParams: WorkerParameters) :
    Worker(appContext, workerParams) {

    override fun doWork(): Result {
        Thread.sleep(5000)
        return Result.success()
    }
}
startWork() 返回了一个 Future 对象 mInnerFuture,调用 future.setFuture(mInnerFuture) 去处理 doWork() 返回的 result。再经过一系列判断后,最终执行了 onWorkFinished() 方法:
1
2
3
4
5
6
7
8
9
10
11
12
13
14
15
16
17
18
19
20
21
22
23
24
25
26
27
28
29
30
31
32
33
34
35
36
37
38
// WorkerWrapper.java
void onWorkFinished() {
	if (!tryCheckForInterruptionAndResolve()) {
		mWorkDatabase.beginTransaction();
		try {
			WorkInfo.State state = mWorkSpecDao.getState(mWorkSpecId);
			mWorkDatabase.workProgressDao().delete(mWorkSpecId);
			if (state == null) {
				// state can be null here with a REPLACE on beginUniqueWork().
				// Treat it as a failure, and rescheduleAndResolve() will
				// turn into a no-op. We still need to notify potential observers
				// holding on to wake locks on our behalf.
				resolve(false);
			} else if (state == RUNNING) {
				handleResult(mResult);
			} else if (!state.isFinished()) {
				rescheduleAndResolve();
			}
			mWorkDatabase.setTransactionSuccessful();
		} finally {
			mWorkDatabase.endTransaction();
		}
	}

	// Try to schedule any newly-unblocked workers, and workers requiring rescheduling (such as
	// periodic work using AlarmManager).  This code runs after runWorker() because it should
	// happen in its own transaction.

	// Cancel this work in other schedulers.  For example, if this work was
	// handled by GreedyScheduler, we should make sure JobScheduler is informed
	// that it should remove this job and AlarmManager should remove all related alarms.
	if (mSchedulers != null) {
		for (Scheduler scheduler : mSchedulers) {
			scheduler.cancel(mWorkSpecId);
		}
		Schedulers.schedule(mConfiguration, mWorkDatabase, mSchedulers);
	}
}
在 onWorkFinished() 会对刚刚执行完毕的任务作进一步处理。首先获取任务的当前状态 state,然后从 db 中删除这个任务,再根据 state 作进一步处理。我们看一下 handleResult(mResult) 的实现:
1
2
3
4
5
6
7
8
9
10
11
12
13
14
15
16
17
18
19
20
21
22
23
24
25
26
27
private void handleResult(ListenableWorker.Result result) {
	if (result instanceof ListenableWorker.Result.Success) {
		Logger.get().info(
				TAG,
				String.format("Worker result SUCCESS for %s", mWorkDescription));
		if (mWorkSpec.isPeriodic()) {
			resetPeriodicAndResolve();
		} else {
			setSucceededAndResolve();
		}

	} else if (result instanceof ListenableWorker.Result.Retry) {
		Logger.get().info(
				TAG,
				String.format("Worker result RETRY for %s", mWorkDescription));
		rescheduleAndResolve();
	} else {
		Logger.get().info(
				TAG,
				String.format("Worker result FAILURE for %s", mWorkDescription));
		if (mWorkSpec.isPeriodic()) {
			resetPeriodicAndResolve();
		} else {
			setFailedAndResolve();
		}
	}
}
- 在
handleResult()方法中会根据任务类型和 result 结果进行不同的处理。例如周期性的任务会重新将这个任务的状态设置为ENQUEUED,更新其他相关参数,并更新数据库。 - 已经完成的一次性任务将会被更新成
SUCCEEDED的状态 handleResult()执行完毕后更新isWorkFinished。如果isWorkFinished为 true,由于我们在GreedyScheduler已经处理了这个任务,为了避免这个任务被其他 schedulers 处理,WorkManager遍历了mSchedulers列表,并将这个任务从其他schedulers中移除。最后再次执行Schedulers.schedule()方法,schedule下一个任务。
小结
- 在 WorkManager 执行了 enqueue() 后,创建 WorkContinuationImpl 对象执行 enqueue() 方法。
- WorkContinuationImpl 持有的 EnqueueRunnable 对象将任务添加到 db,并交给 Schedulers 去调度。
- Schedulers 将任务交给每一个 Scheduler 去处理。没有约束的一次性任务,GreedyScheduler 会先处理这个任务。
- GreedyScheduler 经过一系列判断后,调用 WorkManager 的 startWork() 方法执行这种一次性,非延迟,无约束的任务。
- WorkManager 持有的 StartWorkRunnable 对象会将任务交给 Processor 去处理,执行 startWork() 方法。
- Processor 创建一个 WorkerWrapper 对象,由它去调用 Worker 的 startWork() 方法,执行我们自定义 worker 的任务,并返回相应的 result。
- 任务完成后,WorkerWrapper 会根据 result 对任务状态,db 等进行更新,然后 schedule 下一个任务。
流程图: 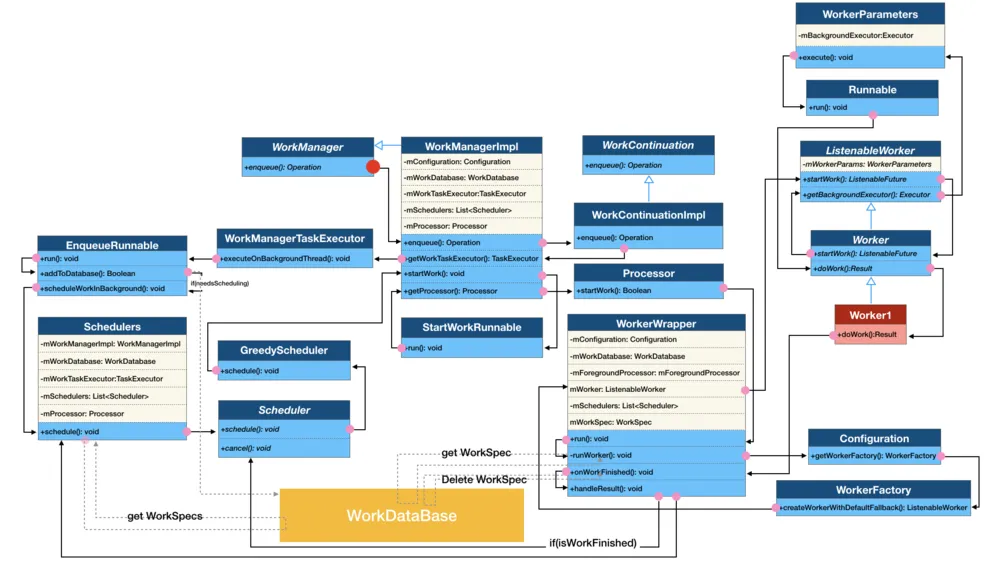
Periodic 周期任务
使用:
1
2
3
4
5
6
WorkManager.getInstance(context)
    .enqueueUniquePeriodicWork(
        workerName,
        ExistingPeriodicWorkPolicy.REPLACE,
        workRequest
    )
进入到 WorkManagerImpl.enqueueUniquePeriodicWork
1
2
3
4
5
6
7
8
9
10
11
12
13
14
15
16
17
18
19
20
21
22
23
24
25
26
27
28
29
// v2.7.1 WorkManagerImpl.java
public Operation enqueueUniquePeriodicWork(
	@NonNull String uniqueWorkName,
	@NonNull ExistingPeriodicWorkPolicy existingPeriodicWorkPolicy,
	@NonNull PeriodicWorkRequest periodicWork) {

    return createWorkContinuationForUniquePeriodicWork(
            uniqueWorkName,
            existingPeriodicWorkPolicy,
            periodicWork)
            .enqueue();
}
// 创建了WorkContinuationImpl,
public WorkContinuationImpl createWorkContinuationForUniquePeriodicWork(
        @NonNull String uniqueWorkName,
        @NonNull ExistingPeriodicWorkPolicy existingPeriodicWorkPolicy,
        @NonNull PeriodicWorkRequest periodicWork) {
    ExistingWorkPolicy existingWorkPolicy;
    if (existingPeriodicWorkPolicy == ExistingPeriodicWorkPolicy.KEEP) {
        existingWorkPolicy = ExistingWorkPolicy.KEEP;
    } else {
        existingWorkPolicy = ExistingWorkPolicy.REPLACE;
    }
    return new WorkContinuationImpl(
            this,
            uniqueWorkName,
            existingWorkPolicy,
            Collections.singletonList(periodicWork));
}
然后调用了 WorkManagerImpl.enqueue():
1
2
3
4
5
6
7
8
9
10
11
12
13
14
// v2.7.1 WorkManagerImpl.java
@Override
public @NonNull Operation enqueue() {
    if (!mEnqueued) {
	    // 创建一个EnqueueRunnable
	    EnqueueRunnable runnable = new EnqueueRunnable(this);
        mWorkManagerImpl.getWorkTaskExecutor().executeOnBackgroundThread(runnable);
        mOperation = runnable.getOperation();
    } else {
        Logger.get().warning(TAG,
                String.format("Already enqueued work ids (%s)", TextUtils.join(", ", mIds)));
    }
    return mOperation;
}
在 TaskExecutor 中执行 EnqueueRunnable,看 run() 方法
1
2
3
4
5
6
7
8
9
10
11
12
13
14
15
16
17
18
19
20
21
22
23
24
25
// EnqueueRunnable.java
@Override
public void run() {
    try {
        // ...
        boolean needsScheduling = addToDatabase();  // 将Worker信息存储到数据库中去
        if (needsScheduling) {
            // Enable RescheduleReceiver, only when there are Worker's that need scheduling.
            final Context context = mWorkContinuation.getWorkManagerImpl().getApplicationContext();
            PackageManagerHelper.setComponentEnabled(context, RescheduleReceiver.class, true);
            scheduleWorkInBackground();
        }
        mOperation.setState(Operation.SUCCESS);
    } catch (Throwable exception) {
        mOperation.setState(new Operation.State.FAILURE(exception));
    }
}
// 安排执行
public void scheduleWorkInBackground() {
    WorkManagerImpl workManager = mWorkContinuation.getWorkManagerImpl();
    Schedulers.schedule(
            workManager.getConfiguration(),
            workManager.getWorkDatabase(),
            workManager.getSchedulers());
}
看 Schedulers.schedule()
1
2
3
4
5
6
7
8
9
10
11
12
13
14
15
16
17
18
19
20
21
22
23
24
25
26
27
28
29
30
31
32
33
34
35
36
37
38
39
40
41
42
43
44
45
46
47
48
49
50
51
52
53
54
55
56
57
58
59
// Schedulers.java
public static void schedule(Configuration configuration, WorkDatabase workDatabase, List<Scheduler> schedulers) {
    // ...

    WorkSpecDao workSpecDao = workDatabase.workSpecDao();
    List<WorkSpec> eligibleWorkSpecsForLimitedSlots;
    List<WorkSpec> allEligibleWorkSpecs;

    workDatabase.beginTransaction();
    try {
        // Enqueued workSpecs when scheduling limits are applicable.
        eligibleWorkSpecsForLimitedSlots = workSpecDao.getEligibleWorkForScheduling(
                configuration.getMaxSchedulerLimit());

        // Enqueued workSpecs when scheduling limits are NOT applicable.
        allEligibleWorkSpecs = workSpecDao.getAllEligibleWorkSpecsForScheduling(
                MAX_GREEDY_SCHEDULER_LIMIT);

        if (eligibleWorkSpecsForLimitedSlots != null
                && eligibleWorkSpecsForLimitedSlots.size() > 0) {
            long now = System.currentTimeMillis();

            // Mark all the WorkSpecs as scheduled.
            // Calls to Scheduler#schedule() could potentially result in more schedules            // on a separate thread. Therefore, this needs to be done first.            for (WorkSpec workSpec : eligibleWorkSpecsForLimitedSlots) {
                workSpecDao.markWorkSpecScheduled(workSpec.id, now);
            }
        }
        workDatabase.setTransactionSuccessful();
    } finally {
        workDatabase.endTransaction();
    }

    if (eligibleWorkSpecsForLimitedSlots != null
            && eligibleWorkSpecsForLimitedSlots.size() > 0) {

        WorkSpec[] eligibleWorkSpecsArray =
                new WorkSpec[eligibleWorkSpecsForLimitedSlots.size()];
        eligibleWorkSpecsArray =
                eligibleWorkSpecsForLimitedSlots.toArray(eligibleWorkSpecsArray);

        // Delegate to the underlying schedulers.
        for (Scheduler scheduler : schedulers) {
            if (scheduler.hasLimitedSchedulingSlots()) {
                scheduler.schedule(eligibleWorkSpecsArray);
            }
        }
    }

    if (allEligibleWorkSpecs != null && allEligibleWorkSpecs.size() > 0) {
        WorkSpec[] enqueuedWorkSpecsArray = new WorkSpec[allEligibleWorkSpecs.size()];
        enqueuedWorkSpecsArray = allEligibleWorkSpecs.toArray(enqueuedWorkSpecsArray);
        // Delegate to the underlying schedulers.
        for (Scheduler scheduler : schedulers) {
            if (!scheduler.hasLimitedSchedulingSlots()) {
                scheduler.schedule(enqueuedWorkSpecsArray);
            }
        }
    }
}
Schedulers.schedule() 查询状态是 ENQUEUED = 0 的任务执行
约束条件任务的执行过程
带约束条件使用示例:
1
2
3
4
5
6
7
val constraints = Constraints.Builder()
	.setRequiresBatteryNotLow(true)
	.build()
val work2Request = OneTimeWorkRequestBuilder<Worker2>()
	.setConstraints(constraints)
	.build()
WorkManager.getInstance(this).enqueue(work2Request)
任务的创建过程中,会为 WorkSpec 添加 Constraints 属性。
1
2
3
4
public final @NonNull B setConstraints(@NonNull Constraints constraints) {
	mWorkSpec.constraints = constraints;
	return getThis();
}
在任务执行的过程中,由于增加了约束条件,根据之前章节的分析,常驻的 GreedyScheduler 的 schedule() 方法将不会 startWork(),而是根据 build version 交由 SystemJobScheduler 或 SystemAlarmScheduler 进行处理。先来看使用 SystemJobScheduler 的情况:
SystemJobScheduler (Build Version 大于等于 23)
SystemJobScheduler 使用的是 JobScheduler 来调度执行任务。通常 JobScheduler 的使用步骤如下:
- 创建
JobService - 配置
JobInfo - 执行
SystemJobService
SystemJobService 是执行任务的服务类,在 onStartJob() 中,会调用 WorkManagerImpl 的 startWork() 执行任务。
1
2
3
4
5
6
7
8
9
10
11
12
13
14
// SystemJobService
@Override
public boolean onStartJob(@NonNull JobParameters params) {
	// ... ...
	String workSpecId = getWorkSpecIdFromJobParameters(params);
	// ... ...
	synchronized (mJobParameters) {
	  // ... ...
		mJobParameters.put(workSpecId, params);
	}
	// ... ...
	mWorkManagerImpl.startWork(workSpecId, runtimeExtras);
	return true;
}
在初始化 SystemJobScheduler 的时候会获取 JobScheduler 对象:
1
2
3
4
5
6
7
// SystemJobScheduler
public SystemJobScheduler(@NonNull Context context, @NonNull WorkManagerImpl workManager) {
	this(context,
		workManager,
		(JobScheduler) context.getSystemService(JOB_SCHEDULER_SERVICE),
		new SystemJobInfoConverter(context));
}
SystemJobScheduler 的 schedule() 方法执行了 scheduleInternal():
1
2
3
4
5
6
7
8
9
10
11
12
13
14
15
16
// SystemJobScheduler
public void scheduleInternal(WorkSpec workSpec, int jobId) {
	JobInfo jobInfo = mSystemJobInfoConverter.convert(workSpec, jobId);
	Logger.get().debug(
			TAG,
			String.format("Scheduling work ID %s Job ID %s", workSpec.id, jobId));
	try {
		mJobScheduler.schedule(jobInfo);
	} catch (IllegalStateException e) {
		... ...
		throw new IllegalStateException(message, e);
	} catch (Throwable throwable) {
		// OEM implementation bugs in JobScheduler cause the app to crash. Avoid crashing.
		Logger.get().error(TAG, String.format("Unable to schedule %s", workSpec), throwable);
	}
}
SystemJobInfoConverter.convert() 方法就是创建了一个 JobInfo,并将 Constraints 里的约束条件赋予 JobInfo 对象,之后便执行了 JobScheduler.schedule(),根据约束条件对任务进行调度。
SystemAlarmScheduler (Build Version 小于 23)
SystemAlarmScheduler 使用的是 AlarmManager 来调度执行任务。在 AndroidManifest 里有如下 receiver 注册:
1
2
3
4
5
6
<receiver android:directBootAware="false" android:enabled="false" android:exported="false" android:name="androidx.work.impl.background.systemalarm.ConstraintProxy$BatteryNotLowProxy">
    <intent-filter>
          <action android:name="android.intent.action.BATTERY_OKAY"/>
          <action android:name="android.intent.action.BATTERY_LOW"/>
    </intent-filter>
</receiver>
在电量变化时,收到 BATTERY_LOW 的广播。在 BatteryNotLowProxy 的 onReceive() 进行处理:
1
2
3
4
5
6
7
8
9
10
// ConstraintProxy
public static class BatteryNotLowProxy extends ConstraintProxy {
}

@Override
public void onReceive(Context context, Intent intent) {
	Logger.get().debug(TAG, String.format("onReceive : %s", intent));
	Intent constraintChangedIntent = CommandHandler.createConstraintsChangedIntent(context);
	context.startService(constraintChangedIntent);
}
createConstraintsChangedIntent() 的执行如下:
1
2
3
4
5
6
// ConstraintProxy
static Intent createConstraintsChangedIntent(@NonNull Context context) {
	Intent intent = new Intent(context, SystemAlarmService.class);
	intent.setAction(ACTION_CONSTRAINTS_CHANGED);
	return intent;
}
SystemAlarmService 的 onStartCommand() 处理如下:
1
2
3
4
5
6
7
8
9
10
@Override
public int onStartCommand(Intent intent, int flags, int startId) {
	super.onStartCommand(intent, flags, startId);
	// ... ...
	if (intent != null) {
		mDispatcher.add(intent, startId);
	}
	// If the service were to crash, we want all unacknowledged Intents to get redelivered.
	return Service.START_REDELIVER_INTENT;
}
调用了 SystemAlarmDispatcher.add() 方法。
1
2
3
4
5
6
7
8
9
10
11
12
13
14
15
16
17
18
19
20
21
// SystemAlarmDispatcher
@MainThread
public boolean add(@NonNull final Intent intent, final int startId) {
	// ... ...
	if (CommandHandler.ACTION_CONSTRAINTS_CHANGED.equals(action)
			&& hasIntentWithAction(CommandHandler.ACTION_CONSTRAINTS_CHANGED)) {
		return false;
	}
	intent.putExtra(KEY_START_ID, startId);
	synchronized (mIntents) {
		boolean hasCommands = !mIntents.isEmpty();
		mIntents.add(intent);
		if (!hasCommands) {
			// Only call processCommand if this is the first command.
			// The call to dequeueAndCheckForCompletion will process the remaining commands
			// in the order that they were added.
			processCommand();
		}
	}
	return true;
}
add() 方法中执行了 processCommand(),这段代码的核心执行语句是:
1
2
// SystemAlarmDispatcher
mCommandHandler.onHandleIntent(mCurrentIntent, startId, SystemAlarmDispatcher.this);
在 CommandHandler 的 onHandleIntent() 方法中,action 为 ACTION_CONSTRAINTS_CHANGED 的执行是:
1
2
3
4
5
6
7
8
9
10
11
12
13
14
15
// CommandHandler
if (ACTION_CONSTRAINTS_CHANGED.equals(action)) {
	handleConstraintsChanged(intent, startId, dispatcher);
}
private void handleConstraintsChanged(
		@NonNull Intent intent, int startId,
		@NonNull SystemAlarmDispatcher dispatcher) {

	Logger.get().debug(TAG, String.format("Handling constraints changed %s", intent));
	// Constraints changed command handler is synchronous. No cleanup
	// is necessary.
	ConstraintsCommandHandler changedCommandHandler =
			new ConstraintsCommandHandler(mContext, startId, dispatcher);
	changedCommandHandler.handleConstraintsChanged();
}
在 handleConstraintsChanged() 方法的执行中,会创建一个 action 为 ACTION_DELAY_MET 的 Intent 然后由 SystemAlarmDispatcher 发送出去,实际上也是调用了 SystemAlarmDispatcher.add() 方法。回到 SystemAlarmDispatcher 的 add() 流程。
1
2
3
4
// ConstraintsCommandHandler
Intent intent = CommandHandler.createDelayMetIntent(mContext, workSpecId);
Logger.get().debug(TAG, String.format("Creating a delay_met command for workSpec with id (%s)", workSpecId));
mDispatcher.postOnMainThread(new SystemAlarmDispatcher.AddRunnable(mDispatcher, intent, mStartId));
回到 onHandleIntent() 方法,在 CommandHandler 的 onHandleIntent() 方法中,action 为 ACTION_DELAY_MET 的执行是:
1
2
3
4
// CommandHandler
else if (ACTION_DELAY_MET.equals(action)) {
	handleDelayMet(intent, startId, dispatcher);
}
handleDelayMet() 的执行过程,会调用 DelayMetCommandHandler 的 handleProcessWork() 方法,接着执行 onAllConstraintsMet():
1
2
3
4
5
6
7
8
9
10
11
12
13
@Override
public void onAllConstraintsMet(@NonNull List<String> workSpecIds) {
	// ... ...
	synchronized (mLock) {
		if (mCurrentState == STATE_INITIAL) {
			// ... ...
			boolean isEnqueued = mDispatcher.getProcessor().startWork(mWorkSpecId);
			// ... ...
		} else {
			Logger.get().debug(TAG, String.format("Already started work for %s", mWorkSpecId));
		}
	}
}
SystemAlarmDispatcher 调用了 Processor 的 startWork() 方法
Ref
[x] [WorkManager 流程分析和源码解析 开发者说·DTalk](https://mp.weixin.qq.com/s/MPZD9LbSbJYx1BLAolIbIg)