04 .FCM测试
04 .FCM测试
FCM 测试
Legacy http 升级到 Http v1
如果应用使用的是 FCM 旧版 HTTP API,您应该考虑按照本指南中的说明改为使用 HTTP v1 API。与旧版 API 相比,HTTP v1 API 具有以下优势:
- 可通过访问令牌提供更高的安全性:HTTP v1 API 根据 OAuth2 安全模型使用只在短时间内有效的访问令牌。即使访问令牌变成公开状态,能被恶意使用的时间也只有 1 小时左右,之后令牌就会失效。传输刷新令牌的频率不像传输旧版 API 中使用的安全密钥那样频繁,因此这些令牌被捕获的可能性要低得多。
- 可针对不同平台更高效地自定义消息:在消息正文中,HTTP v1 API 加入了会传输到所有已定位实例的通用键,以及针对具体平台的键(方便您针对不同平台自定义消息)。这样,您就可以创建 “ 替换项 “,这些替换项可在一则消息中向不同的客户端平台发送略有不同的载荷。
- 对于新的客户端平台版本,扩展性和适应性更出色:HTTP v1 API 完全支持 Apple 平台、Android 和 Web 的消息传递选项。由于 JSON 载荷中包含每个平台专属的定义块,因此 FCM 可以根据需要扩展 API 以支持新版本及新平台。
旧版本使用 secret key,新版本使用 access token,1 个小时有效期,更安全。
如何获取 Secret Key
提供 Server Key:Firebase Console→Settings→Clound Messaging:项目设置/FCM设置
[x] [Where to get the FCM server key to send Firebase push notifications? by Rushabh Navadiya Medium](https://rushabhnavadiya.medium.com/where-to-get-the-fcm-server-key-to-send-firebase-push-notifications-38babe5d7ac5)
如何获取 Access Token
项目设置→服务账号→Firebase Admin SDK
代码获取
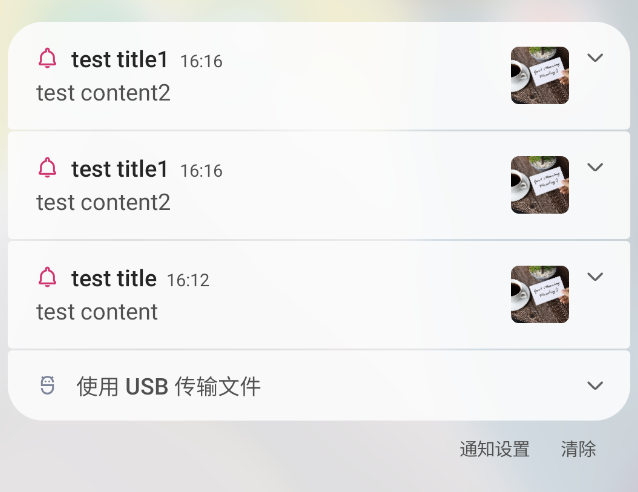
FCM 测试
Firebase 控制台: Notifications Composer
- 添加通知内容
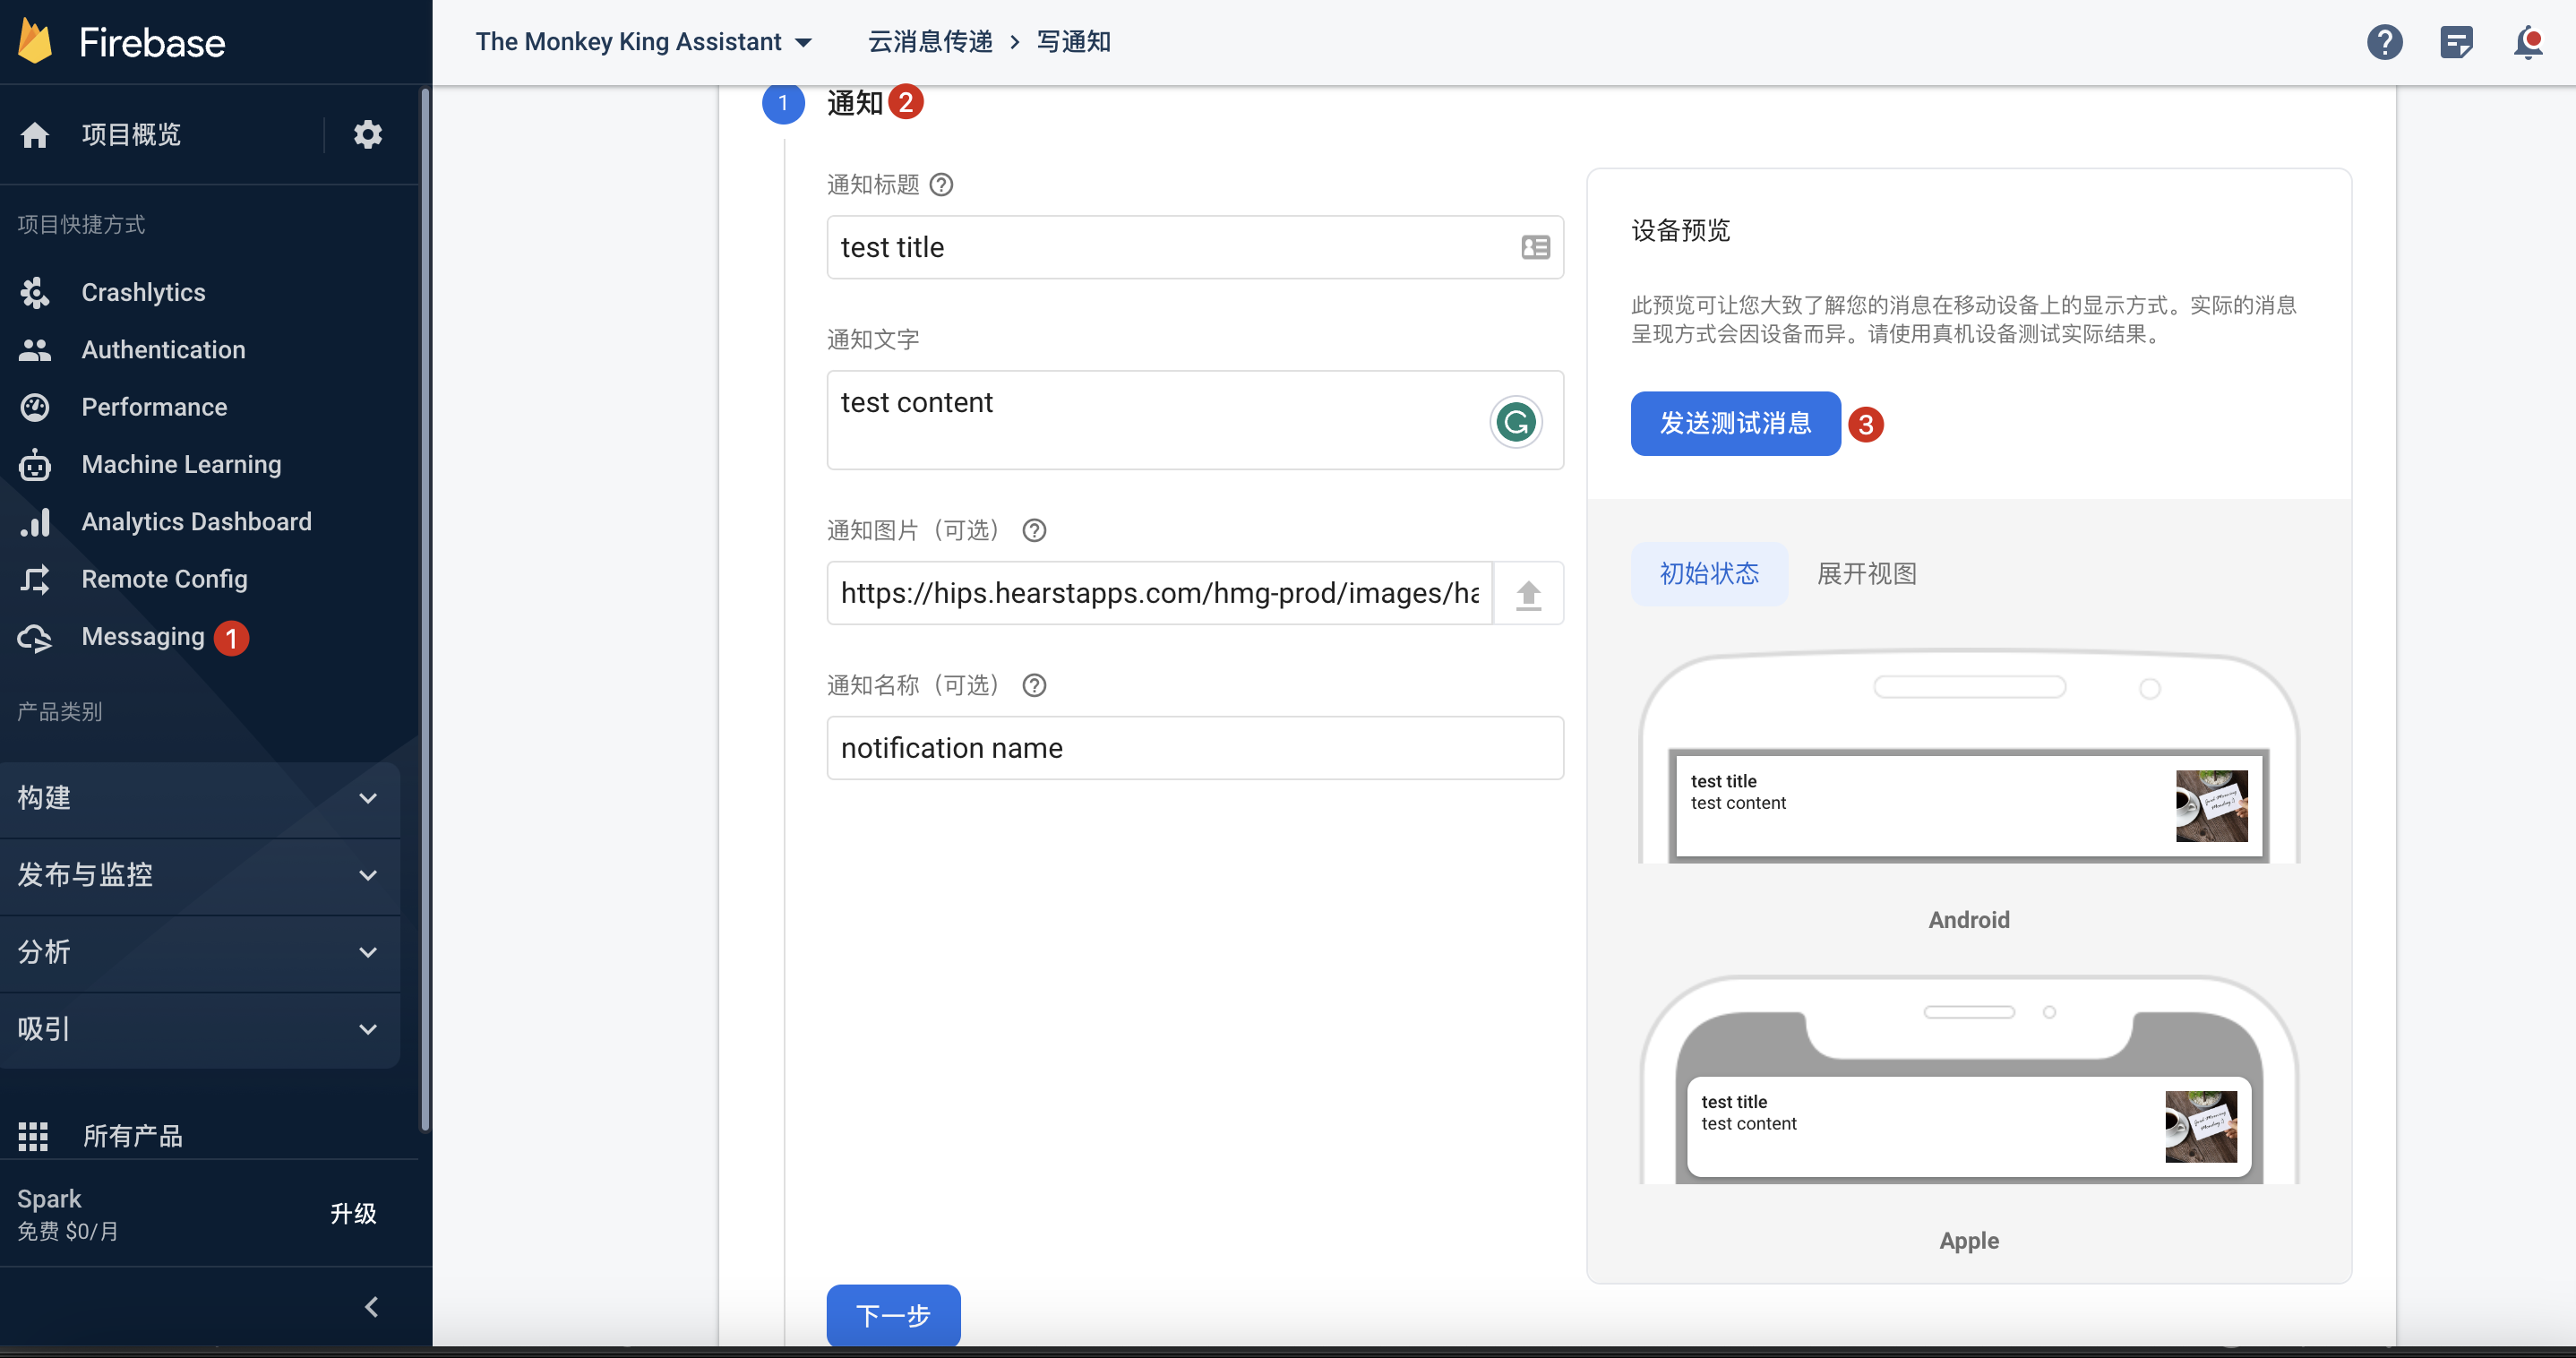
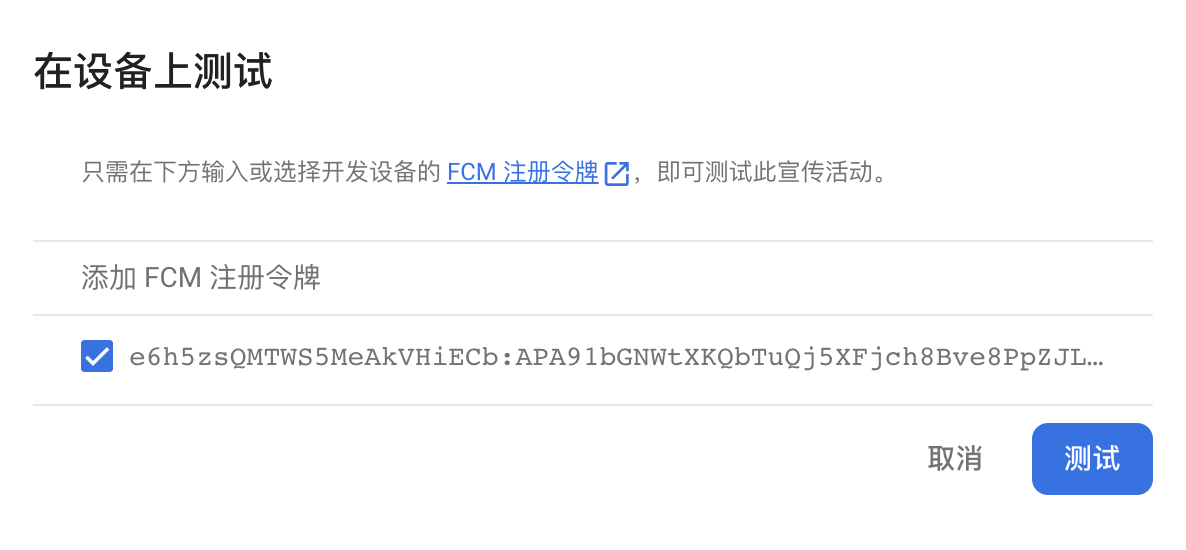
- 添加 FCM Token(通过代码获取Token)
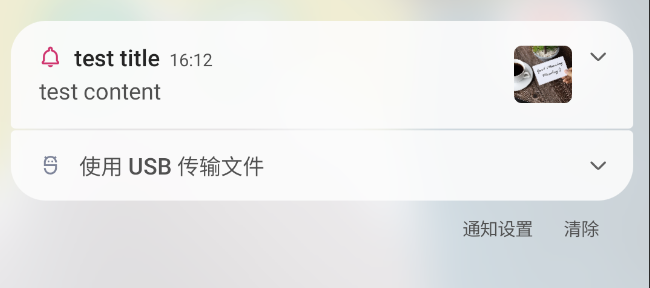
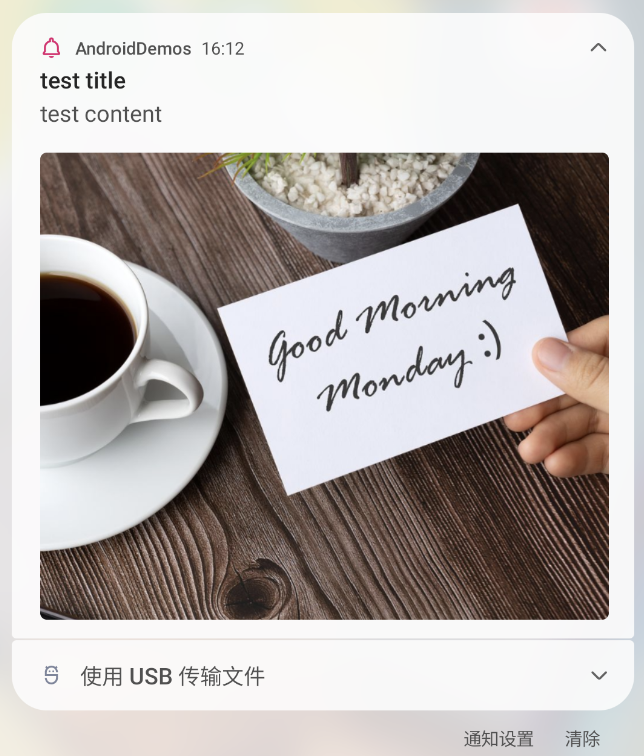
- 单条消息收起和展开
- 多条
OAuth 2.0 Playground + HTTP v 1
旧版本的 FCM APIs 在 2024 年 6 月过期,需要升级到新版本的 HTTP v1
FCM HTTP v 1 + OAuth 2.0 Playground
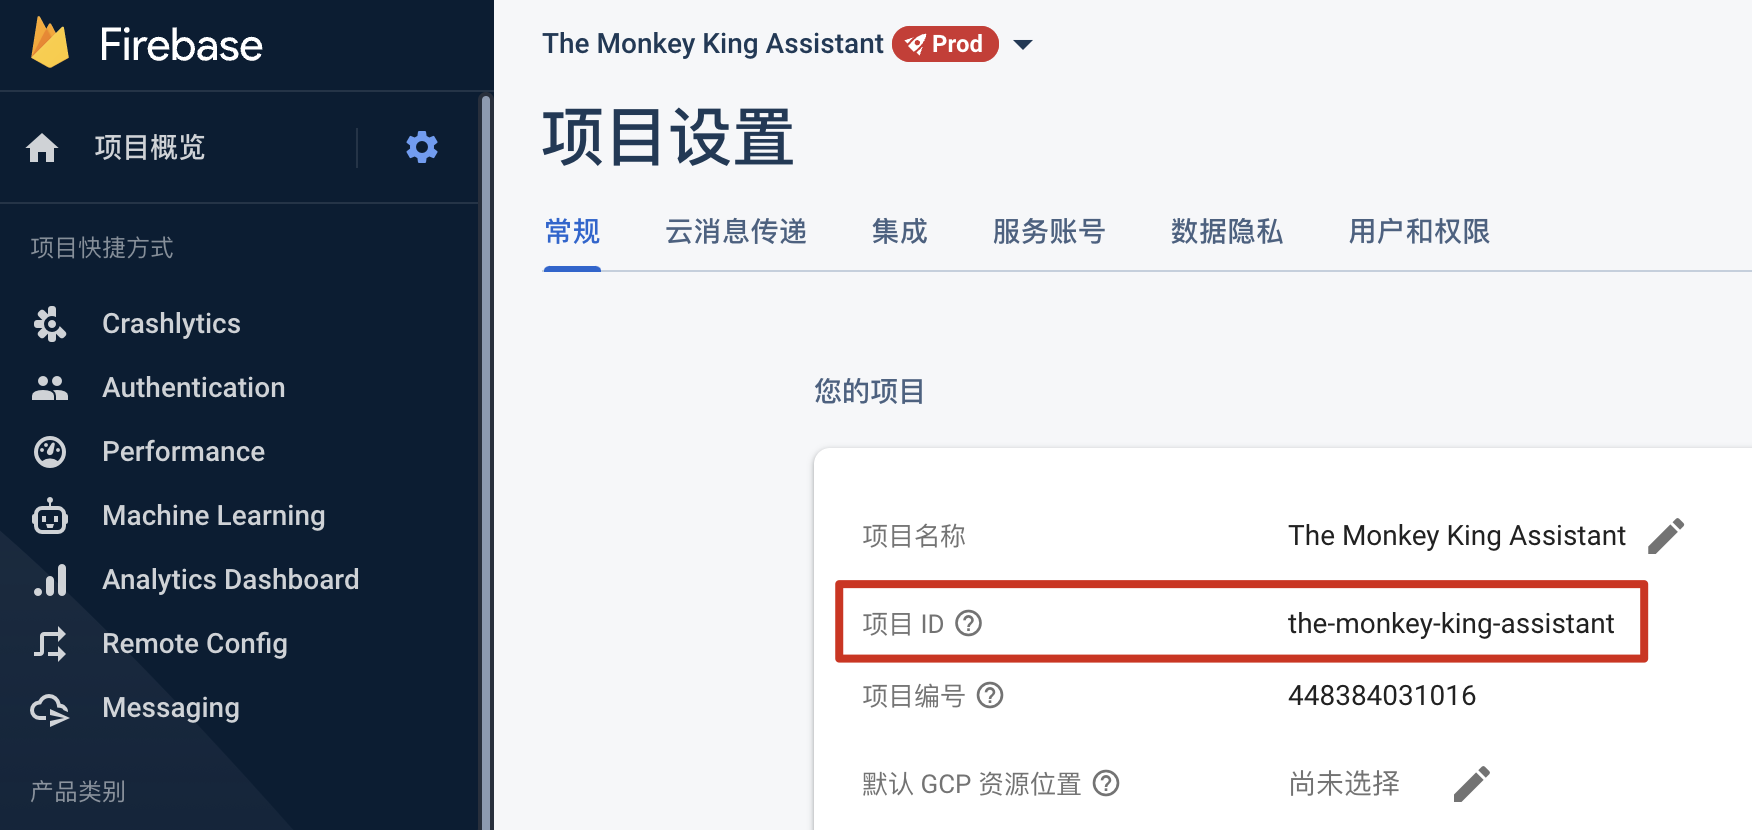
获取 project id
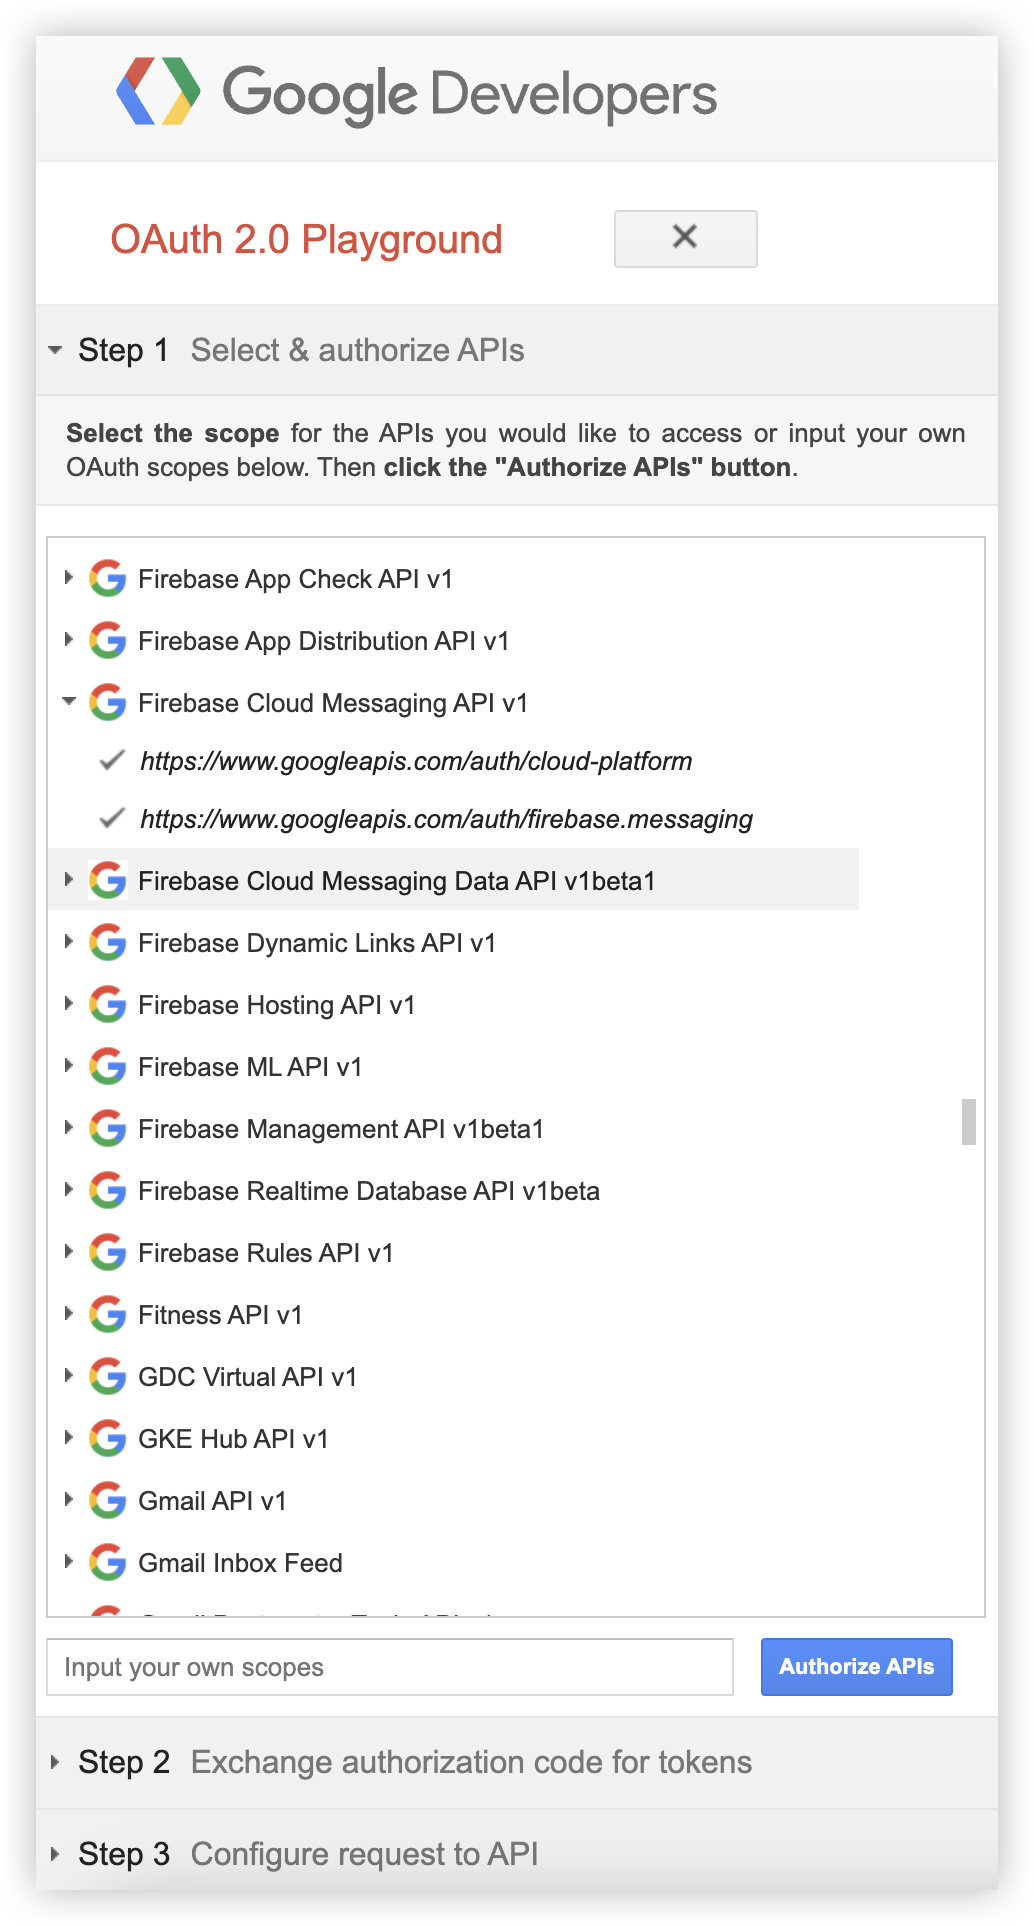
Step 1:选择要授权的 API
Select & authorize APIs
- Open Google Developers OAuth 2.0 Playground https://developers.google.com/oauthplayground
- 勾选 “
Firebase Cloud Messaging API v1” 下的两项 (auth/clound-platform和auth/firebase.messaging), and click “Authorize API’s” button
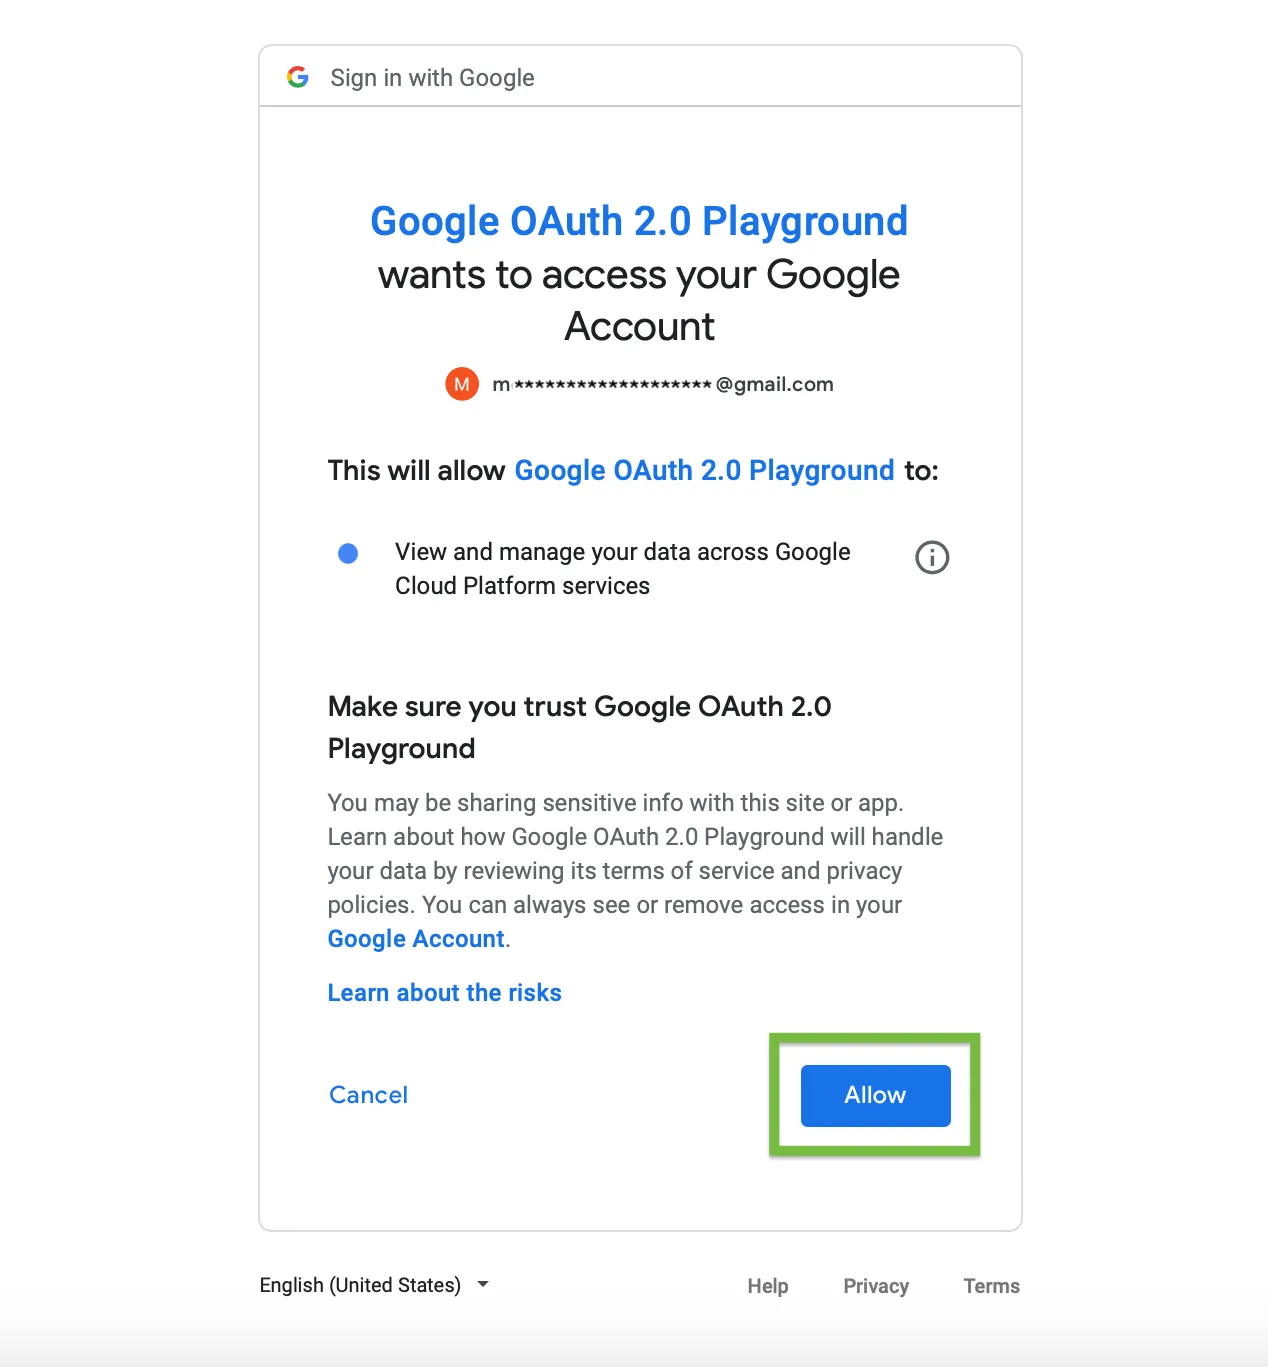
- You will be redirected to Authentication and needs permission for Google OAuth 2.0 Playground to view and manage the GCP services. Click “Allow” button.
- 跳转到 Step2
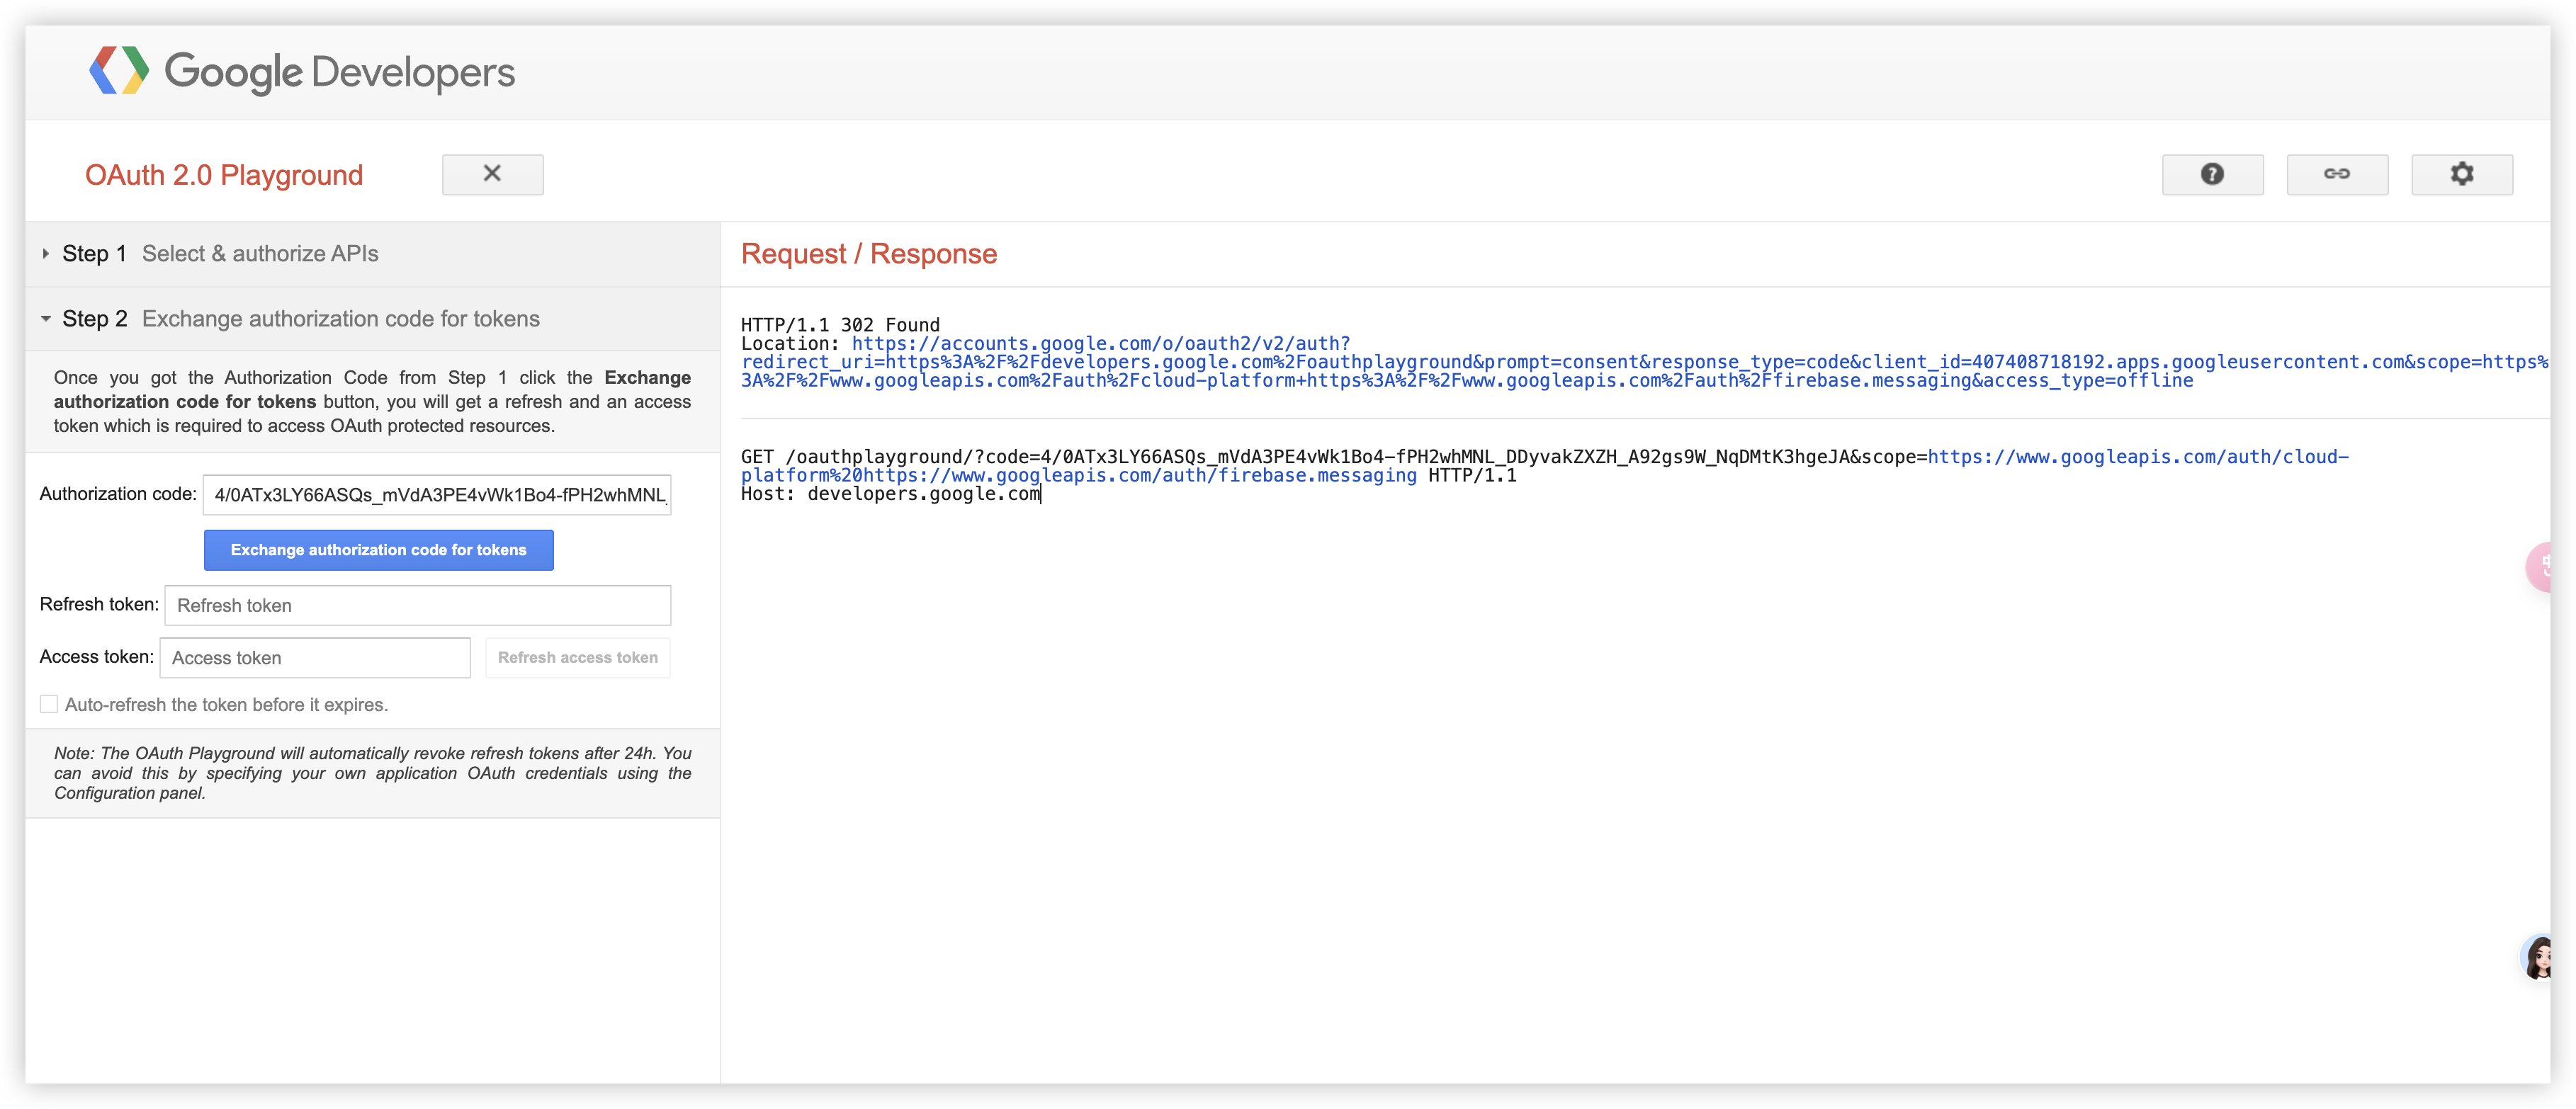
Step 2:用 authorization code 获取 Refresh/Access Token
Exchange authorization code for tokens
从步骤 1 获得 Authorization Code 后,单击 Exchange authorization code for tokens 按钮,您将获得 OAuth 受保护资源所需的访问令牌:refresh and an access token
- Click “
Exchange authorization code for tokens” button. This will generate “Refresh token” and “Access token”
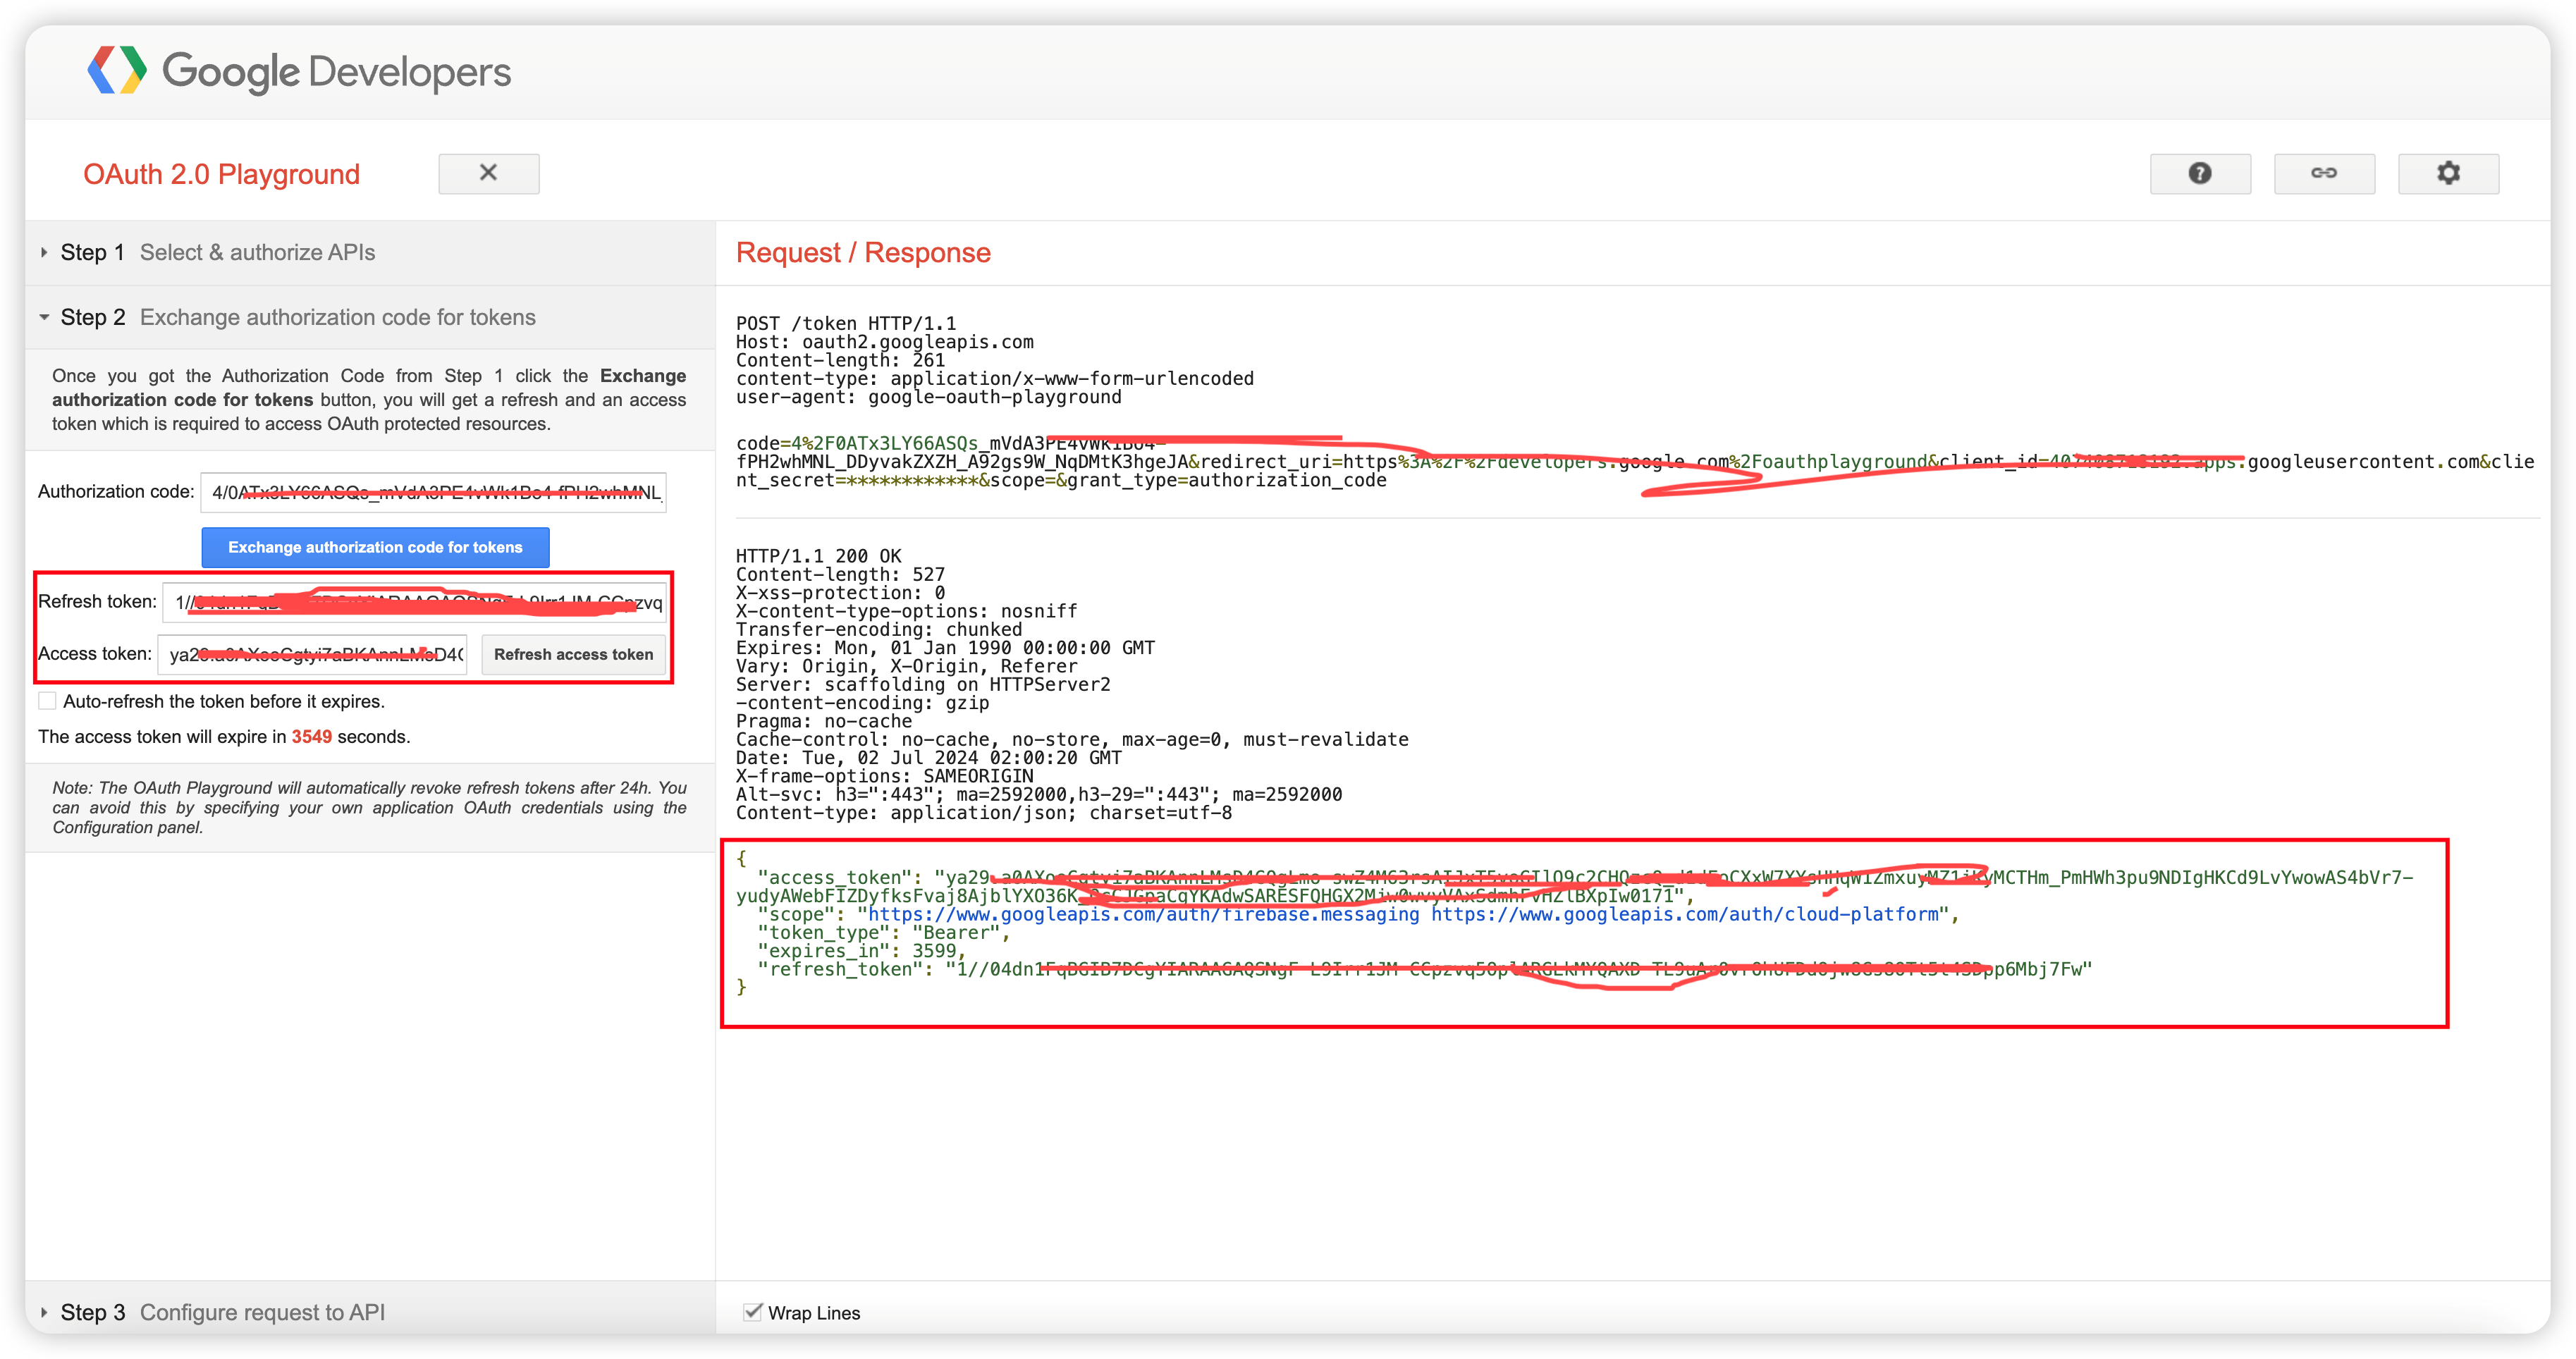
- 勾选
Auto-refresh the token before it expires. - access token 1h 后 过期
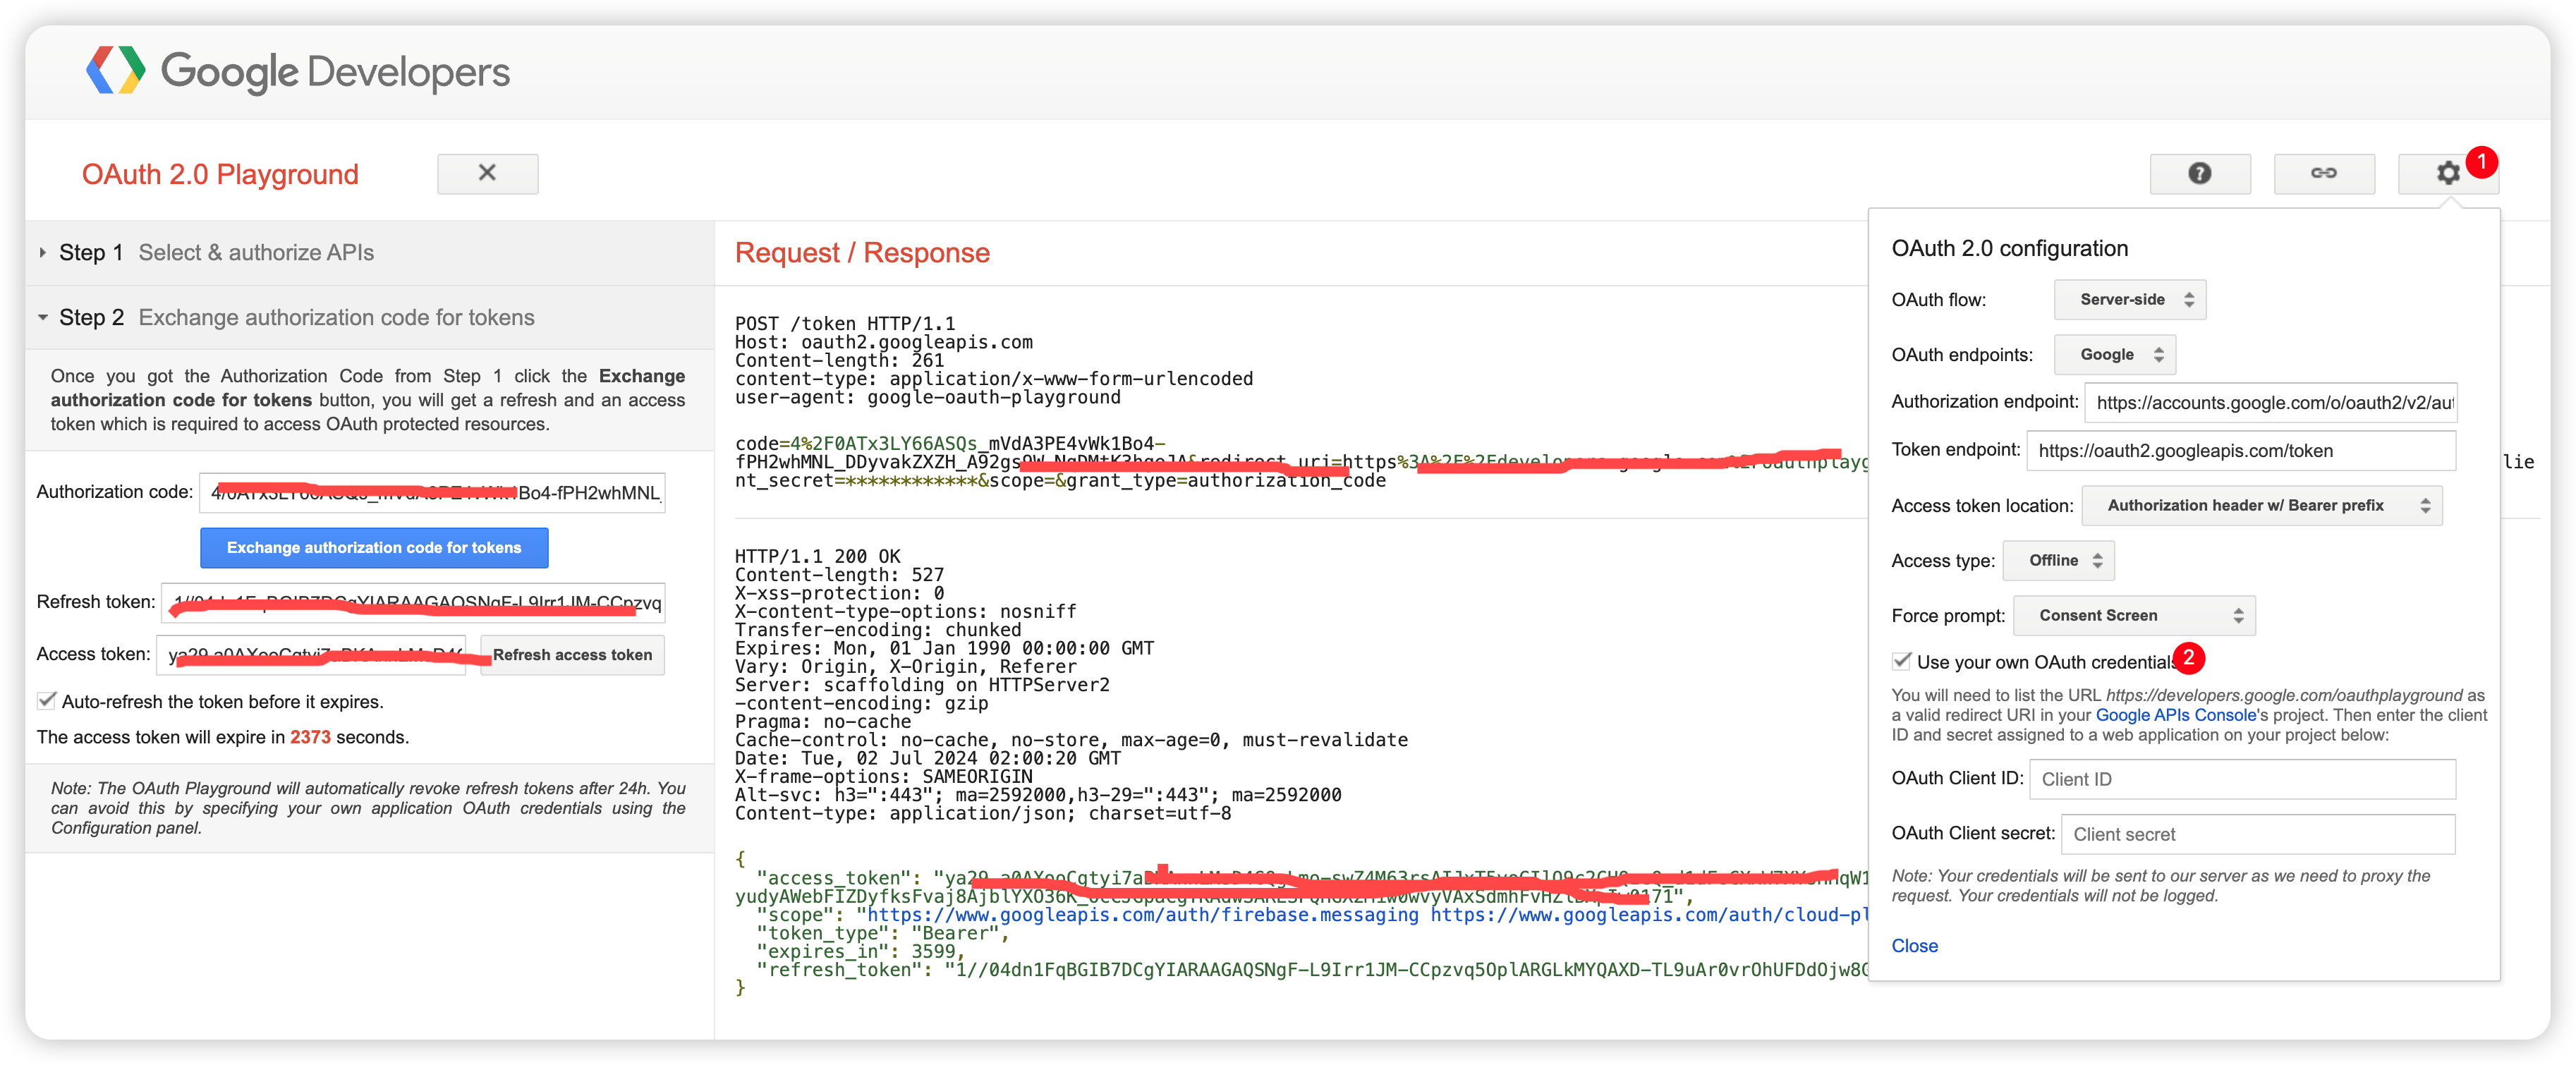
OAuth Playground24h 后会自动移除refresh tokens,你可以通过指定应用的OAuth credentials通过 Configuration 面板 TODO
- Copy the generated “
Access token” as you will require it, if you want to send a message through Postman Or Terminal.
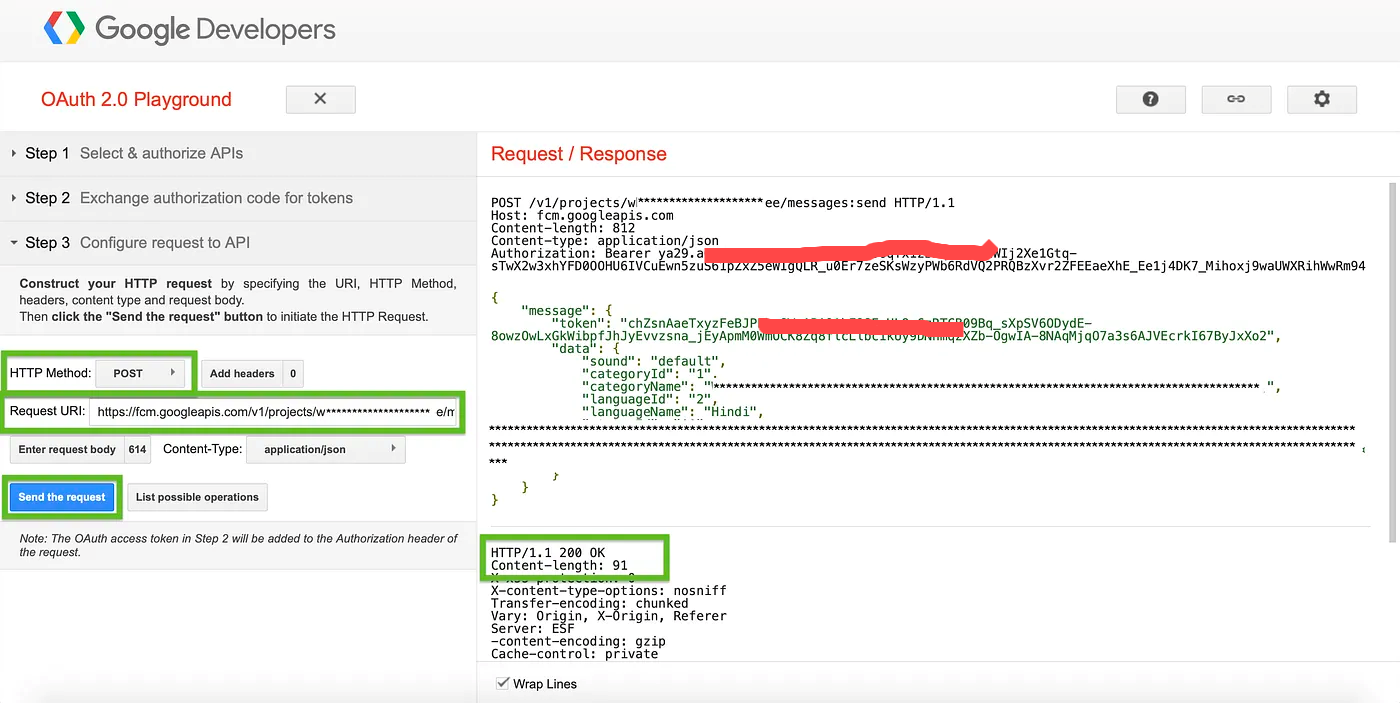
Step 3:发送请求
Configure request to API) and add the following details
- Request URI :
https://fcm.googleapis.com/v1/projects/<Project Id>/messages:send:
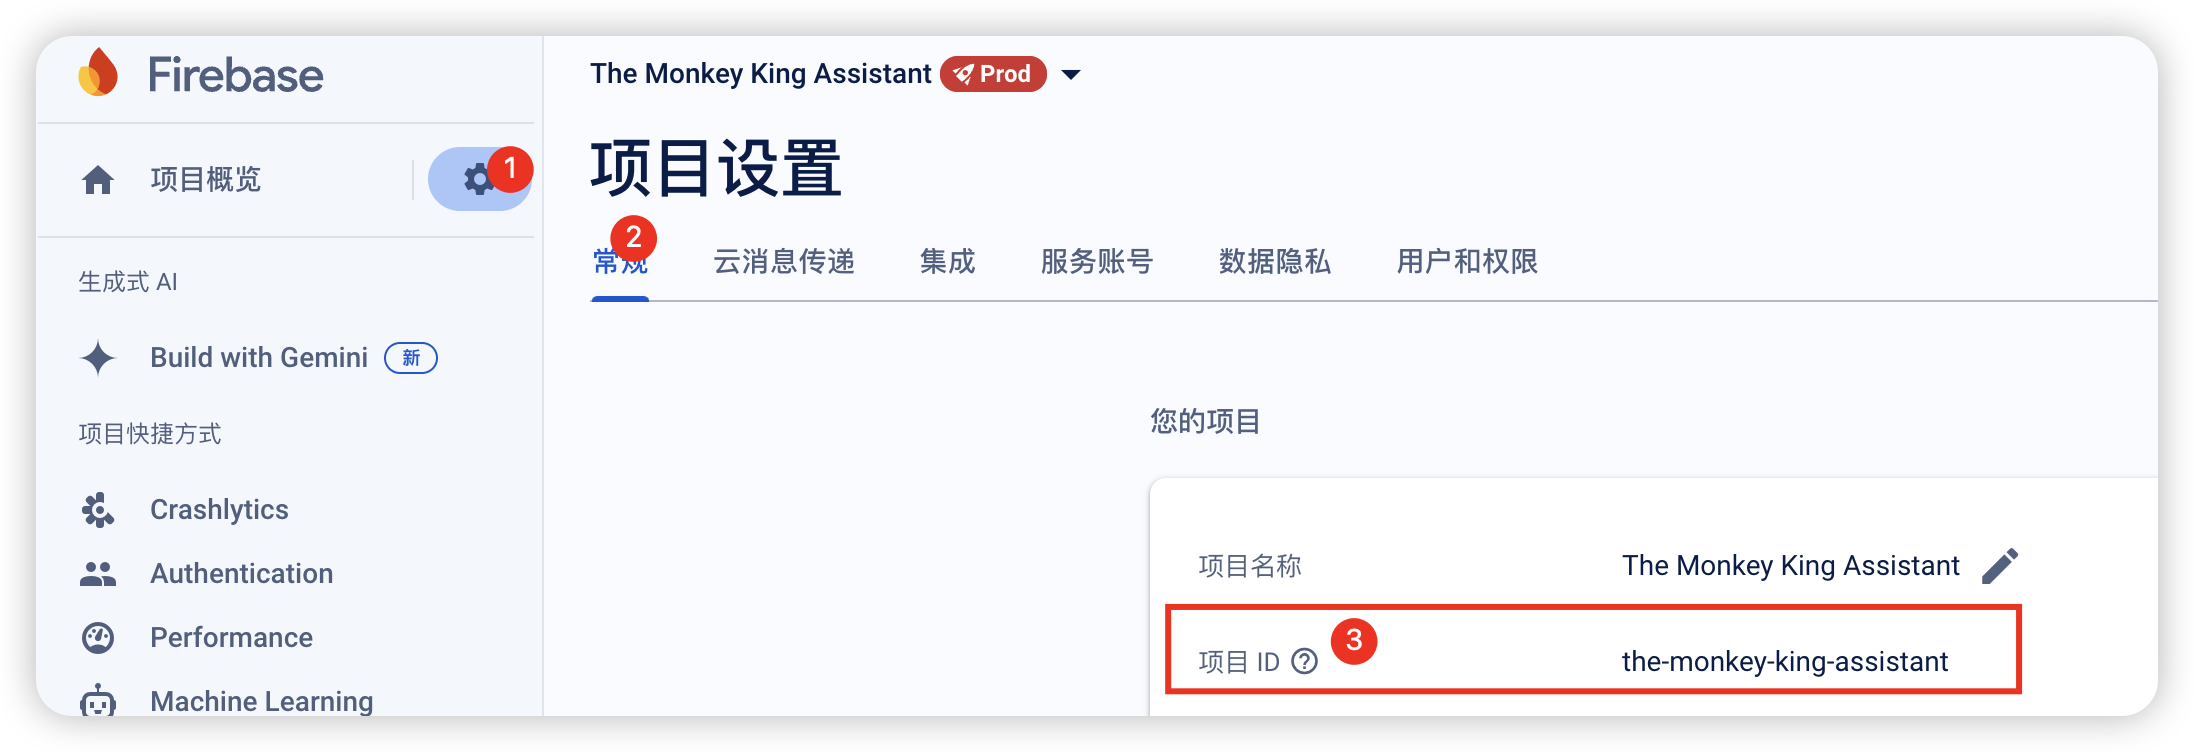
如:https://fcm.googleapis.com/v1/projects/the-monkey-king-assistant/messages:send
- HTTP Method :
POST - 获取 FCM Token
- Click “
Enter request body” and add the payload in the Request Body:
1
2
3
4
5
6
7
8
9
10
11
12
{
    "message": {
        "token": "FCM_TOKEN",
        "data": {
            "body": "Body of Your Notification in data",
            "title": "Title of Your Notification in data",
            "key_1": "Value for key_1",
            "key_2": "Value for key_2",
            "deeplink": "hacket://me/main"
        }
    }
}
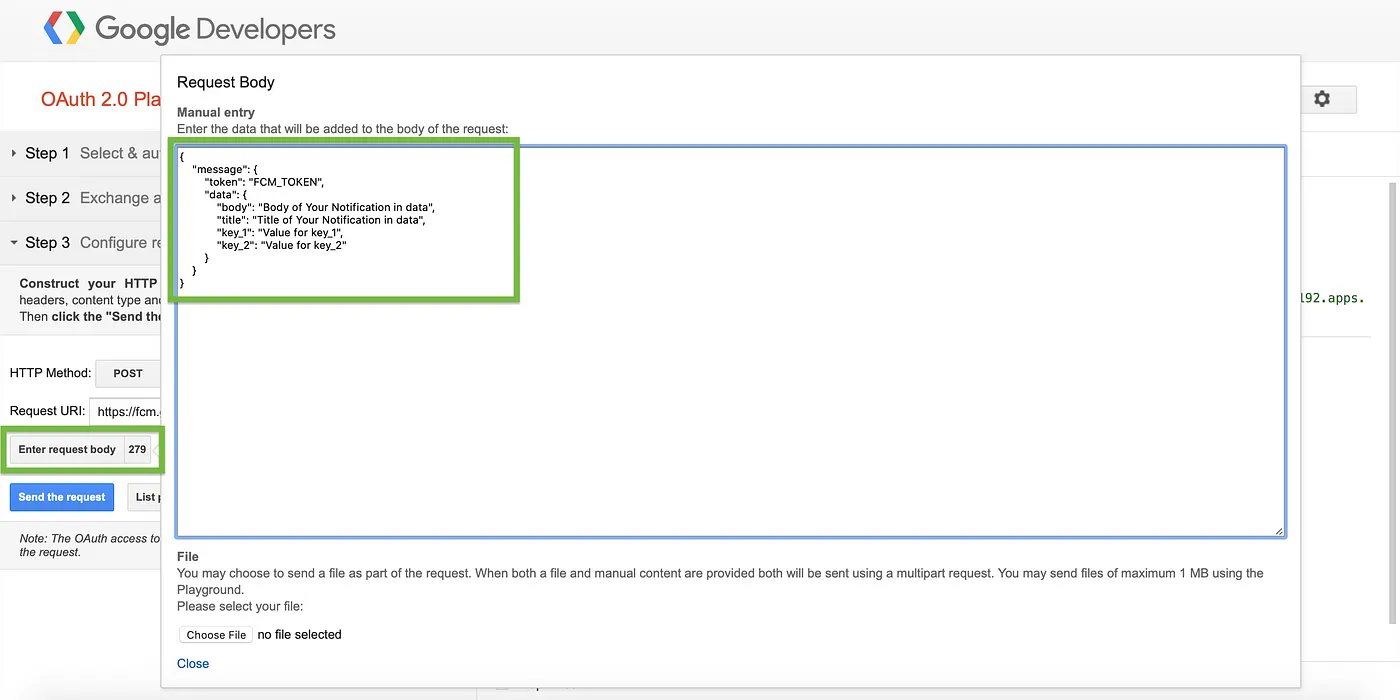
- Click “
Send the request” and Voila, you have successfully send the push notification using FCM HTTP v 1
Postman + HTTP v 1
- Endpoint :
https://fcm.googleapis.com/v1/projects/<Project Id>/messages:send - Method : POST
- Headers :
Authorization : Bearer <Access token>Content-Type : application/json
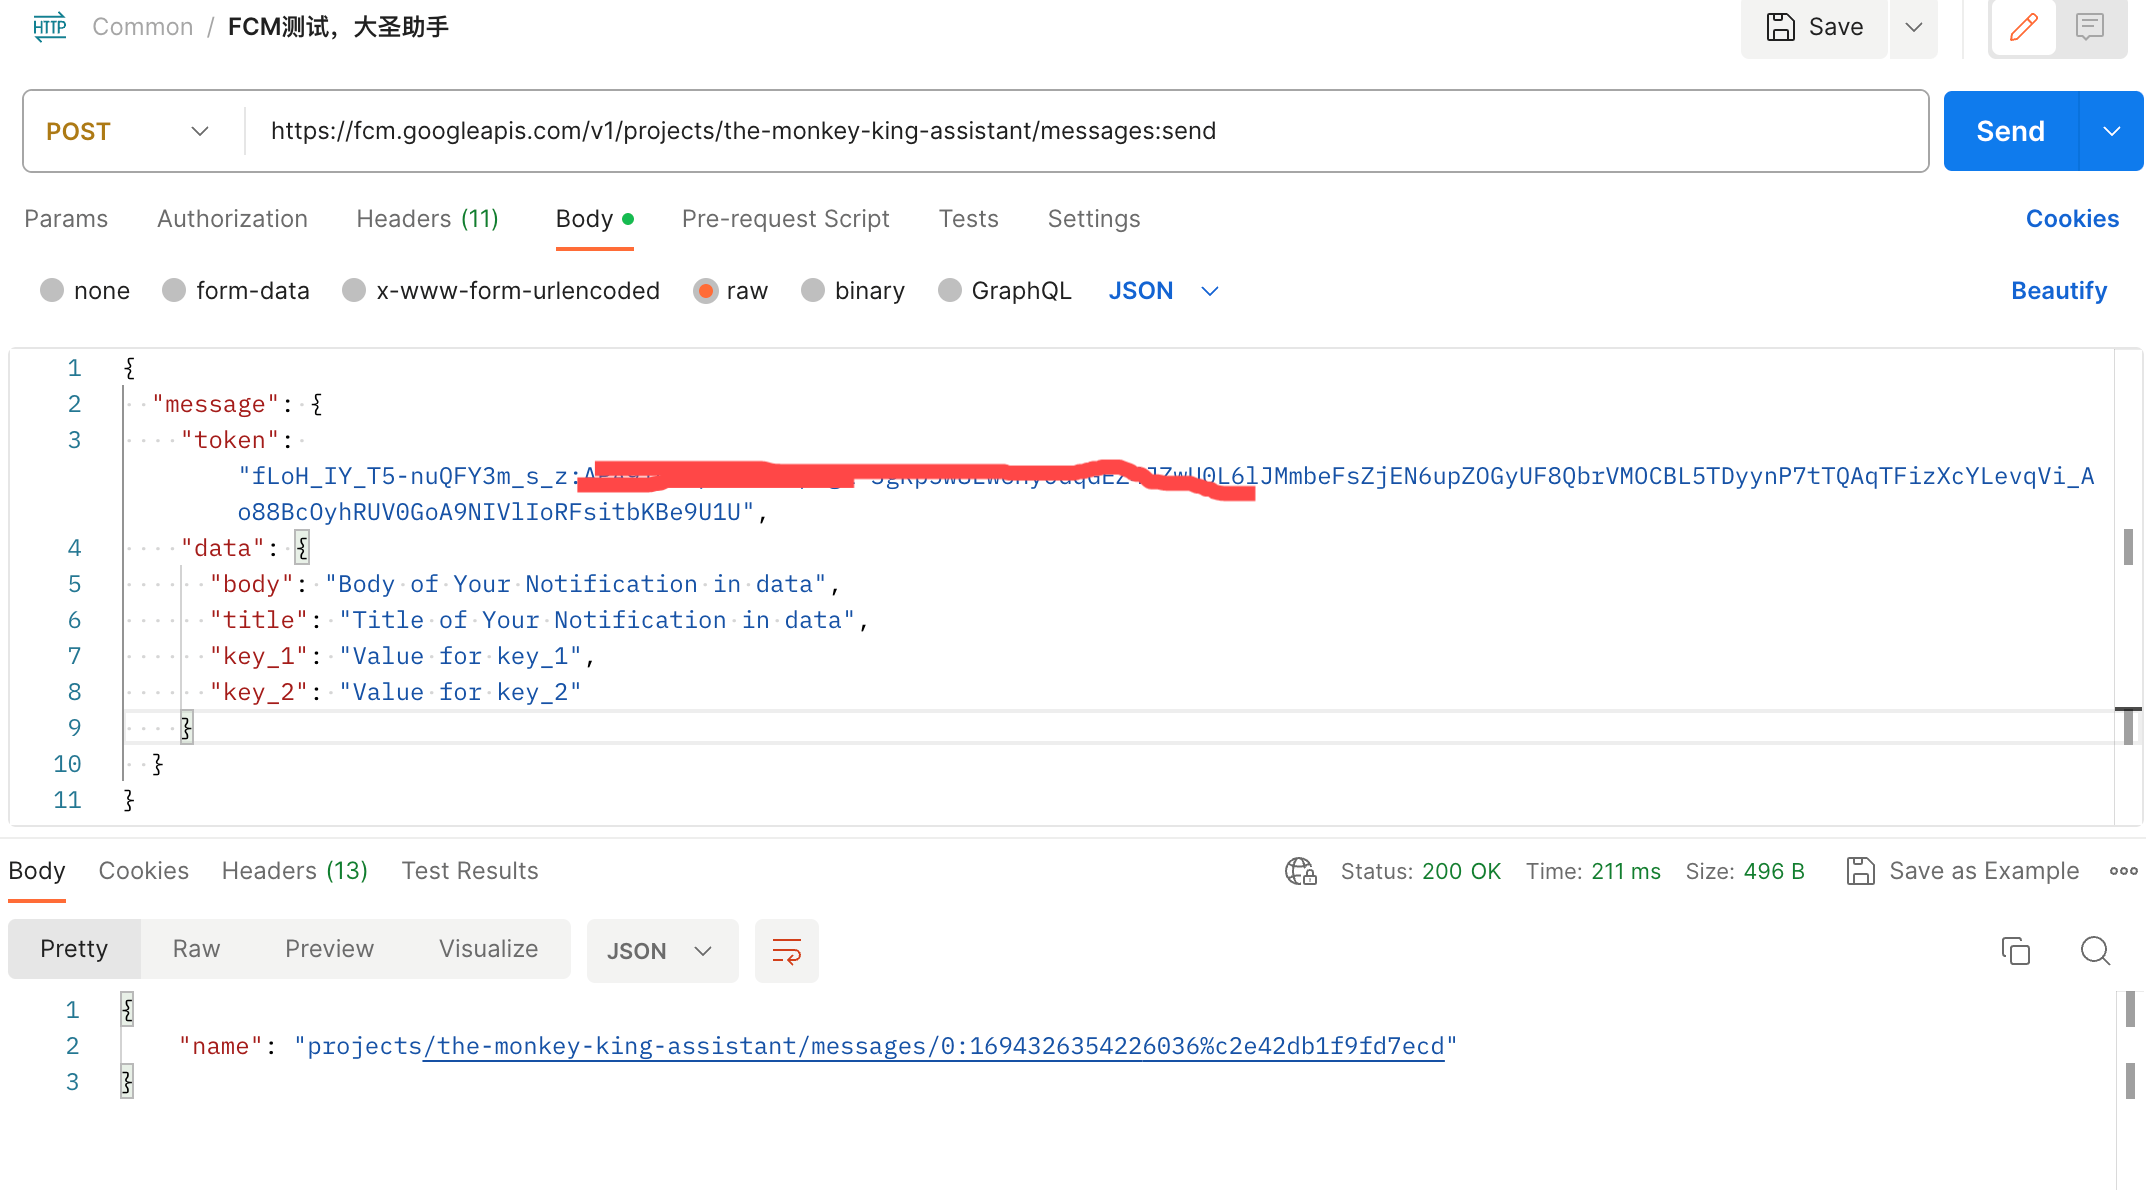
- Body:Body → Raw → JSON
1
2
3
4
5
6
7
8
9
10
11
{
  "message": {
    "token": "FCM_TOKEN",
    "data": {
      "body": "Body of Your Notification in data",
      "title": "Title of Your Notification in data",
      "key_1": "Value for key_1",
      "key_2": "Value for key_2"
    }
  }
}
- Send
Terminal curl + HTTP v 1
Send Notification using Terminal
1
2
3
4
5
6
7
8
9
10
11
12
13
14
curl --location --request POST 'https://fcm.googleapis.com/v1/projects/<Project Id>/messages:send' \
--header 'Authorization: Bearer <Access token>' \
--header 'Content-Type: application/json' \
--data-raw '{
"message": {
"token": "FCM_TOKEN",
"data": {
"body": "Body of Your Notification in data",
"title": "Title of Your Notification in data",
"key_1": "Value for key_1",
"key_2": "Value for key_2"
}
}
}'
三方
PushNotifications 开源的
- 提供 Server Key:
Firebase Console→Settings→Clound Messaging:项目设置/FCM设置 - FCM Token
具体的 json 格式,可参考https://firebase.google.com/docs/cloud-messaging/concept-options
- 简单的
1
2
3
4
5
6
{
    "title": "The notification's title1",
    "body": "The notification's body text1",
    "key1": "Custom value11",
    "key2": "Custom value22"
}
- 示例 2:
1
2
3
4
5
6
7
8
9
10
11
12
13
14
15
16
17
18
19
{
	"token": "fLoH_IY_T5-nuQFY3m_s_z:APA91bE3pClY8cUpwgt-3gRp5w8Lw6Hy0GqGEZ4JZwU0L6lJMmbeFsZjEN6upZOGyUF8QbrVMOCBL5TDyynP7tTQAqTFizXcYLevqVi_Ao88BcOyhRUV0GoA9NIVlIoRFsitbKBe9U1U",
	"notification": {
		"title": "Match update",
		"body": "Arsenal goal in added time, score is now 3-0"
	},
	"android": {
		"ttl": "30s",
		"notification": {
			"click_action": "OPEN_ACTIVITY_1"
		}
	},
  "data": {
            "body": "Body of Your Notification in data",
            "title": "Title of Your Notification in data",
            "key_1": "Value for key_1",
            "key_2": "Value for key_2"
        }
}
fcm-tester
- 获取
secret-key - 获取 fcm token
- 填写 push 消息
代码
| 官方文档:[构建应用服务器发送请求 | Firebase Cloud Messaging](https://firebase.google.com/docs/cloud-messaging/send-message) |
Java
NodeJs
- Send FCM Push Notification from Node.js using Firebase Cloud Messaging (FCM) HTTP V1–2024
- GitHub - patrickkabwe/fcm-node-http: A Node.js client for the FCM HTTP v1 API.
notification 和 data 消息测试
notification 消息
data 消息
Ref
本文由作者按照 CC BY 4.0 进行授权