03.Spring MVC 整合
SSM 整合
SSM 概述
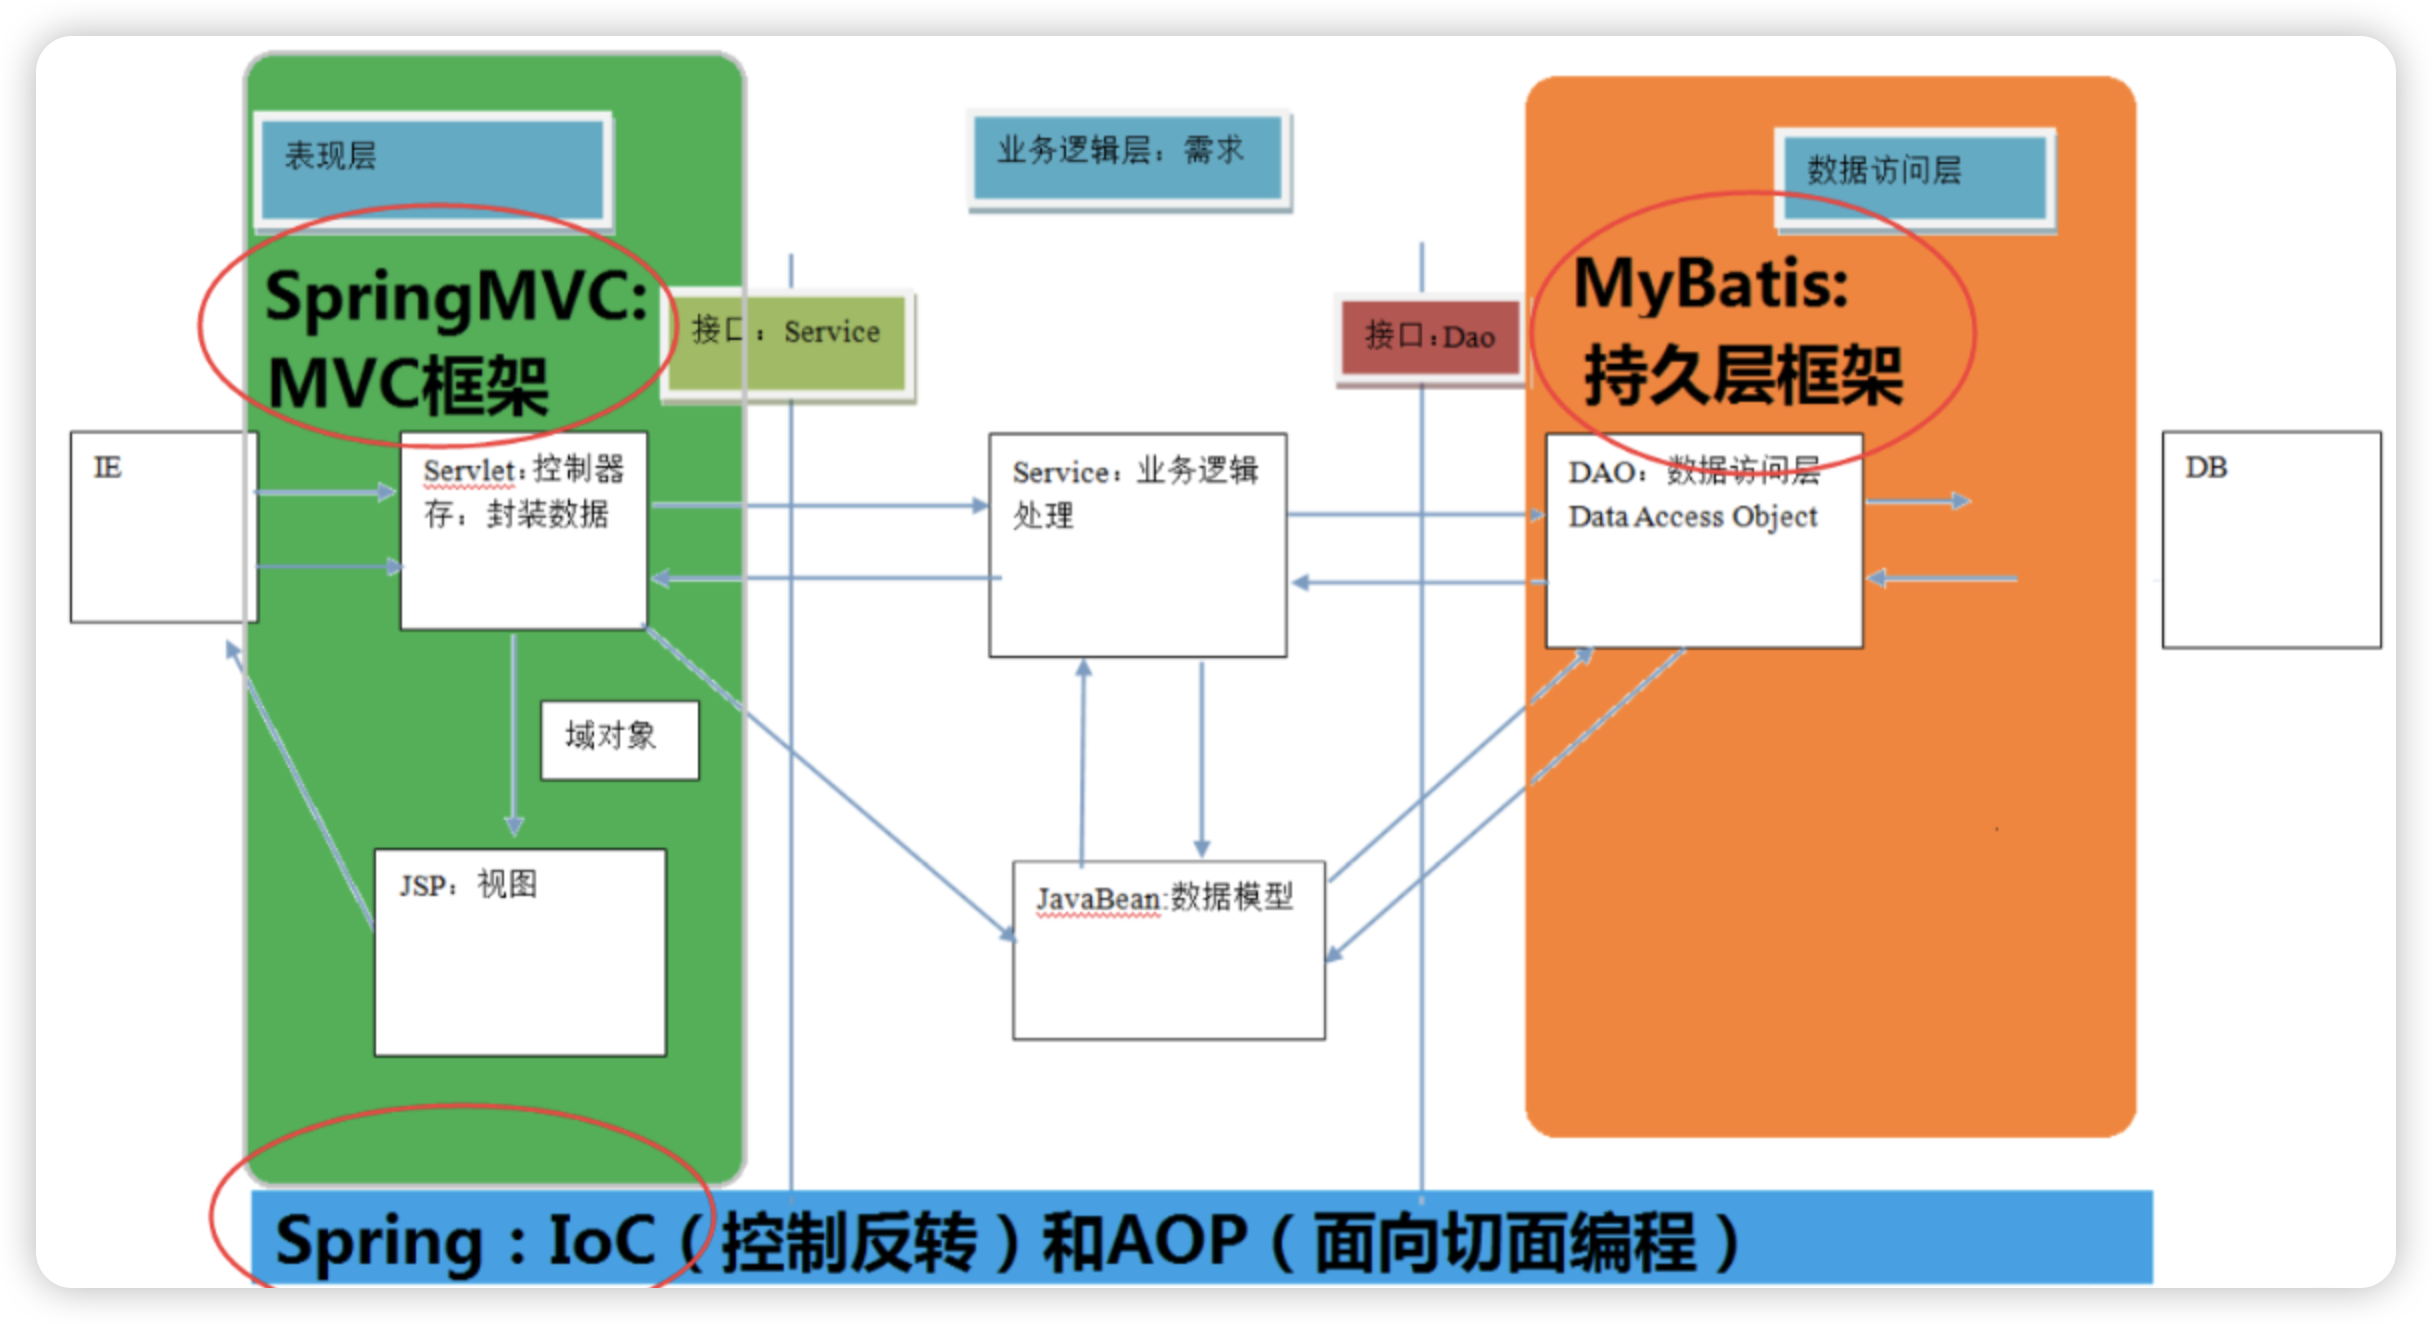
SSM 框架是 Spring、Spring MVC 、和 Mybatis 框架的整合,是标准的 MVC 模式。标准的 SSM 框架有四层,分别是 dao 层(mapper),service 层,controller 层和 View 层。使用 spring 实现业务对象管理,使用 spring MVC 负责请求的转发和视图管理,mybatis 作为数据对象的持久化引擎。
- 持久层:dao 层(mapper)层,主要是做数据持久层的工作,负责与数据库进行联络的一些任务都封装在此。
- 业务层:Service 层,Service 层主要负责业务模块的逻辑应用设计。
- 表现层:Controller 层(Handler 层), 负责具体的业务模块流程的控制。
- 视图层:View 层,主要和控制层紧密结合,主要负责前台 jsp 页面的表示。
持久层:dao 层(mapper)层
作用:主要是做数据持久层的工作,负责与数据库进行联络的一些任务都封装在此。
- Dao 层首先设计的是接口,然后在 Spring 的配置文件中定义接口的实现类。
- 然后可以在模块中进行接口的调用来进行数据业务的处理。(不在关心接口的实现类是哪个类)
- 数据源的配置以及有关数据库连接的参数都在 Spring 的配置文件中进行配置。
业务层:Service 层
作用:Service 层主要负责业务模块的逻辑应用设计。
- 先设计接口然后再设计实类,然后再在 Spring 的配置文件中配置其实现的关联。(业务逻辑层的实现具体要调用到自己已经定义好的 Dao 的接口上)这样就可以在应用中调用 Service 接口来进行业务处理。
- 建立好 Dao 之后再建立 service 层,service 层又要在 controller 层之下,因为既要调用 Dao 层的接口又要提供接口给 controller 层。每个模型都有一个 service 接口,每个接口分别封装各自的业务处理的方法。
表现层:Controller 层(Handler 层)
作用:负责具体的业务模块流程的控制。
- 配置也同样是在 Spring 的配置文件里面进行
- 调用 Service 层提供的接口来控制业务流程。
- 业务流程的不同会有不同的控制器,在具体的开发中可以将我们的流程进行抽象的归纳,设计出可以重复利用的子单元流程模块。
View 层
作用:主要和控制层紧密结合,主要负责前台 jsp 页面的表示。
配置(纯 Java+ 注解,无 xml 配置)
导入依赖
1
2
3
4
5
6
7
8
9
10
11
12
13
14
15
16
17
18
19
20
21
22
23
24
25
26
27
28
29
30
31
32
33
34
35
36
37
38
39
40
41
42
43
44
45
46
47
48
49
50
51
52
53
54
55
56
57
58
59
60
61
<dependencies>
	<!-- SpringMVC -->
	<dependency>
		<groupId>org.springframework</groupId>
		<artifactId>spring-webmvc</artifactId>
		<version>5.3.1</version>
	</dependency>
	<dependency>
		<groupId>org.springframework</groupId>
		<artifactId>spring-jdbc</artifactId>
		<version>5.2.10.RELEASE</version>
	</dependency>
	<dependency>
		<groupId>org.springframework</groupId>
		<artifactId>spring-test</artifactId>
		<version>5.2.10.RELEASE</version>
	</dependency>
	<dependency>
		<groupId>org.mybatis</groupId>
		<artifactId>mybatis</artifactId>
		<version>3.5.6</version>
	</dependency>
	<dependency>
		<groupId>org.mybatis</groupId>
		<artifactId>mybatis-spring</artifactId>
		<version>2.0.6</version>
	</dependency>
	<dependency>
		<groupId>mysql</groupId>
		<artifactId>mysql-connector-java</artifactId>
		<version>5.1.47</version>
	</dependency>
	<dependency>
		<groupId>com.alibaba</groupId>
		<artifactId>druid</artifactId>
		<version>1.1.16</version>
	</dependency>
	<dependency>
		<groupId>junit</groupId>
		<artifactId>junit</artifactId>
		<version>4.12</version>
		<scope>test</scope>
	</dependency>
	<dependency>
		<groupId>javax.servlet</groupId>
		<artifactId>javax.servlet-api</artifactId>
		<version>3.1.0</version>
		<scope>provided</scope>
	</dependency>
	<dependency>
		<groupId>com.fasterxml.jackson.core</groupId>
		<artifactId>jackson-core</artifactId>
		<version>2.15.0</version>
	</dependency>
	<dependency>
		<groupId>org.jetbrains</groupId>
		<artifactId>annotations</artifactId>
		<version>13.0</version>
		<scope>compile</scope>
	</dependency>
</dependencies>
这些都是一些常规的 SSM 整合依赖:
javax.servlet-api为 Servlet 请求交互依赖spring-webmvc为控制层替换依赖mybatis和mybatis-spring为 SpringMVC 整合 MyBatis 依赖druid和spring-jdbc用于 Spring 提供数据源操作依赖jackson-core用于响应数据与接收数据的转换
数据库配置
编写 JdbcConfig 类
1
2
3
4
5
6
7
8
9
10
11
12
13
14
15
16
17
18
19
20
21
22
23
24
25
26
27
28
29
30
31
32
33
34
35
36
37
38
39
40
41
public class JdbcConfig {
    // 注入jdbc.driver配置项的值
    @Value("${jdbc.driver}")
    private String driver;
    // 注入jdbc.url配置项的值
    @Value("${jdbc.url}")
    private String url;
    // 注入jdbc.username配置项的值
    @Value("${jdbc.username}")
    private String username;
    // 注入jdbc.password配置项的值
    @Value("${jdbc.password}")
    private String password;

    @Bean
    public DataSource dataSource() {
        // 创建DruidDataSource作为数据源
        DruidDataSource dataSource = new DruidDataSource();
        // 配置数据源的驱动类
        dataSource.setDriverClassName(driver);
        // 配置数据源的URL
        dataSource.setUrl(url);
        // 配置数据源的用户名
        dataSource.setUsername(username);
        // 配置数据源的密码
        dataSource.setPassword(password);
        return dataSource;
    }

    /**
     * 平台事务管理器
     *
     * @param dataSource DataSource
     */
    @Bean
    public PlatformTransactionManager transactionManager(DataSource dataSource) {
        DataSourceTransactionManager ds = new DataSourceTransactionManager();
        ds.setDataSource(dataSource);
        return ds;
    }
}
resources/jdbc.properties 配置文件:
1
2
3
4
jdbc.driver=com.mysql.jdbc.Driver
jdbc.url=jdbc:mysql://localhost:3306/mybatis?useSSL=false&useUnicode=true&characterEncoding=utf8
jdbc.username=root
jdbc.password=zfs1314520
通过以上的注入操作,可以将配置文件中的数据库连接相关的属性值注入到相应的字段中。这样,其他需要使用数据源的组件可以通过依赖注入的方式获取到这个数据源 Bean,从而获取数据库连接进行操作,事务管理。
数据库测试 SQL:
# 创建数据库
create database mybatis;

# 创建表 book SQL
CREATE TABLE IF NOT EXISTS book(
        id INT(4) PRIMARY KEY  AUTO_INCREMENT COMMENT '主键 ,书籍编号',
type VARCHAR(20),
name VARCHAR(50),
description VARCHAR(200)
);
编写 MyBatisConfig 类
1
2
3
4
5
6
7
8
9
10
11
12
13
14
15
16
17
18
19
20
21
22
23
24
25
26
27
28
public class MyBatisConfig {

    /**
     * 配置SqlSessionFactoryBean,用于创建SqlSessionFactory实例
     *
     * @param dataSource 数据源
     * @return SqlSessionFactoryBean实例
     */
    @Bean
    public SqlSessionFactoryBean sqlSessionFactory(DataSource dataSource) {
        SqlSessionFactoryBean factoryBean = new SqlSessionFactoryBean();
        factoryBean.setDataSource(dataSource);
        factoryBean.setTypeAliasesPackage("me.hacket.entity"); // 设置实体类的别名包路径
        return factoryBean;
    }

    /**
     * 配置MapperScannerConfigurer,用于自动扫描并注册MyBatis的Mapper接口
     *
     * @return MapperScannerConfigurer实例
     */
    @Bean
    public MapperScannerConfigurer mapperScannerConfigurer() {
        MapperScannerConfigurer msc = new MapperScannerConfigurer();
        msc.setBasePackage("me.hacket.mapper"); // 设置Mapper接口的包路径
        return msc;
    }
}
通过在 Spring 的配置文件中引入该配置类,即可完成 MyBatis 的相关配置,使得应用程序可以方便地使用 MyBatis 进行数据库操作。
编写 SpringConfig 类
1
2
3
4
5
6
7
@Configuration
@ComponentScan("me.hacket.service") // 扫描指定包下的组件和Bean
@PropertySource("classpath:jdbc.properties") // 加载jdbc.properties属性文件
@Import({JdbcConfig.class, MyBatisConfig.class}) // 导入JdbcConfig和MyBatisConfig配置类
@EnableTransactionManagement //开启事务
public class SpringConfig {
}
- 当 Spring 使用了事务时,需要使用注解
@EnableTransactionManagement来开启事务 - 通过这些配置,Spring 容器可以加载和管理指定包路径下的组件和 Bean,并且可以根据需要导入其他的配置类,实现灵活的配置和组装
@Import注解是 Spring Framework 中的一个元注解,用于将其他配置类导入到当前配置类中,以便组合多个配置类的功能。通过@Import注解,可以将其他配置类作为 Bean 定义加载到 Spring 容器中- 使用
@PropertySource注解可以方便地管理和加载属性文件中的属性值,使得配置类中的属性值更加灵活和可配置。
编写 SpringMvcConfig 类
1
2
3
4
5
@Configuration
@ComponentScan({"me.hacket.controller", "me.hacket.config"}) // 扫描控制器组件所在的包
@EnableWebMvc // 启用Spring MVC功能
public class SpringMvcConfig {
}
通过以上配置,Spring MVC 能够自动扫描指定包下的控制器类,并提供基于注解的请求映射、参数解析、视图解析等功能,使得开发 Web 应用更加方便和高效。
SpringMvcSupport
1
2
3
4
5
6
7
8
9
10
11
12
13
14
15
16
17
18
19
package me.hacket.config;

import org.springframework.context.annotation.Configuration;
import org.springframework.web.servlet.config.annotation.ResourceHandlerRegistry;
import org.springframework.web.servlet.config.annotation.WebMvcConfigurationSupport;

@Configuration
// @Configuration 是一个注解,用于指明当前类是一个配置类,替代传统的 Spring XML 配置文件。由此告知 Spring 容器,会从该类中查找配置元数据,用以装配和初始化 Spring 应用程序上下文。
public class SpringMvcSupport extends WebMvcConfigurationSupport {
// SpringMvcSupport 是一个继承自 WebMvcConfigurationSupport 的类。WebMvcConfigurationSupport 提供了 Spring 的 MVC 配置信息的默认实现。
    @Override
    protected void addResourceHandlers(ResourceHandlerRegistry registry) {
        // addResourceHandlers 方法用于配置静态资源的处理器。覆盖这个方法以定义静态资源的路径和对应存储位置。
        registry.addResourceHandler("/pages/**").addResourceLocations("/pages/");
        registry.addResourceHandler("/css/**").addResourceLocations("/css/");
        registry.addResourceHandler("/js/**").addResourceLocations("/js/");
        registry.addResourceHandler("/plugins/**").addResourceLocations("/plugins/");
    }
}
WebInit 入口
1
2
3
4
5
6
7
8
9
10
11
12
13
14
15
16
17
18
19
20
21
22
23
24
25
26
27
28
29
30
31
32
33
34
35
36
37
38
39
40
// spring-webmvc< 5.3.x有AbstractAnnotationConfigDispatcherServletInitializer,5.2.x没有
public class WebInit extends AbstractAnnotationConfigDispatcherServletInitializer {

    /**
     * 获取Spring的根配置类,用于配置Spring容器
     *
     * @return 根配置类数组
     */
    protected Class<?>[] getRootConfigClasses() {
        return new Class[]{SpringConfig.class};
    }

    /**
     * 获取SpringMVC的配置类,用于配置SpringMVC容器
     *
     * @return SpringMVC配置类数组
     */
    protected Class<?>[] getServletConfigClasses() {
        return new Class[]{SpringMvcConfig.class};
    }

    /**
     * 获取DispatcherServlet的映射路径
     *
     * @return 映射路径数组
     */
    protected String[] getServletMappings() {
        return new String[]{"/"};
    }

    /**
     * 乱码处理
     */
    @Override
    protected Filter[] getServletFilters() {
        CharacterEncodingFilter filter = new CharacterEncodingFilter();
        filter.setEncoding("UTF-8");
        return new Filter[]{filter};
    }
}
通过在 Web 容器启动时,自动加载该 Servlet 配置类,可以完成 Spring 和 SpringMVC 容器的初始化和配置,使得应用程序可以处理 Web 请求并进行相应的处理。
SpringMVC 的容器,能访问 Spring 容器。而 Spring 的容器,不能访问 SpringMVC 的容器。因为此处设置了 Spring 的 IOC 容器为 Spring MVC 的 IOC 容器的父容器。

模块开发
实体类
1
2
3
4
5
6
7
public class Book {
    private Integer id;
    private String type;
    private String name;
    private String description;
    // getters / setters
}
编写 Dao 层接口
1
2
3
4
5
6
7
8
9
10
11
12
13
14
15
16
17
18
19
20
21
22
public interface BookDao {

    // 插入书籍
    @Insert("insert into book (type, name, description) values (#{type}, #{name}, #{description})")
    public void save(Book book);

    // 更新书籍
    @Update("update book set type = #{type}, name = #{name}, description = #{description} where id = #{id}")
    public void update(Book book);

    // 删除书籍
    @Delete("delete from books  where id = #{id}")
    public void delete(Integer id);

    // 根据ID查询书籍
    @Select("select * from book where id = #{id}")
    public Book getById(Integer id);

    // 获取所有书籍
    @Select("select * from book")
    public List<Book> getAll();
}
- 这些方法使用了 MyBatis 的注解方式来指定对应的 SQL 语句,通过
@Insert、@Update、@Delete、@Select注解将 SQL 语句与方法关联起来。注解中的 SQL 语句使用占位符#{propertyName}来引用对象的属性值,实现动态参数绑定。 - 使用这些方法可以方便地进行数据库操作,例如插入书籍、更新书籍信息、删除书籍、查询单个书籍和获取所有书籍列表。
编写 Service 接口
1
2
3
4
5
6
7
8
9
10
11
12
13
14
15
16
17
18
19
20
21
22
23
24
25
26
27
28
29
30
31
32
33
34
35
36
37
38
39
40
41
42
43
44
45
46
47
48
49
package me.hacket.service;

import me.hacket.entity.Book;
import org.springframework.transaction.annotation.Transactional;

import java.util.List;

@Transactional
public interface BookService {

    /**
     * 保存
     *
     * @param book
     * @return
     */
    public boolean save(Book book);

    /**
     * 修改
     *
     * @param book
     * @return
     */
    public boolean update(Book book);

    /**
     * 按id删除
     *
     * @param id
     * @return
     */
    public boolean delete(Integer id);

    /**
     * 按id查询
     *
     * @param id
     * @return
     */
    public Book getById(Integer id);

    /**
     * 查询全部
     *
     * @return
     */
    public List<Book> getAll();
}
- 当 Spring 使用了事务时,需要使用注解
@Transactional来启用事务。若还需要对@Transactional做其余的配置,可以根据需求来进行决定 - 通常来说,Service 接口层的编写,需要见名知意思
- 通常来说,在编写接口时,需要对此服务的操作结果进行返回
编写 Service 接口实现层
1
2
3
4
5
6
7
8
9
10
11
12
13
14
15
16
17
18
19
20
21
22
23
24
25
26
27
28
@Service
public class BookServiceImpl implements BookService {
    @Autowired
    private BookDao bookDao;

    public boolean save(Book book) {
        bookDao.save(book);
        return true;
    }

    public boolean update(Book book) {
        bookDao.update(book);
        return true;
    }

    public boolean delete(Integer id) {
        bookDao.delete(id);
        return true;
    }

    public Book getById(Integer id) {
        return bookDao.getById(id);
    }

    public List<Book> getAll() {
        return bookDao.getAll();
    }
}
通常来说,编写完 Service 实现类后,就可以对 Service 层进行方法的测试
测试 Service 接口
1
2
3
4
5
6
7
8
9
10
11
12
13
14
15
16
17
18
19
20
21
22
23
24
25
26
27
28
29
30
31
32
33
34
35
36
37
38
39
40
41
42
43
44
package me.hacket.test;

import me.hacket.config.SpringConfig;
import me.hacket.entity.Book;
import me.hacket.service.BookService;
import org.junit.Test;
import org.junit.runner.RunWith;
import org.springframework.beans.factory.annotation.Autowired;
import org.springframework.test.context.ContextConfiguration;
import org.springframework.test.context.junit4.SpringJUnit4ClassRunner;

import java.util.List;

@RunWith(SpringJUnit4ClassRunner.class) // 注解指定了运行测试的类为SpringJUnit4ClassRunner,这样就能够在测试过程中启动Spring容器。
@ContextConfiguration(classes = SpringConfig.class) // 注解指定了使用哪个配置类来加载Spring容器。
public class BookServiceTest {

    @Autowired
    private BookService bookService;

    @Test
    public void testInsert() {
        Book book = new Book();
        book.setName("Java");
        book.setType("编程");
        book.setDescription("Java编程");
        boolean save = bookService.save(book);
        System.out.println("保存结果:" + save + ",保存后的图书:" + book);
    }

    @Test
    public void testGetById() {
        // 测试根据ID获取图书信息的方法
        Book book = bookService.getById(1);
        System.out.println(book);
    }

    @Test
    public void testGetAll() {
        // 测试获取所有图书信息的方法
        List<Book> all = bookService.getAll();
        System.out.println(all);
    }
}
@RunWith注解用于指定测试运行器(test runner),它告诉 JUnit 在运行测试时使用特定的运行器来执行测试。@ContextConfiguration注解用于指定 Spring 容器的配置信息,告诉 JUnit 在运行测试之前要加载哪些配置。
编写表现层
1
2
3
4
5
6
7
8
9
10
11
12
13
14
15
16
17
18
19
20
21
22
23
24
25
26
27
28
29
30
31
32
@RestController
@RequestMapping("/books")
public class BookController {

    @Autowired
    private BookService bookService;

    @PostMapping
    public boolean save(@RequestBody Book book) {
        return bookService.save(book);
    }

    @PutMapping
    public boolean update(@RequestBody Book book) {
        return bookService.update(book);
    }

    @DeleteMapping("/{id}")
    public boolean delete(@PathVariable Integer id) {
        return bookService.delete(id);
    }

    @GetMapping("/{id}")
    public Book getById(@PathVariable Integer id) {
        return bookService.getById(id);
    }

    @GetMapping
    public List<Book> getAll() {
        return bookService.getAll();
    }
}
在表现层(Presentation Layer),数据封装指的是将请求数据和响应数据进行适当的封装和转换,以便在控制器(Controller)和视图(View)之间进行数据传递和交互。
步骤一:设置统一数据的返回结果类
1
2
3
4
5
6
7
8
9
10
11
12
13
14
15
16
17
18
19
20
21
22
23
24
// @Date
public class Result {
    //描述统一格式中的数据
    private Object data;
    //描述统一格式中的编码,用于区分操作,可以简化配置0或1表示成功失败
    private Integer code;
    //描述统一格式中的消息,可选属性
    private String msg;

    public Result() {
    }

    public Result(Integer code,Object data) {
        this.data = data;
        this.code = code;
    }

    public Result(Integer code, Object data, String msg) {
        this.data = data;
        this.code = code;
        this.msg = msg;
    }
}
Result 类中的字段并不是固定的,可以根据需要自行增减提供若干个构造方法,方便操作
- 前端接收数据格式 - 创建结果模型类,封装数据到 data 属性中
- 前端接收数据格式 - 封装特殊消息到 message(msg) 属性中
- 前端接收数据格式 - 封装操作结果到 code 属性中
设置统一数据的返回状态码
1
2
3
4
5
6
7
8
9
10
11
12
// 状态码
public class Code {
    public static final Integer SAVE_OK = 20011;
    public static final Integer DELETE_OK = 20021;
    public static final Integer UPDATE_OK = 20031;
    public static final Integer GET_OK = 20041;

    public static final Integer SAVE_ERR = 20010;
    public static final Integer DELETE_ERR = 20020;
    public static final Integer UPDATE_ERR = 20030;
    public static final Integer GET_ERR = 20040;
}
优化表现层类
1
2
3
4
5
6
7
8
9
10
11
12
13
14
15
16
17
18
19
20
21
22
23
24
25
26
27
28
29
30
31
32
33
34
35
36
37
38
39
40
41
42
// 统一每一个控制器方法返回值
@RestController
@RequestMapping("/books")
public class BookController {

    @Autowired
    private BookService bookService;

    @PostMapping
    public Result save(@RequestBody Book book) {
        boolean flag = bookService.save(book);
        return new Result(flag ? Code.SAVE_OK:Code.SAVE_ERR,flag);
    }

    @PutMapping
    public Result update(@RequestBody Book book) {
        boolean flag = bookService.update(book);
        return new Result(flag ? Code.UPDATE_OK:Code.UPDATE_ERR,flag);
    }

    @DeleteMapping("/{id}")
    public Result delete(@PathVariable Integer id) {
        boolean flag = bookService.delete(id);
        return new Result(flag ? Code.DELETE_OK:Code.DELETE_ERR,flag);
    }

    @GetMapping("/{id}")
    public Result getById(@PathVariable Integer id) {
        Book book = bookService.getById(id);
        Integer code = book != null ? Code.GET_OK : Code.GET_ERR;
        String msg = book != null ? "" : "数据查询失败,请重试!";
        return new Result(code,book,msg);
    }

    @GetMapping
    public Result getAll() {
        List<Book> bookList = bookService.getAll();
        Integer code = bookList != null ? Code.GET_OK : Code.GET_ERR;
        String msg = bookList != null ? "" : "数据查询失败,请重试!";
        return new Result(code,bookList,msg);
    }
}
通常来说,可以在表现层实现业务逻辑的处理,我们可以在此设置操作结果的返回处理
异常处理
异常处理器
异常处理器(Exception Handler)是一种用于捕获和处理应用程序中出现的异常的机制。在 Java 的 Web 应用中,异常处理器通常用于捕获控制器(Controller)中发生的异常,并根据需要进行适当的处理和响应。
出现异常现象的常见位置与常见诱因如下:
- 框架内部抛出的异常: 因使用不合规导致
- 数据层抛出的异常: 因外部服务器故障导致(例如: 服务器访问超时)
- 业务层抛出的异常: 因业务逻辑书写错误导致(例如: 遍历业务书写操作,导致索引异常等)
- 表现层抛出的异常: 因数据收集、校验等规则导致(例如: 不匹配的数据类型间导致异常)
- 工具类抛出的异常: 因工具类书写不严谨不够健壮导致(例如: 必要释放的连接长期未释放等)
拦截并处理异常
1
2
3
4
5
6
7
8
9
10
11
12
13
14
15
16
17
18
19
20
21
22
23
24
25
26
27
// @RestControllerAdvice用于标识当前类为REST风格对应的异常处理器
@RestControllerAdvice
public class ProjectExceptionAdvice {
    // 用于处理用户操作不当而导致的异常
    @ExceptionHandler(BusinessException.class)
    public Result doBusinessException(BusinessException ex){
        return new Result(ex.getCode(),null,ex.getMessage());
    }

    //@ExceptionHandler用于设置当前处理器类对应的异常类型
    @ExceptionHandler(SystemException.class)
    public Result doSystemException(SystemException ex){
        //记录日志
        //发送消息给运维
        //发送邮件给开发人员,ex对象发送给开发人员
        return new Result(ex.getCode(),null,ex.getMessage());
    }

    //除了自定义的异常处理器,保留对Exception类型的异常处理,用于处理非预期的异常
    @ExceptionHandler(Exception.class)
    public Result doOtherException(Exception ex){
        //记录日志
        //发送消息给运维
        //发送邮件给开发人员,ex对象发送给开发人员
        return new Result(Code.SYSTEM_UNKNOW_ERR,null,"系统繁忙,请稍后再试!");
    }
}
@RestControllerAdvice是一个用于全局异常处理的注解,为 Rest 风格开发的控制器类做增强。它可以在整个应用程序范围内捕获和处理异常,并将处理结果以统一的格式返回给客户端;此注解自带@ResponseBody注解与@Component注解,具备对应的功能@ExceptionHandler(Exception.class)注解用于标识一个异常处理方法,指定了要捕获和处理的异常类型。在这里,它捕获的是Exception类型的异常;设置指定异常的处理方案,功能等同于控制器方法,出现异常后终止原始控制器执行,并转入当前方法执行;此类方法可以根据处理的异常不同,制作多个方法分别处理对应的异常