02.Spring IoC
Spring IoC 基础
IoC 和 DI
控制反转 (Inversion of Control, IoC)
IoC是一种设计原则,它将对象的控制权从代码自身转移到外部容器或框架中。这种设计原则可以用多种方式实现,其中依赖注入(DI)是最常用的一种。
使用 IoC 容器,应用程序不需要直接控制对象的创建和管理,而是由 IoC 容器负责。这使得代码更加松耦合,易于扩展和测试。
Spring 框架提供了一个强大的 IoC 容器来管理对象及其依赖关系。Spring IoC 容器基于 Java 的反射机制,能够自动装配 bean。
依赖注入 (Dependency Injection, DI)
依赖注入概述
依赖注入是一种软件设计模式,它允许对象通过外部资源(如配置文件或框架)将其依赖项(其他对象)注入到对象中,而不是在对象内部直接创建依赖项。这样可以提高代码的灵活性和可测试性。
简单示例: 假设我们有一个 Service 类依赖于 Repository 类。传统方式会在 Service 类中直接创建 Repository 实例,而使用依赖注入可以通过构造函数或Setter 方法将 Repository 实例传递给 Service 类。
1
2
3
4
5
6
7
8
9
10
11
12
13
14
15
16
17
18
19
20
21
22
23
// 传统方式
public class Service {
    private Repository repository;

    public Service() {
        this.repository = new Repository(); // 直接在内部创建依赖对象
    }
}

// 使用依赖注入
public class Service {
    private Repository repository;

    // 构造函数注入
    public Service(Repository repository) {
        this.repository = repository;
    }

    // Setter方法注入
    public void setRepository(Repository repository) {
        this.repository = repository;
    }
}
总结来说,IoC 是一种设计原则,通过依赖注入(DI)模式实现。 在 Spring 框架中,IoC 容器负责管理 bean 的生命周期及其依赖项,使得应用更容易维护和扩展。
什么是依赖注入?
依赖是指依靠某种东西来获得支持。比如我会说我们对手机的依赖程度过高。
在讨论 依赖注入 之前,我们先理解编程中的依赖是什么意思。
当 class A 使用 class B 的某些功能时,则表示 class A 具有 class B 依赖。
在 Java 中,在使用其他 class 的方法之前,我们首先需要创建那个 class 的对象(即 class A 需要创建一个 class B 实例)。
因此,将创建对象的任务转移给其他 class,并直接使用依赖项的过程,被称为 “ 依赖项注入 “。
耦合依赖示例:
- Dao
1
2
3
4
5
6
7
8
9
10
11
12
13
14
15
16
17
18
public interface UserDao {
	void getUser();
}
public class UserDaoImpl implements UserDao{
    public void getUser() {
        System.out.println("默认获取用户的数据……");
    }
}
public class UserDaoMySQLImpl implements UserDao{
    public void getUser() {
        System.out.println("默认获取用户的数据……从MySQL");
    }
}
public class UserDaoOracleImpl implements UserDao{
    public void getUser() {
        System.out.println("默认获取用户的数据……从Oracle");
    }
}
- Service
1
2
3
4
5
6
7
8
9
10
public interface UserService {
    void getUser();
}
public class UserServiceImpl implements UserService{
    private UserDao userDao = new UserDaoImpl(); // 这里写死了UserDaoImpl,后续要更换UserDaoMySQLImpl,需要改代码

    public void getUser() {
        userDao.getUser();
    }
}
- 测试
1
2
3
4
5
6
7
8
public class MyTest {
    public static void main(String[] args) {
        // 用户实际调用的是业务层,dao层不需要接触
        UserServiceImpl userService = new UserServiceImpl();

        userService.getUser();
    }
}
在 UserServiceImpl 中,直接硬编码依赖了 UserDaoImpl,导致后续要更换 UserDaoMySQLImpl,需要改代码,耦合性过高,怎么解决这种依赖呢?
- 通过 UserServiceImpl 的构造函数将 UserDao 传递进来
- 通过在 UserServiceImpl 提供 setter,将 UserDao 设置进来
为什么需要使用依赖注入?
假设我们有一个 car class,其中包含各种对象,例如车轮、引擎等。
这里的 car class 负责创建所有依赖对象。现在,如果我们决定将来放弃 MRFWheels,而希望使用 **Yokohama** 车轮,该怎么办?
我们将需要使用新的 Yokohama 依赖关系来重新创建 car 对象。但是,当使用依赖注入(DI)时,我们可以在运行时更改车轮 wheels(因为可以在运行时而不是在编译时注入依赖项)。
你可以将依赖注入视为代码中的中间人,它负责创建想要的 wheels 对象,并将其提供给 car class。
它使 car class 不需要创建车轮 wheels、电池 battery 对象等。
控制反转——依赖注入背后的概念
这是指一个类不应静态配置其依赖项,而应由其他一些类从外部进行配置。
这是 S.O.L.I.D 的第五项原则 ——一类应该依赖于抽象,而不是依赖于具体的东西(简单地说,就是硬编码)。
根据这些原则,一个类应该专注于履行其职责,而不是创建履行这些职责所需的对象。这就是依赖注入发挥作用的地方:它为类提供了必需的对象。
使用依赖注入优缺点
优点:
- 帮助进行单元测试。
- 由于依赖关系的初始化是由注入器组件完成的,因此减少了样板代码。
- 扩展应用程序变得更加容易。
- 帮助实现松耦合,这在应用编程中很重要。
缺点:
- 学习起来有点复杂,如果使用过度会导致管理问题和其他问题。
- 许多编译时错误被推送到运行时。
- 依赖注入框架是通过反射或动态编程实现的。这可能会妨碍 IDE 自动化的使用,例如 “ 查找引用 “,” 显示调用层次结构 “ 和安全重构。
依赖注入的作用是
- 创建对象
- 知道哪些类需要那些对象
- 并提供所有这些对象
如果对象有任何更改,则依赖注入会对其进行调查,并且不应影响到使用这些对象的类。这样,如果将来对象发生变化,则依赖注入负责为类提供正确的对象。
实现依赖注入的库和框架
- Spring (Java)
- Google Guice (Java)
- Dagger /Hilt (Java and Android)
- Castle Windsor (. NET)
- Unity (. NET)
Spring 中 IOC、IOC 容器、Bean、DI 概念
什么是控制反转呢?
使用对象时,由主动 new 产生对象转换为由==外部==提供对象,此过程中对象创建控制权由程序转移到外部,此思想称为控制反转。
- 业务层要用数据层的类对象,以前是自己
new的 - 现在自己不 new 了,交给
别人[外部]来创建对象 别人[外部]就反转控制了数据层对象的创建权- 这种思想就是控制反转
Spring 和 IOC 之间的关系是什么呢?
- Spring 技术对 IOC 思想进行了实现
- Spring 提供了一个容器,称为==IOC 容器==,用来充当 IOC 思想中的 “ 外部 “
- IOC 思想中的
别人[外部]指的就是 Spring 的 IOC 容器
IOC 容器的作用以及内部存放的是什么?
- IOC 容器负责对象的创建、初始化等一系列工作,其中包含了数据层和业务层的类对象
- 被创建或被管理的对象在 IOC 容器中统称为==Bean==
- IOC 容器中放的就是一个个的 Bean 对象
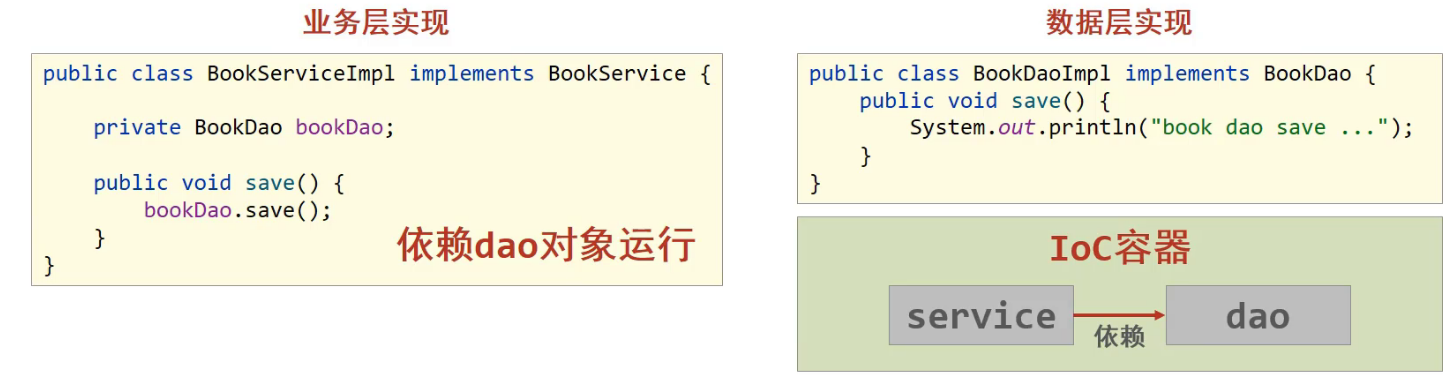
当 IOC 容器中创建好 service 和 dao 对象后,程序能正确执行么?
- 不行,因为 service 运行需要依赖 dao 对象
- IOC 容器中虽然有 service 和 dao 对象
- 但是 service 对象和 dao 对象没有任何关系
- 需要把 dao 对象交给 service,也就是说要绑定 service 和 dao 对象之间的关系
像这种在容器中建立对象与对象之间的绑定关系就要用到 DI
什么是依赖注入呢?
- 在容器中建立 bean 与 bean 之间的依赖关系的整个过程,称为依赖注入
- 业务层要用数据层的类对象,以前是自己
new的 - 现在自己不 new 了,靠
别人[外部其实指的就是IOC容器]来给注入进来 - 这种思想就是依赖注入
- 业务层要用数据层的类对象,以前是自己
IOC 容器中哪些 bean 之间要建立依赖关系呢?
- 这个需要程序员根据业务需求提前建立好关系,如业务层需要依赖数据层,service 就要和 dao 建立依赖关系
介绍完 Spring 的 IOC 和 DI 的概念后,我们会发现这两个概念的最终目标就是:==充分解耦==,具体实现靠:
- 使用 IOC 容器管理 bean(IOC)
- 在 IOC 容器内将有依赖关系的 bean 进行关系绑定(DI)
- 最终结果为: 使用对象时不仅可以直接从 IOC 容器中获取,并且获取到的 bean 已经绑定了所有的依赖关系.
核心概念小结
重点要理解 什么是IOC/DI思想、什么是IOC容器 和 什么是Bean:
什么 IOC/DI 思想?
- IOC: 控制反转,控制反转的是对象的创建权
- DI: 依赖注入,绑定对象与对象之间的依赖关系
什么是 IOC 容器?
- Spring 创建了一个容器用来存放所创建的对象,这个容器就叫 IOC 容器
什么是 Bean?
- 容器中所存放的一个个对象就叫 Bean 或 Bean 对象
Spring IoC 和 DI
Spring IoC
IoC 容器
控制反转 loC (Inversion of Control),是一种设计思想,DI(依赖注入)是实现 loC 的一种方法,也有人认为 DI 只是 loC 的另一种说法。没有 loC 的程序中,我们使用面向对象编程,对象的创建与对象间的依赖关系完全硬编码在程序中,对象的创建由程序自己控制,控制反转后将对象的创建转移给第三方,个人认为所谓控制反转就是:获得依赖对象的方式反转了。
- IoC 是 Spring 框架的核心内容,使用多种方式完美的实现了 IoC,可以使用 XML 配置,也可以使用注解,新版本的 Spring 也可以零配置实现 IoC。
- Spring 容器在初始化时先读取配置文件,根据配置文件或元数据创建与组织对象存入容器中,程序使用时再从 Ioc 容器中取出需要的对象。
- 采用 XML 方式配置 Bean 的时候,Bean 的定义信息是和实现分离的,而采用注解的方式可以把两者合为一体,Bean 的定义信息直接以注解的形式定义在实现类中,从而达到了零配置的目的。
- 控制反转是一种通过描述(XML 或注解)并通过第三方去生产或获取特定对象的方式。在 Spring 中实现控制反转的是 IoC 容器,其实现方法是依赖注入(Dependency Injection, DI)。
Spring IoC 案例
思路分析
(1)Spring 是使用容器来管理 bean 对象的,那么管什么?
- 主要管理项目中所使用到的类对象,比如 (Service 和 Dao)
(2) 如何将被管理的对象告知 IOC 容器?
- 使用配置文件
- 注解? Spring 4.0
(3) 被管理的对象交给 IOC 容器,要想从容器中获取对象,就先得思考如何获取到 IOC 容器?
- Spring 框架提供相应的接口
(4)IOC 容器得到后,如何从容器中获取 bean?
- 调用 Spring 框架提供对应接口中的方法
(5) 使用 Spring 导入哪些坐标?
- 用别人的东西,就需要在 pom.xml 添加对应的依赖
代码
- 添加 Spring 的依赖 jar 包
1
2
3
4
5
6
7
8
9
10
11
12
13
<dependencies>
    <dependency>
        <groupId>org.springframework</groupId>
        <artifactId>spring-context</artifactId>
        <version>5.2.10.RELEASE</version>
    </dependency>
    <dependency>
        <groupId>junit</groupId>
        <artifactId>junit</artifactId>
        <version>4.12</version>
        <scope>test</scope>
    </dependency>
</dependencies>
- 添加案例中需要的类:创建
BookService,BookServiceImpl,BookDao和BookDaoImpl四个类
1
2
3
4
5
6
7
8
9
10
11
12
13
14
15
16
17
18
public interface BookDao {
    public void save();
}
public class BookDaoImpl implements BookDao {
    public void save() {
        System.out.println("book dao save ...");
    }
}
public interface BookService {
    public void save();
}
public class BookServiceImpl implements BookService {
    private BookDao bookDao = new BookDaoImpl();
    public void save() {
        System.out.println("book service save ...");
        bookDao.save();
    }
}
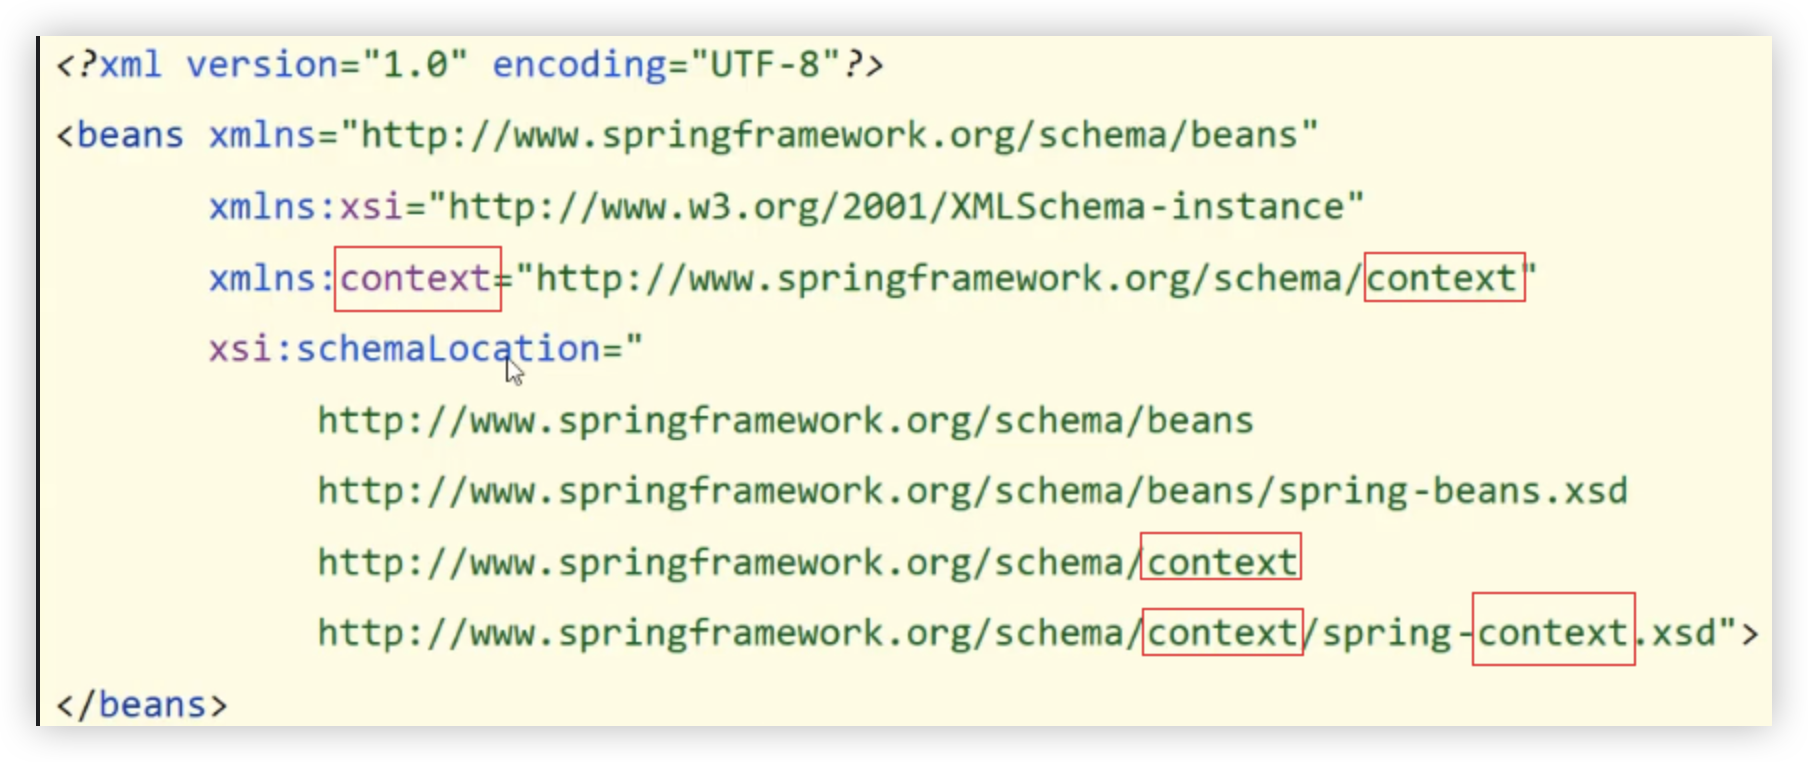
- resources 下添加 spring 配置文件
applicationContext.xml,并完成 bean 的配置
1
2
3
4
5
6
7
8
9
10
11
12
13
<?xml version="1.0" encoding="UTF-8"?>
<beans xmlns="http://www.springframework.org/schema/beans"
       xmlns:xsi="http://www.w3.org/2001/XMLSchema-instance"
       xsi:schemaLocation="http://www.springframework.org/schema/beans http://www.springframework.org/schema/beans/spring-beans.xsd">

    <!--bean标签标示配置bean
    	id属性标示给bean起名字
    	class属性表示给bean定义类型
	-->
	<bean id="bookDao" class="com.itheima.dao.impl.BookDaoImpl"/>
    <bean id="bookService" class="com.itheima.service.impl.BookServiceImpl"/>

</beans>
==注意事项:bean 定义时 id 属性在同一个上下文中 (配置文件) 不能重复==
- 获取 IOC 容器
1
2
3
4
5
6
7
8
9
10
public class App {
    public static void main(String[] args) {
        //获取IOC容器
		ApplicationContext ctx = new ClassPathXmlApplicationContext("applicationContext.xml");
//        BookDao bookDao = (BookDao) ctx.getBean("bookDao");
//        bookDao.save();
        BookService bookService = (BookService) ctx.getBean("bookService");
        bookService.save();
    }
}
Spring 的 IOC 入门案例已经完成,但是在 BookServiceImpl 的类中依然存在 BookDaoImpl 对象的 new 操作,它们之间的耦合度还是比较高,这块该如何解决,就需要用到下面的 DI:依赖注入。
Spring 依赖注入
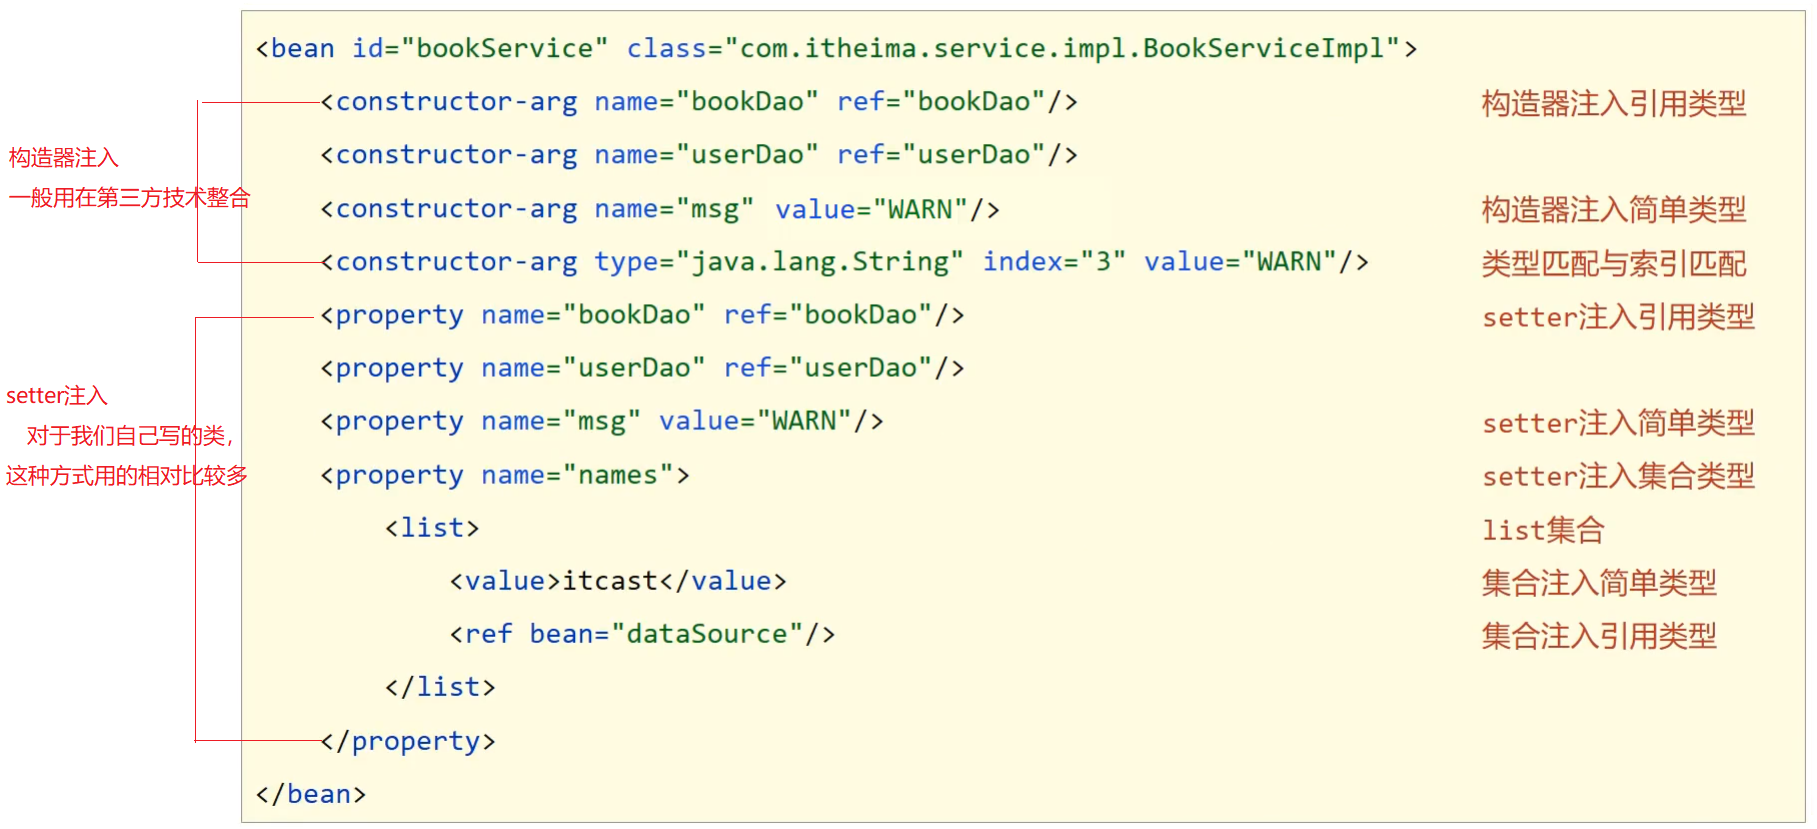
依赖注入分类
- 构造函数注入: 依赖关系是通过 class 构造器提供的。
- setter 注入: 注入程序用客户端的 setter 方法注入依赖项。
- 接口注入: 依赖项提供了一个注入方法,该方法将把依赖项注入到传递给它的任何客户端中。客户端必须实现一个接口,该接口的 setter 方法接收依赖。
构造器注入
在构造器中传递对象。
通过无参构造方法来创建
- JavaBean
1
2
3
4
5
6
7
8
9
10
11
12
13
14
15
16
17
18
19
20
21
package me.hacket.spring.model;

public class User {
    private String name;

    public User() {
        System.out.println("User的无参构造!");
    }

    public String getName() {
        return name;
    }

    public void setName(String name) {
        this.name = name;
    }

    public void show() {
        System.out.println("show name=" + name);
    }
}
- Beans. Xml
1
2
3
4
5
6
7
8
9
<?xml version="1.0" encoding="UTF-8"?>
<beans xmlns="http://www.springframework.org/schema/beans"
       xmlns:xsi="http://www.w3.org/2001/XMLSchema-instance"
       xsi:schemaLocation="http://www.springframework.org/schema/beans
       http://www.springframework.org/schema/beans/spring-beans.xsd">
    <bean id="user" class="me.hacket.spring.model.User">
        <property name="name" value="hacket"/>
    </bean>
</beans>
- 测试类
1
2
3
4
5
6
7
8
@Test
public void testUser() {
	ApplicationContext context = new ClassPathXmlApplicationContext("beans.xml");
	// 在执行getBean的时候, user已经创建好, 通过无参构造
	User user = (User) context.getBean("user");
	// 调用对象的方法 .
	user.show();
}
在调用 show 方法之前,User 对象已经通过无参构造初始化了
通过有参构造方法来创建
- UserT. Java
1
2
3
4
5
6
7
8
9
10
11
12
13
14
15
16
17
18
19
20
21
22
23
24
25
26
package me.hacket.spring.model;

public class UserT {
    private String name;

    public UserT(String name) {
        this.name = name;
        System.out.println("UserT一个参数构造函数被调用");
    }

    public UserT() {
        System.out.println("UserT默认构造函数被调用");
    }

    public String getName() {
        return name;
    }

    public void setName(String name) {
        this.name = name;
    }

    public void show() {
        System.out.println("name=" + name);
    }
}
- Beans. Xml 有三种方式编写
- 下标赋值
- 类型
- 参数名
1
2
3
4
5
6
7
8
9
10
11
12
13
14
15
16
17
18
19
20
21
<?xml version="1.0" encoding="UTF-8"?>
<beans xmlns="http://www.springframework.org/schema/beans"
       xmlns:xsi="http://www.w3.org/2001/XMLSchema-instance"
       xsi:schemaLocation="http://www.springframework.org/schema/beans
       http://www.springframework.org/schema/beans/spring-beans.xsd">
    <!-- 第一种:根据index参数下标设置 -->
    <!--<bean id="userT" class="me.hacket.spring.model.UserT">
        <constructor-arg index="0" value="hacket1"/>
    </bean>-->

    <!-- 第二种:根据参数类型设置,不建议使用 -->
    <!--    <bean id="userT" class="me.hacket.spring.model.UserT">-->
    <!--        <constructor-arg type="java.lang.String" value="hacket2"/>-->
    <!--    </bean>-->

    <!-- 第三种:根据参数名字设置 -->
    <bean id="userT" class="me.hacket.spring.model.UserT">
        <!-- name指参数名 -->
        <constructor-arg name="name" value="hacket3——"/>
    </bean>
</beans>
- 测试
1
2
3
4
5
6
7
8
@Test
public void testUserT() {
	ApplicationContext context = new ClassPathXmlApplicationContext("beans.xml");
	// 在执行getBean的时候, user已经创建好, 通过有参构造
	UserT user = (UserT) context.getBean("userT");
	// 调用对象的方法 .
	user.show();
}
总结: 在配置文件加载的时候,容器中管理的对象就已经初始化了
Setter 注入
- JavaBean
1
2
3
4
5
6
7
8
9
10
11
12
13
14
public class Address {
    private String address;
}

public class Student {
    private String name;
    private Address address;
    private String[] books;
    private List<String> hobby;
    private Map<String, String> card;
    private Set<String> games;
    private String wife;
    private Properties info;
}
- beans.xml
1
2
3
4
5
6
7
8
9
10
11
12
13
14
15
16
17
18
19
20
21
22
23
24
25
26
27
28
29
30
31
32
33
34
35
36
37
38
39
40
41
42
43
44
45
46
47
48
49
50
51
52
53
54
55
56
57
58
59
60
61
62
63
64
<?xml version="1.0" encoding="UTF-8"?>
<beans xmlns="http://www.springframework.org/schema/beans"
       xmlns:xsi="http://www.w3.org/2001/XMLSchema-instance"
       xsi:schemaLocation="http://www.springframework.org/schema/beans
       http://www.springframework.org/schema/beans/spring-beans.xsd">

    <bean id="address" class="me.hacket.spring.model.Address">
        <property name="address" value="深圳"/>
    </bean>
    <bean id="student" class="me.hacket.spring.model.Student">
        <!-- 第一种:普通值注入,value -->
        <property name="name" value="hacket"/>
        <!-- 第二种:Bean注入,ref -->
        <property name="address" ref="address"/>
        <!-- 第三种:数组注入 -->
        <property name="books">
            <array>
                <value>Mybatis</value>
                <value>Spring</value>
                <value>SpringMVC</value>
            </array>
        </property>
        <!-- 第四种:list注入 -->
        <property name="hobby">
            <list>
                <value>家里蹲</value>
                <value>精神萎靡</value>
                <value>无法沟通</value>
            </list>
        </property>
        <!-- 第五种:map注入 -->
        <property name="card">
            <map>
                <entry key="身份证" value="123456"/>
                <entry key="银行卡" value="654321"/>
            </map>
        </property>
        <!-- 第六种:set注入 -->
        <property name="games">
            <set>
                <value>王者荣耀</value>
                <value>英雄联盟</value>
                <value>绝地求生</value>
            </set>
        </property>
        <!-- 第七种:null注入 -->
        <!--<property name="info" value="null"/>-->
        <property name="wife">
            <null/>
        </property>
        <!-- 空字符串注入 -->
        <!--<property name="info" value=""/>-->

        <!-- 第八种:Properties注入 -->
        <property name="info">
            <props>
                <prop key="学号">20240106</prop>
                <prop key="性别">保密</prop>
                <prop key="姓名">hacket</prop>
            </props>
        </property>
    </bean>

</beans>
- 测试
1
2
3
4
5
6
@Test
public void testStudent() {
	ApplicationContext context = new ClassPathXmlApplicationContext("beans.xml");
	Student student = (Student) context.getBean("student");
	System.out.println(student);
}
依赖注入案例
思路分析
(1) 要想实现依赖注入,必须要基于 IOC 管理 Bean
- DI 的入门案例要依赖于前面 IOC 的入门案例
(2)Service 中使用 new 形式创建的 Dao 对象是否保留?
- 需要删除掉,最终要使用 IOC 容器中的 bean 对象
(3)Service 中需要的 Dao 对象如何进入到 Service 中?
- 在 Service 中提供方法,让 Spring 的 IOC 容器可以通过该方法传入 bean 对象
(4)Service 与 Dao 间的关系如何描述?
- 使用配置文件
代码
- 去除代码中的 new:在 BookServiceImpl 类中,删除业务层中使用 new 的方式创建的 dao 对象;为属性提供 setter 方法
1
2
3
4
5
6
7
8
9
10
11
12
13
public class BookServiceImpl implements BookService {
    //删除业务层中使用new的方式创建的dao对象
    private BookDao bookDao;

    public void save() {
        System.out.println("book service save ...");
        bookDao.save();
    }
    //提供对应的set方法
    public void setBookDao(BookDao bookDao) {
        this.bookDao = bookDao;
    }
}
- 在配置文件中添加依赖注入的配置
1
2
3
4
5
6
7
8
9
10
11
12
13
14
15
16
17
18
19
20
<?xml version="1.0" encoding="UTF-8"?>
<beans xmlns="http://www.springframework.org/schema/beans"
       xmlns:xsi="http://www.w3.org/2001/XMLSchema-instance"
       xsi:schemaLocation="http://www.springframework.org/schema/beans http://www.springframework.org/schema/beans/spring-beans.xsd">
    <!--bean标签标示配置bean
    	id属性标示给bean起名字
    	class属性表示给bean定义类型
	-->
    <bean id="bookDao" class="com.itheima.dao.impl.BookDaoImpl"/>

    <bean id="bookService" class="com.itheima.service.impl.BookServiceImpl">
        <!--配置server与dao的关系-->
        <!--property标签表示配置当前bean的属性
        		name属性表示配置哪一个具体的属性
        		ref属性表示参照哪一个bean
		-->
        <property name="bookDao" ref="bookDao"/>
    </bean>

</beans>
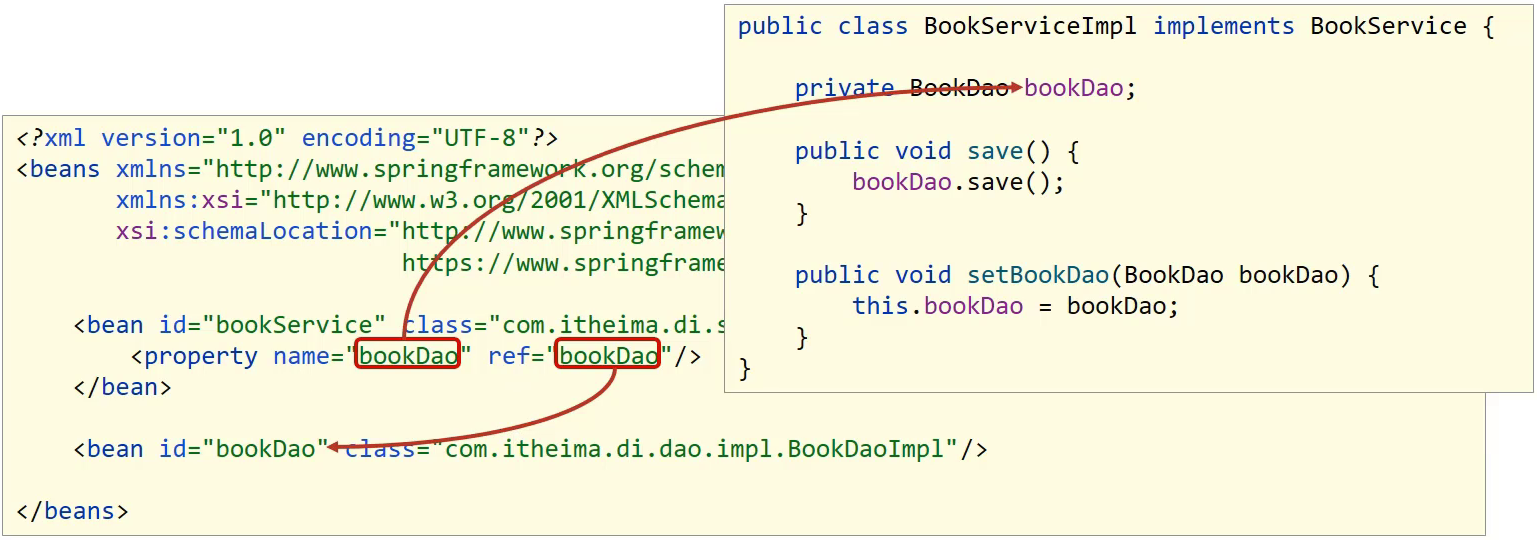
==注意: 配置中的两个 bookDao 的含义是不一样的==
name="bookDao"中bookDao的作用是让 Spring 的 IOC 容器在获取到名称后,将首字母大写,前面加 set 找对应的setBookDao()方法进行对象注入ref="bookDao"中bookDao的作用是让 Spring 能在 IOC 容器中找到 id 为bookDao的 Bean 对象给bookService进行注入- 综上所述,对应关系如下:
p 空间注入(属性注入)
- p 命名空间注入 : 需要在头文件中加入约束文件
xmlns:p="http://www.springframework.org/schema/p"
1
2
3
4
5
6
7
8
9
10
11
12
13
<?xml version="1.0" encoding="UTF-8"?>
<beans xmlns="http://www.springframework.org/schema/beans"
       xmlns:p="http://www.springframework.org/schema/p"
       xmlns:c="http://www.springframework.org/schema/c"
       xmlns:xsi="http://www.w3.org/2001/XMLSchema-instance"
       xsi:schemaLocation="http://www.springframework.org/schema/beans
       http://www.springframework.org/schema/beans/spring-beans.xsd">

	<!-- p命名空间注入,可以直接注入属性的值: property -->
	<bean id="user2" class="me.hacket.spring.model.User"
		p:name="hacket p命名空间注入"
		p:age="32"/>
</beans>
c 空间注入(构造器注入)
c 命名空间注入 : 需要在头文件中加入约束文件 xmlns:c="http://www.springframework.org/schema/c
- c 空间注入示例
1
2
3
4
5
6
7
8
9
10
11
12
13
<?xml version="1.0" encoding="UTF-8"?>
<beans xmlns="http://www.springframework.org/schema/beans"
       xmlns:c="http://www.springframework.org/schema/c"
       xmlns:xsi="http://www.w3.org/2001/XMLSchema-instance"
       xsi:schemaLocation="http://www.springframework.org/schema/beans
       http://www.springframework.org/schema/beans/spring-beans.xsd">

    <!-- c命名空间注入,可以通过构造器注入: construct-args -->
    <bean id="userc" class="me.hacket.spring.model.User"
          c:name="hacket c命名空间注入"
          c:age="22"/>

</beans>
- 发现问题:
beans.xml爆红了,User 没有写有参构造
1
2
3
4
5
6
7
8
9
public class User {
    private String name;
    private int age;

    public User(String name, int age) {
        this.name = name;
        this.age = age;
    }
}
- 解决:把有参、无参构造器加上。
- 由此可知:c 就是所谓的构造器注入
集合注入
- 数组
- List
- Set
- Map
- Properties
添加添加 BookDao、BookDaoImpl 类:
1
2
3
4
5
6
7
8
9
10
11
12
13
14
15
16
17
18
19
20
21
22
23
24
25
26
27
28
29
30
31
32
33
public interface BookDao {
    public void save();
}

public class BookDaoImpl implements BookDao {

public class BookDaoImpl implements BookDao {

    private int[] array;

    private List<String> list;

    private Set<String> set;

    private Map<String,String> map;

    private Properties properties;

     public void save() {
        System.out.println("book dao save ...");

        System.out.println("遍历数组:" + Arrays.toString(array));

        System.out.println("遍历List" + list);

        System.out.println("遍历Set" + set);

        System.out.println("遍历Map" + map);

        System.out.println("遍历Properties" + properties);
    }
	//setter....方法省略,自己使用工具生成
}
resources 下提供 spring 的配置文件,applicationContext.xml
1
2
3
4
5
6
7
8
9
10
11
12
13
14
15
16
17
18
19
20
21
22
23
24
25
26
27
28
29
30
31
32
33
34
35
36
37
38
39
40
41
42
43
44
45
<?xml version="1.0" encoding="UTF-8"?>
<beans xmlns="http://www.springframework.org/schema/beans"
       xmlns:xsi="http://www.w3.org/2001/XMLSchema-instance"
       xsi:schemaLocation="http://www.springframework.org/schema/beans http://www.springframework.org/schema/beans/spring-beans.xsd">

    <bean id="bookDao" class="com.itheima.dao.impl.BookDaoImpl">
	    <property name="array">
		    <array>
		        <value>100</value>
		        <value>200</value>
		        <value>300</value>
		    </array>
		</property>
		<property name="list">
		    <list>
		        <value>itcast</value>
		        <value>itheima</value>
		        <value>boxuegu</value>
		        <value>chuanzhihui</value>
		    </list>
		</property>
		<property name="set">
		    <set>
		        <value>itcast</value>
		        <value>itheima</value>
		        <value>boxuegu</value>
		        <value>boxuegu</value>
		    </set>
		</property>
		<property name="map">
		    <map>
		        <entry key="country" value="china"/>
		        <entry key="province" value="henan"/>
		        <entry key="city" value="kaifeng"/>
		    </map>
		</property>
		<property name="properties">
		    <props>
		        <prop key="country">china</prop>
		        <prop key="province">henan</prop>
		        <prop key="city">kaifeng</prop>
		    </props>
		</property>
    </bean>
</beans>
说明:
property标签表示 setter 方式注入,构造方式注入constructor-arg标签内部也可以写<array>、<list>、<set>、<map>、<props>标签- List 的底层也是通过数组实现的,所以
<list>和<array>标签是可以混用 - 集合中要添加引用类型,只需要把
<value>标签改成<ref>标签,这种方式用的比较少
bean.xml
bean 基础配置
- bean 相关
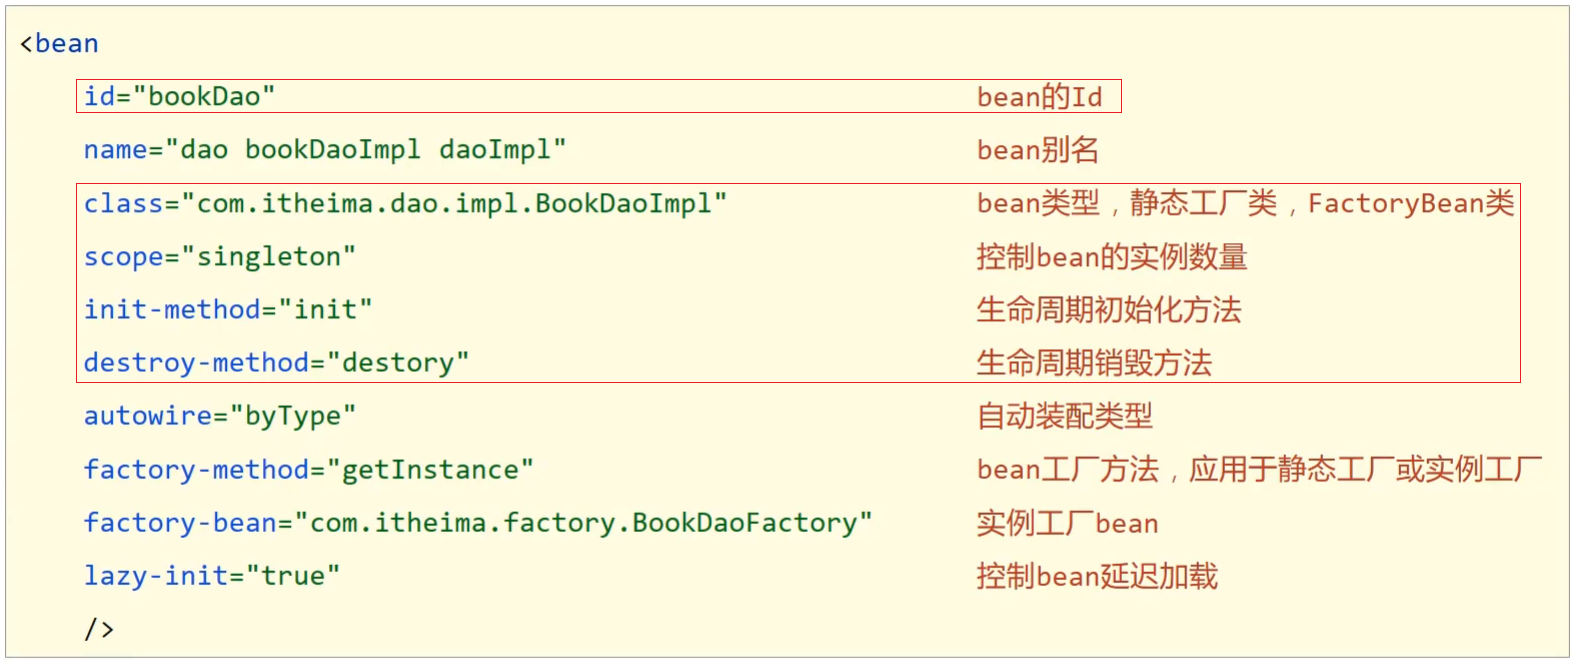
其实整个配置中最常用的就两个属性==id==和==class==。
把 scope、init-method、destroy-method 框起来的原因是,在注解会用到。
- 依赖注入相关
id 和 class
1
<bean id="" class=""/>
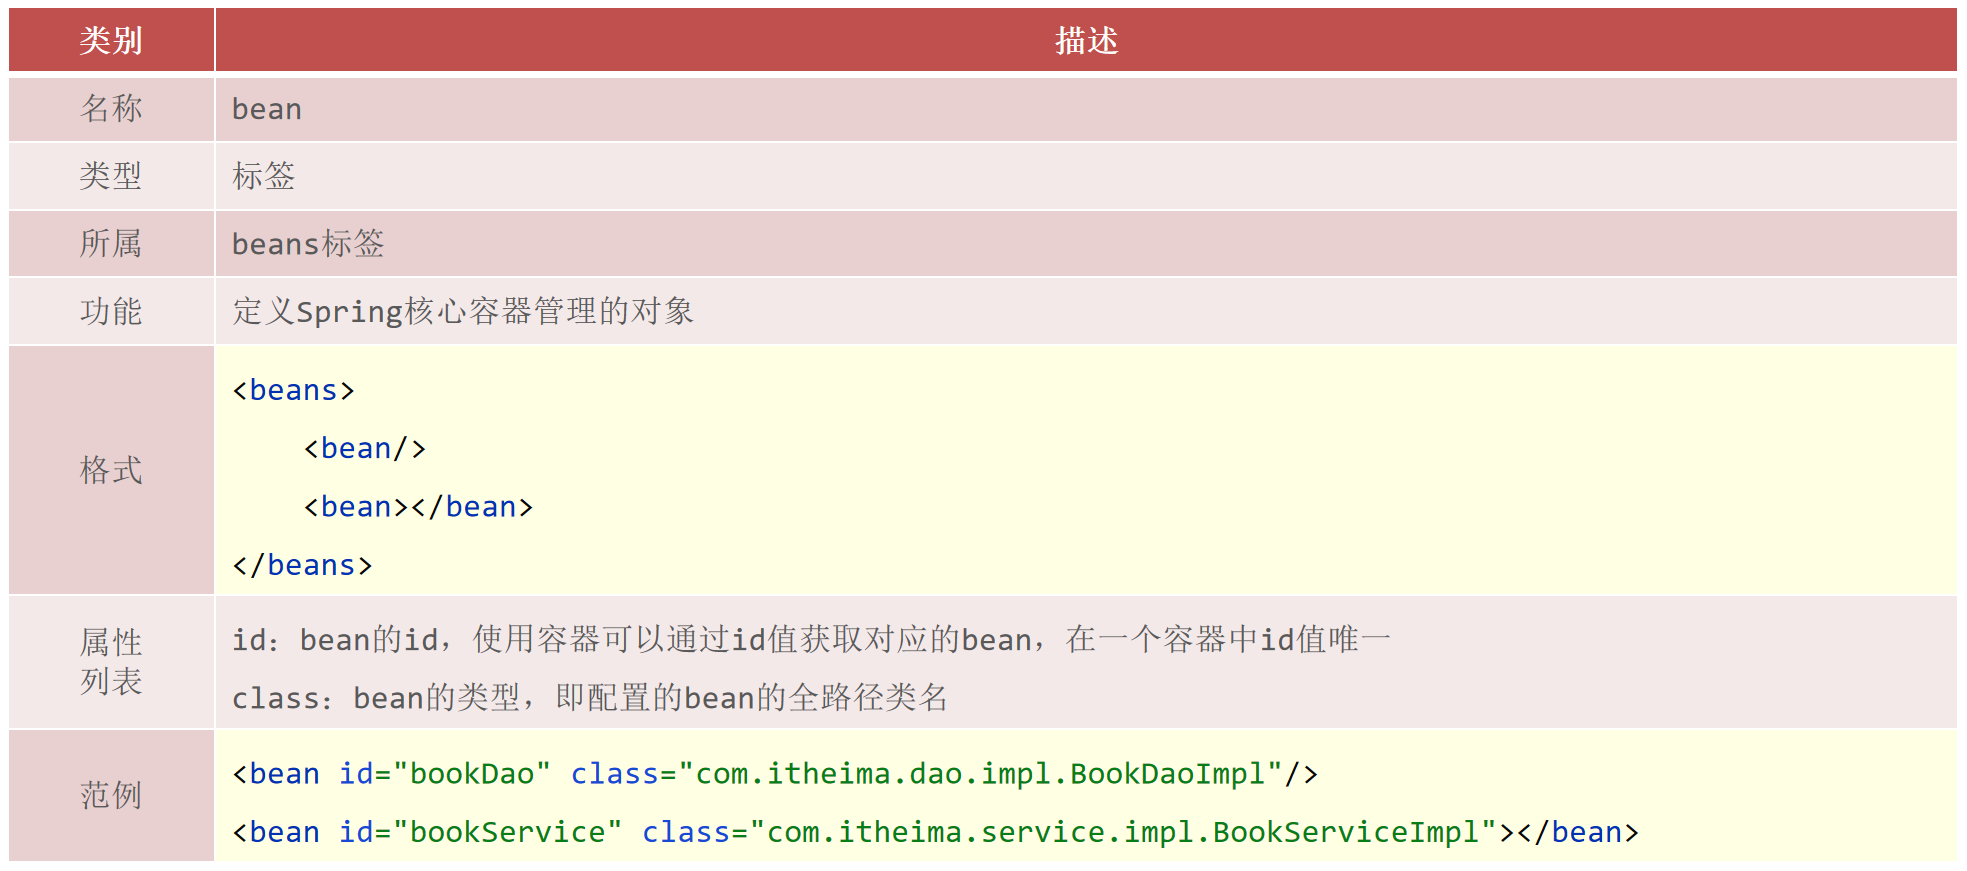
- class 属性能不能写接口如
BookDao的类全名呢?
不行,因为接口是没办法创建对象的。
name
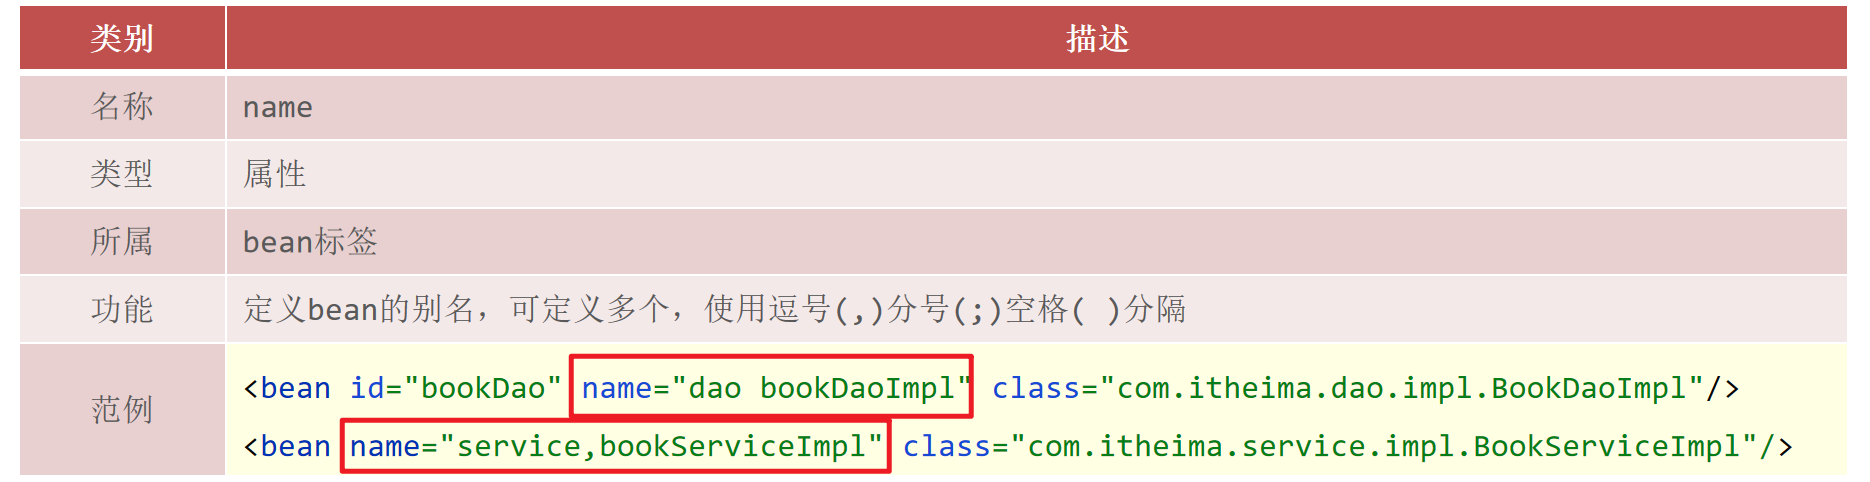
配置 name:
1
2
3
4
5
6
7
8
9
10
11
12
13
<?xml version="1.0" encoding="UTF-8"?>
<beans xmlns="http://www.springframework.org/schema/beans"
       xmlns:xsi="http://www.w3.org/2001/XMLSchema-instance"
       xsi:schemaLocation="http://www.springframework.org/schema/beans http://www.springframework.org/schema/beans/spring-beans.xsd">

    <!--name:为bean指定别名,别名可以有多个,使用逗号,分号,空格进行分隔-->
    <bean id="bookService" name="service service4 bookEbi" class="com.itheima.service.impl.BookServiceImpl">
        <property name="bookDao" ref="bookDao"/>
    </bean>

    <!--scope:为bean设置作用范围,可选值为单例singloton,非单例prototype-->
    <bean id="bookDao" name="dao" class="com.itheima.dao.impl.BookDaoImpl"/>
</beans>
根据名称容器中获取 bean 对象:
1
2
3
4
5
6
7
8
public class AppForName {
    public static void main(String[] args) {
        ApplicationContext ctx = new ClassPathXmlApplicationContext("applicationContext.xml");
        //此处根据bean标签的id属性和name属性的任意一个值来获取bean对象
        BookService bookService = (BookService) ctx.getBean("service4");
        bookService.save();
    }
}
注意:
bean 依赖注入的 ref 属性指定 bean,必须在容器中存在

获取 bean 无论是通过 id 还是 name 获取,如果无法获取到,将抛出异常==NoSuchBeanDefinitionException==
其他配置
别名 alias
alias设置别名 , 为 bean 设置别名 , 可以设置多个别名。
1
2
<!--别名,如果添加了别名,我们也可以使用别名获取到这个对象-->
<alias name="userT" alias="userNew"/>
Bean 的配置
1
2
3
4
5
6
7
8
<!--
   id: bean 的唯一标识符,也就是相当于对象名
   class: bean对象所对应的全限定名:包名+类型
   name: 也是别名,而且name可以同时取多个别名
-->
<bean id="user2" class="me.hacket.spring.model.UserT" name="user2,u2,u3">
	<property name="name" value="懒羊羊的蛋糕店!"/>
</bean>
import
这个 import,一般用于团队开发使用,他可以将多个配置文件,导入合并为一个。
1
2
3
4
5
6
7
8
9
10
11
12
13
<import resource="{path}/beans.xml"/>

<?xml version="1.0" encoding="UTF-8"?>
<beans xmlns="http://www.springframework.org/schema/beans"
       xmlns:xsi="http://www.w3.org/2001/XMLSchema-instance"
       xsi:schemaLocation="http://www.springframework.org/schema/beans
        http://www.springframework.org/schema/beans/spring-beans.xsd">

    <import resource="beans.xml"/>
    <import resource="beans2.xml"/>
    <import resource="beans3.xml"/>

</beans>
bean 作用域
在 Spring 中,那些组成应用程序的主体及由 Spring IoC 容器所管理的对象,被称之为 bean。
简单地讲,bean 就是由 IoC 容器初始化、装配及管理的对象。
| Scope | Description |
|---|---|
| singleton | (默认) 将每个 Spring IoC 容器的单个 bean 定义范围限定为单个对象实例。 |
| prototype | 将单个 bean 定义的作用域限定为任意数量的对象实例。 |
| request | 将单个 bean 定义的范围限定为单个 HTTP 请求的生命周期。也就是说,每个 HTTP 请求都有一个在单个 bean 定义后面创建的 bean 实例。仅在可感知网络的 Spring ApplicationContext 中有效。 |
| session | 将单个 bean 定义的范围限定为 HTTP Session 的生命周期。仅在可感知网络的 Spring ApplicationContext 上下文中有效。 |
| application | 将单个 bean 定义的范围限定为 ServletContext 的生命周期。仅在可感知网络的 Spring ApplicationContext 上下文中有效。 |
| webscoket | 将单个 bean 定义的范围限定为 WebSocket 的生命周期。仅在可感知网络的 Spring ApplicationContext 上下文中有效。 |
Singleton Scope 单例
单例模式(Spring 默认机制)。
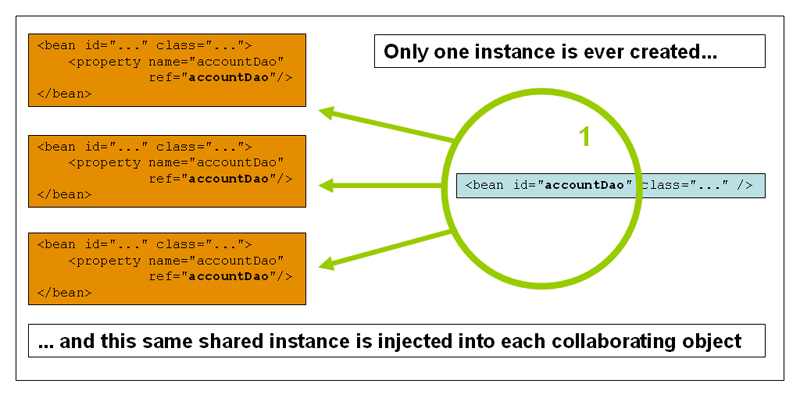
当一个 bean 的作用域为 Singleton,那么 Spring IoC 容器中只会存在一个共享的 bean 实例,并且所有对 bean 的请求,只要 id 与该 bean 定义相匹配,则只会返回 bean 的同一实例。Singleton 是单例类型,就是在创建起容器时就同时自动创建了一个 bean 的对象,不管你是否使用,他都存在了,每次获取到的对象都是同一个对象。
- 注意,Singleton 作用域是 Spring 中的缺省作用域。
- 要在 XML 中将 bean 定义成 singleton,可以这样配置:
1
2
3
4
5
<bean id="user" class="me.hacket.model.User"/>

<!-- 以下内容是等价的,尽管是多余的(默认为单例作用域) -->
<bean id="user2" class="me.hacket.model.User"
	  scope="singleton"/>
Prototype Scope
原型模式:每次从容器中 get 的时候,都会产生一个新对象。
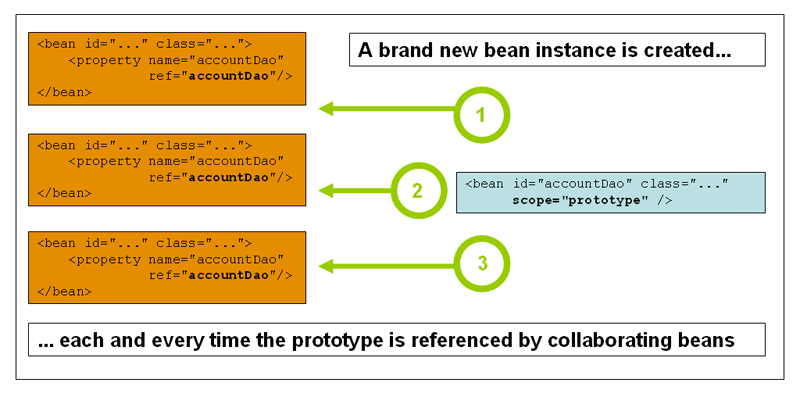
- 在 XML 中将 bean 定义成
prototype
1
<bean id="accountService" class="com.something.DefaultAccountService" scope="prototype"/>
- 其余的
request、session、application、websocket这些只能在 web 开发中使用到
Request scope
单次 http 请求作用域。当请求结束,scope 就被丢弃了
1
<bean id="loginAction" class="com.something.LoginAction" scope="request"/>
使用注解驱动的组件或 Java 配置时,可以使用 @RequestScope 注解将组件分配给 request 范围
1
2
3
4
5
@RequestScope
@Component
public class LoginAction {
    // ...
}
Session Scope
当一个 bean 的作用域为 Session,表示在一个 HTTP Session 中,一个 bean 定义对应一个实例。该作用域仅在基于 web 的 Spring ApplicationContext 情形下有效。
1
<bean id="userPreferences" class="com.something.UserPreferences" scope="session"/>
在单个 HTTP Session 的生存期内,Spring 容器通过使用 userPreferences bean 定义来创建 UserPreferences bean 的新实例。换句话说,userPreferences bean 的作用域实际上是 HTTP Session 级别。与 Request scope 的 Bean 一样,您可以根据需要任意更改所创建实例的内部状态,因为知道其他 HTTP Session 实例 (也使用从相同 userPreferences Bean 定义创建的实例) 不会看到这些状态更改,因为它们特定于单个 HTTP Session。当最终丢弃 HTTP Session 时,也将丢弃作用于该特定 HTTP Session 的 bean。
- 使用注解驱动的组件或 Java 配置时,可以使用
@SessionScope注解将组件分配给session范围。
1
2
3
4
5
@SessionScope
@Component
public class UserPreferences {
    // ...
}
Application Scope
存在整个 web application 生命周期
1
<bean id="appPreferences" class="com.something.AppPreferences" scope="application"/>
WebSocket Scope
WebSocket scope is associated with the lifecycle of a WebSocket session and applies to STOMP over WebSocket applications, see WebSocket scope for more details.
bean 实例化(IoC 容器如何实例化 bean)
对象已经能交给 Spring 的 IOC 容器来创建了,但是容器是如何来创建对象的呢?
就需要研究下 bean的实例化过程,在这块内容中主要解决两部分内容,分别是
- bean 是如何创建的
- 实例化 bean 的三种方式,
构造方法,静态工厂和实例工厂
bean 本质上就是对象,对象在 new 的时候会使用构造方法完成,那创建 bean 也是使用构造方法完成的。
构造方法实例化
步骤 1: 准备需要被创建的类
准备一个 BookDao 和 BookDaoImpl 类
1
2
3
4
5
6
7
8
public interface BookDao {
    public void save();}

public class BookDaoImpl implements BookDao {
    public void save() {
	    System.out.println("book dao save ...");
    }
}
步骤 2: 将类配置到 Spring 容器
1
2
3
4
5
6
<?xml version="1.0" encoding="UTF-8"?>
<beans xmlns="http://www.springframework.org/schema/beans"
	   xmlns:xsi="http://www.w3.org/2001/XMLSchema-instance"
	   xsi:schemaLocation="http://www.springframework.org/schema/beans http://www.springframework.org/schema/beans/spring-beans.xsd">
    <bean id="bookDao" class="com.itheima.dao.impl.BookDaoImpl"/>
</beans>
步骤 3: 编写运行程序
1
2
3
4
5
6
public class AppForInstanceBook {
    public static void main(String[] args) {
	    ApplicationContext ctx = new ClassPathXmlApplicationContext("applicationContext.xml");
        BookDao bookDao = (BookDao) ctx.getBean("bookDao");
        bookDao.save();
    }}
步骤 4: 类中提供构造函数测试
在 BookDaoImpl 类中添加一个无参构造函数,并打印一句话,方便观察结果。
1
2
3
4
5
6
7
8
public class BookDaoImpl implements BookDao {
    public BookDaoImpl() {
	    System.out.println("book dao constructor is running ....");
    }
    public void save() {
	    System.out.println("book dao save ...");
    }
}
步骤 5: 将构造函数改成 private 测试
1
2
3
4
5
6
7
8
public class BookDaoImpl implements BookDao {
    private BookDaoImpl() {
        System.out.println("book dao constructor is running ....");
    }
    public void save() {
        System.out.println("book dao save ...");
    }
}
运行程序,能执行成功,说明内部走的依然是构造函数,能访问到类中的私有构造方法,显而易见 Spring 底层用的是反射
步骤 6: 构造函数中添加一个参数测试
1
2
3
4
5
6
7
8
public class BookDaoImpl implements BookDao {
    private BookDaoImpl(int i) {
        System.out.println("book dao constructor is running ....");
    }
    public void save() {
        System.out.println("book dao save ...");
    }
}
运行程序, 程序会报错,说明 Spring 底层使用的是类的无参构造方法。
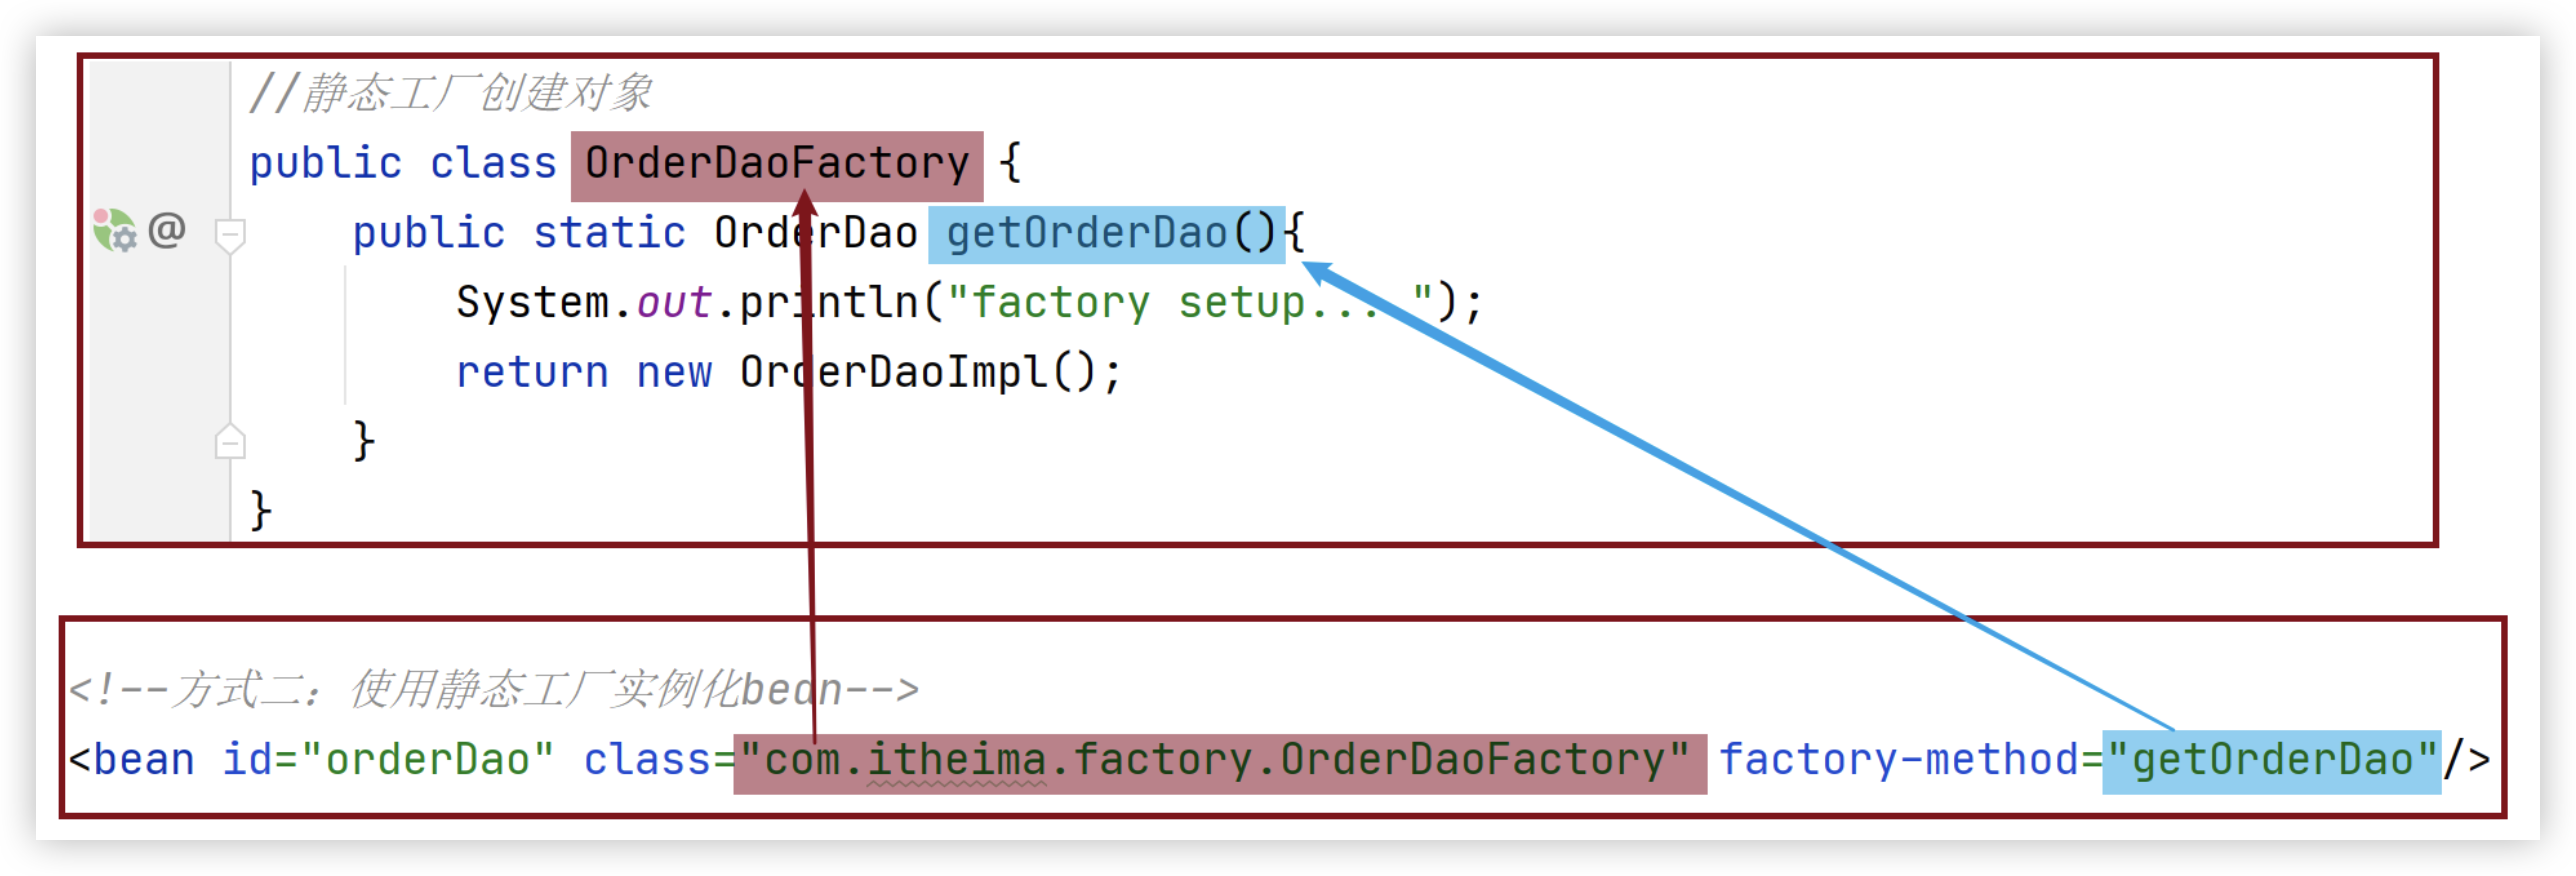
静态工厂实例化 了解
具体实现步骤为:
(1) 在 spring 的配置文件 applicationContext.xml 中添加以下内容:
1
<bean id="orderDao" class="com.itheima.factory.OrderDaoFactory" factory-method="getOrderDao"/>
- class: 工厂类的类全名
- factory-mehod: 具体工厂类中创建对象的方法名
对应关系如下图:
(2) 在 AppForInstanceOrder 运行类,使用从 IOC 容器中获取 bean 的方法进行运行测试
1
2
3
4
5
6
7
public class AppForInstanceOrder {
    public static void main(String[] args) {
        ApplicationContext ctx = new ClassPathXmlApplicationContext("applicationContext.xml");
        OrderDao orderDao = (OrderDao) ctx.getBean("orderDao");
        orderDao.save();
    }
}
(3) 运行后,可以查看到结果
看到这,可能有人会问了,你这种方式在工厂类中不也是直接 new 对象的,和我自己直接 new 没什么太大的区别,而且静态工厂的方式反而更复杂,这种方式的意义是什么?
主要的原因是:
- 在工厂的静态方法中,我们除了 new 对象还可以做其他的一些业务操作,这些操作必不可少,如:
1
2
3
4
5
6
public class OrderDaoFactory {
    public static OrderDao getOrderDao(){
	    System.out.println("factory setup....");//模拟必要的业务操作
        return new OrderDaoImpl();
	}
}
之前 new 对象的方式就无法添加其他的业务内容,重新运行,查看结果:
介绍完静态工厂实例化后,这种方式一般是用来兼容早期的一些老系统,所以==了解为主==。
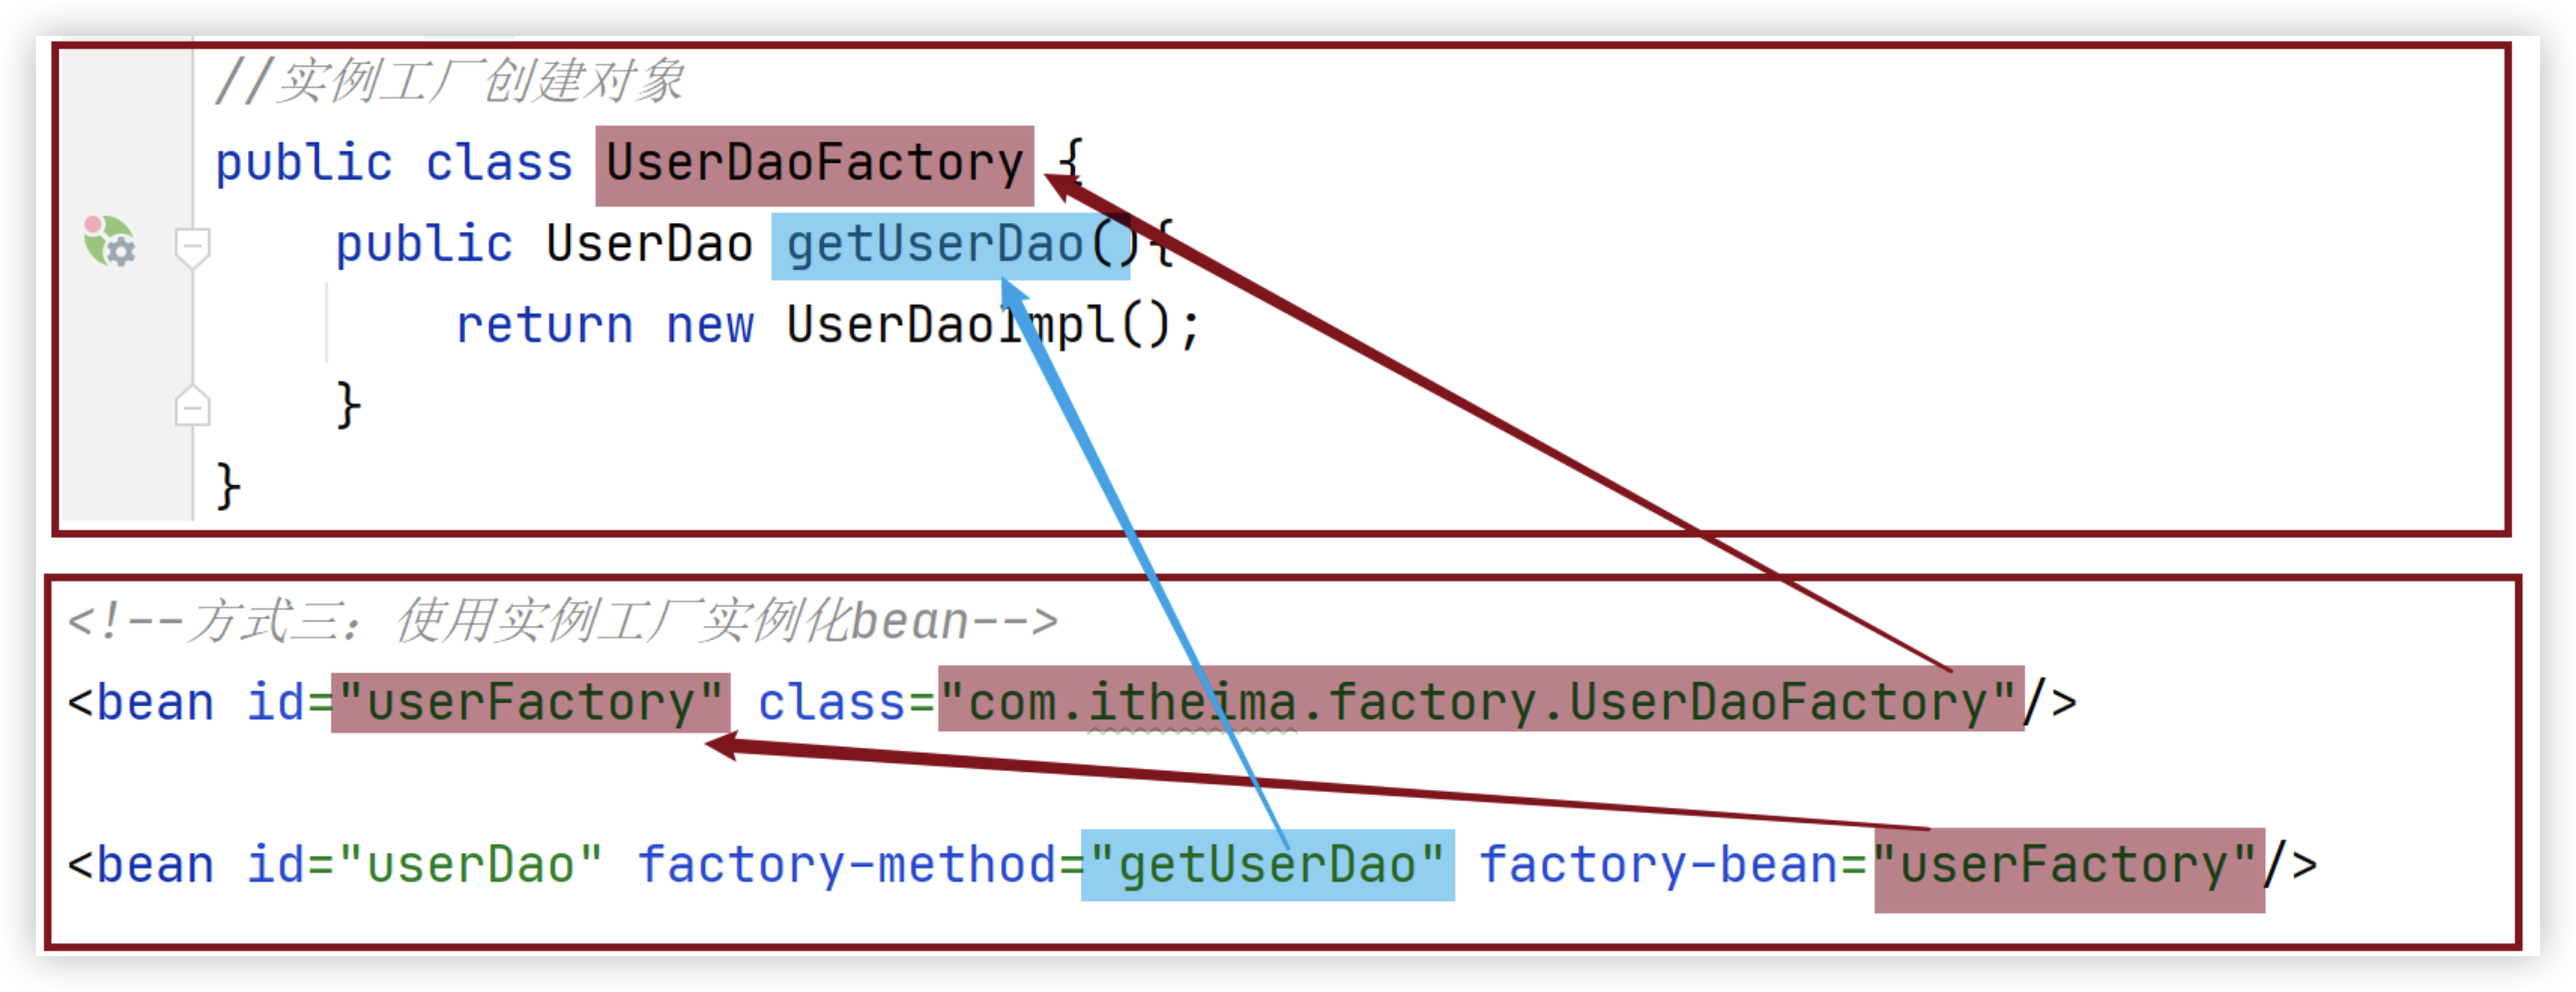
实例工厂与 FactoryBean
实例工厂
具体实现步骤为:
(1) 在 spring 的配置文件中添加以下内容:
1
2
<bean id="userFactory" class="com.itheima.factory.UserDaoFactory"/>
<bean id="userDao" factory-method="getUserDao" factory-bean="userFactory"/>
实例化工厂运行的顺序是:
- 创建实例化工厂对象,对应的是第一行配置
- 调用对象中的方法来创建 bean,对应的是第二行配置
- factory-bean: 工厂的实例对象
- factory-method: 工厂对象中的具体创建对象的方法名,对应关系如下:
factory-mehod: 具体工厂类中创建对象的方法名
(2) 在 AppForInstanceUser 运行类,使用从 IOC 容器中获取 bean 的方法进行运行测试
1
2
3
4
5
6
7
8
public class AppForInstanceUser {
    public static void main(String[] args) {
        ApplicationContext ctx = new
            ClassPathXmlApplicationContext("applicationContext.xml");
        UserDao userDao = (UserDao) ctx.getBean("userDao");
        userDao.save();
    }
}
实例工厂实例化的方式就已经介绍完了,配置的过程还是比较复杂,所以 Spring 为了简化这种配置方式就提供了一种叫 FactoryBean 的方式来简化开发。
FactoryBean
具体的使用步骤为:
(1) 创建一个 UserDaoFactoryBean 的类,实现 FactoryBean 接口,重写接口的方法
1
2
3
4
5
6
7
8
9
10
public class UserDaoFactoryBean implements FactoryBean<UserDao> {
    //代替原始实例工厂中创建对象的方法
    public UserDao getObject() throws Exception {
        return new UserDaoImpl();
    }
    //返回所创建类的Class对象
    public Class<?> getObjectType() {
        return UserDao.class;
    }
}
2) 在 Spring 的配置文件中进行配置
1
<bean id="userDao" class="com.itheima.factory.UserDaoFactoryBean"/>
(3)AppForInstanceUser 运行类不用做任何修改,直接运行
这种方式在 Spring 去整合其他框架的时候会被用到,所以这种方式需要大家理解掌握。
查看源码会发现,FactoryBean 接口其实会有三个方法,分别是:
1
2
3
4
5
6
7
T getObject() throws Exception;

Class<?> getObjectType();

default boolean isSingleton() {
   return true;
}
- 方法一: getObject(),被重写后,在方法中进行对象的创建并返回
- 方法二: getObjectType(),被重写后,主要返回的是被创建类的 Class 对象
- 方法三: 没有被重写,因为它已经给了默认值,从方法名中可以看出其作用是设置对象是否为单例,默认 true,从意思上来看,我们猜想默认应该是单例,如何来验证呢?
思路很简单,就是从容器中获取该对象的多个值,打印到控制台,查看是否为同一个对象。
1
2
3
4
5
6
7
8
9
10
public class AppForInstanceUser {
    public static void main(String[] args) {
        ApplicationContext ctx = new
            ClassPathXmlApplicationContext("applicationContext.xml");
        UserDao userDao1 = (UserDao) ctx.getBean("userDao");
        UserDao userDao2 = (UserDao) ctx.getBean("userDao");
        System.out.println(userDao1);
        System.out.println(userDao2);
    }
}
通过验证,会发现默认是单例,那如果想改成单例具体如何实现?
只需要将 isSingleton() 方法进行重写,修改返回为 false,即可
1
2
3
4
5
6
7
8
9
10
11
12
13
14
15
//FactoryBean创建对象
public class UserDaoFactoryBean implements FactoryBean<UserDao> {
    //代替原始实例工厂中创建对象的方法
    public UserDao getObject() throws Exception {
        return new UserDaoImpl();
    }

    public Class<?> getObjectType() {
        return UserDao.class;
    }

    public boolean isSingleton() {
        return false;
    }
}
Bean 生命周期
- 首先理解下什么是生命周期?
- 从创建到消亡的完整过程,例如人从出生到死亡的整个过程就是一个生命周期。
- bean 生命周期是什么?
- bean 对象从创建到销毁的整体过程。
- bean 生命周期控制是什么?
- 在 bean 创建后到销毁前做一些事情。
测试代码:
- 项目中添加 BookDao、BookDaoImpl、BookService 和 BookServiceImpl 类
1
2
3
4
5
6
7
8
9
10
11
12
13
14
15
16
17
18
19
20
21
22
23
24
25
26
public interface BookDao {
    public void save();
}

public class BookDaoImpl implements BookDao {
    public void save() {
        System.out.println("book dao save ...");
    }
}

public interface BookService {
    public void save();
}

public class BookServiceImpl implements BookService{
    private BookDao bookDao;

    public void setBookDao(BookDao bookDao) {
        this.bookDao = bookDao;
    }

    public void save() {
        System.out.println("book service save ...");
        bookDao.save();
    }
}
- resources 下提供 spring 的配置文件
1
2
3
4
5
6
7
<?xml version="1.0" encoding="UTF-8"?>
<beans xmlns="http://www.springframework.org/schema/beans"
       xmlns:xsi="http://www.w3.org/2001/XMLSchema-instance"
       xsi:schemaLocation="http://www.springframework.org/schema/beans http://www.springframework.org/schema/beans/spring-beans.xsd">

    <bean id="bookDao" class="com.itheima.dao.impl.BookDaoImpl"/>
</beans>
- 编写 AppForLifeCycle 运行类,加载 Spring 的 IOC 容器,并从中获取对应的 bean 对象
1
2
3
4
5
6
7
8
public class AppForLifeCycle {
    public static void main( String[] args ) {
        ApplicationContext ctx = new
        	ClassPathXmlApplicationContext("applicationContext.xml");
        BookDao bookDao = (BookDao) ctx.getBean("bookDao");
        bookDao.save();
    }
}
生命周期设置
接下来,在上面这个环境中来为 BookDao 添加生命周期的控制方法,具体的控制有两个阶段:
- bean 创建之后,想要添加内容,比如用来初始化需要用到资源
- bean 销毁之前,想要添加内容,比如用来释放用到的资源
步骤 1: 添加初始化和销毁方法
针对这两个阶段,我们在 BooDaoImpl 类中分别添加两个方法,==方法名任意==
1
2
3
4
5
6
7
8
9
10
11
12
13
public class BookDaoImpl implements BookDao {
    public void save() {
        System.out.println("book dao save ...");
    }
    //表示bean初始化对应的操作
    public void init(){
        System.out.println("init...");
    }
    //表示bean销毁前对应的操作
    public void destory(){
        System.out.println("destory...");
    }
}
步骤 2: 配置生命周期
在配置文件添加配置,如下:
1
<bean id="bookDao" class="com.itheima.dao.impl.BookDaoImpl" init-method="init" destroy-method="destory"/>
步骤 3: 运行程序
从结果中可以看出,init 方法执行了,但是 destroy 方法却未执行,这是为什么呢?
- Spring 的 IOC 容器是运行在 JVM 中
- 运行 main 方法后,JVM 启动,Spring 加载配置文件生成 IOC 容器,从容器获取 bean 对象,然后调方法执行
- main 方法执行完后,JVM 退出,这个时候 IOC 容器中的 bean 还没有来得及销毁就已经结束了
- 所以没有调用对应的 destroy 方法
close 关闭容器
- ApplicationContext 中没有 close 方法
需要将 ApplicationContext 更换成 ClassPathXmlApplicationContext
1
2
ClassPathXmlApplicationContext ctx = new
    ClassPathXmlApplicationContext("applicationContext.xml");
调用 ctx 的 close() 方法
1
ctx.close();
- 运行程序,就能执行 destroy 方法的内容
注册钩子关闭容器
- 在容器未关闭之前,提前设置好回调函数,让 JVM 在退出之前回调此函数来关闭容器
调用 ctx 的
registerShutdownHook()方法1
ctx.registerShutdownHook();
注意: registerShutdownHook 在 ApplicationContext 中也没有
两种方式介绍完后,close 和 registerShutdownHook 选哪个?
相同点: 这两种都能用来关闭容器
不同点:close() 是在调用的时候关闭,registerShutdownHook() 是在 JVM 退出前调用关闭。
分析上面的实现过程,会发现添加初始化和销毁方法,即需要编码也需要配置,实现起来步骤比较多也比较乱。
Spring 提供了两个接口来完成生命周期的控制,好处是可以不用再进行配置 init-method 和 destroy-method
接下来在 BookServiceImpl 完成这两个接口的使用:
修改 BookServiceImpl 类,添加两个接口 InitializingBean, DisposableBean 并实现接口中的两个方法 afterPropertiesSet 和 destroy
1
2
3
4
5
6
7
8
9
10
11
12
13
14
15
16
public class BookServiceImpl implements BookService, InitializingBean, DisposableBean {
    private BookDao bookDao;
    public void setBookDao(BookDao bookDao) {
        this.bookDao = bookDao;
    }
    public void save() {
        System.out.println("book service save ...");
        bookDao.save();
    }
    public void destroy() throws Exception {
        System.out.println("service destroy");
    }
    public void afterPropertiesSet() throws Exception {
        System.out.println("service init");
    }
}
Bean 的自动装配
- 自动装配是 Spring 满足 bean 依赖的一种方式
- Spring 会在上下文自动寻找,并自动给 bean 装配属性
在 Spring 中有三种自动装配的方式
- 在 xml 中显示的配置
- 在 java 中显示配置
- 隐式的自动装配 bean【重要】
示例手动装配:
- Beans
1
2
3
4
5
6
7
8
9
10
11
12
13
14
15
16
public class Cat {
    public void shout(){
        System.out.println("喵!喵!喵!");
    }
}
public class Dog {
    public void shout(){
        System.out.println("汪!汪!汪!");
    }
}
public class People {
    private Cat cat;
    private Dog dog;
    private String name;
	// setter/getter
}
beans.xml
1
2
3
4
5
6
7
8
9
10
11
12
13
14
15
16
17
18
<?xml version="1.0" encoding="UTF-8"?>
<beans xmlns="http://www.springframework.org/schema/beans"
       xmlns:p="http://www.springframework.org/schema/p"
       xmlns:c="http://www.springframework.org/schema/c"
       xmlns:xsi="http://www.w3.org/2001/XMLSchema-instance"
       xsi:schemaLocation="http://www.springframework.org/schema/beans
       http://www.springframework.org/schema/beans/spring-beans.xsd">
    <bean id="cat" class="me.hacket.spring.model.Cat"/>
    <bean id="dog" class="me.hacket.spring.model.Dog"/>

    <bean id="people" class="me.hacket.spring.model.People">
        <property name="name" value="哇哈哈"/>
        <property name="cat" ref="cat"/>
        <property name="dog" ref="dog"/>

    </bean>

</beans>
byName 自动装配
byName: 会自动在容器上下文中查找,和自己对象 set 方法后而的值对应的 bean id
1
2
3
4
5
6
 <!--自动装配-->
<bean id="cat" class="me.hacket.spring.model.Cat"/>
<bean id="dog" class="me.hacket.spring.model.Dog"/>
<bean id="people" class="me.hacket.spring.model.People" autowire="byName">
	<property name="name" value="哇哈哈2"/>
</bean>
people 会自动查找有 cat 和 dog 属性的 bean 对象。
byType 自动装配
- byName: 会自动在容器上下文中查找,和自己对象 set 方法后而的值对应的 bean id
- byType: 会自动在容器上下文中查找,和自己对象属性类型机同的 bean
1
2
3
4
5
6
<!--自动装配-->
<bean id="cat2" class="me.hacket.spring.model.Cat"/>
<bean id="dog2" class="me.hacket.spring.model.Dog"/>
<bean id="people" class="me.hacket.spring.model.People" autowire="byType">
	<property name="name" value="哇哈哈3"/>
</bean>
自动装配小结
byName的时候,需要保证所有 bean 的 id 唯一,并且这个 bean 需要和自动注入的属性的 set 方法的值一致byType的时候,需要保证所有 bean 的 class 唯一,并且这个 bean 需要和自动注入的属性的类型一致
使用注解实现自动装配属性
- JDK 1.5 支持的注解,Spring 2.5 就支持注解了
- 导入约束,context 约束:
xmlns:context="http://www.springframework.org/schema/context" - ==配置注解的支持;context: annotation-config/==
1
2
3
4
5
6
7
8
9
10
<?xml version="1.0" encoding="UTF-8"?>
<beans xmlns="http://www.springframework.org/schema/beans"
    xmlns:xsi="http://www.w3.org/2001/XMLSchema-instance"
    xmlns:context="http://www.springframework.org/schema/context"
    xsi:schemaLocation="http://www.springframework.org/schema/beans
        https://www.springframework.org/schema/beans/spring-beans.xsd
        http://www.springframework.org/schema/context
        https://www.springframework.org/schema/context/spring-context.xsd">
    <context:annotation-config/>
</beans>
@Autowired
- 需要导入
spring-aop的包 - 直接在属性上使用即可;也可以在 set 方式上使用
- 使用
@Autowired我们可以不用编写 set 方法,前提是你这个自动装配的属性在 IoC(Spring)容器中存在,且符合名字byName和类型byType配置
报错:`org.springframework.beans.factory.xml.XmlBeanDefinitionStoreException: Line 8 in XML document from class path resource [beans.xml] is invalid; nested exception is org.xml.sax.SAXParseException; lineNumber: 8; columnNumber: 33; cvc-complex-type.2.4.c: 通配符的匹配很全面, 但无法找到元素 ‘context:annotation-config’ 的声明。
解决:xsi:schemaLocation 没有写对
1
2
3
4
5
6
7
8
9
10
11
<?xml version="1.0" encoding="UTF-8"?>
<beans xmlns="http://www.springframework.org/schema/beans"
       xmlns:xsi="http://www.w3.org/2001/XMLSchema-instance"
       xmlns:context="http://www.springframework.org/schema/context"
       xsi:schemaLocation="http://www.springframework.org/schema/beans
        https://www.springframework.org/schema/beans/spring-beans.xsd
        http://www.springframework.org/schema/context
        https://www.springframework.org/schema/context/spring-context.xsd">
    <!-- 通过注解的方式注入 -->
    <context:annotation-config/>
</beans>
- 修改
beans.xml
1
2
3
4
5
6
7
8
9
10
11
12
13
14
<?xml version="1.0" encoding="UTF-8"?>
<beans xmlns="http://www.springframework.org/schema/beans"
       xmlns:xsi="http://www.w3.org/2001/XMLSchema-instance"
       xmlns:context="http://www.springframework.org/schema/context"
       xsi:schemaLocation="http://www.springframework.org/schema/beans
        https://www.springframework.org/schema/beans/spring-beans.xsd
        http://www.springframework.org/schema/context
        https://www.springframework.org/schema/context/spring-context.xsd">
    <!-- 通过注解的方式注入 -->
    <context:annotation-config/>
    <bean id="cat" class="me.hacket.spring.model.Cat"/>
    <bean id="dog" class="me.hacket.spring.model.Dog"/>
    <bean id="people" class="me.hacket.spring.model.People"/>
</beans>
- 修改
People.java文件
1
2
3
4
5
6
public class People {
    @Autowired
    private Cat cat;
    @Autowired
    private Dog dog;
}
- 直接在属性上使用,也可以在 set 方式上使用
- 使用
@Autowired我们可以不用编写 Setter 了,前提是你这个自动装配的属性在 IoC(Spring) 容器中存在,且符合名字 byName - 如果
@Autowired自动装配的环境比较复杂,自动装配无法通过一个注解【@Autowired】完成的时候、我们可以使用@Qualifier(value=“xxx”)去配置@Autowired的使用,指定一个唯一的 bean 对象注入
1
2
3
4
5
6
7
8
public class People {
    @Autowired
    @Qualifier(value = "cat111")
    private Cat cat;
    @Autowired
    @Qualifier(value = "dog222")
    private Dog dog;
}
1
2
3
4
5
6
7
8
9
10
11
12
13
14
15
16
<?xml version="1.0" encoding="UTF-8"?>
<beans xmlns="http://www.springframework.org/schema/beans"
       xmlns:xsi="http://www.w3.org/2001/XMLSchema-instance"
       xmlns:context="http://www.springframework.org/schema/context"
       xsi:schemaLocation="http://www.springframework.org/schema/beans
        https://www.springframework.org/schema/beans/spring-beans.xsd
        http://www.springframework.org/schema/context
        https://www.springframework.org/schema/context/spring-context.xsd">
    <!-- 通过注解的方式注入 -->
    <context:annotation-config/>
    <bean id="cat" class="me.hacket.spring.model.Cat"/>
    <bean id="cat111" class="me.hacket.spring.model.Cat"/>
    <bean id="dog" class="me.hacket.spring.model.Dog"/>
    <bean id="dog222" class="me.hacket.spring.model.Dog"/>
    <bean id="people" class="me.hacket.spring.model.People"/>
</beans>
@Resource
1
2
3
4
5
6
7
public class People {
    @Resource(name="cat2")
    private Cat cat;
    @Resource
    private Dog dog;
    private String name;
}
@Resource 和 @Autowired 的区别
- 都是用来自动装配的,都可以放在属性字段上
@Autowired通过 byType 的方式实现,而且必须要求这个对象存在@Resource默认通过 byName 的方式实现,如果找不到名字,则通过 byType 实现,如果两个都找不到的倩况下,就报错【常用】- 执行顺序不同:
@Autowired通过 byType 的方式实现。@Resource默认通过 byName 的方式实现。
Spring IoC 核心容器
这里所说的核心容器,大家可以把它简单的理解为 ApplicationContext。
容器的创建方式
- ==类路径下的 XML 配置文件==
1
ApplicationContext ctx = new ClassPathXmlApplicationContext("applicationContext.xml");
- ==文件系统下的 XML 配置文件==
1
2
ApplicationContext ctx = new FileSystemXmlApplicationContext("applicationContext.xml");
// 要注意路径
Bean 的三种获取方式
1
2
3
4
5
6
7
8
// 方式1:每次获取的时候都需要进行类型转换
BookDao bookDao = (BookDao) ctx.getBean("bookDao");

// 方式2:可以解决类型强转问题,但是参数又多加了一个
BookDao bookDao = ctx.getBean("bookDao",BookDao.class);

// 方式3:按类型注入。必须要确保IOC容器中该类型对应的bean对象只能有一个。
BookDao bookDao = ctx.getBean(BookDao.class);
容器类层次结构
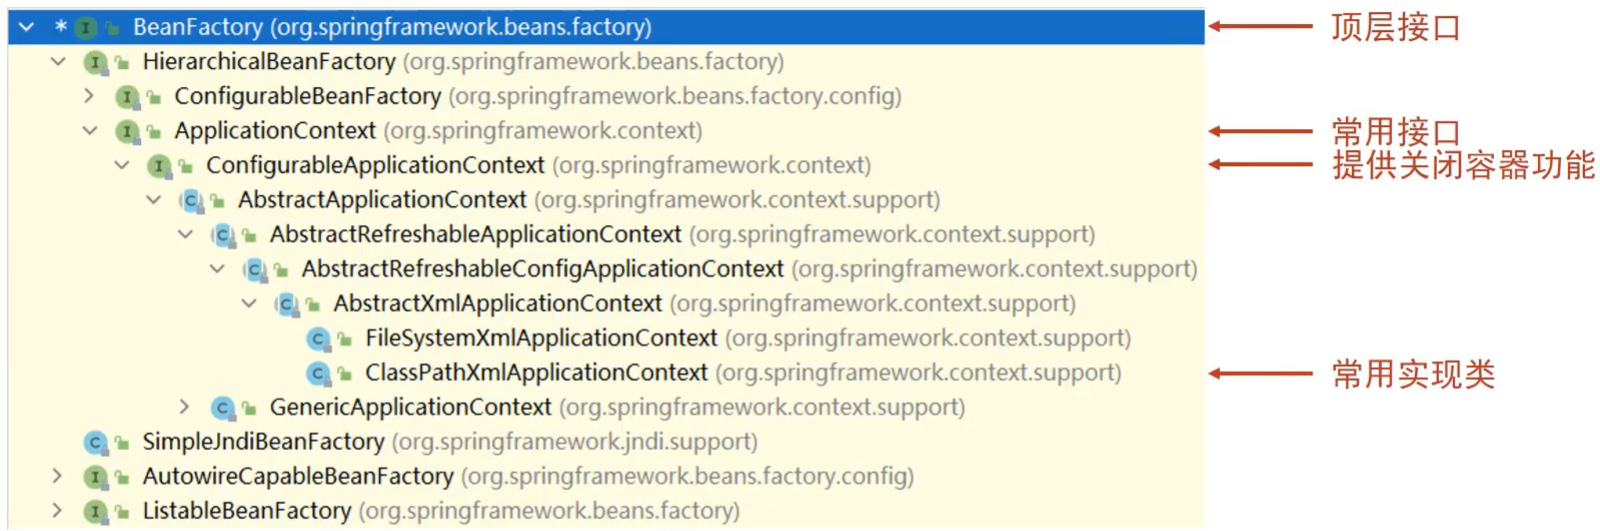
BeanFactory 的使用
使用 BeanFactory 来创建 IOC 容器的具体实现方式为:
1
2
3
4
5
6
7
8
public class AppForBeanFactory {
    public static void main(String[] args) {
        Resource resources = new ClassPathResource("applicationContext.xml");
        BeanFactory bf = new XmlBeanFactory(resources);
        BookDao bookDao = bf.getBean(BookDao.class);
        bookDao.save();
    }
}
为了更好的看出 BeanFactory 和 ApplicationContext 之间的区别,在 BookDaoImpl 添加如下构造函数:
1
2
3
4
5
6
7
8
public class BookDaoImpl implements BookDao {
    public BookDaoImpl() {
        System.out.println("constructor");
    }
    public void save() {
        System.out.println("book dao save ..." );
    }
}
如果不去获取 bean 对象,打印会发现:
- BeanFactory 是延迟加载,只有在获取 bean 对象的时候才会去创建
- ApplicationContext 是立即加载,容器加载的时候就会创建 bean 对象
- ApplicationContext 要想成为延迟加载,只需要按照如下方式进行配置
1
2
3
4
5
6
7
<?xml version="1.0" encoding="UTF-8"?>
<beans xmlns="http://www.springframework.org/schema/beans"
   xmlns:xsi="http://www.w3.org/2001/XMLSchema-instance"
   xsi:schemaLocation="
	http://www.springframework.org/schema/beans http://www.springframework.org/schema/beans/spring-beans.xsd">
    <bean id="bookDao" class="com.itheima.dao.impl.BookDaoImpl"  lazy-init="true"/>
</beans>
Spring IoC 使用
xml IOC/DI 配置管理第三方 bean
现在如果有需求让我们去管理第三方 jar 包中的类,该如何管理?
数据源对象管理
本次案例将使用咱们前面提到过的数据源 Druid(德鲁伊) 和 C3P0 来配置学习下。
环境准备
pom.xml添加依赖1 2 3 4 5 6 7
<dependencies> <dependency> <groupId>org.springframework</groupId> <artifactId>spring-context</artifactId> <version>5.2.10.RELEASE</version> </dependency> </dependencies>
resources 下添加 spring 的配置文件
applicationContext.xml1 2 3 4 5 6 7 8
<?xml version="1.0" encoding="UTF-8"?> <beans xmlns="http://www.springframework.org/schema/beans" xmlns:xsi="http://www.w3.org/2001/XMLSchema-instance" xsi:schemaLocation=" http://www.springframework.org/schema/beans http://www.springframework.org/schema/beans/spring-beans.xsd"> </beans>
编写一个运行类 App
1
2
3
4
5
public class App {
    public static void main(String[] args) {
        ApplicationContext ctx = new ClassPathXmlApplicationContext("applicationContext.xml");
    }
}
思路分析
在上述环境下,我们来对数据源进行配置管理,先来分析下思路:
需求: 使用 Spring 的 IOC 容器来管理 Druid 连接池对象
1.使用第三方的技术,需要在 pom.xml 添加依赖
2.在配置文件中将【第三方的类】制作成一个 bean,让 IOC 容器进行管理
3.数据库连接需要基础的四要素驱动、连接、用户名和密码,【如何注入】到对应的 bean 中 >
4.从 IOC 容器中获取对应的 bean 对象,将其打印到控制台查看结果
思考:
- 第三方的类指的是什么?
- 如何注入数据库连接四要素?
实现 Druid 管理
带着这两个问题,把下面的案例实现下:
步骤 1: 导入 druid 的依赖
pom.xml 中添加依赖
1
2
3
4
5
<dependency>
    <groupId>com.alibaba</groupId>
    <artifactId>druid</artifactId>
    <version>1.1.16</version>
</dependency>
步骤 2: 配置第三方 bean
在 applicationContext.xml 配置文件中添加 DruidDataSource 的配置
1
2
3
4
5
6
7
8
9
10
11
12
13
14
<?xml version="1.0" encoding="UTF-8"?>
<beans xmlns="http://www.springframework.org/schema/beans"
       xmlns:xsi="http://www.w3.org/2001/XMLSchema-instance"
       xsi:schemaLocation="
            http://www.springframework.org/schema/beans
            http://www.springframework.org/schema/beans/spring-beans.xsd">
	<!--管理DruidDataSource对象-->
    <bean class="com.alibaba.druid.pool.DruidDataSource">
        <property name="driverClassName" value="com.mysql.jdbc.Driver"/>
        <property name="url" value="jdbc:mysql://localhost:3306/spring_db"/>
        <property name="username" value="root"/>
        <property name="password" value="root"/>
    </bean>
</beans>
说明:
- driverClassName: 数据库驱动
- url: 数据库连接地址
- username: 数据库连接用户名
- password: 数据库连接密码
- 数据库连接的四要素要和自己使用的数据库信息一致。
步骤 3: 从 IOC 容器中获取对应的 bean 对象
1
2
3
4
5
6
7
public class App {
    public static void main(String[] args) {
       ApplicationContext ctx = new ClassPathXmlApplicationContext("applicationContext.xml");
       DataSource dataSource = (DataSource) ctx.getBean("dataSource");
       System.out.println(dataSource);
    }
}
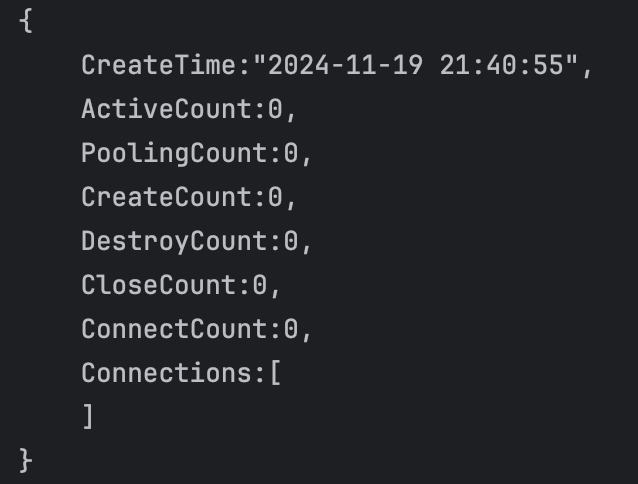
步骤 4: 运行程序
打印如下结果: 说明第三方 bean 对象已经被 spring 的 IOC 容器进行管理
做完案例后,我们可以将刚才思考的两个问题答案说下:
第三方的类指的是什么?
1
DruidDataSource
如何注入数据库连接四要素?
1
setter注入
实现 C3P0 管理
完成了 DruidDataSource 的管理,接下来我们再来加深下练习,这次我们来管理 C3P0 数据源,具体的实现步骤是什么呢?
需求: 使用 Spring 的 IOC 容器来管理 C3P0 连接池对象
实现方案和上面基本一致,重点要关注管理的是哪个 bean 对象`?
步骤 1: 导入 C3P0 的依赖
pom.xml 中添加依赖
1
2
3
4
5
<dependency>
    <groupId>c3p0</groupId>
    <artifactId>c3p0</artifactId>
    <version>0.9.1.2</version>
</dependency>
步骤 2: 配置第三方 bean
在 applicationContext.xml 配置文件中添加配置
1
2
3
4
5
6
7
<bean id="dataSource" class="com.mchange.v2.c3p0.ComboPooledDataSource">
    <property name="driverClass" value="com.mysql.jdbc.Driver"/>
    <property name="jdbcUrl" value="jdbc:mysql://localhost:3306/spring_db"/>
    <property name="user" value="root"/>
    <property name="password" value="root"/>
    <property name="maxPoolSize" value="1000"/>
</bean>
==注意:==
- ComboPooledDataSource 的属性是通过 setter 方式进行注入
- 想注入属性就需要在 ComboPooledDataSource 类或其上层类中有提供属性对应的 setter 方法
- C3P0 的四个属性和 Druid 的四个属性是不一样的
注意:
- 数据连接池在配置属性的时候,除了可以注入数据库连接四要素外还可以配置很多其他的属性,具体都有哪些属性用到的时候再去查,一般配置基础的四个,其他都有自己的默认值
- Druid 和 C3P0 在没有导入 mysql 驱动包的前提下,一个没报错一个报错,说明 Druid 在初始化的时候没有去加载驱动,而 C3P0 刚好相反
- Druid 程序运行虽然没有报错,但是当调用 DruidDataSource 的 getConnection() 方法获取连接的时候,也会报找不到驱动类的错误
加载 properties 文件
我们已经完成两个数据源 druid 和 C3P0 的配置,但是其中包含了一些问题,我们来分析下:
- 这两个数据源中都使用到了一些固定的常量如数据库连接四要素,把这些值写在 Spring 的配置文件中不利于后期维护
- 需要将这些值提取到一个外部的
properties配置文件中 - Spring 框架如何从配置文件中读取属性值来配置就是接下来要解决的问题。
问题提出来后,具体该如何实现?
第三方 bean 属性优化
需求: 将数据库连接四要素提取到 properties 配置文件,spring 来加载配置信息并使用这些信息来完成属性注入。
1.在 resources 下创建一个jdbc.properties(文件的名称可以任意)
2.将数据库连接四要素配置到配置文件中
3.在 Spring 的配置文件中加载 properties 文件
4.使用加载到的值实现属性注入
其中第 3,4 步骤是需要大家重点关注,具体是如何实现。
- resources 下创建一个
jdbc.properties文件,并添加对应的属性键值对
1
2
3
4
jdbc.driver=com.mysql.jdbc.Driver
jdbc.url=jdbc:mysql://127.0.0.1:3306/spring_db
jdbc.username=root
jdbc.password=root
- 在 applicationContext.xml 中开
context命名空间,在配置文件中使用context命名空间下的标签来加载 properties 配置文件
1
2
3
4
5
6
7
8
9
10
11
<?xml version="1.0" encoding="UTF-8"?>
<beans xmlns="http://www.springframework.org/schema/beans"
       xmlns:xsi="http://www.w3.org/2001/XMLSchema-instance"
       xmlns:context="http://www.springframework.org/schema/context"
       xsi:schemaLocation="
            http://www.springframework.org/schema/beans
            http://www.springframework.org/schema/beans/spring-beans.xsd
            http://www.springframework.org/schema/context
            http://www.springframework.org/schema/context/spring-context.xsd">
	<context:property-placeholder location="jdbc.properties"/>
</beans>
- 完成属性注入:使用
${key}来读取 properties 配置文件中的内容并完成属性注入
1
2
3
4
5
6
7
8
9
10
11
12
13
14
15
16
17
18
<?xml version="1.0" encoding="UTF-8"?>
<beans xmlns="http://www.springframework.org/schema/beans"
       xmlns:xsi="http://www.w3.org/2001/XMLSchema-instance"
       xmlns:context="http://www.springframework.org/schema/context"
       xsi:schemaLocation="
            http://www.springframework.org/schema/beans
            http://www.springframework.org/schema/beans/spring-beans.xsd
            http://www.springframework.org/schema/context
            http://www.springframework.org/schema/context/spring-context.xsd">

    <context:property-placeholder location="jdbc.properties"/>
    <bean id="dataSource" class="com.alibaba.druid.pool.DruidDataSource">
        <property name="driverClassName" value="${jdbc.driver}"/>
        <property name="url" value="${jdbc.url}"/>
        <property name="username" value="${jdbc.username}"/>
        <property name="password" value="${jdbc.password}"/>
    </bean>
</beans>
读取单个属性
对于上面的案例,效果不是很明显,我们可以换个案例来演示下:
需求: 从 properties 配置文件中读取 key 为 name 的值,并将其注入到 BookDao 中并在 save 方法中进行打印。
1.在项目中添加BookDao和BookDaoImpl类
2.为BookDaoImpl添加一个 name 属性并提供 setter 方法
3.在jdbc.properties中添加数据注入到 bookDao 中打印方便查询结果
4.在applicationContext.xml添加配置完成配置文件加载、属性注入 (${key})
BookDao和BookDaoImpl类,并在BookDaoImpl类中添加name属性与 setter 方法
1
2
3
4
5
6
7
8
9
10
11
12
13
14
15
public interface BookDao {
    public void save();
}

public class BookDaoImpl implements BookDao {
    private String name;

    public void setName(String name) {
        this.name = name;
    }

    public void save() {
        System.out.println("book dao save ..." + name);
    }
}
- 完成配置文件的读取与注入:在 applicationContext.xml 添加配置,
bean的配置管理、读取外部properties、依赖注入
1
2
3
4
5
6
7
8
9
10
11
12
13
14
15
16
<?xml version="1.0" encoding="UTF-8"?>
<beans xmlns="http://www.springframework.org/schema/beans"
       xmlns:xsi="http://www.w3.org/2001/XMLSchema-instance"
       xmlns:context="http://www.springframework.org/schema/context"
       xsi:schemaLocation="
            http://www.springframework.org/schema/beans
            http://www.springframework.org/schema/beans/spring-beans.xsd
            http://www.springframework.org/schema/context
            http://www.springframework.org/schema/context/spring-context.xsd">

    <context:property-placeholder location="jdbc.properties"/>

    <bean id="bookDao" class="com.itheima.dao.impl.BookDaoImpl">
        <property name="name" value="${jdbc.driver}"/>
    </bean>
</beans>
- 测试:在 App 类中,从 IOC 容器中获取 bookDao 对象,调用方法,查看值是否已经被获取到并打印控制台
1
2
3
4
5
6
7
8
public class App {
    public static void main(String[] args) throws Exception{
        ApplicationContext ctx = new ClassPathXmlApplicationContext("applicationContext.xml");
        BookDao bookDao = (BookDao) ctx.getBean("bookDao");
        bookDao.save();

    }
}
注意事项
问题 1:键值对的 key 为 username 引发的问题
- 在 properties 中配置键值对的时候,如果 key 设置为
username
1
username=root666
- 在 applicationContext.xml 注入该属性
1
2
3
4
5
6
7
8
9
10
11
12
13
14
15
16
<?xml version="1.0" encoding="UTF-8"?>
  <beans xmlns="http://www.springframework.org/schema/beans"
         xmlns:xsi="http://www.w3.org/2001/XMLSchema-instance"
         xmlns:context="http://www.springframework.org/schema/context"
         xsi:schemaLocation="
              http://www.springframework.org/schema/beans
              http://www.springframework.org/schema/beans/spring-beans.xsd
              http://www.springframework.org/schema/context
              http://www.springframework.org/schema/context/spring-context.xsd">

      <context:property-placeholder location="jdbc.properties"/>

      <bean id="bookDao" class="com.itheima.dao.impl.BookDaoImpl">
          <property name="name" value="${username}"/>
      </bean>
  </beans>
- 运行后,在控制台打印的却不是
root666,而是自己电脑的用户名 - 出现问题的原因是
<context:property-placeholder/>标签会加载系统的环境变量,而且环境变量的值会被优先加载,如何查看系统的环境变量?
1
2
3
4
public static void main(String[] args) throws Exception{
      Map<String, String> env = System.getenv();
      System.out.println(env);
  }
- 解决方案
1
2
3
4
5
6
7
8
9
10
11
12
<?xml version="1.0" encoding="UTF-8"?>
  <beans xmlns="http://www.springframework.org/schema/beans"
         xmlns:xsi="http://www.w3.org/2001/XMLSchema-instance"
         xmlns:context="http://www.springframework.org/schema/context"
         xsi:schemaLocation="
              http://www.springframework.org/schema/beans
              http://www.springframework.org/schema/beans/spring-beans.xsd
              http://www.springframework.org/schema/context
              http://www.springframework.org/schema/context/spring-context.xsd">

      <context:property-placeholder location="jdbc.properties" system-properties-mode="NEVER"/>
  </beans>
大家可以自行运行,在打印出来的结果中会有一个 USERNAME=XXX[自己电脑的用户名称]
system-properties-mode: 设置为NEVER,表示不加载系统属性,就可以解决上述问题。- 当然还有一个解决方案就是避免使用
username作为属性的key。
问题 2:当有多个 properties 配置文件需要被加载,该如何配置?
- 调整下配置文件的内容,在 resources 下添加
jdbc.properties,jdbc2.properties,内容如下:
jdbc.properties
1
2
3
4
jdbc.driver=com.mysql.jdbc.Driver
jdbc.url=jdbc:mysql://127.0.0.1:3306/spring_db
jdbc.username=root
jdbc.password=root
` jdbc2.properties `
1
username=root666
- 修改
applicationContext.xml
1
2
3
4
5
6
7
8
9
10
11
12
13
14
15
16
17
18
<?xml version="1.0" encoding="UTF-8"?>
  <beans xmlns="http://www.springframework.org/schema/beans"
         xmlns:xsi="http://www.w3.org/2001/XMLSchema-instance"
         xmlns:context="http://www.springframework.org/schema/context"
         xsi:schemaLocation="
              http://www.springframework.org/schema/beans
              http://www.springframework.org/schema/beans/spring-beans.xsd
              http://www.springframework.org/schema/context
              http://www.springframework.org/schema/context/spring-context.xsd">
      <!--方式一 -->
      <context:property-placeholder location="jdbc.properties,jdbc2.properties" system-properties-mode="NEVER"/>
      <!--方式二-->
      <context:property-placeholder location="*.properties" system-properties-mode="NEVER"/>
      <!--方式三 -->
      <context:property-placeholder location="classpath:*.properties" system-properties-mode="NEVER"/>
      <!--方式四-->
      <context:property-placeholder location="classpath*:*.properties" system-properties-mode="NEVER"/>
  </beans>
说明:
- 方式一: 可以实现,如果配置文件多的话,每个都需要配置
- 方式二:
*.properties代表所有以 properties 结尾的文件都会被加载,可以解决方式一的问题,但是不标准 - 方式三: 标准的写法,
classpath:代表的是从根路径下开始查找,但是只能查询当前项目的根路径 - 方式四: 不仅可以加载当前项目还可以加载当前项目所依赖的所有项目的根路径下的 properties 配置文件
加载 properties 文件小结
- 如何开启
context命名空间
|  |
如何加载 properties 配置文件
1
<context:property-placeholder location="" system-properties-mode="NEVER"/>
如何在
applicationContext.xml引入 properties 配置文件中的值1
${key}
IOC/DI 注解开发管理第三方 bean
见: [[Spring IoC#IOC/DI 注解开发管理第三方 bean]]