02.Gradle技巧
Gradle 技巧
远程 Gradle 脚本
可以将一些通用的 Gradle 脚本放到远程,提高复用性
- gitlab:通过 gitlab 的 api v4 来访问 未验证
apply from: ‘https://git.私有化部署的 gitlab 域名.com/api/v4/projects/projectId(工程 id)/repository/files/目录名%2F 文件名/raw?ref=分支名&private_token=token 内容 '
//子路径里的/要写成%2F,需要 UrlEncode
- github:通过
rawapi或者jsdeliver(cdn)来访问,需要 public 的仓库
格式:https://raw.githubusercontent.com/用户名/仓库名/master/文件名
apply from: ‘https://raw.githubusercontent.com/hacket/gradle-tips/master/README.md’
中国国内可使用 cdn,格式:https://cdn.jsdelivr.net/gh/github用户名/仓库名@分支名/目录/文件名>
apply from: ‘https://cdn.jsdelivr.net/gh/hacket/gradle-tips@master/README.md’
为多 module 引入同一个插件,避免每个 module 都引入
如为需要的 module 引入 maven-publish 插件
- 新建文件
archives_publish.gradle
1
2
3
4
5
6
def publishLibraries = ['appinit-api', 'appinit-annotation', 'appinit-compiler', 'appinit-auto-register', 'appinit-startup']
subprojects { Project subProject ->
    if (publishLibraries.contains(subProject.name)) {
        apply plugin: 'com.vanniktech.maven.publish'
    }
}
- 在根 build.gradle 中引入,这样所有的 module 就都有该插件了
1
apply from: "./archives_publish.gradle"
字符串首字符大写
1
String.capitalize()
查看跳转 gradle 源码
在 gradle-wrapper.properties 中添加 gradle-xxx-all.zip 就可以,是 gradle-xx-bin.zip 就不行。
1
distributionUrl=https\://services.gradle.org/distributions/gradle-6.5-all.zip
看情况添加一个 gradleApi 的依赖
1
2
3
4
dependencies {
    // 可跳转到源码
    implementation gradleApi()
}
打包选项自动移除不必要文件
在用 Kotlin 开发的过程中,会发现打出的 aar 会包含一个类似 META-INF/library_release.kotlin_module 的文件,当我集成打包时,发现不同的 aar 包中含有相同的 .kotlin_module 文件,这样会导致打包失败,这个时候通常的做法是在 build.gradle 文件中这样配置:
1
2
3
packagingOptions {
    exclude 'META-INF/*.kotlin_module'
}
可以在插件中自动实现,避免手动配置:
1
2
3
4
project.afterEvaluate {
    com.android.build.gradle.BaseExtension android = project.extensions.getByName("android")
    android.getPackagingOptions().exclude("META-INF/*.kotlin_module")
}
plugins 和 apply plugin 有什么区别
根据官方文档,使用 plugin 分两步:
- 解析(Resolve): 找到包含给定插件的 jar 的正确版本,并将其添加到脚本类路径中
- 应用(apply):即调用 plugin,应用插件也分两种
- 脚本 plugin 它的写法是
apply from 'other.gradle', - 二进制 plugin 执行 Plugin.apply(T)
- 脚本 plugin 它的写法是
other.gradle 指文件目录与文件名或 Http Url
apply plugin
- apply plugin 老写法,它的解析和应用是分开的
1
2
3
4
5
6
7
8
9
10
11
12
13
//Using legacy plugin application
buildscript {
  repositories {
    maven {
      url "https://plugins.gradle.org/m2/"
    }
  }
  dependencies {
    classpath "org.springframework.boot:spring-boot-gradle-plugin:2.2.2.RELEASE"
  }
}

apply plugin: "org.springframework.boot"
plugins DSL
- plugins DSL 是一种新的插件的应用方式,这种方式只能在 Gradle 2.1 以上才可以使用;它的解析和应用是合并的
1
2
3
4
plugins {
    id «plugin id»
    id «plugin id» version «plugin version» [apply «false»]
}
对于核心 plugin,比如 com.android.application、java,版本号可以省略(新写法隐藏了传统的类似 Maven GAV 的 GroupId 和 ArtifectId,我猜想在 “Gradle plugin portal” 里注册会保存两者的映射,即从 “com.jfrog.bintra” 映射到 “com.jfrog.bintray.gradle: gradle-bintray-plugin”,名字不一样,不小心的话,会找不到的):

而后面的 apply 加上 boolean 值用来控制是否要立即应用该插件。比如我只想在工程的某个子工程中应用该插件:
1
2
3
4
5
6
7
8
plugins {
  id "xyz" version "1.0.0" apply false
}
subprojects { subproject ->
    if (subproject.name == "subProject") {
        apply plugin: 'xyz'
    }
}
这种情况下在子工程 apply 的版本号可以省略。
1
2
3
4
5
//Using the plugins DSL:

plugins {
 id "org.springframework.boot" version "2.2.2.RELEASE"
}
使用 plugins{}这种引入插件的方式更简单些,用的 plugin 是核心 plugin 或者发布在 Gradle plugin repository 才可以。参考 Gradle官方插件库
Gradle7.X 新版插件依赖方式
- 旧版插件依赖方式
1
2
3
4
5
6
7
8
9
10
11
12
13
14
15
16
17
18
19
// 根build.gradle
buildscript {
    // ...
    dependencies {
        // ...
        classpath 'com.google.dagger:hilt-android-gradle-plugin:2.41'
    }
}

// app/lib build.gradle
apply plugin: 'kotlin-kapt'
apply plugin: 'dagger.hilt.android.plugin'
android {
    // ...
}
dependencies {
    implementation "com.google.dagger:hilt-android:2.41"
    kapt "com.google.dagger:hilt-android-compiler:2.41"
}
- 新版插件的依赖方式
插件和仓库地址依赖变了:
1
2
3
4
5
6
7
8
9
10
11
12
13
14
15
// settings.gradle
pluginManagement {
    repositories {
        gradlePluginPortal()
        google()
        mavenCentral()
    }
}
dependencyResolutionManagement {
    repositoriesMode.set(RepositoriesMode.FAIL_ON_PROJECT_REPOS)
    repositories {
        google()
        mavenCentral()
    }
}
引入插件方式也变了:
1
2
3
4
5
6
7
// 根build.gradle
plugins {
    id 'com.android.application' version '7.1.3' apply false
    id 'com.android.library' version '7.1.3' apply false
    id 'org.jetbrains.kotlin.android' version '1.6.21' apply false
    id 'com.google.dagger.hilt.android' version '2.41' apply false
}
Gradle 构建性能分析
Profile report
使用如下命令来生成一份本地的构建分析报告:
1
./gradlew assembleDebug --profile
构建完成会生成一个本地的链接 项目路径/build/reports/profile/profile-2021-07-28-15-16-00.html :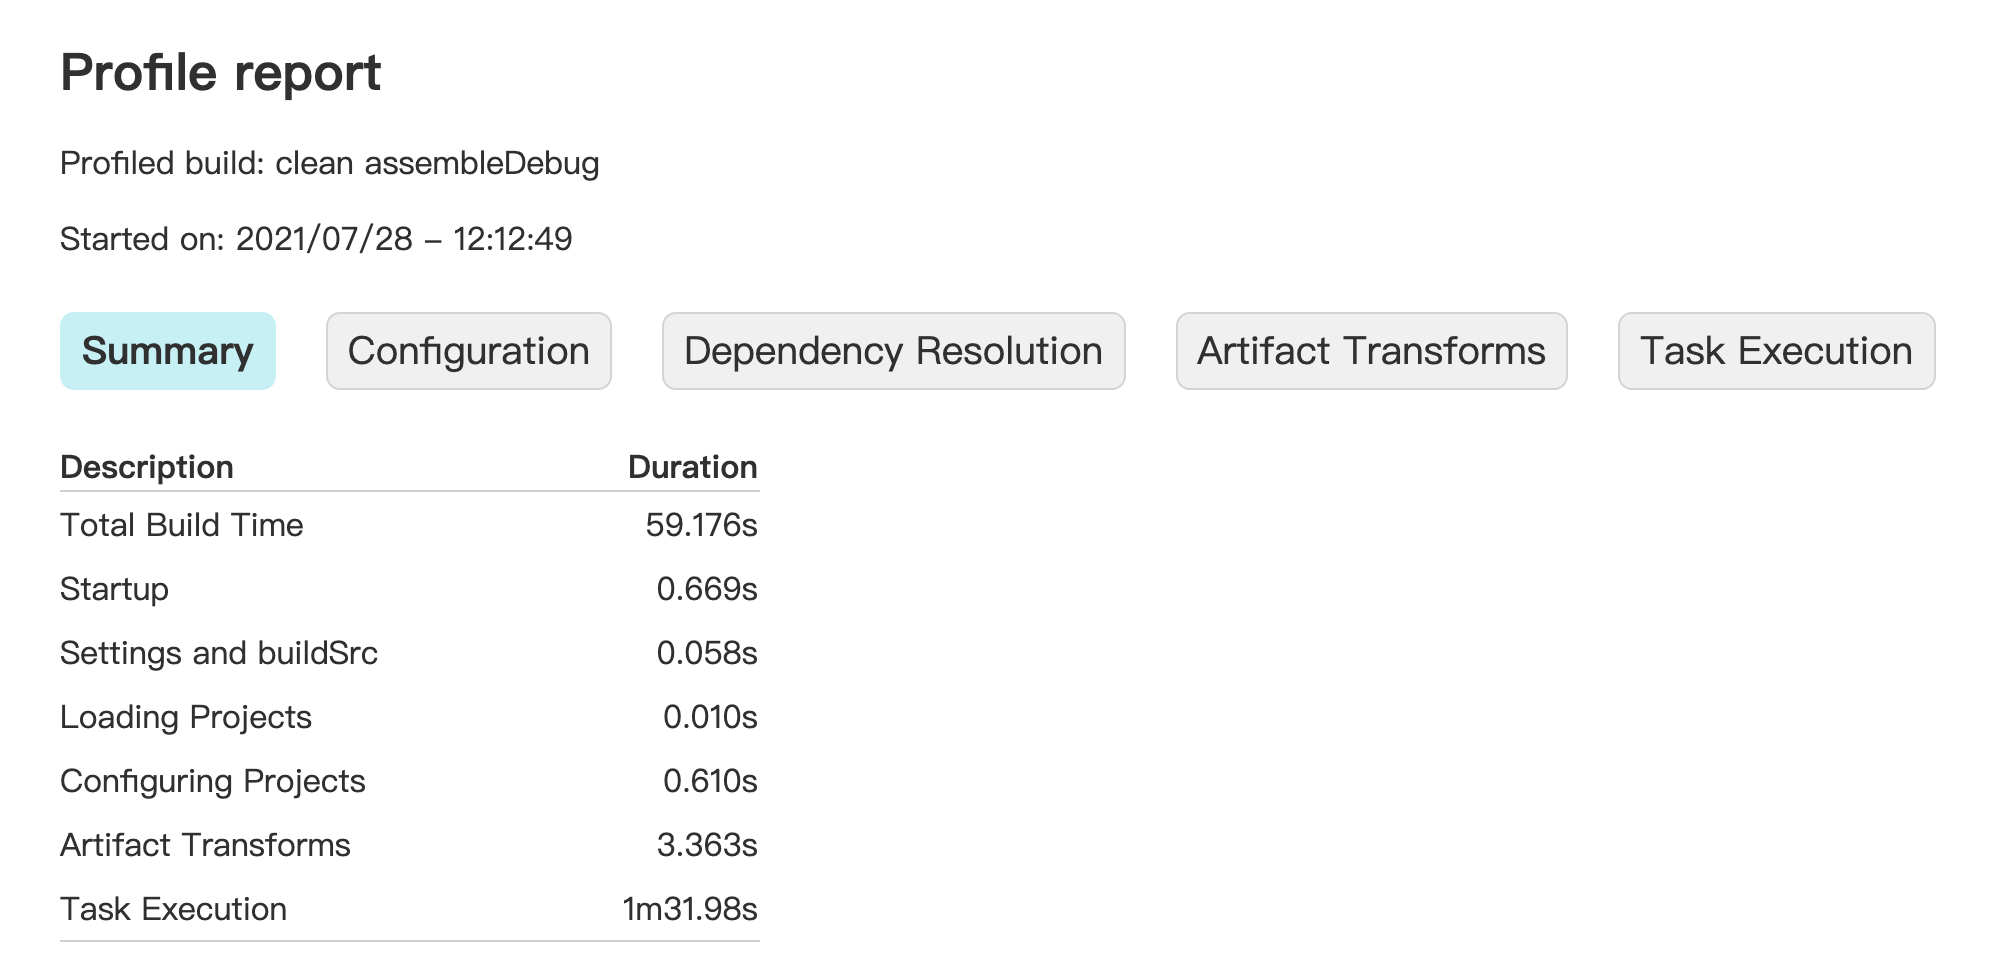
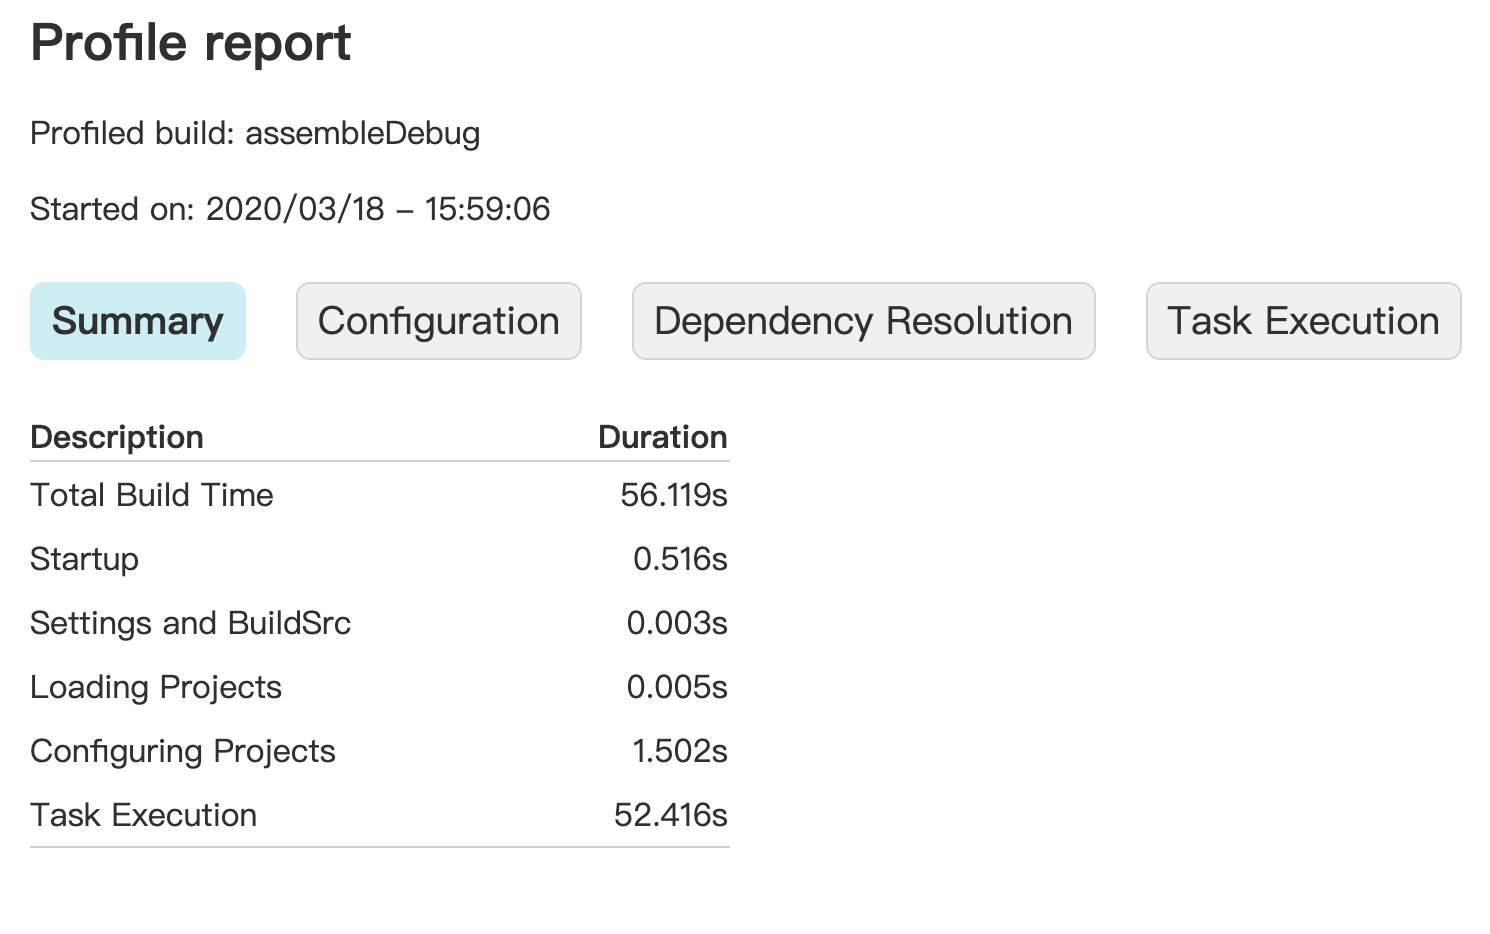
Summary
Gradle 构建信息的概览界面,用于查看 Total Build Time、初始化(包含 Startup、Settings and BuildSrc、Loading Projects 三部分)、配置、任务执行的时间。如下图所示:
Configuration
Gradle 配置各个工程所花费的时间,我们可以看到 All projects、app 模块以及其它模块单个的配置时间。如下图所示: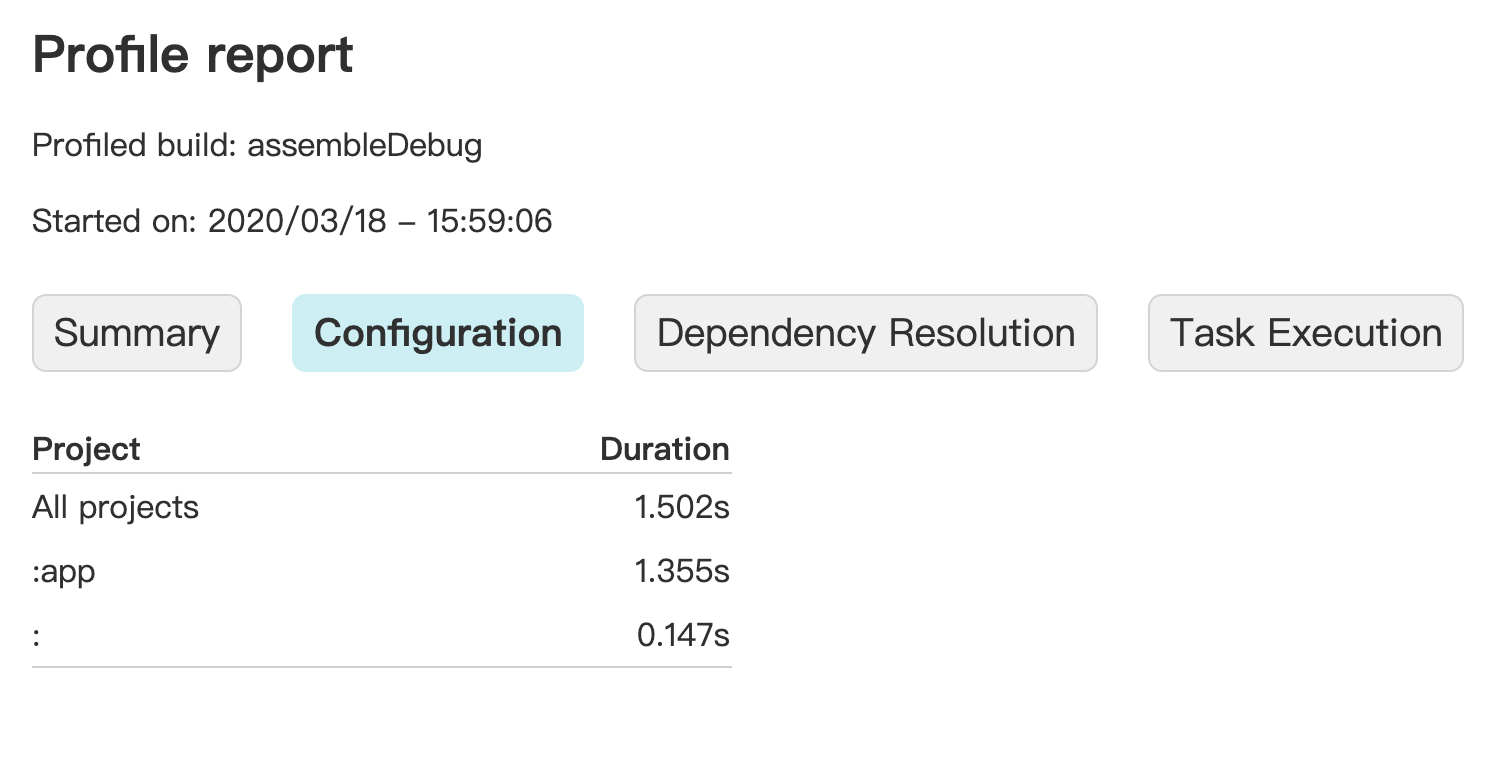
Dependency Resolution
Gradle 在对各个 task 进行依赖关系解析时所花费的时间。如下图所示:
Task Execution
需要注意的是,Task Execution 的时间是所有 gradle task 执行时间的总和,实际上 多模块的任务是并行执行的。
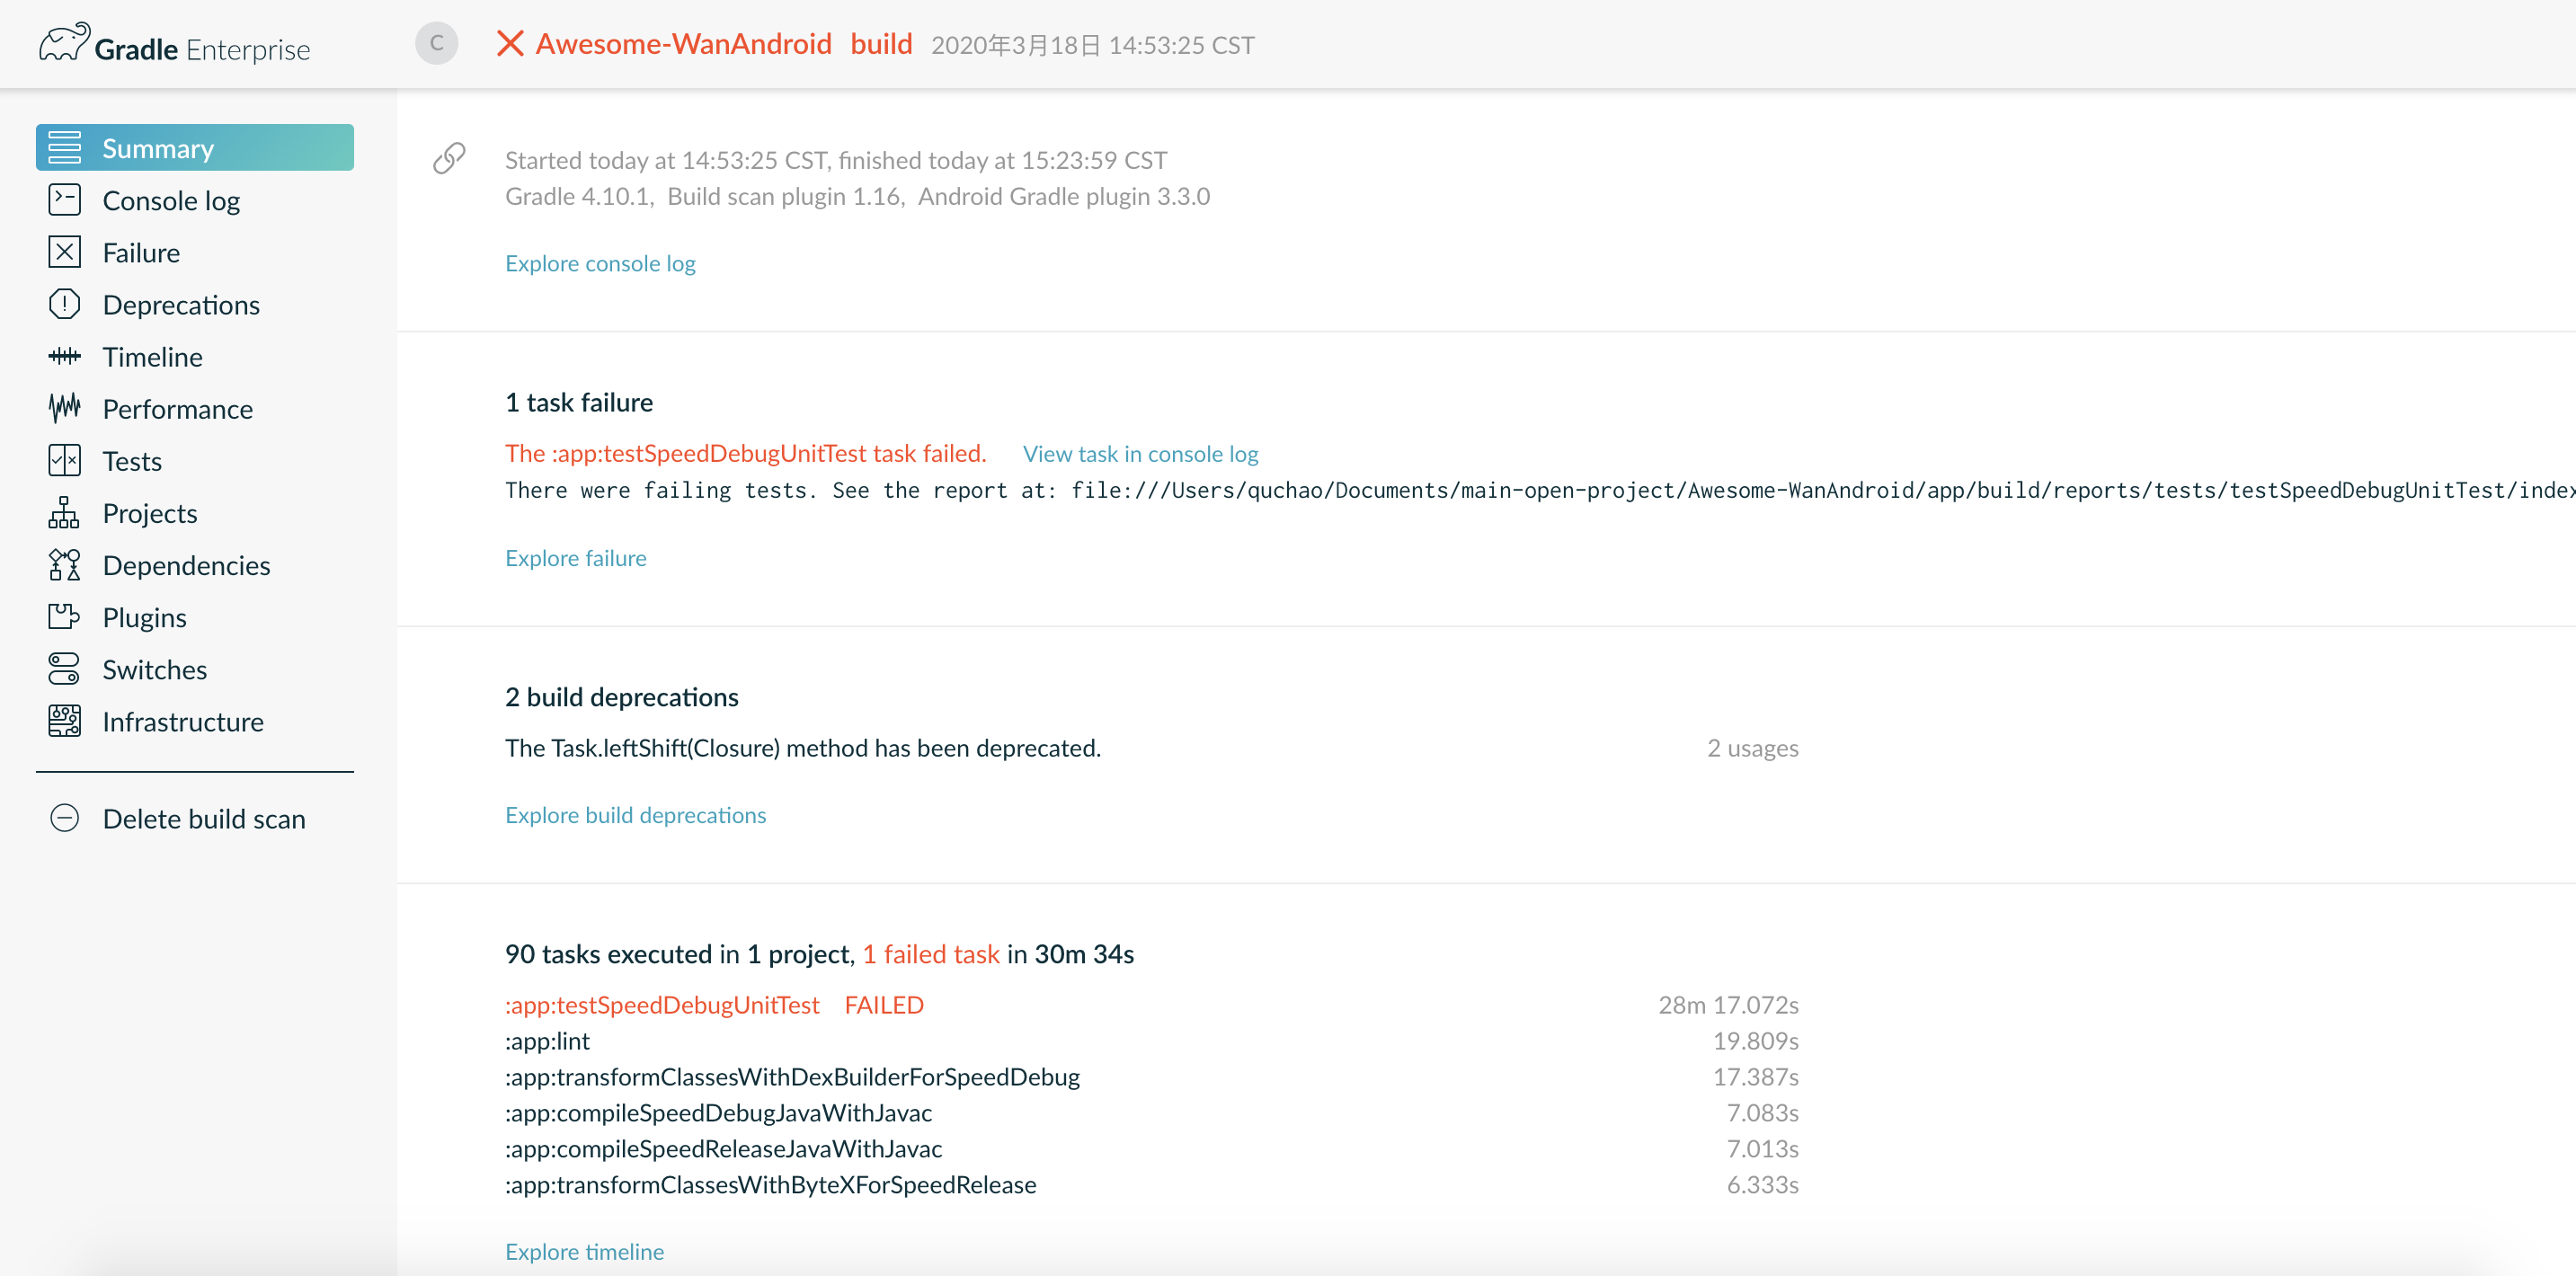
Build Scan
Build Scan 是官方推出的用于诊断应用构建过程的性能检测工具,它能分析出导致应用构建速度慢的一些问题。在项目下使用如下命令即可开启 Build Scan 诊断:
1
./gradlew build --scan
你是第一次使用 Build Scan,首先需要使用自己的邮箱激活 Build Scan:
阿里云镜像Maven仓库
1
2
3
4
5
6
7
8
9
10
11
12
13
14
15
16
17
18
19
20
21
22
23
24
25
26
27
28
29
30
31
32
33
// 具体对应见:https://developer.aliyun.com/mvn/guide
// 使用阿国内阿里云的依赖下载地址替换Google依赖包下载地址


// central (源地址:https://repo1.maven.org/maven2/)
//    maven {
//        url 'https://maven.aliyun.com/repository/central'
//        allowInsecureProtocol = true
//    }
//    Could not find flipper-leakcanary-plugin-0.183.0.jar (com.facebook.flipper:flipper-leakcanary-plugin:0.183.0).
//        Searched in the following locations:
//            https://maven.aliyun.com/repository/central/com/facebook/flipper/flipper-leakcanary-plugin/0.183.0/flipper-leakcanary-plugin-0.183.0.jar

// jcenter http://jcenter.bintray.com/
maven {
    url 'https://maven.aliyun.com/repository/public'
    allowInsecureProtocol = true
}
// jcenter/public central仓和jcenter仓的聚合仓
maven {
    url 'https://maven.aliyun.com/repository/public'
    allowInsecureProtocol = true
}
// google https://maven.google.com/
maven {
    url 'https://maven.aliyun.com/repository/google/'
    allowInsecureProtocol = true
}
// gradle-plugin https://plugins.gradle.org/m2/
maven {
    url 'https://maven.aliyun.com/repository/gradle-plugin'
    allowInsecureProtocol = true
}
遇到的问题
更新了新版本的 Gradle,用 AS 同步时 Gradle 的下载极其缓慢

解决:
- 找到下载的 gradle 版本,目前下载的是
gradle-7.3-all - 去对应的目录
~\.gradle\wrapper\dists\gradle-7.3-all\dfe0rb4hnplvqkibhoc45how8 - 将 gradle-7.3-all.zip 链接放浏览器下载好,不需要解压
- 按下如下格式放好,
gradle-7.3-all不需要解压
Gradle7.x 和 AGP7.x 版本变化
Transform 迁移到 AsmClassVisitorFactory
Transform API 是 AGP1.5 就引入的特性,主要用于在 Android 构建过程中,在 Class 转 Dex 的过程中修改 Class 字节码。利用 Transform API,我们可以拿到所有参与构建的 Class 文件,然后可以借助 ASM 等字节码编辑工具进行修改,插入自定义逻辑。
在 AGP7.0 中 Transform 已经被标记为废弃了,并且将在 AGP8.0 中移除
在 AGP7.0 之后,可以使用 AsmClassVisitorFactory 来做插桩,根据官方的说法,AsmClassVisitoFactory 会带来约 18% 的性能提升,同时可以减少约 5 倍代码。
AsmClassVisitorFactory 之所以比 Transform 在性能上有优势,主要在于节省了 IO 的时间。
如上图所示,多个 Transform 相互独立,都需要通过 IO 读取输入,修改字节码后将结果通过 IO 输出,供下一个 Transform 使用,如果每个 Transform 操作 IO 耗时 +10s 的话,各个 Transform 叠在一起,编译耗时就会呈线性增长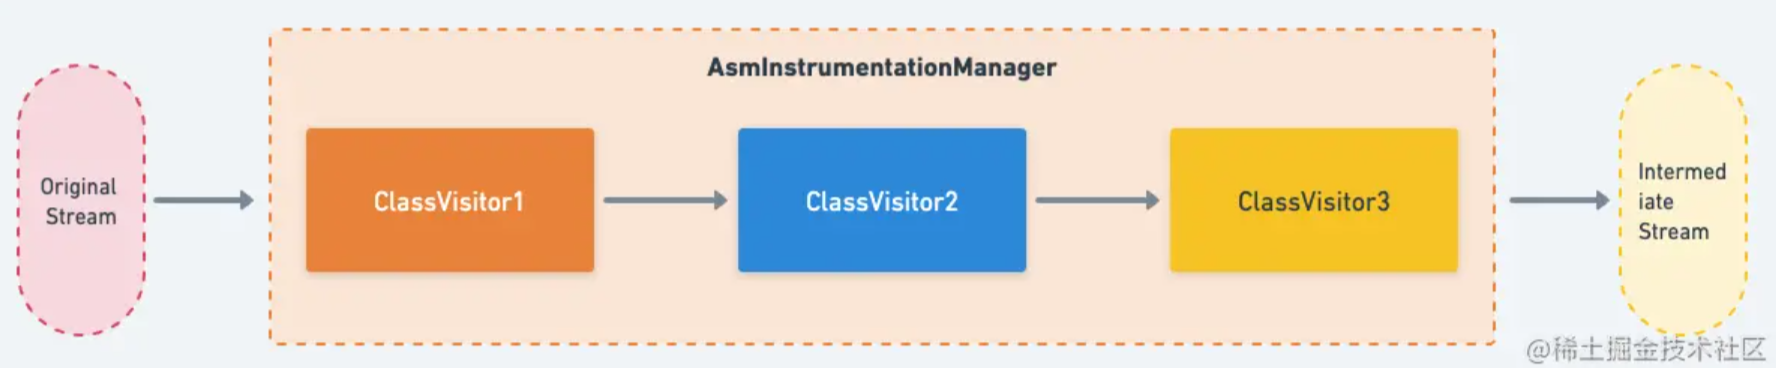
而使用 AsmClassVisitorFactory 则不需要我们手动进行 IO 操作,这是因为 AsmInstrumentationManager 中已经做了统一处理,只需要进行一次 IO 操作,然后交给 ClassVisitor 列表处理,完成后统一输出
通过这种方式,可以有效地减少 IO 操作,减少耗时。其实国内之前滴滴开源的 Booster 与字节开源的 Bytex,都是通过这种思路来优化 Transform 性能的
KAPT 迁移到 KSP
KAPT 工作流程: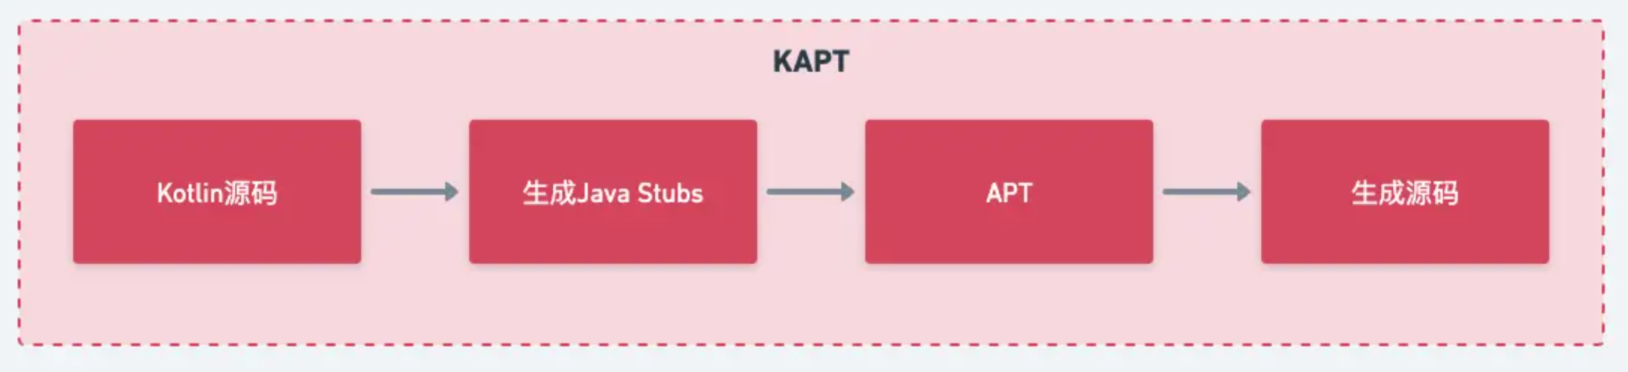
KSP 工作流程: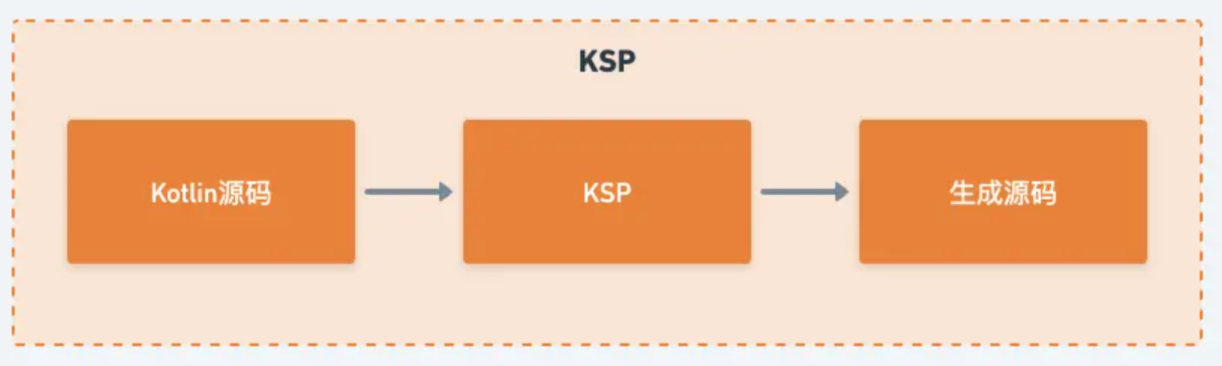
KAPT 慢的原因:KAPT 首先需要将 Kotlin 代码编译成 JavaStubs,这些 JavaStubs 中保留了 Java 注释处理器关注的信息。
这意味着编译器必须多次解析程序中的所有符号 (一次生成 JavaStubs,另一次完成实际编译),但是生成 JavaStubs 的过程是非常耗时的,往往生成 Java Stubs 的时间比 APT 真正处理注解的时间要长。
KSP 不需要生成 JavaStubs,而是作为 Kotlin 编译器插件运行。它可以直接处理 Kotlin 符号,而不需要依赖 Java 注解处理基础架构。因为 KSP 相比 KAPT 少了生成 JavaStubs 的过程,因此通常可以得到 100% 以上的速度提升。
如何迁移到 KSP
- 已经适配了 KSP 的库,更新到最新版即可,ROOM,Moshi 等
- 未适配的库
- Glide(Glide4.14.0 也支持了),KAPT 一般就是用来生成代码,像 Glide 这种生成的代码比较稳定的库 (通常只有几个@GlideModule),可以直接把生成的代码从 build 目录拷贝到项目中来,然后移除 KAPT,后续如果有新的@GlideModule 再更新下生成的文件
- ARouter,这种生成代码不断增加的库,不断会有新的@Route 增加,只能找个适配了 KSP 的路由库了
Configuration Cache
Gradle 的生命周期可以分为大的三个部分:初始化阶段(Initialization Phase),配置阶段(Configuration Phase),执行阶段(Execution Phase)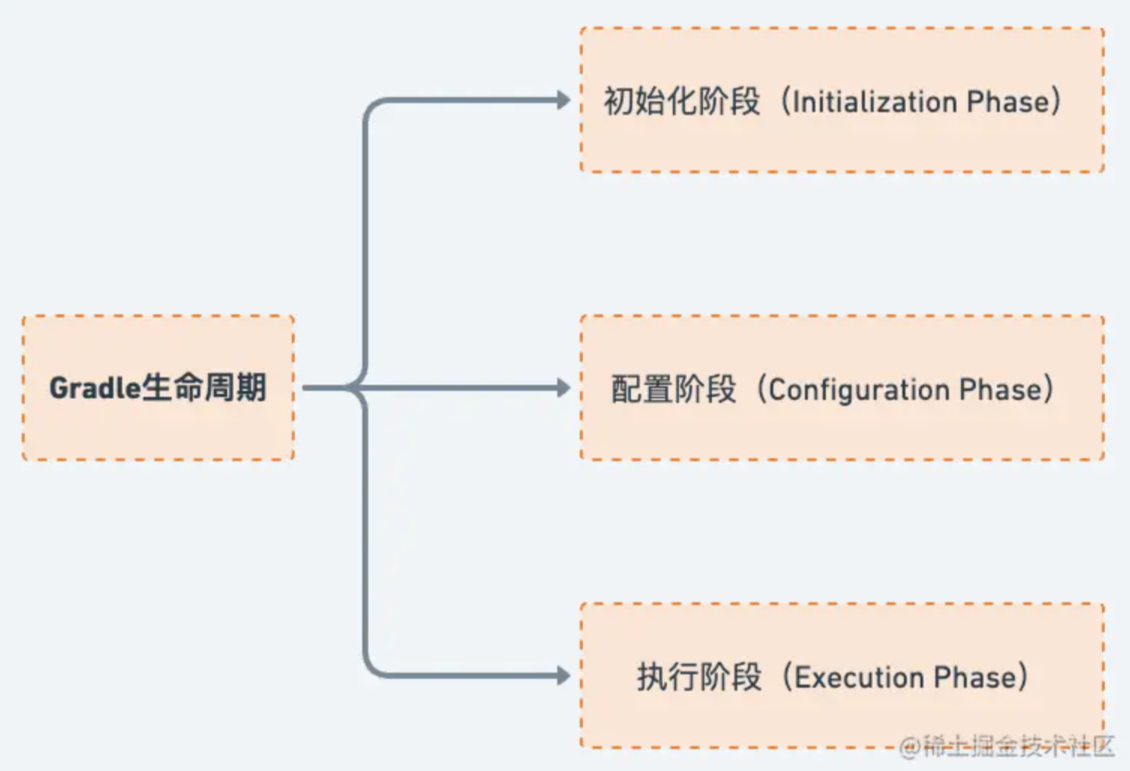
在任务执行阶段,Gradle 提供了多种方式实现 Task 的缓存与重用(如 up-to-date 检测,增量编译,build-cache 等)
任务配置阶段有时也比较耗时,目前 AGP 也支持了配置阶段缓存 Configuration Cache,它可以缓存配置阶段的结果,当脚本没有发生改变时可以重用之前的结果
在越大的项目中配置阶段缓存的收益越大,module 比较多的项目可能每次执行都要先配置 20 到 30 秒,尤其是增量编译时,配置的耗时可能都跟执行的耗时差不多了,而这正是 configuration-cache 的用武之地
Configuration-cache 还是实验特性,如果你想要开启的话可以在 gradle.properties 中添加以下代码:
1
2
3
# configuration cache
org.gradle.unsafe.configuration-cache=true
org.gradle.unsafe.configuration-cache-problems=warn
Android 官方给出了一个开启 Configuration cache 前后的对比,可以看出在这个 benchmark 中可以得到约30%的提升 (当然是在配置阶段耗时占比越高的时候效果越明显,全量编译时应该不会有这样的比例)
Configuration Cache 适配:
如果是项目中自定义 Task 不支持的话,还需要适配一下 Configuration Cache,适配 Configuration Cache 的核心思路其实很简单:不要在 Task 执行阶段调用外部不可序列化的对象 (比如 Project 与 Variant)
移除 Jetifier
什么是 Jetifier?
Jetifier 是 android support 包迁移到 androidX 的工具,当你在项目中启动用 Jetifier 时,Gradle 插件会在构建时将三方库里的 Support 转换成 AndroidX,因此会对构建速度产生影响。
同时 Jetfier 也会对 sync 耗时产生比较大的影响,具体可以看 哔哩哔哩 Android 同步优化•Jetifier
前提:
- 在 gradle.properties 中开启了 android.enableJetifier=true
- AGP7.1.0+,低版本没有 checkJetifier task(task group 为 verification);低版本可用开源库 can-i-drop-jetifier 来检测
检测
1
2
3
4
5
6
7
8
task checkJetifierAll(group: "verification") {}
subprojects { project ->
    project.tasks.whenTaskAdded { task ->
        if (task.name == "checkJetifier") {
            checkJetifierAll.dependsOn(task)
        }
    }
}
运行 task:gradlew checkJetifierAll
1
2
3
4
5
6
7
8
9
10
11
12
13
14
15
> Task :app:checkJetifier
Project ':app' does not use any legacy support libraries. If this is the case for all other projects, you can disable Jetifier by setting android.enableJetifier=false in gradle.properties.

> Task :core:checkJetifier
The following libraries used by project ':core' depend on legacy support libraries. To disable Jetifier, you will need to use AndroidX-supported versions of these libraries.
	com.android.support:support-core-utils:28.0.0 (Project ':core', configuration 'debugAndroidTestCompileClasspath' -> com.android.support:support-core-utils:28.0.0)
	com.android.support:appcompat-v7:28.0.0 (Project ':core', configuration 'debugAndroidTestCompileClasspath' -> com.android.support:appcompat-v7:28.0.0)

> Task :mylibrary1:checkJetifier
Project ':mylibrary1' does not use any legacy support libraries. If this is the case for all other projects, you can disable Jetifier by setting android.enableJetifier=false in gradle.properties.

> Task :mylibrary2:checkJetifier
Project ':mylibrary2' does not use any legacy support libraries. If this is the case for all other projects, you can disable Jetifier by setting android.enableJetifier=false in gradle.properties.

> Task :checkJetifierAll
可以看到,core module 有 support 依赖;其他 module 没有依赖;当所有的 module 都没有了 support 库,就可以移除 Jetifier 了,即设置 android.enableJetifier=false
迁移方案
- 检测库有没有已经支持了 androidX 的最新版本, 如果有直接升级即可
- 如果有源码,添加 android.useAndroidX = true,迁移到 AndroidX,然后升级所有的依赖,发布个新版本就可以了。
- 如果你没有源码,或对于你的项目来说,它太老了。你可以用
jetifier-standalone命令行工具把 AAR/JAR 转成 jetified 之后的 AAR/JAR。这个命令行的转换效果和你在代码里开启 android.enableJetifier 的效果是一样的。命令行如下:
1
2
// https://developer.android.com/studio/command-line/jetifier
./jetifier-standalone -i <source-library> -o <output-library>
关闭 R 文件传递(AGP4.2.0+)
在 apk 打包的过程中,module 中的 R 文件采用对依赖库的 R 进行累计叠加的方式生成。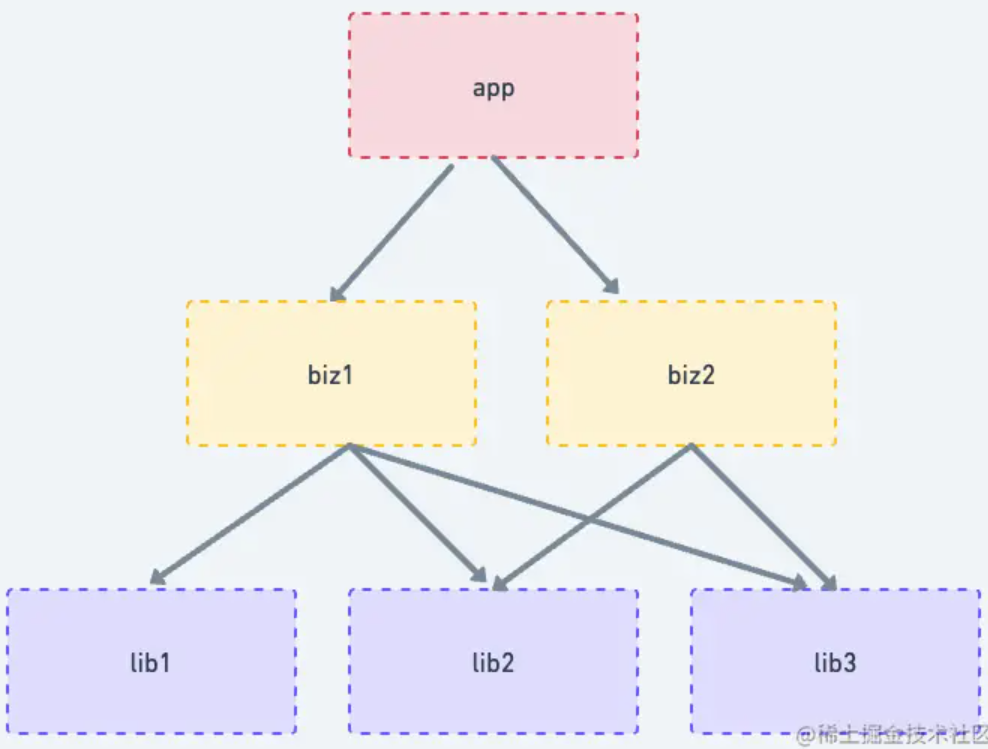
编译打包时每个模块生成的 R 文件如下:
1
2
3
4
5
6
1. R_lib1 = R_lib1;
2. R_lib2 = R_lib2;
3. R_lib3 = R_lib3;
4. R_biz1 = R_lib1 + R_lib2 + R_lib3 + R_biz1(biz1本身的R)
5. R_biz2 = R_lib2 + R_lib3 + R_biz2(biz2本身的R)
6. R_app  = R_lib1 + R_lib2 + R_lib3 + R_biz1 + R_biz2 + R_app(app本身R)
可以看出各个模块的 R 文件都会包含上层组件的 R 文件内容,这不仅会带来包体积问题,也会给编译速度带来一定的影响。比如我们在 R_lib1 中添加了资源,所有下游模块 (上图的 biz1 和 app 模块) 的 R 文件都需要重新编译。
- 关闭 R 文件传递可以通过编译避免的方式获得更快的编译速度
- 关闭 R 文件传递有助于确保每个模块的 R 类仅包含对其自身资源的引用,避免无意中引用其他模块资源,明确模块边界。
- 关闭 R 文件传递也可以减少很大一部分包体积与 dex 数量
如何适配?
- 从
Android Studio Bumblebee开始,新项目的非传递 R 类默认处于开启状态。即 gradle.properties 文件中都开启了如下标记
1
android.nonTransitiveRClass=true
- 对于使用早期版本的 Studio 创建的项目,最低 AGP 版本为 4.2.0,您可以依次前往
Refactor > Migrate to Non-transitive R Classes,将项目更新为使用非传递 R 类。
Kotlin 增量编译的新方式 (开启 Kotlin 跨模块增量编译) Kotlin1.7.0 支持
背景:
在组件化模块化的过程中,当我们修改底层模块 (:util) 时,所有依赖于这个模块的上层模块都需要重新编译,Kotlin 的增量编译在这种情况往往是不生效的,这时候编译是很耗时的。
Kotlin1.7.0 开始,Kotlin 编译器对跨模块增量编译做了支持,并且和 Gradle 构建缓存兼容,对编译避免的支持也得到了改进,这些改进减少了模块和文件重新编译的次数,让整体编译更加迅速。
如何开启:
在 gradle.properties 文件中设置以下选项即可使用新方式进行增量编译:
1
2
kotlin.incremental.useClasspathSnapshot=true // 开启跨模块增量编译
kotlin.build.report.output=file // 可选,启用构建报告
init.gradle 用途
init.gradle 介绍
添加 buildscript
方式 1:
1
2
3
4
5
6
7
8
9
10
11
12
13
14
15
16
17
initscript {
    repositories {
        println("------------------initscript buildscript repositories(plugin)------------------")
        google()
        mavenCentral()
        maven(url = "${System.getenv("HOME")}/maven/")
        maven(url = "https://maven.google.com")
        maven(url = "https://mvnrepository.com/artifact/com.github.gundy/semver4j")
        maven(url = "https://jitpack.io")
    }
    dependencies {
        println("------------------initscript buildscript dependencies------------------")
        //noinspection UseTomlInstead
        classpath("me.ele:lancet-plugin:2.0.0")
        classpath("no.ele.asm:lancet-plugin:2.0.1")
    }
}
在 gradle 的生命周期中,这个是所有的最早执行的方法
这种方式里面不能引入外部的的变量
方式 2:
1
2
3
4
5
6
7
8
9
10
11
12
13
14
15
16
17
allprojects {
    buildscript {
        repositories {
            gradlePluginPortal()
            google()
            mavenCentral()

        }
        dependencies {
            classpath("no.ele.asm:lancet-plugin:2.0.1")
        }
    }
    repositories {
        google()
        mavensCentral()
    }
}
给所有的 Gradle 项目添加仓库依赖
每次新建项目都需要重新配置 gradle,添加国内镜像,那么我们可以在 ~/.gradle/init.gradle 文件中添加对应的国内镜像
https://gist.github.com/bennyhuo/af7c43cc4831661193605e124f539942
不需要改代码引入一些调试工具,如 flipper,dokit 等
~/.gradle/init.gradle
1
2
3
4
5
6
7
8
9
10
11
12
13
14
15
16
17
18
19
20
21
22
23
24
25
26
27
28
29
30
31
32
33
34
35
36
37
38
39
40
41
42
43
44
45
46
47
48
49
50
51
52
53
54
55
56
57
58
59
60
61
62
63
64
65
66
67
68
69
70
71
72
73
74
75
76
77
78
79
80
81
82
83
84
85
86
87
88
89
90
91
92
93
94
95
96
97
98
99
100
101
102
103
104
105
106
107
108
109
110
111
112
113
114
115
116
117
118
119
120
121
122
123
124
125
126
127
static String purpleText(String text) {
    return "\u001B[35m ${text} \u001B[0m"
}

static String yellowText(String text) {
    return "\u001B[33m ${text} \u001B[0m"
}

def needResolutionStrategy_kotlin = true
def needResolutionStrategy_okhttp = true
def kotlin_version = '1.5.10'
def okhttp_version = '3.14.9'

def MAVEN_TOOLS_URL = System.getenv("HOME") + "/maven"
def MODULES = ['AndroidDemos', 'AndroidUI', 'OpenSourceDemos']
def DEBUG_TOOLS_DEP = "me.hacket:debugtools:1.0.0"

println(purpleText("init.gradle MAVEN_TOOLS_URL=$MAVEN_TOOLS_URL, needResolutionStrategy_kotlin=$needResolutionStrategy_kotlin, needResolutionStrategy_okhttp=$needResolutionStrategy_okhttp, kotlin_version=$kotlin_version, okhttp_version=$okhttp_version"))

def repoConfig = { // Closure
    all { ArtifactRepository repo ->
        if (repo instanceof MavenArtifactRepository) {
            def url = repo.url.toString()
            if (url.contains('repo1.maven.org/maven2') || url.contains('jcenter.bintray.com')) {
                println "gradle init: (${repo.name}: ${repo.url}) removed"
                remove repo
            }
        }
    }
    // 具体对应见:https://developer.aliyun.com/mvn/guide
    // 使用阿国内阿里云的依赖下载地址替换Google依赖包下载地址


    // central (源地址:https://repo1.maven.org/maven2/)
//    maven {
//        url 'https://maven.aliyun.com/repository/central'
//        allowInsecureProtocol = true
//    }
//    Could not find flipper-leakcanary-plugin-0.183.0.jar (com.facebook.flipper:flipper-leakcanary-plugin:0.183.0).
//        Searched in the following locations:
//            https://maven.aliyun.com/repository/central/com/facebook/flipper/flipper-leakcanary-plugin/0.183.0/flipper-leakcanary-plugin-0.183.0.jar

    // jcenter http://jcenter.bintray.com/
    maven {
        url 'https://maven.aliyun.com/repository/public'
        allowInsecureProtocol = true
    }
    // jcenter/public central仓和jcenter仓的聚合仓
    maven {
        url 'https://maven.aliyun.com/repository/public'
        allowInsecureProtocol = true
    }
    // google https://maven.google.com/
    maven {
        url 'https://maven.aliyun.com/repository/google/'
        allowInsecureProtocol = true
    }
    // gradle-plugin https://plugins.gradle.org/m2/
    maven {
        url 'https://maven.aliyun.com/repository/gradle-plugin'
        allowInsecureProtocol = true
    }
    maven {
        url MAVEN_TOOLS_URL
        allowInsecureProtocol = true
    }
    google()
    mavenCentral()
    maven {
        url "https://jitpack.io"
        allowInsecureProtocol = true
    }
    maven {
        url "https://maven.google.com"
        allowInsecureProtocol = true
    }
    mavenLocal()
}


// gradle脚本依赖仓库
gradle.projectsLoaded {
    rootProject.buildscript {
        repositories repoConfig
    }
}

// 项目依赖仓库
allprojects { project ->
    repositories repoConfig

    project.afterEvaluate { p ->
        if (p.name == 'buildSrc') {
            return
        }
        if (project.name == rootProject.name) {
            return
        }
        if (!MODULES.contains(p.name)) {
            return
        }
        println(yellowText("handle deps for: ${p.name}. add debugImplementation \"$DEBUG_TOOLS_DEP\""))
        try {
            p.getDependencies().add("debugImplementation", DEBUG_TOOLS_DEP)
        } catch (Exception e) {
            e.printStackTrace()
        }
    }

    // 必须和项目的依赖冲突,编译报错
    configurations.all {
        if (needResolutionStrategy_kotlin) {
            // 编译错误:kotlin.jdk7.AutoCloseableKt is defined multiple times
            resolutionStrategy.force "org.jetbrains.kotlin:kotlin-stdlib:${kotlin_version}"
            resolutionStrategy.force "org.jetbrains.kotlin:kotlin-stdlib-jdk7:${kotlin_version}"
            resolutionStrategy.force "org.jetbrains.kotlin:kotlin-stdlib-jdk8:${kotlin_version}"
            resolutionStrategy.force "org.jetbrains.kotlin:kotlin-stdlib-common:${kotlin_version}"
            resolutionStrategy.force "org.jetbrains.kotlin:kotlin-stdlib-common:${kotlin_version}"
        }
        if (needResolutionStrategy_okhttp) {
            // okhttp版本过高如4.9,过时的api会让编译不通过的
            resolutionStrategy.force "com.squareup.okhttp3:okhttp:${okhttp_version}"
            resolutionStrategy.force "com.squareup.okhttp3:okhttp-urlconnection:${okhttp_version}"
            resolutionStrategy.force "com.squareup.okhttp3:logging-interceptor:${okhttp_version}"
        }
    }
}
init.gradle.kts:
1
2
3
4
5
6
7
8
9
10
11
12
13
14
15
16
17
18
19
20
21
22
23
24
25
26
27
28
29
30
31
32
33
34
35
36
37
38
39
40
41
42
43
44
45
46
47
48
49
50
51
52
53
54
55
56
57
58
59
60
61
62
63
64
65
66
67
68
69
70
71
72
73
74
75
76
77
78
79
80
81
82
83
84
85
86
87
88
89
90
91
92
93
94
95
96
97
98
99
100
101
102
103
104
105
106
107
108
109
110
111
112
113
114
115
116
117
118
119
120
121
122
123
124
125
126
127
128
129
130
131
132
133
134
135
136
137
138
139
140
141
142
143
144
145
146
147
val isOpenInitGradle = true
val kotlinVersion = "1.7.10"
val okhttpVersion = "3.14.9"
val frescoVersion = "2.6.0"

val localMaven: RepositoryHandler.() -> Unit = {
    mavenLocal()
    maven(url = "${System.getenv("HOME")}/maven/")
}
val commonMaven: RepositoryHandler.() -> Unit = {
    google()
    mavenCentral()
    maven(url = "https://maven.google.com")
    maven(url = "https://jitpack.io")
}

val aliYunMaven: RepositoryHandler.() -> Unit = {
    // 具体对应见:https://developer.aliyun.com/mvn/guide 使用阿国内阿里云的依赖下载地址替换Google依赖包下载地址

    // central (源地址:https://repo1.maven.org/maven2/)
    maven(url = "https://maven.aliyun.com/repository/central")
    // jcenter http://jcenter.bintray.com/
//    maven(url = "https://maven.aliyun.com/repository/public")

    // jcenter/public central仓和jcenter仓的聚合仓
    maven(url = "https://maven.aliyun.com/repository/public")

    // google https://maven.google.com/
    maven(url = "https://maven.aliyun.com/repository/google/")

    // gradle-plugin https://plugins.gradle.org/m2/
    maven(url = "https://maven.aliyun.com/repository/gradle-plugin")
}

val businessMaven: RepositoryHandler.() -> Unit = {
    maven(url = "https://mvnrepository.com/artifact/com.github.gundy/semver4j")
}


allprojects {
    val project = this
    if (!isOpenInitGradle) {
        println("init.gradle [:${project.name}] isOpenInitGradle=false".toYellow())
        return@allprojects
    }
    if (project.name == "buildSrc") {
        // 过滤掉buildSrc不添加依赖
        println("buildSrc pass".toPurple())
        return@allprojects
    }
    if (project == rootProject) {
        // root build.gradle 添加buildscript
        buildscript {
            repositories {
                println("------------------allprojects(${project.name}) buildscript repositories(plugin)------------------".toPurple())
                gradlePluginPortal()
                maven(url = "${System.getenv("HOME")}/maven/")
                google()
                mavenCentral()
                maven(url = "https://maven.google.com")
                maven(url = "https://jitpack.io")

            }
            dependencies {
                println("------------------allprojects(${project.name}) buildscript dependencies------------------".toPurple())
                //noinspection UseTomlInstead
//                classpath("me.ele:lancet-plugin:2.0.0")
                classpath("no.ele.asm:lancet-plugin:2.0.1")
            }
        }
    }
    repositories {
        println(
            "------------------allprojects(${project.name}) repositories(module) ${
                System.getenv(
                    "HOME"
                )
            }/maven/------------------".toPurple()
        )
        maven(url = "${System.getenv("HOME")}/maven/")
        google()
        mavenCentral()
        maven(url = "https://maven.google.com")
        maven(url = "https://jitpack.io")
        maven {
            setUrl("https://maven.pkg.github.com/hacket/Maven")
            credentials {
                username = "hacket"
                password = "xxx"
            }
        }
    }

    afterEvaluate {
        if (!project.plugins.hasPlugin("com.android.application")) {
            // com.android.application插件才添加依赖
            println("init.gradle [:${project.name}] com.android.application插件的module才添加".toYellow())
            return@afterEvaluate
        }
        // si lancet
        try {
            apply(plugin = "no.ele.asm")
//            apply(plugin = "me.ele.lancet")
//            for ((index, plugin) in project.plugins.withIndex()) {
//                println("allprojects(${project.name}) plugin index=$index, plugin=$plugin".toPurple())
//            }
            println("allprojects(${project.name}) apply plugin: no.ele.asm succeed.".toPurple())
        } catch (e: Exception) {
            println("allprojects(${project.name}) apply plugin: no.ele.asm error:${e.message}".toYellow())
            e.printStackTrace()
        }

        project.dependencies.apply {
            project.dependencies.add("debugImplementation", "me.hacket:debugtools:1.0.0")
            project.dependencies.add("compileOnly", "no.ele.asm:lancet-base:2.0.1") //升级到ASM 9
            project.dependencies.add("compileOnly", "me.ele:lancet-base:1.0.0")
        }
    }

    if (project.name.contains("si") || project.name.contains("rw")) {
        println("allprojects(${project.name}) configurations force.".toPurple())
        // 必须和项目的依赖冲突,编译报错
        configurations.all {
            // 编译错误:kotlin.jdk7.AutoCloseableKt is defined multiple times
            resolutionStrategy.force("org.jetbrains.kotlin:kotlin-stdlib:${kotlinVersion}")
            resolutionStrategy.force("org.jetbrains.kotlin:kotlin-stdlib-jdk7:${kotlinVersion}")
            resolutionStrategy.force("org.jetbrains.kotlin:kotlin-stdlib-jdk8:${kotlinVersion}")
            resolutionStrategy.force("org.jetbrains.kotlin:kotlin-stdlib-common:${kotlinVersion}")
            resolutionStrategy.force("org.jetbrains.kotlin:kotlin-stdlib-common:${kotlinVersion}")

            // okhttp版本过高如4.9,过时的api会让编译不通过的
            resolutionStrategy.force("com.squareup.okhttp3:okhttp:${okhttpVersion}")
            resolutionStrategy.force("com.squareup.okhttp3:okhttp-urlconnection:${okhttpVersion}")
            resolutionStrategy.force("com.squareup.okhttp3:logging-interceptor:${okhttpVersion}")

            resolutionStrategy.force("com.facebook.fresco:imagepipeline-base:${frescoVersion}")
        }
    }
}

fun String.toPurple(): String {
    return "\u001B[35m $this \u001B[0m"
}

fun String.toYellow(): String {
    return "\u001B[33m $this \u001B[0m"
}