01 .FCM基础
FCM(Firebase Cloud Messaging)
Google FCM 框架概览
Firebase Cloud Messaging(FCM),之前称为 Google 云消息传递(GCM),是一种跨平台消息传递解决方案,它允许开发者安全地向在 iOS、Android 和 Web 上运行的应用发送通知和消息。这项服务由 Firebase 提供,Firebase 是 Google 旗下的一个为移动和网络应用程序提供平台的公司。
FCM 框架的整体工作流程如下:
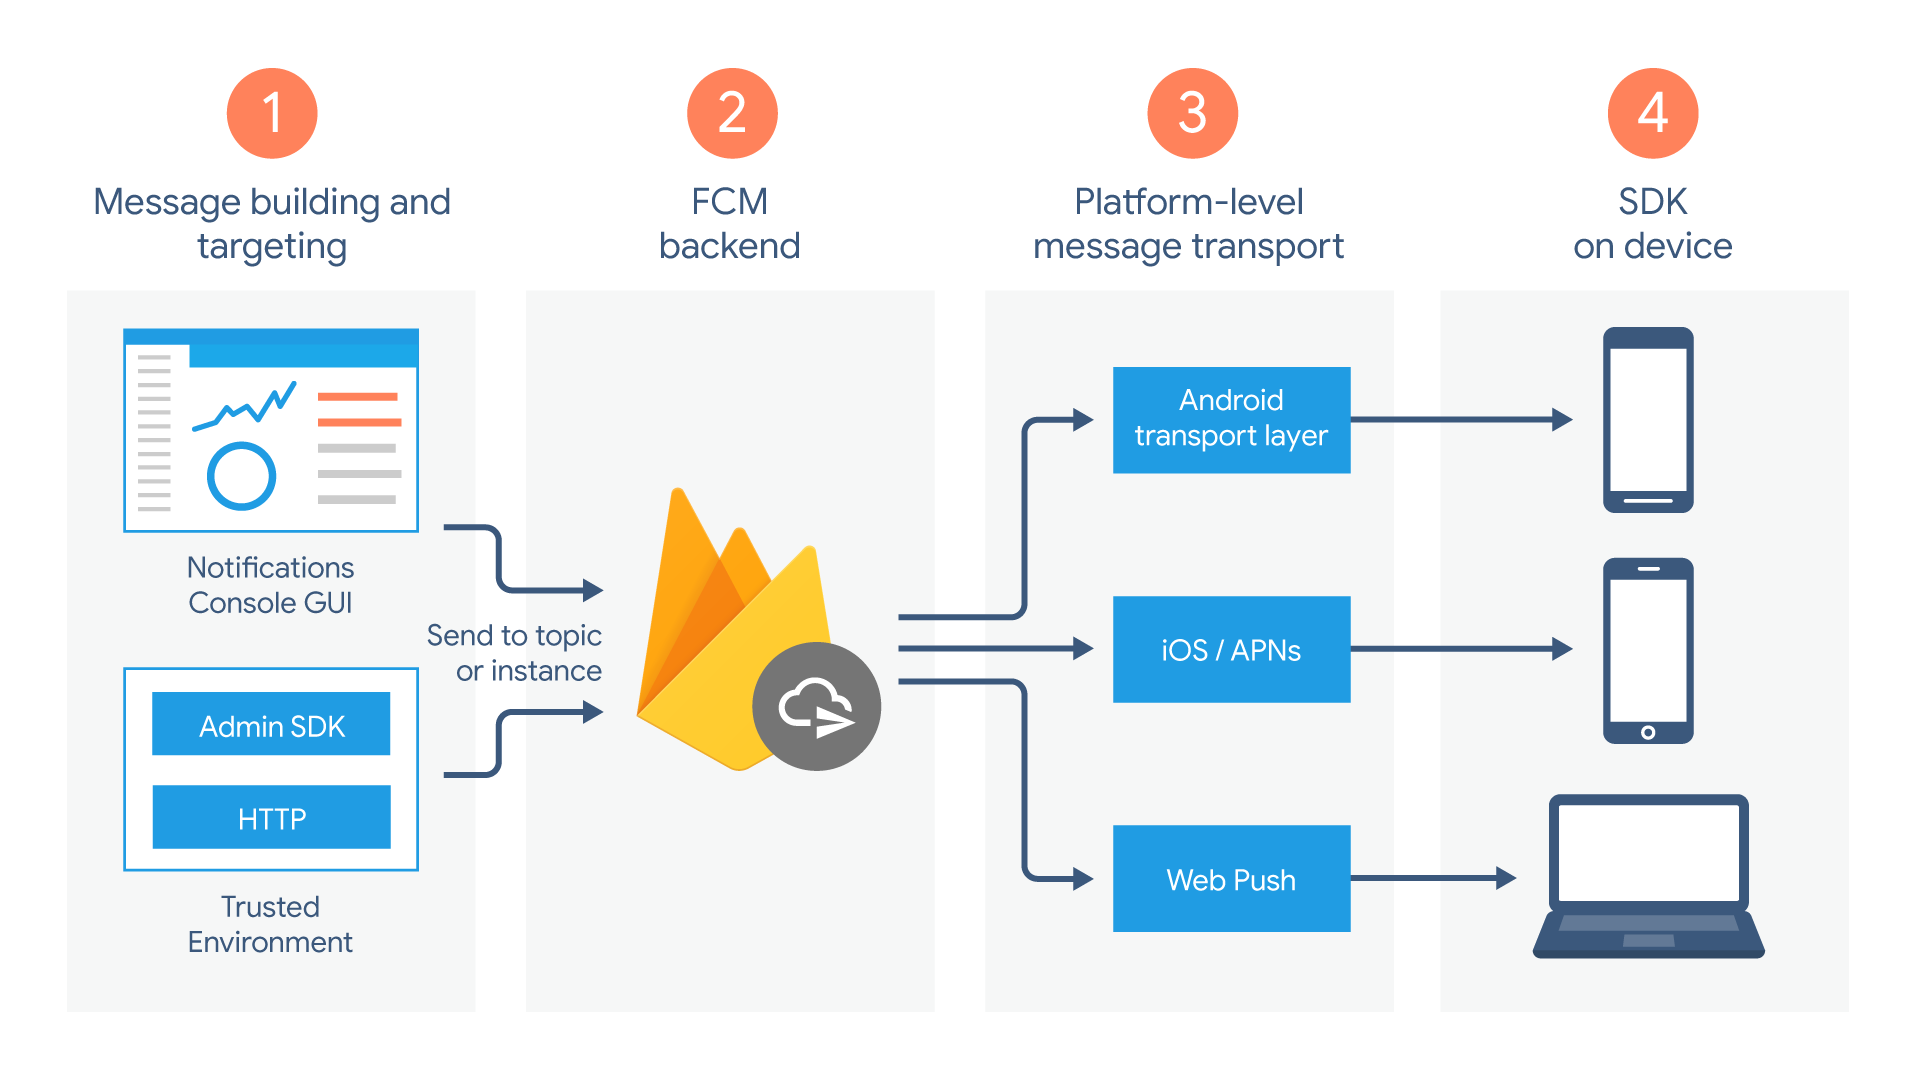
第一部分:消息的构建。消息的构建有两种方式:
- Firebase 控制台(Notifications Console GUI)
- FCM Admin SDK:服务端接入
FCM Admin SDK后按照一定规则构建通知消息,此种更加灵活,方便我们根据不同用户画像做不同的 App 营销处理。
第二部分:FCM BackEnd(FCM 后端),由 Google 负责,对已构建消息的分流处理,根据不同目标发送至不同平台用户。
第三部分:平台层,也就是我们 Android 设备,这里更多指的是 Android 设备上的 Google 服务,完成最原始消息的接收。也就是说,只有有 Google 服务的手机才能收到 FCM 推送。
第四部分:FCM SDK,进一步对消息进行处理,确定分发策略,最终会发送(回调)给接入了 FCM SDK 的目标 App。
当我们接入 FCM 时,只需关心第一、四部分即可。Google 大大简化了我们的使用过程。
FCM 集成
FCM 使用条件
- Android4.4 及以上设备
- 安装了 Google Play Store(Google Service 服务)
GCM uses an existing connection for Google services. For pre-3.0 devices, this requires users to set up their Google account on their mobile devices. A Google account is not a requirement on devices running Android 4.0.4 or higher
- 使用 Jetpack (AndroidX),这需要满足以下版本要求:
com.android.tools.build:gradle 3.2.1或更高版本compileSdkVersion 28或更高版本
- 不需要你的 APP 通过 Google Play Store 发布
- 也不需要 Google 账号
A Google account is not a requirement on devices running Android 4.0.4 or higher
FCM 集成步骤
Add Firebase to your Android project
方式一:
- 配置项目,下载
google-services.json放到 app module - 引入 GMS 服务插件,并应用
- 引入相关依赖
方式二: 通过 Firebase Assistant(Tools > Firebase)
Ref:
[Add Firebase to your Android project Firebase for Android](https://firebase.google.com/docs/android/setup)
添加依赖 FCM SDK 依赖
有两种方式:
- 通过
Firebase Android BoM - 单独引入
FCM SDK
因为 Firebase SDK 集合除了 FCM 还有很多其他比较有用的 SDK,如果需要同时引入这些 SDK,难免会有一些依赖版本冲突的情况发生,所以更推荐使用 Firebase Android BoM 的方式引入,只需要指定目标 BoM 版本,后续只需按需引入其他 Firebase SDK 即可,这样可以保证所有引入的库的版本是兼容的。
这里我们选择引入 google-services 插件的方式,这样一方面在编译期 gradle 可以自动读取 google-services.json 中的内容,可以很大程度上减少了手动编码出错的可能。
另一方面,我们也无需在应用启动时,手动的编写初始化代码,让业务代码更加简洁。初始化步骤如下:
- 在项目级别
build.gradle文件中引入google-services插件:
1
2
3
4
5
6
7
8
9
10
11
12
13
14
15
16
17
18
19
20
21
22
buildscript {
    repositories {
        maven { url 'http://maven.aliyun.com/nexus/content/groups/public' }
        maven { url "https://dl.google.com/dl/android/maven2" }
        mavenCentral()
        google()
    }
    dependencies {
        // 引入 google-service插件
        classpath 'com.google.gms:google-services:4.3.15'
        // ...省略无关代码
    }
}
allprojects {
    repositories {
        mavenCentral()
        maven { url 'http://maven.aliyun.com/nexus/content/groups/public' }
        maven { url "https://dl.google.com/dl/android/maven2" }
        maven { url 'https://jitpack.io' }
        google()
    }
}
- 在应用级目录下的
build.gradle文件中应用插件(应用级目录):
1
2
3
4
5
plugins {
    id 'com.android.application'
    id 'org.jetbrains.kotlin.android'
    id 'com.google.gms.google-services' // 应用 google-service插件
}
Edit your app manifest
- 添加 FirebaseMessagingService 的实现类,用于 APP 在后台时接收消息数据
1
2
3
4
5
6
7
<service
  android:name="me.hacket.assistant.samples.google.firebase.fcm.MyFirebaseMessagingService"
  android:exported="false">
  <intent-filter>
    <action android:name="com.google.firebase.MESSAGING_EVENT" />
  </intent-filter>
</service>
- 可选,添加 notification 的 icon 和 color 如果消息没有的话
1
2
3
4
5
6
7
8
9
10
<!-- Set custom default icon. This is used when no icon is set for incoming notification messages.
     See README(https://goo.gl/l4GJaQ) for more. -->
<meta-data
    android:name="com.google.firebase.messaging.default_notification_icon"
    android:resource="@drawable/ic_stat_ic_notification" />
<!-- Set color used with incoming notification messages. This is used when no color is set for the incoming
     notification message. See README(https://goo.gl/6BKBk7) for more. -->
<meta-data
    android:name="com.google.firebase.messaging.default_notification_color"
    android:resource="@color/colorAccent" />
左上角的 icon 和 color
- 可选,FCM 提供了默认的 channel;Android8.0(API26) 及以上,如果需要自定义定义 notification channel,就用下面的来覆盖;用于到来的消息没有显示的指定 notification channel
1
2
3
<meta-data
    android:name="com.google.firebase.messaging.default_notification_channel_id"
    android:value="@string/default_notification_channel_id" />
| Ref: [Set up a Firebase Cloud Messaging client app on Android | Edit your app manifest](https://firebase.google.com/docs/cloud-messaging/android/client#manifest) |
检查 Google Play 服务是否可用
依靠 Play 服务 SDK 运行的应用在访问 Google Play 服务功能之前,应始终检查设备是否拥有兼容的 Google Play 服务 APK。我们建议您在以下两个位置进行检查:主 Activity 的 onCreate() 方法中,及其 onResume() 方法中。onCreate() 中的检查可确保该应用在检查成功之前无法使用。onResume() 中的检查可确保当用户通过一些其他方式返回正在运行的应用(比如通过返回按钮)时,检查仍将继续进行。
如果设备没有兼容的 Google Play 服务版本,您的应用可以调用 GoogleApiAvailability.makeGooglePlayServicesAvailable(),以便让用户从 Play 商店下载 Google Play 服务。
检测 Google Play Service 是否可用
https://developers.google.com/android/reference/com/google/android/gms/common/GoogleApiAvailability
- isGooglePlayServicesAvailable(Context)
校验 Google Play services 是否安装和可用在这台设备上,并且设备安装的版本不低于 App 需要的版本
1
2
3
4
5
6
7
8
9
10
11
12
13
14
15
16
17
18
19
20
21
22
23
24
25
26
27
28
29
30
31
32
33
34
35
36
37
38
39
40
41
42
object GoogleUtils {
    private const val TAG = "google"
    /**
     * 检查 Google Play 服务
     */
    @JvmStatic
    fun onCheckGooglePlayServices(activity: Activity) {
        // 验证是否已在此设备上安装并启用Google Play服务,以及此设备上安装的旧版本是否为此客户端所需的版本
        val code = GoogleApiAvailability.getInstance().isGooglePlayServicesAvailable(activity)
        if (code == ConnectionResult.SUCCESS) {
            // 支持Google服务
            LogUtils.i(TAG, "支持Google服务")
        } else {
            GoogleApiAvailability.getInstance()
                    .makeGooglePlayServicesAvailable(activity)
                    .addOnCanceledListener {
                        LogUtils.w(TAG, "Google服务cancel")
                    }
                    .addOnFailureListener {
                        LogUtils.printStackTrace(it)
                        LogUtils.w(TAG, "Google服务failure ${it.message}")
                    }
                    .addOnSuccessListener {
                        LogUtils.i(TAG, "Google服务success")
                    }
                    .addOnCompleteListener {
                        LogUtils.i(TAG, "Google服务complete")
                    }
            T.logAndToast(TAG, "不支持Google服务.")
            //不支持时,可以利用getErrorDialog得到一个提示框, 其中第2个参数传入错误信息
            //提示框将根据错误信息,生成不同的样式
            //例如,我自己测试时,第一次Google Play Service不是最新的,
            //对话框就会显示这些信息,并提供下载更新的按键
            if (GlobalContext.isDebugMode()) {
                if (GoogleApiAvailability.getInstance().isUserResolvableError(code)) {
                    GoogleApiAvailability.getInstance().getErrorDialog(activity, code, 0).show()
                }
            }
        }
    }

}
获取 token,上报 token,更新 token
初次启动您的应用时,FCM SDK 会为客户端应用实例生成一个注册令牌 (registration token)。如果您希望指定单一目标设备或者创建设备组,需要扩展 FirebaseMessagingService 并重写 onNewToken 来获取此令牌。
Token 更新时机:
- 应用删除实例 ID
- 应用在新设备上恢复
- 用户卸载/重新安装应用
- 用户清除应用数据
检索当前注册令牌
如果需要检索当前令牌,请调用 FirebaseMessaging.getInstance().getToken()。
1
2
3
4
5
6
7
8
9
10
11
12
13
14
15
16
17
18
19
20
21
22
23
24
25
26
27
28
29
30
31
32
33
34
35
36
37
38
39
40
41
42
43
44
45
46
47
48
49
object PushToken {
    internal const val TAG = "hacket.firebase"
    /**
     * 刷新FCM token
     * 注册令牌可能会在发生下列情况时更改:
     * 1. 应用删除实例 ID
     * 2. 应用在新设备上恢复
     * 3. 用户卸载/重新安装应用
     * 4. 用户清除应用数据
     */
    @JvmStatic
    @JvmOverloads
    fun updatePushToken(@From from: String = From.launch) {
//        Log.d(TAG, "updatePushToken from=$from")
        FirebaseMessaging.getInstance().token
            .addOnCompleteListener(
                OnCompleteListener { task ->
                    if (!task.isSuccessful) {
                        task.exception?.printStackTrace()
                        return@OnCompleteListener
                    }
                    val result = task.result
                    if (result != null) {
                        // 获取新的token
                        val token = result
//                        sendRegistrationToServer(from, token)
                    } else {
                        return@OnCompleteListener
                    }
                }
            )
    }
    @StringDef(
        From.launch,
        From.login_in,
        From.login_out,
        From.app_clear,
        From.refresh_token
    )
    annotation class From {
        companion object {
            const val launch = "launch"
            const val login_in = "login_in"
            const val login_out = "login_out"
            const val app_clear = "app_clear"
            const val refresh_token = "refresh_token"
        }
    }
}
监控令牌的生成
每当生成新令牌时,都会触发 onNewToken 回调函数。
1
2
3
4
5
6
7
8
9
10
11
12
13
/**
 * Called if the FCM registration token is updated. This may occur if the security of
 * the previous token had been compromised. Note that this is called when the
 * FCM registration token is initially generated so this is where you would retrieve the token.
 */
override fun onNewToken(token: String) {
    Log.d(TAG, "Refreshed token: $token")

    // If you want to send messages to this application instance or
    // manage this apps subscriptions on the server side, send the
    // FCM registration token to your app server.
    sendRegistrationToServer(token)
}
消息的处理
AndroidMainfest 定义
- 扩展 FirebaseMessagingService 并在
AndroidMainfest.xml中声明:
1
2
3
4
5
6
7
<service
	android:name="me.hacket.assistant.samples.google.firebase.fcm.MyFirebaseMessagingService"
	android:exported="false">
	<intent-filter>
		<action android:name="com.google.firebase.MESSAGING_EVENT" />
	</intent-filter>
</service>
扩展 FirebaseMessagingService
- token 的保存和消息的接收
1
2
3
4
5
6
7
8
9
10
11
12
13
14
15
16
17
18
19
20
21
22
23
24
25
26
27
28
29
30
31
32
33
34
35
36
37
38
39
40
41
42
43
44
45
46
47
48
49
50
51
52
53
54
55
56
57
58
59
60
61
62
63
64
65
66
67
68
69
70
71
72
73
74
75
76
77
78
79
80
81
82
83
84
85
86
87
88
89
90
91
92
93
94
95
96
97
98
99
100
101
102
103
104
105
106
107
108
109
110
111
112
113
114
115
116
117
118
119
120
121
122
123
124
125
126
127
128
129
130
131
132
133
134
135
136
137
138
139
140
141
142
143
144
145
146
147
148
149
150
151
152
153
154
155
156
157
158
159
160
161
162
163
164
165
166
167
168
169
170
171
172
173
174
175
176
177
178
179
180
181
182
183
184
185
186
187
188
189
190
191
192
193
194
195
196
197
198
199
200
201
202
203
204
205
206
207
208
209
/**
 * FCM 消息接收服务
 *
 * 推送分为 dataMessage(数据消息)和notification(通知消息)两种
 *
 * 区别在于:
 *
 * 1.无论应用程序位于前台还是后台,dataMessage(数据消息)都会在onMessageReceived()中处理。 数据消息是传统上与GCM一起使用的类型。
 *
 * 2.notification(通知消息)仅当应用程序位于前台时,才会在onMessageReceived()中接收。 当应用程序在后台时,将显示自动生成的通知,不会再onMessageReceived()中接收。
 *
 * 当用户点击通知时,他们将返回到应用程序。 包含通知和数据有效负载的消息将被视为通知消息。 Firebase控制台始终发送通知消息。
 */
class MyFirebaseMessagingService : FirebaseMessagingService() {
    companion object {
        private const val TAG = PushToken.TAG
        const val IS_CLICK_FROM_PUSH = "is_click_from_push"
        const val PUSH_REPORT_TITLE = "report_title"
        const val PUSH_REPORT_CONTENT = "report_cnt"
        const val PUSH_REPORT_ID = "report_push_id"

        private const val NOTIFICATION_ID = 0x113

        fun getCurrentProcessName(context: Context): String? {
            val mypid = Process.myPid()
            val manager = context.getSystemService(ACTIVITY_SERVICE) as ActivityManager
            val infos = manager.runningAppProcesses
            if (ListUtils.isEmpty(infos)) {
                return null
            }
            for (info in infos) {
                if (info.pid == mypid) {
                    return info.processName
                }
            }
            // may never return null
            return null
        }
    }
    /**
     * @param remoteMessage 表示从Firebase Cloud Messaging收到的消息的对象,它包含了接收到的推送的所有内容
     */
    override fun onMessageReceived(remoteMessage: RemoteMessage) {
        super.onMessageReceived(remoteMessage)
        dispatchNotification(remoteMessage)
    }

    private fun dispatchNotification(message: RemoteMessage) {
        // 公共的
        val ttl = message.ttl
        val collapseKey = message.collapseKey
        val priority = message.priority
        val from = message.from
        val rawData = message.rawData
        val rawDateStr = String(rawData ?: ByteArray(0))
        // notification
        val notification = message.notification
        // data
        val data = message.data

        val foreground = ForegroundCallbacks.get().isForeground
        Log.d(
            TAG,
            "1.dispatchNotification\n foreground=$foreground,priority=$priority,collapseKey=$collapseKey,ttl=$ttl,from=$from\n notification=$notification \n data=${data}\n rawData=$rawDateStr \n bundle=${
            GsonUtils.toJson(
                message
            )
            }\n process=${getCurrentProcessName(applicationContext)}"
        )
        buildNotificationMessage(message)
        buildDataMessage(message)
    }
    private fun buildDataMessage(message: RemoteMessage) {
        val data = message.data
        if (data.isEmpty()) {
            Log.e(
                TAG,
                "3.buildDataMessage[data=null] process=${getCurrentProcessName(applicationContext)}"
            )
            return
        }
        Log.i(
            TAG,
            "3-1.buildDataMessage[data!=null]\n data=${message.data}\nprocess=${
            getCurrentProcessName(
                applicationContext
            )
            }"
        )
    }
    private fun buildNotificationMessage(
        message: RemoteMessage
    ) {
        val notification = message.notification
        if (notification == null) {
            Log.e(
                TAG,
                "2.buildNotificationMessage[notification=null] process=${
                getCurrentProcessName(
                    applicationContext
                )
                }"
            )
            return
        }

        val title = notification.title
        val body = notification.body
        val icon = notification.icon
        val imageUrl = notification.imageUrl
        val link = notification.link
        val channelId = notification.channelId
        val clickAction = notification.clickAction
        Log.i(
            TAG,
            "2-1.buildNotificationMessage[notification!=null]\n title=$title,body=$body,icon=$icon" +
                ",imageUrl=$imageUrl,clickAction=$clickAction,link=$link,channelId=$channelId\nprocess=${
                getCurrentProcessName(
                    applicationContext
                )
                }"
        )
        val notificationUtils = NotificationUtils(applicationContext)
            .setContentIntent(buildPendingIntent(message))

        val url = if (!icon.isNullOrBlank()) icon else imageUrl?.toString()
        if (url.isNullOrBlank()) {
            Log.i(
                TAG,
                "2-2.buildNotificationMessage[推送]无图,send默认Notification process=${
                getCurrentProcessName(applicationContext)
                }"
            )
            notificationUtils.sendNotification(
                NOTIFICATION_ID,
                title,
                body,
                R.drawable.ic_notitification
            )
        } else {
            val bitmap = BitmapUtils.getBitmapFormUrl(url)
            if (bitmap != null) {
                Log.i(
                    TAG,
                    "2-3.buildNotificationMessage loadBitmap[推送]有大图,send带图片Notification process=${
                    getCurrentProcessName(applicationContext)
                    }"
                )
                notificationUtils.setLarge(bitmap)
            }
            notificationUtils.sendNotification(
                NOTIFICATION_ID,
                "local_$title",
                "local_$body",
                R.drawable.ic_notitification
            )
        }
    }

    private fun buildPendingIntent(message: RemoteMessage): PendingIntent {
        val data = message.data
        val intent = Intent(applicationContext, FCMResultActivity::class.java)
        val deepLink = data[PushResModel.KEY_DEEPLINK]
        val reportTitle = data[PushResModel.KEY_REPORT_TITLE]
        val reportContent = data[PushResModel.KEY_REPORT_CNT]
        val reportPushId = data[PushResModel.KEY_REPORT_PUSH_ID]
        // val pushId = data[PushResModel.KEY_PUSH_ID]
        if (deepLink.isNullOrBlank().not()) {
            intent.data = Uri.parse(deepLink)
        }
        intent.putExtra(IS_CLICK_FROM_PUSH, true)
        intent.putExtra(PUSH_REPORT_TITLE, reportTitle)
        intent.putExtra(PUSH_REPORT_CONTENT, reportContent)
        intent.putExtra(PUSH_REPORT_ID, reportPushId)

        Log.d(
            TAG,
            "9.buildPendingIntent[推送]deepLink=$deepLink process=${
            getCurrentProcessName(applicationContext)
            }"
        )
        val flag = if (Build.VERSION.SDK_INT >= Build.VERSION_CODES.S) {
            PendingIntent.FLAG_IMMUTABLE
        } else {
            PendingIntent.FLAG_UPDATE_CURRENT
        }
        return PendingIntent.getActivity(applicationContext, 0, intent, flag)
    }

    /**
     * 如果更新了InstanceID令牌,则调用此方法。 当先前令牌的安全性受到损害,则可能更新令牌。 最初生成InstanceID令牌时也会调用此方法,因此您可以在此处检索令牌。
     *
     * 该回调方法可以代替Demo工程中的的MyFirebaseInstanceIDService。 Demo工程中FirebaseInstanceIdService这个类也已经被废弃了。
     */
    override fun onNewToken(newToken: String) {
        Log.w(
            TAG,
            "[推送]10.Refreshed newToken\n $newToken process=${
            getCurrentProcessName(applicationContext)
            }"
        )
        SchedulerUtils.runInMain {
            CompatUtil.copyToClipboard(GlobalContext.getAppContext(), newToken)
            toast("[推送]11.newToken=$newToken process=${getCurrentProcessName(applicationContext)}")
        }
        // 可以在这里将用户的FCM InstanceID令牌与应用程序维护的任何服务器端帐户关联起来。
//        PushToken.sendRegistrationToServer(PushToken.From.refresh_token, newToken)
    }
}
扩展 FirebaseMessagingService 后,有三个方法可以重写:
- onNewToken:每次有新 token 生成时回调,我们可以利用这个机制保存 token
- onMessageReceived:
- 对于
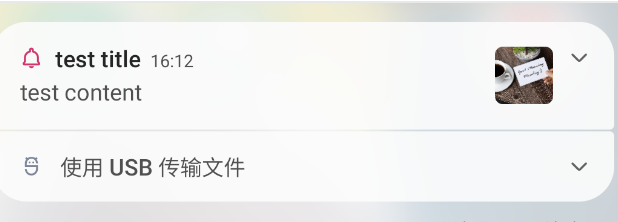
notification通知消息:如果 App 在前台并收到消息时,这个方法就会回调。RemoteMessage 的数据结构和之前提到的 Json 一一对应,这就不展开了。若果 App 处于后台,消息则会直接展示在通知栏(需通知权限) - 对于
data数据消息:无论 App 处于前台还是后台,都会回调到这个方法 - 参数 RemoteMessage 中的 Notification 类型的 notification 对象,用于承载通知消息的数据
- 对于
- onDeletedMessages : Push 消息被删除时回调
通知权限
Android13 及以上新增运行时通知权限
Android 13 中引入了用于显示通知的新运行时权限。该项引入会影响在 Android 13 或更高版本上使用 FCM 通知的所有应用。
默认情况下,FCM SDK(23.0.6 或更高版本)中包含清单中定义的 POST_NOTIFICATIONS 权限。不过,您的应用还需要通过常量 android.permission.POST_NOTIFICATIONS 请求此权限的运行时版本。在用户授予此权限之前,您的应用将无法显示通知。
1
<uses-permission android:name="android.permission.POST_NOTIFICATIONS" />
如需请求该项新运行时权限,请执行以下操作:
1
2
3
4
5
6
7
8
9
10
11
12
13
14
15
16
17
18
19
20
21
22
23
24
25
26
27
28
29
30
31
32
33
34
35
36
37
38
39
// 旧的权限申请代码
if (Build.VERSION.SDK_INT >= Build.VERSION_CODES.TIRAMISU) {
    if (ContextCompat.checkSelfPermission(this, "android.permission.POST_NOTIFICATIONS") ==
        PackageManager.PERMISSION_GRANTED
    ) {
    }  else {

    }
}

// 使用registerForActivityResult
// Declare the launcher at the top of your Activity/Fragment:
private val requestPermissionLauncher = registerForActivityResult(
    ActivityResultContracts.RequestPermission(),
) { isGranted: Boolean ->
    if (isGranted) {
        // FCM SDK (and your app) can post notifications.
    } else {
        // TODO: Inform user that that your app will not show notifications.
    }
}
private fun askNotificationPermission() {
    // This is only necessary for API level >= 33 (TIRAMISU)
    if (Build.VERSION.SDK_INT >= Build.VERSION_CODES.TIRAMISU) {
        if (ContextCompat.checkSelfPermission(this, Manifest.permission.POST_NOTIFICATIONS) ==
            PackageManager.PERMISSION_GRANTED
        ) {
            // FCM SDK (and your app) can post notifications.
        } else if (shouldShowRequestPermissionRationale(Manifest.permission.POST_NOTIFICATIONS)) {
            // TODO: display an educational UI explaining to the user the features that will be enabled
            //       by them granting the POST_NOTIFICATION permission. This UI should provide the user
            //       "OK" and "No thanks" buttons. If the user selects "OK," directly request the permission.
            //       If the user selects "No thanks," allow the user to continue without notifications.
        } else {
            // Directly ask for the permission
            requestPermissionLauncher.launch(Manifest.permission.POST_NOTIFICATIONS)
        }
    }
}
Android13 以下
Android 12L(API 级别 32)或更低版本的应用上的通知权限:当您的应用首次创建通知 Channel 时,只要应用处于前台,Android 便会自动请求用户授予该权限。不过,关于创建 Channel 和请求权限的时机,需要注意下面一些重要事项:
- 如果您的应用是在后台运行时创建的第一个通知渠道(FCM SDK 在收到 FCM 通知时便会在后台创建通知渠道),Android 不会允许该通知显示出来,并且直到用户下次打开应用时才会提示他们授予通知权限。这意味着,在用户打开应用并授予该权限之前收到的所有通知都将丢失。
- 我们强烈建议您将应用更新为使用 Android 13 及更高版本,以便能够利用平台的 API 来请求权限。如果您无法进行此更新,您的应用应该在您向其发送任何通知之前创建通知渠道,以便触发通知权限对话框,并确保不会丢失通知。如需了解详情,请参阅 通知权限最佳实践。
移除 POST_NOTIFICATIONS 权限
默认情况下,FCM SDK 包含 POST_NOTIFICATIONS 权限。如果您的应用不使用通知消息(无论是通过 FCM 通知、通过其他 SDK 还是由您的应用直接发布),并且您不想让应用包含该权限,则可以使用 清单合并 的 remove 标记移除该权限。请注意,移除此权限会阻止系统显示所有通知,而不仅仅是 FCM 通知。将以下内容添加到应用的清单文件中:
1
<uses-permission android:name="android.permission.POST_NOTIFICATIONS" tools:node="remove"/>
防止自动初始化
在生成 FCM 注册令牌后,库会将标识符和配置数据上传到 Firebase。如果您希望阻止自动生成令牌,请将以下元数据值添加到 AndroidManifest.xml,以停用 Analytics 数据收集和 FCM 自动初始化功能(您必须同时停用这两项功能):
1
2
3
4
5
6
<meta-data
    android:name="firebase_messaging_auto_init_enabled"
    android:value="false" />
<meta-data
    android:name="firebase_analytics_collection_enabled"
    android:value="false" />
如需重新启用 FCM 自动初始化功能,请执行运行时调用:
1
Firebase.messaging.isAutoInitEnabled = true
如需重新启用 Analytics 数据收集,请调用 FirebaseAnalytics 类的 setAnalyticsCollectionEnabled() 方法。例如:
1
setAnalyticsCollectionEnabled(true);
这些值一经设置,即使应用重启也将持续生效。
设备解锁
如果 App 只能在设备解锁的前提下收到消息,如果想要在解锁前收到消息,还需要完成如下设置:
添加 firebase-messaging-directboot 依赖:
1
2
3
4
// 如果是Firebase BoM方式依赖
implementation 'com.google.firebase: firebase-messaging-directboot'
// 否则
implementation 'com.google.firebase:firebase-messaging-directboot:20.2.0'
给 Service 添加directBootAware属性
1
2
3
4
5
6
7
8
<service
	android:name="me.hacket.assistant.samples.google.firebase.fcm.MyFirebaseMessagingService"
	android:directBootAware="true"
	android:exported="false">
	<intent-filter>
		<action android:name="com.google.firebase.MESSAGING_EVENT" />
	</intent-filter>
</service>
FCM 消息类型
| [FCM 消息简介 | Firebase Cloud Messaging](https://firebase.google.com/docs/cloud-messaging/concept-options?hl=zh-cn#notifications_and_data_message) |
Notification message(通知消息)
- 包含了一些预定于的用户可见的 keys
- 包含了一些可选的 data payload,最大的 payload 数据大小为 4KB,但从 Firebase 控制台发送消息时除外,在那种情况下,系统会强制执行 1024 个字符的限制
- APP 在后台时由 FCM SDK 内部自己处理;在前台时,回调
FirebaseMessagingService#onMessageReceived这个方法自行处理
用 HTTP v1 推送的 json 文件,设置 notification 节点:
1
2
3
4
5
6
7
8
9
{
  "message":{
    "token":"bk3RNwTe3H0:CI2k_HHwgIpoDKCIZvvDMExUdFQ3P1...",
    "notification":{
      "title":"Portugal vs. Denmark",
      "body":"great match!"
    }
  }
}
在启动页,添加处理,将数据传递到启动页 Intent
1
2
3
4
5
6
7
8
// Handle possible data accompanying notification message.
// [START handle_data_extras]
if (getIntent().getExtras() != null) {
    for (String key : getIntent().getExtras().keySet()) {
        Object value = getIntent().getExtras().get(key);
        Log.d(TAG, "Key: " + key + " Value: " + value);
    }
}
Data message(数据消息)
- Data messages 只包含用户自定义的 keys,key 不能是保留的字段,包括
from、notification、message_type、google或gcm等 - 用户只能在应用内收到应用内消息,消息到来会回调到
FirebaseMessagingService#onMessageReceived方法
带 data 的 json 文件:
1
2
3
4
5
6
7
8
9
10
{
  "message":{
    "token":"bk3RNwTe3H0:CI2k_HHwgIpoDKCIZvvDMExUdFQ3P1...",
    "data":{
      "Nick" : "Mario",
      "body" : "great match!",
      "Room" : "PortugalVSDenmark"
    }
  }
}
1
2
3
4
5
6
7
8
9
10
11
12
13
14
15
16
17
18
19
20
21
22
23
24
25
26
27
28
29
30
31
32
33
34
35
36
37
38
39
40
41
42
43
44
45
46
47
48
49
50
51
52
53
54
55
56
57
58
59
60
61
62
63
64
65
66
67
68
69
70
71
72
73
74
75
76
77
78
79
80
81
82
83
84
85
86
87
88
89
90
91
92
93
94
95
96
97
98
99
100
101
102
103
104
105
106
107
108
109
110
111
112
113
114
115
116
117
118
119
120
121
122
123
124
/**
 * FCM 消息接收服务
 *
 * 推送分为 dataMessage(数据消息)和notification(通知消息)两种
 *
 * 区别在于:
 *
 * 1.无论应用程序位于前台还是后台,dataMessage(数据消息)都会在onMessageReceived()中处理。 数据消息是传统上与GCM一起使用的类型。
 *
 * 2.notification(通知消息)仅当应用程序位于前台时,才会在onMessageReceived()中接收。 当应用程序在后台时,将显示自动生成的通知,不会再onMessageReceived()中接收。
 *
 * 当用户点击通知时,他们将返回到应用程序。 包含通知和数据有效负载的消息将被视为通知消息。 Firebase控制台始终发送通知消息。
 */
class MyFirebaseMessagingService : FirebaseMessagingService() {
    companion object {
        private val TAG = PushToken.TAG
        private val NOTIFICATION_ID = 0x113
    }

    init {
        LogUtils.i(TAG, "${anchor("init")}.")
        RxBus.getDefault<Int>().receive(Constants.RxBusTag.TAG_LOGIN_EVENT_LOGIN_IN,
                object : RxBusReceiver<Int>() {
                    override fun receive(data: Int) {
                        LogUtils.i(TAG, "${this@MyFirebaseMessagingService.anchor("rxbus")}登录成功,更新FCM Token.")
                        PushToken.updatePushToken(PushToken.From.login_in)
                    }
                })

        RxBus.getDefault<Int>().receive(Constants.RxBusTag.TAG_LOGIN_EVENT_LOGIN_OUT,
                object : RxBusReceiver<Int>() {
                    override fun receive(data: Int) {
                        LogUtils.i(TAG, "${this@MyFirebaseMessagingService.anchor("rxbus")}退出登录,更新FCM Token.")
                        PushToken.updatePushToken(PushToken.From.login_out)
                    }
                })
    }

    /**
     * @param remoteMessage 表示从Firebase Cloud Messaging收到的消息的对象,它包含了接收到的推送的所有内容
     */
    override fun onMessageReceived(remoteMessage: RemoteMessage?) {
        super.onMessageReceived(remoteMessage)

        if (remoteMessage == null) {
            return
        }
        LogUtils.d(TAG, "收到推送 From: " + remoteMessage.from)

        // Check if message contains a data payload.
        if (remoteMessage.data.isNotEmpty()) {
            LogUtils.d(TAG, "收到推送 Message data payload: " + remoteMessage.data)
        }

        // Check if message contains a notification payload.
        T.logAndToast(TAG, "收到通知 Message Notification Body: $remoteMessage")
        sendNotification(remoteMessage)
    }

    private fun sendNotification(message: RemoteMessage) {
        val notification = message.notification ?: return

        // val from = message.from
        val title = notification.title
        val body = notification.body
        val icon = notification.icon
        val imageUrl = notification.imageUrl
        val link = notification.link
        val channelId = notification.channelId

        LogUtils.d(TAG, "${anchor("sendNotification")}title=$title\tbody=$body\ticon=$icon"
                + "\timageUrl=$imageUrl	link=$link\tchannelId=$channelId\tdata=${message.data}")

        val url = if (!icon.isNullOrBlank()) icon else imageUrl?.toString()
        Phoenix.with(applicationContext)
                .setUrl(url)
                .setResult {
                    val notificationUtils = NotificationUtils(applicationContext)
                            .setContentIntent(buildPendingIntent(message))
                    if (it != null) {
                        LogUtils.i(TAG, "${this@MyFirebaseMessagingService.anchor("loadBitmap")}有大图,设置Notification大图")
                        notificationUtils.setLarge(it)
                    }
                    var d = R.drawable.ic_notitify_black
                    if (Build.VERSION.SDK_INT >= Build.VERSION_CODES.LOLLIPOP) {
                        d = R.drawable.ic_notitify_white
                    }
                    notificationUtils.sendNotification(NOTIFICATION_ID, title, body, d)
                }
                .load()
    }

    private fun buildPendingIntent(message: RemoteMessage): PendingIntent {
        val data = message.data
        val intent = Intent(applicationContext, SchemeFilterActivity::class.java)
        val deepLink = data[PushResModel.KEY_DEEPLINK]
        // val pushId = data[PushResModel.KEY_PUSH_ID]
        if (deepLink.isNullOrBlank().not()) {
            intent.data = Uri.parse(deepLink)
        }
        LogUtils.d(TAG, "${anchor("buildPendingIntent")}data=$data")
        return PendingIntent.getActivity(applicationContext, 0,
                intent, PendingIntent.FLAG_UPDATE_CURRENT)
    }

    /**
     * 如果更新了InstanceID令牌,则调用此方法。 当先前令牌的安全性受到损害,则可能更新令牌。 最初生成InstanceID令牌时也会调用此方法,因此您可以在此处检索令牌。
     *
     * 该回调方法可以代替Demo工程中的的MyFirebaseInstanceIDService。 Demo工程中FirebaseInstanceIdService这个类也已经被废弃了。
     */
    override fun onNewToken(newToken: String?) {
        if (newToken.isNullOrBlank()) {
            return
        }
        LogUtils.w(TAG, "Refreshed newToken\t$newToken")
        if (GlobalContext.isDebugMode()) {
            CompatUtil.copyToClipboard(newToken)
            T.showShortDebug(newToken + "已拷贝")
        }
        // 可以在这里将用户的FCM InstanceID令牌与应用程序维护的任何服务器端帐户关联起来。
        PushToken.sendRegistrationToServer(PushToken.From.refresh_token, newToken)
    }

}
Notification message 和 Data message
使用 FCM,您可以向客户端发送两种类型的消息:
- notification messages, 通知消息,有时被视为 “ 显示消息 “;FCM SDK 内部处理,消息中将包含一个 “
notification” 字段
1
2
3
4
5
6
7
8
9
{
  "message":{
    "token":"bk3RNwTe3H0:CI2k_HHwgIpoDKCIZvvDMExUdFQ3P1...",
    "notification":{
      "title":"标题",
      "body":"我是内容!"
    }
  }
}
- data messages,数据消息;而数据消息所谓的由客户端自行处理,也仍然经过 Fcm SDK,只不过 Fcm SDK 并不会对其进行任何处理,只是直接投递到客户端罢了。对应的,数据消息的识别字段是 “data”。
1
2
3
4
5
6
7
8
9
{
  "message":{
    "token":"bk3RNwTe3H0:CI2k_HHwgIpoDKCIZvvDMExUdFQ3P1...",
    "data":{
      "Nick" : "Mario",
      "body" : "内容",
    }
  }
}
| 使用场景 | 如何使用 | |
|---|---|---|
| Notification message | - APP 在后台,FCM SDK 自动处理 notificaation 节点数据展示通知,忽略 data 节点的数据 - APP 在前台,APP 自己处理该行为,可处理 notification 和 data 节点的数据,会回调 FirebaseMessagingService | - HTTP v1 带上 notification 节点,可选带 data 节点,总是可 collapsible 的,会忽略 collapsed_key 的设置- 用 Notifications composer |
| Data message | - APP 负责处理 data message,只有自定义的 key-value,没有预定义的 key-value - APP 在前台还是后台都会回调 FirebaseMessagingService | - 用 HTTP v1 带上 data 节点,不能有 notification 节点 |
抉择:
- 如果你想让 FCM SDK 自动处理 APP 在后台时展示 notification,用 Notification message
- 如果 APP 想自己处理消息的话,用 data message
Fcm SDK 是通过识别关键字段来进行消息的分类处理,所以上述的 “notification“,”data” 都是 fcm 识别的关键字之一,定义数据消息时就需要特别注意,按需设置关键字段。同时如果要明确发送数据消息(非通知消息)还需要避开 “from“、”message_type” 或以 “google” 或 “gcm” 开头的任何字词。
无论是通知消息还是数据消息都包含了一个 token 字段,这个字段是由 Fcm SDK 生成用于标识当前客户端的,客户端可以将这个值保存下来并上报给服务端,这样后续服务端就可以通过指定 token 字段的值,定向向指定客户端发送消息了,做到精准营销用户。
Collapsed message 和 Group Notification
collapsed message 离线消息缓存策略
non-collapsible message
不可折叠消息(non-collapsible) 表示每条消息都会单独的传递到设备。
不可折叠消息的一些典型用例是聊天消息或关键消息,例如,在 IM 应用程序中,您可能希望传递每条消息,因为每条消息都有不同的内容。
对于 Android,在不折叠的情况下最多可以存储 100 条消息,如果达到限制,则丢弃所有存储的消息。当设备重新上线时,它会收到一条特殊消息,表明已达到限制。
collapsible message
可折叠消息(collapsible) 是如果尚未传送到设备则可以被新消息替换的消息。
折叠消息的典型用例是用来告知 App 同步服务器的数据,例如体育 App,只需要更新最新的得分,只有最新的消息有用。
FCM 服务对一个设备能同时存储 4 个不同 collapse_key,超过 4 个的话,FCM 只保留 4 个 key,不保证哪些 key 会被保存。
- notification message 默认是可折叠的消息并且会忽略
collapse_key参数,notification message payload 隐式的使用了 collapse_key,为应用的包名;其他的都是不可折叠的 - 从 Notifications Composer(Web 控制台)发送的所有消息都是可折叠的;有一个隐含的 collapse_key
- collapse_key 只作用于 data message(即推送的 json 中没有 notification 节点,只有 data 节点)
group notification 和 collapsible notifications 区别
- group notification 表示同一个 group 消息,称为分组消息;Android7.0 及以上会分组折叠成一条消息,也可以展开展示所有消息;分组消息达到 4 条自动分组折叠起来
- FCM 定义的,FCM collapse messages 指的是如果消息还未到达设备,还在 FMC Server,那么这些相同
collapse_key的消息会被新的消息替换掉,只有新的消息会到达设备;FCM 服务对一个设备能同时存储 4 个不同collapse_key,超过 4 个的话,FCM 只保留 4 个 key,不保证哪些 key 会被保存
Ref
默认 group
APP 不在线,推送了 6 条消息,设备再次连接后,收到了 6 条消息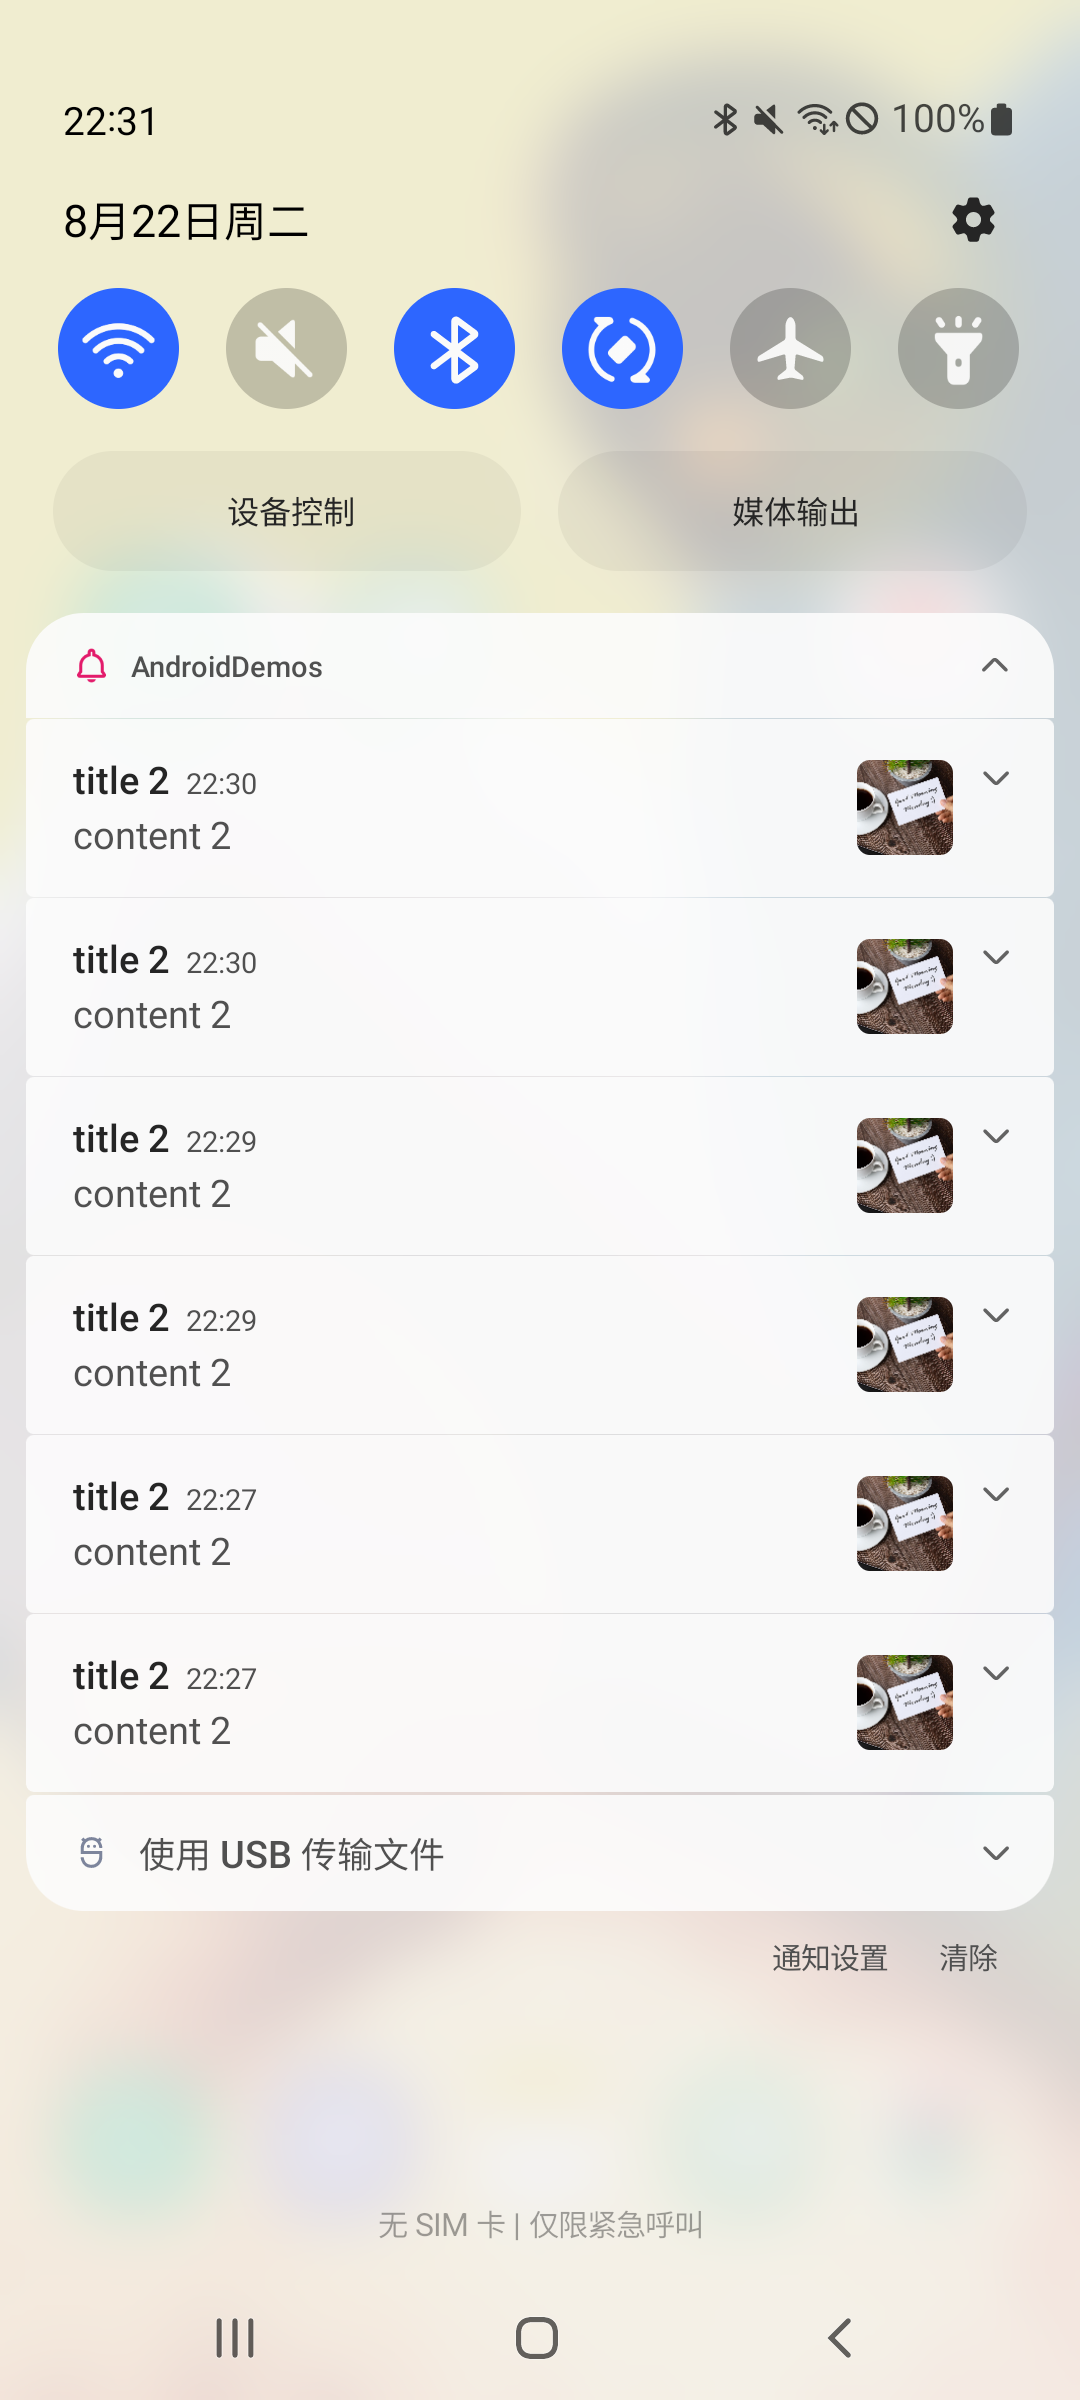
collapsed 消息实现
FCM 在不同平台通过不同方式实现折叠消息:
- Android 通过
collapse_key - iOS 通过
apns_collapse_id - Web/JS 通过
Topic实现
REST Resource: projects.messages json文件
1
2
3
4
5
6
7
8
9
10
11
12
13
14
15
16
17
18
19
20
21
22
23
24
25
26
27
{
  "name": string,
  "data": {
    string: string
  },
  "notification": {
    object (Notification)
  },
  "android": {
    object (AndroidConfig)
  },
  "webpush": {
    object (WebpushConfig)
  },
  "apns": {
    object (ApnsConfig)
  },
  "fcm_options": {
    object (FcmOptions)
  },

  // Union field target can be only one of the following:
  "token": string,
  "topic": string,
  "condition": string
  // End of list of possible types for union field target.
}
- name string,output only。发送消息标识符,格式:
projects/*/message/{message_id} - data input only。任意的 key/value,必须 UTF-8 编码;key 不能是保留字(from,message_type 或其他任意以 google/gcm 开头的字符)
- notification input only,object(Notification)。基本的消息模板(跨平台)
- Android input only,object(AndroidConfig)。Android 平台特有的消息配置
- webpush input only,object(WebpushConfig)。Web 平台特有的消息配置
- apns input only,object(ApnsConfig)。Apple 平台特有的消息配置
- fcm_options input only,FcmOptions。FCM SDK 可选的跨平台 feature
下面 3 个是 required,input only,推送消息的 target,只能是这三个中的一个:
- token 注册的 token,可通过
FirebaseMessaging.getInstance().token获取到 - topic 发送消息的主题,如 weather,但
/topics/前缀不能提供 - condition 发送消息的条件,如
foo' in topics && 'bar' in topics
notification 通用的
1
2
3
4
5
{
  "title": string,
  "body": string,
  "image": string
}
data 通用的
自定义 key-value,key 不要是保留的字符
android
android 可配置的字段
1
2
3
4
5
6
7
8
9
10
11
12
13
14
15
16
{
  "collapse_key": string,
  "priority": enum (AndroidMessagePriority),
  "ttl": string,
  "restricted_package_name": string,
  "data": {
    string: string,
  },
  "notification": {
    object (AndroidNotification)
  },
  "fcm_options": {
    object (AndroidFcmOptions)
  },
  "direct_boot_ok": boolean
}
- collapse_key 标识一组消息可以被折叠,只有最新的消息会被发送给终端;最多 4 个不同的 collapse_key;只能用于 data message
- priority 消息的优先级
- ttl 如果设备离线了消息保存在 FCM 服务器多少秒丢弃,最大支持 4 周,未设置默认是 4 周;设置为 0 如果你想要立即发送消息。如 3.5s 表示 3.5 秒
- restricted_package_name 注册 token 需要匹配的应用包名才能接收消息
- data 自定义的 key/value,会覆盖通用的 data 配置
- notification AndroidNotification 发送给设备的 notification,会覆盖通用的 notification 配置
- fcm_options AndroidFcmOptions 可 FCM SDK 可选的 feature
- direct_boot_ok boolean 如果设置为 true,当设备 boot 时,消息会被发送给 App
AndroidNotification
1
2
3
4
5
6
7
8
9
10
11
12
13
14
15
16
17
18
19
20
21
22
23
24
25
26
27
28
29
30
31
32
33
34
35
{
  "title": string,
  "body": string,
  "icon": string,
  "color": string,
  "sound": string,
  "tag": string,
  "click_action": string,
  "body_loc_key": string,
  "body_loc_args": [
    string
  ],
  "title_loc_key": string,
  "title_loc_args": [
    string
  ],
  "channel_id": string,
  "ticker": string,
  "sticky": boolean,
  "event_time": string,
  "local_only": boolean,
  "notification_priority": enum (NotificationPriority),
  "default_sound": boolean,
  "default_vibrate_timings": boolean,
  "default_light_settings": boolean,
  "vibrate_timings": [
    string
  ],
  "visibility": enum (Visibility),
  "notification_count": integer,
  "light_settings": {
    object (LightSettings)
  },
  "image": string,
}
- tag 设置了 tag 后新消息会替换掉旧消息,其实就相当于本地通知的 notification_id
- channel_id 渠道 id,需要创建好渠道
- image 图片 url
设置消息的优先级
ttl
tl 表示离线用户消息缓存在 FCM 服务器的时间,此时用户设备不在线
- 未设置默认是 4 周(28 天);此值必须是介于 0 至 2,419,200 秒(28 天)之间的一段持续时间,其对应于 FCM 存储并尝试传递消息的最长时间期限。不含此字段的请求默认为最长期限(四周)。
- 超过 ttl 这个时间的消息会被 FCM 丢弃
ttl 参数可能用途:
- 视频聊天来电
- 即将到期的邀请事件
- 日历活动
1
2
3
4
5
6
7
8
9
10
11
{
  "message": {
    "android": {
      "ttl": "30s",
      "notification": {
        "title": "title test1",
        "body": "body test1"
      }
    }
  }
}
参考 1:FCM ttl
参考 1: 华为推送:离线用户消息缓存时间
FCM 数据
消息传送报告
在 Firebase 控制台中的 报告 标签页中,对于向 Android 或 Apple 平台 FCM SDK 发送的消息,包括通过 Notifications Composer 和 FCM API 发送的消息,您可以查看以下数据:
- 发送次数 数据消息或通知消息已加入队列或已成功传递到第三方服务(例如 APNs)以进行传送。如需了解详情,请参阅 消息的生命周期。
- 已收到(仅在 Android 设备上提供) 应用已收到数据消息或通知消息。当接收 Android 设备安装了 FCM SDK 18.0.1 或更高版本时,才可以获得此数据。
- 展示次数(仅针对 Android 设备上的通知消息提供) 当应用在后台运行时,显示通知 (display notification) 已在设备上显示。
- 打开次数 用户打开通知消息。仅针对应用在后台运行时收到的通知报告此数据。
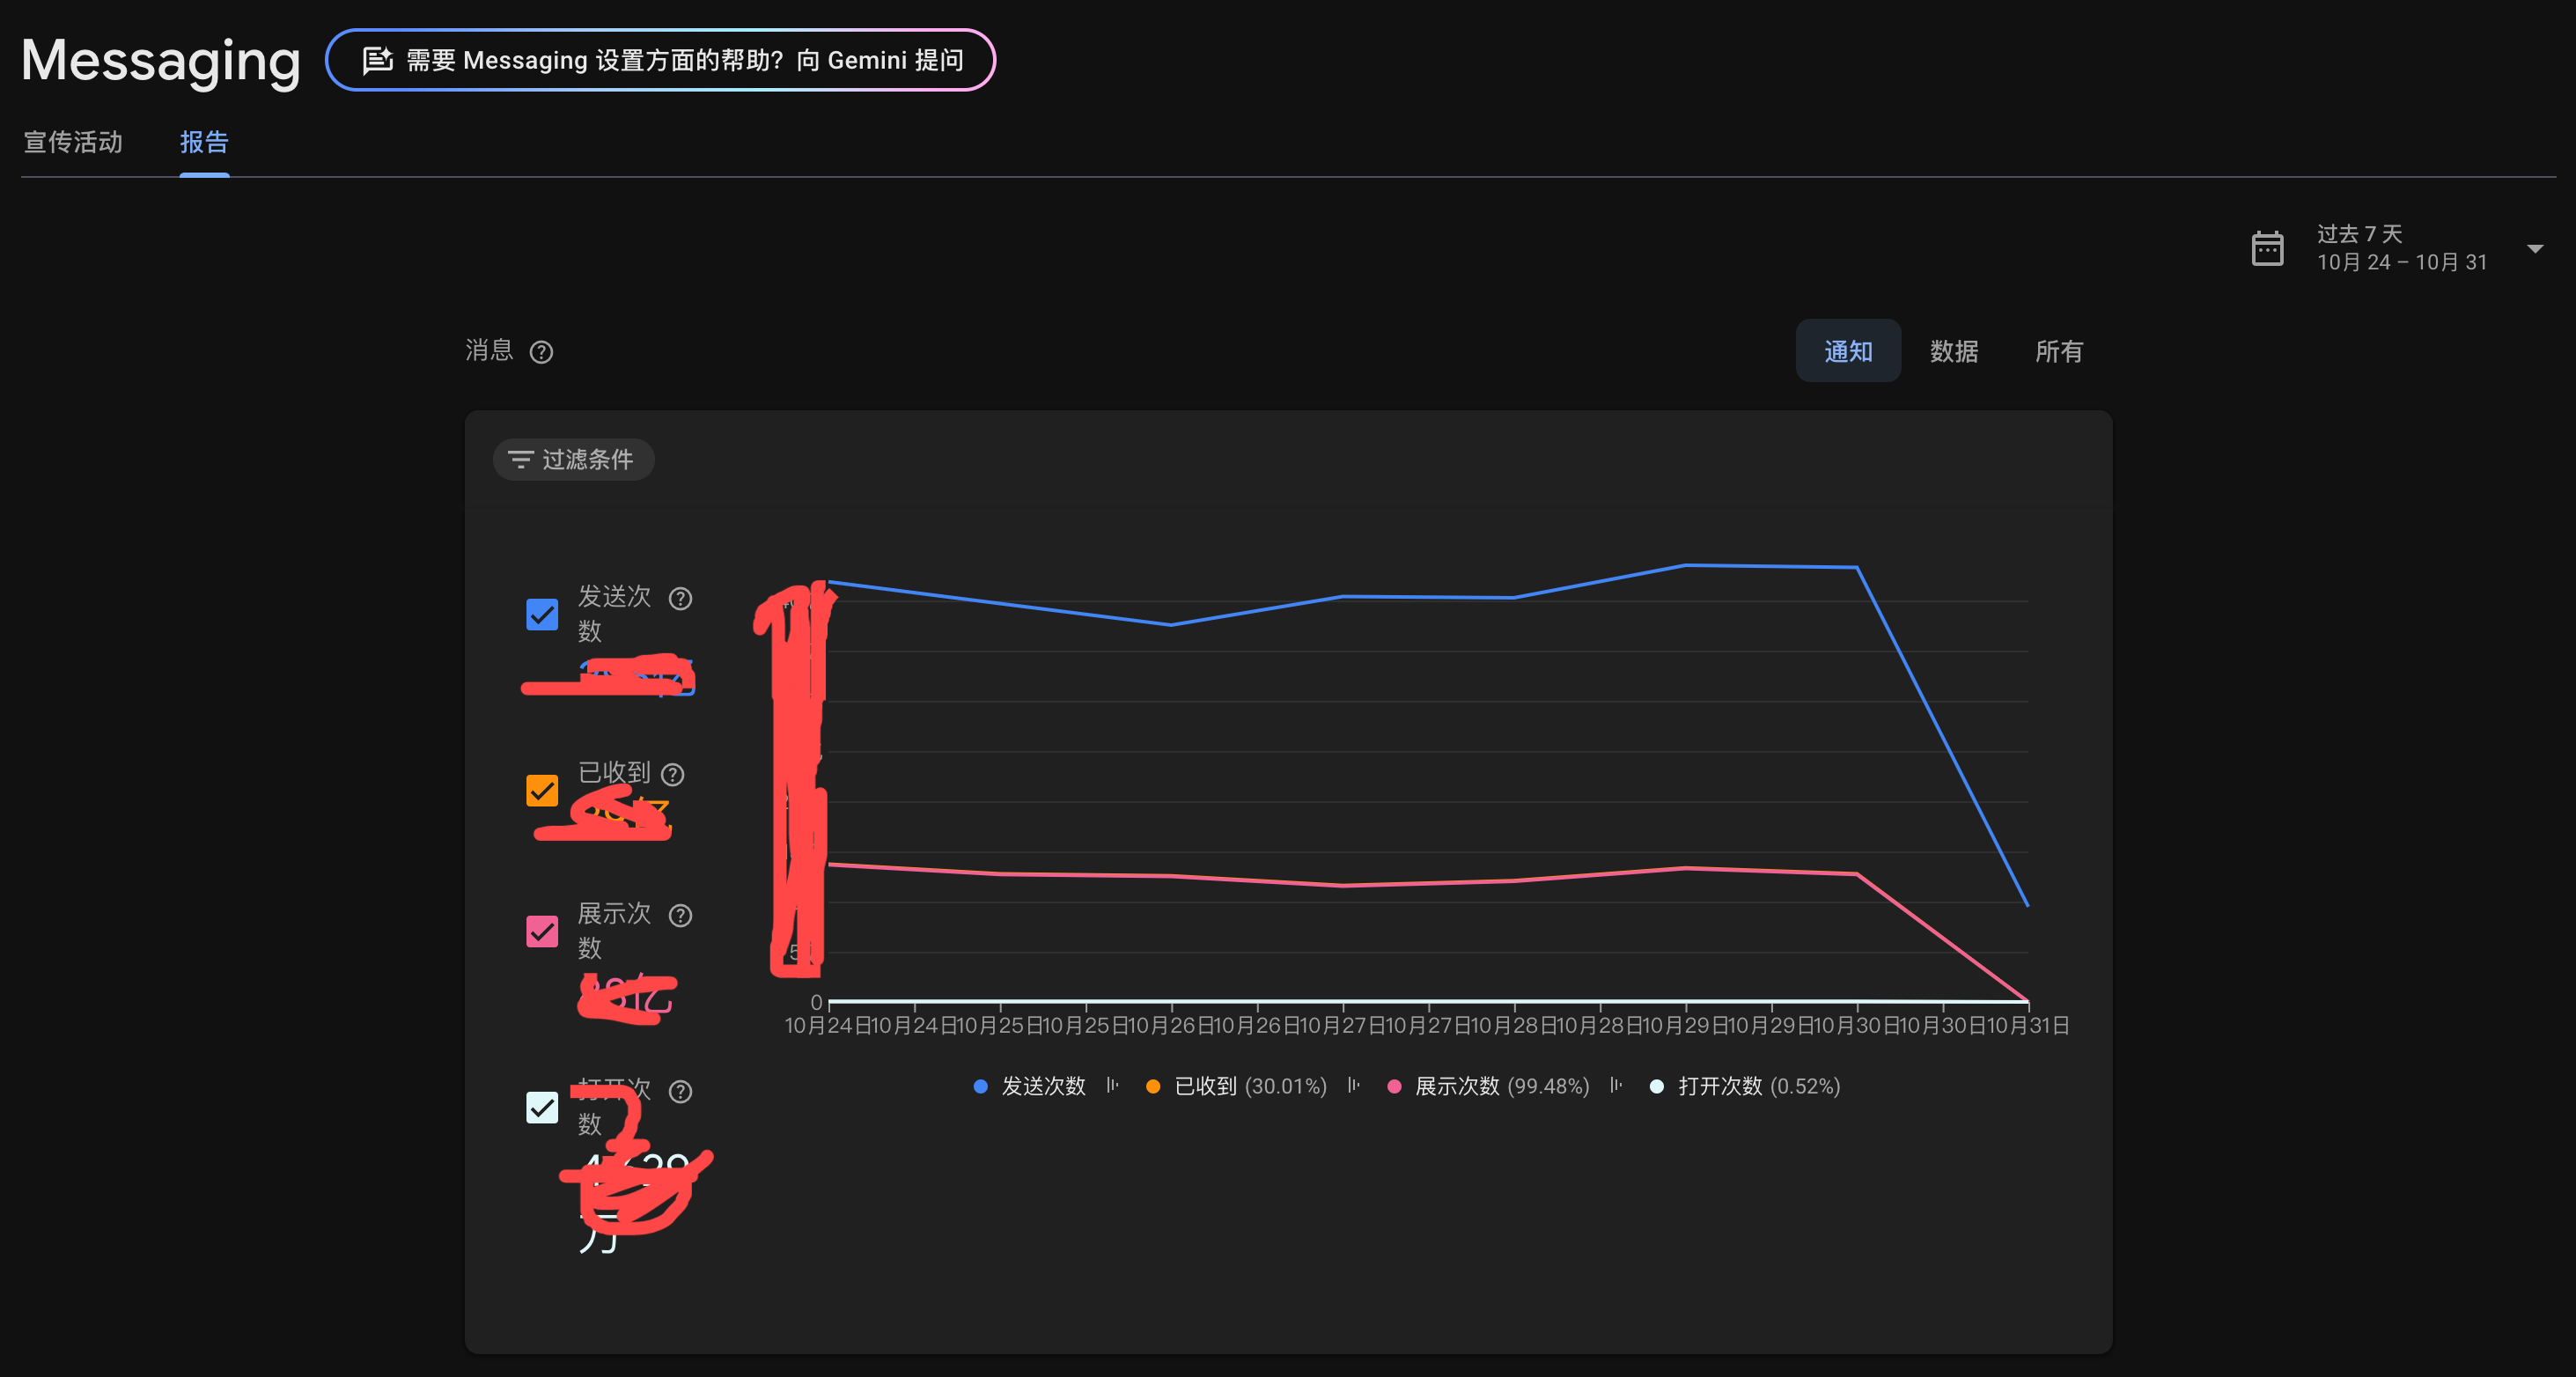
- 通知,带 notification 数据载荷的数据
- 数据,带 data 数据载荷的数据
FAQ
Ref
- 设置 Firebase Cloud Messaging 客户端应用 (Android)
- Google FireBase - fcm 推送 (Cloud Messaging)
https://www.cnblogs.com/CharlesGrant/p/9081351.html - Android FCM 推送详解,出海应用必备